
PA1140RCD - Audio player Monacor - Free user manual and instructions
Find the device manual for free PA1140RCD Monacor in PDF.

| Product type | CD/MP3 player insert module with RDS tuner |
| Brand | Monacor |
| Model | PA1140RCD |
| Supported formats | Audio CD, CD-R, CD-RW, MP3 (CD and USB stick) |
| CD/MP3 player - Distortion | < 0.03% |
| CD/MP3 player - Signal-to-noise ratio | > 85 dB |
| CD/MP3 player - Frequency response | 10 - 20,000 Hz, ±1 dB |
| Wow and flutter | Unmeasurable (quartz precision) |
| Tuner - Bands | FM 87.5-108 MHz, MW 522-1620 kHz |
| Tuner - FM sensitivity | 6 dBμV |
| Tuner - MW sensitivity | 25 dBμV |
| Tuner - FM signal-to-noise ratio | > 60 dB |
| Tuner - MW signal-to-noise ratio | > 50 dB |
| Tuner - Distortion | < 0.5% |
| Preset stations | 18 FM + 6 MW |
| RDS functions | PTY, AF/REG, EON, station name display |
| Display | LCD |
| Power supply | 17 V (==) via Public Address amplifier |
| Dimensions (W × H × D) | 195 × 40 × 215 mm |
| Weight | 1.1 kg |
| Operating temperature | 0 - 40 °C |
| Cleaning | Dry cloth, no chemicals |
| Protection | Water splashes, spray, high humidity, heat |
Frequently Asked Questions - PA1140RCD Monacor
User questions about PA1140RCD Monacor
0 question about this device. Answer the ones you know or ask your own.
Ask a new question about this device
Download the instructions for your Audio player in PDF format for free! Find your manual PA1140RCD - Monacor and take your electronic device back in hand. On this page are published all the documents necessary for the use of your device. PA1140RCD by Monacor.
USER MANUAL PA1140RCD Monacor
CD/MP3 Player Insertion with RDS Tuner

text_image
MONACOR WWW.MONACOR.COM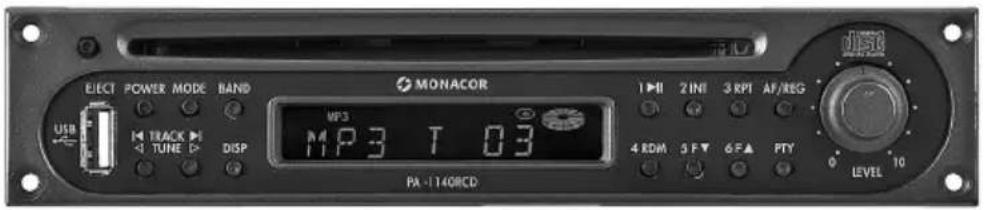
text_image
ELECT POWER MODE BAND MONACOR USB TRACK TUNE DISP MP3 11P3 T 03 4 RDM 5 F▼ 6 F▲ PTY LEVEL 10PA-1140RCD
(B × H × T): 195 × 40 × 215 mm
Gewicht:.... 1,1 kg
CD/MP3 Player Insertion with RDS Tuner
These instructions are intended for technicians installing the module and for users without any specific technical knowledge. Please read the instructions carefully prior to operation and keep them for later reference.
All operating elements and connections described can be found on the fold-out page 3.
1 Operating Elements
1 Button EJECT to eject the CD
2 Button POWER to switch the unit on and off
3 Button MODE to switch between CD replay, MP3 replay via the USB port (10) and radio reception
4 Button BAND to select the reception bands for the radio
5 CD slot
6 Station button 1 or for CD/MP3 operation: Pause/Start
7 Station button 2 or intro replay of all titles for CD / MP3 operation
8 Station button 3 or repeat of the current title for CD / MP3 operation
9 Button AF/ REG for the function: alternative frequency for RDS reception
10 USB port to insert a USB flash drive
11 Buttons TRACK/TUNE
CD / MP3: To go to the next title or to go back to the previous title; fast forward / reverse with the button kept pressed Radio:stationtuning
To start the automatic station scan, briefly press the corresponding button. For manual station scan, keep the button ◀ or ▷ pressed until MANUAL is briefly displayed. Then adjust the station with the button ◀ or ▷.
12 Button DISP to switch the display to various information (e.g. time, programme type, ID3 tags)
13 Display
14 Station button 4 or random replay for CD / MP3 operation
15 Station buttons 5 and 6 or folder selection for CD/MP3 operation
16 Button PTY to select the programme type for RDS reception
17 Volume control LEVEL
2 Safety Notes
The insertion module corresponds to all relevant directives of the EU and is therefore marked with C.€
- The insertion is suitable for indoor use only. Protect it against dripping water and splash water, high air humidity and heat (admissible ambient temperature range 0–40°C).
- Do not set the unit with the installed insertion into operation, and immediately disconnect the mains plug from the mains socket if
- there is visible damage to the insertion, the unit or to the mains cable,
- a defect might have occurred after a drop or similar accident,
- malfunctions occur.
The insertion or the complete unit must in any case be repaired by skilled personnel. - For cleaning only use a dry, soft cloth; never use chemicals or water.
- No guarantee claims for the unit and no liability for any resulting personal damage or material damage will be accepted if the insertion is used for other purposes than originally intended, if it is not correctly installed or operated or if it is not repaired in an expert way.

If the insertion is to be put out of operation definitively, take it to a local recycling plant for a disposal which is not harmful to the environment.
3 Applications
The insertion module is suitable for installation into PA amplifiers from MONACOR with an insertion compartment and into MONACOR extensions, for example:
| PA-1120PA-1240 | PA amplifier for 5 zones |
| PA-1200 PA | amplifier for 4 zones |
| PA-1200EX Extension for 2 modules | |
| PA-5240PA-5480 | PA amplifier for 5 zones |
| PA-6240PA-6480PA-6600 | PA amplifier for 6 zones |
4 Installation of the Insertion Module
WARNING

The installation of the insertion must be made by skilled personnel only! Prior to the installation of the insertion, disconnect the mains plug of the amplifier or of the PA-1200EX from the mains socket. Otherwise there is an electric shock hazard.
1) Remove the housing cover of the amplifier or of the PA-1200EX.
2) Screw off the cover for the insertion compartment on the front side of the amplifier or of the PA-1200EX. Install the insertion and tighten it with screws.
3) Connect the bare three-pole cable of the amplifier or of the PA-1200EX to the pin housing of position c (see fig. 2). This allows to supply the insertion with 17 V (=) and to feed the audio signal to the amplifier.
4) If required, two further audio outputs are available: balanced mono output at the connection d unbalanced stereo output at the connection e
5) To install the supplied antenna jack (fig. 3) on the rear side of the amplifier or of the PA-1200EX, unscrew the cover panel (fig. 4) or remove the cover plate (fig. 5). Insert the antenna jack into the opening and tighten it with screws.
6) Connect the cable of the inserted antenna jack to the five-pole pin housing of position a.
7) The insertion PA-1140RCD has a storage battery so that the stations also remain stored with the unit switched off. The storage battery has been deactivated in the factory to prevent discharge before installation. To activate the battery, set the jumper b to position ON.
To deactivate the battery again (e. g. if stored for a longer time), set the jumper b to position OFF again.
8) Close the amplifier or the PA-1200EX with the housing cover. Connect the reception antenna to the antenna jack (fig. 3). To connect both an FM antenna and a medium wave an tenna, connect them to the jack ANT via an antenna combiner.
5 Operation
1) Switch on the amplifier or the PA-1200EX with the mains switch and the insertion module with the POWER button (2).
2) Adjust the desired volume with the volume control LEVEL (17).
3) To switch off, press the POWER button again.
5.1 Operation of the CD / MP3 player
It is possible to replay audio CDs including those you have burnt yourself (CD-R) and CDs with titles in the MP3 format. In case of rewritable CDs (CD-RW), however, problems may occur during replay depending on the CD type, the CD burner and the burning programme used.
Via the USB port, also MP3 files can be replayed from a USB flash drive.
Note: Due to the large number of storage device manufacturers and device drivers, it cannot be guaranteed that all storage media are compatible with the MP3 player.
5.1.1 Replaying music titles
1) Insert a CD with the lettering facing upwards into the slot (5) until it is automatically retracted. If there is already a CD in the unit, the display shows the symbol Ⓞ.
To change a CD, press the button EJECT (1). The CD is ejected. If the CD is not removed, the unit retracts the CD after a few seconds.
2) Alternatively or additionally, a USB flash drive can be inserted into the USB port (10).
3) After loading, the first title starts. For standard audio CDs, the display shows the title number and the time already played (min.: sec.).
$$ 1 5 - 2 ^ {\prime} 3 8 $$
For titles in the MP3 format, the file name passes through the display, then the title number is shown behind the letter "T". When the button DISP (12) is pressed repeatedly, information about the title of the music piece, the album, the artist etc. (ID3 tags) can be displayed. If no ID3 tags are available, the display shows NO ID3.
Note: When the button DISP is pressed during the replay from a CD or USB flash drive, also information about the station adjusted are displayed, see chapter 5.2.3, paragraph "Information". Press the button DISP repeatedly until the desired information is displayed.
4) When the last title has been played, the unit restarts with the first title (continuous replay).
5) To interrupt the replay, press the button ▶II (6). The display indicates S-PAUSE. When the button ▶II is pressed again, the replay will be continued.
6) To switch between the replay from the CD, the USB flash drive and the radio reception, press the button MODE (3).
5.1.2 Selecting title and folder
1) Select the desired title with the buttons TRACK (11).
Button ▶I: each time the button is briefly pressed, the unit advances one title.
Button ◀: briefly pressed – the unit goes to the title beginning;
each time the button is briefly pressed, the unit goes back one title.
2) If the titles are stored in different folders (file directories), the folders can be selected with the buttons F▲ and F▼(15). The name of the selected folder passes through the display once.
After the selection of the folder, always the first title of the folder starts. To select another title, use the buttons TRACK (11). With the button ▶, it is also possible to go from the last title of a folder to the first title of the next folder, and with the button ◀, from the first title of a folder to the last title of the previous folder.
Note: When the titles have been stored in different folders, they are replayed in the following order:
-
All titles without folder
-
All titles in folders in the root directory
-
All titles in subfolders etc.
The folders are selected and the titles are num bered according to this order as well.
5.1.3 Fast forward and reverse
With the button ▶ (11) pressed, the CD player advances and with the button ▶ pressed, it goes back.
For titles in the MP3 format, it is not possible to go beyond multiple titles with fast forward and reverse. At the end or beginning of a title, the unit switches back to normal replay even if the button (11) is kept pressed.
5.1.4 Replaying title intros
The first 10 seconds of all titles can be replayed.
1) Press the button INT (7). S-INT and the title number are displayed. For titles in the MP3 format, also the file name passes through the display alternately. When the current title has already been replayed for more than 10 seconds, the unit will go to the next title.
2) To replay the intros only of the titles in the selected folder, keep the button INT pressed for more than 3 seconds while switching on the intro replay function so that D-INT (directory intro) is briefly displayed.
3) To switch off the function, press the button INT again. S-INT or D-INT will not be displayed any more and the title whose intro is being replayed will be continued. The function can also be deactivated by means of the button RPT (8) or RDM (14).
5.1.5 Repeated title replay
1) Select the title to be repeated with the button ▶ or ▶ (11) and then press the button RPT (8). S-RPT and the title number are displayed. For titles in the MP3 format, also the file name passes through the display alternately. The title is continuously repeated.
2) To repeat all titles of the selected folder, keep the button RPT pressed for more than 3 seconds while switching on the repeat function so that D-RPT (directory repeat) is briefly displayed.
3) To switch off the function, press the button RPT again. S-RPT or D-RPT will not be displayed any more. The function can also be deactivated by means of the button IN (7) or RDM (14).
5.1.6 Random replay
With random replay, the titles are not replayed in ascending but in random order.
1) Press the button RDM (14). The unit selects the next title at random. S-RDM and the title number are displayed. For titles in the MP3 format, also the file name passes through the display alternately.
2) To replay only the titles of the selected folder at random, keep the button RDM pressed for more than 3 seconds while switching on the random-replay function so that D-RDM (directory random) is briefly displayed.
3) To switch off the random-replay function, press the button RDM again. S-RDM or D-RDM is not displayed any more. The function can also be de-activated by means of the button IN (7) or RPT (8).
5.1.7 Note concerning sound interruptions and reading errors
Cigarette smoke and dust will easily penetrate through all openings of the unit and also settle on the optics of the laser sampling system. If this deposit causes reading errors and sound interruptions, the unit must be cleaned by skilled personnel. Please note that there will be a charge on cleaning, even during the warranty period!
5.2 Operation of the tuner
Once a CD or a USB flash drive has been inserted, the unit will automatically be switched to replay from the CD or USB flash drive. Press the button MODE (3) to switch between radio reception and replay from the CD or USB flash drive.
5.2.1 Station tuning and storing
The tuner is able to receive FM and medium wave stations. To allow storing of more than six stations with the six station buttons (6, 7, 8, 14, 15), the FM band has been divided into three identical subbands. In each of the three subbands (F 1, F 2, F 3) and in the medium wave band (MW), six stations can be stored i. e. a total of 18 FM and 6 medium wave stations.
1) Select the desired band with the button BAND (4). It is recommended to store six stations in the band F 1 first and then to switch over to the band F 2 and then to F 3.
2) For station tuning, use either the automatic or manual station scan:
To start the automatic station scan, briefly press the button (11) ▷ (forward) or ◁ (backward). The automatic station scan stops at the next station. During the station scan, SEARCH is displayed. Restart the station scan repeatedly until the desired station is received.
For manual station scan, keep the button ◀ or ▷ pressed until MANUAL is briefly displayed. Then the received frequency can be increased or reduced step by step with each press of the button (in the FM band by 50 kHz, in the medium wave band by 9 kHz). To run quickly through a great range for manual station scan, keep the button ◀ or ▷ pressed. After manual station scan, the unit switches to automatic station scan again after a few seconds unless the button ◀ or ▷ has been pressed again before. AUTO is briefly displayed.
3) When the station has been tuned, keep the desired numerical key (6, 7, 8, 14, 15) pressed until the station number and "ch" appear on the right in the display (see fig. 1). Then the station is stored under this number in the respective subband.
5.2.2 Calling up stored stations
1) Use the button BAND (4) to select the band in which the desired station has been stored.
2) Select the number of the station with the corresponding numerical key (6, 7, 8, 14, 15).
3) Adjust the desired volume with the volume control LEVEL (17).
4) With a stereo programme, ST appears on the top left of the display.
5.2.3 RDS functions
If the selected station transmits RDS information (radio data system), the name of the station is displayed instead of the frequency. Some stations show additional information alternately with the station name, e.g. music title, artist.
If a station offers traffic programme, TP is displayed. If EON (enhanced other networks) is shown and a programme is received which currently does not offer a traffic programme, the tuner automatically switches to another programme of the same broad casting station when traffic messages are transmitted there. After the traffic announcement, the unit switches back to the previous programme.
Information
With the button DISP (12), the following information can be displayed:
1^st press of button time indication
If no time is transmitted, NO CLOCK is displayed.
The time is not transmitted continuously; therefore, it may take a few minutes until the time is available after the radio has been switched on.
2^nd press of button indication of the band (F1, F2, F3, MW) and of the station frequency
3^rd press of button indication of the programme type
If no programme type is indicated by the station,
PTY NONE is displayed.
4^th press of button station name (basic setting)
The display switches to the basic setting after 5 seconds if no button is pressed.
This information can also be displayed with the button DISP during the replay from a CD or USB flash drive.
Alternative frequencies
If AF is continuously displayed (not flashing), the programme is also broadcast on alternative frequencies of neighbouring stations. Then the unit automatically changes to the station which can be received best. With the button AF/ REG (9), this function can be switched off (AF will be not be displayed any more) and switched on again.
Some stations temporarily broadcast a different programme depending on the region, e. g. regional news. To make sure that the same regional programme will be selected when the unit switches to a station with better reception, the regional programme mode can be switched on. Keep the button AF/ REG pressed for 3 seconds until REG ON is briefly displayed. With the mode switched on, REG is displayed. To switch off the mode, keep the button AF/ REG pressed again for 3 seconds until REG OFF is briefly displayed.
Programme type
With the button PTY (16) one of the stored stations can be selected which currently broadcasts music or information of a special category. The following categories can be selected:
| Music Group Word Group | |
| to be selected with station button 1 (6) | |
| POP M Pop musicROCK M Rock music | NEWS NewsAFFAIRS Current affairsINFO Information |
| to be selected with station button 2 (7) | |
| EASY M Easy listening musicLIGHT M Light classicalmusic | SPORT SportsEDUCATE EducationDRAMA Drama |
| to be selected with station button 3 (8) | |
| CLASSICSSeriousclassicalmusicOTHER M Other music | CULTURE CultureSCIENCE ScienceVARIED Varied |
| to be selected with station button 4 (14) | |
| JAZZ JazzCOUNTRY Country music | WEATHER WeatherFINANCE FinanceCHILDRENChildren'spro-grams |
| to be selected with station button 5 (15) | |
| NATION M National musicOLDIES Oldies | SOCIAL Social affairsRELIGION ReligionPHONE IN Phone in |
| to be selected with station button 6 (15) | |
| FOLK M Folk music | TRAVEL TravelLEISURE LeisureDOCUMENT Documentary |
1) Switch on the function programme type with the button PTY (16). Thus, a more detailed selection of the music group is possible. One category of this group is displayed. To switch to the word group, press the button PTY again. The display shows a category of this group. (With the third press of the button, the function programme type is switched off again.)
2) (Repeatedly) press the corresponding numerical key to select the desired category of the group chosen before. Among the stored stations, the unit searches for the station which currently broadcasts a programme in the selected category. During the search, the sound is switched off.
If the unit cannot find a station with the desired category, the message PTY NONE flashes in the display after some time, and the unit goes to the station last tuned.
3) To switch off the function programme type and to be able to call up the stored stations again with the corresponding station buttons, press the button PTY once or twice so that the station frequency or the station name is displayed.
6 Specifications
Block diagram see page 37
CD/MP3 player
THD: .... < 0.03 %
S/N ratio: .... > 85 dB
Frequency response: .... 10–20 000 Hz, ±1 dB
Wow and flutter: ..... not measurable (quartz precision)
Tuner
Received frequency
FM: 87.5–108 MHz
MW: 522-1620kHz
RF sensitivity
FM: 6dBμV
MW: 25 dBμV
S/N ratio
FM: > 60 dB
MW: .... > 50 dB
THD:.... < 0.5%
General information
Power supply:.... 17 V (---) via the PA amplifier or via the PA-1200EX
Dimensions (W × H × D): 195 × 40 × 215 mm
Weight: 1.1 kg
Subject to technical modification.