GW10841 - Thermostat Gewiss - Free user manual and instructions
Find the device manual for free GW10841 Gewiss in PDF.
| Product type | Programmable thermostat (chronothermostat) RF |
| Dimensions | 120 x 92 x 19 mm |
| Power supply | 3 AAA alkaline batteries 1.5 V |
| Operating modes | Automatic, Manual, Frost protection |
| Programming | Weekly, 15 min resolution, max 4 changes per hour |
| Temperature levels | 3 levels (T1, T2, T3) from 5 to 40°C, 0.1°C resolution |
| Frost protection temperature | Adjustable from 2 to 7°C |
| Special functions | Party (1-23 h), Holiday (1-99 d), temporary override, self-learning (max advance 2 h) |
| Remote control | Via GSM module GW 90821 (optional) |
| Display | LCD with icons |
| Sensor | NTC, 100 kΩ at 25°C |
| Operating temperature range | -5°C to +45°C |
| Measured temperature | 0°C to 45°C |
| Accuracy | ±0.5°C at 20°C |
| Switching differential | 0.2°C to 2°C |
| Measurement unit | °C or °F |
| Radio frequency | 868 MHz |
| Radio range | 100 m in open field |
| Maintenance and cleaning | Clean with a soft, dry cloth. Do not use solvents or abrasive products. |
| Safety | Installation in accordance with electrical standards. Do not expose to moisture. Replace batteries as soon as the low battery symbol appears. |
| Spare parts and repairability | AAA replaceable batteries. For any other repair, contact a qualified professional. |
Frequently Asked Questions - GW10841 Gewiss
User questions about GW10841 Gewiss
0 question about this device. Answer the ones you know or ask your own.
Ask a new question about this device
Download the instructions for your Thermostat in PDF format for free! Find your manual GW10841 - Gewiss and take your electronic device back in hand. On this page are published all the documents necessary for the use of your device. GW10841 by Gewiss.
USER MANUAL GW10841 Gewiss
natural_image
Simple line drawing of a fire and a starburst symbol (no text or labels)text_image
SET T- 18.0text_image
SET Google On
text_image
SET SB y OFFtext_image
00:00 Tz 18.0 °Cnatural_image
Four-panel illustration showing room ventilation, ceiling-mounted fixtures, sunlight streaming through windows, and a window with a sun (no text or symbols)RF wall time-thermostat daily-weekly programme
Attention - Important
Warning ! The safety of this appliance is only guaranteed if all the instructions given here are followed scrupulously. These should be read thoroughly and kept in a safe place. Chorus products can be installed in environments which are dust-free and where no special protection against the penetration of water is required.
They shall be installed in compliance with the requirements for household devices set out by the national standards and rules applicable to low-voltage electrical installations which are in force in the country where the products are installed, or, when there are none, following the international standard for low-voltage electrical installations IEC 60364, or the European harmonization document HD 60364. Gewiss sales organization is ready to provide full explanations and technical data on request.
INDEX
OPERATING INSTRUCTIONS page
- General description 32
- Description of the controls.... 33
- Radio frequency communication 34
- Operating modes.... 35
- Heating / Air conditioning selection 36
- Parameter setting.... 37
- Personalizing the daily program 41
- Temporary forcing of the temperature 42
- Party function 43
- Holiday function 44
- Sunday's program copy.... 45
- Manual operation 46
- Remote control.... 46
- Low batteries indication 47
- Reset and restore the preset values 48
- Preset programs.... 49
- Preset parameters.... 50
INSTALLATION INSTRUCTIONS
- Installation.... 51
- Connection terminals.... 54
- Battery replacement.... 55
FUNCTIONAL DETAILS / TECHNICAL DATA 56
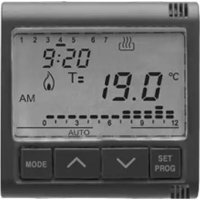
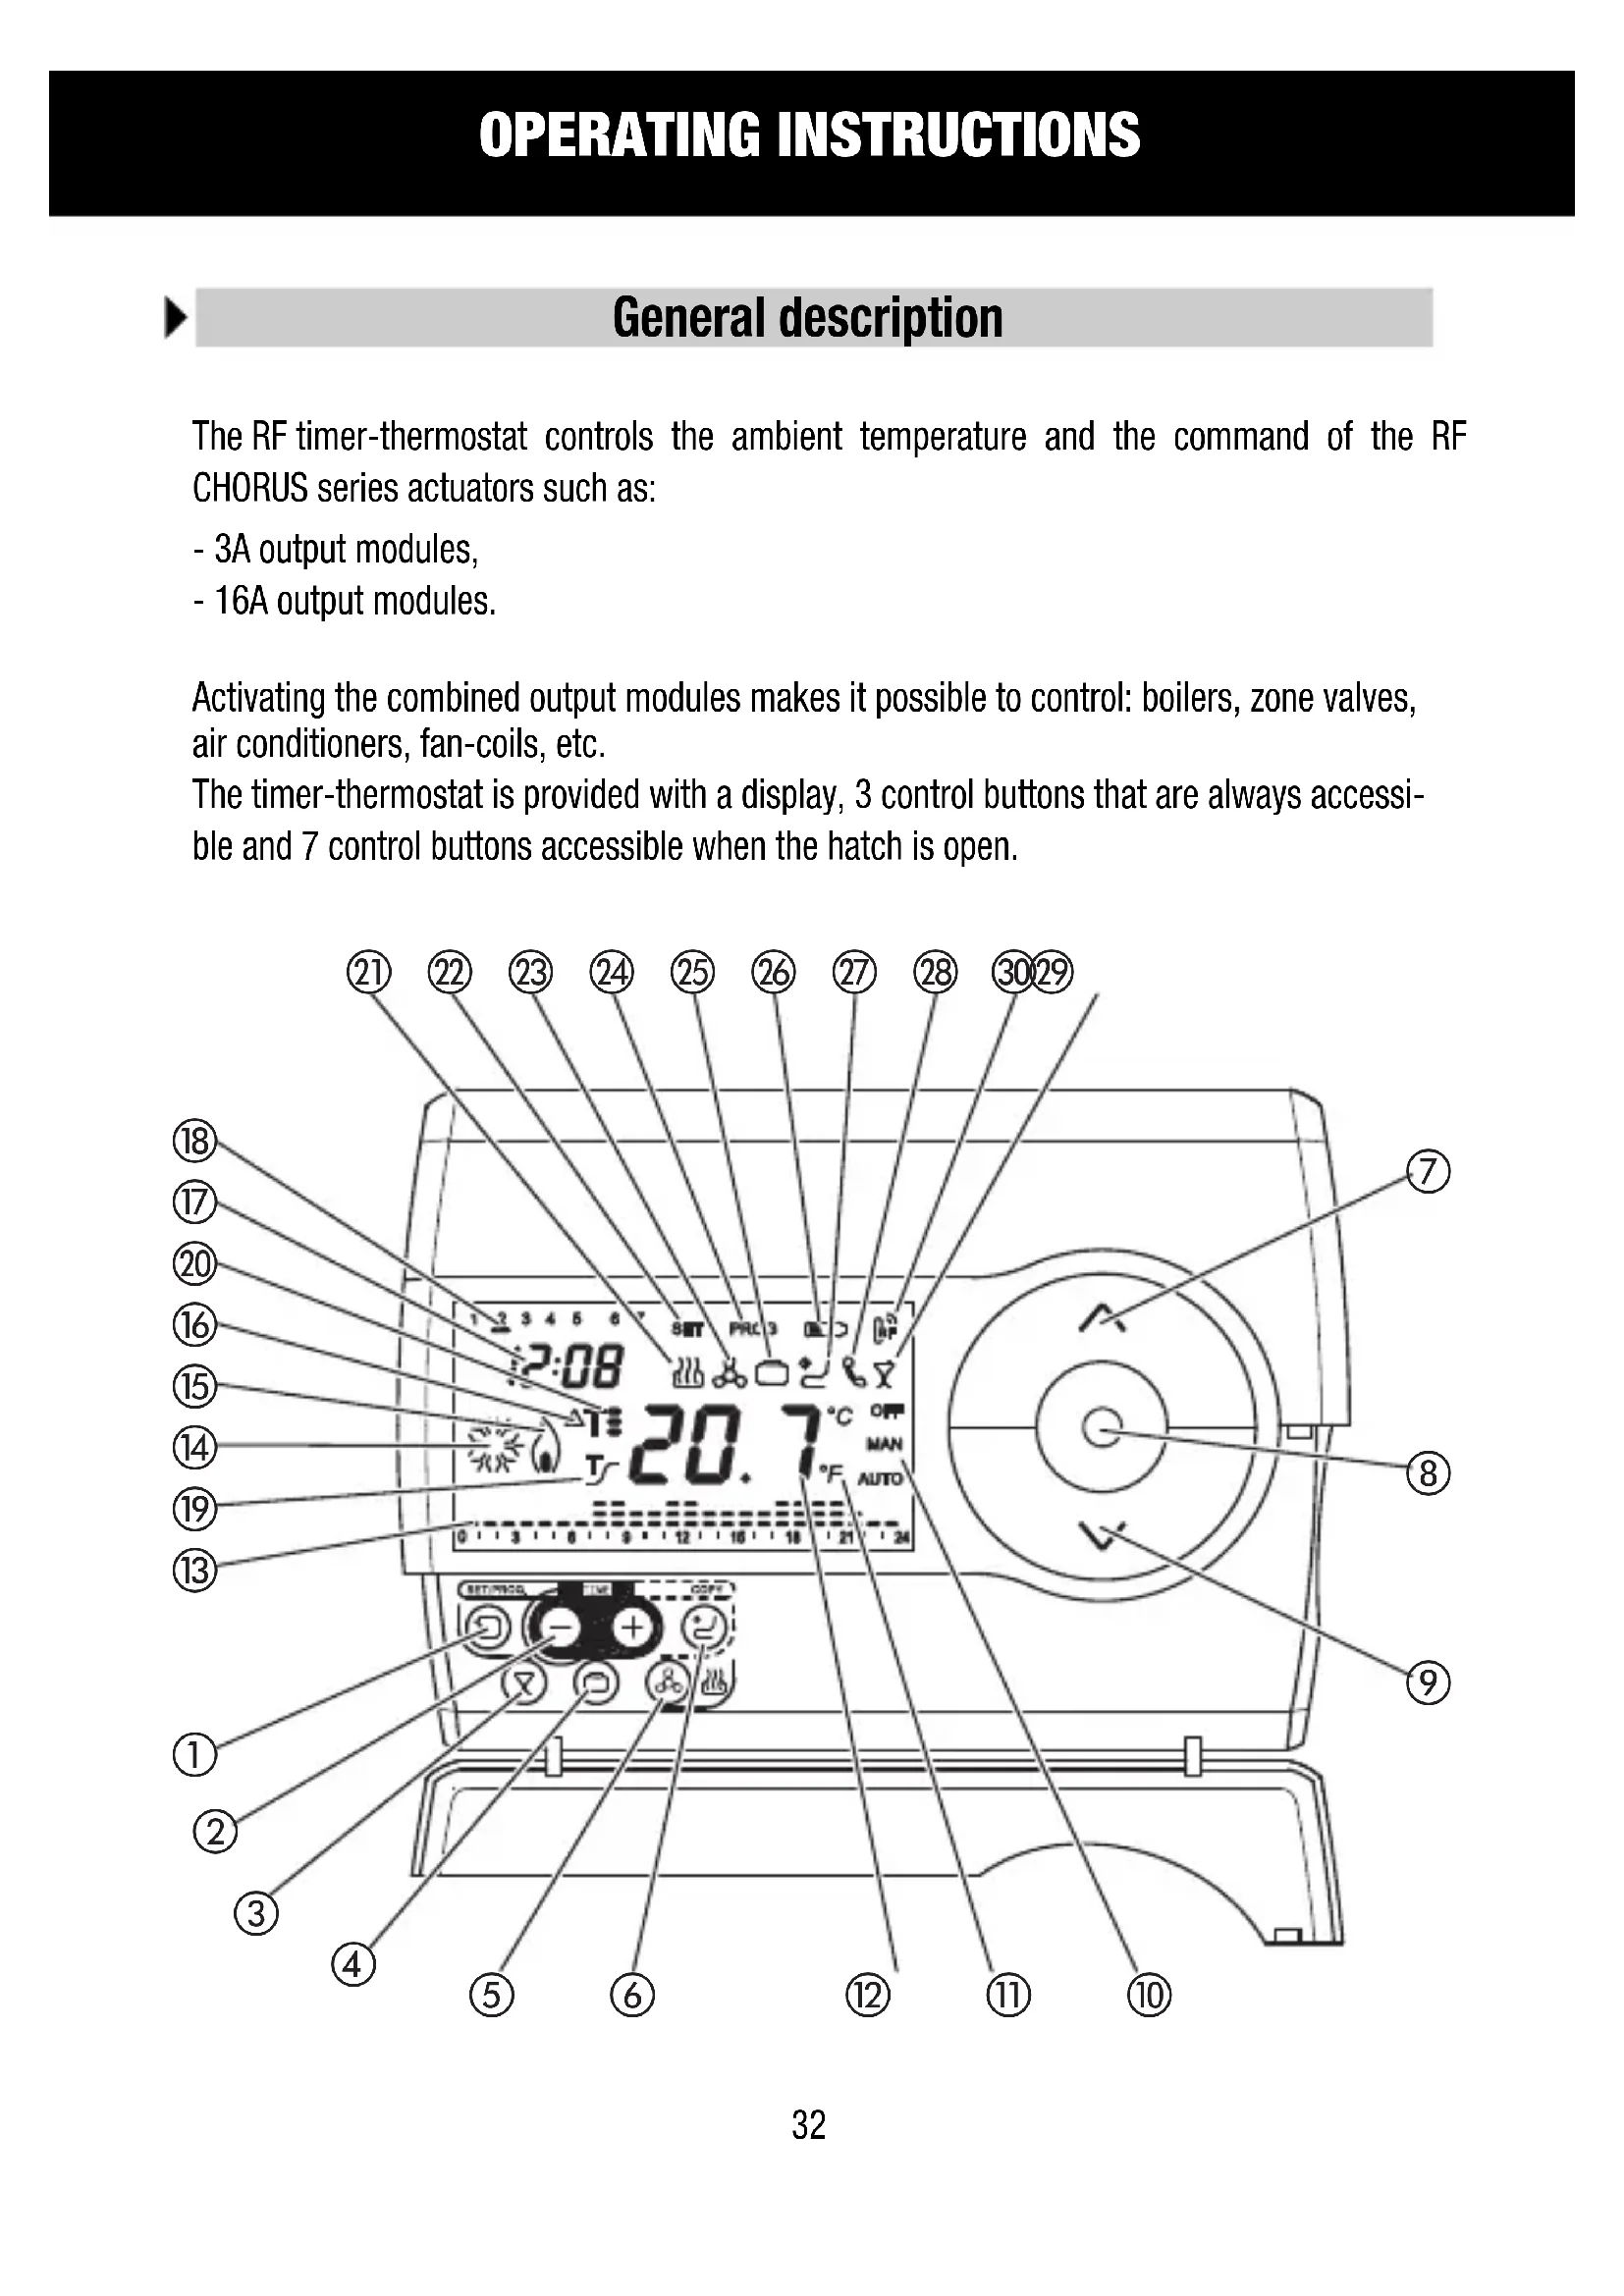
OPERATING INSTRUCTIONS
General description
The RF timer-thermostat controls the ambient temperature and the command of the RF CHORUS series actuators such as:
- 3A output modules,
- 16A output modules.
Activating the combined output modules makes it possible to control: boilers, zone valves, air conditioners, fan-coils, etc.
The timer-thermostat is provided with a display, 3 control buttons that are always accessible and 7 control buttons accessible when the hatch is open.

text_image
21 22 23 24 25 26 27 28 30 29 2:08 20.7°C OFF T F MAN AUTO 1 2 3 4 5 6 7 SET PROC 8 18 17 20 16 15 14 19 13 1 2 3 4 5 6 7 SET PROC 8 18 17 20 16 15 14 19 13 1 2 3 4 5 6 7 SET PROC 8 18 17 20 16 15 14 19 13 ⑦ ⑧ ⑨ ⑤ ⑥ ⑫ ⑪ ⑩ ① ② ③ ④ ⑤ ⑥ ⑦OPERATING INSTRUCTIONS
Description of the controls
| CONTROL BUTTONS | Symbol |
| 1Programming / setting | |
| 2Regulate time | |
| 3Party | |
| 4Holiday | |
| 5Select heating / air conditioning | |
| 6Copy | |
| 7Regulate temperature (+) / Select parameters | |
| 8Select operating mode / Confirm | |
| 9Regulate temperature (−) / Select parameters |
DISPLAY INDICATIONS
| 10Functioning mode AUTO-MAN-OFF | |
| 11Temperature unit of measure °C / °F | |
| 12Ambient temperature measured | |
| 13Daily program profile | |
| 14Air conditioning activation | |
| 15Heating activation | |
| 16Thermal differential | △T |
| 17Clock | |
| 18Day of the week | |
| 19Self-learning function activation | T |
| 20Temperature set point | T, T= T= |
| 21Operating in heating mode | |
| 22Parameter setting status SET | |
| 23Operating in air conditioning mode | |
| 24Programming status PROG | |
| 25Holiday function | |
| 26Low batteries | |
| 27Holiday program copy function | |
| 28Activation from telephonic controller | |
| 29Party function | |
| 30Radio control transmission | |
Radio frequency communication
CONFIGURATION
To make the association with an output module press keys and simultaneously, after having set the output module in learn configuration (see the relative instruction sheet). The actual transmission of a command is signaled on the display by the temporary switching on of symbol RF transmission.
OPERATION
The timer-thermostat operates in combination with a 3A or 16A output module in BISTABLE operating mode, sending switch on/switch off commands depending on its temperature regulation mode and the type of operation selected (heating or air conditioning).
The timer-thermostat periodically retransmits the command, every 5 minutes, to the combined actuator. If the actuator does not receive the message for 4 consecutive times, it commands opening of the relay (OFF) and signals the fault with the green LED blinking.
SIGNALS
Transmission of a command
The transmission of an RF command (ON/OFF) is signaled on the display by the temporary switching on of symbol 📄
OPERATING INSTRUCTIONS
Operating modes
The timer-thermostat offers 3 different operating modes::
- AUTOMATIC
- MANUAL
- OFF/ANTIFREEZE
Key is used to switch from one mode to another.
text_image
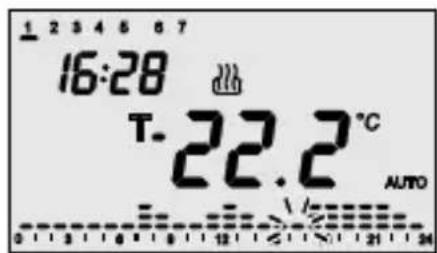
1 2 3 4 5 6 7 16:28 T-22.2 °C AUTO 0 1 2 3 4 5 6 7 12 21 24In automatic operation the timer-thermostat uses a program that can be different for every day of the week.
The text AUTO, the ambient temperature measured and the symbol of the set point relative to the current quarter of an hour appear on the display.
In the hourly profile the column relative to the current hour blinks with the representation of the active set point.

text_image
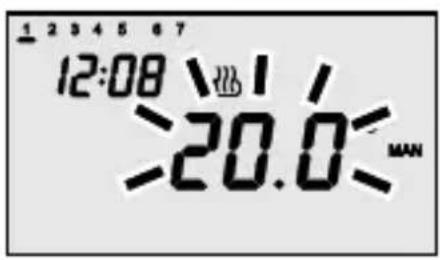
1 2 3 4 5 6 7 16:28 22.2 °C MANIn manual operation the timer-thermostat permanently uses a temperature set point that can be freely set.
The text MAN and the ambient temperature measured appear on the display.
text_image
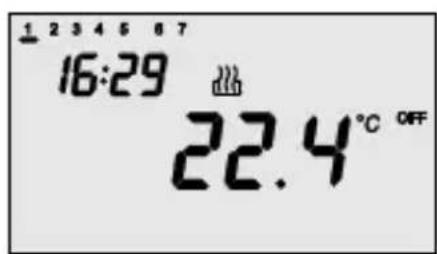
1 2 3 4 5 6 7 16:29 22.4 °C OFFAntifreeze operation is only active in heating. In this case the timer-thermostat uses the set point of the ntifreeze temperature set.
The text OFF and the ambient temperature measured appear on the display.
OPERATING INSTRUCTIONS
Operating modes
When operating, the activation of the heating or air conditioning is signaled as follows:
text_image
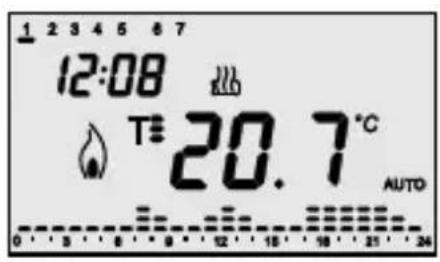
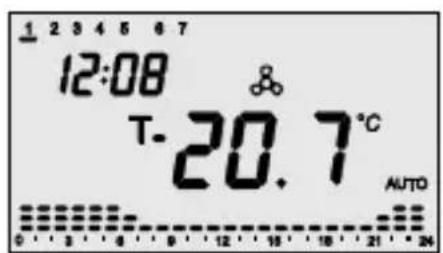
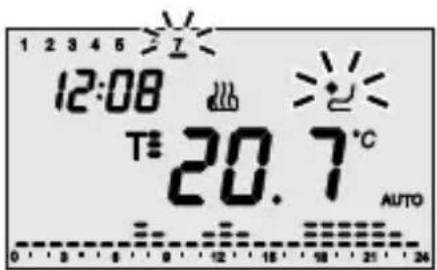
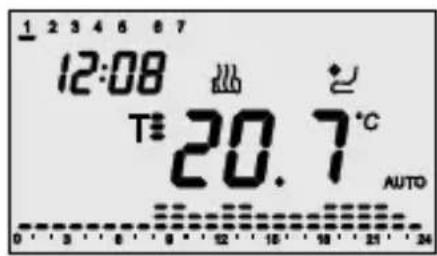
1 2 3 4 5 6 7 12:08 T=20.7°C AUTO 0 5 8 9 10 11 12 13 14 15 16 17 18 19 20 21 22 23 24Heating
The symbol shows switching on of the heating.
text_image
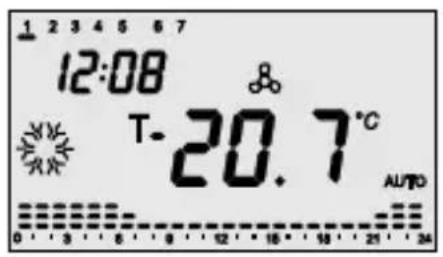
1 2 3 4 5 6 7 12:08 T-20.7°C AUTO 0 3 6 9 12 15 18 21 24Air conditioning
The symbol shows switching on of the air conditioning.
Heating / Air conditioning selection
Pressing key is used to switch the type of operating from heating to air conditioning and vice versa.

text_image
1 2 3 4 5 6 7 12:08 T=20.7°C AUTO 0 3 6 9 12 15 18 21 24Heating
Symbol identifies heating.
text_image
1 2 3 4 5 6 7 12:08 T-20.7°C AUTO 0 1 2 3 4 5 6 7 12 12 12 12 12 12 12 12 12 12 12 12 12 12 12 12 12 12 12 12 12 12 12 12 12 12 12 12 12 12 12 12 12 12 0 AUTOAir conditioning
Symbol identifies air conditioning.
OPERATING INSTRUCTIONS
Parameter setting
Press the key once to set the parameters.
The SET symbol and the clock appear on the display, while the bar of the day of the week starts blinking.
At this point it is possible to modify, in sequence:
- day of the week,
- hours,
- minutes,
- temperature unit of measure,
- set point T1,
- set point T2,
- set point T3,
Temperatures used in the heating or air conditioning program, differentiated by type of operation.
- antifreeze temperature value,
- self-learning activation,
- differential regulation value.
Alternatively it is possible to scroll the sequence pressing key, until the parameter to be modified is selected. The value of each parameter is confirmed by pressing key. The setting phase is exited by pressing key again or, automatically, 30 seconds after the last key entry.
text_image
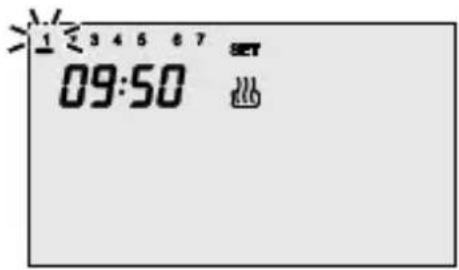
≥1≤3 4 5 6 7 09:50Setting the day of the week
When the day of the week bar blinks, select the current day with keys Ⓑ⊕
(Monday=1, Tuesday=2 ... Sunday=7).
Press key within 30 seconds to confirm the set value.
OPERATING INSTRUCTIONS
Parameter setting
text_image
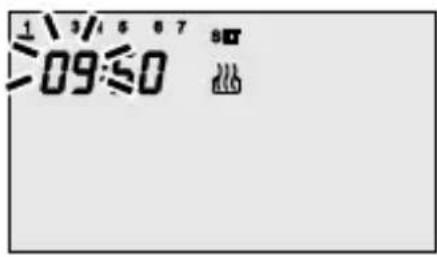
1 3/4 5 6 7 09:50Setting the time
When the hour figures blink, set the hour with keys .
Press key within 30 seconds to confirm the set value.
text_image
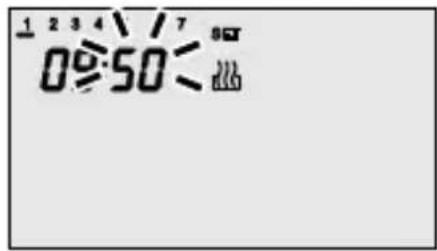
1 2 3 4 5 6 0:50Setting the minutes
When the minutes figures blink, set the minutes with keys (-) (+)
Press key Ⓞ within 30 seconds to confirm the set value.
text_image
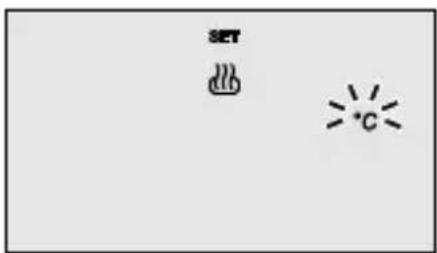
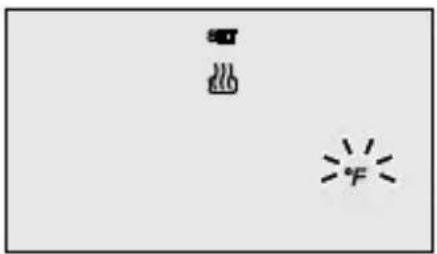
SET CSetting the temperature unit of measure
When the °C or °F symbol starts blinking, select the unit of measure with keys .^^
Press key Ⓞ within 30 seconds to confirm the set value.
natural_image
Simple line drawing of a fire and a snowflake with no text or symbolsOPERATING INSTRUCTIONS
Parameter setting
text_image
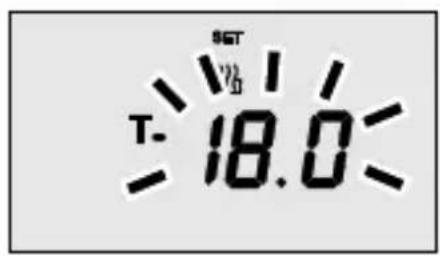
SET T- 18.0Setting Set Point T1
When symbol appears, the temperature value starts to blink. Regulate the value of T1 with keys. Press key ⊙ within 30 seconds to confirm the set value.
text_image
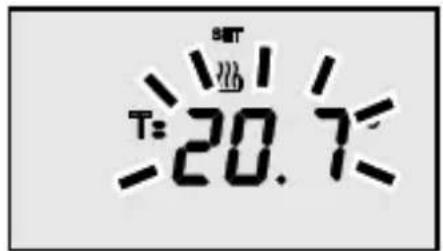
T=20.7Setting Set Point T2
When symbol Appears, the temperature value starts to blink. Regulate the value of T2 with keys .^V Press key ⊙ within 30 seconds to confirm the set value.

text_image
BAR 1/26 T$ 22.0Setting Set Point T3
When symbol T appears, the temperature value starts to blink. Regulate the value of T3 with keys . V Press key ⊙ within 30 seconds to confirm the set value.
text_image
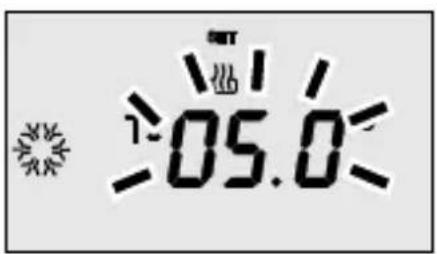
1~05.0Setting the antifreeze temperature value
When symbol ,appears, the temperature value starts to blink. Regulate the antifreeze temperature value with keys . Press key within 30 seconds to confirm the set value.
There are the following constraints between the set point values: Heating: T antifreeze T1 T2 T3 Air conditioning: T1 T2 T3
OPERATING INSTRUCTIONS
Parameter setting
text_image
SET Google On
text_image
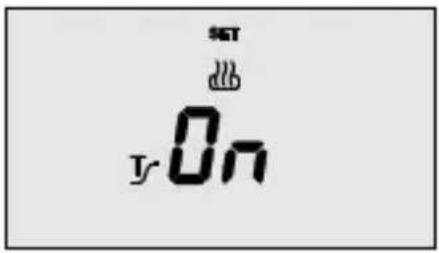
SET SB y OFFActivating self-learning
When symbol appears, activate (ON) or deactivate (OFF) the function with keys.
Press key Ⓞ within 30 seconds to confirm the set value.
Self-learning is used to activate the advance (max. 2 hours) on activating the heating. The timer-thermostat automatically manages the advance, so as to guarantee the temperature set at the start of each period of the programmed profile. This function is activated in heating, in automatic operating mode only.
text_image
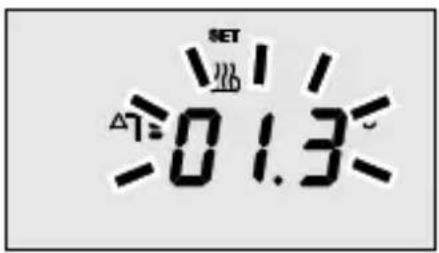
SET 01.3Setting the regulation differential
When symbol appears, set the value of the regulation differential with keys
Press key Ⓞ within 30 seconds to confirm the set value.
The regulation differential is the displacement between the set point set and the actual activation temperature. Save for special situations, it is recommended to keep the preset value.
OPERATING INSTRUCTIONS
Personalizing the daily program
Press key ☐ twice to personalize the preset daily program or to make a modification.
text_image
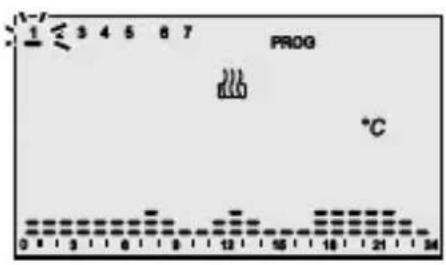
1 ≤ 3 4 5 6 7 PROG °C 0 1 2 3 4 5 6 7 8 9 10 11 12 13 14 15 16 17 18 19 20 21 22 23 24The PROG symbol appears on the display while the bar for the first day of the week will start to blink.
Select the first day required with keys ⊖⊕
Press key within 30 seconds to confirm the selection.
text_image
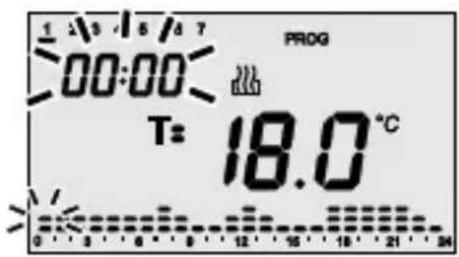
1 2 3 4 5 6 7 00:00 PROG Tz 18.0 °C 0 1 2 3 4After confirmation of the first day, the current profile, relative to the day selected is displayed on the display.
The hour starts to blink.
Select the temperature set point that it is required to set starting from hour 00:00 using keys.

text_image
1 2 3 4 5 6 7 PROG 00:00 T- 16.0 °C 0 < 3 8 9 12 15 18 21 24The symbols T or T and the value corresponding to the selected set point appear on the display.
The set point is applied to the hourly profile until the first variation present in the current program.
text_image
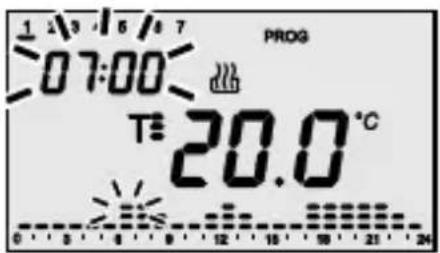
1 2 3 4 5 6 7 07:00 PROG T=20.0 °C 0 5 4 9 12 15 18 21 24Increase the time with keys until the moment when it is required to modify the proposed profile; during the increase the column relative to the selected time blinks on the hourly profile.
Select the new set point with keys, which will be applied until the next variation present in the program.
OPERATING INSTRUCTIONS
Personalizing the daily program
The time is decreased/increased with steps of 15 minutes each time keys, are pressed, so it is possible to define up to 4 programming periods for each hour.
Proceed in the same way as described above until the profile is complete.
Copying the Program
If it is required to copy the program to the next day, confirm the programming performed by pressing key within 30 seconds.
Press key within 30 seconds to confirm the programming without copying; an automatic move is made to the programming for the next day.
Press key, at the end of weekly programming to return to normal operations.
To activate the program select AUTO operating mode by pressing key until the AUTO symbol appears on the display.
Temporary forcing of the temperature
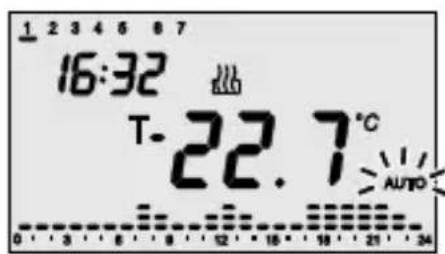
In AUTO operating mode it is possible to temporarily force the active temperature set point using keys to set the required value. Confirm the value by pressing key or waiting 5 seconds.
text_image
1 2 3 4 5 6 7 16:32 T-22.7°C AUTOActivation of the forcing is signaled on the display by the blinking of the AUTO symbol.
The forcing remains active until the first variation of the profile present in the programz.
Party function
In AUTO mode, the Party function is used to temporarily exclude the set program by manually entering a set point for a different temperature, for a period of between 1 and 23 hours inclusive. This function can be used, for example, to extend the comfort period during a dinner, a party, etc.
text_image
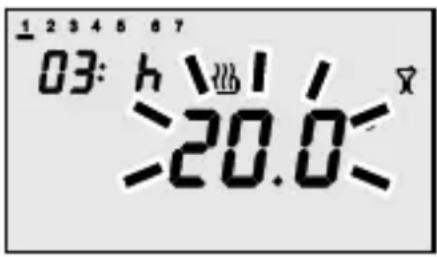
1 2 3 4 5 6 7 03: h \ 1 / >20.0Press key to activate the function, the symbol appears on the display while the value of the set point active at that time starts blinking. Use keys to set the new value of the temperature set point.
Use keys to set the number of hours of activation, that will be displayed on the display.
Press key ☐ or wait 5 seconds, to confirm the setting made.
When the function is active it is still possible to modify the value of the set point and period of activation, in the same way as described above.
The function can also be activated when the timer-thermostat in manual mode (MAN). The Party function remains active until the set period elapses.
The hours count is decremented during operation.
Press key ; for deactivation in advance: on deactivation, the timer-thermostat returns to the starting operating mode.
OPERATING INSTRUCTIONS
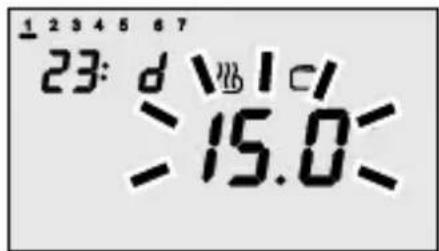
Holiday function
In AUTO mode, the Holiday function is used to temporarily exclude the set weekly program by manually entering a set point for a different temperature, for a period of between 1 and 99 days inclusive. This function could be used, for example, to program a period of economy during a holiday with reactivation of the program on the day of return.
text_image
1 2 3 4 5 6 7 23: d \nb 1 c/ =15.0Press key to activate the function, the symbol appears on the display while the value of the set point active at that time starts blinking. Use keys to set the new value of the temperature set point.
Use keys to set the number of hours of activation, that will be displayed on the display.
Press key ☐ or wait 5 seconds to confirm the setting made.
When the function is active it is still possible to modify the value of the set point and period of activation, in the same way as described above.
The function can also be activated when the timer-thermostat in manual mode (MAN).
The Holiday function remains active until the set period elapses.
The days count is decremented during operation.
Press key Ⓗ for deactivation in advance: on deactivation the timer-thermostat returns to the starting operating mode.
OPERATING INSTRUCTIONS
Sunday's program copy
In AUTO mode it is possible to copy the sunday's profile to any day of the week.
This function is particularly useful when a period of temporary comfort is required, for example, on a public holiday during the week.
text_image
1 2 3 4 5 ≥7 12:08 T=20.7°C AUTO 0 3 4 5 6 7 8 9 10 11 12 13 14 15 16 17 18 19 20 21 22 23 24Press key to activate the function, the symbol and the bar of the feast day start blinking on the display. Use keys to select the day of the week to which to copy the feast day profile; press key, or wait 30 seconds to confirm the setting made.

text_image
12:08 T=20.7°C AUTOWhen the function is active, pressing key displays the day to which the feast day profile has been copied: the corresponding bar starts blinking on the display. Press key again to deactivate the function; if it is required to modify the day of the week, use keys and press key or wait 30 seconds to confirm the new setting.
text_image
1 2 3 4 5 6 7 12:08 T: 20.7°C AUTO 0 3 8 9 12 15 18 21 24When the day selected for the feast copy is in progress, symbol is fixed on. The validity of the feast day copy is temporary, after midnight of the selected day, a return is made to the programmed weekly profile.
OPERATING INSTRUCTIONS
Manual operation
text_image
1 2 3 4 5 6 7 12:08 \ 1 / >20.0 < MAXTo activate manual operating mode, press key , until the text MAN appears on the display. The temperature set point appears for about two seconds.
Use keys to set the required set point value, press key, or wait 5 seconds to confirm the setting.
Remote control
The time-thermostat can be connected to the GSM GW 90 821 remote control unit by a serial connection.
The SMS commands can thus be used to:
- set the type of operation (air conditioning/heating)
- set the operating mode (manual/automatic/off)
- set the operating set point (in MAN mode only)
- request the current status
Every SMS command sent to the device has a corresponding confirmation SMS (with predefined text that cannot be configured);
the status request message gives a reply that includes the following information:
- current operating type (heating/air conditioning)
- current operating mode (off/auto/man)
- set point temperature currently set
- ambient temperature measured
- relay output status (ON/OFF)
The following symbol is displayed on the VDU whenever the operating type or mode are modified from the remote control unit.
Low batteries indication

text_image
1 2 3 4 5 6 7 12:08 20.7°C MKNWhen the batteries charge is low, the symbol on the display starts to blink. Operation of the timer-thermostat is guaranteed in any case. In this case, the batteries must be replaced as soon as possible.
Timer-thermostat operation is no longer guaranteed when symbol is fixed on, in this case the last operation guaranteed is automatic deactivation of the heating/air conditioning.
The available time for replacing the batteries is about 2 minutes, after which only the clock/calendar setting will be lost: all the other settings are kept in non-volatile memory.
OPERATING INSTRUCTIONS
Reset and restore the preset values
Pressing keys, simultaneously performs a complete reset of the timer-thermostat.
N.B.: all parameters set and personalized programs will be cancelled.
When the timer-thermostat is switched on again, it uses the parameters and programs preset in the factory. The timer-thermostat goes into heating in AUTO mode. The Party and Holiday functions are not active.
OPERATING INSTRUCTIONS
Preset programs
The timer-thermostat has 2 preset programs, one for heating and one for air conditioning.
HEATING PROGRAM
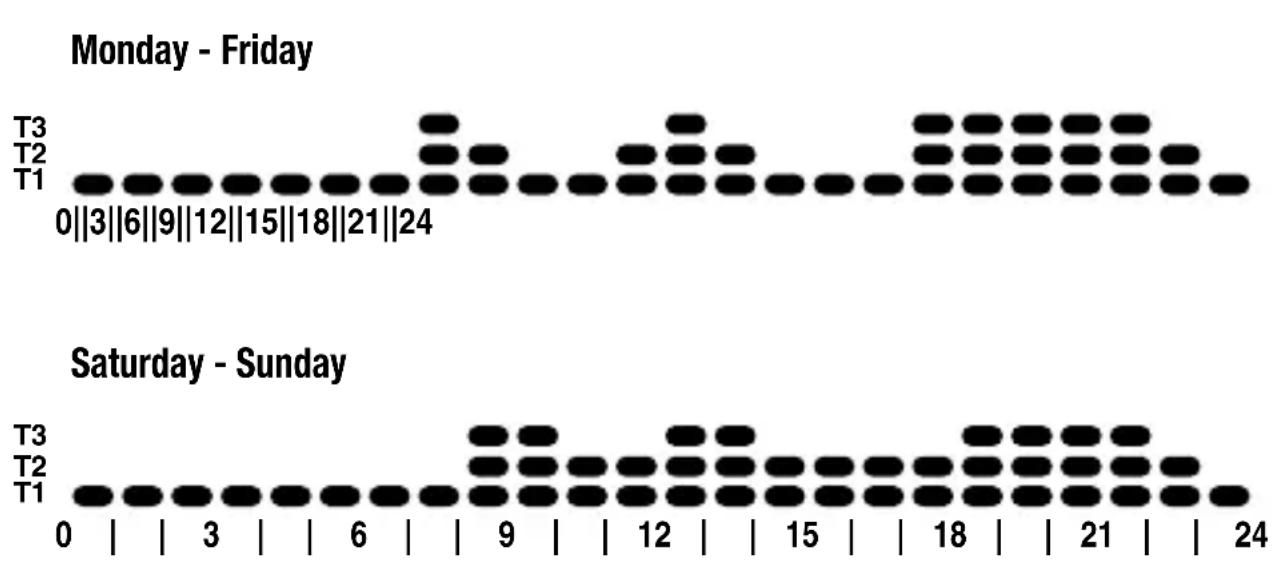
line
| Day | Time | T3 | T2 | | --------- | ---- | ---- | ---- | | Friday | 0 | 0 | 0 | | Friday | 3 | 0 | 0 | | Friday | 6 | 0 | 0 | | Friday | 9 | 0 | 0 | | Friday | 12 | 0 | 0 | | Friday | 15 | 0 | 0 | | Friday | 18 | 0 | 0 | | Friday | 21 | 0 | 0 | | Friday | 24 | 0 | 0 | | Sunday | 0 | 0 | 0 | | Sunday | 3 | 0 | 0 | | Sunday | 6 | 0 | 0 | | Sunday | 9 | 0 | 0 | | Sunday | 12 | 0 | 0 | | Sunday | 15 | 0 | 0 | | Sunday | 18 | 0 | 0 | | Sunday | 21 | 0 | 0 | | Sunday | 24 | 0 | 0 |AIR CONDITIONING PROGRAM

other
| Day | T1 | T2 | T3 | |----|----|----|----| | 0 | | | | | 3 | | | | | 6 | | | | | 9 | | | | | 12 | | | | | 15 | | | | | 18 | | | | | 21 | | | | | 24 | | | |These preset programs can be modified and personalized according to requirements. Follow the instructions contained in the “Daily program personalization” paragraph to make the modifications.
OPERATING INSTRUCTIONS
Preset parameters
Day of the week 1: Monday
Time 00:00
Heating temperature set point T1 16 °C
T2 18 °C
T3 20 °C
T antifreeze 5 °C
Air conditioning temperature set point T1 24 °C
T2 26 °C
T3 28 °C
Self-learning Function disabled (OFF)
Differential regulation Heating 0.2 °C
Air conditioning 0.5 °C
Temperature unit of measure °C
INSTALLATION INSTRUCTIONS
Installation
WARNING
- Before installation ensure that the associated output modules receive the commands correctly.
- In the installation phase respect the assembly direction ( ) on the base of the support.
Fitting with wall plugs.
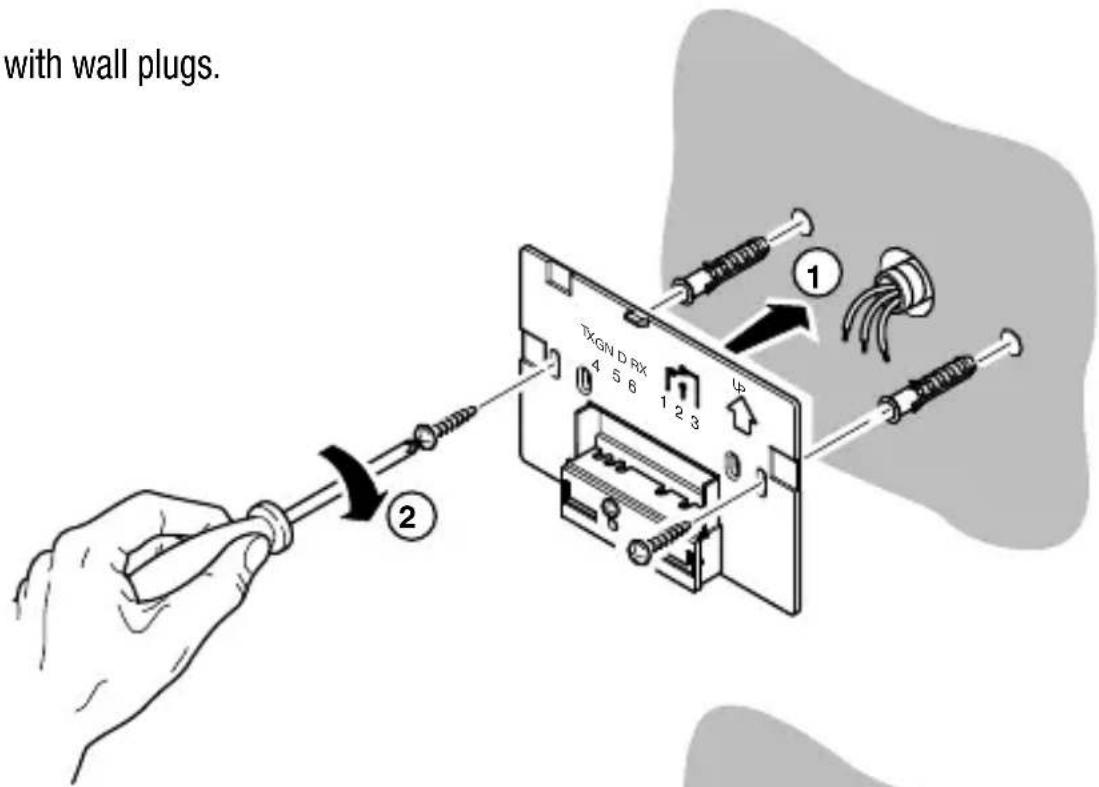
text_image
with wall plugs. TXGN D RX 4 5 6 1 2 3 UP ① ②Fitting to a 3-bay box.
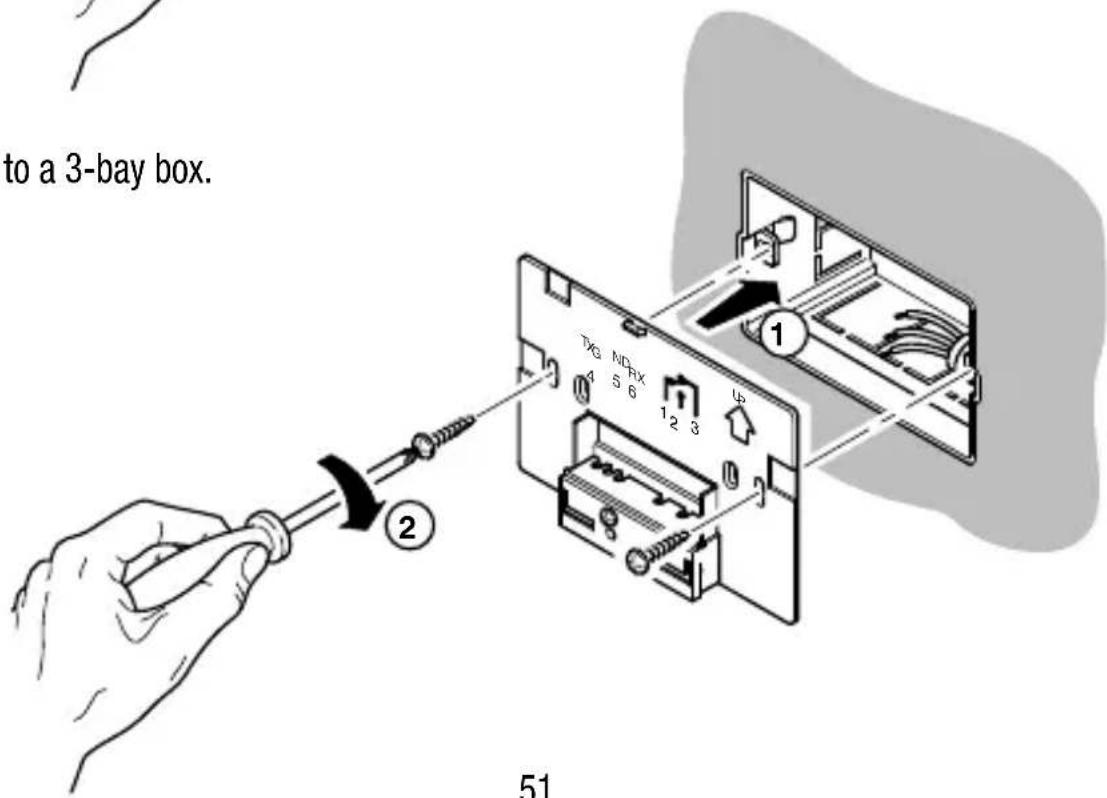
text_image
to a 3-bay box. ② 51INSTALLATION INSTRUCTIONS
Installation
Access to the terminals.
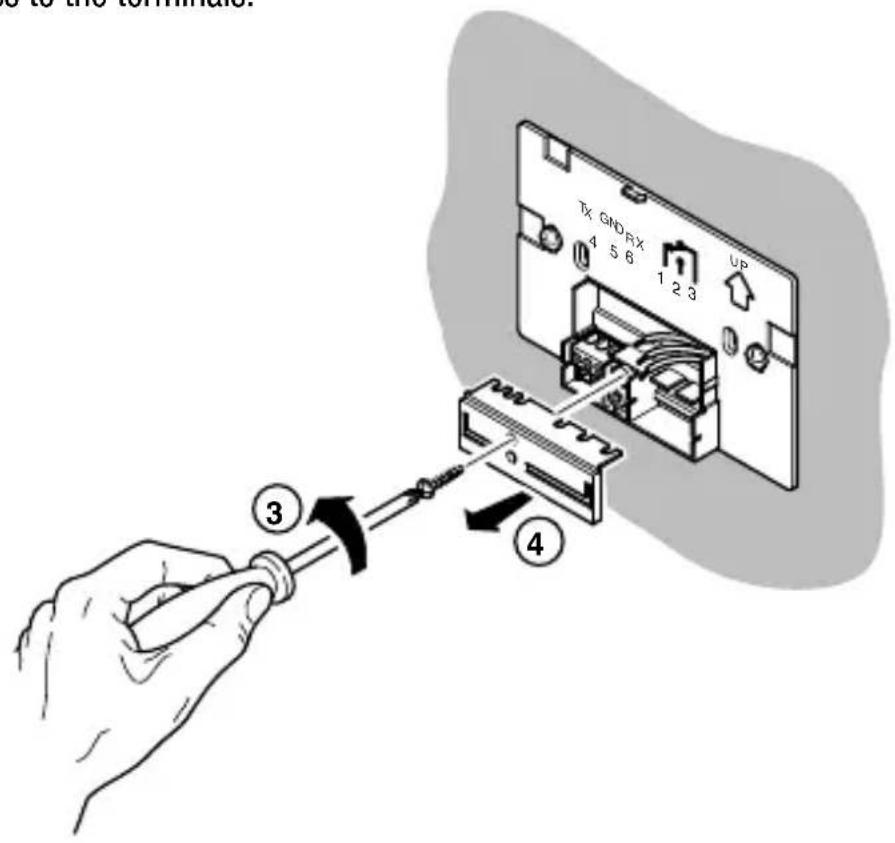
text_image
to the terminal. Tx GND RX 4 5 6 1 2 3 UP ③ ④Connection to the remote control unit (3 cables)
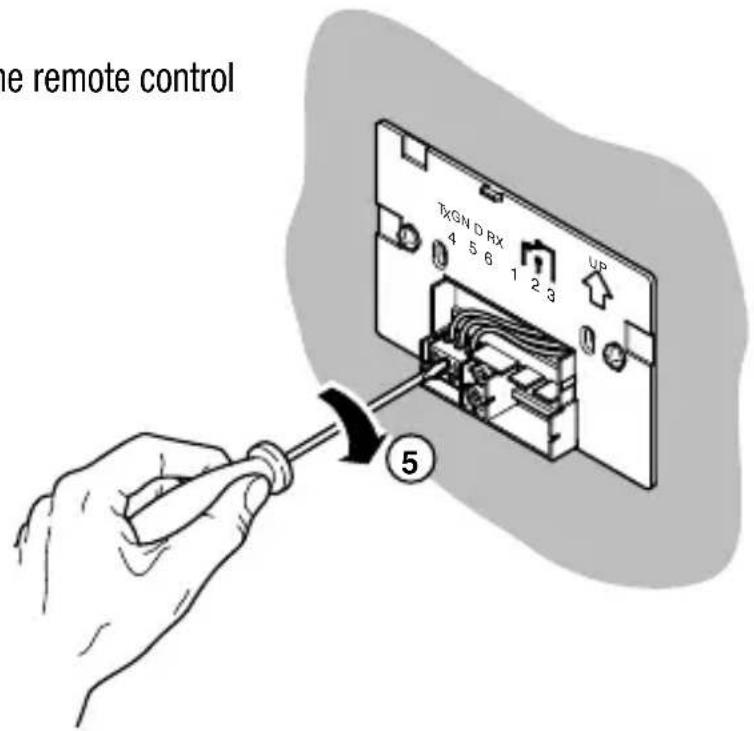
text_image
the remote control TXGN D RX 4 5 6 1 2 3 UP ⑤INSTALLATION INSTRUCTIONS
Installation
Click fixing
of the timer-thermostat on the relative base and locking with screw.
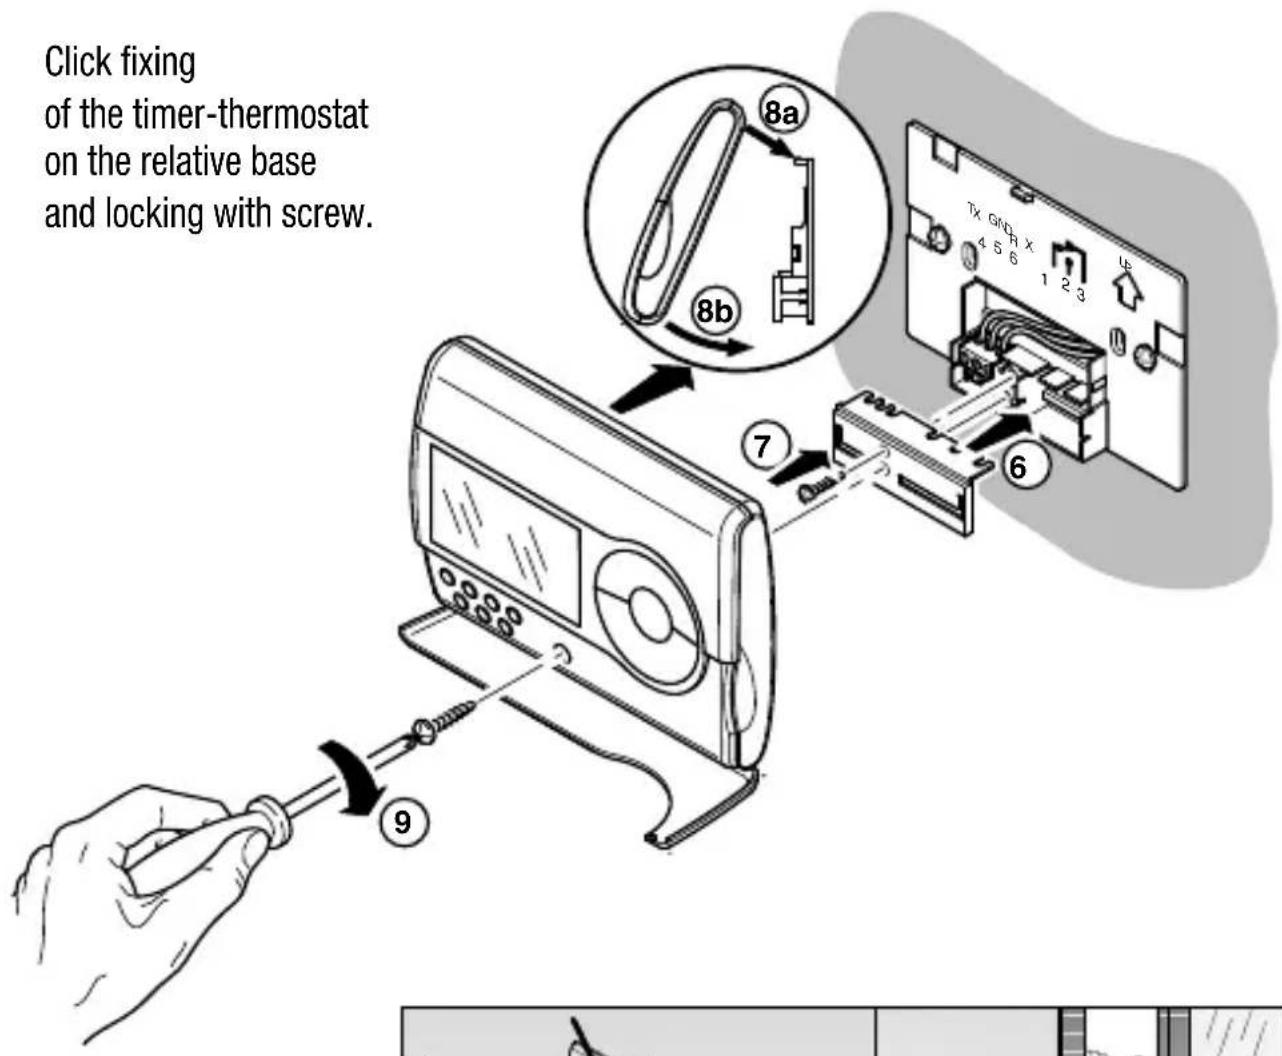
text_image
Click fixing of the timer-thermostat on the relative base and locking with screw.For correct reading of
the ambient
temperature
to be controlled,
it is important
that the
timer-thermostat
is not installed
in niches.
Behind doors
or near windows
or sources of heat.
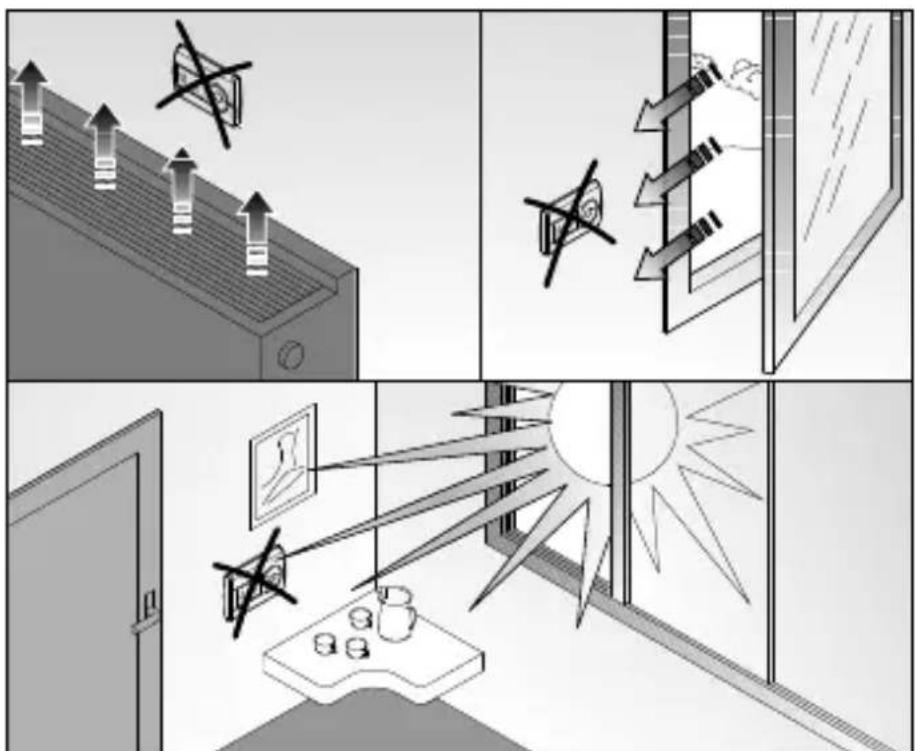
natural_image
Four-panel illustration showing room ventilation, ceiling-mounted fixtures, sunlight streaming through windows, and a window with a sun (no text or symbols)INSTALLATION INSTRUCTIONS
Connection terminals
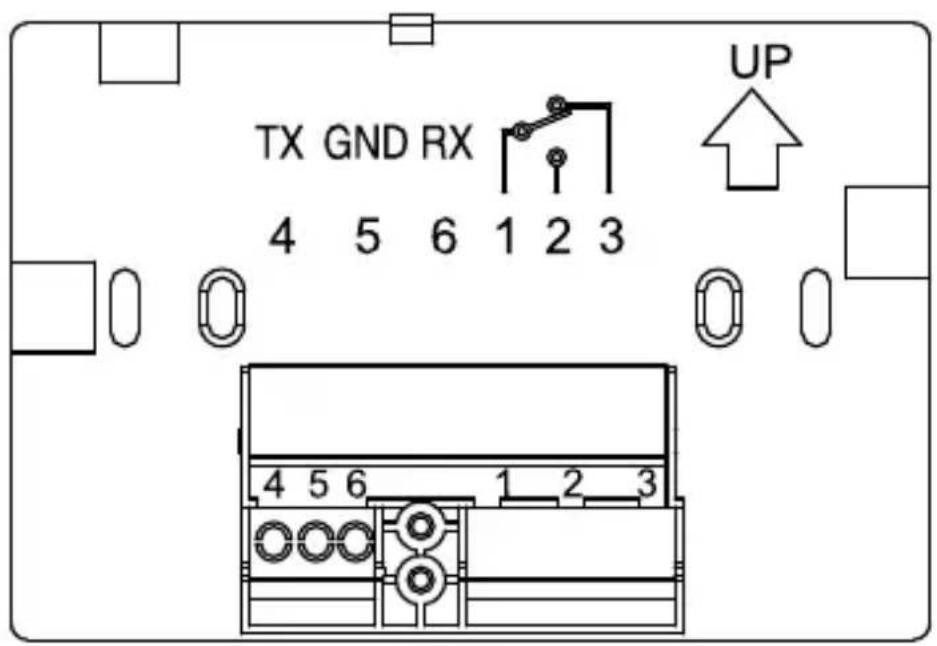
text_image
TX GND RX 4 5 6 1 2 3 UP 4 5 6 1 2 3Remote control unit connection (serial line).
4 - TX (output data)
5 - GND (common)
6 - RX (input data)
INSTALLATION INSTRUCTIONS
Battery replacement
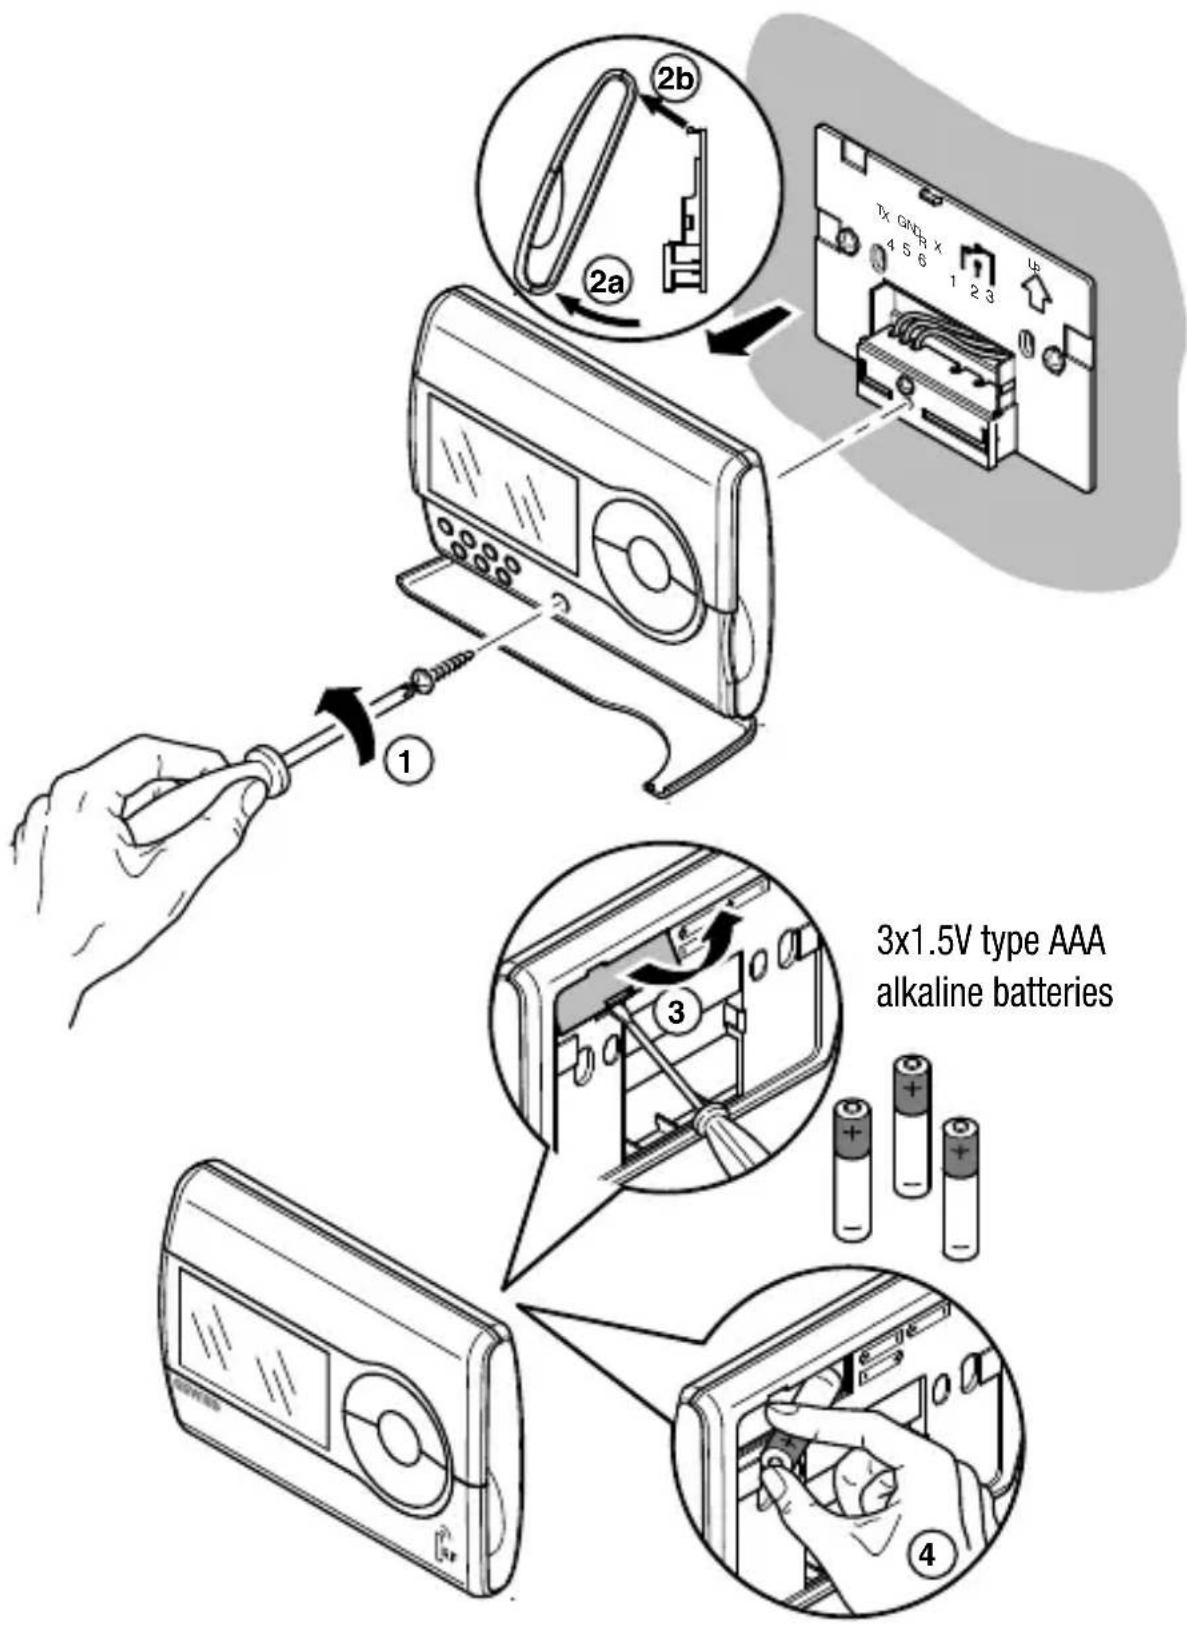
text_image
2b 2a 1 3x1.5V type AAA alkaline batteriesDo not dispose of dead batteries in the environment.
FUNCTIONAL DETAILS / TECHNICAL DATA
Type of operation: heating and air conditioning
Operating mode: automatic, manual and antifreeze
Operating temperature: -5^ ÷ +45^
Measured temperature: 0 ÷ +45^
Temperature probe: NTC, 100KΩ at 25°C
Measurement accuracy: ±0.5°C at 20°C
Preset programs: 2 weekly programs
(heating and air conditioning)
Resolution hourly programming: 15 minute
Max. n° of temperature changes: 4 per hour
Temperature levels: 3 levels (T1-T2-T3) programmable
from 5 to 40°C differentiated
between air conditioning and heating
Temperature set point resolution: 0.1°C
Antifreeze temperature: adjustable from 2 to 7°C
Manual temperature: adjustable from 5 to 40°C
Differential regulation: adjustable from 0.2 to 2°C
Party function: timed from 1 to 23 hours
Holiday function: timed from 1 to 99 days
Temporary temperature forcing: settable
Thermal gradient self-learning: selectable, with max. advance of 2 hours
Unit of measure: ^ C or ^ F
Interval between two successive measurements: 1 minute
Remote control: with the GSM code GW 90 821 remote control
unit (not included)
Batteries discharged signal: with symbol on the display
Radio frequency: 868 MHz
Radio range: 100 m in a free field
Supply: 2x1.5V type AAA alkaline batteries
Stand-by charge: 2 minutes for battery replacement
Max. dimensions (B x L x H): 120x92x19mm
FRANÇAIS
Chronothermostat RF mural programme journalier-hebdomadaire
Attention - Important
The text MAN and the ambient temperature measured appear on the display.

text_image
1 2 3 4 5 6 7 16:29 22.4 °C OFFProgrammation minutes
natural_image
Simple line drawing of a fire and explosion symbol (no text or labels)text_image
SET T- 18.0Programmation du Set-point T1
Programmation du Set-point T2
text_image
1 2 3 4 5 6 7 23: d \nb 1 c/ =15.0other
| Time Point | Event Count | | ---------- | ----------- | | T1 | 0 | | T2 | 3 | | T3 | 6 |natural_image
Four-panel illustration showing ceiling lighting, window view, and outdoor scene with sun rays (no text or symbols)INSTRUCTIONS POUR L'INSTALLATION
Description bornes

text_image
TX GND RX 4 5 6 1 2 3 UPnatural_image
Simple line drawing of a fire with smoke and fire sparks (no text or symbols)text_image
SET T- 18.0text_image
SET SB OFFtext_image
SET 01.3 Δ7=0.13text_image
00:00 Tz 18.0 °Cnatural_image
Four-panel illustration showing ceiling lighting, window view, and outdoor scene with sun rays (no text or symbols)natural_image
Simple line drawing of a fire and a snowflake with no text or symbolsParameter-einstellung

text_image
SET T- 18.0text_image
SET Google On
text_image
SET SB OFFtext_image
SET 01.3 Δ7=0.13text_image
00:00 Tz 18.0°C PROGnatural_image
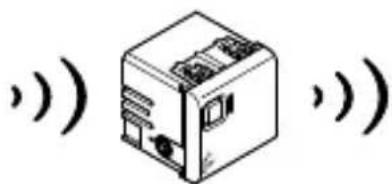
Four-panel illustration showing room ventilation and lighting effects, including ceiling-mounted air ducts, ceiling-mounted screens, sun rays, and a window with a mirror (no text or symbols)Radio frequency command and control system
natural_image
Line drawing of a rectangular electronic device with circular ports and a handle (no text or symbols)Pulsantiera RF
RF button pad
natural_image
Line drawing of a wall-mounted electrical outlet with three slots (no text or symbols)RF movement and twilight sensor
natural_image
Isometric line drawing of a rectangular frame with a circular recess and central hole (no text or symbols)Cronotermostato RF
RF timer-thermostat
Chronothermostat RF
Cronotermostato RF
Chronothermostat RF

natural_image
Line drawing of a rectangular electronic device with a circular button and label (no readable text or symbols)text_image
Diagram showing a device transforming into a light bulb, illustrating the process of lighting or illumination.text_image
Diagram showing a device connected to a bottle, illustrating the process of packaging or cleaning.text_image
Diagram showing a device transforming into a rack with a magnified view of the rack structure.Ripetitore di segnale RF / RF signal repeater Répétiteur de signal RF / Repetidor de señal RF Signalmelderstab RF