ICD1010 - Hi-fi system Soundmaster - Free user manual and instructions
Find the device manual for free ICD1010 Soundmaster in PDF.
User questions about ICD1010 Soundmaster
0 question about this device. Answer the ones you know or ask your own.
Ask a new question about this device
Download the instructions for your Hi-fi system in PDF format for free! Find your manual ICD1010 - Soundmaster and take your electronic device back in hand. On this page are published all the documents necessary for the use of your device. ICD1010 by Soundmaster.
USER MANUAL ICD1010 Soundmaster
text_image
RoRus Air Condition Absolute DIOle Classics RoRus Air Condition RoRus Air Condition RoRus Air Condition RoRus Air Condition RoRus Air Condition RoRus Air Condition RoRus Air Condition RoRus Air Condition RoRus Air Condition RoRus Air Condition RoRus Air Condition RoRus Air Condition RoRus Air Condition RoRus Air Condition RoRus Air Condition RoRus Air Condition RoRus Air Condition RoRUS Air Condition RoRUS Air Condition RoRUS Air Condition RoRUS Air Condition RoRUS Air Condition RoRUS Air Condition RoRUS Air Condition RoRUS Air Condition RoRUS Air Condition RoRUS Air Condition RoRUS Air Condition RoRUS Air Condition RoRUS Air Condition RoRUS Air Condition RoRUS Air Condition RoRUS Air Condition RoRUS Air Condition ROUDEUTSCH
ENGLISH
FRANÇAIS
NEDERLANDS
ITALIANO
ČEŠTINA
SLOVENSKÝ
DAB+ (DIGITALRADIO)......9
UKW (FM)....10
CD....12
USB 13
BLUETOOTH ^® 14
AUDIO IN (AUX)....14
EINSCHLAFTIMER - SLEEP 14
WECKER - ALARM....14
UNDOK....15
text_image
Diagram showing a lock icon with a downward arrow pointing to a device panel, likely illustrating a lock mechanism or control system.text_image
Schlüssel: 0 1 2 3 4 5 6 7 8 9 . _ - @ , a b c d e f g h i j k l m n o p q r s B K S P O K C A N C E Ltext_image
DAB 03:28 BBC Radio 6Music to vote for a track that missed out on the 6Music playlist- Radiosender suchen
text_image
FM 03:28 Alice 97.3 Best Music in the worldDo not dispose of this product with the normal household waste at the end of its life cycle. Return it to a collection point for the recycling of electrical and electronic devices.
This is indicated by the symbol on the product, user manual or packaging
The materials are reusable according to their markings. By reusing, recycling or other forms of utilization of old devices and packaging you make an important contribution to the protection of our environment.
Please contact your local authorities for details about collection points.
WARNING
Caution: To reduce the risk of electric shock, do not remove the cover (or back). There are no user serviceable parts inside. Refer servicing to qualified service personnel.
This symbol indicates the presence of dangerous voltage inside the enclosure, sufficient enough to cause electric shock.
This symbol indicates the presence of important operating and maintenance instructions for the device
Used batteries are hazardous waste and NOT to be disposed of with the household waste! As a consumer you are legally obligated to return all batteries for environmentally responsible recycling – no matter whether or not the batteries contain harmful substances*)
Return batteries free of charge to public collection points in your community or shops selling batteries of the respective kind.
Only return fully discharged batteries
*) marked Cd = cadmium, Hg = mercury, Pb = lead
- Only use mercury and cadmium-free batteries.
- Used batteries are hazardous waste and NOT to be disposed of with the household waste!!!
- Keep batteries away from children. Children might swallow batteries.
- Contact a physician immediately if a battery was swallowed.
- Check your batteries regularly to avoid battery leakage.
- Batteries shall not be exposed to excessive heat such as sunshine, fire or the like.
- CAUTION: Danger of explosion if battery is incorrectly replaced
- Replace only with the same or equivalent type
CAUTION - INVISIBLE LASER RADIATION WHEN OPENING THE COVER OR PRESSING THE SAFETY INTERLOCK. AVOID EXPOSURE TO THE LASER BEAM.
- The device is equipped with a "Class 1 Laser". Avoid exposure to the laser beam as this could cause eye injuries.
- Use the device in dry indoor environments only.
Safety, Environmental and Setup Instructions
- Protect the device from humidity.
- This apparatus is for moderate climates areas use, not suitable for use in tropical climates countries.
- No objects filled with liquids, such as vases, shall be placed on the apparatus.
- The mains plug or an appliance coupler is used as the disconnect device, the disconnect devices shall remain readily operable.
- Connect this device to a properly installed and earthed wall outlet only. Make sure the mains voltage corresponds with the specifications on the rating plate.
- Make sure the mains cable stays dry during operation. Do not pinch or damage the mains cable in any way.
- A damaged mains cable or plug must immediately be replaced by an authorized service center.
- In case of lightning, immediately disconnect the device from the mains supply.
- Children should be supervised by parents when using the device.
- Clean the device with a dry cloth only.
- Do NOT use CLEANING AGENTS or ABRASIVE CLOTHS!
- Do not expose the device to direct sunlight or other heat sources.
• Install the device at a location with sufficient ventilation in order to prevent heat accumulation. - Do not cover the ventilation openings!
- Install the device at a safe and vibration-free location.
- Install the device as far away as possible from computers and microwave units; otherwise radio reception may be disturbed.
- Do not open or repair the enclosure. It is not safe to do so and will void your warranty. Repairs only by authorized service/ customer center.
- No naked flame sources, such as lighted candles, should be placed on the unit.
- When you are necessary to ship the unit store it in its original package. Save the package for this purpose.
- In case of malfunction due to electrostatic discharge or fast transient (burst), remove and reconnect the power supply.
- If the unit is not using for a long period of time, disconnect it from the power supply by unplugging the power plug. This is to avoid the risk of fire.
TABLE OF CONTENT
TABLE OF CONTENT ......1
LOCATIONS OF CONTROLS 2
REMOTE CONTROL ....3
TROUBLESHOOTING....16
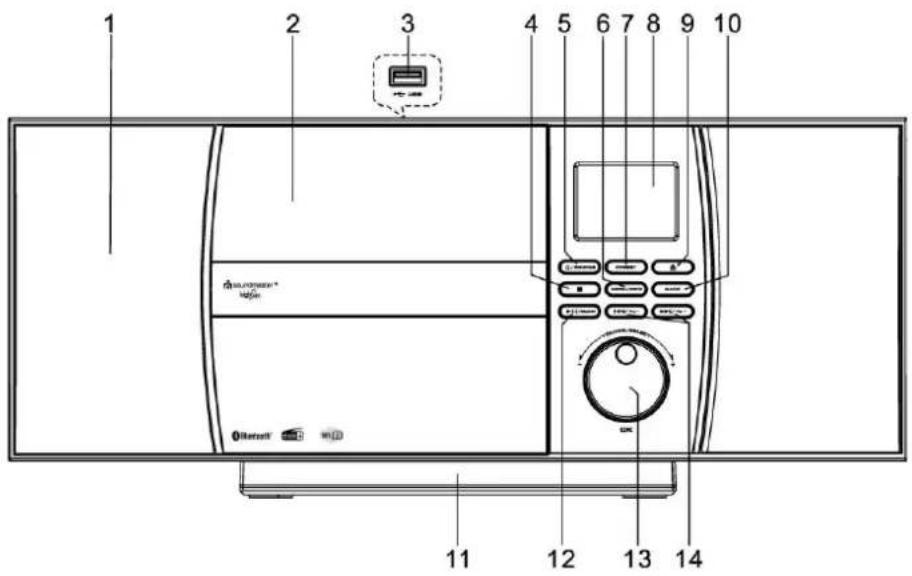
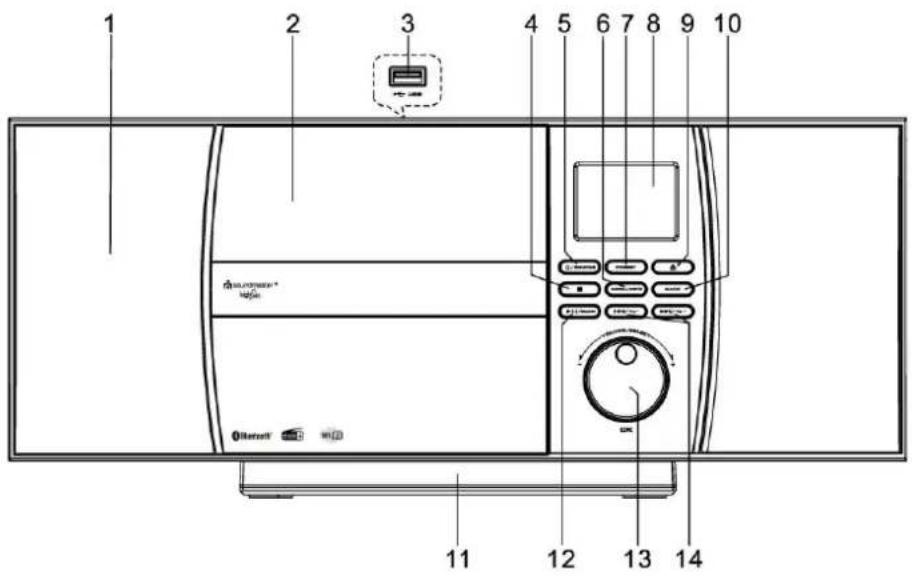
LOCATIONS OF CONTROLS
FRONT VIEW
text_image
1 2 3 4 5 6 7 8 9 10 11 12 13 141 Speaker
2 CD tray
3 USB Port
4 STOP button
5 POWER/SOURCE button
6 MENU/INFO button
7 PRESET button
8 Display
9 EJECT button
10 BACK button
11 Detachable Stand
12 PLAY/PAUSE/SCAN button
13 NAVIGATE/VOLUME/OK knob
14 SKIP/TUNING buttons
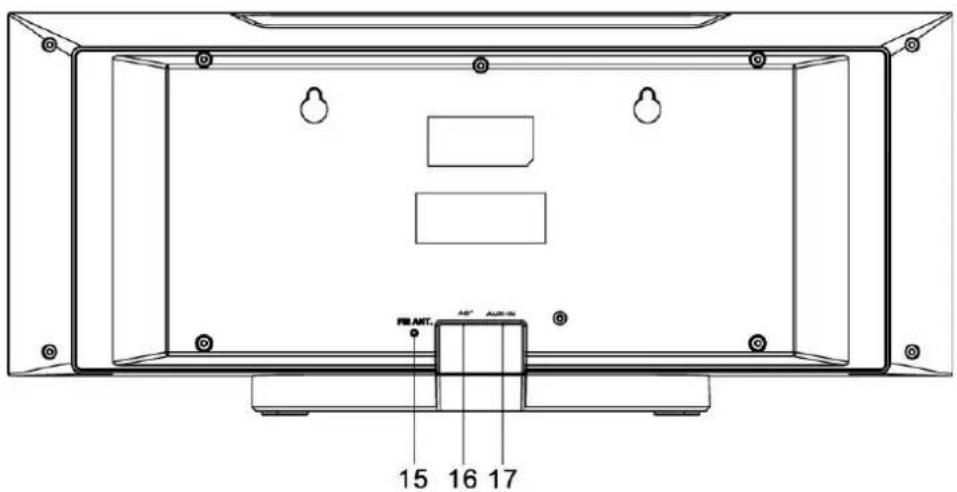
BACK VIEW

text_image
15 16 17 FR.ANT. A2" AU2A-0415 Pigtail antenna
16 AC IN
17 AUX IN
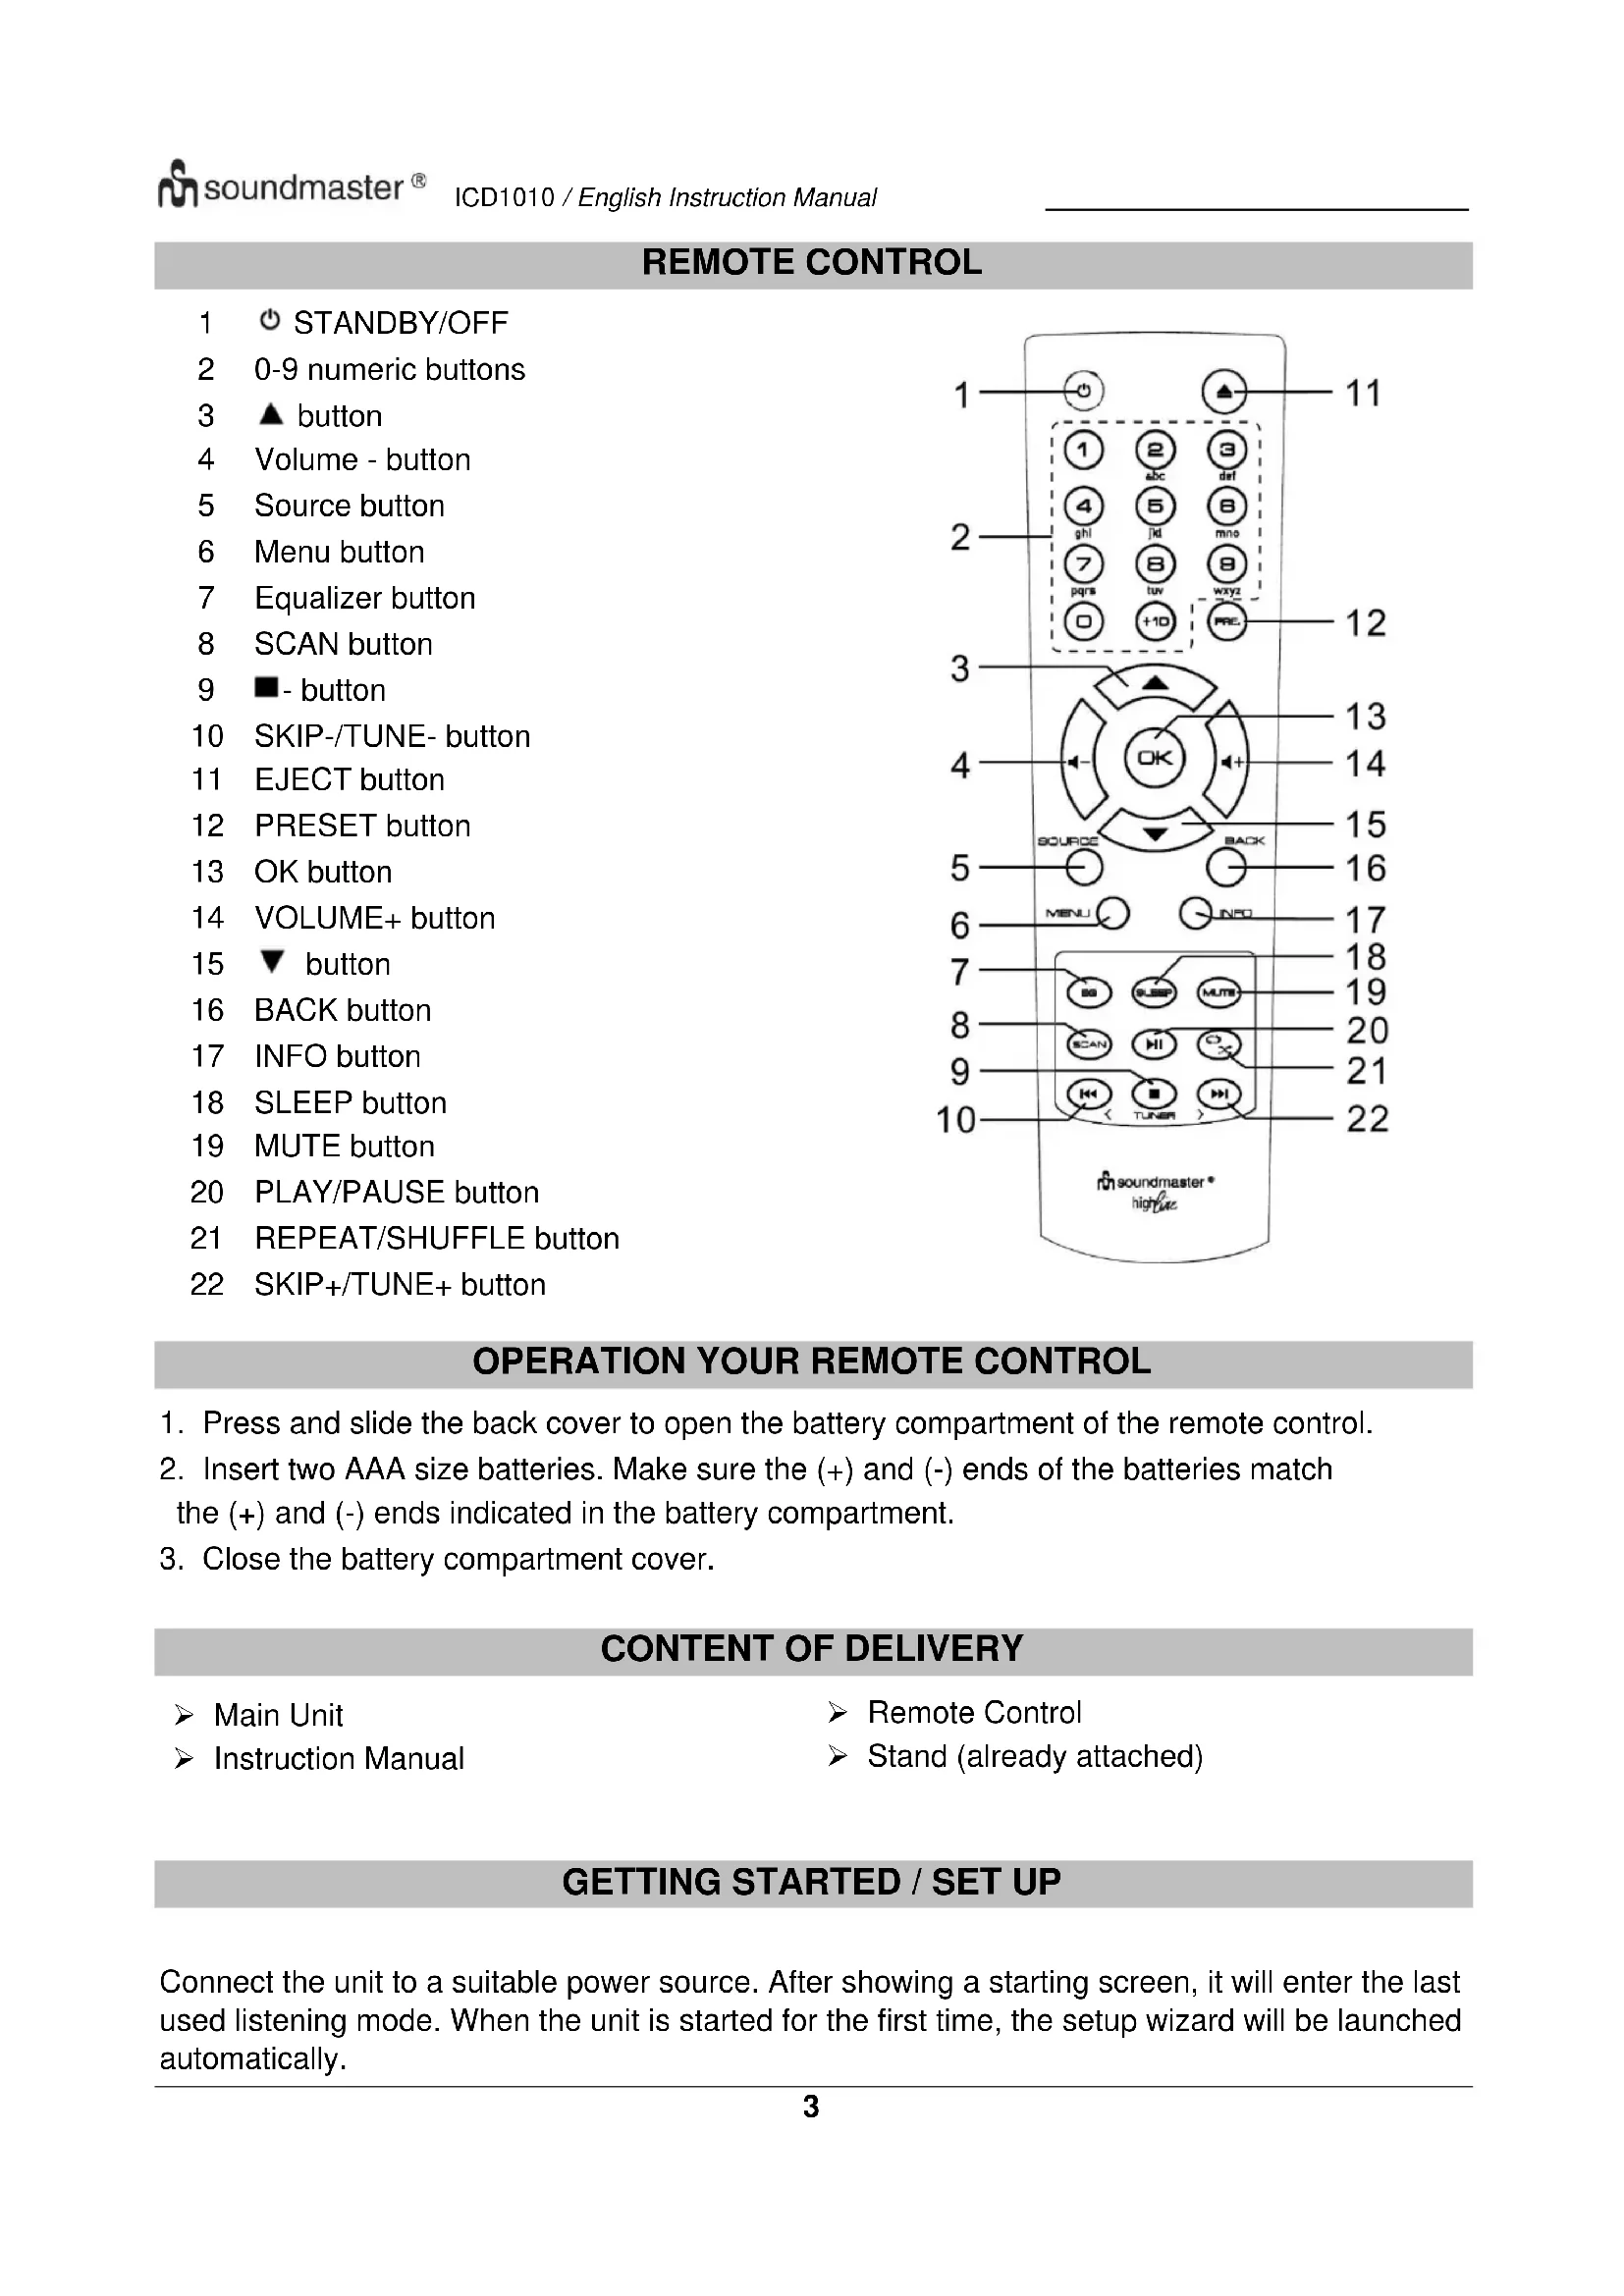
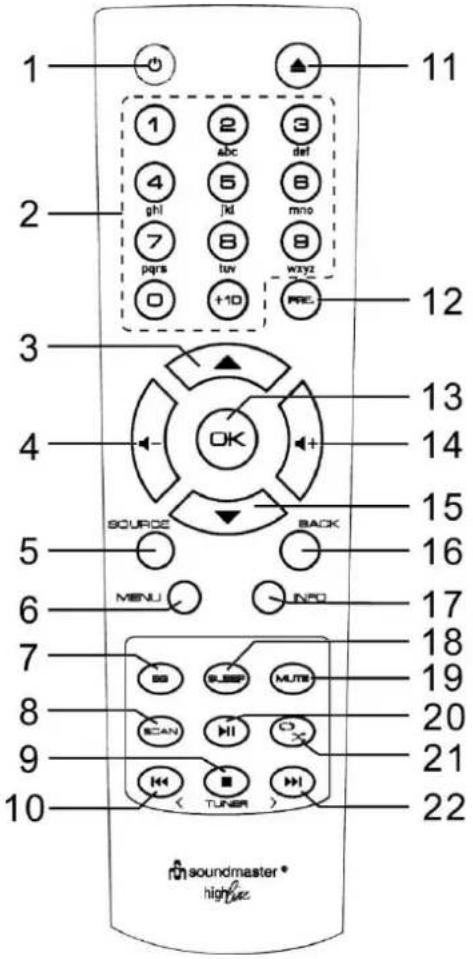
REMOTE CONTROL
1 ⏻ STANDBY/OFF
2 0-9 numeric buttons
3 ▲ button
4 Volume - button
5 Source button
6 Menu button
7 Equalizer button
8 SCAN button
9 - button
10 SKIP-/TUNE- button
11 EJECT button
12 PRESET button
13 OK button
14 VOLUME+ button
15 ▼ button
16 BACK button
17 INFO button
18 SLEEP button
19 MUTE button
20 PLAY/PAUSE button
21 REPEAT/SHUFFLE button
22 SKIP+/TUNE+ button
text_image
1 2 3 4 5 6 7 8 9 10 11 12 13 14 15 16 17 18 19 20 21 22 SOURCE BACK MENU INFO TUNER soundmaster *- Press and slide the back cover to open the battery compartment of the remote control.
- Insert two AAA size batteries. Make sure the (+) and (-) ends of the batteries match the (+) and (-) ends indicated in the battery compartment.
- Close the battery compartment cover.
CONTENT OF DELIVERY
Main Unit
Remote Control
Instruction Manual
Stand (already attached)
GETTING STARTED / SET UP
Connect the unit to a suitable power source. After showing a starting screen, it will enter the last used listening mode. When the unit is started for the first time, the setup wizard will be launched automatically.
WALL MOUNTING
NOTE:
- Be very careful to prevent the unit (2.1kg) from falling when mounting on the wall.
- Before mounting, check the wall strength and also if there a any Power cables behind your drill point. (If you are unsure, ask a qualified technician for help)
- Content of delivery does not include Screws and Dowels.
• After screwed in the screws, check if they are tight
How to mount
Use suitable screws and dowels for the assembly. The dimensions of the screws can be found in the graphic below.
Use a piece of paper as a drilling template and mark the holes approx. 160mm apart. Then attach the drilling template to the wall in a horizontal position. (As pictured) Drill the two holes.
Attach the screws with proper dowels as you can see in the pictures
Remove the base of the device by pulling the two locks on the underside of the base away from the device. Push the stand foot back and pull it off. Now you can hang up your device as shown in the picture
GET THE NETWORK ENVIRONMENT READY
Make sure you have setup the wireless network and you have the WEP, WPA or WPA2 security password to activate the connection.
You may also use the WPS (WiFi Protected Setup) function for easy pairing between the network device and ICD1010. Check if the light indicators on the network device are in appropriate status.
SETUP WIZARD
Note: If the setup wizard is terminated prematurely without a network setup, the device generates its own WiFi access so that the device can be configured using the UNDOK APP.
Network connection indicator:
Wi = Network connection established.
※ = Network connection not established.
1. Language
Select the menu language
2. Private Policy
At the beginning of the first installation or after making a factory reset, the product privacy policy will first appear on the display. To continue the installation, please confirm with the "OK" button.
Further information are available under www.frontiersmart.com/privacy
3. Setup Wizard
Select "YES" to start the Setup Wizard.
4. Time/Date Display format
Select 12 or 24 as the time format.
5. Auto update
The time and date can be updated manually or automatically from DAB, FM or network.
Auto update works with data sent over DAB, FM or the Internet. The clock is only updated when it is in a corresponding mode, so it is suggested to select a mode you use regularly.
DAB and FM use time signals broadcast with radio transmissions. Network uses a time signal sent from the Internet radio portal when in any network connected mode.
6. Time zone/daylight
Set your time zone. If your country uses daylight saving and it is in effect, turn on the Daylight saving option (only available when Auto update from Internet is selected).
7. Manual update
If you set No update, the wizard prompts you to set the time and date manually. The date and time are displayed as dd-mm-yyyy and hh:mm.
The active value appears as flashing. Adjust each value with the “▼/▲” knob. Once the value is set, press the knob to continue setting with next value.
8. Network
Keep Network connected
Select this option when the unit should the network connection in standby keep, when the function is confirmed, the unit wills faster connecting the internet and it is possible to switch on the unit with the "UNDOK" app.
Note: The standby power consumption is slightly increased with this function.
Scanning for the network
ICD1010 is compatible with all common network protocols and encryption methods. It searches for the available networks and list them out for you.
There will be hints for the type of network – if your network devices support WPS function, it will be [WPS] before the SSID (the name of the network device). Select the one you want to connect.
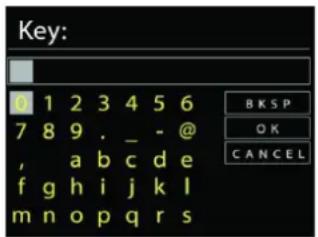
For the wireless connection, you will be asked for input the encryption in the next step. To enter the network's key, use the "NAVIGATE" knob to move the cursor through the characters and press "OK" to confirm. As each character is selected, the key is built up near the top of the display.
text_image
Key: 0 1 2 3 4 5 6 7 8 9 . _ - @ , a b c d e f g h i j k l m n o p q r s B K S P O K C A N C E LThere are three options accessible by tuning the navigate reel back before the first characters – Backspace, OK and Cancel.
WPS encrypted network
WPS encrypted networks are identified by WPS at the start of the network name when the
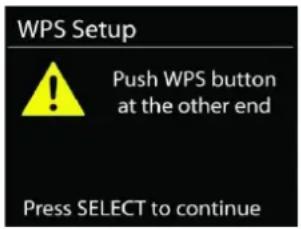
ICD1010 searches the available AP. Use one of the following methods of connection: There is the shortcut WPS key on the unit.
Push button
ICD1010 prompts you to press the connect button on the router. It then scans for a ready Push Button Connect network and connects.
text_image
WPS Setup ! Push WPS button at the other end Press SELECT to continuePin
ICD1010 generates an 8-digit code number which you enter into the wireless router, access point, or an external registrar.
WPS Setup

Enter PIN 98467583 at the other end
Press SELECT to continue
Skip WPS
Enter key as for a standard encrypted network.
For more information on setting up a WPS encrypted network, see your WPS router's instructions.
Completion
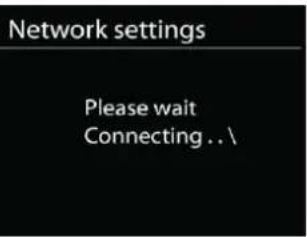
ICD1010 attempts to connect to the selected network.
text_image
Network settings Please wait Connecting... \It will show connected if the setup is successful. If connecting fails,
ICD1010 returns to a previous screen to try again.
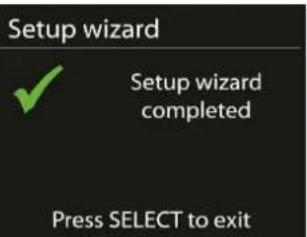
Press "OK" to quit the setup wizard.
text_image
Setup wizard Setup wizard completed Press SELECT to exitMAIN MENU
Press the "MODE" button to select the following modes: Internet Radio, Podcasts, DAB, FM, CD, USB, Bluetooth®, Sleep, Alarm and Timer.
INTERNET RADIO
ICD1010 can play thousands of radio stations and podcasts from around the world though a broadband Internet connection.
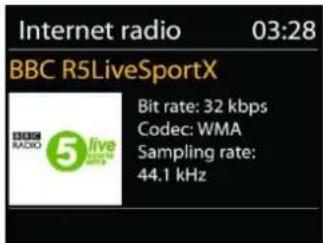
text_image
Internet radio 03:28 BBC R5LiveSportX BIT rate: 32 kbps Codec: WMA Sampling rate: 44.1 kHzWhen you select Internet radio, ICD1010 directly contacts the Frontier Silicon Internet radio portal (which is supported by Airable) to get a list of stations.
If you are already listening to an Internet radio station, you can press “◀” button to quickly return to the last visited branch of the menu tree, rather than “MENU” to go to the first menu of Internet radio mode.
- Germany
German radio stations will be displayed.
- History
When Internet radio mode restarts, the last-listened station is selected. To select another recently used station, enter here to select the listed station. Most recent stations appear at the top of the list.
- Search
You can search to desired radio stations
- Location
Here radio stations can be selected by continent and countries.
- Popular
Here are popular radio stations to see.
- Discover
Here you can select radio stations by country, genre or language.
Presets
To store an Internet radio preset, press and hold the "PRESET" key until the display shows the "Save preset" screen. Select one of the presets to save the current station and press "OK" to confirm.
To select a preset station, press the "PRESET" on, then select one of the listed preset stations and press "OK" to confirm. Or press 0 to 9 on the Remote Control to directly recall the presets.
Now playing information
While the stream is playing, the screen shows its name and description. To view further information, press "INFO" button on the radio or Remote Control.
Each time you press "INFO" button, another set of information is displayed, cycle through name/description, genre/location, reliability, codec/sampling rate, playback buffer and today's date.
PODCASTS
This feature allows podcasts to be selected, searched and listened to.
DAB
DAB mode receives DAB or DAB plus digital radio signal and displays information about the station, streaming audio and the program details.
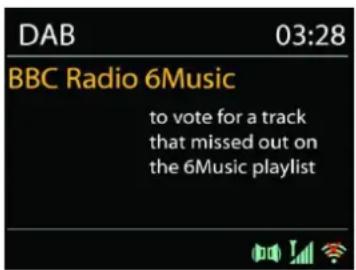
text_image
DAB 03:28 BBC Radio 6Music to vote for a track that missed out on the 6Music playlist- Scanning for stations
The first time you select DAB radio mode, or if the station list is empty, ICD1010 automatically performs a full scan to see what stations are available. You may also need to start a scan manually to update the list of stations for one of the following reasons:
• Available stations change from time to time.
- If reception was not good for the original scan, this may result in an empty or incomplete list of available stations.
- If you have poor reception of some stations (burbling), you may wish to list only stations with good signal strength.
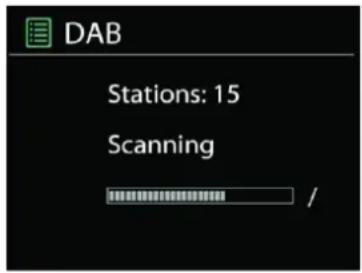
text_image
DAB Stations: 15 Scanning /To start the scan, press the "MENU" button on the remote control or press and hold the "MENU / INFO" button to access the DAB menu. Select the option "Full scan" and confirm with "OK" or press the "SCAN" button on the remote control.
To remove stations that are listed but not unavailable, choose Prune invalid.
- Presets
To store a DAB radio preset, press and hold the "PRESET" button until the display shows the "Save preset" screen. Select one of the presets to save the current station and press "OK" to confirm.
To select a preset, press the "PRESET" button, then select one of the listed preset stations and press "OK" to confirm. Or press 0 to 9 on the Remote Control to directly recall the presets.
Now playing information
While the stream is playing, the screen shows its name and DLS (Dynamic Label Segment) information broadcast by the station giving real-time information such as program name, track title and contact details. Stereo broadcasts are indicated with an icon at the bottom of the screen. To view further information, press “INFO” button.
Each time you press "INFO" button on the radio, another set of information is displayed, cycling through DLS text, program type, ensemble name/frequency, signal strength/error rate, bite rate/codec/channels and today's date.
DAB menu
- Station list
Show the found stations in the station list.
- Scan
A full scan will be started. The found stations will be shown in the station list.
- Manual tune
Select the desired channel and only the selected channel.
- Prune invalid
Delete all radio stations which are not receivable anymore.
• Dynamic range compression (DRC)
If you are listening to music with a high dynamic range in a noisy environment, you may wish to compress the audio dynamic range. This makes quiet sounds louder, and loud sounds quieter. You can change DRC as off, low or high.
- Station order
You can choose the order of the DAB station list to be either Alphanumeric, Ensemble or Valid.
Ensemble lists groups of stations that are broadcast together on the same ensemble. Valid lists valid stations first, alphanumerically, then off-air stations.
FM
FM radio mode receives analogue radio from the FM band and displays RDS (Radio Data System) information about the station and where broadcast.
To manual scan, press and hold “▼ / ▲” button. The frequency display starts to run and scans the FM band and stops at the next station.
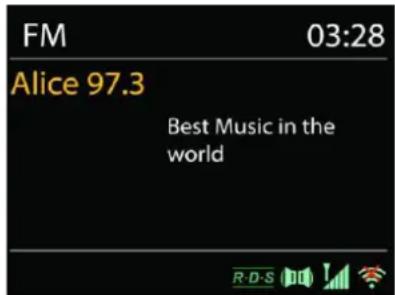
text_image
FM 03:28 Alice 97.3 Best Music in the worldTo fine tune press the “|◀/▶▶|” button on the Remote Control or on the unit. The unit search in 0.05 MHz steps.
Preset
To store an FM radio preset, press and hold the "PRESET" button until the display shows the "Save preset" screen. Select one of the presets to save the current station and press "OK" to confirm.
To select a preset, press the "PRESET" button, then select one of the listed preset stations and press "OK" to confirm. Or press 0 to 9 on the Remote Control to directly recall the presets.
Now playing information
While the stream is playing, the screen shows its frequency, or if RDS signal is available, station name and any further RDS information such as program name, title and other details. Stereo broadcasts are indicated with an icon at the bottom of the screen. To view further information, press the “INFO” button.
Each time you press "INFO" button on the radio, another set of information is displayed, cycling through Radio text, program type, frequency and today's date.
SETTINGS
- Scan settings
Choose FM at first, it will go to a specific station playing. Then press "MENU" on the radio to get above table.
By default, FM scans stop at any available station. This may result in a poor signal-to-noise ratio (hiss) from weak stations. To change the scan settings to stop only at stations with good signal strength, select "Yes" after choosing Strong station only.
- Audio settings
All stereo stations are reproduced in stereo. For weak stations, this may result in a poor signal-to-noise ratio (hiss). To play weak stations in mono, select FM weak reception: Listen in mono only and then "YES".
CD
Notice!
Improper operation can result in material damages!
Do not insert any recording media that deviate from the standard CD format (eg: mini-discs) into the CD player. These may not be played and ejected correctly. Insert only one disc at a time into the CD player.
Open the CD tray by pressing the “▲” button and put a disc (with printing side facing to you) inside. Close the CD tray with the “▲” button. The display will say “Loading” and the disc functions will not work while the disc is loading. After reading the display shows the following information in CD mode:
- Folder
- Track
- Current Play time
- Playback status (playing/pause)
The Playback will begin automatically once the table of contents is read. The display will show "No Disc" when the unit is set to CD mode and there is no CD inside.
- To pause/resume playback of the CD, press the " " button
- To switch to the next track, press the “” button once
- To fast forward through a track, press and hold the “▶▶” button.
- To switch to the previous track, press the “” button twice
- To fast backward through a track, press and hold “ ” button.
- To stop CD playback, press the “” button on the remote control.
- To eject the disc press in stop mode the “” button on the unit.
CD Program
- Set the unit in Stop mode
- Press the "PRE" button on the remote control. The display will show "T01 P01" and "T001" flash.
- Choose with “◀◀” or “▶▶” or 0 to 9 on the Remote Control, the track which should be programmed and confirm the track by pressing the “PRE” button on the remote control. The display changes to “P02”.
- To choose more tracks do step 3 again.
- If all tracks are programmed press the “▶II” button on the unit or remote control to start the programmed playback.
Repeat function
Press repeatedly the “⇐” button on the remote control to select one of the following functions: For Audio-CD:
• 1 x: The played track will be repeated.
- 2 x: The complete CD will be repeated.
• 3 x: The songs are played randomly.
- 4 x: Repeat function is deactivated.
For MP3-CD:
• 1 x: The played track will be repeated.
- 2 x: The complete folder will be repeated.
- 3 x: The complete CD will be repeated.
- 4 x: The songs are played randomly.
- 5 x: Repeat function is deactivated.
The icon of the selected function will be shown at the bottom of the display.
USB
- USB playback
From this point on, menus are generated from the folders on the USB device.
The control functions are the same as in CD mode.
Select with the “▼ / ▲” buttons on the remote control or by using the UNDOK app the desired folder. The display shows folder and file names (not necessarily track names).

Once you have found a track you want to play, press the “▶” button or click on the song title in UNDOK app.
My Playlist
You can add Tracks to your Playlist. While playback press and hold the „OK“ button on the remote control.
Clear my Playlist
Select "Clear my Playlist" and confirm by pressing the "OK" button.
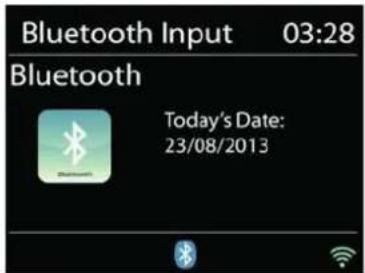
BLUETOOTH®
When you select the Bluetooth® mode, the device is entering to pairing and the BT icon at the bottom of the screen will flash.
Turn on your smartphone, tablet or other Bluetooth® devices to search for the device.
The Bluetooth® pairing name is "ICD1010".
text_image
Bluetooth Input 03:28 Bluetooth Today's Date: 23/08/2013When pairing is successful, the Bluetooth® indicator will light up and stop flashing.
To release BT pairing, turn off or unpair your smartphone, table or other Bluetooth ^® devices.
Press “▶II” on the radio or Remote Control to start or pause the playback. You can press “◀◀” or “▶◀” on the radio or Remote Control to play the previous or next track.
AUX-IN
You can also use this socket to listen to the sound of other playback devices such as MP3 players, CD players, etc. through the loudspeakers.
- Connect the external unit with a 3.5mm Jack cable to the AUX-IN port at the backside of the unit.
- Now you can listen to some music through the speakers of the unit. You can use the Volume control buttons of the unit, but the CD-buttons have no function while listen to AUX.
- You can find more information's about the handling in the instruction manual of your external unit.
NOTE:
Set the Volume of the external unit not to maximum while starting playback.
SLEEP
Select the function "Sleep" in the main menu. Choose from Sleep OFF, 15 mins, 30 mins, 45 mins or 60 mins.
The remaining time to switch off is shown at the bottom of the display.
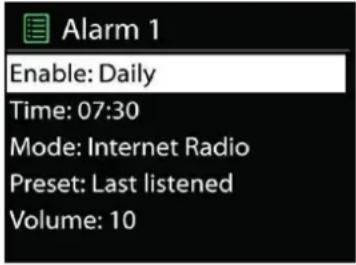
ALARM
There are two versatile wake-up alarms with snooze facility, and a sleep function to turn the system off after a set period. Each alarm can be set to start in a particular mode.
Select "Alarm" in the Main menu to set or change an alarm.
text_image
Alarm 1 Enable: Daily Time: 07:30 Mode: Internet Radio Preset: Last listened Volume: 10Select the alarm number (1 or 2) then configure the following parameters:
- Enable: on/off, Frequency: Daily, Once, Weekends or Weekdays,
- Time
• Mode: Internet Radio, DAB, FM, CD, USB, Buzzer - Preset: Last listened, P1 – P20 (only when DAB or FM is selected).
• Volume: 0 - 32
To activate the new settings, scroll down and select "Save".
The screen shows active alarms with an icon at the bottom left.
UNDOK
The ICD1010 supports remote control from Apple iPhone, iPad and Android using the UNDOK app. The apps are available in Apple's app store and Google's android play.
The UNDOK app allows you to:
- Create a group
- Rename a group
- Edit a group - add or remove one or more products
- Delete a group
• Control a group - choose operating mode and browse for content - Adjust volume for an entire group or for individual products within a group
• Control products which have not been assigned to any group - Control all the modes of the ICD1010 (Internet Radio, Podcast, DAB, FM, CD, USB, Bluetooth®) of the unit.
- Adjust the volume level of current playback
- Setting EQ for various audio presets
- Setting Sleep timer
- Editing the displayed name of the radio.
SYSTEM SETTINGS
1. EQUALIZER
Several preset EQ modes are available: Normal, Flat, Jazz, Rock, Movie, Classic, Pop, News and My EQ.
In the My EQ settings, you can create your own EQ with custom bass and treble settings. You can also select these functions by pressing the "EQ" button on the remote control.
2. STREAMING AUDIO QUALITY
You can set the quality of the radio stations.
3. NETWORK SETTINGS
- Network wizard
Enter to search AP SSID, then input the WEP / WPA key or choose Push Button/Pin/Skip WPS to connect to the wireless network.
- PBC Wlan setup
Push Button Configuration, it is to connect the AP that supports WPS (Wi-Fi Protected Setup).
- View settings
View the information of current connected network: Active connection, MAC address, Wlan region, DHCP, SSID, IP address, Subnet mask, Gateway address, Primary DNS and Secondary DNS.
- Manual settings
Choose wireless network connection and enable or disable DHCP (Dynamic Host Configuration Protocol).
- Network profile
ICD1010 remembers the last four wireless networks it has connected to, and automatically tries to connect to whichever one of them it can find. From here you can see the list of registered networks. You can delete unwanted networks by turning and pressing then choosing "YES" to confirm delete.
- Clear network settings
The adjusted network settings will be deleted.
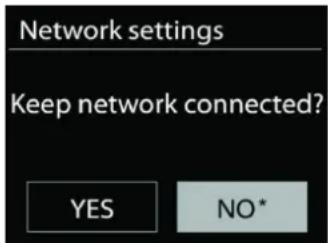
- Keep network connected in standby
If you choose to keep network in standby connected, the WiFi will not disconnect even you are in standby, DAB, FM and Bluetooth® mode. Otherwise, the connection will only available in internet radio mode.
However, it is recommended to maintain the connection for the use of the UNDOK APP.
text_image
Network settings Keep network connected? YES NO*4. TIME/DATE
Set the time manually or automatically update, time format, time zone and daylight.
5. INACTIVE STANDBY
Set the time after the unit switch off automatically in standby.
6. LANGUAGE
Change it as your preference.
7. FACTORY RESET
A factory reset resets all user settings to default values, so that time and date, network configuration and presets are lost. However, the ICD1010 's current software version is maintained.
8. SOFTWARE UPDATE
From time to time, software upgrades may be created with bug fixes and/or additional features. You can either check manually or set ICD1010 to check periodically automatically (this is the default). If newer available software is detected, you will be asked if you want to go ahead with an update. If you agree, the new software is then downloaded and installed. After a software upgrade, all user settings are maintained.
NOTE: Before starting a software upgrade, ensure that ICD1010 is plugged into a stable main power connection. Disconnecting power during an upgrade may permanently damage the unit.
9. SOFTWARE UPGRADE
Install the software via PC
10. SETUP WIZARD
Starts the setup wizard
11. INFORMATION
View the firmware version and the radio ID.
12. PRIVACY POLICY
Shows information about the privacy policy
13. BACKLIGHT
Adjust the display brightness in standby and on mode.
TROUBLESHOOTING
| Error | Remedy |
| The device does not switch on. | Check it the power adaptor is connected properly. |
| Switch automatically off | Due to ErP2 requirements and environmental protection, the unit automatically switches to standby mode when no music is played for more than 15 minutes. |
| No sound. | 1. Turn on the sound as it may be muted2. Increase the volume.3. Pull any connected headphone or speaker from the connector jack. |
| No network connection can be established. | 1. Check the WLAN function.2. Try to set an IP address at the device.3. Activate the DHCP function on the router and make the connection again at the device.4. A firewall is activated on the network – set the respective program in such a way that access is possible.5. Reboot the router |
| WiFi connection cannot be established. | 1. Check the availability of WLAN network on the router.2. Place the device closer to the router.3. Make sure the password is correct. |
| No station is found. | 1. Check the network as well as the access point and firewall.2. The station may not be available currently, try it again later or select another station.3. The link of the station is changed or the station no longer transmits – ask the provider for information.4. The link of manual added station is not correct, make sure it is correct and re-enter. |
| Hiss in FM mode | Check/move the FM antenna or move the radio |
| No stations available / burbling / intermittent in DAB mode. | 1. Move the radio.2. Rescan local stations only (high-strength).3. Check the local DAB coverage. |
| Alarm does not work. | 1. Switch on the alarm.2. Due to the volume setting, refer to the solutions of “No sound”.3. The source of alarm was set to be station but there is no network connection. Change the source of alarm or reconfigure the connection. |
| USB driver or MP3 player is not detected. | 1. Check if the USB driver or MP3 player is plugged properly.2. Some USB hard disks need external power supply, make sure it is connected to the power.3. Not all MP3 players can be read directly on the device – use an USB drive instead. |
| NetRemote does not show or connect to ICD1010 | 1. Reopen the App.2. If you have several streaming from several devices at the same time, it may cause crash, reboot ICD1010 and/or your device. |
| All other undetermined cases. | ICD1010 may process large amount of data after a period of operation, no matter in which mode, it will cause the system freeze or malfunction. Reboot ICD1010 if necessary. |
| The normal function of the product may be disturbed by strong Electro-MagneticInterference. If so, simply reset the product to resume normal operation by following the instruction manual. In case the function could not resume, please use the product in other location. | |
| The device may malfunction when used in areas with strong radio interference. The device will work properly again once there is no more interference. | |
| Under the environment with Conducted Immunity disturbance, the sample may malfunction. It will automatically recover to normal when the Conducted Immunity disturbance stopped. |
The current Version of the instruction manual can be downloaded from www.soundmaster.de
Technical changes and misprints reserved
Copyright by Woerlein GmbH, 90556 Cadolzburg, www.soundmaster.de
Duplication only with the permission of Woerlein GmbH


PROTECTION DE L'ENVIRONNEMENT

text_image
6 mm (0.234") 3.7mm (0.145") 14 mm (0.55") Min\b 30 mm (1.18"text_image
Diagram showing a lock mechanism with an arrow pointing to a lock symbol and a magnified view of the internal structure.ASSISTANT DE CONFIGURATION
text_image
DAB 03:28 BBC Radio 6Music to vote for a track that missed out on the 6Music playlisttext_image
FM 03:28 Alice 97.3 Best Music in the worldLEVERINGSOMVANG....3
AAN DE SLAG/INSTELLEN....3
MUURMONTAGE ....4
DE NETWERKOMGEVING IN GEREEDHEID BRENGEN....4
INSTALLATIE ....5
HOOFDMENU....7
INTERNETRADIO....7
PODCASTS....8
DAB....8
FM....10
CD....11
USB....12
BLUETOOTH ^® 12
AUDIO-IN (AUX) 13
SLAAP ....13
ALARM....13
UNDOK....14
SYSTEEMINSTELLINGEN....14
PROBLEMEN OPLOSSEN....16
text_image
6 mm (0.234") 3.7mm (0.145") 14 mm (0.55") Min\b 30 mm (1.18"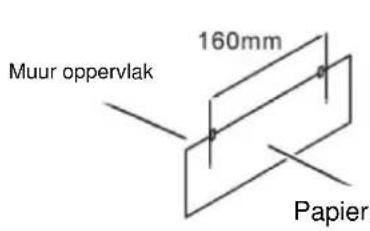
text_image
Muur oppervlak 160mm Papier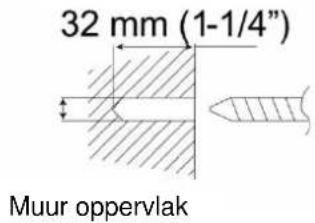
text_image
32 mm (1-1/4") Muur oppervlaktext_image
Diagram showing a lock icon and warning symbol with an arrow pointing to a device panel, likely indicating a lock or lock mechanism.DE NETWERKOMGEVING IN GEREEDHEID BRENGEN
Setup wizard voltooid
Bit rate: 32 kbps Codec: WMA Sampling rate: 44.1 kHz
text_image
DAB 03:28 BBC Radio 6Music to vote for a track that missed out on the 6Music playlisttext_image
FM 03:28 Alice 97.3 Best Music in the worldAUDIO-IN (AUX)....13
SLEEP....13
SVEGLIA....13
UNDOK 14
text_image
6 mm (0.234") 3.7mm (0.145") 14 mm (0.55") Min\b 30 mm (1.18"text_image
Diagram showing a lock icon with an arrow pointing to a panel, indicating a lock mechanism or adjustment.text_image
DAB 03:28 BBC Radio 6Music to vote for a track that missed out on the 6Music playlisttext_image
FM 03:28 Alice 97.3 Best Music in the worldMONTÁŽ NA STĚNU....4
PŘIPRAVTE SI SÍTOVÉ PROSTŘEDÍ......5
PRŮVODCE NASTAVENÍM....5
HLAVNÍ NABÍDKA....7
INTERNET RADIO....7
PODCASTS......8
DAB....8
FM....10
CD....11
USB....13
BLUETOOTH ^® 13
AUX-IN....14
SPÁT....14
ALARM....14
UNDOK....14
NASTAVENÍ SYSTÉMU....15
TROUBLESHOOTING....17
UMÍSTĚNÍ OVLÁDACÍCH PRVKŮ
POHLED ZEPŘEDU
text_image
1 2 3 4 5 6 7 8 9 10 11 12 13 141 Mluvčí
2 Zásobník na CD
3 USB Port
4 STOP knoflík
5 POWER/SOURCE knoflík
6 MENU/INFO knoflík
7 PRESET knoflík
8 Zobrazit
9 EJECT knoflík
10 BACK knoflík
11 Odnímatelný stojan
12 PLAY/PAUSE/SCAN knoflík
13 NAVIGATE/VOLUME/OK stud
14 SKIP/TUNING knoflík
POHLED SHORA
text_image
FRAKT. 48" AUR-05 15 16 1715 Pigtail antenna
16 AC IN
17 AUX IN
DÁLKOVÝ OVLADAČ
1 ⏻ STANDBY/OFF
2 0-9 numeric knoflík
3 ▲ knoflík
4 Volume - knoflík
5 Source knoflík
6 Menu knoflík
7 Equalizer knoflík
8 SCAN knoflík
9 ■- knoflík
text_image
6 mm (0.234") 3.7mm (0.145") 14 mm (0.55") Min\b 30 mm (1.18"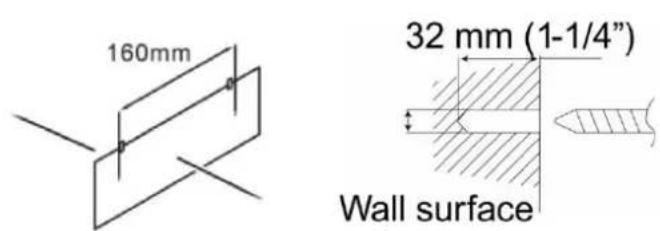
text_image
160mm 32 mm (1-1/4") Wall surface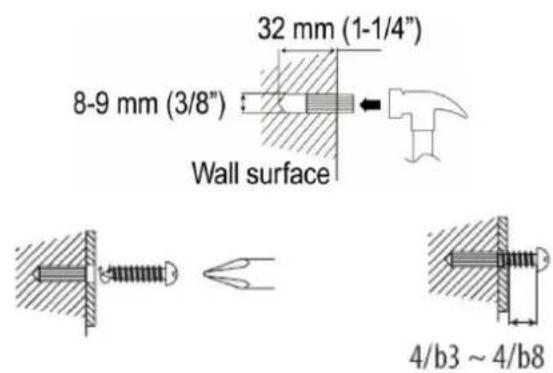
text_image
32 mm (1-1/4") 8-9 mm (3/8") Wall surface 4/b3 ~ 4/b8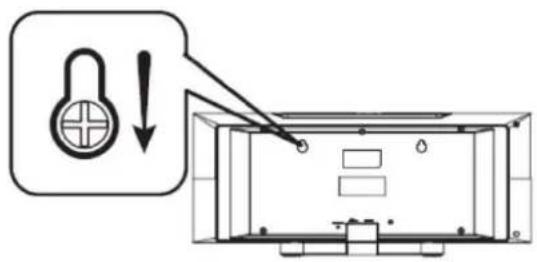
text_image
Diagram showing a lock icon with a downward arrow pointing to a device panel, likely illustrating a lock mechanism or safety warning.PŘIPRAVTE SI SÍTOVÉ PROSTŘEDÍ
text_image
Schlüssel: 0 1 2 3 4 5 6 7 8 9 . _ - @ , a b c d e f g h i j k l m n o p q r s B K S P O K C A N C E Ltext_image
Setup wizard ✓ Setup wizard completed Press SELECT to exit Network settings Please wait Connecting . . \Dokončení
Internet Radio, Podcast, Media player (USB), DAB, FM, Bluetooth®, CD, AUX-In, Sleep and Alarm.
INTERNET RADIO
text_image
DAB 03:28 BBC Radio 6Music to vote for a track that missed out on the 6Music playlist- Hledání stanic
text_image
DAB Stations: 15 Scanning /• Dynamic range compression (DRC)
text_image
FM 03:28 Alice 97.3 Best Music in the worldPřednastavení
text_image
Alarm 1 Enable: Daily Time: 07:30 Mode: Internet Radio Preset: Last listened Volume: 10text_image
Network settings Keep network connected? YES NO*3. ČAS / DATUM
text_image
6 mm (0.234") 3.7mm (0.145") 14 mm (0.55") Min\b 30 mm (1.18"text_image
Diagram showing a lock icon with an arrow pointing to a device panel, indicating lock status or adjustment.GET THE NETWORK ENVIRONMENT READY
text_image
WPS Setup ! Push WPS button at the other end Press SELECT to continuePin
Enter PIN 98467583 at the other end
Press SELECT to continue
Skip WPS
text_image
Network settings Please wait Connecting...text_image
Setup wizard Setup wizard completed Press SELECT to exitHLAVNÉ MENU
text_image
DAB 03:28 BBC Radio 6Music to vote for a track that missed out on the 6Music playlisttext_image
DAB Stations: 15 Scanning /• Dynamic range compression (DRC)
text_image
FM 03:28 Alice 97.3 Best Music in the worldPrednastavené
Ak chcete uložiť predvol’bu FM rádia, stlačte a podržte tlačidlo „PRESET“, kým sa na displeji nezobrazí obrazovka „Save preset“. Vyberte jednu z predvolieb na uloženie aktuálnej stanice a stlačte tlačidlo „OK“ na potvrdenie.
text_image
Alarm 1 Enable: Daily Time: 07:30 Mode: Internet Radio Preset: Last listened Volume: 10text_image
Network settings Keep network connected? YES NO*4. ČAS / DÁTUM
Starts the setup wizard
8. INFORMATION
D 90556 Cadolzburg, Germany
Tel: +49 9103 71 67 0
Fax: +49 9103 71 67 12
E-Mail: info@soundmaster.de
Internet: www.soundmaster.de
Hereby, Wörlein GmbH declares that this device is in compliance with the essential requirements and other relevant provisions of Directive 2014/53/EU.
A copy of the declaration of conformity can be obtained from the above address.