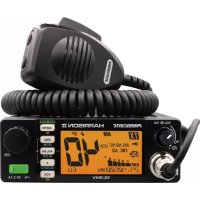
Martin - Stapler PRESIDENT - Free user manual and instructions
Find the device manual for free Martin PRESIDENT in PDF.


User questions about Martin PRESIDENT
0 question about this device. Answer the ones you know or ask your own.
Ask a new question about this device
Download the instructions for your Stapler in PDF format for free! Find your manual Martin - PRESIDENT and take your electronic device back in hand. On this page are published all the documents necessary for the use of your device. Martin by PRESIDENT.
USER MANUAL Martin PRESIDENT
MODE (pression breve)
11) PÉDALE D'ÉMISSION PTT (Push To Talk)
(Configuration: EU; PL; d; EC; U; In)
H.Hotel
1. India
J. Jullett
K Kilo
L Lima
M Mike
N November
Oscar
P Papa
Quebec
R Romeo
Sierra
I. Jangac
U Uniform
V. Victor
W. Whiskey
X X-ray
Y. Yngkee
Z Zulu
LANGUAGE TECHNIQUE
AM : Amplitude Modulation (modulation d'amplitude)
CB : Citizen Band (cauax banallses)
CH : Channel (canal)
CQ : Appel général
CW : Continuous waves (morse)
SWR Standing Waves Ratio
SW : Short waves (ondes courtes)
11) PALANCA DE EMISION PTT (Push To Talk)
H Hotel
1 India
JJuliet
K Killo
L Um
M Mike
N November
Oscara
P Papa
Q Quebec
R Rome
Sierra
Tango
U Uniform
VVictor
WWhiskey
X X-ray
YYankee
Z Zulu
TERMINOS DEL ARGOT CEBEISTA:
A.L.
ARMONICOS
AVE MARIA
BARBAS
BARRA MOVIL
BASE
BIGOTADA: Reunion de aficionados
BREAK
BREAKER
CAJATONTA
CHICHARRA
CORTINERO
CRUCE DE ANTENAS
DOS METROS HORIZONTALS
ENCENDER FILAMENTOS
ESPIRAS
FOTOCOPIA
FRECUENCIA
KAS
LABORO
LADRILLO
LINEA DE BAJA O LINEA
DE500
MODULAR
Before using, be careful never to transmit without first having connected the antenna (connection "B" situated on the back panel of the equipment) or without having set the SWR (Standing Wave Ratio)! Failure to do so may result in destruction of the power amplifier, which is not covered by the guarantee.
MULTI-NORMS TRANSCEIVER!
See function "F" on page 31 and the Configuration table on page 49.
The guarantee of this transceiver is valid only in the country of purchase.
Welcome to the world of the new generation of CB radios. The new PRESIDENT range gives you access to top performance transceiver equipment. With the use of up-to-date technology, which guarantees unprecedented quality, your PRESIDENT MARTIN is a new step in personal communication and is the surest choice for the most demanding of professional CB radio users. To ensure that you make the most of all its capacities, we advise you to read carefully this manual before installing and using your PRESIDENT MARTIN.
A) INSTALLATION
1) WHERE AND HOW TO MOUNT YOUR MOBILE CB RADIO
a) You should choose a well ventilated place most appropriate setting from a simple and practical point of view.
b) Your CB radio should not interfere with the driver or the passengers.
c) Remember to provide for the passing and protection of different wires (e.g. power, antenna, accessory cabling) so that they do not in any way interfere with the driving of the vehicle.
d) To install your equipment, use the cradle (1) and the self-tapping screws (2) provided (drilling diameter 3.2mm ). Take care not to damage the vehicle's electrical system while drilling the dash board.
e) Do not forget to insert the rubber joints (3) between the CB and its support as these have a shock-absorbing effect which permits gentle orientation and tightening of the set.
f) Choose where to place the microphone support and remember that the microphone cord must stretch to the driver without interfering with the controls of the vehicle.
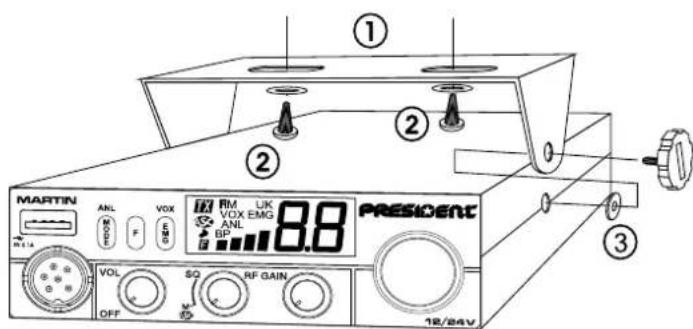
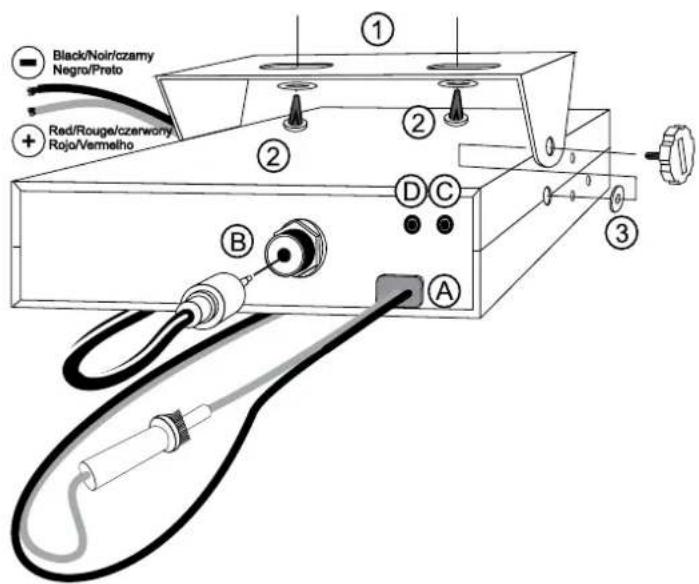
N.B.: As the transceiver has a frontal microphone socket, it can be set into the dash board. In this case, you will need to add an external loud speaker to improve the sound quality of communications (connector EXTSP situated on the back panel: C). Ask your dealer for advice on mounting your CB radio.
2) ANTENNA INSTALLATION
a) Choosing your antenna
- For CB radios, the longer the antenna, the better its results. Your dealer will be able to help you with your choice of antenna.
b) Mobile antenna
- Must be fixed to the vehicle where there is a maximum of metallic surface (ground plane), away from windscreen mountings.
-
If you already have a radio-telephone antenna installed, the transceiver antenna should be higher than this.
-
There are two types of antenna: pre-regulated which should be used on a good ground plane (e.g. car roof or lid of the boot), and adjustable which offer a much larger range and can be used on a smaller ground plane (see § HOW TO ADJUST SWR below).
- For an antenna which must be fixed by drilling, you will need a good contact between the antenna and the ground plane. To obtain this, you should lightly scratch the surface where the screw and tightening star are to be placed.
- Be careful not to pinch or flatten the coaxial cable (as this runs the risk of break down and/or short-circuiting).
- Connect the antenna (B).
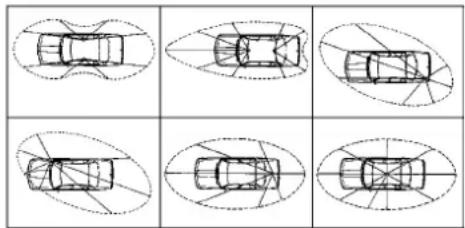
OUTPUT RADIUS PATTERN
c) Fixed antenna
- A fixed antenna should be installed in as clear space as possible. If it is fixed to a mast, it will perhaps be necessary to stay it, according to the laws in force (you should seek professional advice). All PRESIDENT antennas and accessories are designed to give maximum efficiency to each CB radio within the range.
3) POWER CONNECTION
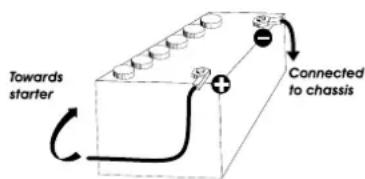
Your PRESIDENT MARTIN 12/24 V is protected against an inversion of polarities. However, before switching it on, you are advised to check all the connections. Your equipment must be supplied with a continued current of 12 or 24 volts (A). Today, most cars and lorries are negative earth. You can check this by making sure that the negative terminal of the battery is connected either to the engine block or to the chassis. If this is not the case, you should consult your dealer.
a) Check that the battery is of 12 or 24 volts.
b) Locate the positive and negative terminals of the battery (+ is red and - is black). Should it be necessary to lengthen the power cable, you should use the same or a superior type of cable.
c) It is necessary to connect your CB to a permanent (+) and (-) . We advise you to connect the power cable directly to the battery (as the connection of the CB cable to the wiring of the car-radio or other parts of the electrical circuit may, in some cases, increase the likelihood of interference).
d) Connect the red wire (+) to the positive terminal of the battery and the black (-) wire to the negative terminal of the battery.
e) Connect the power cable to your CB radio.
WARNING: Never replace the original fuse by one of a different value.
4) BASIC OPERATIONS TO BE CARRIED OUT BEFORE USING YOUR SET FOR THE FIRST TIME (without transmitting and without using the "push-to-talk" switch on the microphone)
a) Connect the microphone.
b) Check the antenna connections.
c) Turn the set on by turning the volume knob VOL (1) clockwise.
d) Turn the squelch SQ knob (2) to minimum M.
e Adjust the volume to a comfortable level.
f) Go to channel 20 by using ROTARY knob (4) or UP/DN buttons (12) on the microphone.
5) HOW TO ADJUST SWR (Standing Wave Ratio)
Warning: This must be carried out when you use your radio for the first time and whenever you re-position your antenna. This adjustment must be carried out in an obstacle-free area.
* Adjustment with external SWR-meter (e.g. TOS-1 PRESIDENT)
a) To connect the SWR meter :
- Connect the SWR meter between the CB radio and the antenna as close as possible to the CB (use a maximum of 40~cm cable, type President CA 2C).
b) To adjust the SWR meter:
- Set the CB on channel 20 in AM.
Put the switch on the SWR-meter to position FWD (calibration).
Press the PTT "push-to-talk" switch (11) on the microphone to transmit. -
Bring the index needle to by using the calibration key.
-
Change the switch to position REF (reading of the SWR level). The reading on the Meter should be as near as possible to 1. If this is not the case, readjust your antenna to obtain a reading as close as possible to 1. (A SWR reading between 1 and 1.8 is acceptable).
- It will be necessary to recalibrate the SWR meter after each adjustment of the antenna.
WARNING: In order to avoid any losses and attenuations in cables used for connection between the radio and its accessories, PRESIDENT recommends to use a cable with a length inferior to 3m .
Your transceiver is now ready for use.
B) HOW TO USE YOUR TRANSCEIVER
1) ON/OFF ~ VOLUME
Turn on: tum VOL knob (1) clockwise. If the function KEY BEEP is active (see menu KEY BEEP page 30), the radio emits a beep. The radio is "on". Display briefly shows the frequency band (see § FREQUENCY BAND SELECTION page 31).
Turn Off: turn VOL knob (1) counterclockwise until radio emits click sound. Your radio is "off".
Volume Adjustment: rotate VOL knob (1) clockwise to increase the volume.
Turn the same knob counterclockwise to reduce the sound level.
2) ASC (Automatic Squelch Control) ~ SQUEELCH
Suppresses undesirable background noises when there is no communication.
Squelch does not affect neither sound nor transmission power, but allows a considerable improvement in listening comfort.
a) ASC: AUTOMATIC SQUEELCH CONTROL
Worldwide patent, a PRESIDENT exclusivity.
Turn the SQ knob (2) anti-clockwise into ASC position. As appears on LCD. No repetitive manual adjustment and a permanent improvement between the sensitivity and the listening comfort when ASCs active. This function can be disconnected by turning the switch clockwise. In this case the squelch adjustment becomes manual again. As disappears from LCD.
b) MANUAL SQUEELCH
Turn the SQ knob (2) clockwise to the exact point where all background noise disappears. This adjustment should be done with precision as, if set to maximum (fully clockwise), only the strongest signals will be received.
3) RF GAIN
Turn the RF GAIN knob (3) to set the reception sensitivity. Maximum position in the case of long-distance call reception. You can decrease the RF GAIN, to avoid distortions, when the Interlocutor is near. Reduce the gain on reception in the case of a close communication with a correspondent not equipped with a RF POWER.
4) ROTARY KNOB
Turn the ROTARY knob (4) to adjust channel. Clockwise to increase, counterclockwise to decrease the channel.
See UP/DN BUTTONS ON THE MICROPHONE page 30.
5) LCD
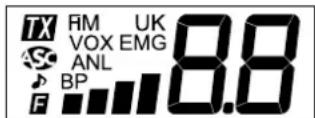
Indica transmission
RM AM mode selected
FM FM mode selected
UK FM mode selected (only in U configuration / ENG)
VOX VOX function activated
EMG Emergency channel (1 or 2) is activated
Automatic Squelch Control activated
ANL ANL filter is activated
ROGER BEEP function activated
BP KEY BEEP function activated
F MENU mode activated
BB Indicates the active channel
SCAN function activated (the dot blinks)
Indicate TX or RX power
6) EMERGENCY CHANNELS ~ EMERGENCY CHANNEL SETTING VOX ~ VOX SETTING
EMERGENCY CHANNELS (short press)
Emergency channels will be automatically selected by pressing the EMG key (8). First press: emergency channel 1 is activated. Second press: emergency channel 2 is activated. Third press: return to the current channel. "EMG" appears on the display when an emergency channel is activated.
The default emergency channels are channel 9/AM (1) and channel 19/AM (2).
Note: Activating a emergency channel prevents changing the modulation mode (AM / FM / UK) or enable/disable the VOX function. If the KEY BEEP function is activated, an error beep sounds (see § KEY BEEP page 30).
EMERGENCY CHANNEL SETTING
Emergency channels can be customized (modulation mode and channel).
- Short press the EMG key (6) until activated the emergency channel to be modified.
- Long press during one second the EMG key (6). F appears on the display, "EMG" blinks.
- If necessary, use the MODE key (8) to change the modulation mode: AM FM or FM UK (In U configuration only)
- Turn the ROTARY knob (4) the select the emergency channel
- Press PTT switch (11) to store and exit. If the KEY BEEP function is activated, an long beep sounds to confirm the success of the operation (see § KEY BEEP page 30).
- If no key is pressed for 5 seconds, the unit automatically exits EMERGENCY CHANNEL without save.
VOX(long press)
The VOX function allows transmitting by speaking into the original microphone (or in the optional vox microphone) without pressing the PTT switch (11). The use of an optional vox microphone connected to the rear panel of the transceiver (C) disables the original microphone.
Long press the VOX key (6) in order to activate the VOX function. "VOX" appears on the display. Long press again the VOX key (6) to disable the function. "VOX" disappears.
VOX SETTING (combination F + VOX)
- Press the F key (7), then press the VOX key (6) to enter the VOX SETTING "VOX" blinks, the current setting and its value appear on the display. Three
parameters allow to adjust the VOX: Sensitivity L / Anti-vox level R / Vox delay time E.
2a. Turn the ROTARY knob (4) or use the UP/DN key (12) on the microphone to modify the current parameter then, press the F key (7) to select next parameter or...
2b. Press fist the F key (7) to select another the parameter and then turn the ROTARY knob (4) or use the UP/DN key (12) on the microphone to modify the current parameter.
3. When all adjustments are done, press PTT switch (11) to store and exit. If the KEY BEEP function is activated, an long beep sounds to confirm the success of the operation (see § KEY BEEP page 30).
4. If no key is pressed for 5 seconds, the unit automatically exits the function VOX SETTING without save.
Sensitivity L : allows the adjustment of the microphone (original one or optional vox) for an optimum transmission quality. Adjustable level from 1 (high level) to 9 (low level). Default value: 5.
- Anti-Vox R: allows disabling the transmission generated by the surrounding noise. The level is adjustable. RF (according the squelich level) and from 0 (without anti-vox) to 9 (low level). Default value: RF.
Delay time E: allows avoiding the sudden cut of the transmission by adding a delay at the end of speaking. The level is adjustable from 1 (short delay) to 9 (long delay). Default value: 1.
VOX SETTING doesn't activate the VOX function.
7) F(short press)
Allows to set/validate functions (see for example VOX SETTING above). This key pressed alone don't have any use.
See § FREQUENCY BAND SELECTION page 31.
8) MODE ANL
MODE(short press)
Press MODE key (8) to select the modulation mode: AM or FM. Selected mode is displayed on LCD.
Your modulation mode has to correspond to the one of your correspondent.
Frequency Modulation / FM: for nearby communications on a flat open field.
Amplitude Modulation / AM: communication on a field with relief and obstacles at middle distance (the most used).
In U configuration only: The MODE key (8) allows to select the ENG or CEPT frequency band. "UK" is displayed when the ENG frequency band is se
lected. When the CEPT frequency band is selected, "UK" disappears from the display (see table on page 45).
ANL (long press)
Automatic Noise Limiter. This filter allows reducing back ground noises and some reception interferences.
Long press the ANL key (8) to activate/disable the ANL filter. "ANL" appears on the display when the filter is activated.
Note: ANL filter works only in AM mode
9) USB CHARGING SOCKET
The USB socket (9) can be used to charge smartphones, tablets or other rechargeable devices with 5 V - 2.1 A.
10) 6 PIN MICROPHONE PLUG
The plug is located on the front panel of the transceiver and makes the setting of the equipment into the dashboard easier.
See Cabling Diagram page 48.
11) PTT (Push To Talk)
Transmission key, press to transmit a message. IX is displayed and release to listen to an incoming communication, IX disappears.
TOT (Time Out Timer)
If the transmission using PIT switch (11) or VOX function is longer than 3 minutes, the display starts blinking and the transmission ends. A beep will sound until the PIT switch (13) key is released.
12) UP/DN BUTTONS ON MICROPHONE SCAN
UP/DN BUTTONS ON MICROPHONE (short press)
Press UP/DN buttons (12) on the microphone to change the channel. UP to increase and DN to decrease the channel.
See ROTARY KNOB page 28.
SCAN (very long press)
Press and hold the UP or DN button (12) for ± 7 seconds or until a beep sounds to activate the SCAN function. The dot between the two channel digits flashes to indicate that the function is active.
The scanning stops as soon as there is a busy channel. The scanning automatically starts 3 seconds after the end of the transmission and no key is activated during 3 s. In SCANNING mode, turn the ROTARY knob (4) or press the UP/DN buttons (12) on the microphone to change scan direction. Press PTT switch (11) to exit SCAN. The dot between the two channel digits disappears from LCD.
A) DC-POWER TERMINAL (13.2 V / 26.4 V)
B) ANTENNA CONNECTOR (SO-239)
C) JACK FOR EXTERNAL OPTIONAL SPEAKER (8Ω, 0.3.5 mm)
D) JACK FOR OPTIONAL VOX MICROPHONE (8 , 2.5mm)
C) FUNCTIONS TURNING ON THE UNIT
1) COLOR
This function allows to choose the backlight color of the LCD.
- Turn on the power while pressing the MODE key (8). The letter corresponding to the current color blinks.
- Turn the ROTARY knob (4) or use UP/DN buttons (12) on the microphone to select the color. 7 available colors over and over:

- Press PT switch (11) to validate and exit. If the KEY BEEP function is activated, an long beep sounds to confirm the success of the operation (see § KEY BEEP page 30).
- If no key is pressed for 5 seconds, the unit automatically exits the COLOR SETTING without save.
Default COLOR is: Or(orange).
2) KEY BEEP
When the function is activated, a beep sounds when a key is pressed, by changing the channel etc. "BP" appears on the display when the function is active.
- Turn on the power while pressing the DN button (12) on the microphone. The display shows "BP" and the current status, BF or Dn, of the function.
-
Repeat the point 1 until the display shows the desired status.
-
Release the DN key on the microphone.
Default KEY BEEP is in
3) ROGER BEEP
When the function is active, the icon appears on the display. The Roger Beep sounds when the PIT switch (11) on the microphone is released in order to let your correspondent speak. Historically as transceiver is a "simplex" communication mode, it is not possible to speak and to listen at the same time (as it is the case with a telephone). Once someone had finished talking, he said "Roger" in order to prevent his correspondent that It was his turn to talk. The word "Roger" has been replaced by a significant beep. There comes "Roger beep" from.
- Turn on the power while pressing the UP button (12) on the microphone. The display shows “D” and the current status on the function: DF or Dn.
- Repeat the point 1 until the display shows the desired status.
- Release the UP key on the microphone. When the function is activated "BP" appears on the display.
Default ROGER BEEP is DF.
(Configuration: EU; PL; d; EC; U; In)
The frequency bands have to be chosen according to the country of use. Don't use any other configuration. Some countries need a user's licence. See table page 50.
- Turn on the power while pressing the F key (7). The letter corresponding to the current configuration is blinking.
- In order to change the configuration, use the ROTARY knob (4) on the unit or the UP/DN buttons (12) on the microphone.
- When the configuration is selected, press the F key (7) during 1 second. The letter corresponding to the configuration is continuously displayed and a confirmation beep sounds.
- At this point, confirm the selection by switching off the transceiver and then switching it on again.
See the frequency bands table at pages 45 to 47 / configuration table page 49.
5) RESET
Resetstal user-defined settings and returns to default values.
- Turn on the power while pressing the EMG key (6). "r5" blinks on the display.
- Long press F knob (7) to reset. A long beep confirms that the re initialization have been done.
- If no key is pressed for 5 seconds or if the PTT switch (11) is pressed, the unit exits RESET without change.
-Channels:40
- Modulation modes : AM / FM
Frequency ranges : from 26.965 MHz to 27.405 MHz
- Antenna impedance : 50 ohms
- Power supply : 13.2 V / 26.4 V
- Dimensions : 115 (L) x 165 (P) x 35 (H) mm
Weight:0.571kg
- Accessories supplied
: 1 microphone electret UP/DOWN with support, mounting cradle, screws and fused power cord.
2) TRANSMISSION
Frequency allowance
- Carrier power
-Transmission interference
- Audio response
- Emitted power in the adj. channel
- Microphone sensitivity
-Drain
- Modulated signal distortion
3) RECEPTION
Maxi. sensitivity at 20 dB sinad
Frequency response
- Adjacent channel selectivity
Maximum audio power
- Squelch sensitivity
- Frequency Image rejection rate
- Intermediate frequency rej. rate
-Drain
0.5μV-113dBm (AM)
0.35 μV - 116 dBm (FM)
300 Hz to 3 kHz in AM/FM
:60dB
:3W
: minimum 0.2 uV - 120 dBm
maximum 1 mV - 47 dBm
0 dB
:70dB
180~500mA maximum(13.2V)
90~250mA maximum (26.4V)
E) TROUBLE SHOOTING
1) YOUR RADIO WILL NOT TRANSMIT OR YOUR TRANSMISSION IS OF POOR QUALITY
-
Check that the antenna is correctly connected and that the SWR is properly adjusted.
-
Check that the microphone is properly plugged in.
- Check that the programmed configuration is the correct one (see table page 49).
2) YOUR RADIO WILL NOT RECEIVE OR RECEPTION IS POOR
- Check that the RF GAIN (3) is set on maximum.
- Check that the squelch level is properly adjusted.
- Check that the volume (1) is set to a comfortable listening level.
- Check that the antenna is correctly connected and that the SWR is properly adjusted.
- Check that you are using the same modulation mode as your correspondent.
- Check that the programmed configuration is the correct one (see table page 49).
- Check the power supply.
- Check the connection wiring.
- Check the fuse.
F) HOW TO TRANSMIT OR RECEIVE AMESSAGE?
Now that you have read the manual, make sure that your CB Radio is ready for use (i.e. check that your antenna is connected).
Press the «push-to-talk» switch (12) and announce your message «Attention stations, transmission testing» which will allow you to check the cleanness and the power of your signal. Release the switch and wait for a reply. You should receive a reply like, «Strong and clear».
If you use a calling channel (19) and you have established communication with someone, it is common practice to choose another available channel so as not to block the calling channel.
H) GLOSSARY
INTERNATIONAL PHONETIC ALPHABET
A Alpha
B Bravo
C Charlie
D Delta
E Echo
F Foxtrott
G Golf
H Hotel
India
J Juliett
K Killo
L Lima
M Mike
N November
Oscar
P Papa
QQueb
R Romeo
Sierra
Tango
Uniform
V Victor
WWhiskey
X X-ray
Y Yankee
Z Zulu
TECHNICAL VOCABULARY
AM : Amplitude Modulation
CB : Citizen's Band
CH : Channel
CW : Continuous Wave
DX: Long Distance Liaison
DW : Dual Watch
FM : Frequency Modulation
GMT: Greenwich Meantime
HF : High Frequency
LF : Low Frequency
LSB : Lower Side Band
RX : Receiver
SSB : Single Side Band
SWR : Standing Wave Ratio
SWL : Short Wave Listening
SW:Short Wave
TX :CBTransceiver
UHF : Ultra High Frequency
USB : Upper Side Band
VHF : Very High Frequency
CB LANGUAGE
Advertising
Back off
Basement
Base station
Bear
Bear bite
Bear cage
Big slab
Big 10-4
Bleeding
Blocking the channel
Blue boys
Break
Breaker
Clean and green
Cleaner channel
: Flashing lights of police car
:Slowdown
:Channel1
: A CB set in fixed location
:Policeman
:Speeding fine
:Policestation
Motorway
: Absolutely
Signal from an adjacent channel interfering with the transmission
: Pressing the PTT switch without talking
:Police
Used to ask permission to join a conversation
: A CBer wishing to join a channel
Clear of police
: Channel with less interference
Coming in loud and proud : Good reception
Doughnut : Tyre
Down and gone : Turning CB off
Down one : Go to a lower channel
Do you copy? : Understand?
DX : Long distance
Eighty eights : Love and kisses
Eye ball : CBers meeting together
Good buddy : Fellow CBer
Hammer : Accelerator
Handle:CBer's nickname
Harvey wall banger : Dangerous driver
How am I hitting you? : How are you receiving me?
Keying the mike : Pressing the PTT switch without
talking
Kojac with a kodak : Police radar
Land line Telephone
Lunch box : CB set
Man with a gun : Police radar
Mayday SOS
Meat wagon : Ambulance
Midnight shopper :Thief
Modulation : Conversation
Negative copy : No reply
Over your shoulder : Right behind you
Part your hair : Behave yourself - police ahead
Pull your hammer back : Slow down
Rat race Congested traffic
Rubberbander : New CBer
Soil boat fuel Wind
Smokey dozing : Parked police car
Smokey with a camera : Police radar
Spaghetti bowl : Interchange
Stinger : Antenna
Turkey Dumb CBer
Up one : Go up one channel
Wall to wall : All over/everywhere
What am I putting to you? : Please give me an S-meter
SIMPLIFIED EU
DECLARATION OF CONFORMITY
Hereby, Groupe President Electronics, declares that the CB
radio equipment :
Brand: PRESIDENT
Type: TXPR218
Commercial Name: MARTIN
is in compliance with Directive 2014/53/EU.
The full text of the EU declaration of conformity is available at
the following internet address:
https://president-electronics.com/DC/TXPR218.
GENERAL WARRANTY CONDITIONS
This device is guaranteed 2 years parts and labour in its country of purchase against any manufacturing defects validated by our technical department. *The After-sales Service of PRESIDENT reserves the right not to apply the warranty if a breakdown is caused by an antenna other than those distributed by PRESIDENT, and if said antenna is at the origin of the breakdown. An extension of 3 years warranty is proposed systematically for the purchase and use of a PRESIDENT antenna, bringing the total duration of the warranty to 5 years. In order to be valid, the warranty certificate must be returned within a period of 30 days after the purchase date to the After-sales Service of the company Groupe President Electronics, or any foreign subsidiary.
It is recommended to carefully read the following conditions and to respect them under penalty of losing their benefit.
- To be valid the warranty certificate must be returned to us at the latest 1 month after the purchase.
- Please duly complete the warranty certificate on the right hand side of the page, detach it (portion to be removed marked by dotted line) and send it back.
Any repair under warranty will be free and the return delivery costs will be borne by our company. - A purchase proof must be necessarily included with the device to be repaired.
The dates listed on the warranty certificate and proof of purchase must match. - Do not proceed with the installation of the device without reading the user manual.
- No spare part will be sent nor exchanged by our services under warranty.
The warranty is only valid in the country of purchase.
Exclusions (are not covered):
- Damages caused by accident, shock or inadequate packaging.
- Power transistors, microphones, lights, fuses and the non respect of the installation and use of specifications (including but not limited to antenna used with too high power, final output power transistors (SWR), inversion of polarities, bad connections, overvoltage,...)
- The warranty cannot be extended due to the non-availability of the device while it is being serviced at our technical services location, nor by a change of one or more components or spare parts.
Transceivers which have been modified. The warranty application is excluded in case of modification or poor maintenance done by a third party not approved by our company.
If you note malfunctions:
- Check the power supply of your device and the quality of the fuse.
-
Check that the antenna, the microphone.... are correctly connected.
-
Check that the squelch level is properly adjusted; the programmed configuration is the correct one...
- In case the device is not under warranty, the repair and return of the device will be charged.
- All related documents must be preserved even after the end of the warranty period and if you resell your device, given to the new owner for the After-sales follow-up.
- In case of real malfunction, please contact your dealer first; they will decide action to be taken.
- In case of an intervention not covered by the warranty, an estimate will be established before any repair.
Thank you for your trust in the PRESIDENT quality and experience. We recommend that you read this manual carefully so that you are completely satisfied with your purchase. Do not forget to return the detachable warranty certificate on the right hand side of this page; it is very important for the identification of your device during a possible rendering of our services.


Date of purchase :
Type: CB Radio MARTIN
Serial N°:

NOT COVERED BY THE WARRANTY
WITHOUT THE DEALER STAMP
UWAGA!
11) PTT (Push To Talk) - naciśnij, aby sąwić
A Alpha H Hotel Oscar V Victor
B Bravo India P Papa W Whiskey
C Charlie J Jullett Q Quebec X X-ray
D Delta K Kilo R Romeo Y Yankee
E Echo L Lima S Sierra
F Foxtrott M Mike T Tango G Golf N November U Uniform
TERMINOLOGIA TECHNICZNA
FREQUENCY TABLE for U (ENG)
TABLEA CZESTOTLIWOSCI dlA U (ENG)
| N° du canal FréquenceN° Canal FrecuenceChannelKanal Częstotiwość Kanal Czȩstotiwość | FréquencesNáciaCzȩstotiwość | Channel | |
| 1 26,965 MHz 21 | 27,215 MHz | ||
| 2 26,975 MHz 22 | 27,225 MHz | ||
| 3 26,985 MHz 23 | 27,255 MHz | ||
| 4 27,005 MHz 24 | 27,235 MHz | ||
| 5 27,015 MHz 25 | 27,245 MHz | ||
| 6 27,025 MHz 26 | 27,265 MHz | ||
| 7 27,035 MHz 27 | 27,275 MHz | ||
| 8 27,055 MHz 28 | 27,285 MHz | ||
| 9 27,065 MHz 29 | 27,295 MHz | ||
| 10 | 27,075 MHz 30 | 27,305 MHz | |
| 11 | 27,085 MHz 31 | 27,315 MHz | |
| 12 | 27,105 MHz 32 | 27,325 MHz | |
| 13 | 27,115 MHz 33 | 27,335 MHz | |
| 14 | 27,125 MHz 34 | 27,345 MHz | |
| 15 | 27,135 MHz 35 | 27,355 MHz | |
| 16 | 27,155 MHz 36 | 27,365 MHz | |
| 17 | 27,165 MHz 37 | 27,375 MHz | |
| 18 | 27,175 MHz 38 | 27,385 MHz | |
| 19 | 27,185 MHz 39 | 27,395 MHz | |
| 20 | 27,205 MHz 40 | 27,405 MHz | |
| N° du canal Fréquence N° Canal Frecuencé Kanal Czestotliwość | naces N° du canal a N° Canal Frecuencía Frequency | Fréquences C频道 Czestotliwość | Channel | Frequen | ||
| 1 | 27,601 | 25 MHz | 21 | 27,801 | 25 MHz | |
| 2 | 27,611 | 25 MHz | 22 | 27,811 | 25 MHz | |
| 3 | 27,621 | 25 MHz | 23 | 27,821 | 25 MHz | |
| 4 | 27,631 | 25 MHz | 24 | 27,831 | 25 MHz | |
| 5 | 27,641 | 25 MHz | 25 | 27,841 | 25 MHz | |
| 6 | 27,651 | 25 MHz | 26 | 27,851 | 25 MHz | |
| 7 | 27,661 | 25 MHz | 27 | 27,861 | 25 MHz | |
| 8 | 27,671 | 25 MHz | 28 | 27,871 | 25 MHz | |
| 9 | 27,681 | 25 MHz | 29 | 27,881 | 25 MHz | |
| 10 | 27,69125 MHz | 30 | 27,89125 MHz | |||
| 11 | 27,70125 MHz | 31 | 27,90125 MHz | |||
| 12 | 27,71125 MHz | 32 | 27,91125 MHz | |||
| 13 | 27,72125 MHz | 33 | 27,92125 MHz | |||
| 14 | 27,73125 MHz | 34 | 27,93125 MHz | |||
| 15 | 27,74125 MHz | 35 | 27,94125 MHz | |||
| 16 | 27,75125 MHz | 36 | 27,95125 MHz | |||
| 17 | 27,76125 MHz | 37 | 27,96125 MHz | |||
| 18 | 27,77125 MHz | 38 | 27,97125 MHz | |||
| 19 | 27,78125 MHz | 39 | 27,98125 MHz | |||
| 20 | 27,79125 MHz | 40 | 27,99125 MHz | |||
FREQUENCY TABLE for d
TABLEA CZESTOTLIWOSCI dl a d
| N° du canal FréquenceN° Canal FrecuenceChannelKanal Częstotiwość Kanal Czȩstotiwość | |||
| 1 26,965 MHz 21 | 27,215 MHz | ||
| 2 | 26,975 MHz 22 | 27,225 MHz | |
| 3 | 26,985 MHz 23 | 27,235 MHz | |
| 4 | 27,005 MHz 24 | 27,245 MHz | |
| 5 | 27,015 MHz 25 | 27,25 MHz | |
| 6 | 27,025 MHz 26 | 27,265 MHz | |
| 7 | 27,035 MHz 27 | 27,275 MHz | |
| 8 | 27,055 MHz 28 | 27,285 MHz | |
| 9 | 27,065 MHz 29 | 27,295 MHz | |
| 10 | 27,075 MHz 30 | 27,305 MHz | |
| 11 | 27,085 MHz 31 | 27,315 MHz | |
| 12 | 27,105 MHz 32 | 27,325 MHz | |
| 13 | 27,115 MHz 33 | 27,335 MHz | |
| 14 | 27,125 MHz 34 | 27,345 MHz | |
| 15 | 27,135 MHz 35 | 27,355 MHz | |
| 16 | 27,155 MHz 36 | 27,365 MHz | |
| 17 | 27,165 MHz 37 | 27,375 MHz | |
| 18 | 27,175 MHz 38 | 27,385 MHz | |
| 19 | 27,185 MHz 39 | 27,395 MHz | |
| 20 | 27,205 MHz 40 | 27,405 MHz | |
| N° du canal Fréquence N° Canal Frecuency Channel KanaI CzestotliwoŚc Kanai CzestotliwoŚc | N° du canala N° Canal FrecuencyKanaI CzestotliwoŚc | FréquencesC channel | Frequen | |
| 41 | 26,565 MHz 61 | 26,765 MHz | ||
| 42 | 26,575 MHz 62 | 26,775 MHz | ||
| 43 | 26,585 MHz 63 | 26,785 MHz | ||
| 44 | 26,595 MHz 64 | 26,795 MHz | ||
| 45 | 26,605 MHz 65 | 26,805 MHz | ||
| 46 | 26,615 MHz 66 | 26,815 MHz | ||
| 47 | 26,625 MHz 67 | 26,825 MHz | ||
| 48 | 26,635 MHz 68 | 26,835 MHz | ||
| 49 | 26,645 MHz 69 | 26,845 MHz | ||
| 50 | 26,655 MHz 70 | 26,855 MHz | ||
| 51 | 26,665 MHz 71 | 26,865 MHz | ||
| 52 | 26,675 MHz 72 | 26,875 MHz | ||
| 53 | 26,685 MHz 73 | 26,885 MHz | ||
| 54 | 26,695 MHz 74 | 26,895 MHz | ||
| 55 | 26,705 MHz 75 | 26,905 MHz | ||
| 56 | 26,715 MHz 76 | 26,915 MHz | ||
| 57 | 26,725 MHz 77 | 26,925 MHz | ||
| 58 | 26,735 MHz 78 | 26,935 MHz | ||
| 59 | 26,745 MHz 79 | 26,945 MHz | ||
| 60 | 26,755 MHz 80 | 26,955 MHz | ||
FREQUENCY TABLE for In
TABLEA CZESTOTLIWOSCI dla In
| N° du canal FréquenceN° Canal FrecuenceChannelKanal Częstotliwość Kanal Czȩstotliwość | FréquencesN° canal FrecuenciaKanal Czȩstotliwość | Channel | |
| 1 | 26,960 MHz | 21 | 27,210 MHz |
| 2 | 26,970 MHz | 22 | 27,220 MHz |
| 3 | 26,980 MHz | 23 | 27,250 MHz |
| 4 | 27,000 MHz | 24 | 27,230 MHz |
| 5 | 27,010 MHz | 25 | 27,240 MHz |
| 6 | 27,020 MHz | 26 | 27,260 MHz |
| 7 | 27,030 MHz | 27 | 27,270 MHz |
| 8 | 27,050 MHz | 28 | 27,280 MHz |
| 9 | 27,060 MHz | 29 | 27,290 MHz |
| 10 | 27,070 MHz | 30 | 27,300 MHz |
| 11 | 27,080 MHz | 31 | 27,310 MHz |
| 12 | 27,100 MHz | 32 | 27,320 MHz |
| 13 | 27,110 MHz | 33 | 27,330 MHz |
| 14 | 27,120 MHz | 34 | 27,340 MHz |
| 15 | 27,130 MHz | 35 | 27,350 MHz |
| 16 | 27,150 MHz | 36 | 27,360 MHz |
| 17 | 27,160 MHz | 37 | 27,370 MHz |
| 18 | 27,170 MHz | 38 | 27,380 MHz |
| 19 | 27,180 MHz | 39 | 27,390 MHz |
| 20 | 27,200 MHz | 40 | 27,400 MHz |
| N° du canal Fréquence N° Canal Frecuencia Frequency Channel Kanal Czestotliwość | naces N° du canal a N° Canal Frecuencia Frequency Kanal Czestotliwość | Fréquences C channel | |||
| 1 | 26,965 MHz | 2 | 27,215 MHz | ||
| 2 | 26,975 MHz | 22 | 27,225 MHz | ||
| 3 | 26,985 MHz | 23 | 27,255 MHz | ||
| 4 | 27,005 MHz | 24 | 27,235 MHz | ||
| 5 | 27,015 MHz | 25 | 27,245 MHz | ||
| 6 | 27,025 MHz | 26 | 27,265 MHz | ||
| 7 | 27,035 MHz | 27 | 27,275 MHz | ||
| 8 | 27,055 MHz | ||||
| 9 | 27,065 MHz | ||||
| 10 | 27,075 MHz | ||||
| 11 | 27,085 MHz | ||||
| 12 | 27,105 MHz | ||||
| 13 | 27,115 MHz | ||||
| 14 | 27,125 MHz | ||||
| 15 | 27,135 MHz | ||||
| 16 | 27,155 MHz | ||||
| 17 | 27,165 MHz | ||||
| 18 | 27,175 MHz | ||||
| 19 | 27,185 MHz | ||||
| 20 | 27,205 MHz | ||||
PRESE MICROA6 BROCHES·CONEXIONDELMICRO6PINS
6-PIN MICROPHONE PLUG · WTYK MIKROFONU 6-PIN
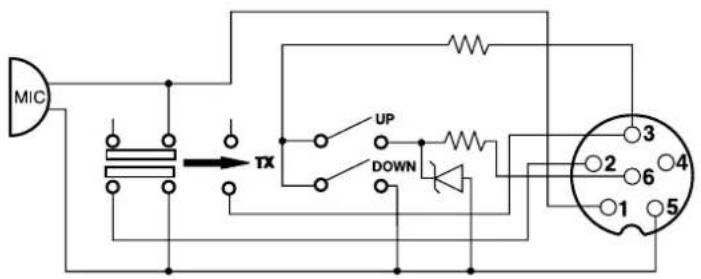
1 Modulation Modulación Modulation Modulación
2RX RX RX RX
3 TX-UP/DOWN TX-UP/DOWN TX-UP/DOWN TX-UP/DOWN
4
5 Masse Masa Ground Masa
6 Alimentation Alimentacion Power Supply Zasilanie
NORMES·F-NORMAS·F-NORMS·F-NORMY·F
| N° | Code | Frequency | FM Channel | AM Channel | Country | CH 19 | CH 9 |
| 1 | EU | 26.965 ~ 27.405 | 40 Ch (4W) | 40 Ch (4W) | AT, BE, BG, CH, CY, DK, EE, ES, FI, FR, GR, HR, HU, IE, IS, IT, LT, LU, LV, NL, NO, PT, RO, SE, SI | AM | AM |
| 2 | PL | 26.960 ~ 27.400 | -5 KHz 40 Ch (4W) | -5 KHz 40 Ch (4W) | PL | AM | AM |
| 3 | d | 26.565 ~ 27.405 | 80 Ch (4W) | 40 Ch (4W) | CZ, DE, SK | FM | AM |
| 4 | EC | 26.965 ~ 27.405 | 40 Ch (4W) | - | MT | FM | FM |
| 5 | U | 26.965 ~ 27.405 | 40 Ch (4W) | 40 Ch (4W) | UK | FM | FM |
| 27.60125 ~ 27.99125 | ENG 40 Ch (4W) | - | FM | FM | |||
| 6 | in | 26.965 ~ 27.275 | 27 Ch (4W) | 27 Ch (4W) | IN | AM | AM |
Remarque : Dans la configuration U: le bouton MODE (8) permet de selectionner la bande de frquence ENG ou CEPT. "UK" s'affiche lorsque la bande de frquence ENG est selectionnee. Lorsque la bande de frquence CEPT est selectionnee, "UK" disparait de l'afficheur (voir tableau page 45).
Observacion: En la configuracion U el boton MODE (8) permite selecciona la banda de fecuencia ENGT o CEPT. "UK" aparece en la pantalla cuando la banda de fecuencia ENG esta selecionada. Cuando la banda de fecuencia CEPT esta selecionada, "UK" desaparece de la pantalla (Vease la tabla pagina 45).
Note: In U configuration: The MODE key (8) allows to select the ENG or CEPT frequency band. "UK" is displayed when the ENG frequency band is selected. When the CEPT frequency band is selected, "UK" disappears from the display (see table on page 45).
Uwaga: W konfiguraci U: Przycisk MODE (8) pozwala wybrać pasmo czestotliwość ENG lub CEPT. Komunikat „UK" zostanie wyświetzenia, gdy wybrano czestotliwość ENG. Po wybraniu pasma czestotliwość CEPT komunikat „UK" znika z wyświet placza (patrz tabela na stronie 45).
The frequency band and the transmission power of your transceiver must correspond with the configuration authorized in the country where it is used.
Countries in which there are particular restrictions (Licence/Register)
Please see updated table on website www.president-electronics.com, page 1The CB radios" then President Radio CB and Europe.