SGB 1200 B5 - Electric oven SILVERCREST - Free user manual and instructions
Find the device manual for free SGB 1200 B5 SILVERCREST in PDF.

User questions about SGB 1200 B5 SILVERCREST
0 question about this device. Answer the ones you know or ask your own.
Ask a new question about this device
Download the instructions for your Electric oven in PDF format for free! Find your manual SGB 1200 B5 - SILVERCREST and take your electronic device back in hand. On this page are published all the documents necessary for the use of your device. SGB 1200 B5 by SILVERCREST.
USER MANUAL SGB 1200 B5 SILVERCREST
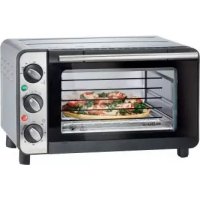
MINI OVEN / MINI-BACKOFEN / MINI-FOUR SGB 1200 B5
GB IE
MINIOVEN
Operating instructions
FR BE
MINI-FOUR
Mode d'emploi
CZ
MINI TROUBA NA PECENI
Návod k obsluze
SK
MINIRÜRA
Návod na obsluhu
DK
MINIOVN
Before reading, unfold the page containing the illustrations and familiarise yourself with all functions of the device.
FR BE
GB/IE Operating instructions Page 1
Using the appliance 6
Glass door 6
Inserting the crumb tray 6
Using the rack 6
Using the baking tray 7
Before initial use 7
Operating the appliance 8
Function switch 8
Temperature control 8
Timer 8
Grilling and baking 8
Cleaning and care 9
Storage 10
Troubleshooting 10
Disposal 11
Kompernass Handels GmbH warranty 11
Service 12
Importer 12
Recipes 13
Introduction
Congratulations on the purchase of your new appliance.
You have selected a high-quality product. The operating instructions are part of this product. They contain important information on safety, usage and disposal. Before using the product, familiarise yourself with all handling and safety guidelines. Use the product only as described and for the range of applications specified. Please also pass these operating instructions on to any future owner(s).
Intended use
The automatic oven and grill is intended exclusively for the heating, cooking and grilling of food.
This appliance is intended solely for use in private households. Do not use it for commercial applications.
All other uses are deemed to be improper and may result in property damage or even in personal injury.
Package contents
Mini oven
1 baking tray
1 rack
1 pair of tongs
1crumb tray
Operating instructions
NOTE
Check contents for completeness and damage immediately after unpacking. Contact Customer Services if necessary.
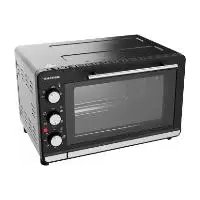
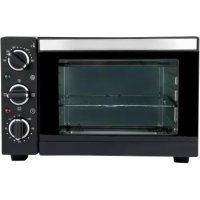
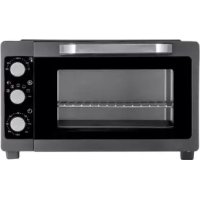
Appliance description
Figure A:
1 Rails
2 Temperature control
Green control lamp
4 Function switch
Red control lamp
6 Timer
7 Insertedcrumbtray
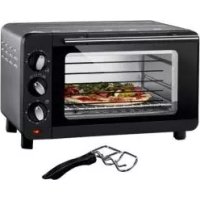
Figure B:
Rack
Baking tray
10 Tongs
Technical data
Rated voltage: 220 - 240V (alternating current), 50 / 60Hz
Power consumption: 1200 W

All of the parts of this appliance that come into contact with food are food-safe.
Safety guidelines

DANGER! RISK OF ELECTRIC SHOCK!
- Do not open the housing of the appliance or attempt to repair it. Doing so can lead to risks and also invalidates the warranty. Defective appliances should be repaired by the retailer or authorized personnel only.
- To avoid potential risks, if the appliance power cable is damaged, it must be replaced by the manufacturer, its customer service or by a qualified technician.
- Do not allow any liquids to penetrate the housing. Do not expose the appliance to humidity and do not use it outdoors. Additionally, do not place liquid-filled receptacles such as vases on the appliance. There is a risk of fire and of receiving an electric shock! If liquids permeate into the housing, unplug the appliance immediately and arrange for it to be repaired by a qualified technician.
- Never touch the appliance, power cable or power plug with wet hands. There is a risk of electric shock!

NEVER immerse the appliance in water or other liquids! There is a risk of electrocution if residual liquids come into contact with live components during operation.
WARNING! RISK OF INJURY!
This appliance may be used by children of the age of 8 years or more and by persons with reduced physical, sensory or mental capabilities or lack of experience and/or knowledge if they are being supervised or have been instructed with regard to the safe use of the appliance and have understood the potential risks.
Children must not use the appliance as a plaything.
- Cleaning and user maintenance must not be performed by children unless they are older than 8 years of age and are supervised.
Children younger than 8 years of age must be kept away from the appliance and the power cable.
- Route the power cable in such a way that no one can tread on it or trip over it.
- Never touch the glass door or the housing during use, as these can get very hot. Use oven gloves or something similar to open the glass door to avoid being burnt!
- Never touch the heating elements or the viewing window when the appliance is in use, or before it has cooled down completely. Do not reach into the cooking chamber when the appliance is in use. Wait until the appliance has cooled down. Otherwise, you could sustain burns.
Allow the appliance to cool down after use before transporting it.
Always use oven gloves or an oven cloth when handling the appliance while it is hot.

Caution! Hot surface!
Caution! Do not touch the glass door when the appliance is heated-up. Risk of burns!
CAUTION! MATERIAL DAMAGE!
- Do not use an external timer switch or a separate remote control system to operate the appliance.
- Never leave the appliance unattended during operation.
- Ensure that the appliance, the power cable and the plug do not come into contact with heat sources such as hotplates or naked flames.
- Only operate the appliance with the original accessories supplied.
- Do not kink or crush the power cable.
- To disconnect, always remove the plug itself from the mains power socket; do not pull on the power cable.
- Ensure that there are no highly inflammable materials in the immediate vicinity of the automatic oven and grill (e.g. dishcloths, oven cloths, etc.) when the appliance is in use.
- Never dry textiles or other objects on, above or inside the appliance. There is a risk of fire!
- Do not use this baking tray for storage and processing of acidic, alkaline or salty food.
NOTE
No user action is required to switch the product between 50 and 60Hz . The product adapts automatically to either 50 or 60Hz .
Installation
WARNING! RISK OF FIRE!
- Never place the appliance beneath wall cabinets or adjacent to curtains, wall units or other flammable objects.
A minimum clearance of 10cm must be maintained between the appliance and wall cupboards, ceilings, walls or similar structures, measured upwards of the appliance, and 5cm measured laterally. For this reason the appliance may not be used, for example, in cupboards or similar. Otherwise there is likely to be insufficient ventilation for the appliance, which could result in fire or damage.
Always place the appliance on a heatresistant surface. Failure to do so increases the risk of fire or of the appliance being damaged. The surface under appliance may become discoloured and be damaged. Additionally, permanent indentations could arise if the appliance is placed on a soft surface.
Do not place the appliance immediately adjacent to sources of water, e.g. sinks or basins, or in damp cellar areas. Otherwise, there is a risk of receiving an electric shock.
Place the appliance on a solid, level and heat-resistant surface (e.g. stainless steel worktops or natural stone worktops such as granite). Ensure there is sufficient ventilation around the appliance.
Push the appliance up against the wall, with its rear side facing the wall. The spacers on the back must touch the wall. Ensure that the wall is made of heat-resistant material, e.g. tiles, natural stone or granite.
Clean all components as described in the section "Cleaning and care".
Using the appliance
Glass door
CAUTION! PROPERTY DAMAGE!
Do not lean on the glass door. Do not place objects on the glass door. This can cause damage to the door hinges.
Cooking some foods, especially fatty foods, can result in increased smoke production. In this case, do not close the glass door completely; instead, leave it slightly open.
The glass door has a latching position so that it remains open a little: if you carefully push the glass door closed, it clicks into this position shortly before closing completely.
Inserting the crumb tray
Push the crumb tray ⑦ under the lower heating element so that it rests flat on the bottom of the appliance.
Using the rack
WARNING! RISK OF INJURY!
Always use the tongs to insert the rack into the appliance or to remove it.
Push the rack onto one of the 2 rails in the cooking chamber of the appliance.
CAUTION! MATERIAL DAMAGE!
- Never place the rack ⑧ directly upon the heating elements.
To remove the hot rack 8, hook the tongs 10 onto it as follows:
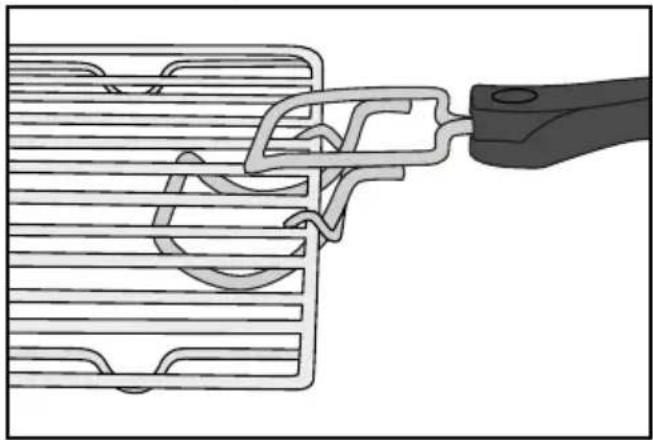
Fig. 1: Hooking the tongs onto the rack
Using the baking tray
WARNING! RISK OF INJURY!
Always use the tongs to insert the baking tray into the appliance or to remove it.
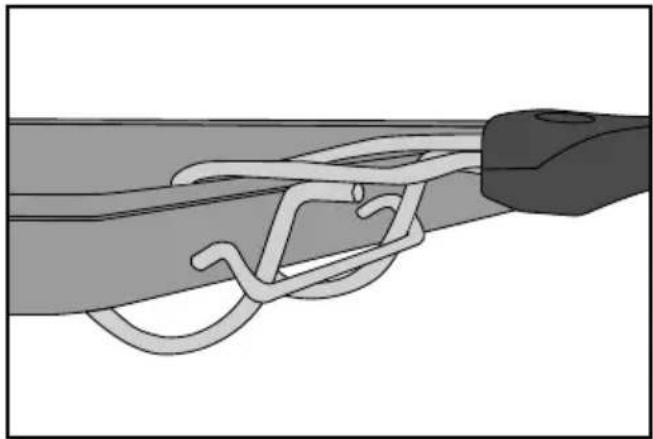
Fig. 2: Hooking the tongs onto the baking tray
Push the baking tray onto one of the 2 rails in the cooking chamber of the appliance.
CAUTION! MATERIAL DAMAGE!
- Never place the baking tray ⑨ directly onto the heating elements.
Do not use this baking tray 9 for storage and processing of acidic, alkaline or salty food.
Before initial use
Once the appliance is set up correctly:
1) Insert the plug into a mains power socket.
2) Turn the temperature control ② clockwise to the maximum temperature (to the limit stop).
3) Turn the function switch 4 to "top and bottom heat".
4) Open the glass door and leave it open for this operation.
5) Remove any installed accessories from the cooking chamber.
6) Turn the timer 6 to 20 minutes.
NOTE
The first time the appliance heats up, a small amount of smoke and odour may be generated due to production-related residue. This is normal and is completely harmless. Provide sufficient ventilation; for example, by opening a window.
The appliance switches off automatically after 20 minutes. If you want to interrupt the heating process prematurely, turn the temperature control ② counter-clockwise to the limit stop and set the function switch ④ to OFF and set the timer ⑥ to "OFF".
7) Allow the appliance to cool down, then clean the appliance as described in the section "Cleaning and care".
The appliance is now ready for use.
Operating the appliance
Function switch
You can switch on the appliance using the function switch 4, and can also set three different functions:
| Symbol Meaning |
| "Top heat" e.g. for grilling |
Temperature control
Use the temperature control 2 to set the desired temperature.
Timer
User the timer 6 to set the cooking time.
Set the timer 6 to the desired cooking time. The red control lamp 5 lights up. Once the set time has elapsed, you will hear a beep and the appliance stops heating. The red control lamp 5 goes out.
NOTE
You can also use the timer 6 as a short-period timer without the heating function.
- Set the function switch 4 to OFF.
- Set the desired time on the timer 6.
The switch of the timer 6 now rotates anticlockwise to "OFF". A beep sounds when the set time has elapsed. The appliance does not heat up.
Grilling and baking
CAUTION! MATERIAL DAMAGE!
- Never place any containers or food directly onto the floor of the appliance, the heating elements or the crumb tray ⑦.
1) Place the crumb tray ⑦ in the appliance.
2) Remove the rack 8 and baking tray 9 from the appliance. If required, cover these with baking paper or grease the baking tray 9 with fat/oil that is suitable for baking.
NOTE
The oven must be pre-heated appropriate to each dish. Refer to the guidelines in the respective recipe. Pre-heating is useful for:
- very short baking times,
- crisp crusts,
delicate dishes that require a constant temperature, such as souffles.
If no pre-heating is required, skip step 3.
3) Allow the appliance to heat up to the desired temperature:
- Close the glass door.
- Select the required temperature using the temperature control 2.
- Select the required function with the function switch 4.
Use the timer 6 to set a preheating time of at least 15 minutes.
The red control lamp 5 indicates that the appliance is switched on. The switch of the timer 6 now rotates anticlockwise to the "OFF" position.
4) As soon as the set temperature is reached, the green control lamp ③ lights up. Place the food you wish to grill or bake on the rack ⑧ or the baking tray ⑨, respectively, and slide it into one of the rails ①. Ensure that there is sufficient space between the food and the inner walls/ heating elements of the appliance.
5) Close the glass door.
6) Use the timer to set the required grilling or baking time. The maximum grilling or baking time is 60 minutes.
NOTE
If the cooking time for the food is less than 20 minutes, first set the timer to 40 minutes and then turn it back to the required grilling or baking time.
The appliance switches off automatically after the set time. You will hear a beep and the control lamps 5/3 go out. If you want to stop the heating process prema surely, turn the temperature control 2 anticlockwise as far as the stop, set the function switch 4 to OFF and set the timer 6 to "OFF".
7) After cooking, remove the rack 8 or the baking tray 9 using the tongs 10.
Cleaning and care

Before cleaning the appliance, disconnect the power plug from the mains power socket! There is a risk of electric shock!

Never immerse the appliance in water or any other liquid!

WARNING! RISK OF INJURY!
Always allow the appliance to cool down before cleaning it. Otherwise there is a risk of sustaining burns!
It is best to clean the appliance and accessories as soon as they have cooled down. This makes food residues easier to remove.
CAUTION! MATERIAL DAMAGE!
Do not use abrasive or aggressive cleaning materials. These could damage the surface of the appliance!
Do not clean the components of the appliance in a dishwasher!
Do not clean the cooking chamber with an oven spray as this may make residues on the heating elements impossible to remove.
Wipe the appliance with a damp cloth. If necessary, put a little mild detergent on the cloth and wipe the appliance off afterwards with a cloth dampened with clean water. Dry everything properly.
Clean the cooking chamber and the glass door with a damp cloth. If necessary, put a little mild detergent on the cloth and wipe the appliance off afterwards with a cloth dampened with clean water. Dry everything properly.
Clean the tongs 10, the baking tray 9, the rack 8 and the crumb tray 7 in hot water. Dry all parts properly after cleaning.
Storage
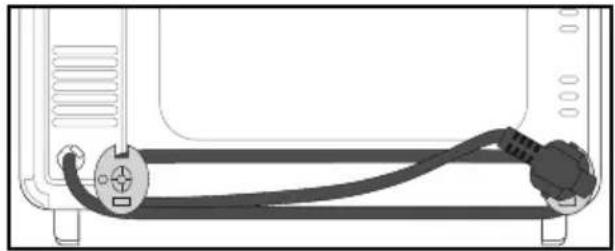
You can wind the mains cable around the spacers on the rear side of the appliance and attach the plug to one of the spacers:
Store the cleaned appliance and its accessories in a clean, dust-free and dry location.
Troubleshooting
| Fault Cause | Solution | |
| The appliance is not working. | The power plug is not connected to the mains power. | Insert the plug into a mains power socket. |
| The mains power socket is defective. | Use a different mains power socket. | |
| The appliance is defective. | Contact the Customer Service department. | |
| The red control lamp ⑤ is lit, but the appliance does not heat up. | The function switch ④ is set to OFF. | Turn the function switch ④ to the desired function. |
| The cooking time of the food seems overly long. | The glass door has been opened often to check the cooking progress. | Do not open the glass door any more often than is absolutely necessary. |
| The wrong temperature level has been set. Check the temperature settings. | ||
| Smoke and odours develop during use. | There is detergent or food residue on the heating elements. | Remove the food from the appliance and continue the cooking process with the glass door open until the smoke stops. |
If the malfunction cannot be corrected as suggested above, or if you have found some other kind of malfunction, please contact our Customer Service department.
Disposal
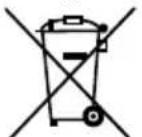
Never dispose of the appliance in the normal domestic waste. This product is subject to the provisions of European Directive 2012/19/EU.
Dispose of the appliance via an approved waste disposal company or your municipal waste disposal facility. Please observe applicable regulations. Please contact your waste disposal facility if you are in any doubt.

Your local community or municipal authorities can provide information on how to dispose of the worn-out product.

The product is recyclable, subject to extended producer responsibility and is collected separately.

The packaging is made of environmentally friendly materials which you can dispose of at your local recycling centre.
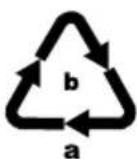
Dispose of the packaging in an environmentally friendly manner. Note the labelling on the packaging and separate the packaging material components for disposal if necessary. The packaging material is labelled with abbreviations (a) and numbers (b) with the following meanings: 1-7: Plastics, 20-22: Paper and cardboard, 80-98: Composites.
This appliance has a 3-year warranty valid from the date of purchase. If this product has any faults, you, the buyer, have certain statutory rights. Your statutory rights are not restricted in any way by the warranty described below.
Warranty conditions
The warranty period starts on the date of purchase. Please keep your receipt in a safe place. This will be required as proof of purchase.
If any material or manufacturing fault occurs within three years of the date of purchase of the product, we will either repair or replace the product for you or refund the purchase price (at our discretion).
This warranty service requires that you present the defective appliance and the proof of purchase (receipt) within the three-year warranty period, along with a brief written description of the fault and of when it occurred.
If the defect is covered by the warranty, your product will either be repaired or replaced by us. The repair or replacement of a product does not signify the beginning of a new warranty period.
Warranty period and statutory claims for defects
The warranty period is not prolonged by repairs effected under the warranty. This also applies to replaced and repaired components. Any damage and defects present at the time of purchase must be reported immediately after unpacking. Repairs carried out after expiry of the warranty period shall be subject to a fee.
Scope of the warranty
This appliance has been manufactured in accordance with strict quality guidelines and inspected meticulously prior to delivery.
The warranty covers material faults or production faults. The warranty does not extend to product parts subject to normal wear and tear or to fragile parts which could be considered as consumable parts such as switches, batteries or parts made of glass.
The warranty does not apply if the product has been damaged, improperly used or improperly maintained. The directions in the operating instructions for the product regarding proper use of the product are to be strictly followed. Uses and actions that are discouraged in the operating instructions or which are warned against must be avoided.
This product is intended solely for private use and not for commercial purposes. The warranty shall be deemed void in cases of misuse or improper handling, use of force and modifications / repairs which have not been carried out by one of our authorised Service centres.
Warranty claim procedure
To ensure quick processing of your case, please observe the following instructions:
Please have the till receipt and the item number (IAN) 373136_2104 available as proof of purchase.
You will find the item number on the type plate on the product, an engraving on the product, on the front page of the operating instructions (below left) or on the sticker on the rear or bottom of the product.
If functional or other defects occur, please contact the service department listed either by telephone or by e-mail.
You can return a defective product to us free of charge to the service address that will be provided to you. Ensure that you enclose the proof of purchase (till receipt) and information about what the defect is and when it occurred.

You can download these instructions along with many other manuals, product videos and installation software at www.lidl-service.com.
This QR code will take you directly to the Lidl service page (www.lidl-service.com) where you can open your operating instructions by entering the item number (IAN) 373136_2104.
Service
GB Service Great Britain
Tel.: 0800 404 7657
E-Mail: kompernass@lidl.co.uk
IE Servicelreland
Tel.: 1890 930 034
(0,08 EUR/Min., (peak))
(0,06 EUR/Min., (off peak))
E-Mail: kompernass@lidl.ie
IAN373136_2104
Importer
Please note that the following address is not the service address. Please use the service address provided in the operating instructions.
KOMPERNASS HANDELS GMBH
BURGSTRASSE 21
44867 BOCHUM
GERMANY
www.kompernass.com
Recipes
In this section, we provide you with various sample recipes for preparing dishes. These examples are recommendations. Cooking times may vary.
These recipes are provided without guarantee. All information on ingredients and preparation is indicative only. Modify the suggested recipes to taste. We hope you enjoy the recipes and wish you "bon appetit"!
NOTE
Take note of the preparation guidelines provided on the food packaging.
Muffins
Ingredients for four people:
1 cup of flour
1 teaspoon of baking powder
1 egg
1 tablespoon of melted butter
1 cup of milk
3 tablespoons of sugar
1 pinch salt
For variations: also nuts, chopped bananas or chocolate flakes
Preparation:
1) Gradually mix the flour, baking powder, egg, milk, salt and sugar together in a bowl, one by one.
2) Melt the butter in a saucepan and mix it into the dough.
3) Subject to taste, blend in the nuts, chocolate flakes or mashed bananas.
4) Place the prepared dough into standard muffin moulds and place them on the baking tray 9.
5) Bake the muffins at 220^ on the bottom rail using top & bottom heat for about 15 minutes.
Hawaiian toast
Ingredients for 4 pieces of toast:
4 slices of toasting bread
1-2 tablespoons of remoulade
120 g cooked ham
1/2 tin of pineapples
4 slices of cheese for gratinating
Curry
Preparation:
1) Toast the bread slices.
2) Spread the remoulade thinly over the pieces of toast and lay the slices of cooked ham on top.
3) Lay one slice of pineapple on each piece of toast. Season with curry.
4) Then place a slice of cheese over each of the pineapple slices.
5) Lay the Hawaiian toasts on the rack 8 and bake at 200^ for about 8 minutes on the upper rail using top heat.
Baking deep-frozen pizza
Preparation:
1) Place the rack on the upper rail in the cooking chamber.
2) Place the deep-frozen pizza, without packaging, onto the rack 8.
3) Bake the pizza, using top and bottom heat, for about 20 minutes.
4) Please follow the instructions on the packaging regarding temperature.
Spritzgebäck cookies
Ingredients:
125 g butter
125 g sugar
1 packet of vanilla sugar
1 pinch salt
1 egg
1 egg white
250 g flour (type 405)
1 teaspoon of baking powder
Zest of half a lemon
Preparation:
1) Beat the butter until foamy.
2) Add the sugar, vanilla sugar, lemon zest and eggs.
3) Mix the flour, baking powder and salt and stir into the mixture using a mixing spoon.
4) Allow the dough to stand for about 10 minutes.
5) Shape the dough as desired, e.g. with the assistance of a mincer, cookie cutters or a piping bag.
6) Line the baking tray with baking paper and place the cookies on this.
7) Bake the cookies on the top rail of a preheated oven at 180^, using top and bottom heat, for about 10-15 minutes, until they are golden brown.
NOTE
This quantity of dough is sufficient for several baking trays 9.
Bread rolls
Ingredients:
300 g flour (or wholemeal flour)
2 heaped teaspoons of baking powder
200 g linseeds
1 egg
500 g quark or curd cheese
1 teaspoon of salt
Subject to taste: caraway seeds, onions, bacon ...
Preparation:
1) Knead all ingredients together well and then shape into small rolls.
2) Line the baking tray with baking paper and place the rolls on this.
3) Bake on the top rail at about 200^ for around 30 minutes.
NOTE
This quantity of dough is sufficient for several baking trays 9.
Meringues
Ingredients:
1 egg white
Salt
45g sugar
Preparation:
1) Place the chilled egg white into a fat-free mixing bowl. Ensure that no egg yolk is mixed in with it or the meringue will not solidify.
2) Beat the egg white at a slow speed, so that the bubbles formed in the meringue are not too large.
3) Add a pinch of salt to taste.
4) Gradually add in half of the sugar when the meringue starts to solidify.
5) Then beat it at the highest speed until stiff.
6) Add the remaining sugar. This allows the meringue to attain the required solidity.
7) Fill a piping bag fitted with a large star nozzle with the meringue mixture and squeeze out rosettes, slithers or other shapes onto a baking tray lined with baking paper. Leave a little space between each shape.
8) Pre-heat the oven and grill to about 120^ using top and bottom heat.
9) Bake the meringues at around 120^ using top and bottom heat for about 2 hours.
Buttered croutons
Ingredients:
2 slices of toasting bread
1 tbsp. butter
Preparation:
1) Cut the bread into small cubes.
2) Melt the butter at low heat in a saucepan and mix in the cubed bread.
3) Line a baking tray with baking paper and distribute the bread cubes evenly on it.
4) Bake the bread cubes at approx. 170^ (top heat) on the upper rail. After around 7-10 minutes, turn the bread cubes and continue baking them for another 7-10 minutes until they are golden brown.
NOTE
You can also use herb or garlic butter instead of regular butter. Baking time is then reduced by about 5 minutes.
Minced meat baguettes
Ingredients:
2 baguette rolls
250 g minced meat (half and half)
2 tomatoes
1 onion (diced)
2 tbsp. tomato puree
40 g grated Parmesan cheese
4 slices of cheese
Salt and pepper
Preparation:
1) Slice the baguettes and hollow them out.
2) Mix together the minced meat, tomato paste, onion, Parmesan, some salt and a little pepper.
3) Shape the minced meat into four equal-sized, flat burgers and place them on the baguette halves.
4) Cut the tomatoes into slices and arrange them on the baguettes.
5) Arrange the cheese slices on the baguettes.
6) Place the baguettes on a baking tray 9 and then bake them on the bottom rail at about 225^ in a preheated oven using top and bottom heat for about 20 minutes.
NOTE
You can also season the minced meat mixture with basil, chilli or other spices.
Cauliflower (gratinated)
Ingredients:
1/2 head cauliflower (about 250 g)
3 lemon slices
1 tbsp. butter
1 heaped tsp. flour
1 tbsp. lemon juice
1 tbsp. slivered almonds
2 tbsp. gratin cheese (grated)
Salt, pepper, nutmeg
Preparation:
1) Divide the cauliflower into florets and wash them.
2) Cook the cauliflower with the lemon slices in boiling, salted water for 8 - 10 minutes until the cauliflower is al dente. Retain about 150 ml of the cooking water before pouring the rest away.
3) Melt the butter in a saucepan and then brown the flour, while stirring continuously, for about 1 minute.
4) Continue stirring and pour in the cauliflower water and let it cook for about 2 minutes. If the roux gets too solid, gradually add more water until a creamy consistency is achieved. Season with lemon juice, nutmeg, salt and pepper.
5) Place the cauliflower in a baking dish (about 14cm in diameter) and pour the sauce evenly over it.
6) Sprinkle in the cheese and almond slivers over it.
7) Place the baking dish on the baking tray 9.
8) Bake the prepared dish at 200^ in a preheated oven, using top and bottom heat, for about 20 minutes on the bottom rail.
Salmon-filled flaky pastries (burek)
Ingredients:
1 pack of flaky pastry slices (approx. 8 pieces)
1 pack of smoked salmon, sliced (about 200 g)
1 lemon
1 onion
1 pack of cream cheese (200 g)
Freshdill
Salt and pepper
1 egg yolk
Preparation:
1) Separate the puff pastry sheets and, if necessary, allow them to thaw.
2) Mix the cream cheese with salt, pepper and the juice of one lemon.
3) Finely dice the onion.
4) Add half of the salmon and the onion to the cream cheese mixture and mix it all coarsely with a blender.
5) Cut the remaining salmon into thin strips.
6) Add the salmon and the dill to the mixture and blend all ingredients together.
7) Place individual tablespoons of the mixture on a flaky pastry sheet and fold them over.
8) Coat the resulting pouch with egg yolk.
9) Place the burek pieces on a baking sheet. Leave sufficient space between the individual pouches because the flaky pastry will expand.
10) Bake the pastries on the lower rail at around 120^ using top and bottom heat for about 25 - 30 minutes. The flaky pastry should turn light brown in colour.
NOTE
The stated quantity of pastry is sufficient for several baking trays 9.
Inhaltsverzeichnis
Einleitung 18
KOMPERNASS HANDELS GMBH
BURGSTRASSE 21
44867 BOCHUM
DEUTSCHLAND
www.kompernass.com
Rezepte
Puisance absorbee:1200W

Chere cliente, cher client,
Chere cliente, cher client,
KOMPERNASS HANDELS GMBH
BURGSTRASSE 21
44867 BOCHUM
ALLEMAGNE
www.kompernass.com
Recettes
Nominate spanning: 220 - 240 V ~ (wisselstroom), 50/60 Hz
WAARSCHUWING! LICHAMELIJK GEVAAR!
WAARSCHUWING! BRANDGEVAARI!
WAARSCHUWING! LETSELGEVAAR!
WAARSCHUWING! LETSELGEVAARI!
WAARSCHUWING! LETSELGEVAAR!
KOMPERNASS HANDELS GMBH
BURGSTRASSE 21
44867 BOCHUM
DUITSLAND
www.kompernass.com
Recepten
KOMPERNASS HANDELS GMBH
BURGSTRASSE 21
44867 BOCHUM
NEMECKO
www.kompernass.com
Recepty
V teto kapitole uvadime nekolik prikladu pro pripravu jidel. Tyto priklady isou pouze doporučeni. Doba pripravy se muze mirne lišit.
Regulator temperature 90
Zegar sterujacy 90
Regulator temperature
Za pomocq regulatora temperature 2所提供 utawic zqdanq temperature.
Zegar steruicy
KOMPERNASS HANDELS GMBH
BURGSTRASSE 21
44867 BOCHUM
NIEMCY
www.kompernass.com
Przepisy
KOMPERNASS HANDELS GMBH
BURGSTRASSE 21
44867 BOCHUM
NEMECKO
www.kompernass.com
Recepty
V tejto kapitole Vám uvedieme nekol'ko prikladov na pripravu jegál. Tieto priklady su odporucania. Doba pripravy jegla sa moze lišit'.
Recepty bez záruky. Vsetky informácie o prisadách a priprave su orientacné. Doplnte si tieto recepty o Vase vlastné skusenosti. Želame Vám úspené pečenie a dobru chuf!
UPOZORNENIE
Dodržiavajte tiez upozornenia k priprave jegál na obale potravin.
Muffiny
Prisady pre styri osoby:
KOMPERNASS HANDELS GMBH
BURGSTRASSE 21
44867 BOCHUM
ALEMANIA
www.kompernass.com
Recetas
KOMPERNASS HANDELS GMBH
BURGSTRASSE 21
44867 BOCHUM
TYSKLAND
www.kompernass.com
Opskrifter
KOMPERNASS HANDELS GMBH
BURGSTRASSE 21
44867 BOCHUM
GERMANY
www.kompernass.com
Last Information Update · Stand der Informationen · Version des informations · Stand van de informatie
Stav informaci - Stan informacioni - Stav informacioni - Estado de las informaciones - Tilstand af information:
08/2021·Ident.-No.: SGB1200B5-062021-1
IAN 373136_2104