SGB 1200 A4 - Electric oven SILVERCREST - Free user manual and instructions
Find the device manual for free SGB 1200 A4 SILVERCREST in PDF.

User questions about SGB 1200 A4 SILVERCREST
0 question about this device. Answer the ones you know or ask your own.
Ask a new question about this device
Download the instructions for your Electric oven in PDF format for free! Find your manual SGB 1200 A4 - SILVERCREST and take your electronic device back in hand. On this page are published all the documents necessary for the use of your device. SGB 1200 A4 by SILVERCREST.
USER MANUAL SGB 1200 A4 SILVERCREST
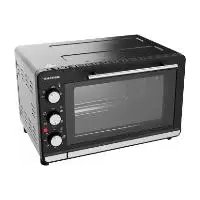
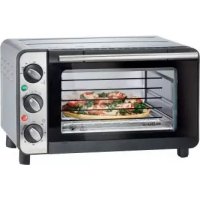
MINI OVEN
Operating instructions and safety instructions
MINI-OVEN
Handling on behalf of customers
TROUBA NA GRIOVANOI A PECENI Névoi kühacu a lazoprešni potyko
TANGA GUMH
Coorewing 45
50/9474 East
GERMANY
- Intended use 26
- Package contents 26
- Technical specifications 27
- Safety instructions 27
5.Copyright 32
6.Before you start 32 - Controls 32
- Getting started 33
8.1 Initial operation 34
8.2 Using the electric oven and grill 34
8.3 Using the rotisserie (12) 35
- Maintenance/cleaning 37
9.1 Maintenance 37
9.2 Cleaning 37
- Storage when not in use 38
11.Troubleshooting 38
12. Environmental regulations and disposal information 39
13. Food-grade use 39
14. Conformity notes 39
15. Recipes 40
16. Warranty and service information 45
Congratulations!
By purchasing the SilverCrest Electric Oven and Grill SGBR 1500 D1 KAT, hereinafter referred to as the electric oven and grill, you have opted for a quality, long-lasting product.
These operating instructions contain important information about the safe use of the electric oven and grill and tips and information on everyday use and disposal. Before using the electric oven and grill, study the operating Instructions carefully and only use it in the areas described and for the purposes described. If you sell the electric oven and grill or give it away, make sure you provide these operating instructions with it. The operating instructions are part of the product.
1. Intended use
This electric oven and grill has been designed for grilling, cooking and baking foods such as meat, fish, side dishes and cakes. The electric oven and grill has not been designed for corporate or commercial applications. Use the electric oven and grill for private purposes only. Any use other than that mentioned above does not correspond to the intended use. The electric oven and grill may also not be used outdoors or in tropical climates. This electric oven and grill fulfils all relevant norms and standards associated with CE Conformity. In the event of any modification to the electric oven and grill that was not approved by the manufacturer, compliance with these standards is no longer guaranteed. The manufacturer shall not be liable for any damage or malfunctions resulting from such modifications.
Observe the regulations and laws in the respective country of use.
2. Package contents
Electric oven and grill
Baking tray
- Handle (for baking tray and grill tray)
Rotisserie, incl. clips
- Handle (for rotisserie)
Grill tray
- Crumb tray
These operating instructions
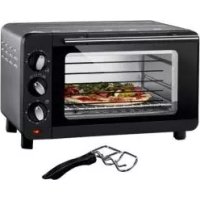
These operating instructions have a fold-out cover. On the inside of the cover, the electric oven and grill and its accessories are shown with figures indicated. The meanings of the numbers are as follows:
1 Cooking space 2 Drive (for rotisserie)
3 Slide-in racks 4 Thermostat
5 Indicator light 6 Mode selection switch
7 Timer 8 Door
9 Door handle 10 Baking tray
11 Handle (for baking tray and grill tray) 12 Rotisserie
13 Clips 14 Handle (for rotisserie)
15 Grill tray 16 Power cable
17 Crumb tray
3. Technical specifications
| Model SGBR 1500 D1 KAT | |
| Power supply 220 - 240 V | ~, 50 / 60 Hz |
| Power consumption 1400 - 1650 W | |
| Temperature range 70 - 230 °C | |
| Timer function up to 120 minutes | |
| Cooking space volume approx. 29 litres | |
| Dimensions (W x H x D) approx. 47.7 x 29.6 x 39.7 cm | |
| Weight (incl. accessories) approx. 8 kg | |
| Safety Approved | TUV SUD GSE Greerite Sicherest |
The technical data and design may be changed without prior notice.
4. Safety instructions
Before you use this electric oven and grill for the first time, please read the following notes and heed all warnings, even if you are familiar with handling electronic devices. Keep this user manual in a safe place for future reference. If you sell the electric oven and grill or give it away, pass on the user manual at the same time. It is a part of the device.

DANGER! This symbol alerts you about a potentially dangerous situation. Ignoring it can lead to severe injury or even death.

WARNING! This symbol denotes important information for the safe operation of the electric oven and grill and user safety.
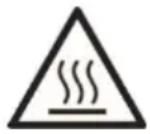
DANGER! Warning, hot surfaces! This symbol denotes the risk of injuries or burns from hot surfaces on the electric oven and grill.

This symbol denotes further information on the topic.
Operating environment

This electric oven and grill is only suitable for use in dry inside spaces.
This electric oven and grill is not for use in rooms with a high temperature or humidity (e.g. bathrooms), and must be kept free of excessive dust.

DANGER! Risk of getting burnt! Do not touch the glass door, it can get very hot when in use.

DANGER! The electric oven and grill is not designed to be operated with an external timer or a separate remote control system. Fire hazard!

DANGER! This electric oven and grill may be used by children of 8 years or over or by persons with physical, sensory or mental impairments or those with no knowledge or experience providing they are supervised or they have been given instructions on the proper use of the electric oven and grill and they understand the associated risks. This appliance is not a toy. Cleaning and user maintenance must not be carried out by children unless they are older than 8 years old and supervised. Keep the packaging materials out of the reach of children. Packaging material is not a toy.
There is a risk of asphyxiation.
Keep children younger than 8 years away from the appliance and its power cable (16).
DANGER! If you notice any smoke, unusual noises or strange smells, switch off the electric oven and grill immediately and remove the mains plug from the mains socket. If this occurs, the electric oven and grill should not be used before it has been inspected by authorised service personnel. Never inhale smoke from a possible device fire. If you do inadvertently inhale smoke, seek medical attention. Smoke inhalation can be damaging to your health.
D A N G E R! Never touch the power cable (16) or the electric oven and grill with wet hands, there is a risk of electric shock!
DANGER! The electric oven and grill must not be covered in order to avoid overheating. Fire hazard!
DANGER! Always place the electric oven and grill on an even, heat-resistant surface away from heat sources and combustible materials, liquids or gases. Leave a clearance of at least 15 cm to walls to prevent fire hazards!
DANGER! The electric oven and grill must not be damaged in order to avoid any further risks.
DANGER! Make sure that no fire hazards (e.g. candles) are placed on or near the electric oven and grill. Fire hazard!
D A N G E R! Constant supervision when in use is not necessary, but regular checks are required. When not using the electric oven and grill, turn it off and disconnect the mains plug from the mains socket. Do not put the electric oven and grill away before it has completely cooled down. Fire hazard!
D A N G E R! Warning: Risk of fire! Never use the electric oven and grill near inflammable materials like curtains.
D A N G E R! Warning: Risk of fire! Never use the electric oven and grill in a cupboard.
DANGER! Risk of getting burnt! When switched on, the temperature of exposed surfaces may be very high. When in use, hot steam comes out of the ventilation slots. Hot steam can also come out when the electric oven and grill is opened. Always use the handle (11) provided to remove the grill tray (15) or the baking tray (10). You can remove the rotisserie (12) using the handle (14). When removing food, do not touch the inside of the electric oven and grill. Use pot holders or oven gloves to prevent burns. There is a danger of injury.
WARNING! Do not expose the electric oven and grill to any direct heat sources (e.g. heaters), direct sunlight or strong artificial light. The device must not be exposed to spray or dripping water or abrasive liquids. Do not use the electric oven and grill near water. The electric oven and grill
must especially never be immersed (do not place any containers containing liquids such as drinks, vases, etc. on the electric oven and grill). Make sure that the electric oven and grill is not subject to excessive shocks or vibrations. Do not introduce any foreign bodies into the device. Otherwise the electric oven and grill could get damaged.
WARNING! Do not place items on the door (8) or lean on it. The door (8) is not able to bear any weight. Otherwise the electric oven and grill could get damaged.
WARNING! The baking tray (10) must not be used to prepare or store salty, acidic or alkaline foods.
Power cable
DANGER! Always hold the power cord (16) by the mains plug and never pull on the power cord (16) itself.
DANGER! Make sure that the power cable (16) does not touch any hot surfaces of the electric oven and grill.
DANGER! Do not use adapters or extension cables which do not meet the applicable safety standards and do not attempt to modify the power cord (16) yourself! If the power cord (16) is damaged, it must be replaced by the manufacturer, its customer service or a similarly qualified person, in order to avoid any possible danger.
WARNING! Never place the electric oven and grill, furniture or other heavy objects on the power cable (16) and make sure it does not get kinked.
WARNING! Never tie knots in the power cable (16) and do not tie it to other cables. The power cable (16) should be positioned such that nobody can trip over it or be obstructed by it.
5. Copyright
All the contents of this User Manual are protected by copyright and provided to the reader for information only. Copying data and information without the prior explicit written consent of the author is strictly forbidden. This also applies to any commercial use of the contents and information. All texts and diagrams are up-to-date as of the date of printing. Subject to change without notice.
6. Before you start
Remove the electric oven and grill and the accessories from the packaging. Remove all packaging materials and protective film. Check that all the parts are complete and undamaged. If you find anything missing or damaged, please contact the manufacturer.
7. Controls
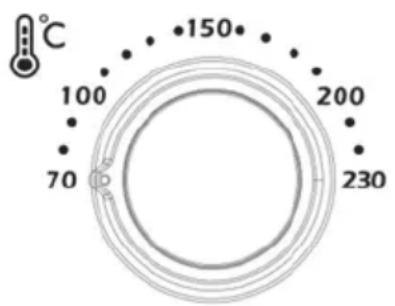
Thermostat (4)
Set the temperature you want (max. 230^ ) using the thermostat (4).
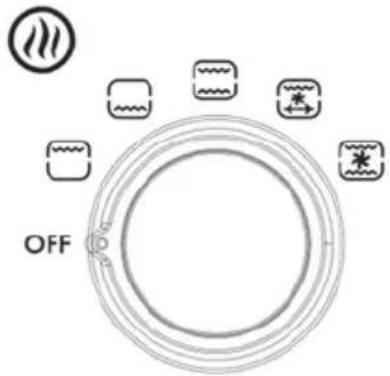
Mode selection switch (6)
You can select the following functions using the mode selection switch (6):
OFF Switched off Top heat (e.g. for grilling) Bottom heat (e.g. for baking cakes) Top/bottom heat (e.g. for pizza) Top heat with fan and rotisserie function (e.g. for grilling chicken) Top/bottom heat with fan (e.g. for rolls or biscuits)
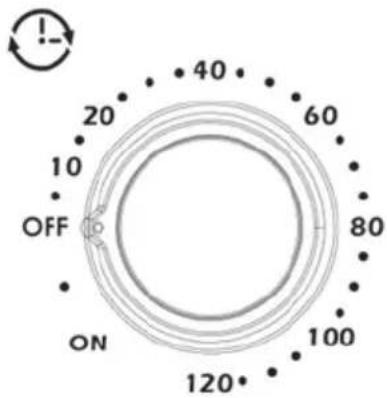
Timer (7)
Set the time you want (max. 120 minutes) using the timer (7). After the set time has elapsed, the electric oven and grill beeps and switches itself off. Turn the timer (7) to the "OFF" position to switch the electric oven and grill off before the set time has elapsed.
Turn the timer (7) anticlockwise to "ON" to use the electric oven and grill in continuous mode. In this mode, the electric oven and grill does not switch off automatically. Turn the timer (7) to the "OFF" position to switch the electric oven and grill off.
If the cooking time is less than 20 minutes, first set the timer (7) to 40 minutes and then go back to the cooking time you want.
8. Getting started
DANGER! Place the electric oven and grill on a level and heat-resistant surface. Place a heat-resistant board in between the surface and the electric oven and grill if the surface itself is critical.
DANGER! Risk of getting burnt! When switched on, the temperature of exposed surfaces may be very high. When in use, hot steam comes out of the ventilation slots. Hot steam can also come out when the electric oven and grill is opened. Always use the handle (11) provided to remove the grill tray (15) or the baking tray (10). You can remove the rotisserie (12) using the handle (14). When removing food, do not touch the inside of the electric oven and grill. Use pot holders or oven gloves to prevent burns. There is a danger of injury.
8.1 Initial operation
- If they are inserted, remove the crumb tray (17), the baking tray (10), the rotisserie (12) and the grill tray (15).
- When using the electric oven and grill for the first time, leave the door (8) open.
- Plug the mains plug into an easily accessible mains socket.
- Adjust the thermostat (4) to "230 °C" (highest setting).
- Move the mode selection switch (6) to "Top/Bottom heat".
- Set the timer (7) to "15 min".
- The status indicator (5) lights up when the device is in use. When you use it for the first time, smells or slight smoke may develop. This is normal and perfectly safe. Open a window to ensure sufficient ventilation.
- The electric oven and grill switches off automatically after the set time.
- Then unplug the mains plug from the mains socket.
- Clean the electric oven and grill as described in the "Cleaning" chapter.
8.2 Using the electric oven and grill
To cook food in the electric oven and grill, proceed as follows:
- If it is not already there, place the crumb tray (17) at the very bottom of the electric oven and grill.
- Insert the baking tray (10) or the grill tray (15) onto the desired shelf (3).

Using the middle shelf (3) achieves the best heat distribution.

If you wish to cook fatty foods on the grill tray (15), you can insert the baking tray (10) one shelf (3) below to catch any drips.
- Place the food on the baking tray (10) or the grill tray (15). It may be worth lining the baking tray (10) with greaseproof paper or greasing it.

Give the electric oven and grill around 10 minutes to heat up to the desired temperature.
- Close the door (8) of the electric oven and grill.
- Plug the mains plug into an easily accessible mains socket.
- Set the temperature you want using the thermostat (4).
- Move the mode selection switch (6) to the desired function.
- Set the timer (7) to the time you want. For continuous mode, turn the timer (7) anticlockwise to "ON".
-
The electric oven and grill now switches on. The status indicator (5) lights up when the device is in use.
-
The electric oven and grill switches off automatically after the time set on the timer (7). When the timer (7) reaches the "OFF" position, there is a beep. You can also turn the timer (7) to the "OFF" position manually to switch the electric oven and grill off before the time has finished. If you have set the timer (7) to "ON", you need to switch the electric oven and grill off manually. To do this, turn the timer (7) to the "OFF" position.
- Now open the door (8) of the electric oven and grill. Always use the door handle (9).

DANGER! Risk of getting burnt! Never touch the door (8) itself, the housing, the contents or the inside of the cooking space (1).
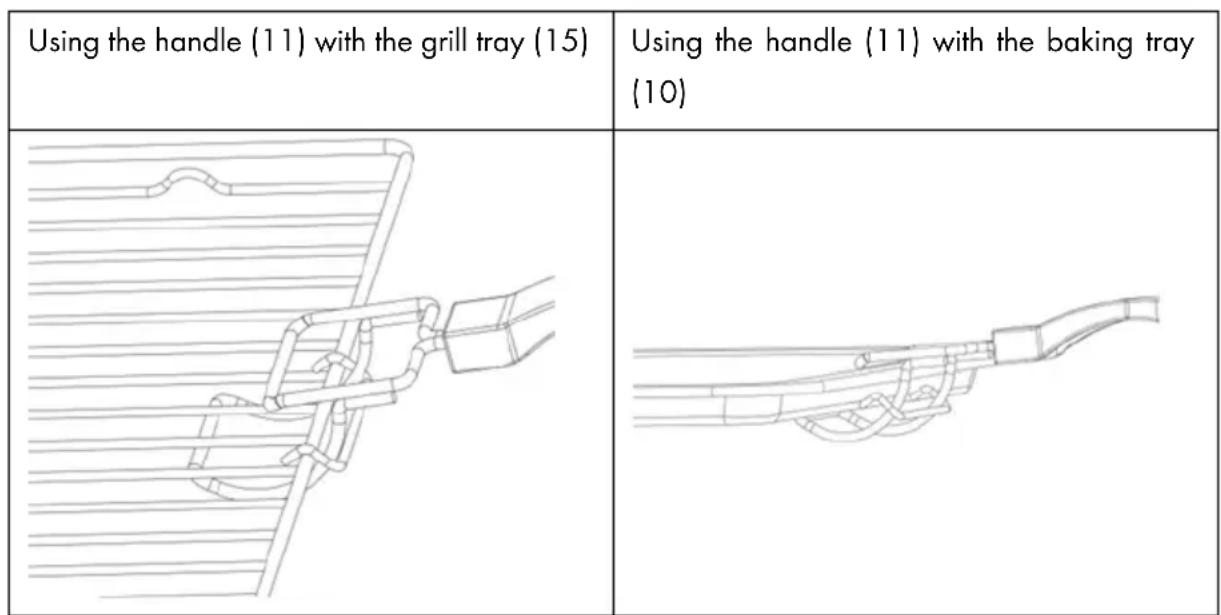
- Now remove your food. If you wish to remove the grill tray (15) or the baking tray (10), use the handle (11) provided. Hook the handle (11) in as shown in the diagrams below. Use a pan holder or oven gloves.
- After using the electric oven and grill, switch the mode selection switch (6) to the "OFF" position.
- Clean the electric oven and grill as described in the "Cleaning" chapter.
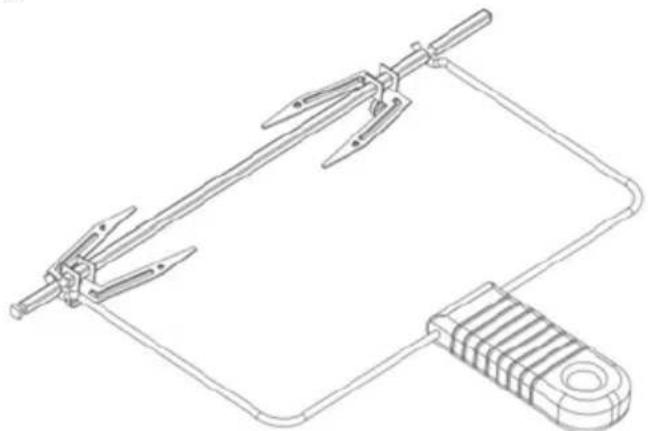
8.3 Using the rotisserie (12)
To cook food using the rotisserie (12), proceed as follows:
- If it is not already there, place the crumb tray (17) at the very bottom of the electric oven and grill.

Insert the baking tray (10) onto the bottom shelf (3), so that it can collect any drips.
- Secure the food to the rotisserie (12) using the clips (13). To do this, undo the screws on the clips (13). Now fix your food by adjusting the clips (13) so they hold the food securely. Retighten the screws on the clips (13). Make sure that the recesses are kept clear so that you can remove the rotisserie (12) using the handle (14) after cooking.

- First, insert the end of the rotisserie (12) without the groove around 5mm into the drive (2).
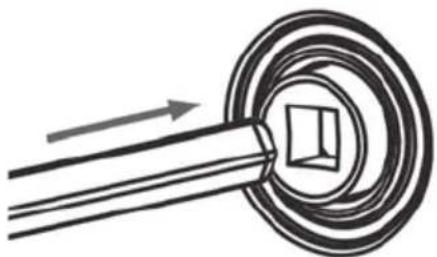
- Then insert the other end of the rotisserie (12) with the groove into the rotisserie holder. Make sure that the rotisserie (12) and the food to be prepared can turn freely in the cooking space (1).

Give the electric oven and grill around 10 minutes to heat up to the desired temperature.
- Close the door (8) of the electric oven and grill.
- Plug the mains plug into an easily accessible mains socket.
- Set the temperature you want using the thermostat (4).
- Move the mode selector switch (6) to the "Top heat with fan and rotisserie function".
- Set the timer (7) to the time you want. For continuous mode, turn the timer (7) anticlockwise to "ON".
- The electric oven and grill now switches on and the rotisserie (12) starts to turn. The status indicator (5) lights up when the device is in use.
- The electric oven and grill switches off automatically after the time set on the timer (7). When the timer (7) reaches the "OFF" position, there is a beep. You can also turn the timer (7) to the "OFF" position manually to switch the electric oven and grill off before the time has finished. If you have set the timer (7) to "ON", you need to switch the electric oven and grill off manually. To do this, turn the timer (7) to the "OFF" position.
- Now open the door (8) of the electric oven and grill. Always use the door handle (9).

DANGER! Risk of getting burnt! Never touch the door (8) itself, the housing, the contents or the inside of the cooking space (1).
- Now remove the rotisserie (12) using the handle (14) provided. To do this, insert the hook at the end of the handle (14) into the recesses on the rotisserie (12). Use a pan holder or oven gloves.
After using the electric oven and grill, switch the mode selector switch (6) to the "OFF" position.
Clean the electric oven and grill as described in the "Cleaning" chapter.
9. Maintenance/cleaning
9.1 Maintenance

WARNING! Maintenance is required if the electric oven and grill has been damaged in any way, for example, if liquid has entered the product, if the electric oven and grill has been exposed to rain or moisture, if the electric oven and grill is not working properly or if it has been dropped. If you notice any smoke, unusual noises or strange smells, switch off the electric oven and grill immediately and remove the mains plug from the mains socket. If this occurs, the electric oven and grill should not be used before it has been inspected by authorised service personnel. All servicing work must be carried out by qualified specialist personnel. Never open the housing on the electric oven and grill.
9.2 Cleaning

DANGER! Unplug the mains plug from the mains socket before you start to clean, there is the risk of electric shock!

DANGER! Wait until the electric oven and grill has cooled down. Otherwise there is risk of burn injury!

DANGER! Never immerse the electric oven and grill itself in water, there is a risk of electric shock!

WARNING! Do not use oven cleaner spray to clean the cooking space (1), as this can produce residues on the heating rods which cannot be removed.
If they are inserted, remove the crumb tray (17), the baking tray (10), the rotisserie (12) and the grill tray (15) for cleaning. Firstly, remove any large food residues and empty the crumb tray (17). The handles (11, 13), the crumb tray (17), the baking tray (10), the rotisserie (12), incl. clips (13) and the grill tray (15) can then be cleaned with warm water and washing-up liquid. Rinse all parts with clean water and dry them thoroughly. Never use any wire brushes or scourers, as they could scratch the coating.
The accessories are not dishwasher-safe.
To clean the inside and outside surfaces of the electric oven and grill and the glass door, use a slightly dampened cloth and a little washing-up liquid. Never use any solvents or cleaners that may damage the metal or plastic. Rinse with clean water and then dry thoroughly.
10. Storage when not in use
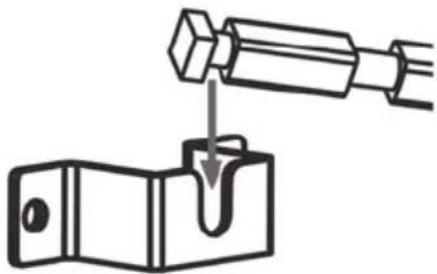
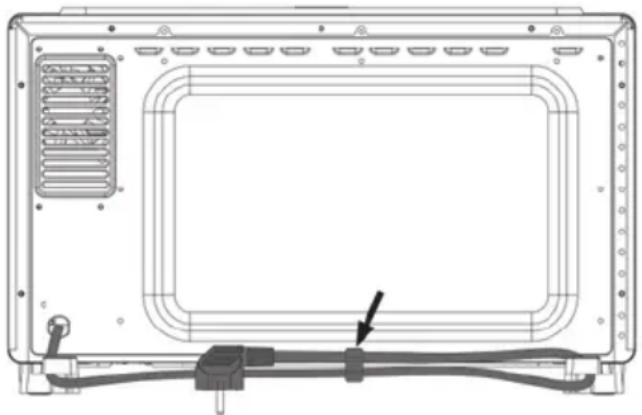
When you do not wish to use the electric oven and grill, disconnect the mains plug from the mains socket. Switch the mode selector switch (6) and the timer (7) to the "OFF" position. Set the thermostat (4) to "70 °C". Wind the power cable (16) in the cable winder on the back of the device, as shown in the diagram below. Use the holding bracket (arrow) to fix the power cable (16). Store the clean electric oven and grill and accessories in a clean, dry place out of direct sunlight.
11. Troubleshooting
The electric oven and grill is not working.
- Check that the mains plug is correctly inserted into the mains socket.
- Check the setting on the thermostat (4) and switch it to a higher temperature if necessary.
- Check the setting on the timer (7) and set a time on it or switch it to "ON" as required.
- Check the setting on the mode selector switch (6) and switch it to the desired function if necessary.
Food is taking a very long time to cook.
-
The temperature may be set too low. Check the setting on the thermostat (4) and switch it to a higher temperature if necessary.
The door (8) may not be closed properly. Close the door (8) properly. -
The door (8) has been opened too often. Only open the door (8) to check progress on cooking and no more often than necessary.
The electric oven and grill does not get properly hot.
- Please note that you need to pre-heat the electric oven and grill for around 10 minutes before the correct temperature is reached and you can put in the food.
12. Environmental regulations and disposal information

Devices marked with this symbol are subject to the European Directive 2012/19/EU. All electrical and electronic devices must be disposed of separately from household waste at official disposal centres. Avoid damage to the environment and risks to your personal health by disposing of the device properly. For further information about proper disposal, contact your local council, disposal bodies or the shop where you bought the device.

Dispose of all packaging in an environmentally friendly manner. Cardboard packaging can be taken to paper recycling centres or public collection points for recycling. Any film or plastic contained in the packaging should be taken to your public collection points for disposal.

Please note the markings on the packaging material when disposing of it, it is labelled with abbreviations (a) and numbers (b), the meanings of which are as follows: 1-7: plastic / 20-22: paper and cardboard / 80-98: composite materials.

13. Food-grade use

This symbol designates products whose physical and chemical composition has been tested and found to be non-hazardous to health when used in contact with food in accordance with the requirements of Regulation EU 1935/2004.
14. Conformity notes

The product complies with the requirements of the applicable European and national directives. Evidence of conformity has been provided. The manufacturer has the relevant declarations and documentation.

The complete EU Declaration of Conformity is available for download from this link: https://www.targa.gmbh/downloads/conformity/322491_1904.pdf
V005 19
15. Recipes
Meatballs
Ingredients:
1 kg mixed beef and pork mince
2 onions, finely chopped
100 g flour / breadcrumbs
2 eggs
50 g mustard
30 g grated cheese (strong)
3 tsp parsley, finely chopped
2 tsp marjoram
2 tsp sweet paprika
3 tsp black pepper, freshly ground
2 tsp salt
Method:
Insert the baking tray (10) onto the middle shelf (3), so that it can collect any drips. Preheat the oven for 10 minutes to 230^ using top heat.
Put all the ingredients in a large bowl and mix thoroughly. Now shape into balls of around 125 g each. Spread the meatballs evenly over the grill tray (15). Cook the meatballs on the top shelf (3) for about 15 minutes on each side.
Spinach and salmon lasagne
Ingredients:
250 g creamed spinach (frozen)
125 g wild salmon fillet (frozen)
Lasagne sheets
100g crème fraîche
50g cheese, grated
Oil for greasing
salt
pepper
nutmeg
Method:
Put the spinach in a pan and defrost over a low heat. Season with salt, pepper and nutmeg. Allow the salmon to only defrost slightly, then cut into pieces. Grease a 0.8 litre square dish and line the base with lasagne sheets. Then spread half the salmon and spinach over it, cover with lasagne sheets again and spread the remaining salmon and spinach over until the dish is nearly full. For the final layer, top with more lasagne sheets and cover with crème fraîche. Sprinkle the cheese over the top and then bake on the middle shelf (3) for approx. 50 minutes in the oven, which you have preheated for 10 minutes to 180^ with top/bottom heat.
Lemon muffins
Ingredients for 6 muffins:
80 g sugar
1 tsp vanilla sugar
1 egg (medium)
50 ml sunflower oil
100 ml milk
Juice and zest from 12 unwaxed lemon
160 g flour
2 tsp baking powder
Pinch of salt
Method:
Preheat the oven for 10 minutes to 200^ using top/bottom heat with fan. Combine the sugar and vanilla sugar with the oil and whisk until creamy with the egg. Add the milk, lemon juice and zest and mix again. Mix the flour, baking powder and salt and mix thoroughly with the other ingredients. Fill 6 muffin cases around 2/3 full with the mixture and bake for around 25 minutes on the baking tray (10) on the middle shelf (3). Allow to cool on a rack.
Tarte flambée toast
Serves 2:
4 slices white bread
For the topping:
1/2 onion
70g smoked ham
120g crème fraîche
100 g cheese, grated
pepper
chive rings
Method:
Finely chop the onion and the ham and mix all the topping ingredients apart from 50g of cheese, then spread over the bread.
Preheat the oven for 10 minutes to 200^ using top heat.
Sprinkle the remaining 50g cheese over the top and bake on the middle shelf (3) for 15 to 20 minutes until it is as brown as you like it. Serve sprinkled with the chive rings.
Cheesy party rolls
Serves 2:
150 g mixed beef and pork mince
30 g red pesto
chopped thyme
chopped oregano
1 tsp chopped hazelnuts
Salt and pepper
Paprika
40 g grated cheese
2 rolls (half-backed rolls are ideal)
Method:
Preheat the oven for 10 minutes to 190^ using top/bottom heat with fan.
Cut open the rolls and place on a baking tray (10) lined with greaseproof paper.
Season the mince with salt, pepper, thyme, oregano and paprika and combine with the hazelnuts and pesto. Spread the mince mixture evenly over the rolls and sprinkle cheese on top, then cook everything for approx. 30 minutes on the middle shelf (3).
Grilled chicken
Ingredients:
whole chicken, approx. 1.5kg
Chicken seasoning
Cooking oil
Method:
Insert the baking tray (10) onto the bottom shelf (3), so that it can collect any drips. Preheat the oven for 10 minutes to 230^ using top/bottom heat with fan.
Rinse the chicken off in clean water and pat dry. Season the chicken evenly inside and out with the chicken seasoning. Then brush the outside of the chicken with cooking oil.
Spear the chicken on the rotisserie (12) and secure it with the clips (13). If necessary, secure the wings and thighs with a heat-resistant cable tie so that the rotisserie (12) can turn easily in the oven.
Make sure the recesses on the rotisserie (12) are kept clear. Use the handle (14) to fit the rotisserie (12) into the oven.
Move the mode selector switch (6) to the "Top heat with fan and rotisserie function". Cook the chicken for around 80 minutes, depending on its size.
Remove the cooked chicken from the oven and carve it with poultry scissors.
Vanilla croissants
Makes about 30
50g ground almonds (no skin)
140 g flour (plus a little extra for working)
40 g sugar
1 egg yolk (size M)
100 g cold butter
Salt
25 g icing sugar
1 tsp vanilla sugar
Method:
Combine 50g almonds, 140g flour, 40g sugar, 1 egg yolk, 100g cold butter, cut into pieces and a pinch of salt using the kneading hook of a food mixer, then use your hands to bring together into a smooth dough.
Bring the dough together into a ball, wrap in cling film and chill for about 1 hour. Line the baking tray (10) with greaseproof paper and preheat the oven for 10 minutes to 200^ using top/bottom heat. Form the dough into 2 rolls (diameter approx. 1.5cm ) on a floured work surface. Cut the prepared rolls of dough into 15 little pieces each (approx. 3cm long). Form each of the pieces of dough into a roll of about 8cm in length and bend into croissant shapes by bending into a crescent and pushing the ends into points.
Bake the vanilla croissants in the pre-heated oven on the middle shelf (3) for 12 minutes. Combine the icing sugar and vanilla sugar and sprinkle over the hot croissants with a sieve. Then allow the vanilla croissants to cool for around 30 minutes.
Oven-baked trout
Ingredients:
1 trout, whole, raw
1 / 2 lemon
1 garlic clove
1 sprig rosemary
1 sprig thyme
1 sprig parsley
Salt and pepper
Olive oil
Method:
Gut the trout, wash, pat dry and score 3 × diagonally.
Place the fish on a piece of tinfoil which is large enough to wrap it.
Slice the lemon and the garlic and spread inside the trout with the washed herbs. Season the trout and drizzle with olive oil. Then wrap the fish in the tinfoil and cook for 20-30 minutes on a tray on the middle shelf (3) of the oven, which you have preheated for 10 minutes to 200^ using top/bottom heat.
Mini rolls
Ingredients:
Bread mix of your choosing
Flour for working
Sunflower seeds, sesame seeds, poppy seeds or similar to sprinkle on top.
Method:
Prepare the bread mix as per the instructions, knead to a dough and allow to prove.
Make little rolls out of the bread and allow to prove again on a baking sheet lined with greaseproof paper in a warm place for 40 minutes until they have increased in size. Preheat the oven for about 10 minutes to 230^ using top/bottom heat. Carefully moisten the rolls with a spray or brush, make a cut in the top and sprinkle with seeds or flour to taste. Depending on their size, cook the rolls for 10-15 minutes on the bottom shelf (3) until they go slightly brown on the top. Allow to cool on a rack.
Country potatoes
Ingredients:
300 g potatoes, waxy variety
1 tbsp oil
1 garlic clove
salt
pepper
sweet paprika
Method:
Preheat the oven for 10 minutes to 200^ top/bottom heat.
Wash and clean the potatoes, do not peel, cut into slices and put in a bowl. Combine the oil with the spices and crushed garlic and wet the potatoes thoroughly.
Line the baking tray (10) with greaseproof paper and spread the spiced potatoes over it, then cook on the middle shelf (3) in a hot oven for approx. 45-55 minutes until the potatoes are cooked.
16. Warranty and service information
Warranty of TARGA GmbH
Dear Customer,
This device is sold with three years warranty from the date of purchase. In the event of product defects, you have legal rights towards the seller. These statutory rights are not restricted by our warranty as described below.
Warranty conditions
The warranty period commences upon the date of purchase. Please keep the original receipt in a safe place as it is required as proof of purchase. If any material or manufacturing faults occur within three years of purchase of this product, we will repair or replace the product free of charge as we deem appropriate.
Warranty period and legal warranty rights
The warranty period is not extended in the event of a warranty claim. This also applies to replaced and repaired parts. Any damage or defects discovered upon purchase must be reported immediately when the product has been unpacked. Any repairs required after the warranty period will be subject to charge.
Scope of warranty
The device was carefully manufactured in compliance with stringent quality guidelines and subjected to thorough testing before it left the works. The warranty applies to material and manufacturing faults. This warranty does not cover product components which are subject to normal wear and which can therefore be regarded as wearing parts, or damage to fragile components such as switches, rechargeable batteries or components made of glass. This warranty is void if the product is damaged, incorrectly used or serviced. To ensure correct use of the product, always comply fully with all instructions contained in the user manual. The warnings and recommendations in the user manual regarding correct and incorrect use and handling of the product must always be observed and complied with. The product is solely designed for private use and is not suitable for commercial applications. The warranty is rendered void in the event of incorrect handling and misuse, if it is subjected to force, and also if any person other than our authorised service technicians interfere with the device. No new warranty period commences if the product is repaired or replaced.
Submitting warranty claims
To ensure speedy handling of your complaint, please note the following:
Before using your product for the first time, please read the enclosed documentation carefully. Should any problems arise which cannot be solved in this way, please call our hotline.
- Always have your receipt, the product article number as well as the serial number (if available) to hand as proof of purchase.
- If it is not possible to solve the problem on the phone, our hotline support staff will initiate further servicing procedures depending on the fault.

Service

Phone: 0800 404 7657
E-Mail: targa@lidl.co.uk
IE
Phone: 1890 930 034
E-Mail: targa@lidl.ie
MT
Phone: 800
62230
E-Mail: targa@lidl.com.mt
CY
Phone: 8009
4409
E-Mail: targa@lidl.com.cy
IAN:322491_1904

Manufacturer
Please note that the following address is not a service address. First contact the service point stated above.
TARGA
GmbH
Coesterweg 45
59494 Soest
GERMANY
Table des matieres
Cher client, chere clientele,
Cher client, chere cliente,
https://www.targa.gmbh/downloads/conformity/322491_1904.pdf