
AeroSphère L - Speaker GENEVA - Free user manual and instructions
Find the device manual for free AeroSphère L GENEVA in PDF.
| Product type | Wireless active speaker |
| Model | AeroSphère L (Large) |
| Brand | Geneva |
| Wireless connectivity | Wi-Fi (AirPlay, DLNA), Bluetooth (with aptX) |
| Audio input | Line-In (3.5 mm jack) |
| Additional functions (with optional base) | FM radio, DAB/DAB+, CD player |
| Power supply | 100-240 V AC, 50/60 Hz |
| Standby power consumption | 0.47 W |
| Operating temperature | 5 to 40 °C |
| Display | Geneva logo color (status) |
| Control | Infrared remote control, mobile app (iOS/Android) |
| Compatibility | iPhone, iPad, iPod touch, Android, PC/Mac (iTunes) |
| Audio codecs | Bluetooth aptX (high quality) |
| Maximum number of speakers (with base) | 4 AeroSphère speakers |
| Auto power off | After 15 minutes of inactivity |
| Remote control battery | CR2032 (3 V) |
| Dimensions (approx.) | Not provided in the manual |
| Weight (approx.) | Not provided in the manual |
| Maintenance and cleaning | Clean with a dry cloth only. Do not block ventilation openings. |
| Safety | Do not expose to water or moisture. Use only the original power adapter. Do not place on heat-sensitive surfaces. |
| Repairability | Entrust any repair to a qualified technician. Spare parts available from the manufacturer. |
| General information | Class II (double insulation). Compliant with European standards (CE). |
Frequently Asked Questions - AeroSphère L GENEVA
User questions about AeroSphère L GENEVA
0 question about this device. Answer the ones you know or ask your own.
Ask a new question about this device
Download the instructions for your Speaker in PDF format for free! Find your manual AeroSphère L - GENEVA and take your electronic device back in hand. On this page are published all the documents necessary for the use of your device. AeroSphère L by GENEVA.
USER MANUAL AeroSphère L GENEVA
SETUP GUIDE-ENGLISH....01
IMPORTANT SAFETY INSTRUCTIONS
- Read these instructions.
- Keep these instructions.
- Heed all warnings.
- Follow all instructions.
- Do not use this device near water.
- Only clean with a dry cloth.
-
Do not block any vents. Install in accordance with the manufacturer's instructions.
-
Do not install near any heat sources such as radiators, heaters, stoves, or other devices (including amplifiers) that produce heat.
-
Do not defeat the safety purpose of the polarized or grounding-type plug. A polarized plug has two blades with one wider than the other. A grounding type plug has two blades and a third grounding prong. The wide blade or the third prong are provided for your safety. If the provided plug does not fit into your outlet, consult an electrician for replacement of the obsolete outlet.
-
Protect the power cord from being walked on or pinched particularly at the plugs, convenience receptacles, and the point where they exit from the device.
-
Only use attachments/accessories specified by the manufacturer.
-
Use only with the cart, stand, tripod, bracket, or table specified by the manufacturer, or sold with the device. When a cart is used, use caution when moving the cart/device combination to avoid injury from tip-over.

-
Unplug this device during lightning storms or during long periods of disuse.
-
Refer all servicing to qualified service personnel. Servicing is required when the device has been damaged in any way, such as power-supply cord or plug damages, liquid has been spilled or objects have fallen into the device, the device has been exposed to rain or moisture, does not operate normally, or has been dropped.
-
Do not install this equipment in a confined or built-in space such as a book case or similar unit, and maintain well-ventilated conditions. The ventilation should not be impeded by covering the vents with items such as newspaper, table-cloths, curtains etc.
-
WARNING: Please refer the information on exterior bottom enclosure for electrical and safety information before installing or operating the device.
-
WARNING: To reduce the risk of fire or electric shock, do not expose this device to rain or moisture. The device should not be exposed to dripping or splashing and objects filled with liquids, such as vases, should not be placed on the apparatus.
-
CAUTION: Danger of explosion if battery is incorrectly replaced. Only replace with the same or equivalent type.
-
WARNING: The battery (battery or batteries or battery pack) should not be exposed to excessive heat such as sunshine, fire or the like.
-
WARNING: The mains plug/appliance coupler is used as a cut-off device, the cut-off device should remain readily operable.
-
Correct Disposal of this product. This marking indicates that this product should not be disposed with other household wastes throughout the EU. To prevent possible harm to the environment or human health from uncontrolled waste disposal, recycle it responsibly to promote the sustainable reuse of material resources. To return your used device, please use the return and collection systems or contact the retailer where the product was purchased. They can take this product for environmental safe recycling.
Batteries in the remote control: Keep the remote control battery away from children. It may cause a fire or chemical burn if mishandled. Do not recharge, disassemble, heat above 212^ F ( 100^ C), Replace only with a battery of the correct type and model number (CR2032 lithium coin cell battery, 3 V).

DO NOT INGEST BATTERY, CHEMICAL BURN HAZARD
The remote control supplied with this product contains a coin/button cell battery. If the coin/button cell battery is swallowed, it can cause severe internal burns in just 2 hours and can lead to death.
Keep new and used batteries away from children. If the battery compartment does not close securely, stop using the product and keep it away from children.
If you think batteries might have been swallowed or placed inside any part of the body, seek immediate medical attention.
Operating Temperatures: 5 - 40 deg °C / 41 - 104 deg °F
AeroSphere Base—Use the original power adapter: Only use the supplied original power adapter to power and charge the device. Other power adapters might look similar, but using them could result in electric shock and could damage the device.

CAUTION: RISK OF ELECTRIC SHOCK, DO NOT OPEN ATTENTION: RISQUE DE CHOC ELECTRIQUE-NE PAS OUVRIR
WARNING: To reduce the risk of electric shock, do not remove cover (or back) as there are no user-serviceable parts inside. Refer servicing to qualified personnel.
This lightning flash with arrowhead symbol within an equilateral triangle is intended to alert the user to the presence of non-insulated "dangerous voltage" within the product's enclosure that may be of sufficient magnitude to constitute a risk of electric shock.
The exclamation point within an equilateral triangle is intended to alert the user to the presence of important operating and maintenance instructions in the literature accompanying the appliance.
☐ This equipment is a Class II or double insulated electrical appliance. It has been designed in such a way that it does not require a safety connection to electrical earth.
FCC Regulations Warning: Changes or modifications to this unit not expressly approved by the party responsible for compliance could void the user's authority to operate the equipment. NOTE: This equipment has been tested and found to comply with the limits for a Class B digital device, pursuant to Part 15 of the FCC Rules. These limits are designed to provide reasonable protection against harmful interference in a residential installation. This equipment generates, uses and can radiate radio frequency energy and, if not installed and used in accordance with the instructions, may cause harmful interference to radio communications. However, there is no guarantee that interference will not occur in a particular installation. If this equipment does cause harmful interference to radio or television reception, which can be determined by turning the equipment off and on, the user is encouraged to try to correct the interference by one or more of the following measures:
Reorient or relocate the receiving antenna.
- Increase the separation between the equipment and receiver.
- Connect the equipment into an outlet on a circuit different from that to which the receiver is connected.
- Consult the dealer or an experienced radio / TV technician for help.
Modifications not expressly approved by the manufacturer could void the user's authority to operate the equipment under FCC rules. FCC ID: ZXX-A010 / ZXX-A020 / ZXX-A030
Canada This device complies with Industry Canada licence - exempt RSS standard(s). Operation is subject to the following two conditions: (1) this device may not cause interference, and (2) this device must accept any interference, including interference that may cause undesired operation of the device. Industrie Canada (IC): 10107A-A01 / 10107A-A02 / 10107A-A03
CE Conformity
G-Lab GmbH declares that this device complies with the essential requirements and other relevant provisions of European Directive 1999 / 5 / EC. The declaration of conformity may be consulted upon request to G-Lab GmbH, Zurich, Switzerland or on http://genevalab.com.
CE0359
The European Directive on Waste Electrical and Electronic Equipment
(WEEE) was implemented to dramatically reduce the amount of waste going to landfills, thereby reducing the environmental impact on the planet and human health. Please act responsibly by recycling used products. If this product is still usable, consider giving it away or selling it.

Used batteries: Please dispose of used batteries properly, following the local regulations. Do not place the battery in fire.
CLASS 1 LASER PRODUCT
Licensing and copyrights
© 2014 G-Lab GmbH. All rights reserved.
Under the copyright laws, this manual may not be copied, in whole or in part, without the written consent of G-Lab GmbH.
Geneva® is a registered trademark of G-Lab GmbH.
AirPlay, iPad, iPhone, iPod, iPod classic, iPod nano, iPod touch, iTunes, iOS, and Retina are trademarks of Apple Inc., registered in the U.S. and other countries. iPad Air, iPad mini, and Lightning are trademarks of Apple Inc.
"Made for iPod," "Made for iPhone," and "Made for iPad" mean that an electronic accessory has been designed to connect specifically to iPod, iPhone, or iPad, respectively, and has been certified by the developer to meet Apple performance standards. Apple is not responsible for the operation of this device or its compliance with safety and regulatory standards. Please note that the use of this accessory with iPod, iPhone, or iPad may affect wireless performance.
App Store is a service mark of Apple Inc.
iTunes is for legal or rightholder-authorized copying only. Don't steal music.
The Bluetooth ^® word mark and logos are registered Trademarks owned by Bluetooth SIG, Inc. Wi-Fi is a registered trademark of the Wi-Fi Alliance.
Setup Guide version
Version: v1.0. for the following products:
Geneva AeroSphère / Large (Model: A010) / Small (Model: A020) / Base (Model: A030)
I ABOUT THE GENEVA AEROSPHÈRE SYSTEM
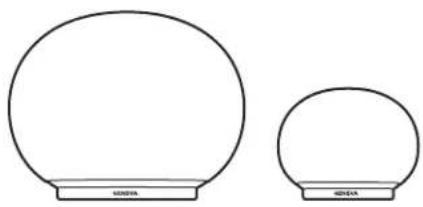
AEROSPHÈRE SMALL, LARGE & BASE
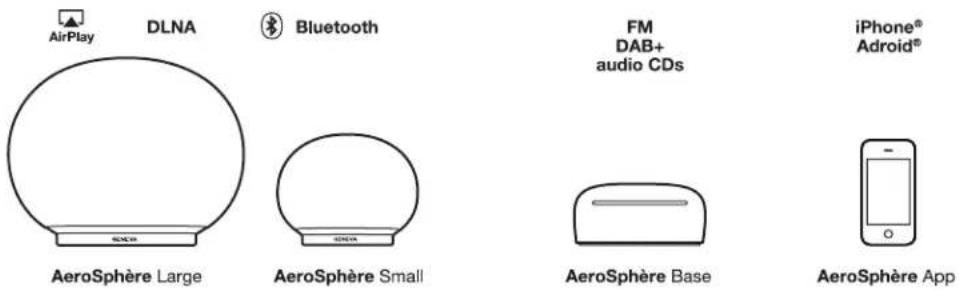
AeroSphère Small and AeroSphère Large
AeroSphere Small and AeroSphere Large are wireless active speakers that play music from the following sources:
- AirPlay ^ (via Wi-Fi ^ )
- DLNA ^ (via Wi-Fi)
- Bluetooth ^ Audio (including the high quality codec aptX ^ )
- Line-In
- FM, DAB+ and audio CD, with the optional AeroSphere Base In this document "AeroSphere speaker" refers to both models AeroSphere Small and AeroSphere Large.
The speakers can be control via
- Remote control and/or
- AeroSphere App (iPhone ^® or Android ^® )
AeroSphère Base
By adding an AeroSphere Base to your home network, the following functions will be added to all connected AeroSphere speakers:
- FM radio
• DAB / DAB+ radio (works only in countries with DAB service) - Audio CD
• Additional Line-In input
Up to four AeroSphere speakers can be added to the AeroSphere Base. AeroSphere Base streams audio from CDs, FM or DAB to up to four connected AeroSphere speakers at the same time. The AeroSphere Base is controlled with the AeroSphere app (iPhone or Android). In addition, most functions can also be controlled with the remote control.
AEROSPHÈRE APP
If your smartphone is connected to your Wi-Fi home network, you can control all AeroSphere products with the AeroSphere app. Both iPhone and Android apps are available. No setup is required, because the AeroSphere app will find all AeroSphere speakers and the Base automatically.
Functions
• Show all AeroSphere products in your Wi-Fi network
- Change volume on all AeroSphere speakers
- Adjust bass and treble on all AeroSphere speakers
- Change the input sources on the speakers
- Launch other streaming applications on your smartphone
- Control the FM, DAB+ and Audio CD functionality of the AeroSphere Base
- Change the names of all the speakers, for example to "Bedroom" and "Living room"
How to download the AeroSphere App
iPhone version: search for "AeroSphere" in the App Store® The Geneva AeroSphere app works with iPhone and iPod Touch.
Android version: search for "AeroSphere" in the Google Play store.
WHAT TO DO NEXT?
natural_image
Two simple oval-shaped objects with rounded tops, no text or symbols presentAeroSphère Small & Large
- Getting started with the AeroSphere Small & Large ...... page 04 Once completed: you can play Bluetooth on the AeroSphere speaker (Time required: 5 minutes).
- Wi-Fi Setup for the AeroSphère Small & Large...... page 06 Once completed: the AeroSphère speaker is connected to your Wi-Fi network. Now you are ready to use AirPlay, DLNA and all audio sources from the AeroSphère Base (FM, DAB+, audio CD) (Time required: 5 minutes).
- First steps with the AeroSphere Small & Large...... page 08 Once completed: you know how to use AirPlay, DLNA and Line-In. You are familiar with the display status and the remote control.
Problems? ...... page 16
See the "Troubleshooting and FAQ" section and the "Feature Guide" on aerosphere.genevalab.com.
AeroSphère Base
- Getting started with the AeroSphere Base ...... page 11 Once completed: you have connected all wires and you are ready for the Wi-Fi setup ( Time required: 5 minutes ).
- Wi-Fi Setup for the AeroSphere Base...... page 13 Once completed: the AeroSphere Base is connected to your Wi-Fi network. Now you are ready to use listen to FM, DAB+ and Audio CD from the AeroSphere Base (Time required: 5 minutes).
- First steps with the AeroSphere Base...... page 14 Once completed: you know how to use FM, DAB+ and the Audio CD with the remote control and the AeroSphere app. There is no additional setup needed because the AeroSphere Base will find all AeroSphere speakers automatically.
WOULD YOU LIKE TO LEARN MORE?
Use the "Feature Guide" to learn more about the system
There are many multiroom configurations possible with the AeroSphere system. Learn how you can use the AeroSphere with Android, iOS devices, Windows and Mac computers.
You can find the "Feature Guide" on aerosphere.genevalab.com
II GETTING STARTED WITH THE AEROSPHÈRE SMALL & LARGE
Time required: 5 minutes
Once completed you can play Bluetooth on the AeroSphere speaker
POWERING THE SPEAKER UP

Connect power
Turn the AeroSphere speaker carefully on its side. Don't put the AeroSphere Large on its head. Connect one end of the power cord to the connector to the on the bottom of the AeroSphere speaker.
Hold the end of the AC power cord tight with your fingers, and wiggle the connector while pushing in, until it is inserted all the way. Make sure the AC power cord is properly attached. Finally, plug the other end in a wall outlet.

Remote control
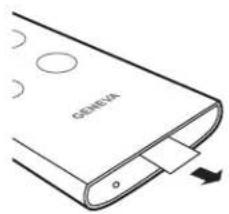
Remove the plastic slip at the end of the remote control.
Turn on the AeroSphère speaker
Press the power button on the remote control, or press the power button at the back of the speaker. The Geneva logo will turn yellow.
Using Bluetooth
Press the Ⓧ button on the remote control, and wait until the entry "AeroSphere" appears in the Bluetooth setup of your smart phone. For detailed instructions, go to the next chapter "Bluetooth Setup". With Bluetooth you can listen music wirelessly without being connected to your Wi-Fi network.
Now go to chapter "Wi-Fi Setup for AeroSphere Small & Large"
In order to use AirPlay, DLNA or Geneva Multiroom, you need to connect the AeroSphere speakers to your home network.
Proper placement of the AeroSphère Large
The AeroSphere Large is a high performance audio system, and produces heat during operation. This means the metal plate at the bottom side can get hot. Do not place the speaker on a heat sensitive surface (such as untreated wood, etc.). The surface must be flat, for proper air circulation underneath the unit. The speaker must not be placed on a bed, sofa or similar surfaces that may block the natural ventilation.
BLUETOOTH SETUP
Mobile phones, tablets, and computers with Bluetooth can connect to the AeroSphere speaker and play music wirelessly. The mobile phone, tablet, or computer must support Bluetooth A2DP. The AeroSphere speaker supports also the high quality codecaptX.
Initial Setup ("pairing") with iPhone, iPad or iPod touch
- Press ⚙ on the remote control.
- Select "Settings" on your iPhone. Select "General / Bluetooth". Turn on Bluetooth. New Bluetooth devices are detected automatically.
- Wait until "AeroSphere Small/Large ... (Not Paired)" appears.
- Select "AeroSphere...". The phone is now connecting ("pairing") to the AeroSphere speaker.
- Once successfully paired, you can play music on an iPhone, iPad or iPod touch and listen to it on the AeroSphere speaker.
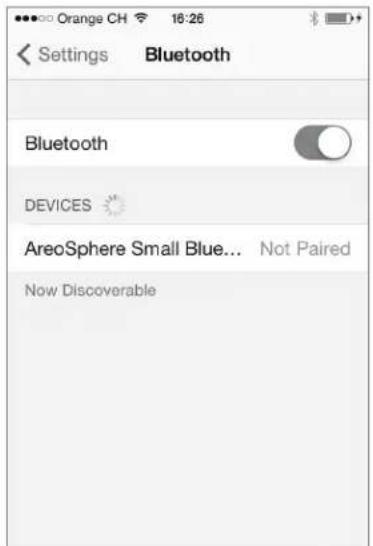
Bluetooth settings on the iPhone ^20
PLAYING MUSIC WITH BLUETOOTH
Most smartphones connect automatically to the AeroSphere speaker after the initial setup ("pairing").
- Press ⚙ on the remote control. When the AeroSphere speaker connects, the display changes from a flashing blue to a constant blue color.
- Now music that is playing on your smartphone streams automatically to the AeroSphere speaker.
Status information on the display
Blue, constant: successfully connected.
Blue, fast flashing: searching for previously paired devices.
Blue, slow flashing: pairing / no active connection.
Pairing guide for other devices and mobile phones
Go to www.genevalab.com and select "Support."

Selecting Bluetooth as audio output (control center of iOS7)
III WI-FI SETUP FOR THE AEROSPHÈRE SMALL & LARGE

Time required: 5 minutes
Once completed: the AeroSphère speaker is connected to your Wi-Fi network. Now you are ready to use AirPlay, DLNA and all audio sources from the AeroSphère Base (FM, DAB+, audio CD).
OVERVIEW
Playing music wirelessly with AirPlay or DLNA requires the AeroSphere speakers to first be connected to your home network via Wi-Fi (WLAN / wireless network). There are three different methods you can use for the Wi-Fi setup.
WI-FI SETUP METHOD WHEN TO USE THIS METHOD
WAC * You can use your iPhone, iPad, iPod Touch. They require iOS 7 or higher.
WPS Your Wi-Fi router has a WPS push button for easy network setup.
AeroSphère Network Setup webpage
Advanced method go to the "Feature Guide" on aerosphere.genevalab.com
* Enabled by default when using the AeroSphere speaker for the first time.
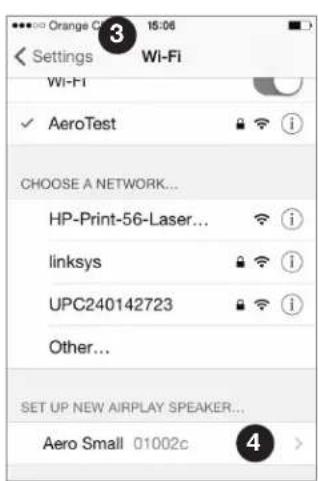
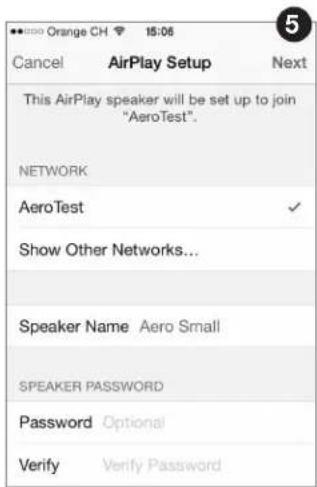
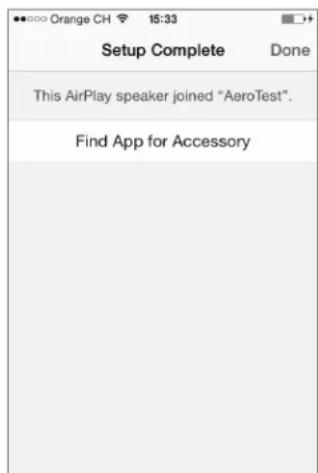
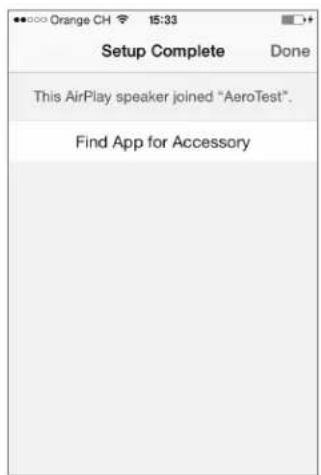
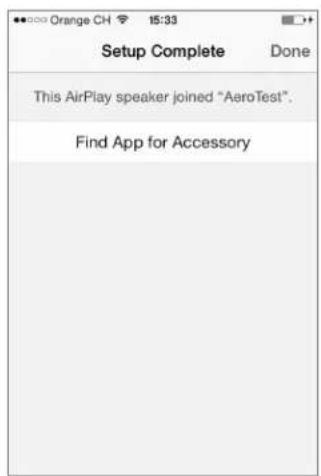
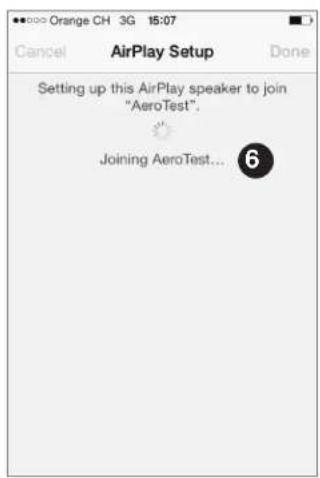
WI-FI SETUP WITH WAC (WIRELESS ACCESSORY CONFIGURATION)
What is needed for this setup?
- An iOS device (Phone, iPad or iPod Touch) with iOS version 7 or higher.
- The iOS device must already be connected to your Wi-Fi network
Instructions
- Turn the AeroSphere speaker on: wait until you see the display flash two times repeatedly in green. When you are using the AeroSphere speaker for the first time, this mode is already enabled. Skip step 2 and go to step 3.
- If the display does not flash two times repeatedly in green, you can enable the Wi-Fi Setup with WAC manually: Hold the "SETUP" button on the back for 10 seconds, until the display starts flashing two times repeatedly in green.
- Go to Settings of your iOS device and select Wi-Fi.
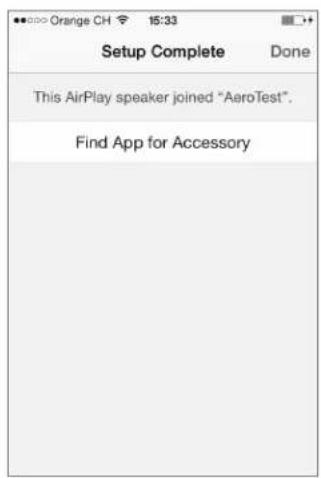
- Wait until you see the entry "SET UP NEW AIRPLAY SPEAKER" on the lower part of the display. Select it.
-
Press "Next" on the upper right.
-
The iOS device will now automatically transfer its Wi-Fi settings to the AeroSphere speaker.
- Wait until the display of the AeroSphere speaker has successfully connected to the Wi-Fi network: the display changes from a flashing green to a constant green.
What is WAC?
WAC is an easy Wi-Fi setup method for iOS devices (iPhone, iPad, iPod Touch). By default this Wi-Fi setup method is enabled when you use the AeroSphere speakers for the first time. The display indicates that WAC is active by flashing two times repeatedly in green.
Troubleshooting
- Repeat the procedure.
- Make sure your iPhone, iPad or iPod touch are using iOS version 7 or higher
- Make sure your iPhone, iPad or iPod touch is connected to a Wi-Fi network
• Try another Wi-Fi setup method. - Check the networking troubleshooting guide on the Genevalab.com Support page.


WI-FI SETUP WITH WPS
What is needed for this setup?
Your Wi-Fi router needs to support WPS. No computer or smartphone is needed for this setup.

Instructions
- Turn the AeroSphère speaker on.
- Wait until the display flashes in green.
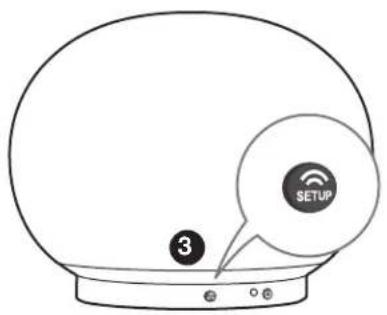
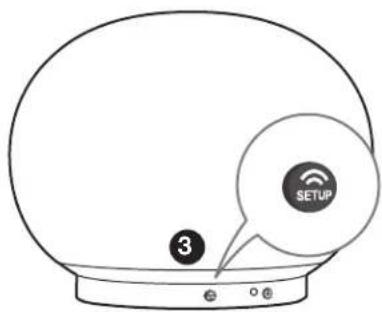
- Press the "SETUP" button on the back of the AeroSphere speaker.
- On the Wi-Fi router press the WPS button. Typically a light on the button starts to flash. If nothing happens, you may have to hold the button for a few seconds. The AeroSphere speaker and the Wi-Fi router are now starting to connect to each other.
- Wait until the display of the AeroSphere speaker changes to button green. This can take up to a minute. Now you are connected to your Wi-Fi network.
What is WPS?
WPS (Wi-Fi protected setup) is a simple way to connect a new device to a Wi-Fi network. WPS is a common feature on today's Wi-Fi wireless routers or Wi-Fi access points. When pushing the "SETUP" button on the AeroSphere Small or Large and the "WPS" button on the Wi-Fi access point within about a minute, the AeroSphere Small or Large will automatically connect to the Wi-Fi network.
Troubleshooting
- Repeat the procedure.
- Upgrade the software on your Wi-Fi router.
- Try another Wi-Fi setup method.
- Check the networking troubleshooting guide on the Genevalab.com Support page.
WI-FI SETUP WITH THE AEROSPHÈRE NETWORK SETUP WEBPAGE
Follow the detailed description in the "Feature Guide" on aerosphere.genevalab.com
IV FIRST STEPS WITH THE AEROSPHÈRE SMALL & LARGE

Once completed you know how to use AirPlay, DLNA and Line-In. You are familiar with the display status and the remote control.
Are you connected to Wi-Fi?
Before using AirPlay, DLNA, FM, DAB+ or CD you need to connect the AeroSphere speaker to your Wi-Fi network. See previous chapter "Wi-Fi Network Setup".
Turn the power on of the AeroSphere speaker and check the display. After the start-up period (yellow), a blinking display means you are waiting to connect. Once you are successfully connected, the display is constant. For detailed display status information, go to the following chapter "Controls".
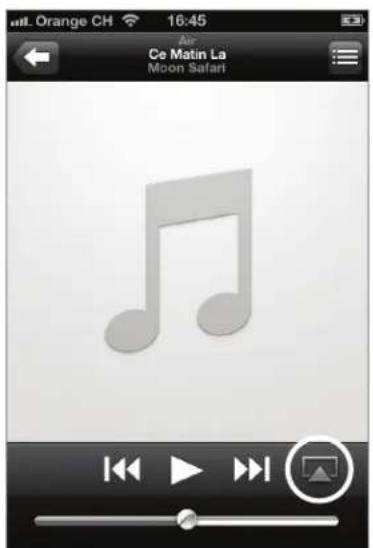
AIRPLAY
What is AirPlay?
AirPlay lets you wirelessly stream music from your iPhone, iPad, iPod touch, Mac or Windows computer to the Geneva AeroSphere speaker and other AirPlay speakers. Once you select the AeroSphere speaker with the AirPlay icon in iTunes or the iOS device, the AeroSphere speakers switch automatically from the current audio source to AirPlay.
Playing music with iTunes ^® from a computer (Mac or Windows)
- Turn the AeroSphère speaker on.
- Wait until the AeroSphere speaker has successfully connected to the Wi-Fi network (the display is constant green).
- Open iTunes on your Mac or Windows computer.
- Select the AirPlay icon, then select "AeroSphere Small" or "AeroSphere Large".
Any music playing on iTunes is now streamed to the AeroSphere speaker over the Wi-Fi network.

Internet Radio, Spotify and other streaming apps
Any iPhone or iPad app that plays music can be streamed over the Wi-Fi network to the AeroSphere speaker via AirPlay.
Playing music from an iPhone, iPad or iPod Touch
- Select the app "Music" any other music or streaming app.
- Select the AirPlay icon, then select "AeroSphere Small" or "AeroSphere Large".
AirPlay on iOS 6 and earlier
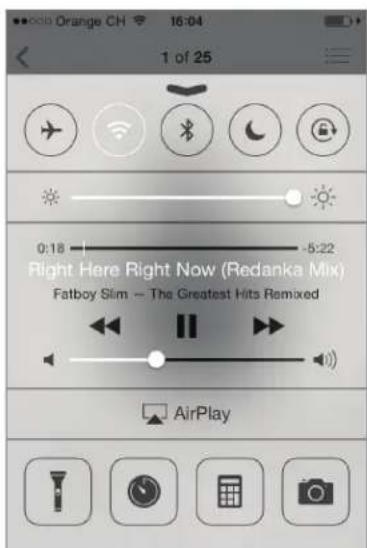
AirPlay in the control center (AirPlay on iOS 7 and newer)

AirPlay on iOS 6 and earlier
You can listen to music from other iPhone apps, such as Internet Radio, Spotify ^® , etc. In most iPhone apps the AirPlay icon will automatically appear if there is an AirPlay speaker in your local network.
AirPlay on iOS 7 and newer
Swipe from the bottom to the top to make the control center appear. The AirPlay icon shows available speakers below the play/pause icon. If there are no AirPlay speakers available, the AirPlay icon is hidden.
AUDIO
Volume
- Remote control: use the volume buttons
- AeroSphère app: use the volume bar
DLNA
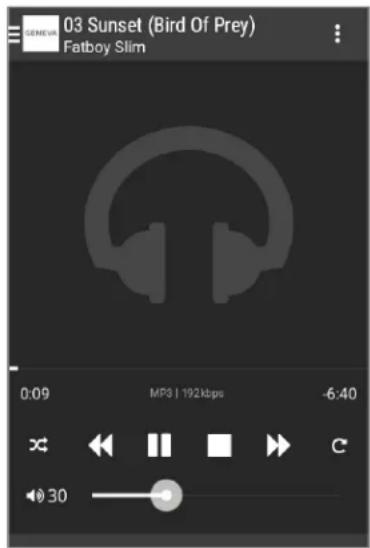
What is DLNA?
DLNA is a standard for streaming audio via a home network to a speaker. The AeroSphère speakers support DLNA. Once a user selects the AeroSphère speaker in a DLNA app on a smartphone, the AeroSphère speakers automatically switch from the current audio source to DLNA.
![Fabian Win Twonky Se.. RENDERER AeroShpere Small 34ac38 LIBRARY Fabian Win Twonky Server Local Media Server Fabian Win Twonky Server Genie Media Servers (GLab-Silvio[Windows]) GLAB-SILVIO: Administrator: GLAB-SILVIO: Silvio:](/content/2026/03/558831/images/68ad869dc673bc402cfa9da32492399348d98928d7338368894242c593f98f2c.jpg)
Bass and treble
- AeroSphere app: tap the music note icon on the lower right of the screen, then use the bass and treble bar.
Playing music from the Android app "BubbleUPnP"
We recommend the app "BubbleUPnP" for streaming music from your Android phone to the AeroSphere speaker.
- Download "BubbleUPnP" from the Google Play store.
- Change audio output from "Local Renderer" to "AeroSphère Small" or "AeroSphère Large".
- Music will automatically play on the AeroSphère speaker.
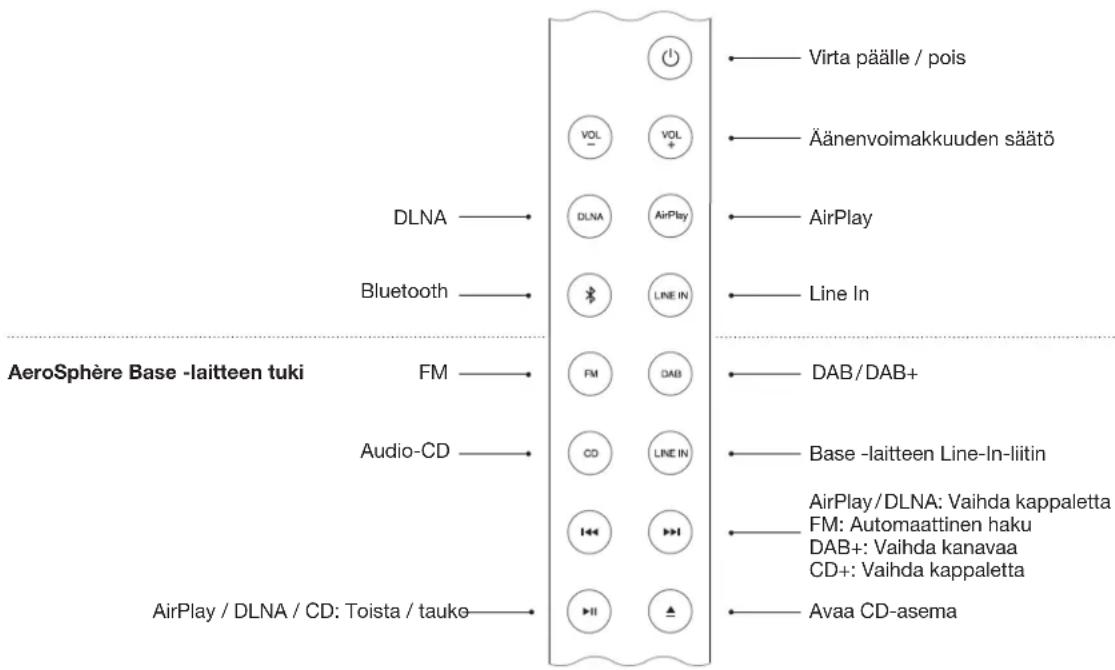
REMOTE CONTROL
DISPIAY
The color of the Geneva logo shows the operation status of the device.
color STATUS
off Device is powered off
yellow Device is starting up
green (constant) AirPlay or DLNA, connected to the Wi-Fi network
green (flashing) AirPlay or DLNA, waiting to connect to the Wi-Fi network
blue (constant) Bluetooth, connected
blue (flashing) Bluetooth, connecting or pairing
pink Line-In
only WITH AEroSPhèrE BASE
red Audio CD (AeroSphère Base)
light blue FM or DAB+ (AeroSphère Base)
pink Line-In (AeroSphère Base)
red / light blue / pink ( flashing ) Waiting to connect to the AeroSphere Base
ADvAncED
green/yellow blinking Failed to connect to a Wi-Fi network
green (flashing 3 times) Successfully connected to Wi-Fi network
green (repeated short single flash) Wi-Fi setup in progress (WPS method)
green (repeated short double flash) Wi-Fi setup in progress (webpage or WAC method)
llnE-In
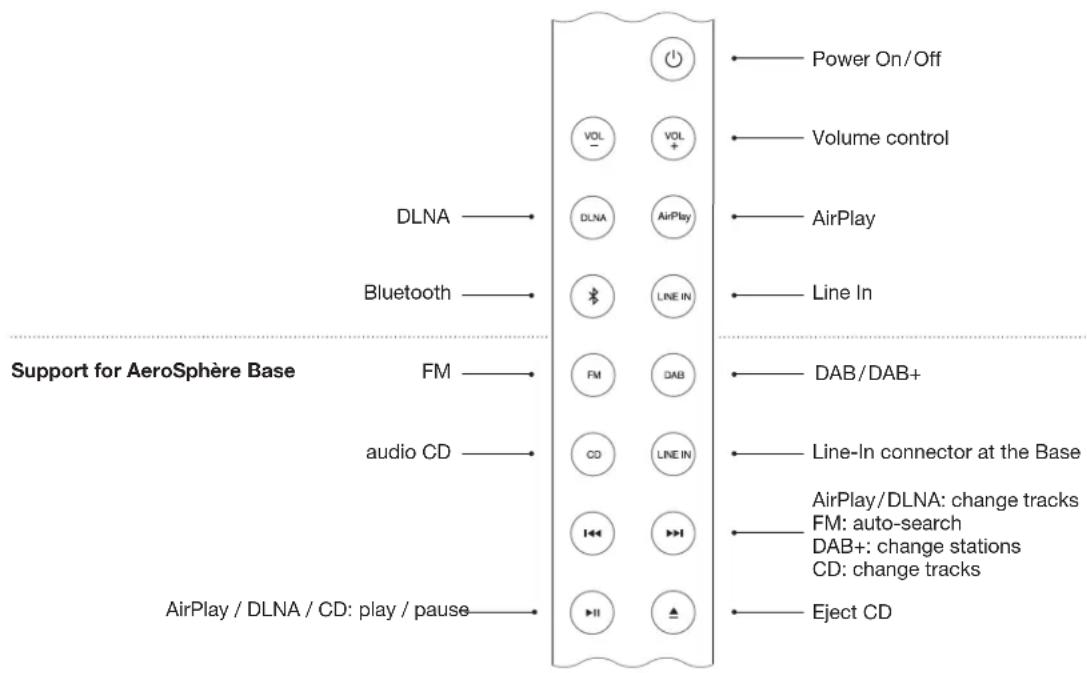
The 3.5 mm analog audio input on the back of the AeroSphere speaker can be used for external audio sources. Press 📄 on the remote control. There are two 📄 buttons on the remote control: the upper 📄 button selects the analog audio input on the AeroSphere speaker, the lower 📄 button selects the analog audio input of the AeroSphere Base.
BAck PAnEI

natural_image
Simple line drawing of a dome-shaped object with a base and two small circular markers at the bottom (no text or symbols)| PoWEr BUTTON | PoWEr on / oFF |
| Wifi Setup button | WPS setup ( push button once )WAC setup / Network webpage setup ( hold button for 10 sec ) |
| Line-in connector | Analog audio input ( stereo ), 3.5 mm connector |
| AC power input connector | AC power input ( 100 - 240 VAC, 50/60 Hz ) |
V GETTING STARTED WITH THE AEROSPHÈRE BASE

Time required: 5 minutes
Once completed: you have connected all wires and you are ready for the Wi-Fi setup.
OVERVIEW
The AeroSphère Base adds FM, DAB+ and audio CD functionality to all AeroSphère Base speakers in the same home network. The AeroSphère is controlled with the remote controls of the AeroSphère speakers, or with the AeroSphère iPhone and Android App.
No separate remote control is needed to operate the AeroSphere Base. The AeroSphere Base has no remote control sensor. You can control the AeroSphere Base functionality directly from the AeroSphere speakers.

natural_image
Simple line drawing of a computer mouse with an open lid (no text or symbols)CONNECTING ALL WIRES
Attach the FM / DAB+ Antenna
- Screw the enclosed FM/DAB+ antenna into the antenna connector on the back.
- Screw the two rods into the end of the antenna
- Place the end of the antenna at least one meter away from the AeroSphere Base. The long wire allows you to place the antenna in a location where you have the best FM/DAB+ reception. Note that only the two rods at the end of the wire is the actual antenna.
Connect the power
- Connect the AC power adapter to an AC wall outlet. Then connect the other end of the AC power adapter into the back of the AeroSphere Base.
- Move the power switch to the ON position. The AeroSphere Base is a network device and will always stay connected to the network.
Next: Wi-Fi Setup
Now you are ready to connect the AeroSphere Base to your Wi-Fi network—go to the next chapter for more details.
Do I need to configure the AeroSphere system?
No. You do not have to do additional configuration. Once the Base and the Speakers are connected to the Wi-Fi network, the AeroSphere Base finds all available AeroSphere speakers automatically.

STATUS LIGHT
| yellow AeroSphère Base is starting up, this takes about 20 seconds | |
| green (constant) | Successfully connected to the Wi-Fi network and successfully connected to at least one AeroSphère speaker |
| green (slowly blinking) | Successfully connected to the Wi-Fi network |
| green (fast blinking) | In the process of connecting to the Wi-Fi network |
| green (single flashing, repeating) | Wi-Fi setup in progress (WPS method) |
| green (double flashing, repeating) | Wi-Fi setup in progress (network setup webpage method) |
| yellow / green / red (changing) | Software update in progress |
How to eject the CD
You can eject the CD with the following methods:
- Hold your hand about 10 mm above the CD slot. The CD eject sensor is located above the CD slot. It detects the hand with a proximity sensor.
- Use the button on the remote control
- Use the eject icon in the AeroSphere app
VI WI-FI SETUP FOR THE AEROSPHÈRE BASE

Time required: 5 minutes
Once completed: the AeroSphere Base is connected to your Wi-Fi network. Now you are ready to use listen to FM, DAB+ and Audio CD from the AeroSphere Base.
OVERVIEW
Streaming FM, DAB+ and audio CD wirelessly to AeroSphere speakers requires the AeroSphere Base to first be connected to the same Wi-Fi network. The AeroSphere Base must be in same Wi-Fi network as the AeroSphere speakers.
WI-FI SETUP METHOD WHEN TO USE THIS METHOD
WPS Your Wi-Fi router has a WPS push button for easy network setup.
AeroSphère Network Setup webpage*
Advanced method.
go to the "Feature Guide" on aerosphere.genevalab.com
* Enabled by default when using the AeroSphere speaker for the first time.
WAC is not supported on the AeroSphère Base
WI-FI SETUP WITH WPS
What is needed for this setup?
Your Wi-Fi router needs to support WPS. There is no computer or smartphone needed for this setup.
Instructions
- Turn the AeroSphère Base on.
- Wait until the status light flashes in green.
- Press the white "SETUP" button on the back of the AeroSphere Base.
- On the Wi-Fi router press the WPS button. Typically a light on the button starts to flash. If nothing happens, you may have to hold the button for a few seconds. The AeroSphere speaker and the Wi-Fi router are now starting to connect to each other.
- Wait until the status light changes from fast blinking green to flashing green to slowly flashing green. You are now successfully connected to your Wi-Fi network.
What is WPS?
WPS (Wi-Fi protected setup) is a simple way to connect a new device to a Wi-Fi network. WPS is a common feature on today's Wi-Fi wireless routers or Wi-Fi access points. After pushing the white "SETUP" button
Troubleshooting
- Repeat the procedure.
- Upgrade the software on your Wi-Fi router.
- Try the "AeroSphere Network Setup webpage" method in the next chapter.
- Check the Genevalab.com support page.
on the AeroSphere Base and the "WPS" button on the Wi-Fi access point, within about a minute the AeroSphere Base will automatically connect to the Wi-Fi network.
WI-FI SETUP WITH THE AEROSPHÈRE NETWORK SETUP WEBPAGE
Follow the detailed description in the "Feature Guide" on aerosphere.genevalab.com
VII FIRST STEPS WITH THE AEROSPHÈRE BASE

Once completed: you know how to use FM, DAB+ and the Audio CD with the remote control and the AeroSphere app. There is no additional setup needed because the AeroSphere Base will find all AeroSphere speakers automatically.
HOW TO CONTROL THE AEROSPHÈRE BASE
You can control the AeroSphere Base with the AeroSphere app and a remote control of the AeroSphere speaker. The Base has no remote control sensor so you need to point the remote control at an AeroSphere speaker.
How do I find the AeroSphere speakers and Base with the App?
Start the AeroSphère app. The AeroSphère app finds all available AeroSphère speakers and Base automatically.
How to download the AeroSphere app
iPhone version: search for "AeroSphere" in the App Store®
The Geneva AeroSphere app works with iPhone and iPod Touch.
Android version: search for "AeroSphere" in the Google Play store.
BEYOND THE BASICS
How many AeroSphère speakers can I connect to the AeroSphère Base?
Up to four AeroSphère speakers.
Why is there a delay when changing the AeroSphere sources (from/to FM, DAB, CD)?
The audio is streamed over the Wi-Fi network and then the audio is buffered for a few second on the speakers. The reason for audio buffering is to be less sensitive to Wi-Fi network traffic and to minimize audio interruptions.
Why is there a delay when I change stations in DAB or when I change tracks on a CD?
See above. After pressing a CD or DAB command on the remote control or app (change stations, change tracks), the station or tracks are changed immediately on the AeroSphere Base, but the audio buffering on the AeroSphere speakers adds a delay.
There are audio interruptions when I listen to FM radio
The wireless network bandwidth is not only limited, but also shared with Bluetooth, other devices on the same Wi-Fi network and Wi-Fi networks close by. See section "How to make sure you get the best audio streaming quality in your Wi-Fi network" for ways to minimize audio interruptions.
Can I turn the AeroSphère Base on and off from the AeroSphère App?
No. The AeroSphère Base is running all the time, similar to a WiFi router.
FM
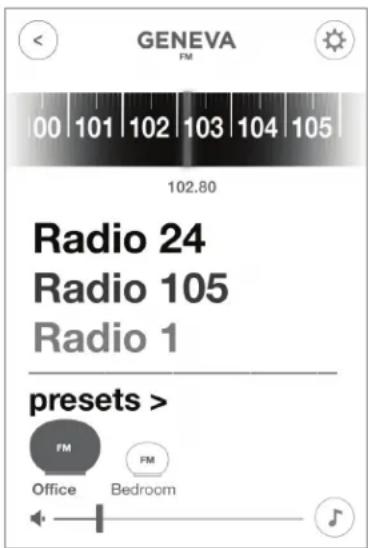
How to select FM
- Remote control: press .
- AeroSphere app: after you selected the AeroSphere speaker icon, select the FM menu in the main screen.
Find a station automatically with auto-search
- Remote control: Press ⏻ or ⏱
- AeroSphere app: Swipe the FM frequency scale.
Select a station manually
- AeroSphere app: slide the frequency scale to the desired frequency.
FM presets
- AeroSphere app: select a station in the FM station list. To store and edit the presets, select the menu entry "Presets".
DAB/DAB+
The AeroSphère Base is compatible with DAB and DAB+.
How to select DAB+
- Remote control: press
- AeroSphere app: after you have selected an AeroSphere speaker icon, select the DAB menu in the main screen.

Select a station
- Remote control: Press ⏻ or ⏻ to change radio stations.
- AeroSphere app: select a station in the DAB station list
Using DAB for the first time ("Scan" function)
Initially the AeroSphere Base has no DAB+ stations stored. Using the "Scan" function, the radio will find the available stations in your region. After a "Scan", the stations are automatically stored. The "Scan" function is also needed after moving the AeroSphere Base to a new location with different radio stations or when you move the AeroSphere Base to a room with a different radio reception.
- Tap the "Scan" menu item on DAB screen in the AeroSphere app.
- Once all available stations have been found, the list is refreshed.
What is DAB?
DAB / DAB+ (sometimes also called digital radio) is only available in certain countries (UK, Germany, Switzerland, Norway, Hong Kong, and more).

AUDIO CD
How to select CD
- Remote control: press
- AeroSphere app: after you have selected an AeroSphere speaker icon, select the CD menu in the main screen.

Basic control
- Remote control: use, and to play, pause and skip tracks.
- AeroSphere app: use the , and ... buttons.
How to eject a CD
- Hold your hand above the CD slot. The CD eject sensor is located above the CD slot. It detects the hand with a proximity sensor.
- Remote control: press
- AeroSphere app: use the eject icon in the AeroSphere app.

VIII TROUBLESHOOTING AND FAQ
See also areosphere.genevalab.com
GENERAL
Why are there two ⓊN buttons on the remote control?
The upper LINE IN refers to the LINE-IN analog audio input on the back of an AeroSphere speaker.
The lower (next to CD) selects the analog audio input on the back of the AeroSphere Base. Audio from this input is streamed to all connected AeroSphere speakers.
How do I change the battery in the remote control?
- Locate the small hole on the black side facing the user.
- Gently push the included pin into this hole and push in. Alternatively you can use a safety pin.
- Push the pin gently to the left side.
- The battery compartment will slide out. Replace the battery (3V lithium cell, 3V CR2032). Verify that the battery is inserted with the right polarity (+ side is facing down).

How do I change the bass and treble?
Use the music note icon in the AeroSphere app.
Power consumption in standby
AeroSphere Large: 0.47 Watt ( Powering off: use the ⏻ button on remote control or the power button on the back of the speaker )
AeroSphere Small: 0.3 Watt ( Powering off: use the ⏻ button on remote control or the power button on the back of the speaker )
AeroSphère Base: 0.3 Watt (Powering off: slide power switch to "OFF" position)
Why is the AeroSphère Small or AeroSphère Large turning itself off?
The AeroSphere speaker will automatically turn itself off after 15 minutes if there is no active audio input. This is an Energy saving functionality, required by law in many countries.
WI-FI SETUP
How to reset to factory default settings
AeroSphere speakers: Hold the power button on the back of the speakers for 10 seconds, until the display starts blinking red. Then remove your finger from the button.
AeroSphere Base: Hold the Wi-Fi button for a few seconds while turning the power switch from OFF to ON position.
What happens when I do reset to factory defaults?
- The Wi-Fi network settings are reset.
- The Wi-Fi setup method WAC is started (AeroSphere speakers only).
Are WAC and "Network setup webpage" methods active at the same time?
Yes, both methods are available at the same time. If you have an iOS device with iOS 7 or higher, you are not able to select the temporary Wi-Fi network from the Wi-Fi menu in the iOS preferences. With an iOS device with iOS 6 or lower, you will not see the WAC method in the Wi-Fi setup menu.
BLUETOOTH
I cannot connect to the AeroSphere speaker.
- Select Bluetooth with the remote control – the display must be blue (constant or flashing).
- If the display is NOT flashing, another device has already been connected. This device must first be turned off - only one device can be connected at the same time.
- Reset Bluetooth with the instructions below.
How to reset Bluetooth
Up to eight paired Bluetooth devices can be stored. To clear the memory, perform the following steps:
- Turn on the AeroSphere speaker and select with the remote control.
- Within 5 seconds of entering Bluetooth mode, hold down the button on the remote control for at least 5 seconds.
- Pair your mobile phone again.
During pairing, my smartphone requests a PIN—what is the PIN? If the phone asks for a PIN, enter "0000" (four zeros).
AIRPLAY
I don't see the AeroSphere speaker show up in the AirPlay icon of iTunes
The AirPlay icon in iTunes or iPhone only shows if an AirPlay speaker has been discovered in your Wi-Fi network. Make sure the AeroSphere speaker is successfully connected to your home network. The display must be constant green.
How do multiple AirPlay speakers in the same network behave together?
iTunes can play to more than one AirPlay speaker at the same time. The music will always be synchronized.
SUPPORT
Service and repair
If the product is damaged and needs repair, please contact your dealer. Visit www.genevalab.com to find a dealer in your area.
Warranty
See the specific terms for your country at www.genevalab.com.
natural_image
Two simple oval-shaped objects with rounded tops, no text or symbols presentAeroSphère Small & Large
- First steps with the AeroSphere Base ...... Seite 30
Netzanschluss


Anleitung

FERNBEDIENUNG

natural_image
Simple line drawing of a dome-shaped object with a base and two small circular elements at the bottom (no text or symbols)natural_image
Simple line drawing of a rounded object with a semi-circular cutout (no text or symbols)Industrie Canada (IC): Nr. 10107A - A040
Conformité CE
natural_image
Two simple oval-shaped objects with rounded tops, no text or symbols presentAeroSphère Small & Large


CONFIGURATION DU WI-FI AVEC WPS
Instructions
natural_image
Simple line drawing of a dome-shaped object with a base and two small circular markers at the bottom (no text or symbols)natural_image
Simple line drawing of a rounded object with a semi-circular cutout (no text or symbols)CONNECTER TOUS LES CÂBLES
Fixez l'antenne FM/DAB+
CONFIGURATION DU WI-FI AVEC WPS
natural_image
Two simple geometric shapes with rounded tops and base, no text or symbols presentAeroSphère Small & Large

Instrucciones
natural_image
Simple line drawing of a dome-shaped object with a base and two small circular markers at the bottom (no text or symbols)natural_image
Simple line drawing of a rounded object with a semi-circular cutout (no text or symbols)natural_image
Two simple oval-shaped objects with rounded tops, no text or symbols presentAeroSphère Small & Large
ACCENSIONE DELL'ALTOPARLANTE

CONFIGURAZIONE WI-FI TRAMITE WAC (WIRELESS ACCESSORY CONFIGURATION)
CONFIGURAZIONE WI-FI TRAMITE WPS
Istruzioni
natural_image
Simple line drawing of a dome-shaped object with a base and two small circular markers at the bottom (no text or symbols)natural_image
Simple line drawing of a computer mouse with an open lid (no text or symbols)COLLEGARE TUTTI I CAVI
Fissare l'antenna FM/DAB+
Apple, iPod, Apple, iPod, iPhone and iPad are trademarks of Apple Computer, Inc. registered in the U.S. and other countries.
natural_image
Two simple oval-shaped objects with rounded tops, no text or symbols presentAeroSphère Small & Large
Bluetooth-instellingen op de iPhone®
MUZIEK AFSPELEN MET BLUETOOTH
WI-FI-INSTELLING MET DE WAC (WIRELESS ACCESSORY CONFIGURATION).


WI-FI-INSTELLING MET WPS
Instructies
natural_image
Simple line drawing of a dome-shaped object with a base and two small circular markers at the bottom (no text or symbols)natural_image
Simple line drawing of a computer mouse with an open lid (no text or symbols)HET AANSLUITEN VAN ALLE DRADEN
natural_image
Two simple oval-shaped objects with rounded bases, no text or symbols presentAeroSphère Small & Large
- Kom godt i gang med AeroSphère Small og Large......side 100
Strømtislutning
Bluetooth-indstillinger på en iPhone®
AFSPILNING AF MUSIK MED BLUETOOTH
WI-FI-INDSTILLING MED WAC (WIRELESS ACCESSORY CONFIGURATION).

INDSTILLING AF WI-FI MED WPS
Instruktioner
natural_image
Simple line drawing of a dome-shaped object with a base and two small circular markers at the bottom (no text or symbols)natural_image
Simple line drawing of a computer mouse with an open lid (no text or symbols)TILSLUTNING AF ALLE KABLERNE
INDSTILLING AF WI-FI MED WPS
INDSTILLING AF WI-FI
natural_image
Two simple oval-shaped objects with rounded tops, no text or symbols presentAeroSphère Small & Large
Koppa in strömmen
WI-FI-INSTALLATION MED WAC (WIRELESS ACCESSORY CONFIGURATION).


WI-FI-INSTALLATION MED WPS
Instruktioner
natural_image
Simple line drawing of a dome-shaped object with a base and two small circular markers at the bottom (no text or symbols)natural_image
Simple line drawing of a computer mouse with an open lid (no text or symbols)ANSLUTA ALLA KABLAR
WI-FI-INSTALLATION MED WPS
natural_image
Two simple oval-shaped objects with rounded tops, no text or symbols presentAeroSphère Small & Large
- Komme i gang med AeroSphère Small & Large ....Side 132
Koble til strøm
WI-FI-OPPSETT MED WAC (WIRELESS ACCESSORY CONFIGURATION).

WI-FI-OPPSETT MED WPS

Instruksjoner
Bass og diskant
natural_image
Simple line drawing of a dome-shaped object with a base and two small circular markers at the bottom (no text or symbols)| STromknAPPEn | STrom På/Av |
| Wifi Oppsett-knappen | WPS-oppsett ( trykk knapp en gang )WAC oppsett / Nettverksoppsett-nettside (hold knappen inne i 10 sek) |
| Line-in kontakt | Analog lydinngang (stereo), 3,5 mm-kontakt |
| Strømkontaktinngang | AC-strøminngang (100 - 240 VAC, 50/60 Hz) |
V KOMME I GANG MED AEROSPHÈRE BASE

Tiden det tar: 5 minutter
natural_image
Simple line drawing of a computer mouse with an open lid (no text or symbols)KOBLE TIL ALLE LEDNINGER
Fest FM/DAB+ antenne
- Skru den medfølgende FM/DAB+ antennen inn i antennekontakten på baksiden.
- Skru de to stengene inn i enden av antennen
- Plasser enden av antennen minst en meter vekk fra AeroSphère Base. Med den lange ledningen kan du plassere antennen på et sted der du har best FM/DAB+ mottak. Legg merke til at bare de to stengene ved enden av ledningen er selve antennen.
Koble strøm
WI-FI-OPPSETT MED WPS
natural_image
Two simple oval-shaped objects with rounded tops, no text or symbols presentAeroSphère Small & Large
Kytke virta
WI-FI-ASENNUS WAC:LLÄ (WIRELESS ACCESSORY CONFIGURATION)
WI-FI-ASENNUS WPS:LLÄ
Ohjeet
KAUKOSÄÄDIN
natural_image
Simple line drawing of a dome-shaped object with a base and two small circular elements at the bottom (no text or symbols)vlrTAPAInIkE vlrTA PääIIE / PolS
natural_image
Simple line drawing of a computer mouse with an open lid (no text or symbols)KAIKKIEN JOHTOJEN YHDISTÄMINEN
Apple, iPod, iPhone and iPad are trademarks of Apple Computer, Inc. registered in the U.S. and other countries
natural_image
Two simple oval-shaped objects with rounded tops, no text or symbols presentAeroSphère Small & Large
Conecte à energia
CONFIGURAÇÃO DE WI-FI COM WAC (WIRELESS ACCESSORY CONFIGURATION).

Instruções
natural_image
Simple line drawing of a dome-shaped object with a base and two small circular buttons at the bottom (no text or symbols)natural_image
Simple line drawing of a computer mouse with an open mouth (no text or symbols)CONECTANDO TODOS OS FIOS
natural_image
Two simple oval-shaped objects with rounded tops, no text or symbols presentAeroSphère Small & Large

AeroSphère 스피커 켜기
iPhone®O
BLUETOOTH로 음악 재생
WPS WI-FI 설정
이 셋업을 위해 무엇이 필요한가?
지침
저음과 고음
natural_image
Simple line drawing of a dome-shaped object with a base and two small circular markers at the bottom (no text or symbols)natural_image
Simple line drawing of a computer mouse with an open mouth (no text or symbols)모든 전선 연결
FM/DAB+안테나 부착


- IMPORTANT SAFETY INSTRUCTIONS
- DO NOT INGEST BATTERY, CHEMICAL BURN HAZARD
- CAUTION: RISK OF ELECTRIC SHOCK, DO NOT OPEN ATTENTION: RISQUE DE CHOC ELECTRIQUE-NE PAS OUVRIR
- CE Conformity
- CE0359
- Licensing and copyrights
- Setup Guide version
- I ABOUT THE GENEVA AEROSPHÈRE SYSTEM
- AeroSphère Small and AeroSphère Large
- The speakers can be control via
- AeroSphère Base
- AEROSPHÈRE APP
- Functions
- How to download the AeroSphere App
- WHAT TO DO NEXT?
- AeroSphère Small & Large
- WOULD YOU LIKE TO LEARN MORE?
- Use the "Feature Guide" to learn more about the system
- II GETTING STARTED WITH THE AEROSPHÈRE SMALL & LARGE
- POWERING THE SPEAKER UP
- Connect power
- Remote control
- Turn on the AeroSphère speaker
- Using Bluetooth
- Now go to chapter "Wi-Fi Setup for AeroSphere Small & Large"
- Proper placement of the AeroSphère Large
- BLUETOOTH SETUP
- Initial Setup ("pairing") with iPhone, iPad or iPod touch
- PLAYING MUSIC WITH BLUETOOTH
- Status information on the display
- Pairing guide for other devices and mobile phones
- III WI-FI SETUP FOR THE AEROSPHÈRE SMALL & LARGE
- OVERVIEW
- WI-FI SETUP METHOD WHEN TO USE THIS METHOD
- WI-FI SETUP WITH WAC (WIRELESS ACCESSORY CONFIGURATION)
- What is needed for this setup?
- Instructions
- What is WAC?
- Troubleshooting
- WI-FI SETUP WITH WPS
- What is WPS?
- WI-FI SETUP WITH THE AEROSPHÈRE NETWORK SETUP WEBPAGE
- IV FIRST STEPS WITH THE AEROSPHÈRE SMALL & LARGE
- Are you connected to Wi-Fi?
- AIRPLAY
- What is AirPlay?
- Playing music with iTunes ® from a computer (Mac or Windows)
- Internet Radio, Spotify and other streaming apps
- Playing music from an iPhone, iPad or iPod Touch
- AirPlay on iOS 6 and earlier
- AirPlay on iOS 7 and newer
- AUDIO
- Volume
- DLNA
- What is DLNA?
- Bass and treble
- Playing music from the Android app "BubbleUPnP"
- DISPIAY
- color STATUS
- only WITH AEroSPhèrE BASE
- ADvAncED
- llnE-In
- BAck PAnEI
- V GETTING STARTED WITH THE AEROSPHÈRE BASE
- CONNECTING ALL WIRES
- Attach the FM / DAB+ Antenna
- Connect the power
- Next: Wi-Fi Setup
- Do I need to configure the AeroSphere system?
- How to eject the CD
- VI WI-FI SETUP FOR THE AEROSPHÈRE BASE
- VII FIRST STEPS WITH THE AEROSPHÈRE BASE
- HOW TO CONTROL THE AEROSPHÈRE BASE
- How do I find the AeroSphere speakers and Base with the App?
- BEYOND THE BASICS
- How many AeroSphère speakers can I connect to the AeroSphère Base?
- Why is there a delay when changing the AeroSphere sources (from/to FM, DAB, CD)?
- Why is there a delay when I change stations in DAB or when I change tracks on a CD?
- There are audio interruptions when I listen to FM radio
- Can I turn the AeroSphère Base on and off from the AeroSphère App?
- FM
- How to select FM
- Find a station automatically with auto-search
- Select a station manually
- FM presets
- DAB/DAB+
- How to select DAB+
- Select a station
- Using DAB for the first time ("Scan" function)
- What is DAB?
- AUDIO CD
- How to select CD
- Basic control
- How to eject a CD
- VIII TROUBLESHOOTING AND FAQ
- GENERAL
- How do I change the battery in the remote control?
- How do I change the bass and treble?
- Power consumption in standby
- Why is the AeroSphère Small or AeroSphère Large turning itself off?
- WI-FI SETUP
- How to reset to factory default settings
- What happens when I do reset to factory defaults?
- Are WAC and "Network setup webpage" methods active at the same time?
- BLUETOOTH
- I cannot connect to the AeroSphere speaker.
- How to reset Bluetooth
- I don't see the AeroSphere speaker show up in the AirPlay icon of iTunes
- How do multiple AirPlay speakers in the same network behave together?
- SUPPORT
- Service and repair
- Warranty
- Netzanschluss
- Anleitung
- FERNBEDIENUNG
- Conformité CE
- CONFIGURATION DU WI-FI AVEC WPS
- CONNECTER TOUS LES CÂBLES
- Fixez l'antenne FM/DAB+
- Instrucciones
- ACCENSIONE DELL'ALTOPARLANTE
- CONFIGURAZIONE WI-FI TRAMITE WAC (WIRELESS ACCESSORY CONFIGURATION)
- CONFIGURAZIONE WI-FI TRAMITE WPS
- Istruzioni
- COLLEGARE TUTTI I CAVI
- Fissare l'antenna FM/DAB+
- MUZIEK AFSPELEN MET BLUETOOTH
- WI-FI-INSTELLING MET DE WAC (WIRELESS ACCESSORY CONFIGURATION).
- WI-FI-INSTELLING MET WPS
- Instructies
- HET AANSLUITEN VAN ALLE DRADEN
- Strømtislutning
- AFSPILNING AF MUSIK MED BLUETOOTH
- WI-FI-INDSTILLING MED WAC (WIRELESS ACCESSORY CONFIGURATION).
- INDSTILLING AF WI-FI MED WPS
- Instruktioner
- TILSLUTNING AF ALLE KABLERNE
- INDSTILLING AF WI-FI
- Koppa in strömmen
- WI-FI-INSTALLATION MED WAC (WIRELESS ACCESSORY CONFIGURATION).
- WI-FI-INSTALLATION MED WPS
- ANSLUTA ALLA KABLAR
- Koble til strøm
- WI-FI-OPPSETT MED WAC (WIRELESS ACCESSORY CONFIGURATION).
- WI-FI-OPPSETT MED WPS
- Instruksjoner
- Bass og diskant
- V KOMME I GANG MED AEROSPHÈRE BASE
- KOBLE TIL ALLE LEDNINGER
- Fest FM/DAB+ antenne
- Koble strøm
- Kytke virta
- WI-FI-ASENNUS WAC:LLÄ (WIRELESS ACCESSORY CONFIGURATION)
- WI-FI-ASENNUS WPS:LLÄ
- Ohjeet
- KAUKOSÄÄDIN
- KAIKKIEN JOHTOJEN YHDISTÄMINEN
- Conecte à energia
- CONFIGURAÇÃO DE WI-FI COM WAC (WIRELESS ACCESSORY CONFIGURATION).
- Instruções
- CONECTANDO TODOS OS FIOS
- AeroSphère 스피커 켜기
- BLUETOOTH로 음악 재생
- WPS WI-FI 설정
- 지침
- 저음과 고음
- 모든 전선 연결
- FM/DAB+안테나 부착
Brand : GENEVA
Model : AeroSphère L
Category : Speaker