
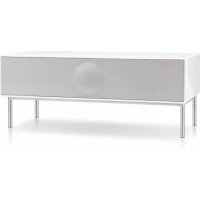
AeroSphère - Loudspeaker GENEVA - Free user manual and instructions
Find the device manual for free AeroSphère GENEVA in PDF.


| Product Type | Portable Bluetooth Speaker |
| Brand | Geneva |
| Model | AeroSphère |
| Dimensions | Approx. 25 cm diameter |
| Weight | Approx. 1.5 kg |
| Power Source | Built-in rechargeable battery (USB-C) or AC adapter |
| Battery Life | Up to 8 hours at moderate volume |
| Connectivity | Bluetooth 5.0, 3.5 mm auxiliary input |
| Driver | Full-range 3-inch driver |
| Frequency Range | 80 Hz - 20 kHz |
| Maximum Power Output | 20 W |
| Controls | Power, volume, play/pause, Bluetooth pairing |
| Microphone | Built-in for hands-free calls |
| Protection Rating | IPX4 (splash-proof) |
| Compatible Devices | Smartphones, tablets, laptops with Bluetooth |
| Material | High-quality fabric mesh and durable plastic |
| Color Options | Black, White, Red (subject to availability) |
| Box Contents | Speaker, USB-C cable, audio cable, manual |
| Maintenance | Clean with a soft dry cloth; avoid liquids |
| Safety Precautions | Do not expose to extreme temperatures; keep away from water (except splash-proof) |
| Spare Parts & Repairability | Contact Geneva customer service for spare parts; not user-serviceable |
| General Information | Designed in Switzerland; free manual available online |
Frequently Asked Questions - AeroSphère GENEVA
User questions about AeroSphère GENEVA
0 question about this device. Answer the ones you know or ask your own.
Ask a new question about this device
Download the instructions for your Loudspeaker in PDF format for free! Find your manual AeroSphère - GENEVA and take your electronic device back in hand. On this page are published all the documents necessary for the use of your device. AeroSphère by GENEVA.
USER MANUAL AeroSphère GENEVA
- User Interface: AeroSphere Small & Large 5
2.1. Remote control....5
2.2. AeroSphère App .... 5
2.3. Sound controls 5
2.4. Display 6
2.5. Back Panel 6
2.6. Playing Music with Line-In....6
- User Interface: AeroSphere Base 7
3.1. Insert and eject a CD 7
3.2. Back Panel....7
- User Interface: AeroSphere App ....8
4.1. Overview 8
4.2. Main screen 9
4.3. FM....11
4.4. DAB+....12
4.5. CD 13
4.6. Advanced: App SettingS....14
- Playing Music with Bluetooth....15
5.1. Setup ("Pairing") for iPhone, iPod touch and iPad 15
5.2. Using an iPhone, an ipod touch or an iPad 16
5.3. Setup ("pairing") for Android 17
5.4. Using An Android 17
- Playing Music with AirPlay....18
6.1. Playing music from an iPhone, and iPod touch or an iPad 18
6.2. Playing music with Spotify, Wimp, Deezer etc. from an iPhone....20
6.3. Playing Internet Radio from an iPhone....20
6.4. Using iTunes On Mac OR Windows....21
6.5. Playing music from iTunes to multiple AeroSphere speakers....22
6.6. Advanced: More on AirPlay 23
6.7. Advanced: using the iPhone app "AirPlay Multi room Player" With multiple AeroSphere speakers....24
- Playing Music on Android (DLNA)......25
7.1. Using DLNA on Android....25
7.2. Playing music from the Samsung app "Music" 26
7.3. Playing music from the app "BubbleUPnP" 26
- Playing Music with the AeroSphere Base 27
8.1. Using the AeroSphere Base 27
8.2. Using any iPhone music app With multiple AeroSphere speakers .....28
8.3. Using other audio devices with the AeroSphere Base 29
- Sound Setup....30
9.1. Recommended Audio Settings For AeroSphère Large 30
9.2. Left and Right setup (AeroSPHère SmallL)....31
- Wi-Fi Setup 32
10.1. OVERVIEW....32
10.2. Wi-Fi Setup with WAC (Wireless Accessory Configuration)....33
10.3. Wi-Fi Setup with WPS 34
10.4. ADVANCED: more on WPS 35
10.5. Advanced: Using the Network Setup webpage (AeroSphere Small & Large)....36
10.6. Advanced: Using the Network Setup webpage (AeroSphere BASE) 39
- Recommendations for the best audio streaming quality 40
11.1. Wi-Fi Router....40
11.2. Reasons for audio drops when streaming from a smart phone....40
-
Troubleshooting & FAQ 41
-
Copyrights....42
Document Version:
v0.50
1. About the Geneva AeroSphère System
1.1. AEROSPHÈRE SMALL, LARGE & BASE
AeroSphère Small and Large
AeroSphère Small and AeroSphère Large are wireless active speakers that play music from the following sources:
• AirPlay® (using Wi-Fi®)
- DLNA® for Android (using Wi-Fi)
- Bluetooth® audio (including the high quality codec aptX®)
- Line-In
In this guide, "AeroSphère speaker" refers to both models AeroSphère Small and AeroSphère Large.
The speakers can be controlled via
- Remote control (included with AeroSphère Small and AeroSphère Large)
and/or - AeroSphère app (iPhone® or Android®)
AeroSphère Base
By adding an AeroSphere Base to your home network, the following functions will be added to all connected AeroSphere speakers:
- FM radio
• DAB/DAB+ radio (only in countries with DAB service) - Audio CD
• Additional Line-In input
Up to four AeroSphere speakers can be connected to the AeroSphere Base. AeroSphere Base streams audio from CDs, FM or DAB to up to four connected AeroSphere speakers at the same time. The AeroSphere Base is controlled with the AeroSphere app (iPhone or Android). In addition, most functions can also be controlled with the remote control.
2. User Interface: AeroSphère Small & Large
2.1. REMOTE CONTROL

Figure 1: AeroSphère Small & Large remote control.
2.2. AEROSPHÈRE APP
Go to section User Interface: AeroSphere App this guide.
2.3. SOUND CONTROLS
Volume
- Remote control: use the volume buttons "VOL-" and "VOL+".
- AeroSphère app: use the volume bar on the bottom.
Bass and treble
In the AeroSphere App, tap the music note icon on the lower right side of the screen, and then use the bass and treble bar.
Optimal bass settings
The chapter "Sound Settings" shows you how to find the best Bass setting depending on where you place the AeroSphere speakers in the room.
2.4. DISPLAY
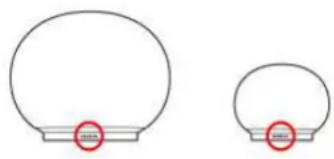
natural_image
Two identical dome-shaped objects with red circular markers at the base (no text or symbols)Figure 2: The color of the Geneva logo shows the operation status of the device.
| Color | Status |
| black Device is powered off | |
| yellow Device is starting up | |
| green AirPlay, DLNA, connected to the Wi-Fi network | |
| green (blinking) | AirPlay, DLNA, waiting to connect to the Wi-Fi network |
| blue Bluetooth, connected | |
| blue (blinking) Bluetooth, connecting or pairing | |
| pink Line-In | |
| Only with AeroSphere Base | |
| red Audio CD (AeroSphere Base) | |
| light blue FM or DAB+ (AeroSphere Base) | |
| pink Line-In (AeroSphere Base) | |
| red (blinking) Waiting to connect to audio CD | |
| light blue (blinking) Waiting to connect to FM or DAB+ | |
| pink (blinking) | Waiting to connect to Line-in from the Base |
| Advanced | |
| green / yellow (blinking) | Failed to connect to a Wi-Fi network |
| green (blinking 3 times) | At this moment, successfully connected to the Wi-Fi network |
| green(repeated short single blink) | Wi-Fi setup in progress (WPS method) |
| green(repeated short double blink) | Wi-Fi setup in progress (webpage or WAC method) |
| changing colors | Software update in progress |
2.5. BACK PANEL
| Item | Function |
| Power button | Power On / Off |
| Wi-Fi Setup button | WPS setup (push button once)WAC setup / Network webpage setup (hold button for 10 sec) |
| Line-in connector | Analog audio input ( stereo ), 3.5 mm connector |
| AC power input connector | AC power input (100 - 240 VAC, 50/60 Hz) |
2.6. PLAYING MUSIC WITH LINE-IN
The 3.5 mm analog audio input on the back of the AeroSphère speaker can be used for external audio sources. Press "LINE-IN" on the remote control. There are two "LINE-IN" buttons on the remote control: the upper "LINE-IN" button selects the analog audio input on the AeroSphère speaker, the lower "LINE-IN" button selects the analog audio input of the AeroSphère Base.
3. User Interface: AeroSphère Base
3.1. INSERT AND EJECT A CD
You can eject the CD with the following methods:
- Hold your hand about 10 mm above the CD slot. The CD eject sensor is located above the CD slot. It detects the hand with a proximity sensor.
- Use the eject button on the remote control.
- Use the eject icon in the AeroSphere app.
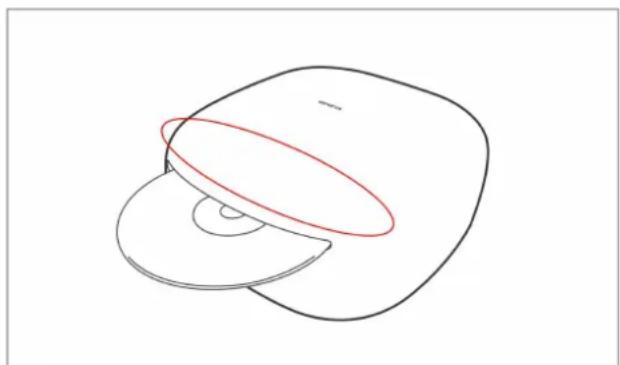
natural_image
Simple line drawing of a computer mouse with a red elliptical highlight on the screen (no text or symbols)Figure 3: Hold your hand in the marked area for inserting and ejecting a CD.
3.2. BACK PANEL

Figure 4: Base panel, the status light is marked in red.
Status light
| Color | Status |
| ■ yellow | AeroSphère Base is starting up, this takes about 20 seconds |
| ■ green | Successfully connected to the Wi-Fi network and successfully connected to at least one AeroSphère speaker |
| ■ green (slowly blinking) | Successfully connected to the Wi-Fi network |
| ■ green (fast blinking) | In the process of connecting to the Wi-Fi network |
| ■ green (single blinking, repeating) | Wi-Fi setup in progress (WPS method) |
| ■ green (double blinking, repeating) | Wi-Fi setup in progress (network setup webpage method) |
| ■■ yellow / green / red (changing) | Software update in progress |
Back panel
| Item | Function |
| Power switch | Power On / Off |
| Wi-Fi SETUP | Press WPS, then select button setup methodHold for 10 seconds: Network webpage setup method |
| Line-in connector | Analog audio input ( stereo ), 3.5 mm connector |
| DC power input | Connect to the AC power adapter connector |
| Radio antenna connector | Input for external FM / DAB antenna. F-Type connector. |
| Status light | Shows current status, see details below |
4. User Interface: AeroSphère App
In this chapter you'll learn how to use FM, DAB+ and the Audio CD with the remote control and the AeroSphere app. There is no additional setup needed because the AeroSphere Base will find all AeroSphere speakers automatically.
4.1. OVERVIEW
How to download the AeroSphère app
See the links on the AeroSphère Support page.
App Functions
• Automatic discovery of all AeroSphere products in your home network
- Change volume on all AeroSphère speakers
- Adjust bass and treble on all AeroSphère speakers
- Change the input sources on the speakers
- Start another streaming application
• Control the FM, DAB+ and Audio CD functionality of the AeroSphere Base
- Change names of all the speakers
About the AeroSphère System
The AeroSphère App (iPhone, Android) controls all Geneva AeroSphère products. AeroSphère Small and AeroSphère Large are wireless active speakers that play music from AirPlay (via Wi-Fi), DLNA and Bluetooth. The speakers can be controlled via remote control and the AeroSphère app (iPhone or Android). By adding the AeroSphère Base to your home network, the following functions will be added: FM, DAB+ and audio-CD. Up to four speaker play then the same music at the same time over the Wi-Fi network to the speakers.

flowchart
graph TD
    A["Remote"] --> B["Select & Control CD"]
    B --> C["Base"]
    C --> D["AeroSphere App"]
    D --> E["iPhone, Android"]
    F["Speaker 1"] --> G["CD"]
    H["Speaker 2"] --> I["CD"]
    J["Speaker 3"] --> K["CD"]
    L["Speaker 4"] --> M["CD"]
    N["Speaker 1"] --> O["CD"]
    P["Speaker 2"] --> Q["CD"]
    R["Speaker 3"] --> S["CD"]
    T["Speaker 4"] --> U["CD"]
    V["Speaker 1"] --> W["CD"]
    X["Speaker 2"] --> Y["CD"]
    Z["Speaker 3"] --> AA["CD"]
    AB["Speaker 4"] --> AC["CD"]
    AD["Source: CD"] --> AE["Base"]
    AF["Playing CD to multiple speakers"] --> AG["Speaker 1"]
    AF --> AH["Speaker 2"]
    AF --> AI["Speaker 3"]
    AF --> AJ["Speaker 4"]
Figure 5: Example configuration of four AeroSphère speakers and an AeroSphère Base. A remote control or the AeroSphère App can be used to control the system.
4.2. MAIN SCREEN

Figure 6: The main screen with an AeroSphere Base (left), and without an AeroSphere Base (right).
Starting the app
When the app starts, it will automatically find all AeroSphere products in the Wi-Fi network. If no products are discovered, learn more in the troubleshooting section.
In the main menu, first select the speaker icon, then the audio source. The CD, FM and DAB sources are only shown if you have an AeroSphere Base in your home network.
How to select a music source
- Select a speaker at the bottom
- Select one of the music sources, for example "FM"
- The current music source of a speaker can be seen inside the speaker icon
- The GENEVA logo of the speaker indicates the current music source with a color.
Current music source of an AeroSphère speaker - color of GENEVA logo
| Color | Music Source |
| ■ black | Off |
| ■ yellow | Device is starting up |
| ■ green | AirPlay, DLNA |
| ■ blue | Bluetooth |
| ■ pink | Line-In |
| ■ red | Audio CD (AeroSphère Base) |
| ■ light blue | FM or DAB+ (AeroSphère Base) |
| ■ pink | Line-In (AeroSphère Base) |
Customizing the speaker name
The name of the speaker can be changed in Settings ("Bath", "Kitchen", "Living Room").


Figure 7: Launching other music apps (left), bass and treble settings (right).
Audio controls
-
Select a speaker
-
Adjust the control for volume, mute, bass or treble
Volume: slider at the bottom
Mute: touch the speaker icon on the bottom left
Unmute: touch the same icon again
Bass, treble: touch the music note icon on the bottom right
How to launch your favorite music app quickly
There is a list of popular music apps. If you have an app installed on your device, the app will open.
4.3.FM

Figure 8: FM screen.
Find a station automatically with auto-search
Press the red << or >> auto-search keys on the display.
Select a station manually
Slide the frequency scale to the desired frequency.
FM presets
Select a station in the FM station list. To store and edit the presets, select the menu entry "Presets".
Changing between Mono and Stereo reception
In the settings menu, you can select either Mono or Stereo (if stereo is available, it will be the default option). If a station has weak reception, use Mono to reduce background noise.
Remote control usage
• How to select FM: press FM.
• Find a station with auto-search: Press the keys << or >>.
4.4. DAB+
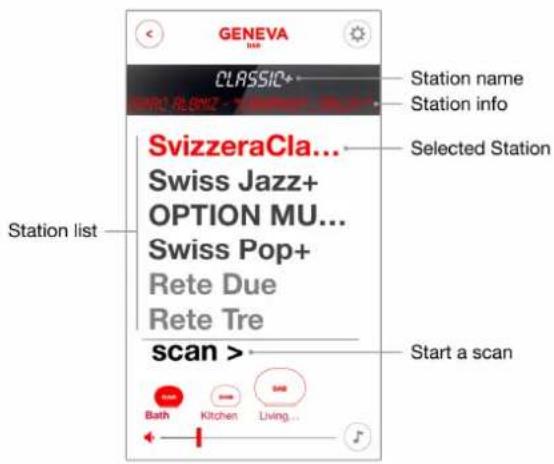
Figure 9: DAB screen.
How to select DAB+
After you have selected an AeroSphere speaker icon, select the DAB menu in the main screen.
Select a station
Select a station in the DAB station list. The currently selected station is marked red.
Using DAB for the first time ("Scan" function)
Initially the AeroSphere Base has no DAB+ stations stored. Using the "Scan" function, the radio will find the available stations in your region. After a "Scan", the stations are automatically stored. The "Scan" function is also needed after moving the AeroSphere Base to a new location with different radio stations or when you move the AeroSphere Base to a room with a different radio reception.
- Tap the "Scan" menu item.
- Once all available stations have been found, the list is refreshed.
Remote control usage
• How to select DAB: press DAB.
- Change stations: press the keys << or >>.
What is DAB?
DAB/DAB+ (sometimes also called digital radio) is only available in certain countries (UK, Germany, Switzerland, Norway, Hong Kong, and more). The AeroSphere Base is compatible with DAB and DAB+.
4.5. CD

Figure 10: DAB screen.
How to select CD
After you have selected an AeroSphere speaker icon, select the CD menu in the main screen.
Basic control
Use the Play/Pause and skip icons.
How to eject a CD
Use the eject icon in the AeroSphère app.
On the AeroSphere Base: hold your hand above the CD slot. The CD eject sensor is located above the CD slot. It detects the hand with a proximity sensor.
Remote control usage
• How to select CD: press CD.
• How to eject a CD: press Eject.
- Basic control: use play/pause, << and >> keys.
4.6. ADVANCED: APP SETTINGS

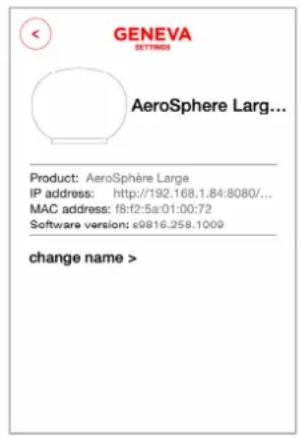
Figure 11: Settings, main menu (left), speaker menu (right).
Speakers
With this menu you have access to more details of each speaker and the Base. You can see the IP address, software version and change the name of each speaker. The speaker name will appear below the speaker icon (for example "Living room", "Studio" or "Kitchen").
DAB show/hide
If you do not have access to DAB, you can hide the DAB menu entry from the main menu.
FM stereo/mono
The FM mono settings are explained in detail in the FM section.
Password
You can enter a password to protect the settings menu from unauthorized access.
Customizing the "Line-In (Base)" menu entry
The "Line-In" audio input of the AeroSphere Base can be used to attach for external audio inputs: turntable, MP3 player, AirPort Express, etc. If you select speakers>AeroSphere Base> you can change the default name in the main menu from "Line-In (Base)", for example to "Turntable".
Changing the balance of the AeroSphère Small
See section "Audio" of the Feature Guide.
5. Playing Music with Bluetooth
5.1. SETUP ("PAIRING") FOR IPHONE, IPOD TOUCH AND IPAD
Mobile phones, tablets, and computers with Bluetooth can connect to the AeroSphere speaker and play music wirelessly. The mobile phone, tablet, or computer must support Bluetooth A2DP. The AeroSphere speaker supports also the high quality codec aptX.
Instructions
- Press Bluetooth on the remote control.
- Select "Settings / Bluetooth" on your iPhone. Turn on Bluetooth. New Bluetooth devices are detected automatically.
- Wait until "AeroSphère Small/Large ... (Not Paired)" appears.
- Select "AeroSphere...". The phone is now connecting ("pairing") to the AeroSphere speaker.
- Once successfully paired, you can play music on an iPhone, iPad or iPod touch and listen to it on the AeroSphere speaker.

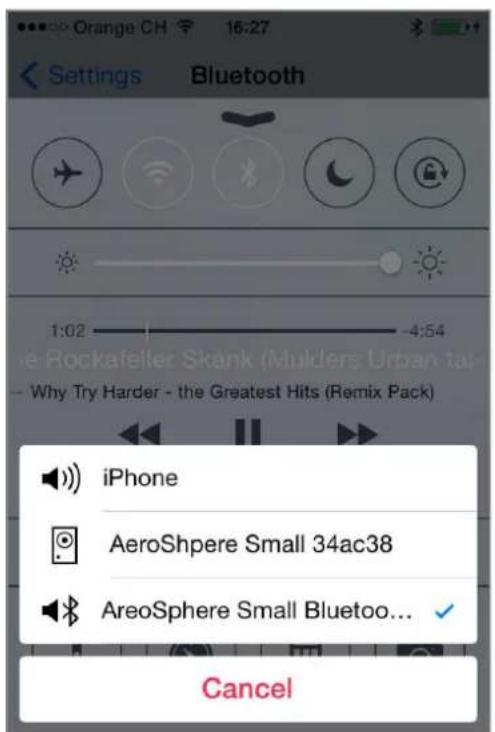
Figure 12: Bluetooth settings on the iPhone Selecting Bluetooth as audio output (control center of iOS7)
5.2. USING AN IPHONE, AN IPOD TOUCH OR AN IPAD
Overview
The easiest way to use the AeroSphere speakers wirelessly is by using Bluetooth. Mobile phones, tablets, and computers with Bluetooth can connect to the AeroSphere speaker and play music wirelessly. The AeroSphere speakers also support the high quality codec aptX. -The aptX codec is automatically selected by the app or software, if the device supports aptX (for example Mac OS X, Samsung Galaxy S, Samsung Note and Windows Phones).
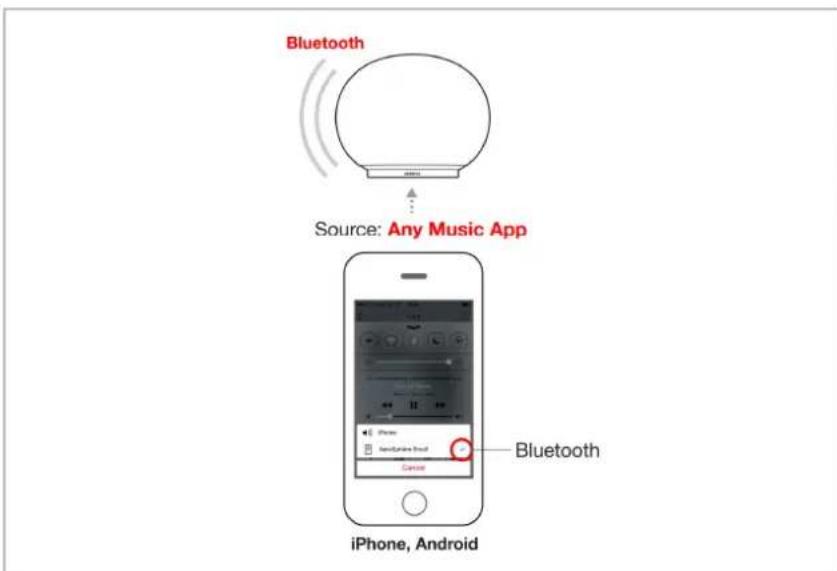

Figure 13 (left): Playing music with Bluetooth.
Figure 14 (right): Selecting Bluetooth speaker with the control center of the iPhone.
Playing music with Bluetooth
Most smart phones automatically connect to the AeroSphere speaker after the initial setup ("pairing").
- Press the Bluetooth key on the remote control. When the AeroSphere speaker connects, the display changes from a flashing blue to a constant blue color.
- Music will now stream automatically from your phone to the AeroSphere speaker.
Status information on the display
- Blue, constant: successfully connected.
- Blue, fast flashing: searching for previously paired devices.
- Blue, slow flashing: pairing / no active connection.
5.3. SETUP ("PAIRING") FOR ANDROID
Android phones and tablets with Bluetooth can connect to the AeroSphere speaker and play music wirelessly. The Android phones and tablets must support Bluetooth A2DP. The AeroSphere speaker supports also the high quality codec aptX.
Instructions
- Press Bluetooth on the remote control.
- Select "Settings" on the device.
- Turn on Bluetooth (switch on the right is green).
- Select "Bluetooth" to go into the Bluetooth screen
- Wait until "AeroSphere Small/Large ... (Not Paired)" appears under "Available devices". If you don't see a new entry, press "Scan".
- Select "AeroSphère...". The phone is now connecting ("pairing") to the AeroSphère speaker.
- Once successfully paired, you can play music on an Android device and listen to it on the AeroSphere speaker.
natural_image
Simple line drawing of a spherical object with motion lines indicating sound or vibration (no text or symbols)Source: Any Music App
Android
Figure 15: Playing music via Bluetooth from an Android phone.
Pairing and playing music from an Android phone is very similar to an iPhone. See the Bluetooth section in "Playing Music".
6. Playing Music with AirPlay
What is AirPlay?
AirPlay lets you wirelessly stream music from your iPhone, iPad, iPod touch, Mac or Windows computer to the Geneva AeroSphere speaker and other AirPlay speakers. Once you select the AeroSphere speaker with the AirPlay icon in iTunes or the iOS device, the AeroSphere speakers switch automatically from the current audio source to AirPlay.
6.1. PLAYING MUSIC FROM AN IPHONE, AND IPOD TOUCH OR AN IPAD

Figure 16: Using AirPlay to stream music wirelessly on an AeroSphere speaker.
Instructions
- Select the "Music" app or any other streaming app to play music
- Open the "control center". Swipe the screen from the bottom to the top to make the control center appear. The AirPlay icon shows available speakers below the play/pause icon. If there are no AirPlay speakers available, the AirPlay icon is hidden.
- Select the AirPlay icon, then select "AeroSphere Small" or "AeroSphere Large".
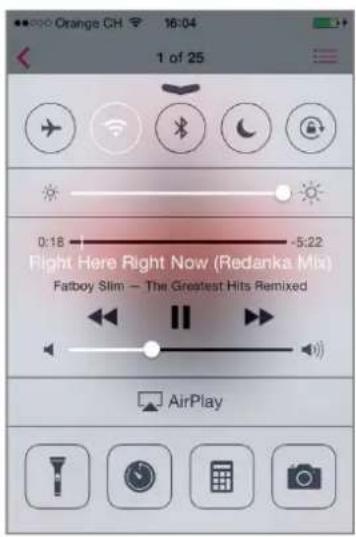

Figure 17: Selecting an AirPlay speaker with the control center of the iPhone
Are you connected to Wi-Fi?
Before using AirPlay, DLNA, FM, DAB+ or CD, you need to connect the AeroSphere speaker to your Wi-Fi network. See the chapter "Wi-Fi Network Setup" in the Setup Guide.
Turn on the power of the AeroSphere speaker and check the display. After the start-up period (yellow), a blinking display means you are waiting to connect. Once you are successfully connected, the display is constant. For detailed display status information, go to the following chapter "Controls".
AirPlay on iOS 6 and earlier
The AirPlay selection is done inside the app, since there is no "control center". You can listen to music from other iPhone apps, such as Internet Radio, Spotify, etc. In most iPhone apps, the AirPlay icon will automatically appear if there is an AirPlay speaker in your local network
6.2. PLAYING MUSIC WITH SPOTIFY, WIMP, DEEZER ETC. FROM AN IPHONE
Any music iPhone app works with AirPlay
Any audio streaming app such as Spotify, Wimp or Deezer can stream audio to the AeroSphere speaker via AirPlay. The same applies for any Internet Radio app.
Instructions
- Start the streaming app (for example Spotify).
- Play some music.
- Open the control panel (swipe from the bottom to the top). Select the AeroSphere speaker and wait a few seconds.
- Now you can hear the music from the AeroSphere speaker. The speaker changes from any source automatically to AirPlay.
- Adjust the volume with the volume slider in the iPhone control center, or use the remote control. The volume level on the AeroSphere speaker and the iPhone control panel are always synchronized.
The steps for using Bluetooth are the exact same as using AirPlay. The Bluetooth option is in the same menu in the control center.
How to get to your favorite streaming app quicker
If you are using the AeroSphere app, you can go directly to your favorite app. In the main screen, browse down, until you see entries such as "Music", "Spotify" or "Wimp". Tap the menu item, and the app is launched directly from the AeroSphere app.
6.3. PLAYING INTERNET RADIO FROM AN IPHONE
AirPlay supports any Internet Radio app on the iPhone, iPod touch and iPad. Our recommended Internet Radio app is "Tuneln Radio".
Instructions
- Start the app "Tuneln Radio" (or any other Internet Radio app).
- Select a radio station, press play. Wait until the music plays on your iPhone.
- Open the control panel (swipe from the bottom to the top). Select the AeroSphere speaker and wait a few seconds.
- Now you can hear the music from the AeroSphere speaker. The speaker changes from any source automatically to AirPlay.
- Adjust the volume with the volume slider in the iPhone control center, or use the remote control. The volume level on the AeroSphere speaker and the iPhone control panel are always synchronized.
6.4. USING ITUNES ON MAC OR WINDOWS
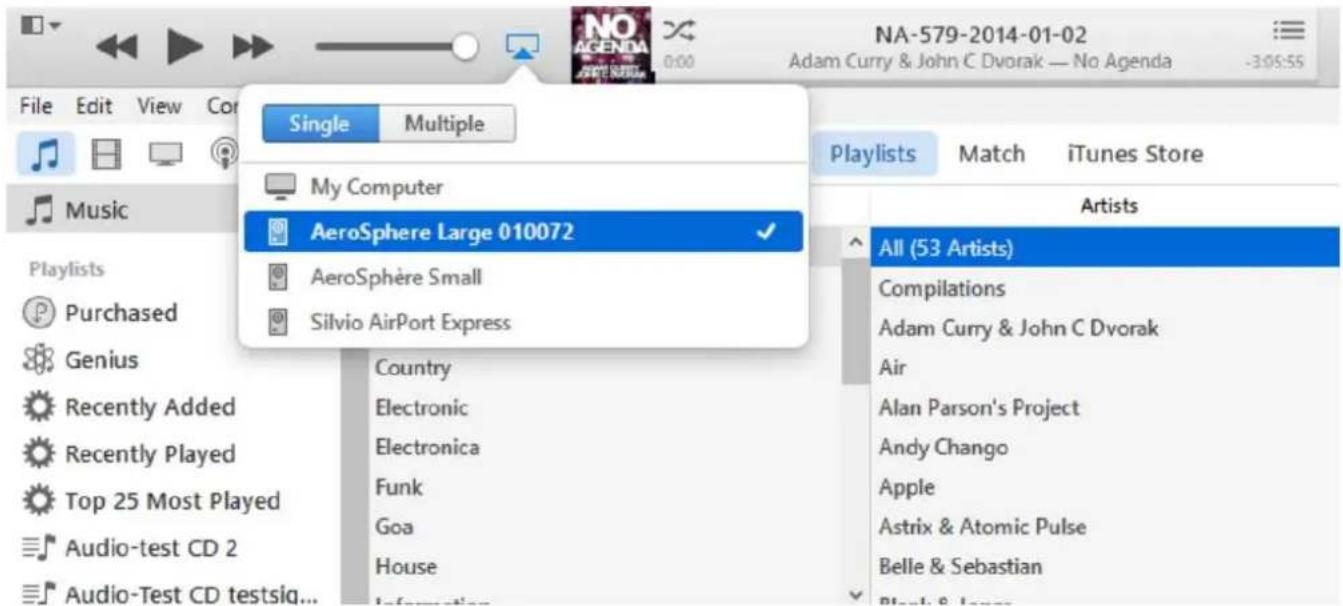
Figure 18: selecting an AeroSphere speaker from iTunes.
Instructions
- Turn the AeroSphère speaker on.
- Wait until the AeroSphere speaker has successfully connected to the Wi-Fi network (the display is constant green).
- Open iTunes on your Mac or Windows computer.
- Select the AirPlay icon, then select "AeroSphere Small" or "AeroSphere Large".
- Play a track, the music is now streamed to the selected AeroSphere speaker over the Wi-Fi network.
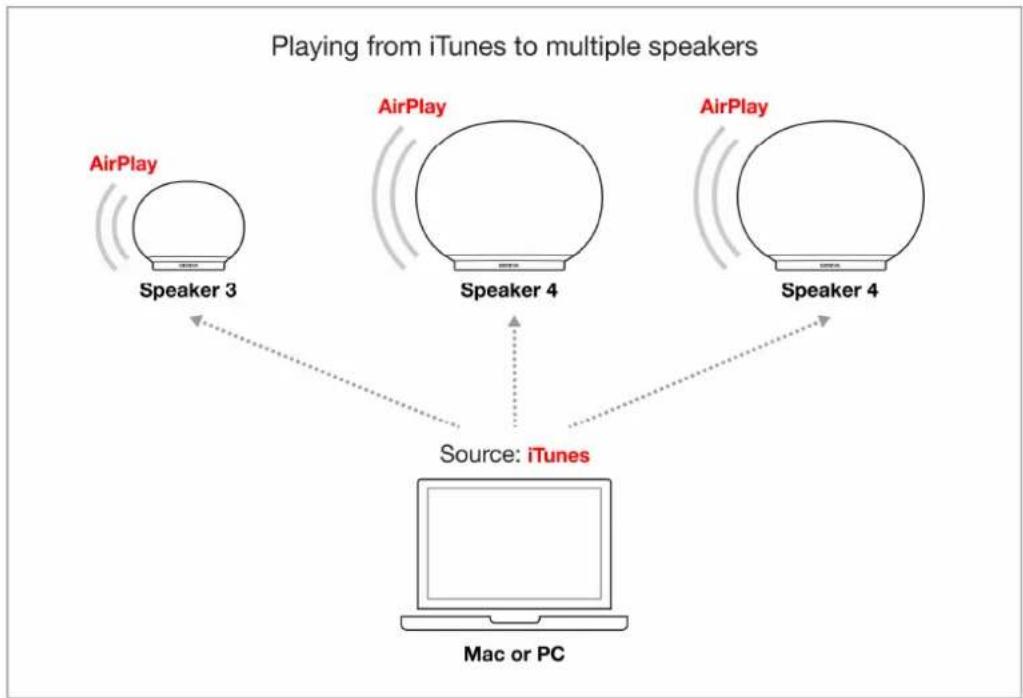
6.5. PLAYING MUSIC FROM ITUNES TO MULTIPLE AEROSPHÈRE SPEAKERS
flowchart
graph TD
    A["Speaker 3"] -->|AirPlay| B["Source: iTunes"]
    C["Speaker 4"] -->|AirPlay| B
    D["Speaker 4"] -->|AirPlay| B
    E["Speaker 4"] -->|AirPlay| B
    F["Speaker 4"] -->|AirPlay| B
    B --> G["Mac or PC"]
Figure 19: Playing from iTunes to multiple speakers.
Instructions
- Repeat the steps above
- Select the AirPlay icon, then check "Multiple".
- Uncheck "My Computer" and select all AeroSphere speakers.
- Music from iTunes will now play on all connected AeroSphere speakers.

Figure 20: Selecting multiple speakers from iTunes.
6.6. ADVANCED: MORE ON AIRPLAY
Automatic selection of AirPlay and volume synchronization
When you select the Geneva AeroSphere speaker in the AirPlay menu, the speaker automatically changes to AirPlay. There is no need to use the remote control to switch. Furthermore, the volume level that you see on the control panel is the current volume level from the speaker. When you change the volume with the remote control, the volume is automatically updated on the iPhone.
Several AirPlay speakers in the same Wi-Fi network
You can use several AirPlay speakers in the same Wi-Fi network. For example, if you play music from your iPhone to the AeroSphere Small, you can use your iPod with the AeroSphere Large at the same time.
Playing the same music to several AirPlay speakers at the same time
You can do this with an iPhone/iPod, Mac or a Windows PC, as in the following figure.

Figure 21: You can play music to several AirPlay speakers independently at the same time.
6.7. ADVANCED: USING THE IPHONE APP "AIRPLAY MULTI ROOM PLAYER" WITH MULTIPLE AEROSPHÈRE SPEAKERS
If you don't have an AeroSphere Base you still can play music from an iPhone music app multiple AeroSphere speakers. The iPhone app "AirPlay Multiroom Player" by Whaale allows music to be played from the following sources:
- Local music files from your iPhone
• Deezer music service - Internet radios

flowchart
graph TD
    A["Speaker 1"] --> B["Speaker 2"]
    B --> C["Speaker 3"]
    C --> D["Speaker 4"]
    E["iPhone"] --> B
    F["Source: "AirPlay Multiroom Player" app by Whale\nLocal music, Internet radio, Deezer"] --> B
    G["Playing music with the app 'AirPlay Multiroom Player to multiple speakers'"] --> B
Figure 22: Playing music with the app "AirPlay Multiroom Player" to multiple speakers.
Playing music
- Download the app (search for "Airplay Multiroom player" by Whaale).
- Start the app.
- On the lower left, tap until you see "SPEAKER" - you will see all AirPlay speakers in your network.
- Drag the AirPlay speakers up.
- On the lower left, tap until you see "MUSIC" - on the bottom you see your music sources.
- Drag the "iPod" icon up, to the speakers, then press the large play icon.
- You will see a music collection. Choose a song and then press play.
- If you press the large round icon on the left, you will see the volumes for each speaker.
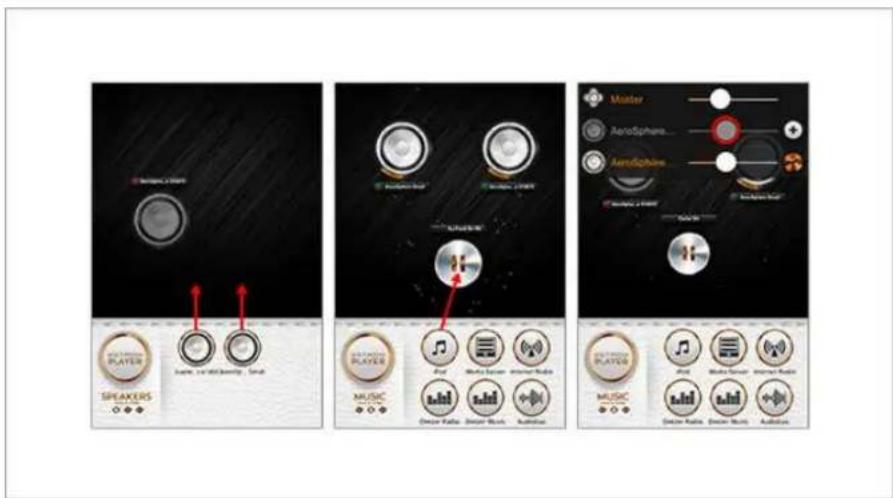
Figure 23: Drag the speakers up (left), then drag the iPod icon up (middle), adjust the volume (right).
7. Playing Music on Android (DLNA)
The AeroSphere speakers work with apps that have DLNA support. DLNA is a standard for streaming audio via a home network to a speaker. Once a user selects the AeroSphere speaker in a DLNA app on a smartphone, the AeroSphere speakers will switch automatically from the current audio source to DLNA. DLNA works very similar to AirPlay. The main difference is that DLNA must be supported by the music app itself, because the Android OS does not have an DLNA output function similar to the AirPlay button on the iPhone control panel.
Recommended Android apps
We recommend the following apps for streaming music from your Android phone or tablet to the AeroSphere speaker:
- "Music" on Samsung phones (pre-installed music player app on most Samsung phones)
- "BubbleUPnP"

Source: Apps with DLNA
Android
Figure 24: Using DLNA to stream music wirelessly on an AeroSphere speaker.
7.2. PLAYING MUSIC FROM THE SAMSUNG APP "MUSIC"

Figure 25: Playing music on an AeroSphere Small speaker with the Samsung "Music" app.
Setup: The app "Music" is already preinstalled on most Samsung phones.
Step 1: Play a track or an album.
Step 2: Select the music note icon/album art on the lower right to go to the next screen.
Step 3: Press the icon on the upper left to go into the "Select device" menu.
Step 4: Select "AeroSphere Small". Music will automatically play on the AeroSphere speaker.
7.3. PLAYING MUSIC FROM THE APP "BUBBLEUPNP"

Figure 26: Playing music on an AeroSphere Small speaker with the "BubbleUPnP" app.
Setup: Download "BubbleUPnP" from the Google Play store.
Step 1: Open the "Local Renderer"
Step 2: Select "AeroSphère Small".
Step 3: Press on the bar to go to the next screen.
Step 4: Press play. Music will automatically play on the AeroSphere speaker.
Step 5: Adjust the volume. The volume on the speaker is now synchronized with the app's volume slider.
With the BubbleUPnP app, you can play music from the following sources:
- Music files (MP3) stored locally on your Android phone.
- Music from other DLNA servers in your local network.
8. Playing Music with the AeroSphère Base
8.1. USING THE AEROSPHÈRE BASE
What can I do with the AeroSphère Base?
You can stream FM, DAB+ and Audio CDs to a maximum of four AeroSphère speakers simultaneously. You control the AeroSphère Base with the AeroSphère app and a remote control. The Base has no remote control sensor, so you need to point the remote control at an AeroSphère speaker. You don't need the use AeroSphère app all the time, as most functions work with the remote control.
AeroSphère setup
All AeroSphère speakers and the AeroSphère Base need to be connected to the same Wi-Fi network. There is no additional setup needed because the AeroSphère Base will find all AeroSphère speakers automatically.

flowchart
graph TD
    A["Remote"] --> B["Select & Control CD"]
    B --> C["Speaker 1"]
    B --> D["Speaker 2"]
    B --> E["Speaker 3"]
    B --> F["Speaker 4"]
    C --> G["CD"]
    D --> H["CD"]
    E --> I["CD"]
    F --> J["CD"]
    G --> K["Base"]
    H --> K
    I --> K
    J --> K
    K --> L["AeroSphere App"]
    L --> M["iPhone, Android"]
Figure 27: Configuration of four AeroSphère speakers and one AeroSphère Base. A remote control or the AeroSphère app can be used to control the system.
How do I find the AeroSphere speakers and Base with the App?
Once the AeroSphère app is started, it finds all available AeroSphère speakers and the Base automatically.
8.2. USING ANY IPHONE MUSIC APP WITH MULTIPLE AEROSPHÈRE SPEAKERS
You can play music from your favorite iPhone app and stream it to all connected AeroSphere speakers. This multi room setup supports up to four AeroSphere speakers playing music at the same time.

flowchart
graph TD
    A["Spotify Wimp"] --> B["Speaker 1"]
    C["Spotify Wimp"] --> D["Speaker 2"]
    E["Spotify Wimp"] --> F["Speaker 3"]
    G["AeroSphere app"] --> H["Base"]
    I["AirPort Express"] --> J["AirPlay"]
    K["AeroSphere app"] --> L["Select LINE IN"]
    M["Base"] --> N["AirPlay"]
    O["AirPort Express"] --> P["AirPlay"]
    Q["Sensor: Remote"] --> R["Change volume"]
    S["Sensor: Speaker 1"] --> T["Spotify 1"]
    U["Sensor: Speaker 2"] --> V["Spotify 2"]
    W["Sensor: Speaker 3"] --> X["Spotify 3"]
    Y["Sensor: iPhone"] --> Z["iPhone"]
    AA["Sensor: iPhone"] --> AB["iPhone"]
Figure 28: Playing any music from any iPhone app to multiple AeroSphere speakers.
Setup
- Connect an Apple AirPort Express to your network (wired or Wi-Fi).
- Connect the audio output of the AirPort Express to the "LINE IN" input of the AeroSphere Base with a 3.5 mm cable.
Playing music
- Start your favorite music app on your iPhone or iPad (for example Spotify or Wimp).
- In the control panel, select the AirPort Express as AirPlay output.
- Select "Line-In (Base)" from the AeroSphere app, or change all connected AeroSphere speakers to "LINE-IN" (the lower one) with the remote control.
- Music from your iPhone will now play on all connected AeroSphere speakers.
- Change the Master volume with the volume control in the iPhone app.
- Change the volume of each speaker in the AeroSphere app or with the remote control.
Background
The AirPlay technology supports multiple speakers, and the audio is properly synchronized. Currently AirPlay can play to multiple speakers on iTunes (Mac or Windows) and any music software on Mac OS X. However, on iOS devices AirPlay can only be streamed to one AirPlay speaker.
8.3. USING OTHER AUDIO DEVICES WITH THE AEROSPHÈRE BASE
You can connect your turntable to the AeroSphere system with the "LINE IN" input of the AeroSphere Base. Connect the audio output (Line out, head phone out) with the "LINE IN" 3.5 mm connector at the back of the Base.

flowchart
graph TD
    A["Speaker 1"] -->|Turntable| B["Speaker 2"]
    C["Speaker 2"] -->|Turntable| D["Speaker 3"]
    E["Speaker 3"] -->|Turntable| F["Base"]
    G["Base"] -->|Select LINE IN| H["Remote Control Panel"]
    I["Headphone out, 3.5 mm cable to Base, 3.5 mm LINE input"] --> J["Source: LINE IN"]
    K["Source: Turntable"] --> L["End"]
Figure 29: Playing music from a turntable to multiple speakers with the AeroSphere system.
9. Sound Setup
9.1. RECOMMENDED AUDIO SETTINGS FOR AEROSPHÈRE LARGE
Bass setup
The AeroSphere Large has a very powerful subwoofer. If the speaker is placed close to a wall or a corner, the bass will be amplified and too dominant. The bass is adjusted in the AeroSphere app, and can be accessed by selecting the music note icon on the lower right.

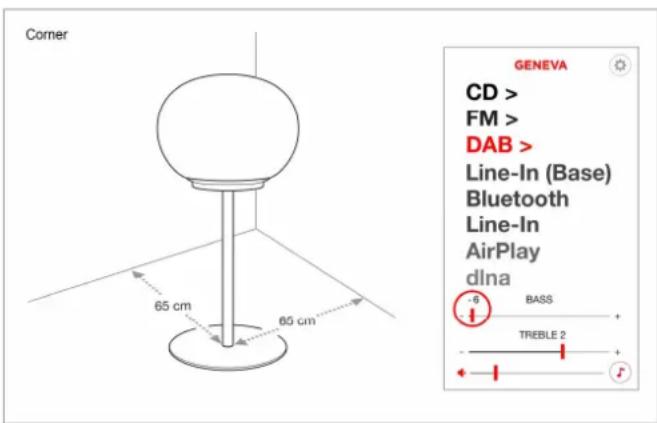
Figure 30: AeroSphère Large placed next to a wall. Figure 31: AeroSphère Large placed in a corner
- Freestanding
Bass setting: 0 (no adjustments needed)
Optimal position for best sound: place the speaker at least 2 meters from next wall.
- Next to a wall
Bass setting: -4 to -5
Optimal position for the best sound: place the speaker so that the center of the speaker is 50 cm away from the wall and has at least 2 meters free on each side.
- In a corner
Bass setting: -6
Optimal position for the best sound: place the speaker so that the center of the speaker is 55 cm away from both walls.
Treble setup
Depending on the room, adjust the treble to your liking. Typically, floors and walls that reflect sound well (wood, stone, concrete) need less treble. If you have a lot damping (carpets, curtains) then you might need to increase the treble setting.
9.2. LEFT AND RIGHT SETUP (AEROSPHÈRE SMALL)
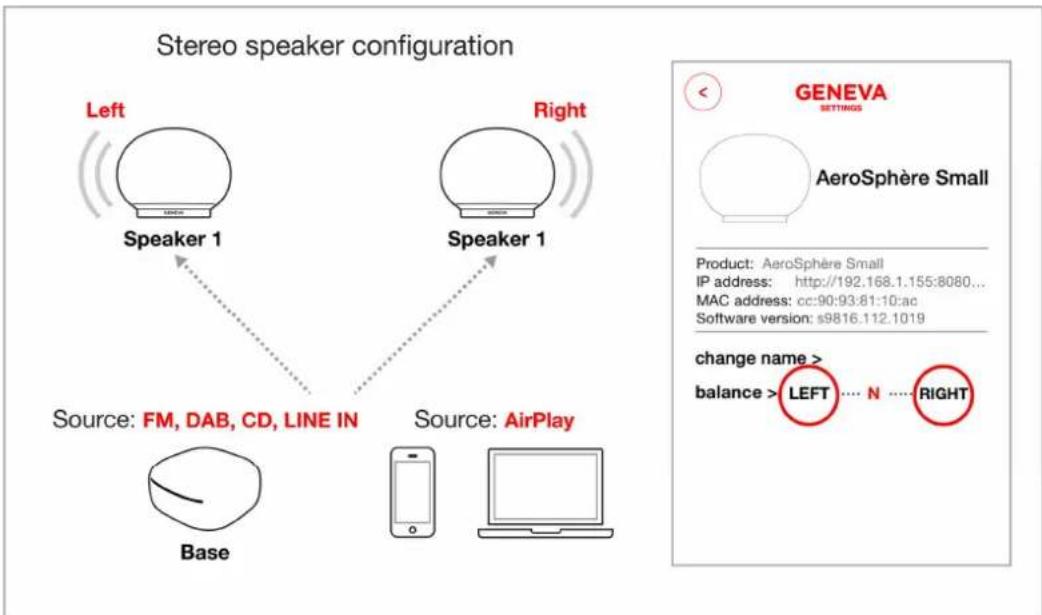
Two AeroSphere Small speakers can be configured and used as a pair of stereo speakers. With the AeroSphere App, each speaker has a balance option in Settings:
N = neutral (default setting) - the mono speaker is using a mix between the left and right channel LEFT = play only the left audio channel RIGHT = play only the right audio channel
Use the balance settings and select LEFT for the left speaker and RIGHT for the right speaker. The audio will be synchronized, so that there is no delay between the two speakers. These settings can only be used for AeroSphere Small.
flowchart
graph TD
    A["Speaker 1"] --> B["Source: FM, DAB, CD, LINE IN"]
    C["Speaker 1"] --> D["Source: AirPlay"]
    E["Base"] --> F["Sensor Icon"]
    G["Left"] --> H["Speaker 1"]
    I["Right"] --> J["Speaker 1"]
    K["Source: AirPlay"] --> L["Sensor Icon"]
    M["Source: AirPlay"] --> N["Sensor Icon"]
Figure 32: Two AeroSphere Small speakers can be configured in a stereo speaker configuration.
10. Wi-Fi Setup
10.1. OVERVIEW
Playing music wirelessly with AirPlay or DLNA requires the AeroSphere speakers to be connected to your home network via Wi-Fi (WLAN / wireless network). There are three different methods you can use for the Wi-Fi setup.
| Wi-Fi Setup method | When to use this method | Supported by |
| WAC * With an iPhone, iPad, or iPod Touch (requires iOS 7 or higher) | AeroSphere Small, Large | |
| WPS With a Wi-Fi router, which has a WPS push button for easy network setup. | AeroSphere Small, Large, Base | |
| AeroSphere Network Setup webpage | Advanced method, if the other methods don't work | AeroSphere Small, Large, Base |
* Enabled by default when using the AeroSphere speaker for the first time.
10.2. WI-FI SETUP WITH WAC (WIRELESS ACCESSORY CONFIGURATION)
What is needed for this setup?
- An iPhone, iPad or iPod Touch with iOS version 7 or higher.
- The iOS device must already be connected to your Wi-Fi network
Instructions
- Turn the AeroSphere speaker on: wait until you see the display flash two times repeatedly in green. When you are using the AeroSphere speaker for the first time, this mode is already enabled. Skip step 2 and go to step 3.
- If the display does not flash two times repeatedly in green, you can enable the Wi-Fi Setup with WAC manually: Hold the "SETUP" button on the back for 10 seconds, until the display starts flashing two times repeatedly in green.
-
Go into Preferences on your iOS device and select Wi-Fi.
-
Wait until you see the entry "SET UP NEW AIRPLAY SPEAKER" on the lower part of the display. Select it.
-
Press "Next" on the upper right.
-
The iOS device will now automatically transfer its Wi-Fi settings to the AeroSphere speaker.
-
Wait until the display of the AeroSphere speaker has successfully connected to the Wi-Fi network: the display changes from a flashing green to a constant green.

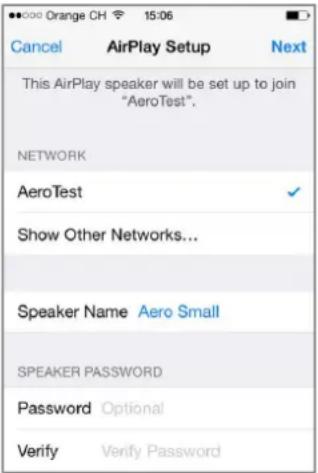


Figure 33: 4. AirPlay Wi-Fi setup with WAC with iPhone, iOS version 7 or higher.
What is WAC?
WAC is an easy Wi-Fi setup method for iOS devices (iPhone, iPad, iPod Touch). By default, this Wi-Fi setup method is enabled when you use the AeroSphere speakers for the first time. The display indicates that WAC is active by flashing two times repeatedly in green.
Troubleshooting
- Repeat the procedure.
- Make sure your iPhone, iPad or iPod touch are using iOS version 7 or higher
- Make sure your iPhone, iPad or iPod touch is connected to a Wi-Fi network
- Try another Wi-Fi setup method.
- Check the networking troubleshooting guide on the Genevalab.com support page.
10.3. WI-FI SETUP WITH WPS
What is needed for this setup?
Your Wi-Fi router needs to support WPS. No computer or smartphone is needed for this setup.

Figure 34: Wi-Fi setup with WPS. Press the WPS button on both the Wi-Fi router and the AeroSphere speaker.
Instructions
- Turn the AeroSphère speaker on.
- Wait until the display flashes in green.
- Press the "SETUP" button on the back of the AeroSphere speaker.
- On the Wi-Fi router, press the WPS button. Typically a light on the button starts to flash. If nothing happens, you may have to hold the button for a few seconds. The AeroSphere speaker and the Wi-Fi router are now starting to connect to each other.
- Wait until the display of the AeroSphere speaker changes to button green. This can take up to a minute. Now you are connected to your Wi-Fi network.
What is WPS?
WPS (Wi-Fi protected setup) is a simple way to connect a new device to a Wi-Fi network. WPS is a common feature on most Wi-Fi wireless routers or Wi-Fi access points. After pushing the "SETUP" button on the AeroSphere Small or Large and the "WPS" button on the Wi-Fi access point, the AeroSphere Small or Large will automatically connect to the Wi-Fi network (this takes about one minute).
Troubleshooting
- Repeat the procedure.
- Upgrade the software on your Wi-Fi router.
- Try another Wi-Fi setup method.
- Check the networking troubleshooting guide on the Genevalab.com support page.
10.4. ADVANCED: MORE ON WPS
WPS Icon
Sometimes only an icon is shown on a Wi-Fi router, without the name "WPS".
Official WPS icon:

Different names for WPS
WPS is not always labeled "WPS".
Netgear
WPS = Push'n connect
Netgear WPS Icon:

Fritzbox
WPS button = WLAN

WPS does not always work
Some Wi-Fi routers offer WPS, but it does not work at all.
10.5. ADVANCED: USING THE NETWORK SETUP WEBPAGE (AEROSPHÈRE SMALL & LARGE)
What is needed for this setup?
You need a computer (Mac, Windows or Linux), a tablet or a smartphone that is connected to your home network. You also need to know the password of your Wi-Fi network. This method works with any Wi-Fi router or Wi-Fi access point.
flowchart
graph TD
    A["3 Push SETUP key 10 sec."] --> B["4 Wait 30 sec."]
    B --> C["5 Temporary Wi-Fi network: AEROSPHERE_*_SETUP"]
    C --> D["6 Connect to Wi-Fi"]
    D --> E["7 Network Setup for GENEVA AeroSphere"]
    E --> F["8 Configure"]
    F --> G["9 Cancel"]
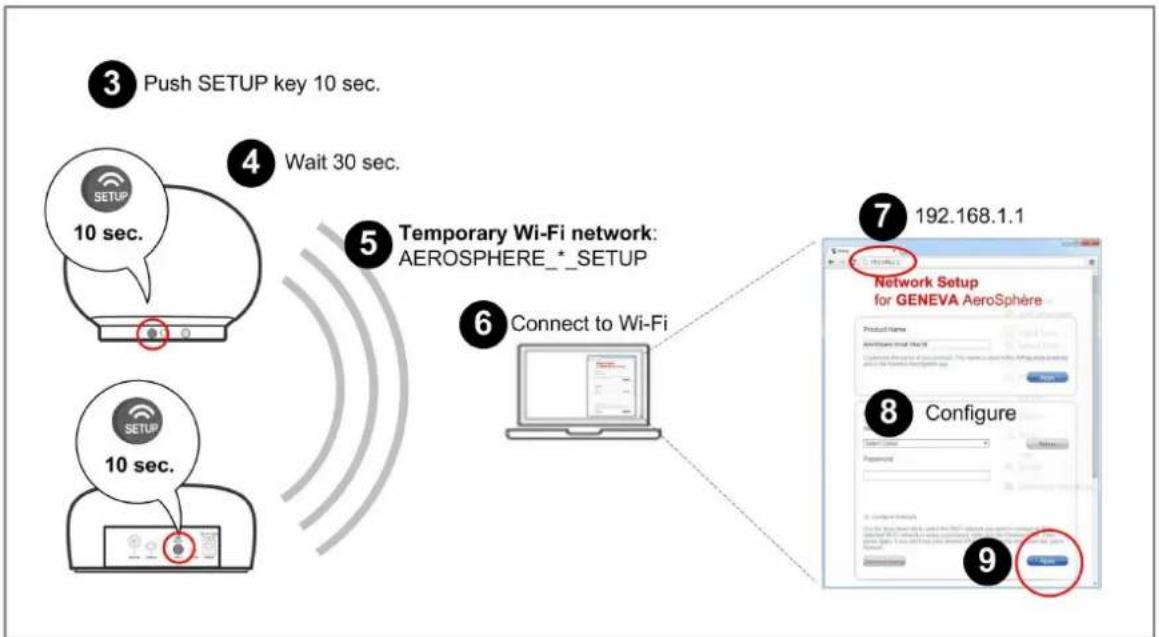
Figure 35: How to do the Wi-Fi setup with the network setup webpage.
Instructions
iPhone, iPad or iPhone touch with iOS 7 or higher: This setup method will not work with iOS version 7 or higher. Instead, use the WAC Wi-Fi Setup method in the Setup Guide.
-
Turn the AeroSphere Speaker on: wait until you see the display flash two times repeatedly in green. When you are using the AeroSphere Speaker for the first time, this mode is already enabled. Skip step 2 - 4 and go to step 5.
-
After you turned the speaker on, wait about 30 seconds.
-
If the display does not flash two times repeatedly in green, you can enable this Wi-Fi Setup manually: Hold the "SETUP" button on the back for 10 seconds, until the display starts flashing two times repeatedly in green.
4. Wait 30 seconds.
-
A new temporary Wi-Fi network is now available ("AeroSphere_Small_SETUP..." or "AeroSphere_Large_SETUP..."). This temporary Wi-Fi network is created by the AeroSphere speaker and does not require a password.
-
Connect to the temporary Wi-Fi network, depending on your device and operating system.
iPhone, iPad or iPod Touch
6.1. Open "Settings", then open "Wi-Fi".
6.2. Make sure Wi-Fi is on.
6.3. Select the network "AeroSphere_Small_SETUP..." or "AeroSphere_Large_SETUP...".
6.4. Click "Join".
Android
6.1. Open "Settings", then go to "Wireless & networks", "Wi-Fi".
6.2. Make sure Wi-Fi is on.
6.3. Select the network "AeroSphere_Small_SETUP..." or "AeroSphere_Large_SETUP...".
Mac OS 10.5 or higher
6.1. Go to System Preferences, select "Network".
6.2. On the left, select Wi-Fi. Make sure Wi-Fi is enabled.
6.3. Select the network "AeroSphere_Small_SETUP..." or "AeroSphere_Large_SETUP..." in the menu "Network Name".
6.4. Click "Apply".
Windows 7
6.1. Go to the control panel, select "Networking".
6.2. Select "Manage wireless networks".
6.3 Select the network "AeroSphere_Small_SETUP..." or "AeroSphere_Large_SETUP...".
6.4. Click "OK".
Windows 8
6.1. Go to the control panel, select "Networking and Internet".
6.2. Select "Connect to a network".
6.3. Select the network "AeroSphere_Small_SETUP..." or "AeroSphere_Large_SETUP...".
6.4. Click "Connect".
Windows 8.1
6.1. Go to the control panel, select "Networking and Sharing Center".
6.2. Select "Change adapter settings".
6.3. Select "Wi-Fi"
6.4. Select "Connect To" above.
6.3. Select the network "AeroSphere_Small_SETUP..." or "AeroSphere_Large_SETUP...".
6.4. Click "Connect".
- Open an Internet browser (Safari, Windows Explorer, Chrome, Firefox, etc.).
Enter http://192.168.1.1
You are now on the Network Setup webpage of the AeroSphere Speaker.
- Select your Wi-Fi network (SSID). Enter the password, if needed.
- Press "Apply".
- Wait until the AeroSphere speaker connects to your Wi-Fi network. This can take up to a minute. The display will change to steady green after a successful connection.

Figure 36: Network setup webpage of an AeroSphere device.
Troubleshooting
- Repeat the procedure.
- Check if Wi-Fi is enabled on your computer or smartphone.
- Ensure you have entered the correct IP address in the Internet browser: http://192.168.1.1
- You may have selected the wrong Wi-Fi network or the wrong password was entered.
- Check the networking troubleshooting guide on the Genevalab.com support page.
Connection Status
The display indicates if the device connected to your Wi-Fi network:
AeroSphere Small & Large: green (blinking) = not connected, green (constant) = connected
AeroSphere Base: green (fast blinking) = not connected, green (slow blinking) = connected, green (constant) = connected & connected to a AeroSphere speaker.
Background
The AeroSphere device becomes a temporary Wi-Fi router. First you connect to the temporary Wi-Fi network of the AeroSphere device so you can access its "Network Setup" webpage. On the webpage, you can enter the Wi-Fi network name (SSID) and password of your Wi-Fi network.
10.6. ADVANCED: USING THE NETWORK SETUP WEBPAGE (AEROSPHÈRE BASE)

flowchart
graph TD
    A["3 Push SETUP key 10 sec."] --> B["4 Wait 30 sec."]
    B --> C["5 Temporary Wi-Fi network: AEROSPHERE_*_SETUP"]
    C --> D["6 Connect to Wi-Fi"]
    D --> E["7 Network Setup for GENEVA AeroSphere"]
    E --> F["8 Configure"]
    F --> G["9 Access"]
Figure 37: How to do the Wi-Fi setup with the network setup webpage.
Instructions
This setup method works with iPhone, iPad, Android, Mac and PC.
-
Turn the AeroSphere Base on by sliding the power switch to the ON position. Wait until you see the display flash two times repeatedly in green. When you are using the AeroSphere Speaker for the first time, this mode is already enabled. Skip step 2 - 4 and go to step 5.
-
After you turned the Base on, wait about 30 seconds.
-
If the display does not flash two times repeatedly in green, you can enable this Wi-Fi Setup manually: Hold the "SETUP" button on the back for 10 seconds, until the display starts flashing two times repeatedly in green.
4. Wait 30 seconds.
-
A new temporary Wi-Fi network is now available ("AeroSphere_Base_SETUP..."). This temporary Wi-Fi network is created by the AeroSphere Base and requires no password.
-
Connect to the temporary Wi-Fi network, depending on your device and operating system.
6 - 9. Follow steps 6 - 9 on the "Instructions" in the previous section for AeroSphere Small & Large.
10: The display will change from green (fast blinking) to green (slow blinking) with a successful connection. This can take up to a minute. You are now successfully connected to your Wi-Fi network.
11. Recommendations for the best audio streaming quality
In some places, there can be high Wi-Fi traffic. The following configurations are recommended for the best possible audio streaming.
11.1. WI-FI ROUTER
- Wi-Fi router choice: Use a Wi-Fi router that supports WMM - this is the case for most newer 802.11N Wi-Fi routers. WMM ensures that audio traffic (AirPlay, DLNA, FM, DAB+ and Audio CD) has the highest priority in your Wi-Fi network.
- Wi-Fi router location: place your Wi-Fi router in a central place.
- ADVANCED: manual Wi-Fi channel selection: In your Wi-Fi router settings, select a Wi-Fi channel that is used the least. Free software tools (for example the Windows software inSSIDer) can tell you which Wi-Fi channels your neighbors are using. Select channels 1, 6 or 11. Since the channels are overlapping it does not make any sense use other channels than 1, 6 or 11.
• ADVANCED: automatic Wi-Fi channel selection: Some Wi-Fi routers offer an automatic channel selection.
11.2. REASONS FOR AUDIO DROPS WHEN STREAMING FROM A SMART PHONE
The AeroSphere products are built to have strong Wi-Fi reception. If you experience audio drops, try to go closer to your smart phone to the Wi-Fi router. Most smart phones have very little space for an optimal antenna placement.
12. Troubleshooting & FAQ
Go to the "Troubleshooting & FAQ" on AeroSphere support on www.genevalab.com.
13. Copyrights
© 2014 G-Lab GmbH. All rights reserved.
Under the copyright laws, this manual may not be copied, in whole or in part, without the written consent of G-Lab GmbH.
Geneva® is a registered trademark of G-Lab GmbH.
AirPlay, iPad, iPhone, iPod, iPod classic, iPod nano, iPod touch, iTunes, iOS, and Retina are trademarks of Apple Inc., registered in the U.S. and other countries. iPad Air, iPad mini, and Lightning are trademarks of Apple Inc.
"Made for iPod," "Made for iPhone," and "Made for iPad" mean that an electronic accessory has been designed to connect specifically to iPod, iPhone, or iPad, respectively, and has been certified by the developer to meet Apple performance standards. Apple is not responsible for the operation of this device or its compliance with safety and regulatory standards. Please note that the use of this accessory with iPod, iPhone, or iPad may affect wireless performance.
App Store is a service mark of Apple Inc.
iTunes is for legal or right holder-authorized copying only. Don't steal music.
The Bluetooth® word, mark and logos are registered Trademarks owned by Bluetooth SIG, Inc.
Wi-Fi is a registered trademark of the Wi-Fi Alliance.
DLNA® is a registered trademark of Digital Living Network Alliance.
aptX is a trademark of CSR.


- About the Geneva AeroSphère System
- AEROSPHÈRE SMALL, LARGE & BASE
- AeroSphère Small and Large
- The speakers can be controlled via
- AeroSphère Base
- User Interface: AeroSphère Small & Large
- REMOTE CONTROL
- AEROSPHÈRE APP
- SOUND CONTROLS
- Volume
- Bass and treble
- Optimal bass settings
- DISPLAY
- BACK PANEL
- PLAYING MUSIC WITH LINE-IN
- User Interface: AeroSphère Base
- INSERT AND EJECT A CD
- BACK PANEL
- User Interface: AeroSphère App
- OVERVIEW
- How to download the AeroSphère app
- App Functions
- About the AeroSphère System
- MAIN SCREEN
- Starting the app
- How to select a music source
- Customizing the speaker name
- Audio controls
- How to launch your favorite music app quickly
- 4.3.FM
- Find a station automatically with auto-search
- Select a station manually
- FM presets
- Changing between Mono and Stereo reception
- Remote control usage
- DAB+
- How to select DAB+
- Select a station
- Using DAB for the first time ("Scan" function)
- What is DAB?
- CD
- How to select CD
- Basic control
- How to eject a CD
- ADVANCED: APP SETTINGS
- Speakers
- DAB show/hide
- FM stereo/mono
- Password
- Customizing the "Line-In (Base)" menu entry
- Changing the balance of the AeroSphère Small
- Playing Music with Bluetooth
- SETUP ("PAIRING") FOR IPHONE, IPOD TOUCH AND IPAD
- Instructions
- USING AN IPHONE, AN IPOD TOUCH OR AN IPAD
- Overview
- Playing music with Bluetooth
- Status information on the display
- SETUP ("PAIRING") FOR ANDROID
- Playing Music with AirPlay
- What is AirPlay?
- PLAYING MUSIC FROM AN IPHONE, AND IPOD TOUCH OR AN IPAD
- Are you connected to Wi-Fi?
- AirPlay on iOS 6 and earlier
- PLAYING MUSIC WITH SPOTIFY, WIMP, DEEZER ETC. FROM AN IPHONE
- Any music iPhone app works with AirPlay
- How to get to your favorite streaming app quicker
- PLAYING INTERNET RADIO FROM AN IPHONE
- USING ITUNES ON MAC OR WINDOWS
- PLAYING MUSIC FROM ITUNES TO MULTIPLE AEROSPHÈRE SPEAKERS
- ADVANCED: MORE ON AIRPLAY
- Automatic selection of AirPlay and volume synchronization
- Several AirPlay speakers in the same Wi-Fi network
- Playing the same music to several AirPlay speakers at the same time
- ADVANCED: USING THE IPHONE APP "AIRPLAY MULTI ROOM PLAYER" WITH MULTIPLE AEROSPHÈRE SPEAKERS
- Playing music
- Playing Music on Android (DLNA)
- Recommended Android apps
- PLAYING MUSIC FROM THE SAMSUNG APP "MUSIC"
- PLAYING MUSIC FROM THE APP "BUBBLEUPNP"
- Playing Music with the AeroSphère Base
- USING THE AEROSPHÈRE BASE
- What can I do with the AeroSphère Base?
- AeroSphère setup
- How do I find the AeroSphere speakers and Base with the App?
- USING ANY IPHONE MUSIC APP WITH MULTIPLE AEROSPHÈRE SPEAKERS
- Setup
- Background
- USING OTHER AUDIO DEVICES WITH THE AEROSPHÈRE BASE
- Sound Setup
- RECOMMENDED AUDIO SETTINGS FOR AEROSPHÈRE LARGE
- Bass setup
- - Freestanding
- - Next to a wall
- - In a corner
- Treble setup
- LEFT AND RIGHT SETUP (AEROSPHÈRE SMALL)
- Wi-Fi Setup
- OVERVIEW
- WI-FI SETUP WITH WAC (WIRELESS ACCESSORY CONFIGURATION)
- What is needed for this setup?
- What is WAC?
- Troubleshooting
- WI-FI SETUP WITH WPS
- What is WPS?
- ADVANCED: MORE ON WPS
- WPS Icon
- Different names for WPS
- WPS does not always work
- ADVANCED: USING THE NETWORK SETUP WEBPAGE (AEROSPHÈRE SMALL & LARGE)
- Wait 30 seconds.
- iPhone, iPad or iPod Touch
- Android
- Mac OS 10.5 or higher
- Windows 7
- Windows 8
- Windows 8.1
- Enter http://192.168.1.1
- Connection Status
- ADVANCED: USING THE NETWORK SETUP WEBPAGE (AEROSPHÈRE BASE)
- Recommendations for the best audio streaming quality
- WI-FI ROUTER
- REASONS FOR AUDIO DROPS WHEN STREAMING FROM A SMART PHONE
- Troubleshooting & FAQ
- Copyrights
Brand : GENEVA
Model : AeroSphère
Category : Loudspeaker