USER MANUAL AF 20 Kärcher
Czech 68
Slovenian 72
Polish 76
Romanian 81
Slovak 85
Croatian 89
Serbian 93
Bulgarian 98
Estonian 103
Latvian 107
Lithuanian 111
Ukrainian 115
Arabic 123




Contents
| General notes | 8 |
| Safety instructions | 8 |
| Intended use | 8 |
| Environmental protection | 8 |
| Accessories and spare parts | 9 |
| Scope of delivery | 9 |
| Warranty | 9 |
| Description of the device | 9 |
| Inserting the filter | 9 |
| Operation | 9 |
| Transport and storage | 10 |
| Care and service | 10 |
| Troubleshooting guide | 11 |
| EU Declaration of Conformity | 12 |
| Technical data | 12 |
General notes


Please read and comply with these original instructions prior to the initial operation of your appliance and store them for subsequent owners.
Safety instructions
Hazard levels
⚠️ DANGER
- Indication of an imminent threat of danger that will lead to severe injuries or even death.
⚠ WARNING
- Indication of a potentially dangerous situation that may lead to severe injuries or even death.
△ CAUTION
- Indication of a potentially dangerous situation that may lead to minor injuries.
ATTENTION
- Indication of a potentially dangerous situation that may lead to damage to property.
General safety instructions
⚠️ DANGER • Only connect the device to alternating current. The voltage indicated on the type plate must match the voltage of the power source. • Never touch the mains plug and socket with wet hands. • Risk of asphyxiation. Keep packaging film out of the reach of children. • Operation in explosive atmospheres is prohibited.
⚠ WARNING • Persons with reduced physical, sensory or mental capabilities, or those with a lack of experience and knowledge, are only allowed to use the appliance if they are supervised or have been instructed with respect to using the appliance safely, and understand the resultant dangers involved. • Children from the age of 8 may use the appliance if they are supervised or have been instructed in its use by a person responsible for their safety, and if they have understood the resultant dangers involved. • Children must not play with the appliance. • Children must be supervised to prevent them from playing with the appliance. • Children may only perform cleaning work and user maintenance under supervision. • Check the power supply cable with mains plug for damage before operation each time. Do not put the device into operation with a damaged power supply cable. Have a damaged power supply cable replaced immediately by the authorised customer service / qualified electrician. • Switch off the device immediately and remove the mains plug before performing any care and service work.
⚠ CAUTION • Do not pull the mains plug out the socket using the power supply cable. • Have repair work, installation of spare parts and work on electrical components carried out by the authorised customer service only. • It is prohibited to cover the air inlet and outlet. • Switch off the device after each use and remove the mains plug. • Do not place the device near a heat source. • The device is not a replacement for appropriate ventilation. • The device must be placed on an even, firm subsurface. • Only use accessories and spare parts which are approved by the manufacturer. Only original accessories and original spare parts ensure that the appliance will run fault-free and safely.
- Do not use the device in damp conditions or in rooms with high ambient temperatures, e.g., bathrooms.
Intended use
In accordance with the descriptions and safety instructions listed in these operating instructions, use the device only as an air purifier.
- The device is intended for use as an air purifier.
- The device is suitable for both private and commercial use.
- The device is intended only for indoor use.
Environmental protection

The packing materials can be recycled. Please dispose of packaging in accordance with environmental regulations.

Electrical and electronic appliances contain valuable, recyclable materials and often components such as batteries, rechargeable batteries, or oil,
which - if handled or disposed of incorrectly - can
pose a potential threat to human health and the environment. However, these components are required for the correct operation of the appliance. Appliances marked by this symbol are not allowed to be disposed of together with household rubbish.
Notes on the content materials (REACH)
Current information on content materials can be found at: www.kaercher.com/REACH
Accessories and spare parts
Only use original accessories and original spare parts. They ensure that the appliance will run fault-free and safely.
Information on accessories and spare parts can be found at www.kaercher.com.
Scope of delivery
The scope of delivery for the appliance is shown on the packaging. Check the contents for completeness when unpacking. If any accessories are missing or in the event of any shipping damage, please notify your dealer.
Warranty
The warranty conditions issued by our relevant sales company apply in all countries. We shall remedy possible malfunctions on your appliance within the warranty period free of cost, provided that a material or manufacturing defect is the cause. In a warranty case, please contact your dealer (with the purchase receipt) or the next authorised customer service site.
(See overleaf for the address)
Description of the device
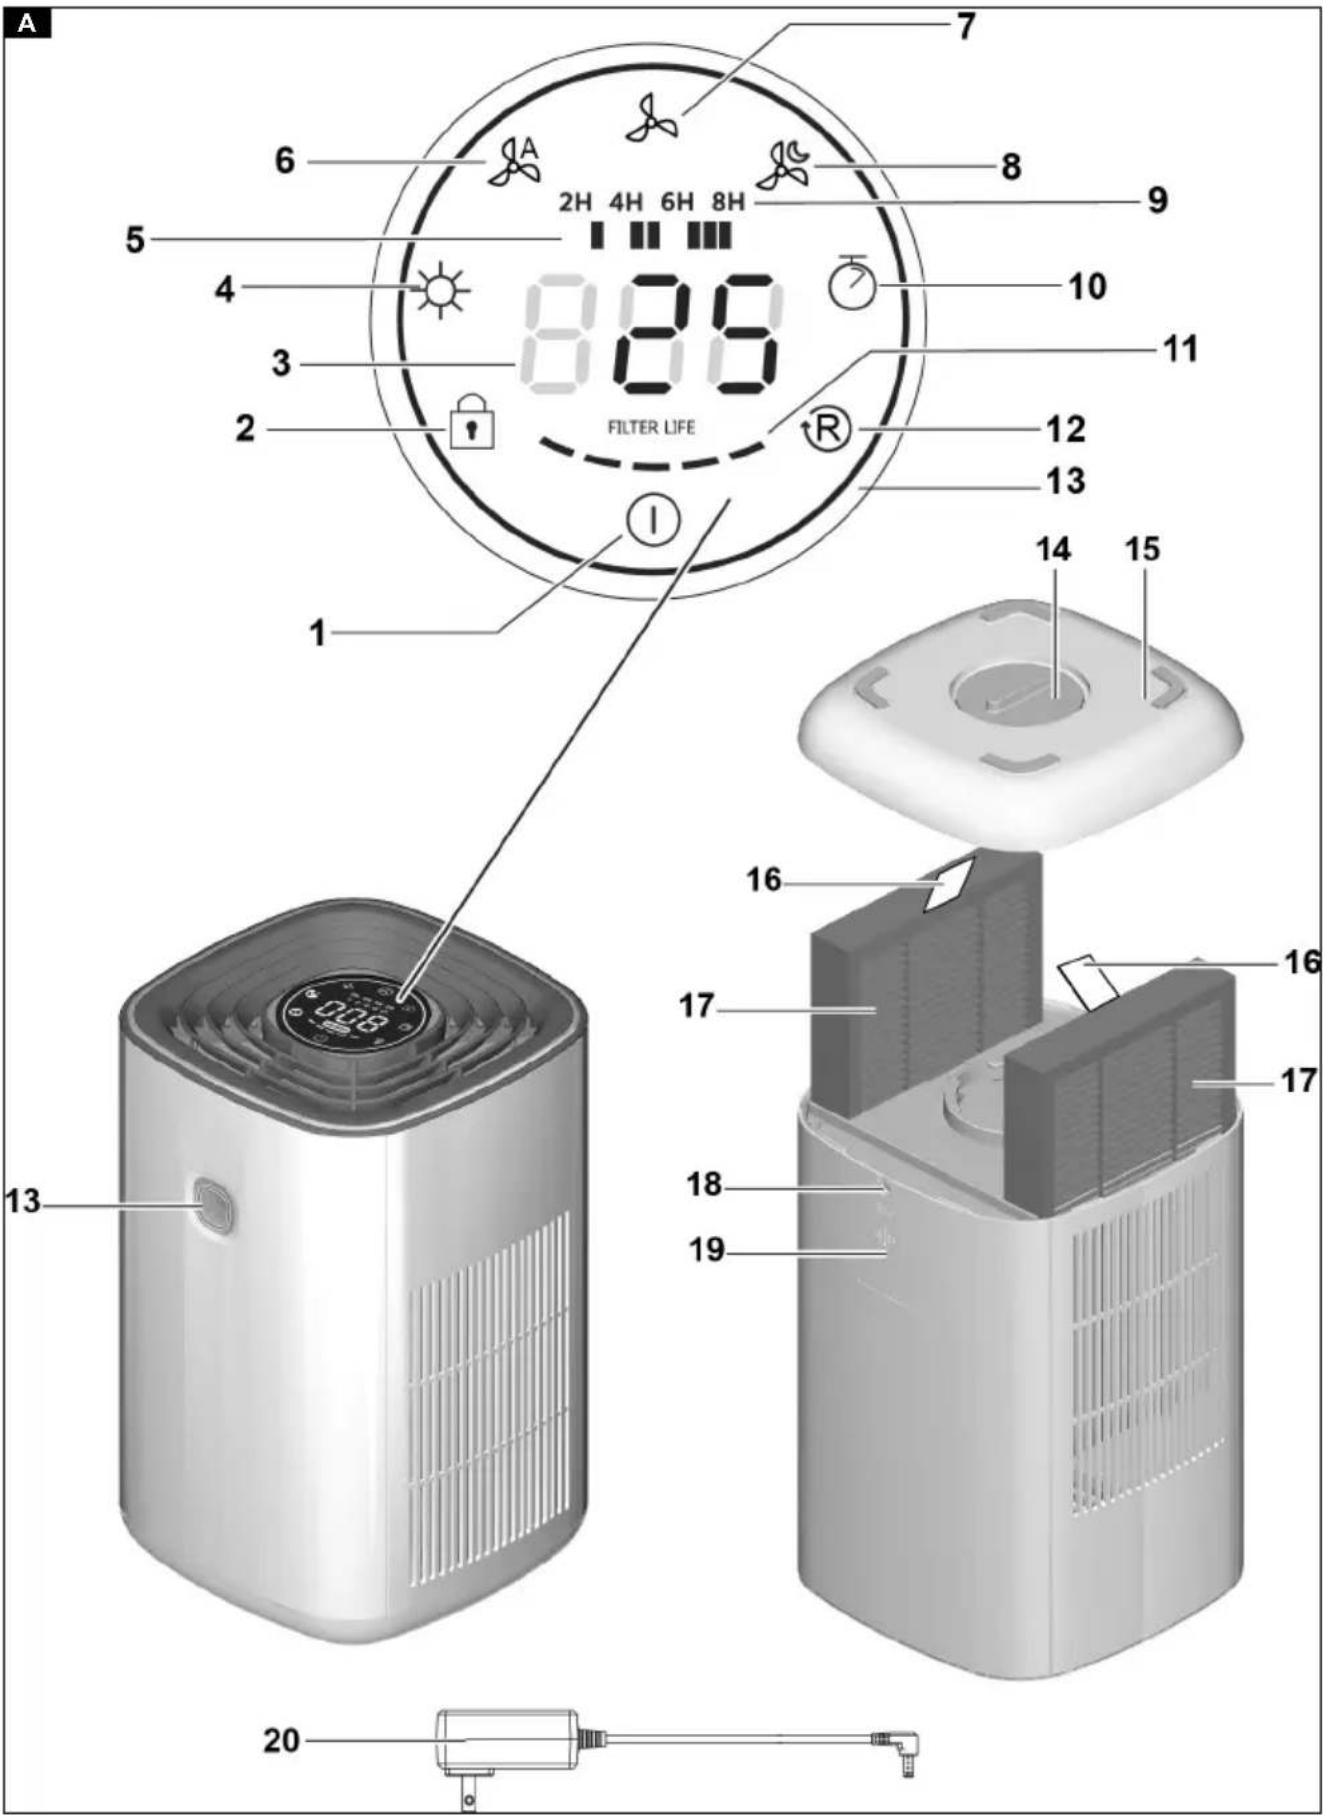
For the illustrations, refer to the graphics page. Illustration A
① Operation button for Device On / Off ② Operation button for Function lock ③ Display PM 2.5 Air quality index ④ Operation button for Switch off display ⑤ Display for fan level ⑥ Operation button for Auto mode On / Off ⑦ Fan level operation button ⑧ Operation button for Sleep mode On / Off ⑨ Timer display ⑩ Operation button for Timer ⑪ Filter service life display ⑫ Operation button for Filter reset ⑬ Air quality display and device display ⑭ Filter cover lock ⑮ Filter cover ⑯ Filter tab ⑰ Filter
⑱ Connection for power supply unit ⑲ Device sensor ⑳ Power adapter
Note
The function settings are only possible via the operation buttons and not via the displays.
Inserting the filter
Before initial start up, the fine filters already installed in the unit must be unpacked.
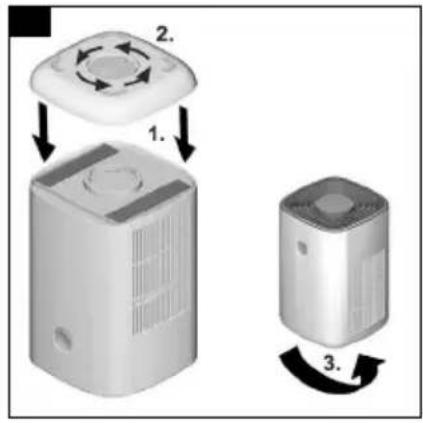
- Turn the device over, and turn the filter cover lock 90 degrees clockwise.
Illustration B
- Remove the filter cover.
Illustration C
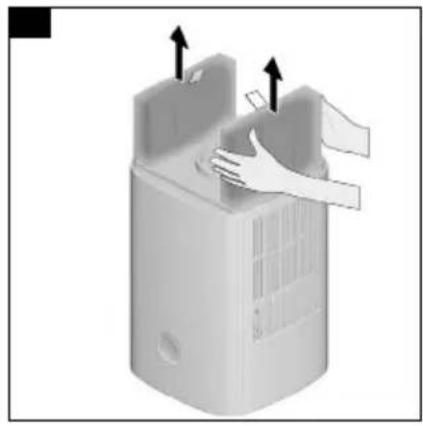
- Remove the packed filters.
Illustration D
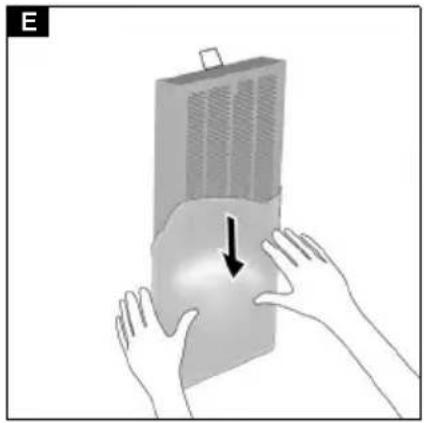
- Unpack the filters.
Illustration E
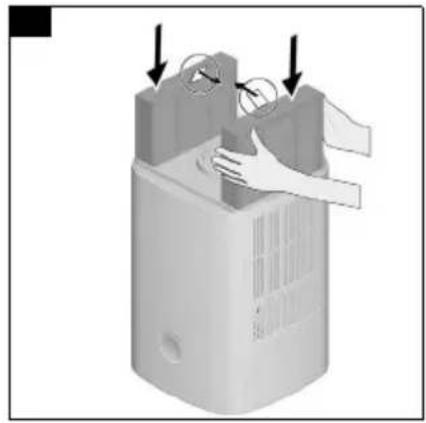
- Insert the unpacked filters. Ensure that the draw shackles are visible and point inwards.
Illustration F
- Put on the filter cover and turn the lock 90 degrees anticlockwise. Turn the device over with the display facing upwards.
Illustration G
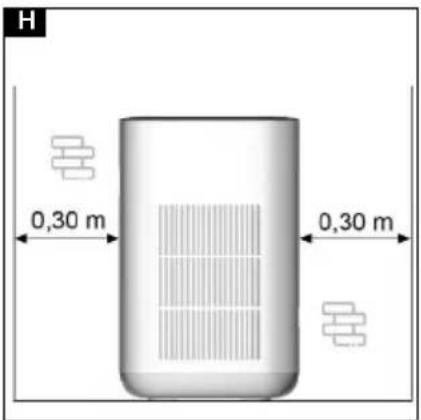
- Place the device on a level surface. Ensure that a distance of 30 cm is maintained to each side.
Illustration H
Note
Do not place the device on hot surfaces or in the immediate vicinity of the room heating.
Do not allow any liquids or foreign bodies (e.g. metallic objects) to enter the device.
- Insert the plug of the power supply unit into the device and insert the mains plug into the socket.
Illustration I
The device is ready for operation.
Note
The first time you use the device, we recommend allowing it to run overnight to perform an initial basic cleaning of your room.
Note
The table with the hours of the display symbols for the filter service life, see Replacing the filter
Operation
Switching the device on/off
- To switch on the device: Press the on/off button on the device.
Illustration I
The device starts automatically.
Note
After the system is switched on, the displays and buttons on the control panel light up briefly. The integrated air quality sensor measures the air quality in the room automatically.
- If required, the following functions, for example, can be set via the operation buttons:
- Fan level
- Auto mode
- Sleep mode
- Timer
- To switch off the device: Press the On/Off switch of the device.
The displays and buttons on the control panel go out. The device is switched off.
Setting auto mode
In automatic mode, the air purifier sets the appropriate fan level depending on the air quality.
In the event of poor air quality, for example, the fan level is automatically set high.
Symbol for the auto mode operation button:

- Press the auto mode operation button. The automatic mode is switched on or off.
Setting sleep mode
In sleep mode, the fan runs at the lowest speed and is therefore very quiet. All light symbols are off.
- Press the sleep mode operation button. The sleep mode is switched on or off.
Symbol for the sleep mode operation button:

Depending on the air quality, the fan level can be manually set to level I, II, or III. If the air quality is poor, for example to filter out smoke, the blower should run at maximum speed (level III) for 15-20 minutes.
Note
To clean the air effectively, keep windows and doors closed while the air purifier is switched on.
Symbol for the fan level operation button:

- Press the fan level operation button repeatedly until the desired level is reached.
The selected fan level is displayed on the control panel.
Setting the timer
The timer can be set to 2, 4, 6, or 8 hours of run time. When the set time has elapsed, the device switches off automatically. The fan level can be changed at any time.
Symbol for the timer operation button:

- Switching on: Press the Timer operation button repeatedly until the desired run time is reached. The display lights up. The set run time is displayed on the control panel.
- Switching off: Press the Timer operation button until the timer display goes out. Timer is off.
Lock / unlock control panel
To prevent accidental change of settings, e.g. by children or pets, the control panel can be locked.
Symbol for the lock operation button and display for control panel:

- Lock: Press the button for 3 seconds.
- Unlock: Press the lock button for 3 seconds.
Display PM 2.5 air quality
The display shows the concentration of fine dust (PM 2.5) numerically in the unit μg/m³. In addition, a colour index provides information about the air quality:
| PM 2.5 Air quality | Colour | |
| 0 - 60 Good Blue | | |
| 61 - 120 Moderate | Yellow | |
| 121 - 500 Poor Red | | |
Transport and storage
△CAUTION
Failure to observe the weight
Risk of injury and damage
Be aware of the weight of the device during transport and storage.
Store the device only in dry indoor rooms.
Care and service
Cleaning
⚠️DANGER
Danger of death from electric shock
Liquids can conduct electricity and thus cause serious or fatal injuries.
Always disconnect the power supply unit from the socket before cleaning and maintenance work.
Never immerse the device or the power supply unit in water.
Never use wet cloths to clean the device or the power supply unit.
- Switch off the device.
- Unplug the power supply unit from the socket.
- Wipe the device with a soft, dry cloth. Do not use abrasive or corrosive detergents.
Replacing the filter
The filter should be changed after 2500 - 3000 hours of operation at the latest. If the device becomes louder, an unpleasant smell emanates from the device (filter) or the filter is visibly dirty, it should be changed at an earlier stage. The symbol flashes in the display to remind you of a required filter change.
Symbol for the operation button for filter reset:

Depending on the service life, the following number of symbols is displayed:
| Display for service life of filter (h) |
| 2401 - 3000 | |
| 1801 - 2400 | |
| 1201 - 1800 | |
| 601 - 1200 | |
| 1 - 600 | |
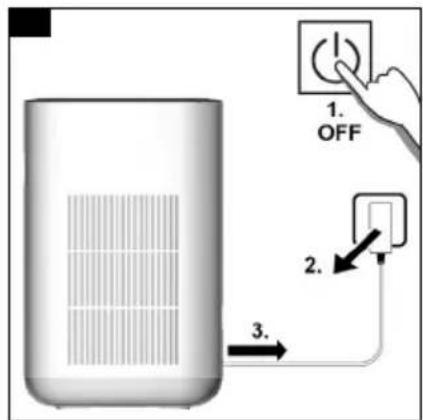
- Switch off the device, and disconnect the power supply unit from the socket and device.
Illustration J
- Turn the device over, and turn the filter cover lock 90 degrees clockwise.
Illustration B
- Remove the filter cover.
Illustration C
- Remove the filters.
Illustration D
- Unpack the new filters.
Illustration E
- Insert the unpacked filters. Ensure that the draw shackles are visible and point inwards.
Illustration F
- Put on the filter cover and turn the lock 90 degrees anticlockwise. Turn the device over with the display facing upwards.
Illustration G
- Connect the power supply unit to the device and socket.
- Switch the device on.
a To reset the filter (Reset), press the symbol for 3 seconds.
Illustration K

Troubleshooting guide
Malfunctions often have simple causes that you can remedy yourself using the following overview. When in doubt, or in the case of malfunctions not mentioned here, please contact your authorised Customer Service.
| Fault Cause Rectification | | |
| The device cannot be switched on | No electrical voltage present | ● Check the socket and the power supply fuse. ● Insert the plug of the power supply unit into another socket. |
| Power supply unit defective | ● Contact Customer Service to replace the power supply unit. |
| Device defective ● Contact Customer Service. |
| Display flashes and device does not start | Filter cover not inserted correctly | ● Insert the filter cover correctly, making sure that the filters are seated correctly. |
| Airflow is reduced | Filter clogged | ● Changing the filter, see chapter Replacing the filter. |
| Filter not unpacked | ● Unpacking the filter, see chapter Inserting the filter. |
| Fan level too low | ● Increasing the fan level, see chapter Setting the fan level. |
| Air outlet is blocked | ● Remove foreign bodies. |
| Odour elimination ineffective | Poor ambient air quality | ● Open windows to improve ventilation. |
| Filter used up or used too long | ● Replace the filter. |
| Fan level too low | ● Increasing the fan level, see chapter Setting the fan level. |
| Poor air quality | Fan level too low | ● Increasing the fan level, see chapter Setting the fan level. |
| Draught | ● Close the windows and doors while the device is working. |
| Room size clearly above 20 m2 | ● Observe the maximum room size. |
| Air slots on the device blocked | ● Keep the required distances from the device. ● Do not place anything on the device. |
| Filter not unpacked | ● Unpacking the filter, see chapter Inserting the filter. |
| Filter clogged or contaminated. | ● Changing the filter, see chapter Replacing the filter. |
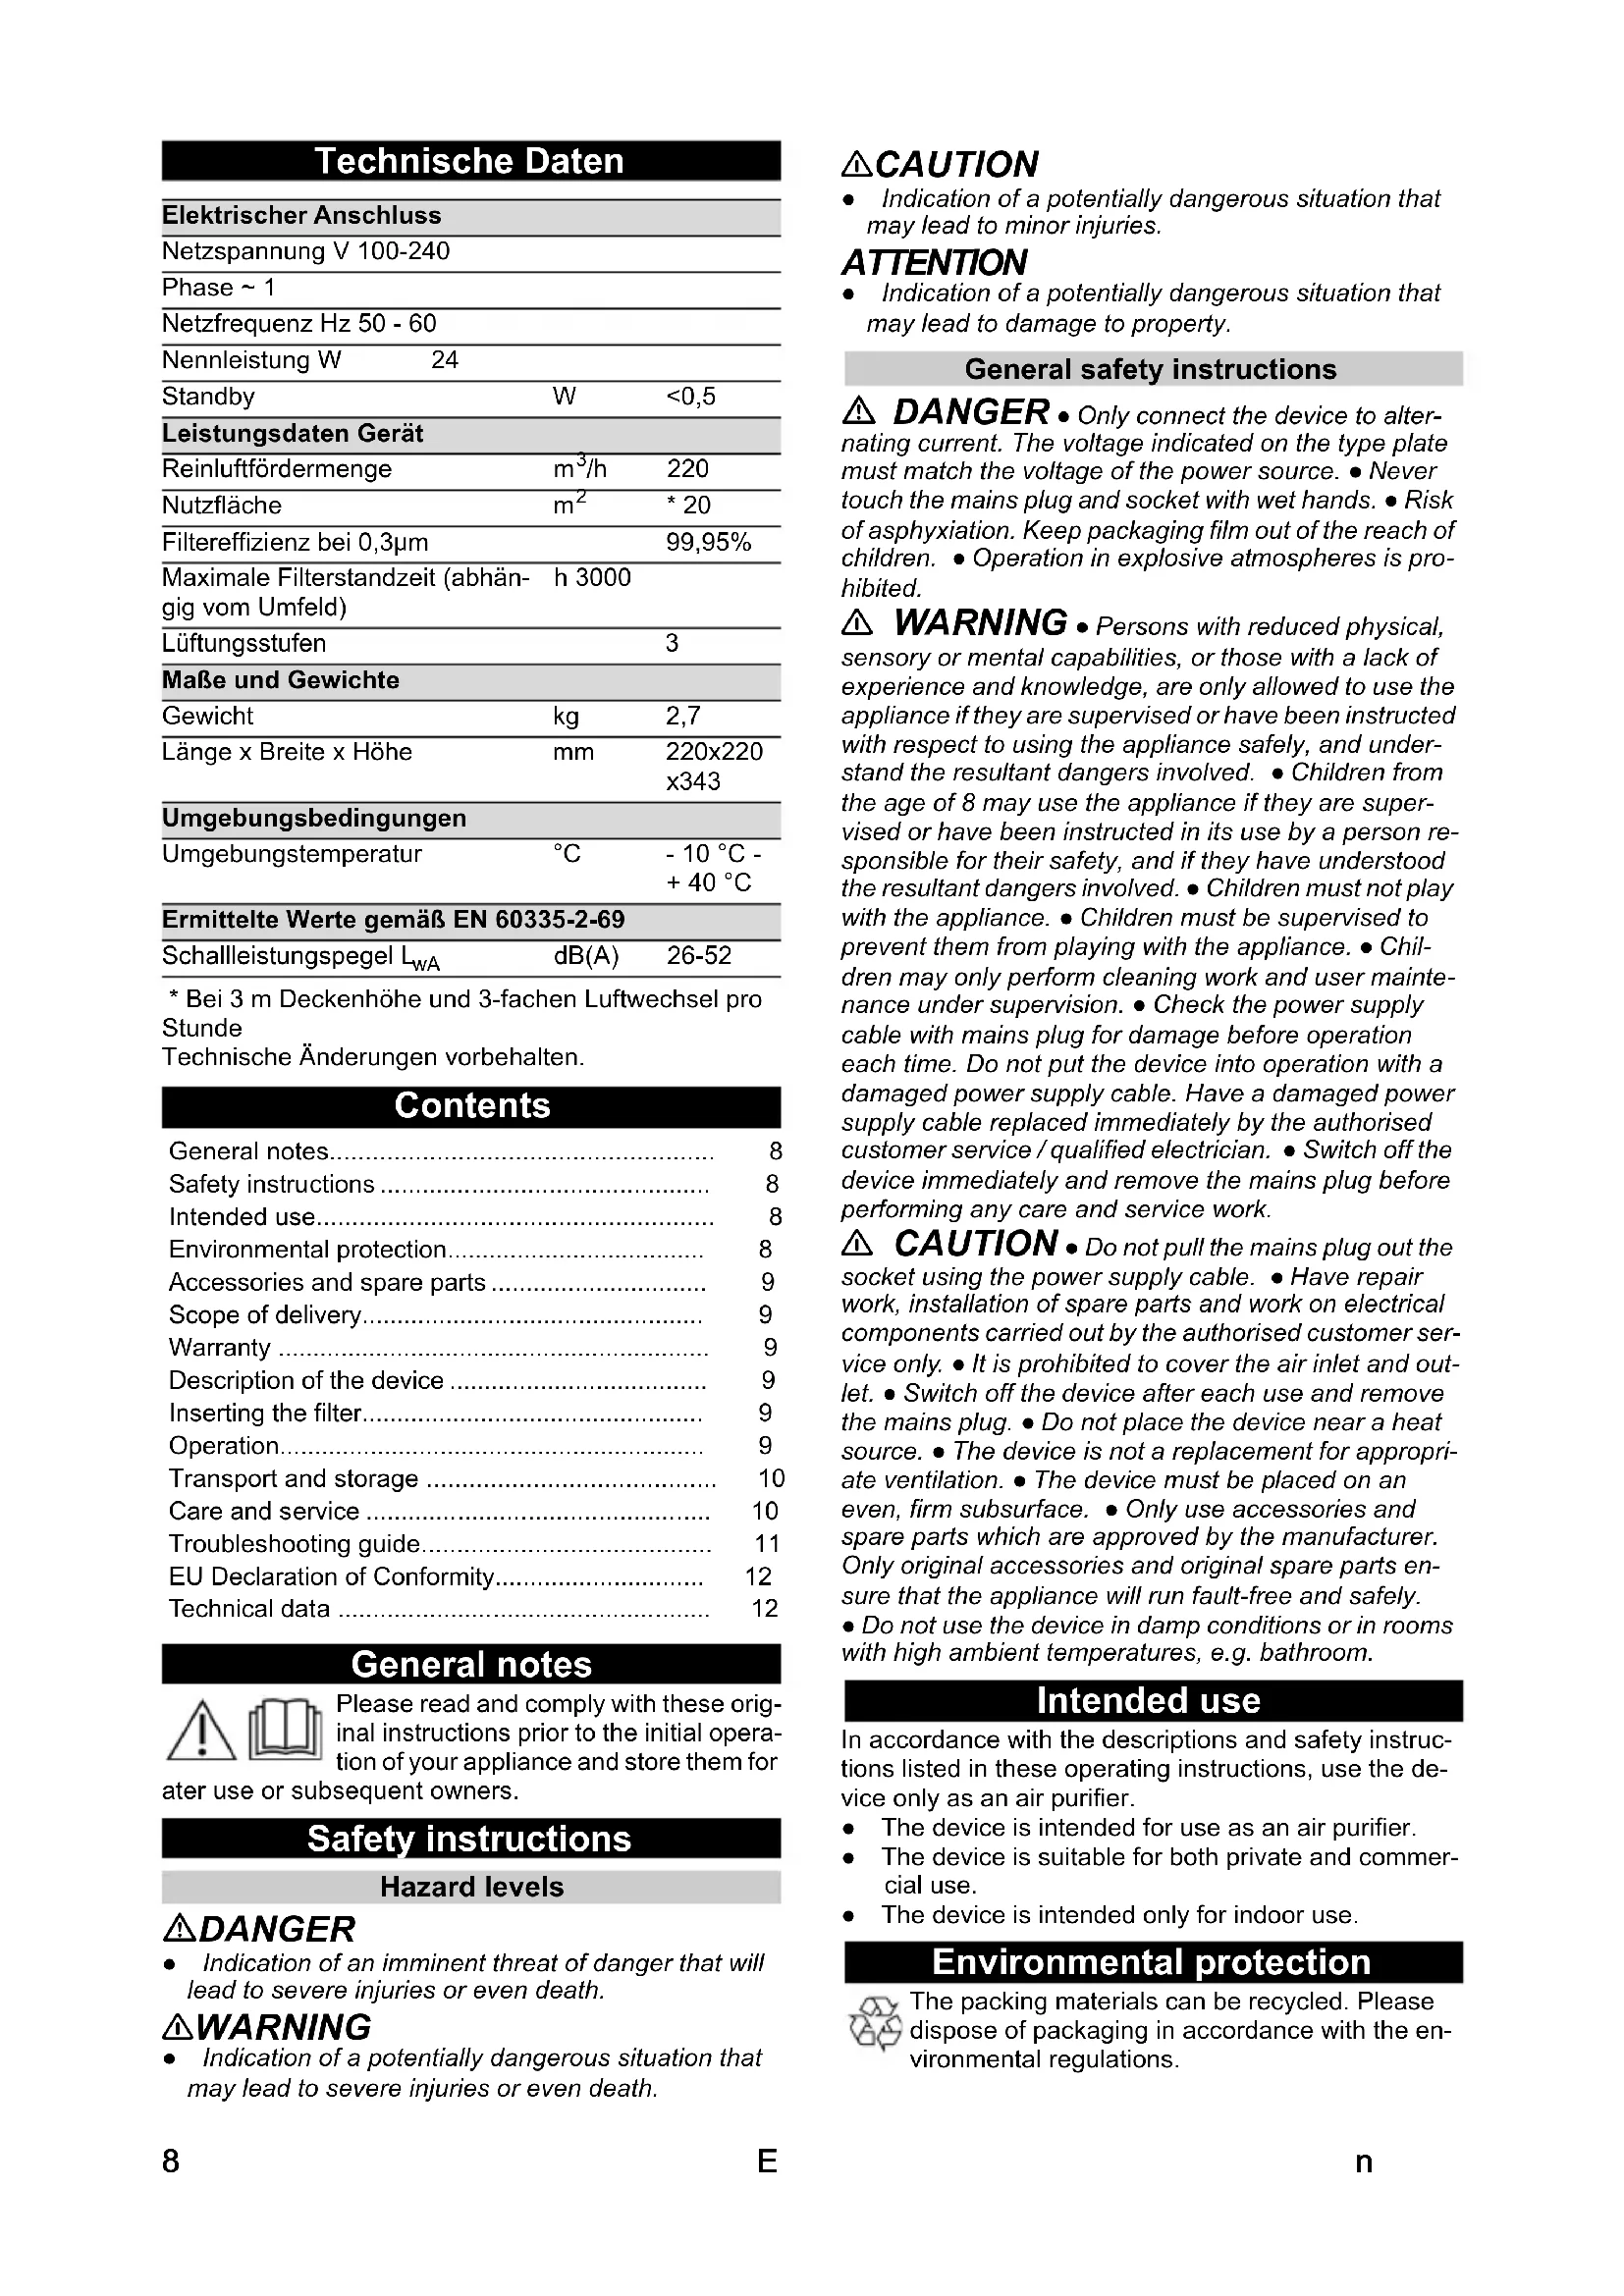
Technical data
| Electrical connection |
| Mains voltage V 100-240 |
| Phase ~ 1 |
| Power frequency Hz 50 - 60 |
| Nominal power W 24 |
| Standby | W | <0,5 |
| Device performance data |
| Clean air flow rate | m3/h | 220 |
| Floor space | m2 | * 20 |
| Filter efficiency at 0.3 μm | | 99,95% |
| Maximum filter working time (de-pending on environment) | h 3000 | |
| Ventilation levels | | 3 |
| Dimensions and weights |
| Weight | kg | 2.7 |
| Length x width x height | mm | 220x220x343 |
| Ambient conditions |
| Ambient temperature | °C | - 10 °C -+ 40 °C |
| Determined values in acc. with EN 60335-2-69 |
| Sound power level LwA | dB(A) | 26-52 |
* At 3 m ceiling height and 3 x air exchange per hour. Subject to technical changes without notice.
Content
Symbol for timer control button:

Transport and storage
CAUTION
Disregard of weight
| Prikaz radnog veka filtera (h) |
| 2401–3000 | |
| 1801–2400 | |
| 1201–1800 | |
| 601–1200 | |
| 1–600 | |
- Switch off the device and unplug the power cord from the socket and the device.
Figure J
- Turn the device and rotate the filter cover lock 90 degrees clockwise.
Figure B
- Remove the filter cover.
Figure C
- Remove the filter.
Figure D
- Unpack the new filter.
Figure E
- Insert the unpacked filter. Make sure the pull tabs are visible and point inward.
Figure F
- Replace the filter cover and rotate the lock 90 degrees counterclockwise. Turn the device with the display upward.
Figure G
- Connect the power cord to the device and the socket.
- Switch on the device.
a To reset the filter (reset), press the symbol for 3 seconds.
Figure K
Troubleshooting assistance
Malfunctions usually have simple causes that you can resolve yourself with the help of the following overview. If you have any doubts or malfunctions not listed here, please contact an authorized service center.
www.kaercher.com/REACH
THANK YOU!
Register your product and benefit from many advantages.
www.kaercher.com/welcome


Rate your product and tell us your opinion.
www.kaercher.com/dealersearch
Alfred Kärcher SE & Co. KG
Alfred-Kärcher-Str. 28-40
71364 Winnenden (Germany)
Tel.: +49 7195 14-0
Fax: +49 7195 14-2212