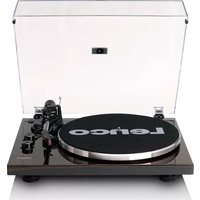
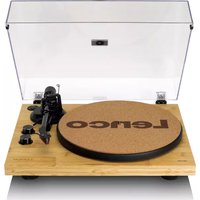
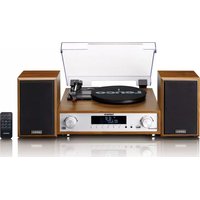
LS440 - Turntable LENCO - Free user manual and instructions
Find the device manual for free LS440 LENCO in PDF.
| Product type | Turntable with 4 built-in speakers and Bluetooth receiver |
| Dimensions (closed) | 440 x 370 x 192 mm |
| Dimensions (open) | 400 x 425 x 462 mm |
| Weight | 6.05 kg |
| Power supply | 100-240 V AC, output 12 V DC, 1,500 mA (power adapter included) |
| Power consumption | 35 W |
| Playback speeds | 33 1/3 rpm and 45 rpm |
| Output power (Bluetooth mode) | 40 W |
| Speakers | 2 x 15 W + 2 x 10 W |
| Pickup cartridge | Audio-Technica AT3600 (MM) |
| Recommended tracking force | 3.5 ±0.5 g |
| Frequency response | 20 Hz to 20 kHz |
| Bluetooth | Version 5.0 (reception only) |
| Auxiliary input | 3.5 mm stereo jack |
| Headphone output | 3.5 mm jack |
| Audio outputs | RCA jack (switchable PHONO/LINE) |
| Care and cleaning | Soft, dry cloth; do not use solvents. |
| Safety | Automatic stop after 20 min of inactivity; overload protection. |
| Spare parts and repairability | Replaceable cartridge, belt, stylus; repair by qualified personnel. |
| Warranty | Compliant with European legislation; contact the retailer. |
Frequently Asked Questions - LS440 LENCO
User questions about LS440 LENCO
0 question about this device. Answer the ones you know or ask your own.
Ask a new question about this device
Download the instructions for your Turntable in PDF format for free! Find your manual LS440 - LENCO and take your electronic device back in hand. On this page are published all the documents necessary for the use of your device. LS440 by LENCO.
USER MANUAL LS440 LENCO
User manual - Turntable with 4 speakers built-in and Bluetooth reception
Usage of controls or adjustments or performance of procedures other than those specified herein may result in hazardous radiation exposure.
KEEP THESE INSTRUCTIONS IN MIND:
- Do not cover or block any ventilation openings. When placing the device on a shelf, leave 5cm ( 2'' ) free space around the whole device.
- Install in accordance with the supplied user manual.
- Keep the device away from heat sources such as radiators, heaters, stoves, candles and other heat-generating products or naked flame. The device can only be used in moderate climates. Extremely cold or warm environments should be avoided. Working temperature between 0^ and 35^ C.
- Avoid using the device near strong magnetic fields.
- Electrostatic discharge can disturb normal usage of this device. If so, simply reset and restart the device following the instruction manual. During file transmission, please handle with care and operate in a static-free environment.
- Warning! Never insert an object into the product through the vents or openings. High voltage flows through the product and inserting an object can cause electric shock and/or short circuit internal parts. For the same reason, do not spill water or liquid on the product.
- Do not use in wet or moist areas such as bathrooms, steamy kitchens or near swimming pools.
-
The device shall not be exposed to dripping or splashing and make sure that no objects filled with liquids, such as vases, are placed on or near the apparatus.
-
Do not use this device when condensation may occur. When the unit is used in a warm wet room with damp, water droplets or condensation may occur inside the unit and the unit may not function properly; let the unit stand in power OFF for 1 or 2 hours before turning on the power: the unit should be dry before getting any power.
- Although this device is manufactured with the utmost care and checked several times before leaving the factory, it is still possible that problems may occur, as with all electrical appliances. If you notice smoke, an excessive build-up of heat or any other unexpected phenomena, you should disconnect the plug from the main power socket immediately.
- This device must operate on a power source as specified on the specification label. If you are not sure of the type of power supply used in your home, consult your dealer or local power company.
- Keep away from animals. Some animals enjoy biting on power cords.
- To clean the device, use a soft dry cloth. Do not use solvents or petrol based fluids.
To remove severe stains, you may use a damp cloth with dilute detergent. - The supplier is not responsible for damage or lost data caused by malfunction, misuse, modification of the device or battery replacement.
- Do not interrupt the connection when the device is formatting or transferring files. Otherwise, data may be corrupted or lost.
- If the unit has USB playback function, the USB memory stick should be plugged into the unit directly. Don't use an USB extension cable because it can cause interference resulting in failing of data.
-
The rating label has been marked on the bottom or back panel of the device.
-
This device is not intended for use by people (including children) with physical, sensory or mental disabilities, or a lack of experience and knowledge, unless they're under supervision or have received instructions about the correct use of the device by the person who is responsible for their safety.
- This product is intended for non professional use only and not for commercial or industrial use.
- Make sure the unit is adjusted to a stable position. Damage caused by using this product in an unstable position vibrations or shocks or by failure to follow any other warning or precaution contained within this user manual will not be covered by warranty.
- Never remove the casing of this device.
- Never place this device on other electrical equipment.
- Do not allow children access to plastic bags.
- Only use attachments/accessories specified by the manufacturer.
- Refer all servicing to qualified service personnel. Servicing is required when the device has been damaged in any way, such as the power supply cord or the plug, when liquid has been spilled or objects have fallen into the device, when the device has been exposed to rain or moisture, does not operate normally, or has been dropped.
- Long exposure to loud sounds from personal music players may lead to temporary or permanent hearing loss.
- If the product is delivered with power cable or AC power adaptor:
- If any trouble occur, disconnect the AC power cord and refer servicing to qualified personnel.
-
Don't step on or pinch the power adaptor. Be very careful, particularly near the plugs and the cable's exit point. Do not place heavy items on the power adaptor, which may damage it. Keep the entire device out of children's reach! When playing with the power cable, they can seriously injure themselves.
-
Unplug this device during lightning storms or when unused for a long period.
- The socket outlet must be installed near the equipment and must be easily accessible.
- Do not overload ac outlets or extension cords. Overloading can cause fire or electric shock.
- Devices with class 1 construction should be connected to a main socket outlet with a protective earthed connection.
- Devices with class 2 construction do not require a earthed connection.
- Always hold the plug when pulling it out of the main supply socket. Do not pull the power cord. This can cause a short circuit.
-
Do not use a damaged power cord or plug or a loose outlet. Doing so may result in fire or electric shock.
-
If the product contains or is delivered with a remote control containing coin/cell batteries:
Warning:
- "Do not ingest battery, Chemical Burn Hazard" or equivalent working.
- [The remote control supplied with] This product contains a coin/button cell battery. If the battery is swallowed, it can cause severe internal burns in just 2 hours and can lead to death.
- Keep new and used batteries away from children.
- If the battery compartment does not close securely, stop using the product and keep it away from children.
-
If you think batteries might have been swallowed or placed inside any part of the body, seek immediate medical attention.
-
Caution about the use of Batteries:
-
Danger of explosion if battery is incorrectly replaced. Replace only with the same or equivalent type.
-
Battery cannot be subjected to high or low extreme temperatures, low air pressure at high altitude during use, storage or transportation.
- Replacement of a battery with an incorrect type that can result in an explosion or the leakage of flammable liquid or gas.
- Disposal of a battery into fire or a hot oven, or mechanically crushing or cutting of a battery, that can result in an explosion.
- Leaving a battery in an extremely high temperature surrounding environment that can result in an explosion or that leakage of flammable liquid or gas.
- A battery subjected to extremely low air pressure that may result in an explosion or the leakage of flammable liquid or gas.
- Attention should be drawn to the environmental aspects of battery disposal.
INSTALLATION
- Unpack all parts and remove protective material.
-
Do not connect the unit to the mains before checking the mains voltage and before all other connections have been made.
-
Those instruction are related only to products using power cable or AC power adaptor.
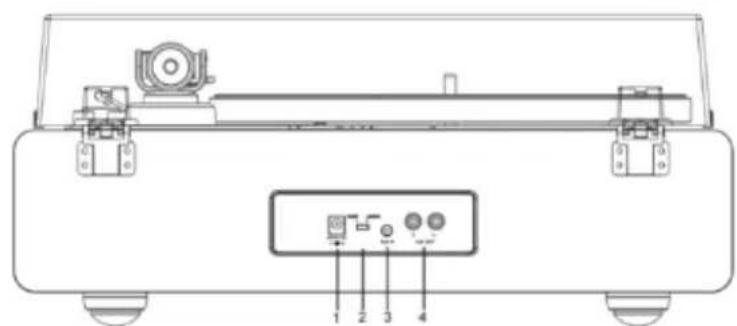
Product Description
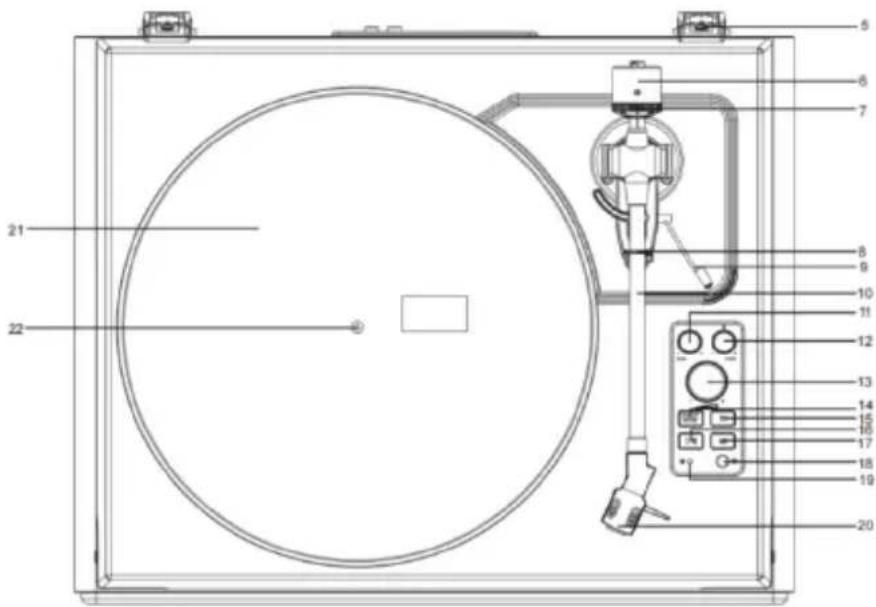

- DC INPUT Jack
- Phono & Line Out Switch
- AUX IN Jack
- Phono & Aux Out Jacks
- Lid Hinge
- Counterweight
- Tracking Force Dial
- Tonearm Clip
- Tonearm Lift Lever
- Tonearm
-
Tone Control
-
Pitch Control
- Volume Control
- ON/OFF/Function Button
- 33 1/3 RPM Speed Button
- START/Stop Button
- 45RPM Speed Button
- Headphone Jack
- Indicator
- Stylus Cartridge
- Turntable Platter
- Turntable Spindle
Included Items
Before installing the turntable, check the package contents to ensure all parts below are included and free of visible damage. Please retain the original packaging materials for exchange or return purposes.
- Turntable Unit
- Cartridge Alignment Protractor
- Power Adapter
- 45 RPM Adapter
- Turntable Lid
- Instruction Manual
- Slip Mat
- Platter with Belt
- Counterweight
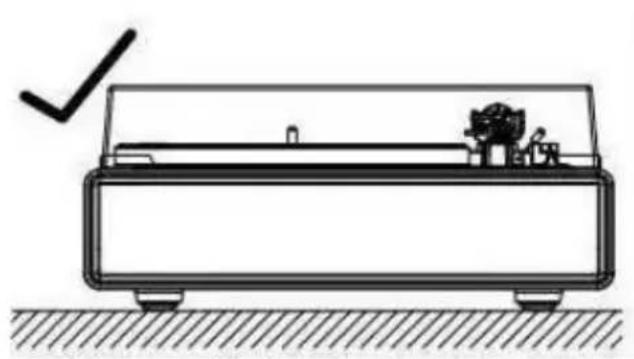
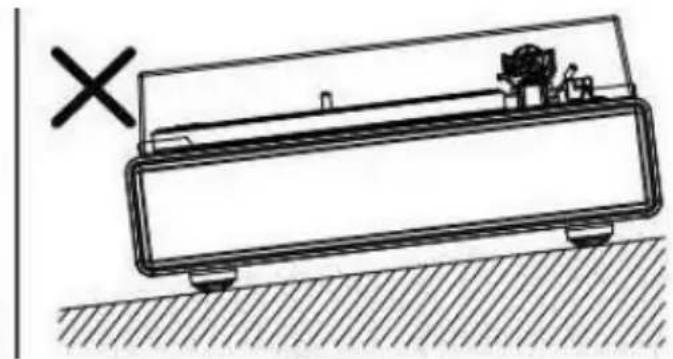
Installing the turntable
. Mount the turntable on a level surface.
. To avoid the effects of vibrations and acoustic pressure, do not mount the turntable next to items such as speakers.
. The turntable may pick up radio static if placed next to a radio. Therefore, try to keep the turntable away from radios.
. If the turntable is near equipment (cell phone, etc.) that emits strong radio waves, noise may occur.
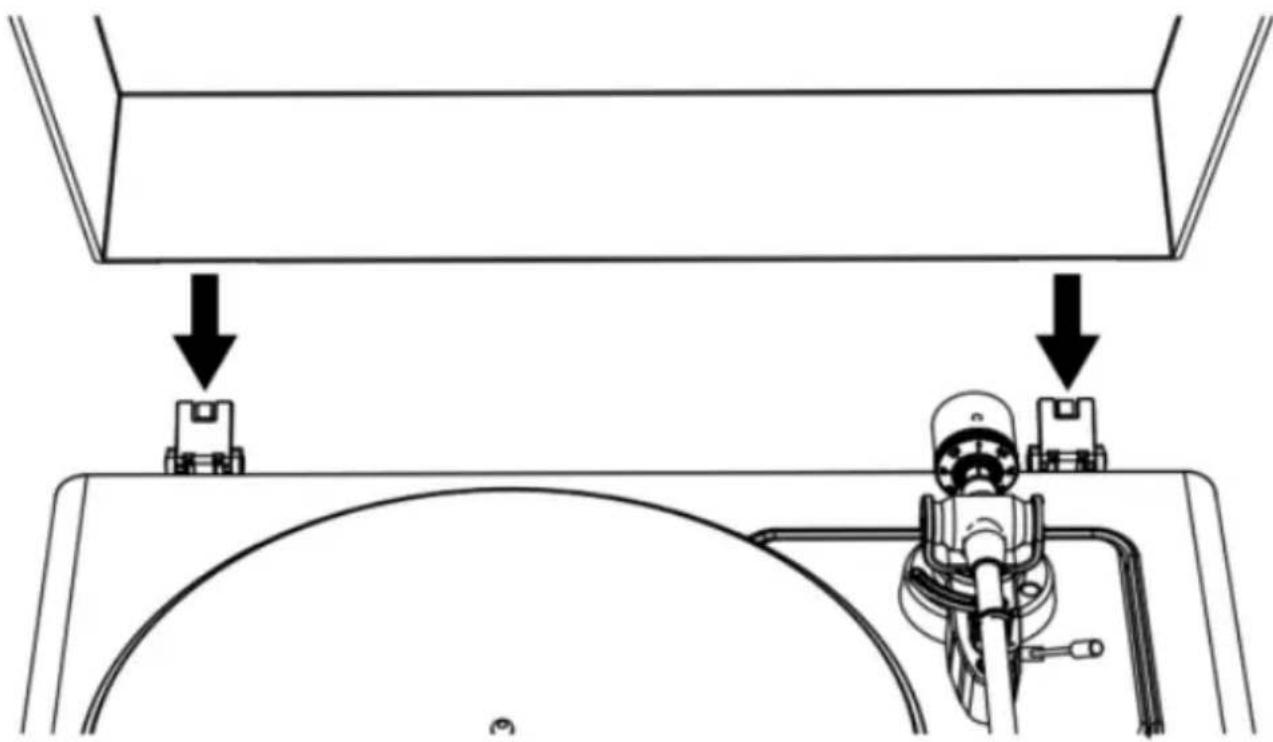
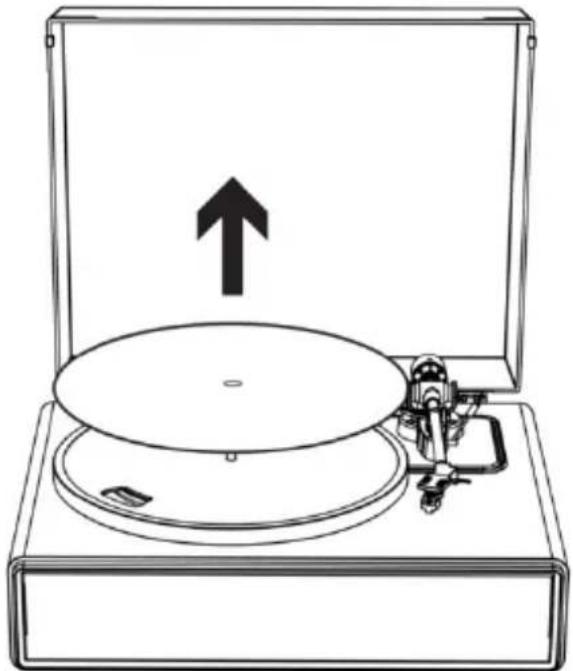
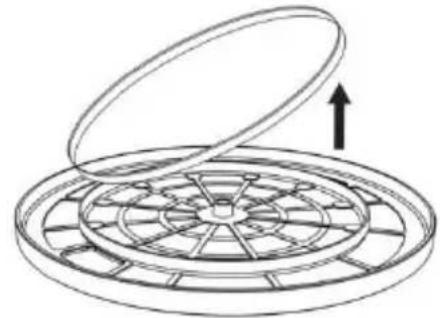
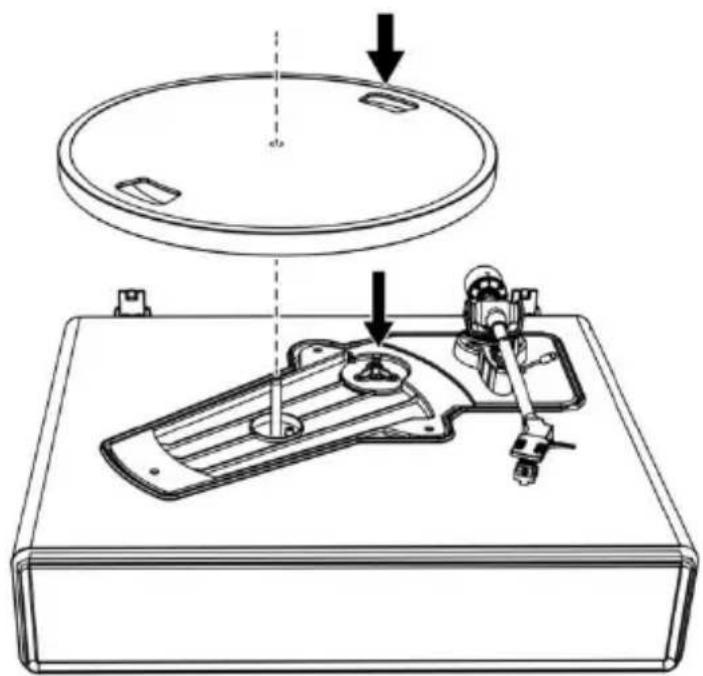
Installing the Lid
Insert the hinge pockets of the lid onto the hinges of the turntable.
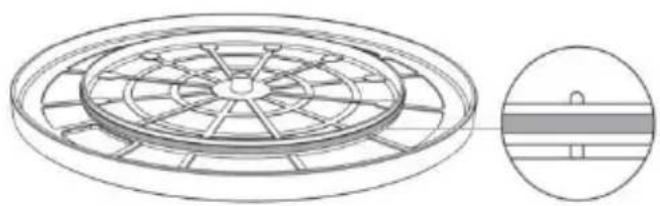
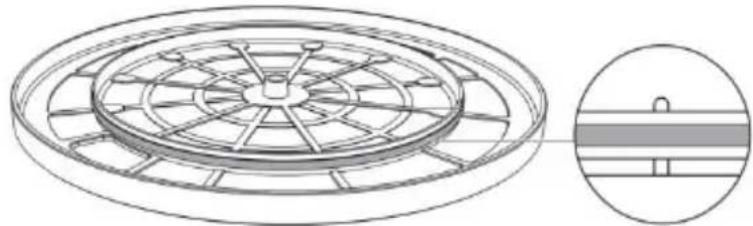
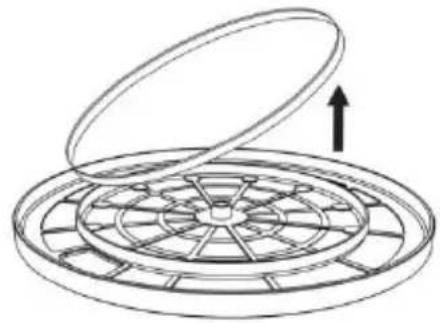
Turntable Platter and Belt Setup
- Turn the platter over and check the belt position.
Make sure that the drive belt is looped in the middle of the circle. The drive belt located too high or too low in this circle may cause the drive belt to fall off or speed to be unstable.
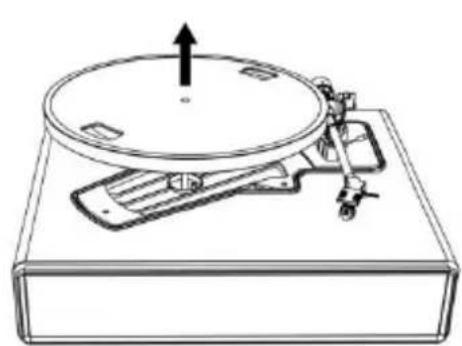
- Set the platter on the spindle.
Make sure the platter is fully seated on the spindle.
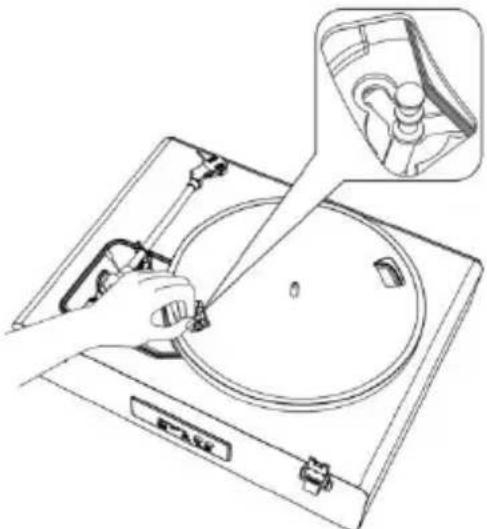
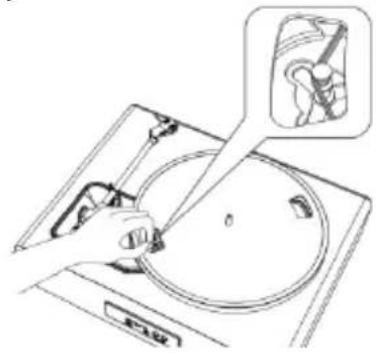
- Place the belt on the motor pulley.
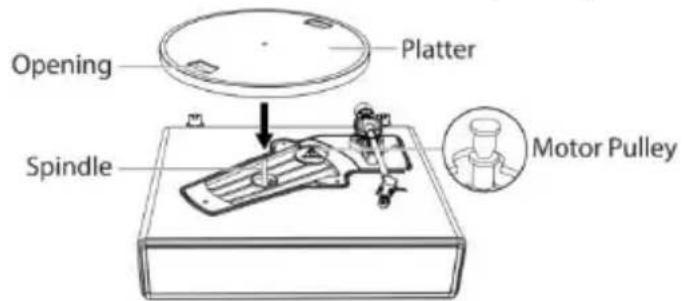
Align one of the platter openings with the motor pulley, and while pulling both ends of the red ribbon that comes attached to the belt, place the belt on the motor pulley, as per the diagram. When doing this, be careful not to twist the belt.
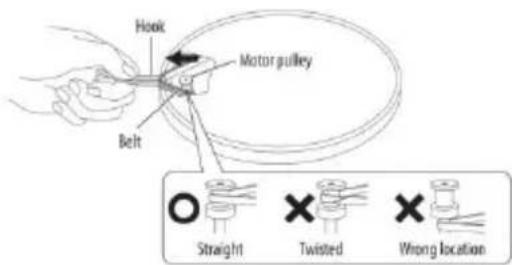
- Remove the red ribbon from the belt.
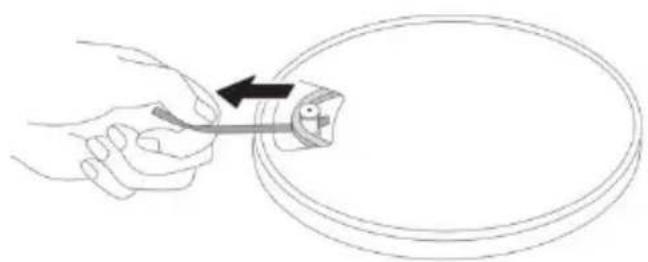
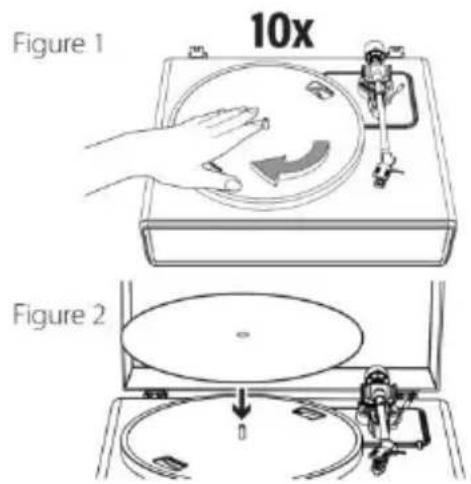
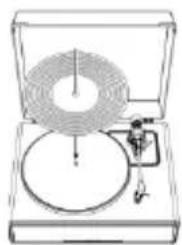
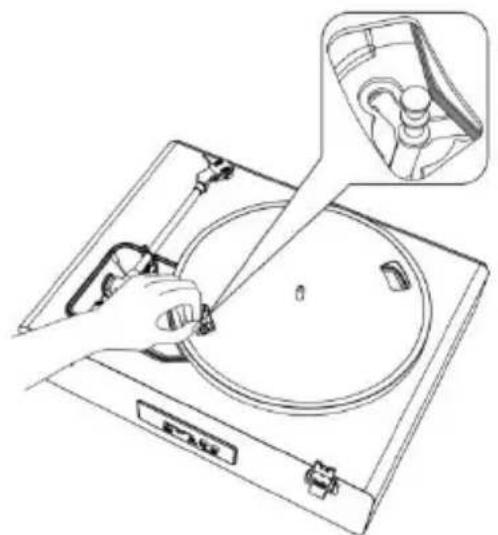
Rotating the Platter
- Using your hands, slowly rotate the platter ten times in a clockwise direction (Figure 1).
- This step is for resetting the auto mechanism, getting rid of any twists in the belt and making sure the belt rides smoothly along the drive rim on the underside of the platter.
- Place the slip mat on top of the platter. Make sure the logo on the mat is facing up (Figure 2).
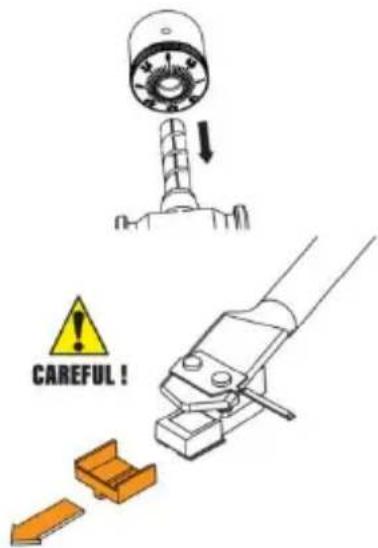
Cartridge Tracking Force Adjustment
The supplied Counterweight is suitable for cartridges weighing between 3.0-6.0g.

- Gently push and turn the counterweight onto the rear of the tonearm (with the dial facing toward the front of the turntable).
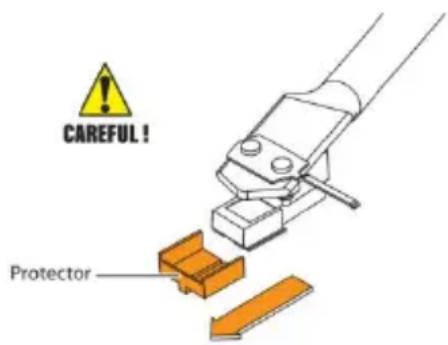
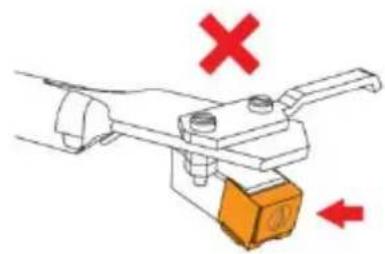
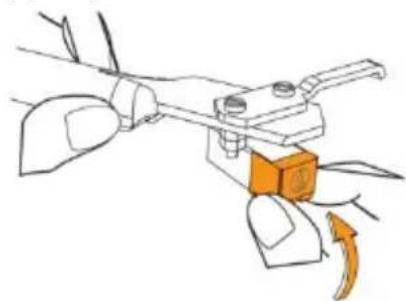
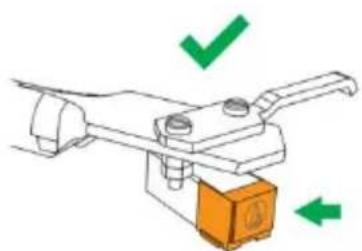
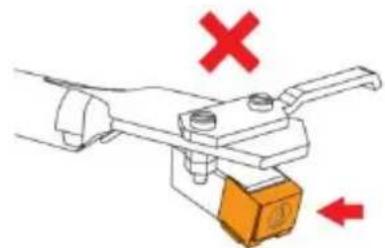
- Pull the protector straight forward to remove it.
NOTE: Applying a downward force may cause the stylus to come off the body. Only low volume is output if the stylus has come off, or is about to come off, so refer to "Replacing the stylus" to reattach the stylus correctly.
- Remove the tie-wrap and unlock the tonearm.
- Lower the tonearm lift lever and position the cartridge in the space between the tonearm rest and platter.
- Carefully rotate the counterweight until the tonearm achieves a neutral balance. The tonearm should return to this balanced position if it is moved up or down. This adjustment must be done carefully.
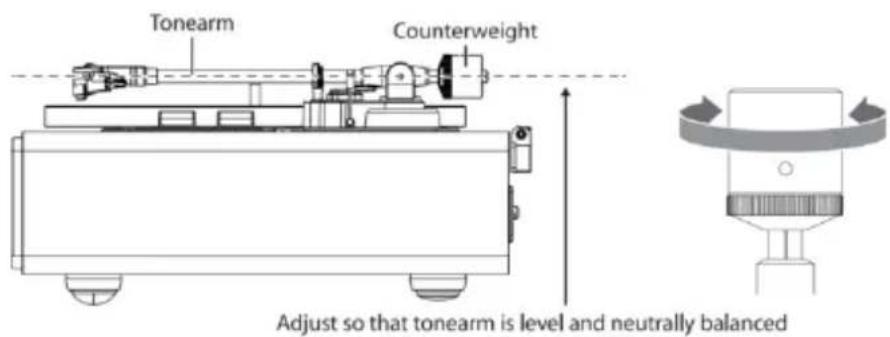
- Once the tonearm is correctly balanced, return the tonearm to its rest. Without moving the position of the counterweight, gently
rotate the tracking force dial until the zero is in line with black center line on the rear of the tonearm. Check to make sure the tonearm is still neutrally balanced.
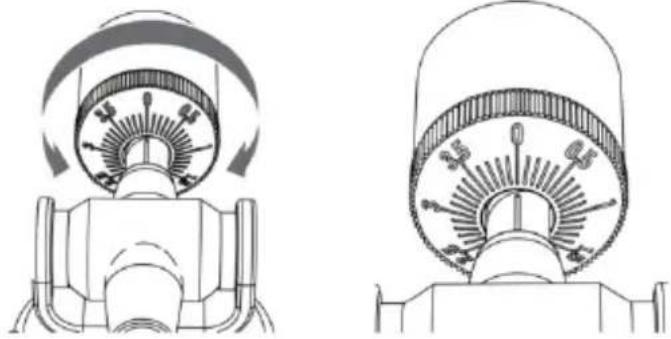
- Finally, rotate the counterweight and tracking force dial together counterclockwise (as seen from the front) to adjust the tracking force according to the cartridge manufacturer's recommendations.
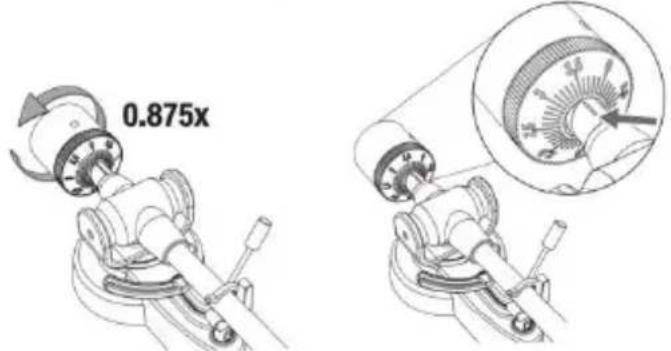
Note: Each mark on the scale represents 0.1g. The recommended tracking force for the factory-installed cartridge is 3.5g ± 0.5g . Carefully rotate the tracking force dial. When "3.5" is centered over the black line on the top of the tonearm please stop.
Connection to External Speaker with RCA Audio Cable
This turntable includes 4 built-in speakers and a built-in phono amplifier.
If you wish to use your own amplifier or speakers, please follow the instructions below:

NOTE: In order to achieve the best sound, it is advised to set the turntable volume to a minimal level. Then the turntable's audio will be played back through your own amplifier, speakers, etc.
1. Setting pre-amplifier selector switch
This product has a built-in phono amplifier function. You can use the product even if you do not have a phono amplifier or connectable equipment with a built-in phono amplifier.
Use the pre-amplifier selector switch to set the output, as shown below.
| Connectable equipment being used | Position of pre-amplifier selector switch | Where to connect RCA audio cable |
| Device with phono input | PHONO | Phono input jack and ground (earth) terminal of connectable equipment |
| Device without phono input | LINE | AUX or line input jack of connectable equipment |
NOTE: The RCA Jacks are not designed to be connected directly to the passive/unpowered speakers on LINE mode. If connected to the passive speakers, there will be no sound.
2. Connecting the device
Align the settings for the pre-amplifier selector switch and connect the RCA audio cable to an input jack that is compatible with the connectable equipment you are using (amplifier, active speakers, etc.).
- The RCA audio cable's red jack is for the right (R) channel, and the white jack is for the left (L) channel.
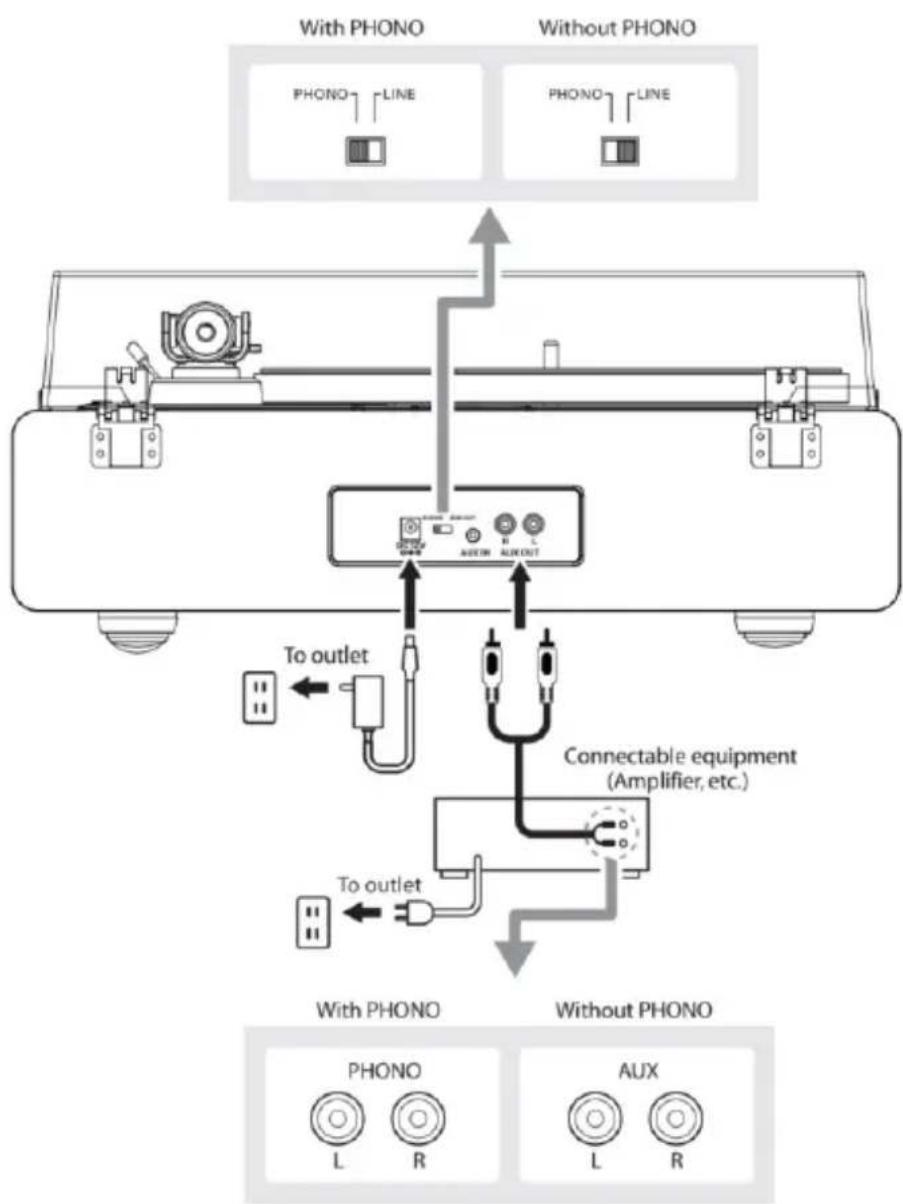
Main Power Connection
- Insert the DC plug of the AC adapter cord into the DC INPUT Jack at the back of the turntable.
- Plug the AC adapter into a normal power outlet.
NOTE: Do not plug the AC power adapter into a power outlet before all turntable assembly is completed. Before turning on turntable power, recheck all connections to make sure they are correct and secure.
Always turn off the turntable before connecting or disconnecting from power.
Power Management Function
The turntable will automatically power off after 20 minutes of inactivity.
The indicator light will turn off.
To resume operation, press the ON/OFF button again.
Playing a Record
1. Before playing a record
1.1. Pull the protector straight forward to remove it.
NOTE: Applying a downward force may cause the stylus to come off the body. Only low volume is output if the stylus has come off, or is about to come off, so refer to "Replacing the stylus" to reattach the stylus correctly.
1.2. Place the record on the felt mat so that the center hole aligns with the spindle.
2. Turntable Operation
Sufficiently lower the volume of the amplifier and speakers first.
2.1. Connect the included power adapter to the turntable, press the mode button. The turntable will turn on. The indicator will light in red.
2.2. Remove the stylus protector from the stylus.
2.3. Place the record on the slip mat.
2.4. Press the Speed Selector button to switch between 33 and 45 RPM speeds according to the type of record.
2.5. Press the START/Stop button once and the platter will play or pause.
2.6. Unlock the tonearm clip and set the tonearm lift lever to the up position.
2.7. Position the tonearm over the desired location (groove) on the record.
2.8. Carefully lower the tonearm on the record by setting the tonearm lift lever to the down position.
2.9. Turn up the volume of the turntable as needed.
2.10. When you are finished playing the record, raise the tonearm, return it to rest on the arm clip and long press the mode button to turn off the turntable.
3. Pitch Control
3.1. The turntable speed can be increased or decreased by approximately 10% by rotating the Pitch Control knob.
3.2. To increase the speed, turn the Pitch Control knob clockwise.
3.3. To decrease the speed, turn the Pitch Control knob
counter-clockwise.
4. Tone Control
4.1. The tone of this turntable could be adjusted by rotating the Tone Control knob.
4.2. To be a brighter sound, turn the Tone Control knob clockwise.
4.3. To be a deeper sound, turn the Tone Control knob counter-clockwise.
NOTE:
- If the silent pause time between each track is longer than 3 minute, the platter will stop spinning automatically to avoid damaging the record. The indicator light will be red. To resume operation, press the START button.
- If the felt mat gets dirty, it can easily scratch the record, so remove the felt mat periodically and wipe off any dust.
- To prevent the record from scratches and warping, remove it after use.
- Do not use a disk stabilizer.
AUX-IN Operation
This turntable includes an auxiliary audio signal input jack for connecting external audio devices like MP3 players, CD players, and older, non-dockable iPods so you can listen to your external source through the turntable's speakers.
- Use an audio cable (not included) with one 3.5mm stereo connection on each end of the cable.
- Plug one end into the AUX-IN jack on the turntable and the other end to the Line Out jack of the audio device.
- Power on the turntable and audio device. The indicator light of turntable is red.
- Press the MODE button again, the indicator light of turntable
turns green. It's AUX-IN mode.
- The volume level can be controlled through the turntable. Operate all the functions on the auxiliary device as usual.
NOTE:
- Make sure the tone arm is securely locked to avoid any damage.
- When you are done, don't forget to turn off the power on the turntable and your external device.
Bluetooth Operation
- Connect the included power adapter to the turntable and press the mode button, the indicator will light in red.
- Press the mode button twice to Bluetooth mode. The indicator light turns blue and flash quickly. You will hear an activation sound from the turntable.
- Turn on the Bluetooth feature of your media device and search for and select "Lenco LS-430/Lenco LS-440"to pair the media device and turntable.
- Once your media device is successfully paired with the turntable, the turntable will play a short confirmation sound.
- Play and stream music from your media device to the turntable. The indicator light will become solid.
Note: Bluetooth version: 5.0
"This product has a bluetooth reception function, you can not transmit any bluetooth sound with it: this means that you can receive wirelessly a bluetooth sound signal from an external source like a smartphone."
Care
Turntable Body
- When the turntable body is dirty or dusty, first disconnect the AC
adapter and then wipe off the dirt and dust with a soft, dry cloth.
- Do not use benzenes, thinners, etc.
- When storing the product for a long time, disconnect the AC adapter from the outlet and wrap the product in plastic; do not allow it to become damp; the drive belt should be removed to prevent unequal stretching.
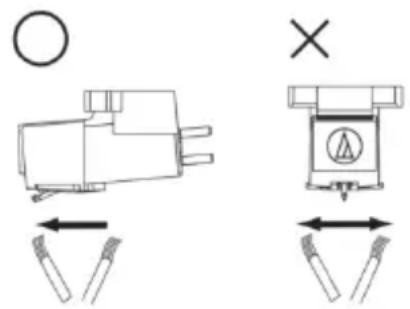
Stylus Tip
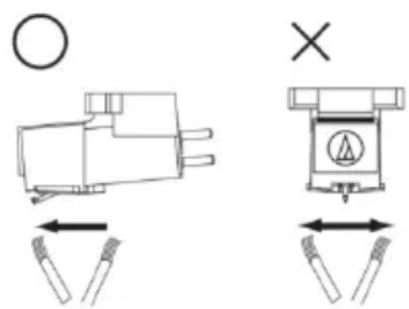
- If dirt and grime are stuck to the stylus tip, clean it with a commercially sold brush.
- We recommend using a stylus cleaner (not included) if the stylus tip is considerably dirty. Clean the stylus tip by moving the brush from the rear to the front of the stylus tip.
Replacing the Stylus
It's suggested to replace the stylus after 400 hours of use.
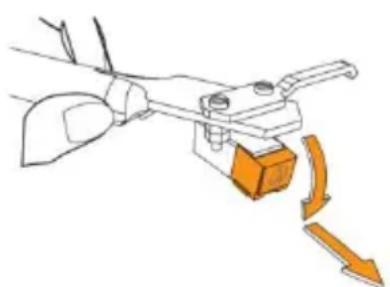
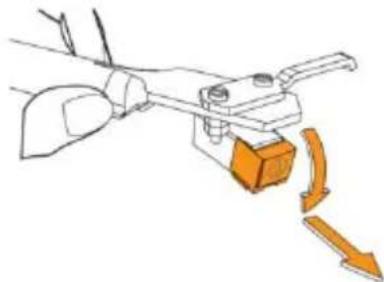
Removing the Stylus
- In addition to the deterioration of sound quality, records may also be damaged as the cartridge's stylus tip wears down.
- Be sure to disconnect the product's AC adapter from the outlet.
- When replacing the stylus, hold the headshell and the cartridge body tightly. Rotate the front of the stylus in a forward and down motion.
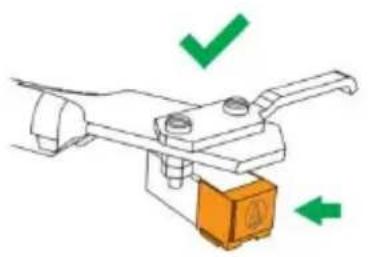
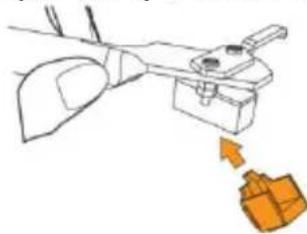
Installing a New Replacement Stylus
- Mount the new replacement stylus to the cartridge.

Engage in body first
- Lift the stylus up until you hear a click.
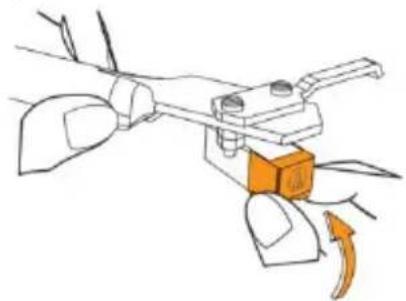
- Make sure there is no gap between the headshell and the cartridge.
Replacing the Belt
- The belt is a consumable part. Replace the belt if the speed of playback slows down or irregular rotation occurs. As a rule of thumb, we suggest replacing the belt once a year.
- Before replacing the belt, be sure to disconnect the product's AC adapter from the outlet.
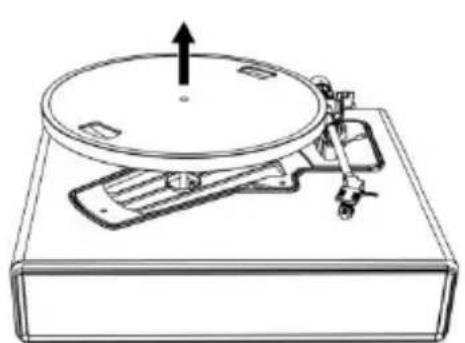
1. Remove the slip mat.
2. Remove the belt from the motor pulley.
- Remove the main platter and then remove the old belt.
- Turn the platter over and you will see a raised circle. Loop the new belt along the middle circle.
- Attach the platter.
Align one of the openings with the position of the brass-colored motor pulley.
6. Place the belt on the brass-colored motor pulley
Grasp the belt that was attached in step 4 and, while pulling it, place it on the brass motor pulley.
- Using your hands, slowly rotate the platter ten times in a clockwise direction as shown by the arrow below.

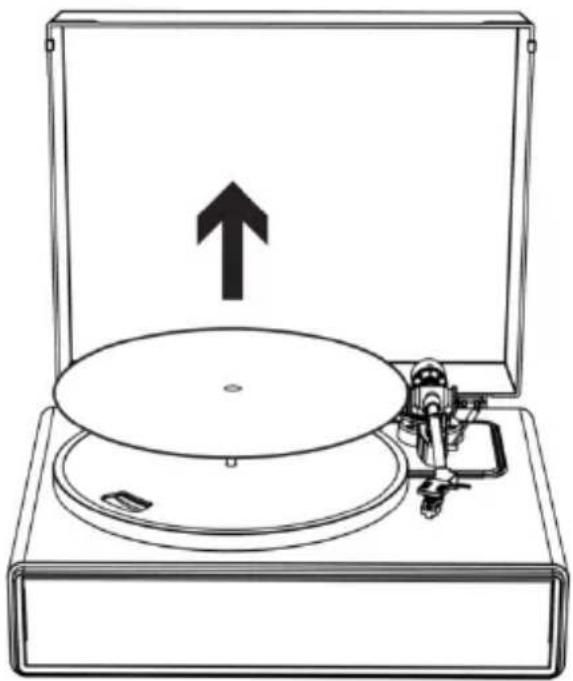
When the Turntable is Moved
Using the product's original packing materials, wrap the turntable in the reverse order from when you unwrapped it. If you do not have the packaging materials, take the following measures:
- After disconnecting the AC adapter from the outlet, remove the felt mat and platter, and then wrap them so that they do not get damaged.
- Attach the protector to the cartridge.
- Use a string or something similar to tie the tonearm to the rest so that it does not become dislodged.
- Wrap the turntable body with paper or a soft cloth so that it does not get damaged.
Troubleshooting
| Problem | Solution |
| The platter does not spin. | ·Is the AC adapter connected to the outlet? -Connect the AC adapter to the outlet. ·What's the status of the indicator light? -The indicator light is green. That means the turntable is in AUX IN mode. Please press the mode button twice to switch to Turntable mode. -The indicator light is blue. That means the turntable is in Bluetooth mode. Please press the mode button once to switch to Turntable mode. -The red indicator light will indicate Turntable mode. ·Has the belt slipped from the platter? -Correctly place the belt on the platter. ·Is the belt placed on the motor pulley? -Check that the belt is placed on the motor pulley (brass-colored) correctly. ·Has the belt been damaged? -Replace it with a new belt. |
| The platter spins, but there is no sound from the turntable? | ·Is the stylus damaged? -Check the stylus and replace it, if necessary. It's suggested to replace the stylus after 400 hours of use. ·Is the stylus placed correctly on the body of the cartridge? -Check the cartridge and adjust it, if necessary. |
| The stylus skips. | ·Is the record warped? -Check the record. ·Is the record scratched? -Check the record. ·Is the stylus pressure correct? -Refer to "Cartridge Tracking Force Adjustment" to readjust the tracking force. |
| The turntable is making a strange 'howling' sound. | ·Is the product picking up excessive vibrations from the floor, surfaces of the walls, or nearby speakers? -Decrease the vibrations or mount the product on a surface that is not subject to the effects of vibrations. ·Is the product mounted on an unstable surface? -Check whether the surface on which the product is mounted is suitable. |
| There is noise when the record is playing. | • Is there dust on the cartridge's stylus tip? - If dust is stuck to the stylus tip, clean it with a commercially sold brush. |
| The sound when the record is playing is either too fast or too slow. | • Are the speed settings for this product correct? - Please select the correct speed for the type of record being played. |
| Playback speed slows down or there is irregular rotation. | • Is the belt stretched out? - Replace with a new belt. • Is the belt installed correct? - Refer to "Turntable Platter and Belt Setup" to setup the belt. |
Specifications
Turntable
| Power Supply | AC100-240V, DC output 12V 1500mA |
| Power Consumption | 35W |
| Turntable Speed | 33 1/3, 45 RPM |
| Output Power (RMS) | 40W on Bluetooth mode |
| Speakers Rating | 2 x 15W + 2 x 10W |
| Dimensions (LxWxH) | 17.32"x 14.57"x 7.56"(440 x 370 x 192mm) (lid closed), 15.75"x 16.73"x 18.19" (400 x 425 x 462mm) (lid open) |
| Weight | 13,3lb (6,05kg) |
Stylus
| Model | Audio-Technica AT3600 |
| Frequency Response | 20Hz-20kHz |
| Channel Balance | <2.5dB |
| Channel Separation | >18dB |
| Output Voltage | 2.5mV |
| Recommended Load Resistance | 47kΩ |
| Amplifier Connection | MM (Moving Magnet) - input |
| Recommended Tracking Force | 3.5±0.5g |
| Weight | 0.18oz (5.1 g) |
Note: Design and specifications are subject to change without notice.
Power supply adaptor
Manufacturer: BRIGHTPOWER OPTOELECTRONIC TECHNOLOGY CO., LTD
Model number: SW1201500-NM
Use only the power supply listed in the user instructions
| Information | Value and and precision |
| Manufacturers name or trade mark, commercial registration and address | BRIGHTPOWER OPTOELECTRONIC TECHNOLOGY CO., LTD |
| Model Identifier | SW1201500-NM |
| Input voltage | 100-240V |
| Input AC frequency | 50-60Hz |
| Output voltage | DC 12V |
| Output current | 1500mA |
| Output Power | 18W |
| Average active efficiency | 85.00% |
| Efficiency at low load (10%) | 83.20% |
| No load Power consumption | 0.1W |
1. Guarantee
Commaxx B.V. offers service and warranty in accordance to European law, which means that in case of repairs (both during and after the warranty period) you should contact your local dealer.
Important note: It is not possible to send products that need repairs to Commaxx B.V. directly.
Important note: If this unit is opened or accessed by a non-official service center in any way, the warranty expires.
This device is not suitable for professional use. In case of professional use, all warranty obligations of the manufacturer will be voided.
2. Disclaimer
Updates to Firmware and/or hardware components are made regularly. Therefore some of the instruction, specifications and pictures in this documentation may differ slightly from your particular situation. All items described in this guide for illustration purposes only and may not apply to particular situation. No legal right or entitlements may be obtained from the description made in this manual.
3. Disposal of the Old Device


This symbol indicates that the relevant electrical product or battery should not be disposed of as general household waste in Europe. To ensure the correct waste treatment of the product and battery, please dispose them in accordance to any applicable local laws of requirement for disposal of electrical equipment or batteries. In so doing, you will help to conserve natural resources and improve standards of environmental protection in treatment and disposal of electrical waste (Waste Electrical and Electronic Equipment Directive).
4. DECLARATION OF CONFORMITY
Hereby, Commaxx declares that the radio equipment type Lenco LS-430 and LS-440 is in compliance with directive 2014/53/EU. The full text of the EU declaration of conformity is available at the following internet address:
https://commaxx-certificates.com/doc/ls-430_doc.pdf
Type RF : Bluetooth
Frequency range : 2402-2480 MHz
Power : <6dBm
5. Service
For more information and helpdesk support, please visit
www.lenco.com
Commaxx B.V. Wiebachstraat 37, 6466 NG Kerkrade, The Netherlands.
Nederlandss
OPGELET:
Engage in body first
| EN | FR |
| Figure 1 | Figure 1 |
| Figure 2 | Figure 2 |
Engage in body first
| EN | ES |
| Engage in body first | Engage in body first |
Engage in body first
https://commaxx-certificates.com/doc/ls-430 doc.pdf
: Bluetooth
MEPbI PPEIOCTOPOXHOCTN IPEEd NcNoJIb3OBAHNEM
HEOXBODMO COBIOATb CLEYIOUne IHCTPYKcIN:
- He 3aKpbIbaiTe n He 3aRopaxnBaIte BeHTnlaOnHbIe OTBepCTnI. Ppi pa3MeueHnn yctpoiCTBa Ha noJIke Tpe6yeTc8 5 cm (2 dIOmAm) CBO6oJHO rnoCTpaHCTBa BOKpyr yctpoiCTBa CO BCEx CTOpOH.
- YctaHOBNTe B COOTBeTCTBUN C npHlaRaembIM pyKOBOdCTBOM NO 3KcPnyatauIN.
- Держinte устюст bo вдали OT Истонков тела, Таши Кадраиматоры OTолленя, обогравaten, песи, с被执行的各种调用调用调用调用调用调用调用调用调用调用调用调用调用调用调用调用调用调用调用调用调用调用调用调用调用调用调用调用调用调用调用调用调用调用调用调用调用调用调用调用调用调用调用调用调用调用调用调用调用调用调
- Избeraite IncnoB3OBaHnЯ yctpoiCTBa B6IIN3N cnIbHbIX MaHHTbIX nOJIeN.
- ΘleKtpocTaTnueckn pa3pI MOnKeT co3daTb nomexn B pa6oTe daHHoro yctpoiCTBa. B TaKOM clyuae Heo6xOdImo BblIOJIHHTb c6poc DaHHbIX n nepe3aRpy3ky yctpoiCTBa, cIeDyI INcTpyKUIMB pyKOBoDcTBe NO ekCnIyatauIN. Ppi nepeJaue daHHbIX Tpe6yETc8 octOpOJHoCTb N obecneueHne pa60tby yctpoiCTBa B cpeDe, CBO6oJHOI OT NOMex.
- BhIMaHHe! HnKoTdA He BCTaBnaTe NoctOpOHHe IpeDMeTbI BycTpoiCTBO uepe3 BeHTnlaZnOHhBe i npyRne OTBepCTn. UcTPOIcTBO npoxOHT BbICOKoe HaPjXeHne, N BcTaBka NoctOpOHHeTopeDMeta MoKeT npNBecTN K nopaxeHIO 3JIeKTpNueCKm TOKOM n/nn KOpOTKOMy 3aMbikAHIO Ha BHyTpENHX 3JIeMeHTax yCtpoiCTBa. Po TOn Jx e npuHHe HeJIb3a
donyckaTb npolnbHnHa yCTpoiCTBO BODbl nIIN dpyroJxndKoCTn.
- He IncnoIb3yIte yCTPOBCTBO B NOMEeHnX C BbICOKO BlaJxHOCTbIO, TaKIX KaK BaHHbIe KOMHaTbI, KUXH, HApOLHeHHbIe napOM, nII OkOLO 6accEINOB.
- He donyckaTe nonaHa Ha yctpoCTBO KapeIb IIN 6pb3r, CJIeIte 3a Tem, uTo6bl Hn Ha yctpoCTBe, Hn PraDM C Hm He 6blIO eMKoCTeH, HApOJIHeHHbIX JxNdkoCTbIO, HApPIMep, Ba3.
- He IncnoIb3yIte yCTPOcTBO B ycIOBnax, B KOTOpbIX BO3MOJHO o6pa3OBaHne KOHeHcata. Ecln yCTPOcTBO IncnoJIb3YeTeB TeNlOM NOMEUeHN C NOBbIWeHNO BlaXHoCTbIO, BHUTPN yCTPOcTBA MOrY T O6pa3OBaTbCЯКПи BOdBi NLI KOnDeHcAT, YTO MoJKeT PrINBeCTN K HeKOppeKTHoN pa6Ote yCTPOcTBA; cIeDyET OCTaBnTB yCTPOcTBO C BbIKLIOUeHHbIM PNTaHnem Ha 1-2 Yaca, IN TOJIbKO IocNe 3TOrO MOJHc BOKIIIOuAtb PNTaHnE: nepei nOdauei PNTAHnY yCTPOcTBO DOJXHO 6bITb cyxIm.
- XotyaanHoe yctpoCTBO n H3rotOBLeHO c oc6oTtataTeIbHocTbIO, a TaKKe npOJIo HeoNHOkpaTHyIO npOBepKy nepei OTRpy3KOc 3aBOJa-n3rOTOBHTeJIa, MOrYT Bo3HNKHyTb np6leMbI, KaN y JIO6Oro 3JeKtpnueckoro np6opa. Ecln Bbl 3aMeTIIN DbIM, nepeRpeB nII INHbIe HeoXnDaHHbIe YBLeHnA, HeMeDJIeHNO BbITaUHTe BNkY n3 pO3ETKn.
- YcTpoIcTBo DoJxHo pa6OtaTb OT nCTOuHnKa nITaHnA, XapakTePncTnKoTOporo COOTBeTCTByIOT XapakTePncTnKam, Yka3aHHbIM Ha 3aBOdCKo TaNChUKe. Ecln Bbl He yBepenbl B COOTBeTCTBn TnPa NCTOuHnKa nITaHnA, nCNoJIb3yEmOro B BaWeM dOME, o6paTntecb 3a KOHCyIbTaUeN K dInlepy nII MeCTHOJ hEproCha6JXauOSeN opraHn3aUHN.
- He donycka Te K yctpoCTBy XNBOTbIX. HeKOtOpBie XNBOTbIe IIO6r rpb3b shHypbl nITaHnA.
- Дли оочinctустroduства IncnoIb3yIte Мягкю cyxuTo TkaHb. He IncnoIb3yIte pactBOPHTeIN IIn JnIDKOCTN Ha OCHOBe HeΦTe npOdyKTOB.
Дя удалени StOиKnx 3aRpa3HeHn MoXHo nCNoIb3OBaTb TkaHb, cMOyeHHyU pa36abIeHHbIM MOUIm CpeDCTBOM.
14. Пocтавшик He HeceT OTBeTCTBeHHOCTn 3a NOBpeJdeHnI nI INOTepIO dAHbIX B pe3yIbTaTe HeNCpPaBHOCTn, HeIpaBnIbHOrO nCNoJIb3OBaHnI, MoIΦNkauu NycTroYcTBa IIN 3aMeHbl aKKymyIaTOPa.
15. He npepbBaIte coeHHeHne, KOrda yctpoiCTBO fOpMaTnpyet Inn nepeDaet foJIbI. Nhaue daHHbIe MOrY T 6bITb NOBpeJxDeHbI IIN noTePraHbI.
16.Еслустpoьстwo оcaшенио ункцииь Bocnpo3BedeHЯ uepe3 USB,to USB-hakonntelb cIeDyET NOdklIOUaTb HeNocpeДCTBeHHO K yCtpoiCTBy.He nCnoJIb3yIte ydInHnTeIbHbI USB-Ka6eIb,TaK KaK OH MoJKeT Bbl3BaTb NOMexn,чTO npNBedet K c6OJO daHHbIX.
17. Ha nixknei nn 3aDnei paHei yCTpoiCtBa nMeetc Ta6nUka c TexHnuecknMn DaHHbIMn.
18. Данhoe устюв He пedingиануено дя Испьзовая Людм (Вклоча DeTe) с Инbalдноctью BCleДCTBVE comatчеснх hapшени, с hapшениMu ChyвстBEHNOBO BOCPЯТИ НЛ ПСХИЧЕСКIMN hapшениМN, a ТAKЖe He IMeHQUIMN DOCTaTOUHOrO OblTa N 3HaHn, eCIn OHN He HaxODЯТСЯ NOД писмOTpOM ИЛ He NOLYUJI N INCHpyKcIIN NO npabINbHOMY ICSNoIb3OBaHNU USTPOJCTBa OT LIIca, OTBETCTBeHHORO 3a Иx 6e3OpacHocTb.
19. YcIpoIcTBo He npeHa3NaueHo dIy npofoecnOHaIbHoro, KOMMepueckoro nIy npomblJeHHoro npimHeHna.
20. y6eIntecb B TOM, yTO yCTpoiCtBO haxoIITcB yCTOuHBOM noLOJKeHn. IapaHTnHe paCnpocTpaHareTcR Ha NOBpeJDeHnRA, BO3HnKShne B pe3yIbTaTe nCNoJIb3OBaHnRA yCTPOiCTBa BV HeYCTOuHBOM noLOJKeHn, Bn6paUHOHHOro BO3deICTBnRA nn YdApOB, a TaKxe HecO6JIIODeHnRA dpyrnx ppeDynpexJDeHn nn MeP npEDoCTOpOxHOCtN, CoDEpKaUHXcR B DaHNOM pyKOBoIDCTBe nO 3KcIIyaTaUIN.
21. HnKoIa He cHmaiTe KOpNyc yCTpoiCTBa.
- Н Markets He РOMEДАЕ YSTROВИЕ ДPyRoe 3JIeKTPnueckoe obOpydoBaHne.
- He pa3pewaIte DeTЯm nIgpaTb c PIIaCTNKOBOy yNaKOBKOY O T yCTpO'cTBA.
- История Толбко писно相关内容/Вспомога�лhoe obopyдованке, указаанные поиьдentelem.
- 06cIyJxNBAHHe yCTpoiCTBa DoJIxHO OcyIeCTBJIaTbCra TOLbKO KBaIIuΦnIupoBaHHbIMn CpeIaJIncTAmn. 06cIyJxNBAHne Tpe6yeTcR npHaJIuHm KaKnx-ll6o nobpejxdHn Ha yCTpoiCTBe, HApIeMep, B Clyuae IOBpeJxDeHn IhUpa IITaHn IIN BILKn, ecn Ha yCTpoiCTBO IpOJIlaCb JNDKOCTb, IIN UTO-TO yPano, ecn yCTpoiCTBO NOBvepILOCb BO3deIcTBIO DoJxIe IIN BLaIg, ecn OHO He φyHKciOnHnpyeT HopMaJIbHO, IIN erO yPoHII.
- Длntельhoe BO3dEиCTBnE rpoMknx 3ByKOB OT LInuHbIX My3bIkaJIbHbIX npOnrpbIbaTeJe MoJKeT npINBeCTn K BpeMeHHoI nII NOCTOaHHoI nOtepe clyxa.
- EcIn yctpoIcTBO nocTabIaTeTcK Ka6eIeM NITaHnI nn aDaIaTePOM NITaHnI nepeMeHHoro Toka:
- Пи ВОЗнКовени HeполадOK OTсоeДиНITE Ka6eь пИтаня OT сети поременго тoka и образиТecь К KBалифицроваHHbIM спесиалистам ДдЯ BыПОЛHeHЯ ТExнчecкOTO obcLужИВaHЯ.
He hactynaTe Ha aadantep nntaan He donyckaTe ero 3aueemleHn. Co6IIOdaTe ocToPOxKHOCTb, ocObeHNO BO3Je WTekePoB n Ka6eIbHO rO BbIOda. He cTaBbTe Ha aadantep nHTAHn TjXeJIbIe PpeDMtbl, KOTOpbIE MOrYr erO NOBpeDNTb. XpaHnTe yCTpoiCtBO B HeDOCTyHOM dJa DeTei MeCTe! Prn Irpe C Ka6eIeM nTaN HOn MOrYr POJyUHTb cepBe3HbIe TpaBMbl. -
OTKIIOUaIte yCTPOiCTBO OT cETN BO BpeM rpo3bl, nIN ecIn OHO He IcNoJIb3YeTcB TeueHne dIITeJIbHOrO BpeMeHN.
-
Po3eTKa DoJIxHa HaxOuNTbCra Pardom C o6OpyDoBaHneM IdoJIxHa 6bITb JeKoDoCTynHOi.
He neperpykaTe po3eTKn cetn nepemeHHoro TOKa nIyDInHnteI. NeperpZka MoXeT npVBecTN K BO3rOpAHIO nInpaJKeHIO 3JIeKTPnueCKM TOKOM. - UcTpoIcTBa c KOHcTpkyKuNei Klacca 1 cIeDyET nOdkluoyatb K OCHOBHO p03eTke c 3a3eMJIeHNHeM.
- UcTpoIcTbA c KOHcTpKcIeN Klacca 2 He Tpe6yIOT 3a3emIeHnra.
-
Прии ИЗВLEЧЕНИ BUILКИ ИЗ OCHOВ"HО рОзЕТКИ BCERДа следует ДерЖАТьСЯ BUILKИ, a He TянУТь 3a Шур пNTань. ᝀTO можETппВЕСТИ K KОРOTКOMY 3aMbIKAHINIO.
He nCnoJIb3yIte noBpeJdeHbI shHyp nHTaHnI nn BnKy, a TaKKe He3aKpeIeHHyIO po3etKy. 3TO MOKeT npNBecTn K BO3rOpAHIO IIN IopaKeHHIO 3JeKTpNueCKm TOKOM. -
Приносяпбатаразецк/элем entob пntаня tabletoчого тпа в самом устюстve поь в пльte дистанционогуnpавеленя:
BHHMaHHe:
He nporlaTbIbTaB 6aTapeIO, onacHocTb XmMnueckoro OxKora" IIN aHaIOrnUHnA HaDnncb.
[Пульт дисанционно управлени, BXODяшь в Комплей постови ] Данhoe n3делne соржntбатapeйку/элем ent петаши табл致电чого тира.В с lyuae nporlaatbваня 6atapeиka может Вызваръ Тяжелbie BHyTpehнe OЖOrnВ Te ueHne BCero 2 yacobиnpinBecTN K cmeptN.
XpaHnTe HOBbie n HcNoJIb3OBAHHbIe 6aTapeKn B HeIOCTyINHom dIa DeTei MeCTe.
- Ecni 6aTaapeHbI OTCeK HeBO3MOxH0 HaDeJxHO 3aKpbITb, npeKpaTnte IcNoJIb3OBAHne yCTpO'CTBa N NOMeCTnte ero B MeCTO, HeIOCTyINHoe dIra DeTei.
- EcIn Bbl npednoIaraeTe, yTo 6aTaapeKn MoTIn 6bITb IpOrloyeHbI nII NOMeUeHbI BHyTpB KaKOJ-LIN6O qAcTH TeLa, HeMeDJIeHHo 6bpaTHTecb 3a MeDiuCnHCKO JNOMOUsbHO.
-
OcToPoJxHocTb npn nCnoJIb3OBAHm 6aTaapeek:
-
Onachoctb B3pbIbA npn HeinpabHbHOJ 3aMeHe 3JeMeHTa NITAHN. DOnyckaetcJ 3aMeHa TOLbKO Ha 3JeMeHTbl NITAHN JTO RO JKe IIN 3KBuBaJIeHTHOrTO TUNa.
- Θлем ent ПИтань HeIb3Я NOДВерраТь BOЗдeйСТВИО СПШКOM
ВысOKиX ИИ СПшКOM HИЗКИХ TemпepаТур, ИИЗКOrO
aTмOCферног ДавLEеня Ha 6Ольшиx ВысOTax пи
ЭКСПЛУаТaци, xpaHeHи ИИ ТраHCnOpТиРовKE.
3aMeHa 3aMeHa TnTaHn Ha 3aMeHn TnTaHn HeCOOTBeTCTBvUoIeRo TnPa MoKeT npNBecTN K B3pBiBy NnYTeUKe IerKOBocPnAmEHaIOuSeiCs JNkOcTN Nn Ra3a.
Czirahne 3JIeMeHTa NITAHn, MexaHnueckoe pa3pyWeHne nn pa3pe3aHnE 3JIeMeHTa NITAHn MoJKeT npINBeCTn K B3pbIBy.
OcTabLeHne 3JIeMeHtA NITaHnB OOKpyKaIOuSei cpeDe c OueHb BbICOKIMN TeMnepaTypamN MoKeT npNBecTn K B3pbIBy IIN YTeUKe JERKOBOCnIaMeHraIOuSeiCs KNDKOCTN IIN Ra3a.
HaxoJdeHne 3JeMeHTa NITaHnB YCIOBnX CInuKOM Hn3KOrO aTMocΦepHOrO daBLeHnMoJKeT npNBecTu K B3pBiBy IIN YTeUKe JERKOBOcPJIaMeHЯIooeJcR XNkOCTNu IIN Ra3a.
Heo6xoJIMO o6paTntb BnImaHne Ha 3KoIOrnueckne acNeKTbYtJIu3aunn 3JeMeHTOB nITaHna.
YCTAHOBKA
- PacnakyIte BCE deTaIIu n CHMnTe 3aunTHbI MaTePnaJI.
He cIeJyET noDKJIIOUaTb yCTpO'cTBo K cTeN 6e3 npEiBapnteJbHO npOBepKn ceTeBOrO HApPjXeHn I DO BblIOJHeHn BcEx dpYnx noDKJIIOUeHn.
* DaHHbIe NHCTpyKcH N OTHOCATc TOnbKO K yCTpOiCTBaM c Ka6eIem nHTaHn I nn aAdantepom nepemeHHoro ToKa.
Опсане устpoиства

3ByKOBOrO BXoJa IJIa NODKJIIOUeHnBHeuHnx ayDNOyCTPOIcTB, TaKHX KaK MP3-IIeepbI, CD-IIeepbI n 60lee cTapbie He npincoeHNYeMble MoJeN iPod dIra BO3MOxHOCTn IpocLyuWBaHnBHeuHero nCTOuHnKa Upe3 dINHaMnKn IpONrpbIBaTeJia.
- Историяаудно-кавель (He BXOДИТ В КОМПЛЕКТ) с однemстец-развемом 3,5 MM на кадом конце кавеля.
- Подклочи Te OdIN KoHeц Ka6eЯ K pa3bemy AUX-IN Ha npoInrpbBaTeIe, a dpyro - K pa3bemy Line Out Ha aydnooyctpoiCTBe.
- BkIIOHTe NITaHHe npOnrpbIBaTeJI aYdNIOyCTPOiCTBa. HndNKatOp npOnrpbIBaTeJI 6yDet CBeNTbCra KpaChbIM.
- ChOba HaxMnte KhoNky peXnMa (MODE), nHdNkaTOp npOnrpbBaTeIydeT cBeTHTbcra 3eJIeHbIM. 3To peXnM AUX-IN.
- YpOBeHb rPOMKocTn MoJHo peRyIInpoBaTb uepe3 npOnrpbIbTeJIb. YnpaBHeHne BcEMN yHKzIaMn BCnOMoTaIbHO yCTpoIcTba OcyuEcTBlaeTcKaK o6bluHo.
ПРИМЕЧАНЕ:
- Y6eIntecb B TOM, yTO ToHaPM HaJeXHo 3aΦnKcnpoBaH, BO n36exHHe NOBpeJdEHH.
- После завершени Воспpon3бдени He 3a6ydbTe BbIKIIOHTbпитане поигьвateл n BHeшнero yctpoiCTBa.
ПовлочnénoBluetooth
- Подклочип рпILAЯмьй aадаNTер пntаня К прогрьВаTeю И NaЖМИТе KнОПКу ржIMa, ИнДИКаTOp 6уDEТ CBeTITbСЯ КpacHBIM.
- Haxmte KhoNky peXnMa DBaXdbI, YTo6blpeeyTN BpeXnM Bluetooth. INdnKatOp 6ydt CBeTntbCnHIM n 6bICTpo MnTaTb. Bbl yCbIshTe 3Byk akTnBaun npOnrpbIBaTeJra.
- BkIouHrTe yHKcIIO Bluetooth Ha ycTpoIcTBe xpaHeHnJaHHbIX, NaIITe N BbI6epHTe "Lenco LS-430/Lenco LS-440" dIa
COPRAJXHNA XpAHENI IN PONrPBbATEJI.
- После успшно соряжени устpoиствахраненя данньix с поигьвatelem, поигьвateль BOCПОИЗБeДeТ KОРOTКИ 3ВуК в Каунец подтберждени.
- Bocnpo3BODITE n nepedaBaIte My3bIKy c yCTpoiCTBa xpaHEnia daHHbIX Ha npOnrpbIbATEJIb. HndnKaTOp 6yDet CBETNTbcra, He MInraJ.
Приимechanical: ВерсанBluetooth: 5.0
"Данhoe устюг bo nmeet yHKnIO npema bluetooth, Bbl He Moxete cero nomoubno nepedaBatb 3Byk no bluetooth: 3TO O3HaayeT, YTO Bbl Moxete npHIMaTb 3ByKOBoN cnHaI 6ecnpoBODhIM cnocobom no bluetooth ot BheHero nCTouHnKa, HapnMep, OT cMaprfoHa."
yxoA
Kopnyc nponrpbBateIa
- Ecni Koprnyc npoNrpBbAteTn NOKpbIcN pblbU nII rpa3bU, cHaayala OTcoeDHHTe shHyp aadantepa nepemehHoro ToKa, a 3aTeM ydaJInte PbIb N rpa3b MraKoCyXOu TKaHbU.
He ncpoJIb3yIte 6eH3nH, paCTBOpITeIN I T.D. - Прпnomeшени устpoиства на дintelhoe xpaheHne сеуet OTCoeHNITb shyp aanTepa nepemehnHO TOka OT po3eTKI 3aBepHyTB ySTPOICTBO B NOIN3TNIEHOBYIO PIIeHKy; He donyckaiTe nonadahnia BlaRn B ySTPOIcTBO; npIBOJHOpeMeHB Heo6xOdmo ChrTb dIЯ пeIDOTBpaaeeHna HepaBHOMepHoro paCTaJKeHna.
Hrna
- Ecni Ha ngle cKaanlnaeTcra rpa3b N nbilb, Ounchnte ee c nOMOu bIO KNCTOUKN.
- Ecni nIgna cnilbHO 3aqr3HeHa, Mbl peKOMeHdyem NcnoJIb3OBaTb CpeIcTBO IJnOuNCTKN IrIbl (He BXoIIT B KOMIIeKT NoCTaBKn). Bo BpEm OUncTkn DBnXeHne KInCTOuyKn DOLJxHO 6blb HappaBNeHo OT 3aIHeJ Yactn K NepeDHeJ Yactn IrIbl.
3aMeHa nIJIbl
PekomeHnyetc3aMeHa nIgbli uepe3 kaXdbie 400 yacob ekCnIyatau.
I3BleueHne nrgblbI
- Ecni ngla n3HOWeHa, To, NOMmo yxUdSeHnKaueCTBa 3Byka, 3TO MOXeT npINBeCTn K NOBpeJdeHnIO pLaCTnHKn.
- Y6eIntecb B TOM,ЧTO aДaNTep nepemeHHoro TOKa npOINrpbBaTeJIy OTKIIuoyeh OT pO3ETKN.
- Пи замены седует крени досятголовки и Корпс 3ByKocHmataл. Повернite поедно уасть илbli no Haprablenu Bpepd N Bn3.
YCTaHOBka HOBOI rIblI
- YcTaHOBInTe HOByIO INrIy B rOJIOBky.
Chauja yctaHOBTb Ha Kopnyc
2.Двигаite ngly BBepxdo ueuka.
- y6eIntecb B OTCyTCTBn 3a30pa MeJdy rOIOBkoN KOpnycom.
3ameHa pemHra
- PemeNb - 3TO paCXoHbI MaTePnaI. ON IOndJeKHT 3aMeHe npi 3aMeJleHnCKOpOCTN BocnpOn3BeDeHnI IN HepaBHomepHom BpaSeHn. KaK npaBnlo, peKOMeHdyetc eXeRoDHa 3aMeHa peMnI.
- Парад замену ремня обаятьно отоединite щадпетерпераMuHOrTo TOKa yCTpoiCTBa OT po3eTKN.
1. CHIMNTE cPNTMaT.
2. Chmnte peMeHb co uKnBa dBnrateJIa.
- CHIMITE OCHOBHOJ DNCK, a 3aTeM CHIMITE peMeHb, NOdJIeXaIzni 3aMeHe.
Installation of plodespiller
| EN | DA |
| Tonearm | Tonearm |
| Counterweight | Kontravæ gt |
| Adjust so that tonearm is level and neutrally balanced | Justér, indtil tonearmen er i niveau og i balance |