Wasserwerk 250 - Pump Blumfeldt - Free user manual and instructions
Find the device manual for free Wasserwerk 250 Blumfeldt in PDF.
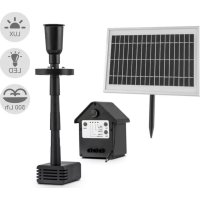
| Product type | Solar pump for fountain or small pond |
| Brand | Blumfeldt |
| Model | Wasserwerk 250 |
| Power supply | Solar panel + rechargeable battery |
| Operating voltage | 6-9 V DC |
| Maximum delivery capacity | 250 L/h |
| Maximum delivery height | 1.2 m |
| Water jet height | 0.6 m |
| Cable length | 5 m |
| Battery | 6 V, 4 Ah (replaceable) |
| Solar panel power | 3 W |
| LED lighting | LED ring, automatic on in darkness |
| Operating modes | Solar (direct) and battery (with automatic switching) |
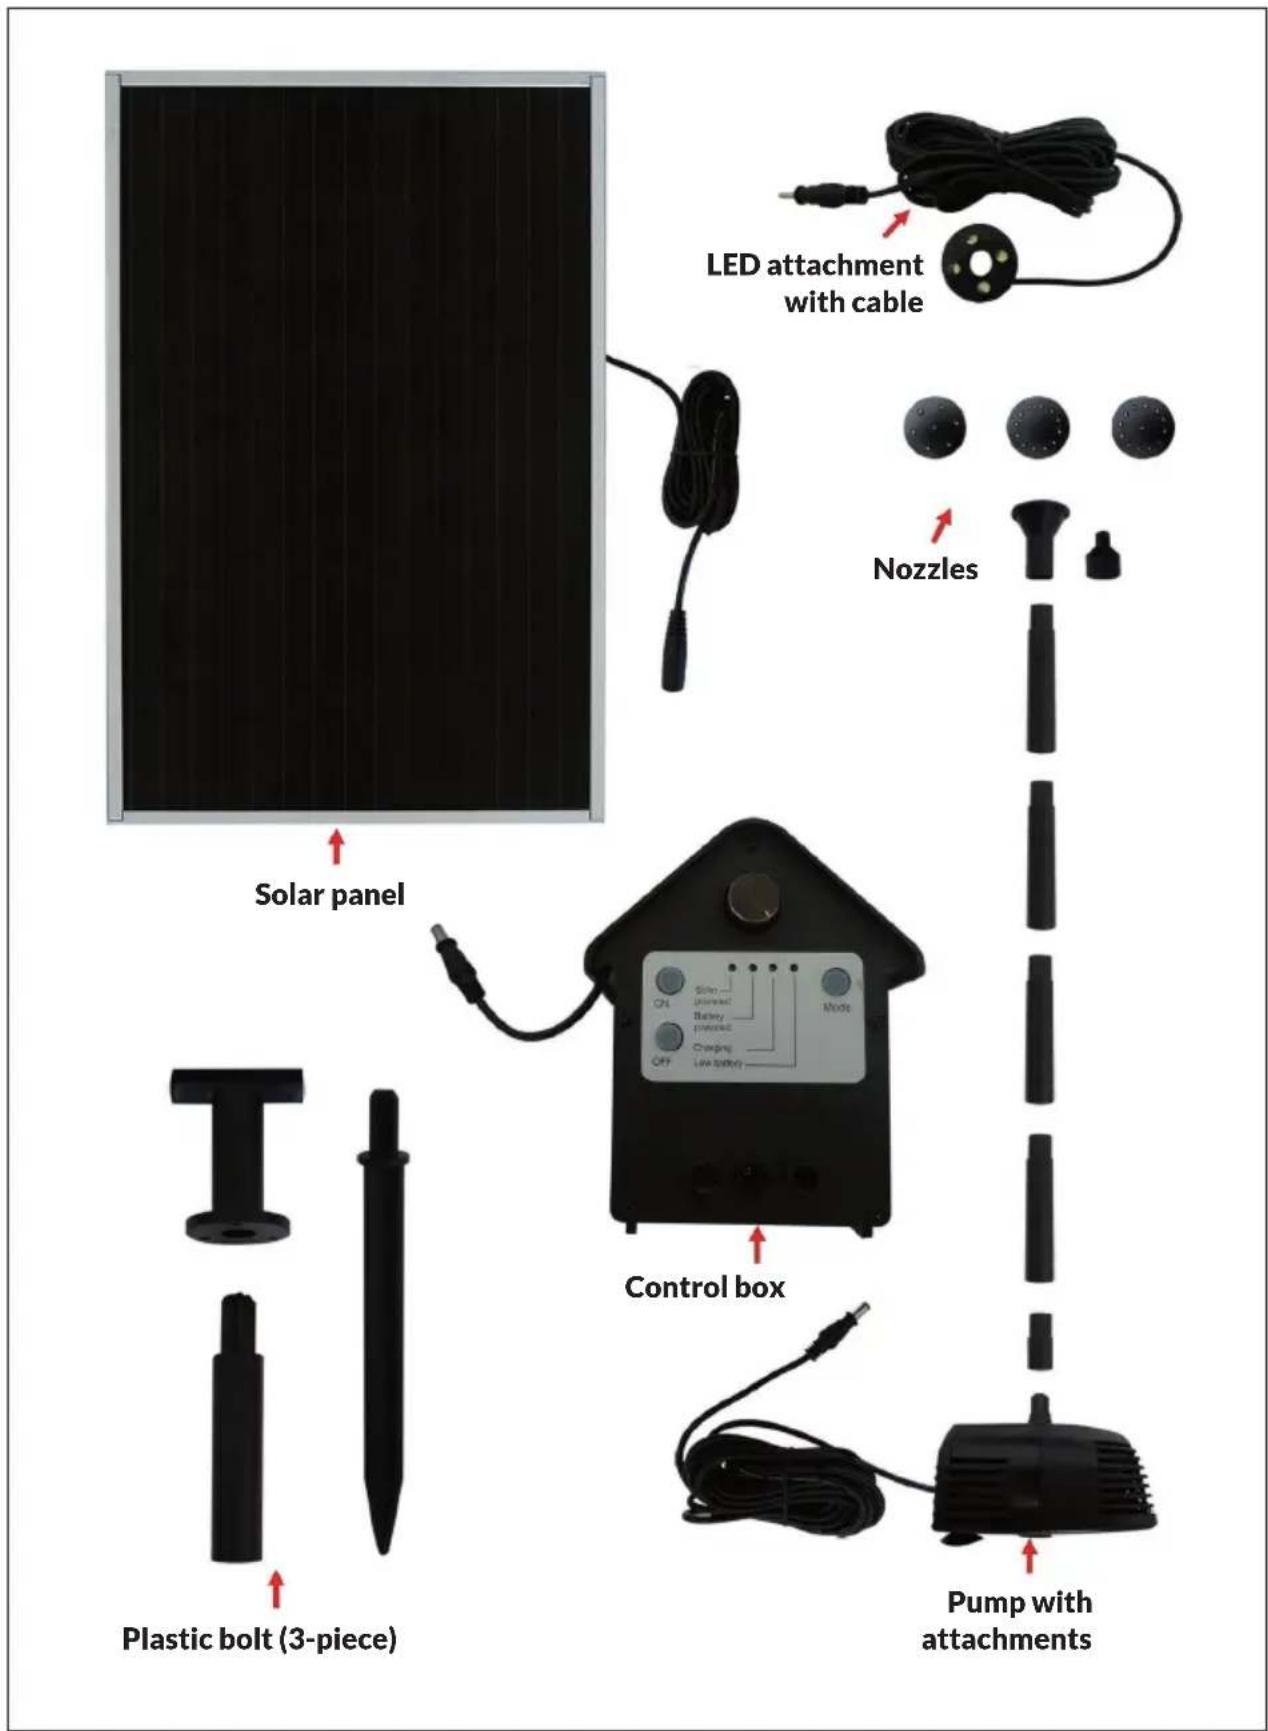
| Package contents | Battery, solar panel, pump, 10 watering devices (columns, sprayer, nozzles), ground stake (3 pieces), LED ring |
| Installation | Submersible pump, ground-mounted solar panel, connection of nozzles |
| Maintenance | Clean the solar panel and pump filter regularly; replace battery if necessary |
| Safety | Do not use with alternating current, do not run dry, avoid water above 50°C |
| Recommended use | Freshwater pond, temperature up to 50°C |
| Initial charging time | At least 8 hours in full sun before first use |
| Spare parts | Replaceable battery (6 V, 4 Ah); other parts available on request |
Frequently Asked Questions - Wasserwerk 250 Blumfeldt
User questions about Wasserwerk 250 Blumfeldt
0 question about this device. Answer the ones you know or ask your own.
Ask a new question about this device
Download the instructions for your Pump in PDF format for free! Find your manual Wasserwerk 250 - Blumfeldt and take your electronic device back in hand. On this page are published all the documents necessary for the use of your device. Wasserwerk 250 by Blumfeldt.
USER MANUAL Wasserwerk 250 Blumfeldt
Member of Berlin Brands Group
Handwerkerstr. 11
15366 Dahlwitz-Hoppegarten
Deutschland
Berlin Brands Group UK Ltd
PO Box 1145
Oxford,OX19UW
United Kingdom
Dear customer,
Congratulations on the purchase of your device. Please read the following instructions carefully and follow them to prevent potential damage. We accept no liability for damage caused by disregarding the instructions or improper use. Please scan the QR code to access the latest operating instructions and for further information about the product.

CONTENTS
Safety Instructions 14
Overview 15
Installation 16
Operation 17
Maintenance and care 18
Disposal instructions 20
Manufacturer & Importer (UK) 20
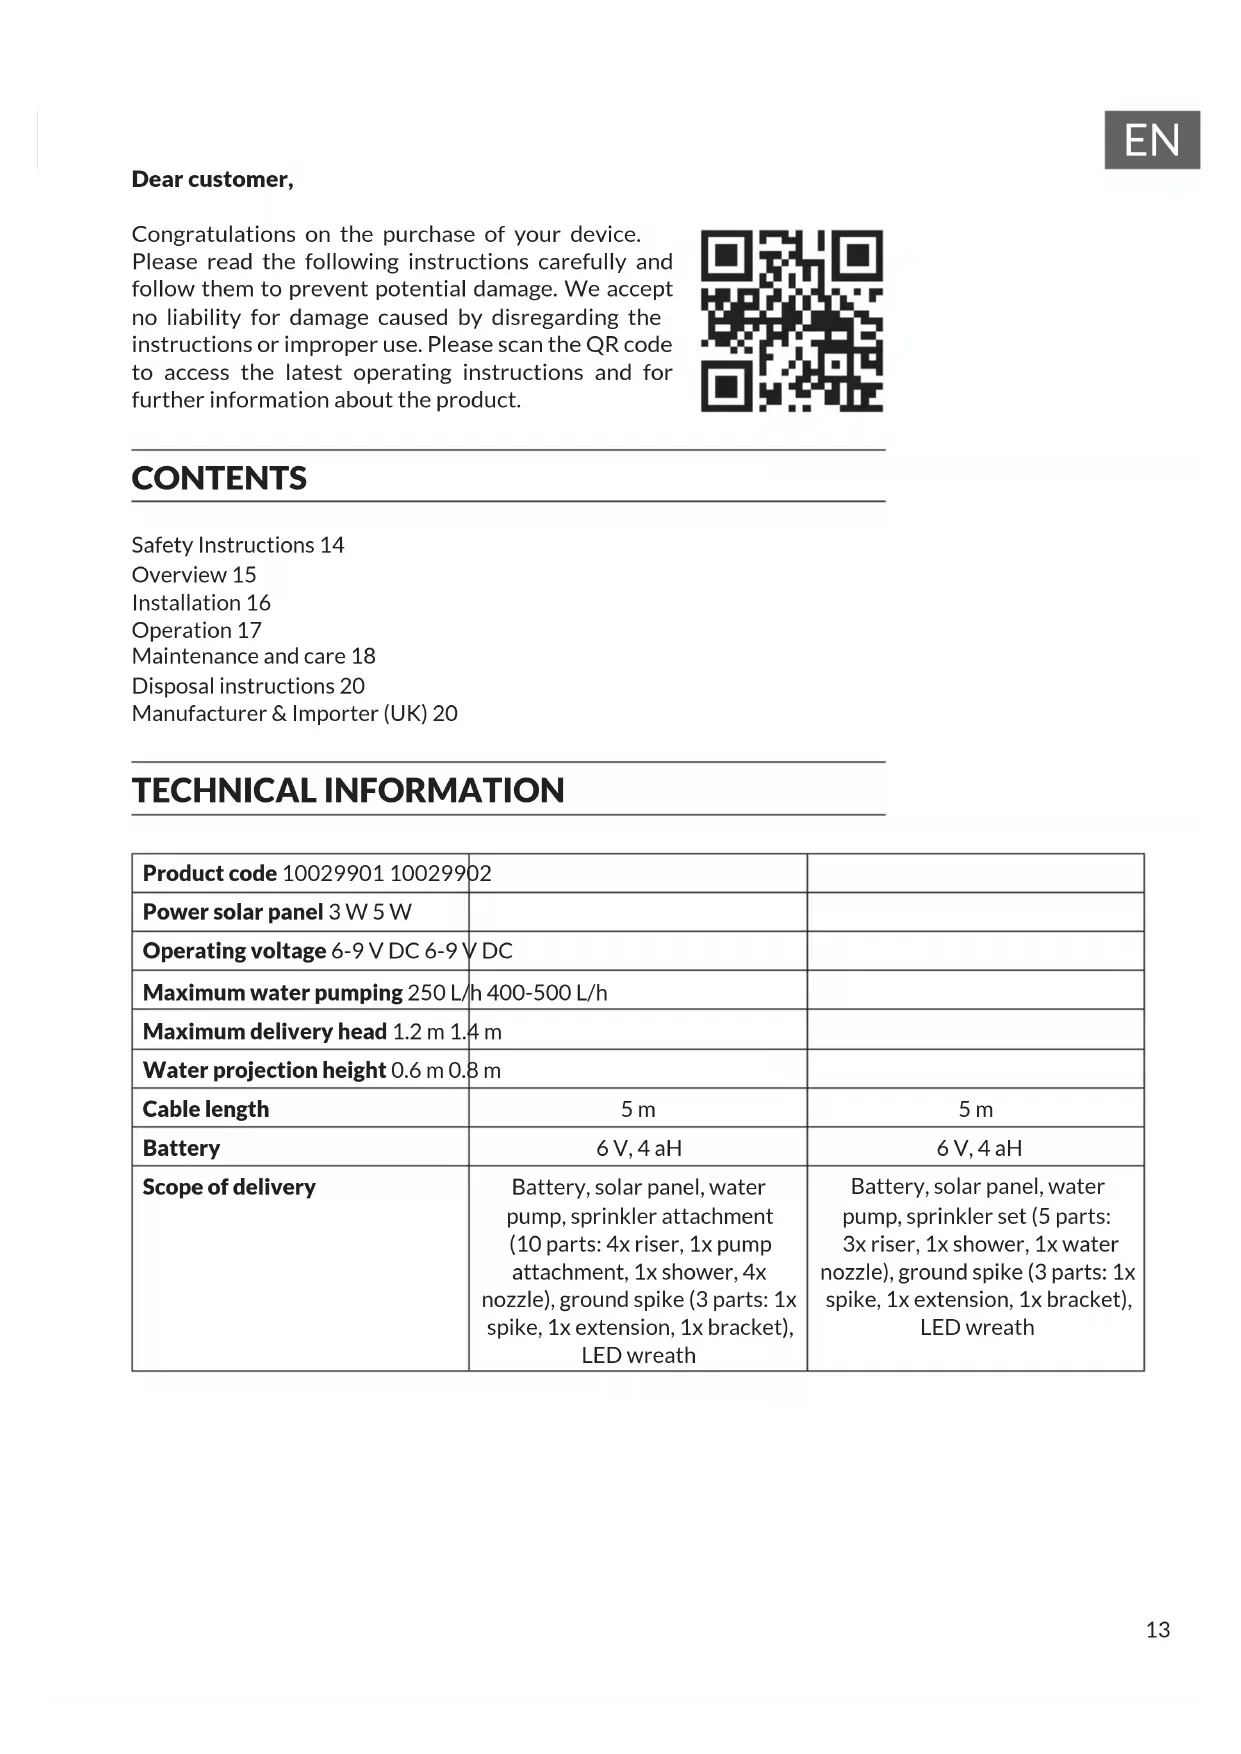
TECHNICAL INFORMATION
| Product code 10029901 10029902 | ||
| Power solar panel 3 W 5 W | ||
| Operating voltage 6-9 V DC 6-9 V DC | ||
| Maximum water pumping 250 L/h 400-500 L/h | ||
| Maximum delivery head 1.2 m 1.4 m | ||
| Water projection height 0.6 m 0.8 m | ||
| Cable length | 5 m | 5 m |
| Battery | 6 V, 4 aH | 6 V, 4 aH |
| Scope of delivery | Battery, solar panel, water pump, sprinkler attachment (10 parts: 4x riser, 1x pump attachment, 1x shower, 4x nozzle), ground spike (3 parts: 1x spike, 1x extension, 1x bracket), LED wreath | Battery, solar panel, water pump, sprinkler set (5 parts: 3x riser, 1x shower, 1x water nozzle), ground spike (3 parts: 1x spike, 1x extension, 1x bracket), LED wreath |
SAFETY INSTRUCTIONS
- To reduce the risk of electric shock, do not remove any of the covers. This device contains parts that are not accessible to the user.
- The appliance identification is provided on the back of the appliance.
- Do not place vessels filled with liquids, such as vases or watering cans, on the appliance.
- Do not drop metal objects on this appliance.
- Do not place any heavy objects on the device.
- Only use accessories and add-on parts that have been approved by the manufacturer.
- Pull the plug out of the socket if there is a thunderstorm, a storm or if you are not going to use the device for a long period of time. This way, you can prevent damage.
- Have repairs carried out by qualified specialists only.
- Repair is required if the appliance has been damaged in any way, i.e. if objects have fallen on it, if it is not working properly or if it has been dropped. Do not attempt to repair the device yourself. Opening the cover exposes you to the risk of electric shock and other personal injury.
- Do not pull, bend or place heavy objects on the cord.
- Do not touch the plug with wet hands.
- Do not place sources of open flames, e.g. burning candles, on the device.
- Never let the pump run empty.
- Never connect the appliance to an AC power source. It is only designed for operation with direct current.
- Only operate the pump in freshwater ponds at temperatures up to a maximum of 50^ .
- Do not place the solar panel in hollows or holes where water is likely to accumulate. Please ensure that you select a level location with a firm base. The plastic bolt should be inserted into sufficiently solid soil.
- Do not place the device on other devices that may become hot. This heat could damage the device.
- Do not use volatile liquids such as bug sprays. Excessive pressure when wiping the surface can cause damage. Rubber or plastic parts should not be in contact with the appliance for a long period of time.
- Children over 8 years as well as mentally, sensory and physically impaired persons may only use the device if they have been informed in detail about the functions and safety precautions by a supervisor responsible for them beforehand and understand the associated risks.
INSTALLATION
General information
- The pump is suitable for fountains or small ponds. The solar panel supplies the pump with the necessary operating voltage and charges the battery.
- Light sunlight and even cloudy skies are sufficient (in daylight) to operate the pump.
The LED lights automatically illuminate the fountain in the dark.
Assembly
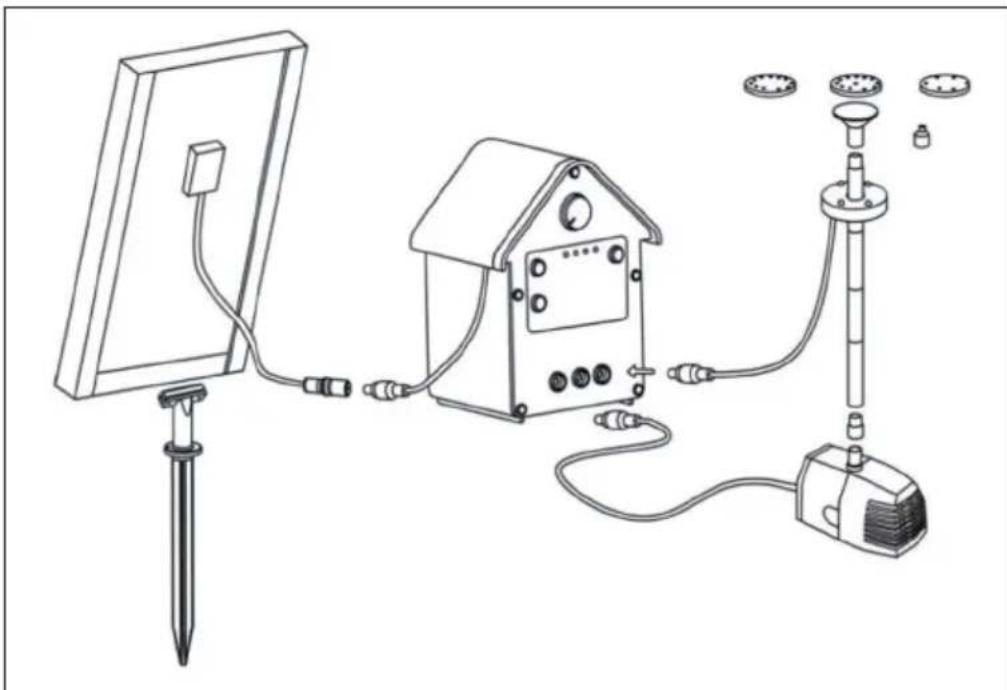
- Attach the plastic bolt to the underside of the frame of the solar panel.
- Connect the solar panel to the control box.
- Position the pump under water so that it is completely covered. Use the four flexible suction cups to attach the pump to the pond/well bottom. If the water is far too deep for the pump to reach the surface, elevate its standing position by placing stones or similar suitable material under it.
- Select the desired nozzle for the well and plug it onto the well pipe, as well as the well pipe onto the pump.
- Connect all parts as shown in the illustration.
OPERATION
Once the pump is installed and connected, allow it to spend at least 8 hours in full sunlight before using it.
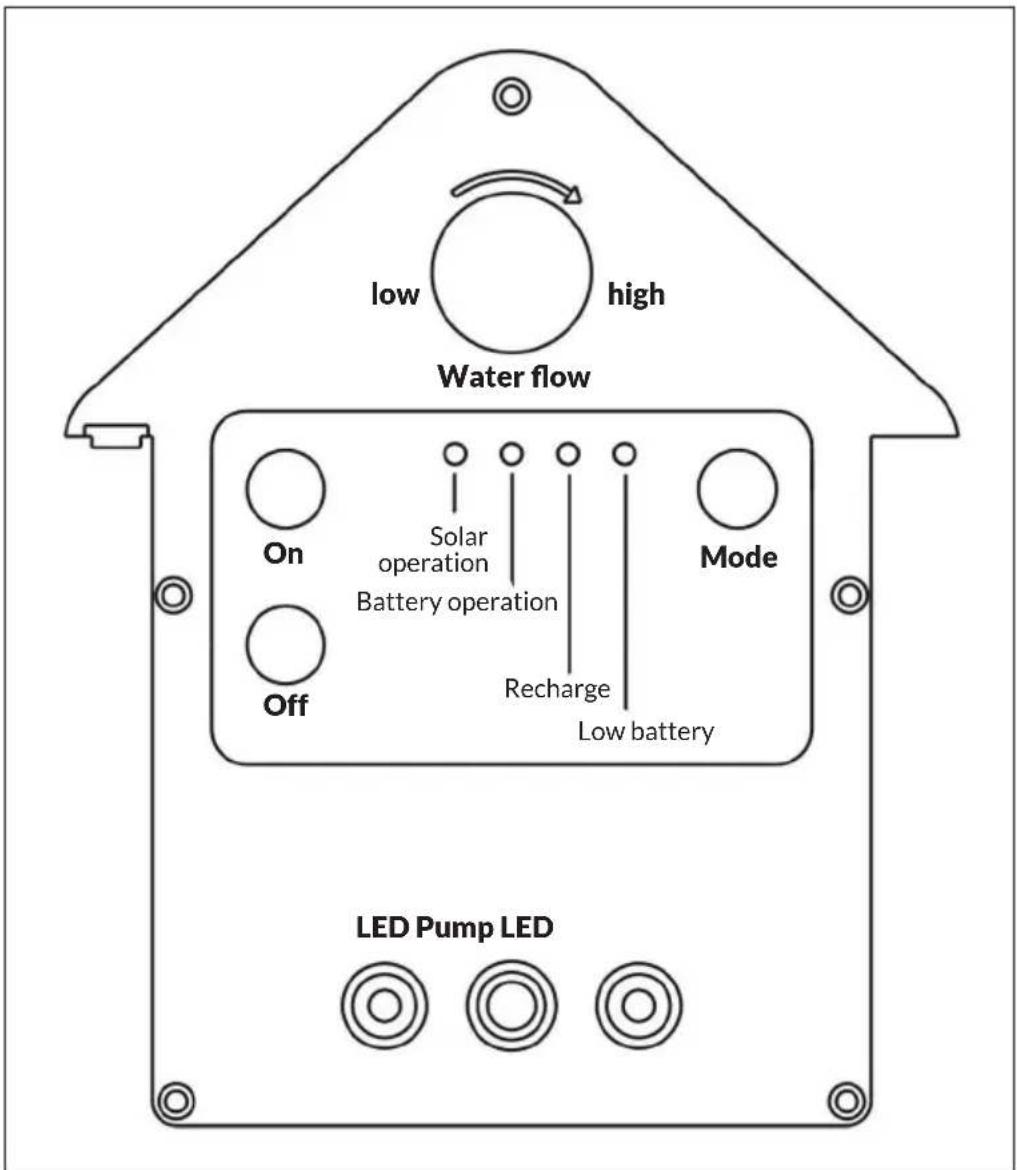
Testing The Control Box:
- Press ON and make sure that the corresponding LED starts to light up.
- Press MODE several times to cycle through the different operating modes, which are indicated by changing LEDs (solar operation, battery operation).
- As soon as the solar panel is connected to the control box, the charging LED should light up to indicate the charging status.
MAINTENANCE AND CARE
Solar panel
The solar panel should be wiped regularly with a soft cloth, so that the light transmission remains guaranteed. Do not use abrasive materials or cleaning agents.
Pump
If after a while the pump no longer provides the usual throughput or stops working, check for sediment or dirt clogging the filter or pump. Remove the covers from the pump and impeller (see illustration) and wash both parts with clean water.

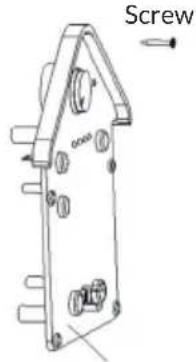
Battery
If the pump stops working after about 12 - 18 months in operation, the reason could be that the battery life has been exhausted. Open the housing according to the illustration and replace the battery with a model with the same specifications (6 V, 4 aH):
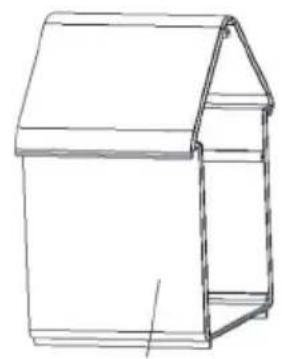
Housing Battery Circuit board Front
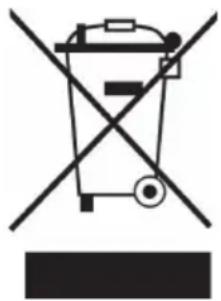
If there is a legal regulation in your country regarding the disposal of electrical and electronic equipment, this symbol on the product or on the packaging indicates that this product must not be disposed of with household waste. Instead, it must be taken to a collection point for the recycling of electrical and electronic equipment. By disposing of this product in accordance with the regulations, you protect the environment and the health of those around you from negative consequences. For information on recycling and disposal of this product, contact your local government or household waste disposal service.
This product contains batteries. If there is a legal regulation in your country regarding the disposal of batteries, the batteries must not be disposed of in household waste. Consult your local regulations for the disposal of batteries. By disposing of this product in accordance with the regulations, you protect the environment and the health of those around you from negative consequences.
MANUFACTURER & IMPORTER (UK)
Manufacturer:
Chal-Tec GmbH, Wallstraße 16, 10179 Berlin, Germany.
Importer for Great Britain:
Berlin Brands Group UK Ltd
PO Box 1145
Oxford,OX1 9UW
United Kingdom
Estimado cliente:
Berlin Brands Group UK Ltd
PO Box 1145
Oxford,OX19UW
United Kingdom
Cher client, chere clientele,
Berlin Brands Group UK Ltd
PO Box 1145
Oxford,OX19UW
United Kingdom
Gentile clientele,
PRODUTTORE IMPORTATORE (UK)
Produtlore:
Chal-Tec GmbH, Wallstraße 16, 10179 Berlin, Germania.
Berlin Brands Group UK Ltd
PO Box 1145
Oxford,OX19UW
United Kingdom