
V9 - Handheld vacuum DREAME - Free user manual and instructions
Find the device manual for free V9 DREAME in PDF.
| Product Type | Cordless Table Vacuum |
| Brand | Dreame |
| Model | V9 |
| Power Supply | Rechargeable lithium-ion battery with original AC adapter |
| Initial Charging Time | Approximately 4 hours |
| Battery Display | 5-level indicator: low, half, almost full, fully charged, standby |
| Protections | Automatic shutdown in case of blockage, motor overheating protection |
| Filter | Washable HEPA filter (24h drying required) |
| Included Accessories | Soft brush, anti-dust mite electric brush, 2-in-1 crevice tool, 2-in-1 brush nozzle, 2-in-1 charging and storage station |
| Maintenance | Dustbin, cyclone and HEPA filter washable; brushes cleanable without water |
| Usage | Indoor, dry surfaces only |
| Safety Instructions | Do not vacuum liquids or sharp objects; keep away from children; use only original accessories |
| Recycling | Product subject to WEEE directive (2012/19/EU) – do not dispose of with household waste |
Frequently Asked Questions - V9 DREAME
User questions about V9 DREAME
0 question about this device. Answer the ones you know or ask your own.
Ask a new question about this device
Download the instructions for your Handheld vacuum in PDF format for free! Find your manual V9 - DREAME and take your electronic device back in hand. On this page are published all the documents necessary for the use of your device. V9 by DREAME.
USER MANUAL V9 DREAME
Dreme Cordless Vacuum Cleaner User Manual
Manufactured by: Drame Trading (Tianjin) Co., Ltd.
For further information, please visit www.dreame-technology.com
C
Made in China
dreame
Dreme Cordless Vacuum Cleaner User Manual 01
To prevent accidents including electric shock or fire caused by improper use, please read this manual carefully before use and retain it for future reference.
Warning
This product can be used by children aged from 8 years and above and persons with physical, sensory, intellectual deficiencies, or limited experience or knowledge under the supervision of a parent or guardian to ensure safe operation and to avoid any risk of hazards. Cleaning and maintenance shall not be made by children without supervision.
The vacuum is not a toy. Children shall not play with or operate this product. Please exercise caution when using the vacuum near children. Do not allow children to clean or maintain the vacuum unless supervised by a parent or guardian.
Do not use the vacuum outdoors or on wet surfaces. Only use the vacuum on dry indoor surfaces. Do not touch the plug or any part of the vacuum with wet hands.
To reduce the risk of fire, explosion, or injury, check to make sure the lithium battery and charging adapter are undamaged before use. Do not use the vacuum if either the lithium battery or charger is damaged.
The soft roller brushbar, battery, metal connector pin, and vacuum are electrically conductive and should not be immersed in water or other liquid. Make sure to dry all filters after cleaning.
To prevent injury caused by moving parts, turn off the vacuum before cleaning the soft roller brushbar. The soft roller brushbar, dust compartment, and filter must all be properly installed before using the vacuum.
Only use the original charging adapter. Never use an unoriginal adapter, as this may cause the lithium battery to catch fire.
Do not use the vacuum to pick up flammable or combustible liquids, such as gasoline, or bleach, ammonia, drain cleaners or other liquids.
Do not use the vacuum to pick up drywall particles, ashes like fireplace ash, or smoking or burning materials such as coal, cigarette butts or matches.
Do not use the vacuum to pick up sharp or hard objects, such as glass, nails, screws, or coins, which may damage the machine.
Keep hair, loose clothing, fingers and other parts of the body away from the vacuum's openings and moving parts. Do not point the hose, wand or tools at your eyes or ears or put them in your mouth.
Do not put any object into the vacuum's openings. Do not use the vacuum with any opening blocked. Keep free of dust, lint, hair, or other items which may reduce airflow. Do not rest the vacuum against a chair, table, or other unstable surface, as this may cause damage to the machine or personal injury. If the vacuum becomes damaged from being knocked over or is otherwise malfunctioning, please contact our authorized service department. Never attempt to disassemble the device on your own.
All instructions in the manual for recharging the battery must be strictly followed. Failure to properly charge the battery within the specified temperature range could damage the battery.
Only use accessories and replacement parts that are approved by Dreme.
Do not use the vacuum without the clear dust compartment and filter in place.
Make sure the vacuum is unplugged when not used for extended periods as well as prior to performing any maintenance or repairs.
Please be extra careful when using the vacuum to clean stairs.
Do not install, charge, or use this product outdoors, in bathrooms, or around a pool.
Fire Hazard Warning: Do not apply any type of fragrance to the vacuum's filter. These types of products are known to contain flammable chemicals which may cause the vacuum to catch fire.
This product is designed for home use only.
We Dreme Trading (Tianjin) Co., Ltd., hereby, declares that this equipment is in compliance with the applicable Directives and European Norms, and amendments. The full text of the EU declaration of conformity is available at the following internet address: www.dreme-technology.com

means detachable supply unit
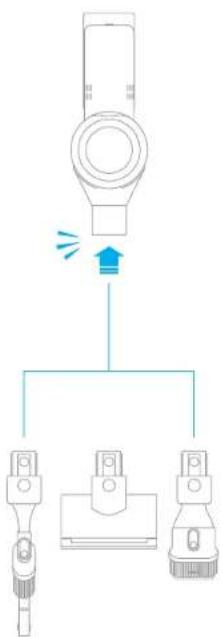
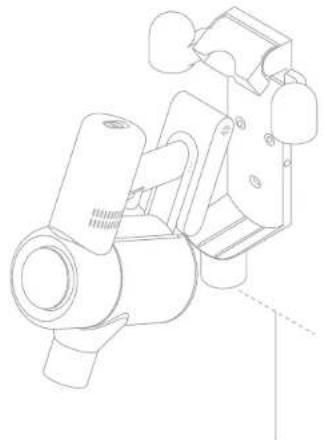
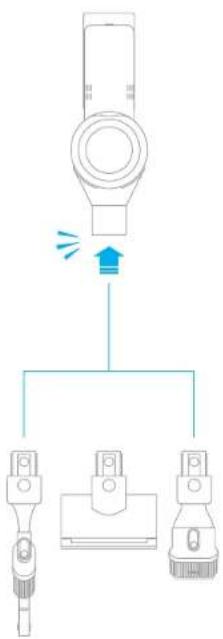
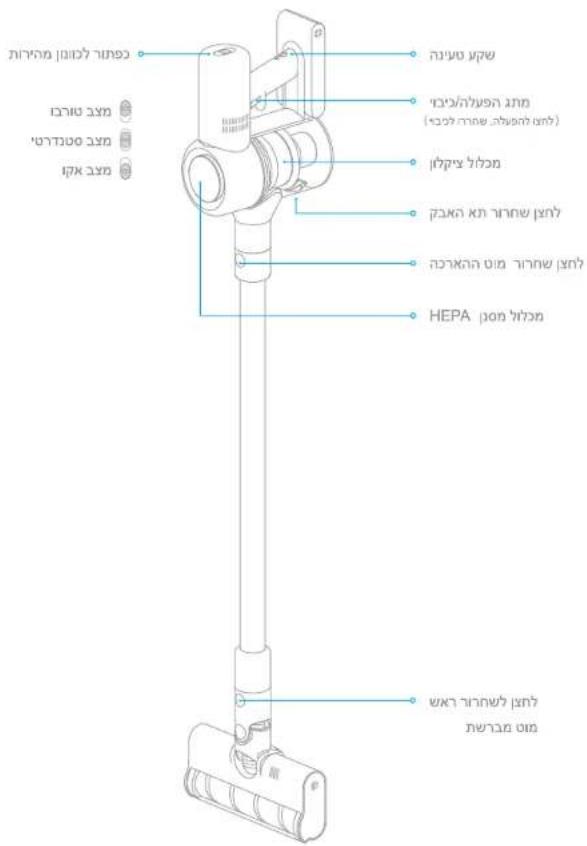
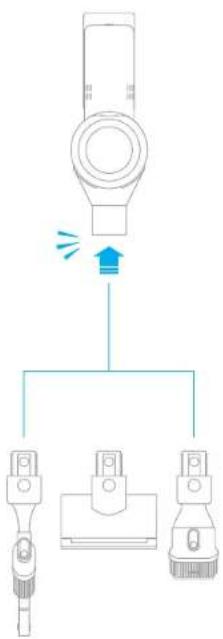
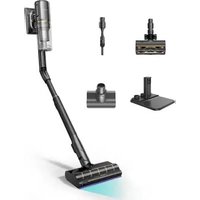
Product Overview
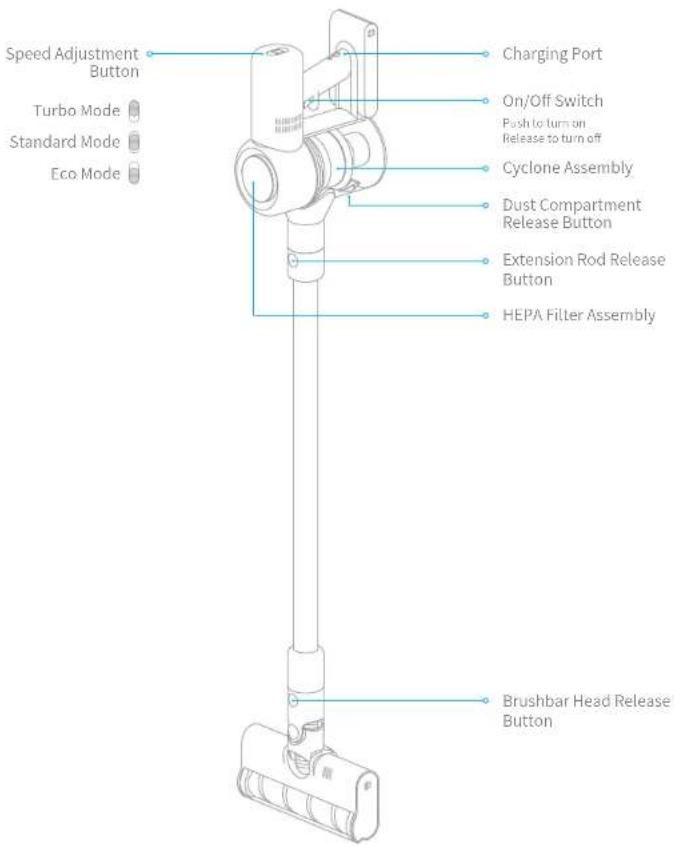
Part Names
Product Overview

Accessories
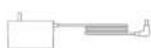
Power Adapter2-in-1 Crevicel

Soft Roller Nozzle Mini-Motorized Nozzle

2-in-1 Charging & Storage Mount (including screens × 2 wall plugs × 2
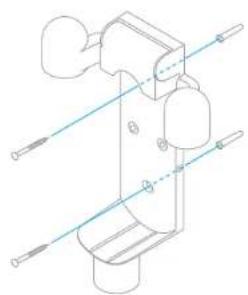
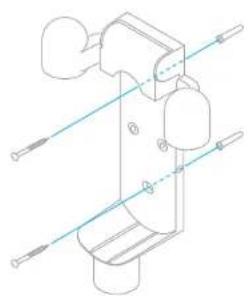
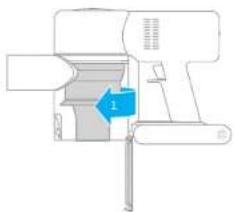
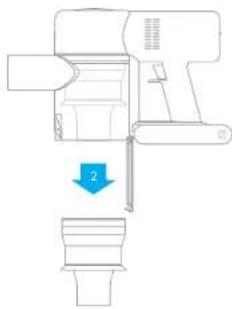
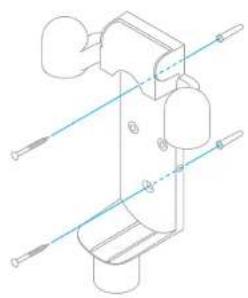
Installation
Vacuum and Accessories Installation Diagram

Insert till it clicks into place.

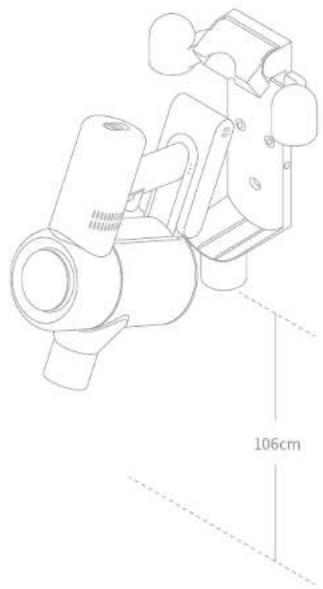
Installation
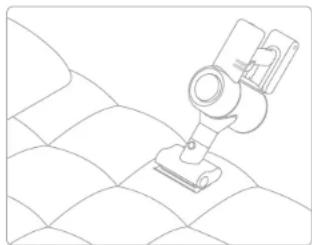
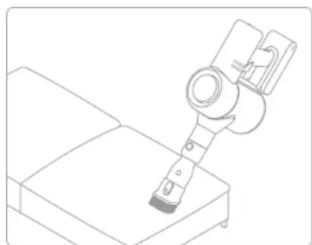
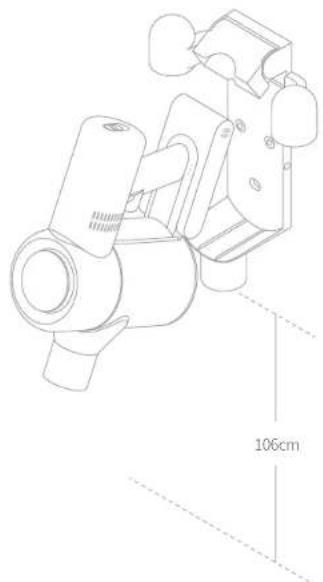
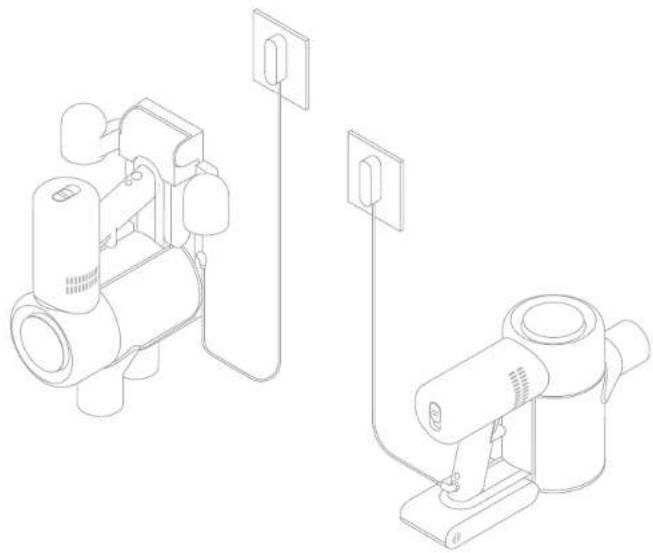
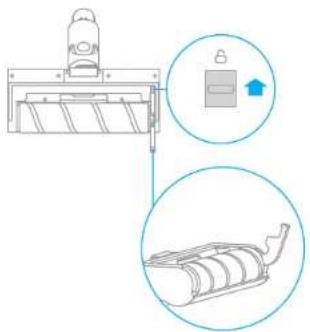
Installing the 2-in-1 Charging & Storage Mount
- The 2-in-1 charging & storage mount is an optional accessory, you can install it based on your requirements.
- The mount should be installed in a cool, dry place near a power outlet, out of direct sunlight, and away from moisture-prone areas, such as a kitchen.
- Securely install the mount using mounting hardware suitable for the type of wall selected. Make sure the installation area is clear of any pipes such as gas or water lines, and air ducts, electric wires and cables, or drainage lines.
- It is recommended to hire a professional to install the mount and to use protective clothing, goggles, and other protective equipment where necessary.
- Using an electric drill, mark and drill two 8mm diameter holes into the wall where desired to a depth of about 30mm . Insert the wall plugs into the holes, position the mount, then fasten it to the wall with the included screws.
106cm
How to Use
Note:
- Fully charge the vacuum before using it for the first time. This will take about 4 hours.
- Vacuum cannot be used while charging.
- Vacuuming at turbo mode for a prolonged period will cause the battery to heat up, which increases charging time. Allow the vacuum to cool down for 30 minutes before charging it.

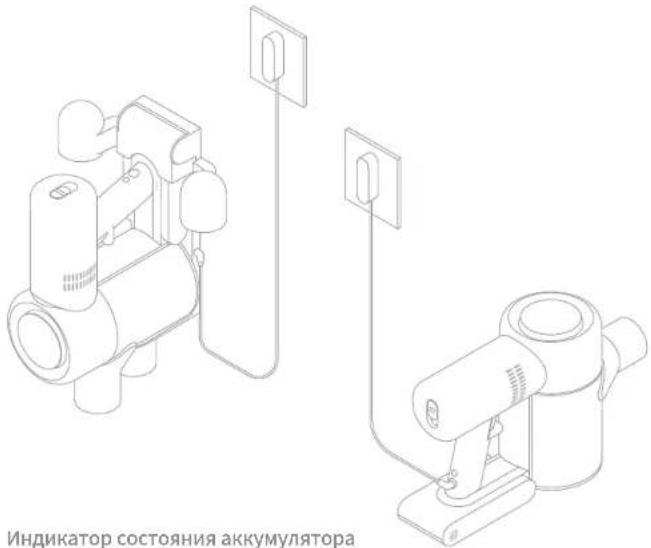
Battery Status Indicator
OffBingOn
Low battery
Half battery
Nearly full
O O O Fully charged
Fully charged
Note: Once the vacuum is fully charged, the indicator will turn off after 5 minutes, and the vacuum will enter the energy-saving mode.
Please read the Safety Instructions in this user manual before proceeding.
How to Use
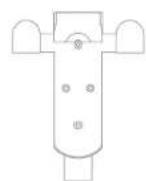
Using Different Attachments
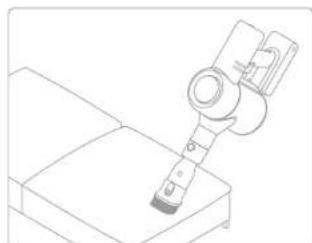
Mini-Motorized Nozzle: Strong vibrations yield deep cleaning action for removing mites and dust from mattresses and fabric surfaces.
2-in-1 Brush Nozzle: Suitable for vacuuming up dust and mites on beds, sofas, and other furniture fabric.
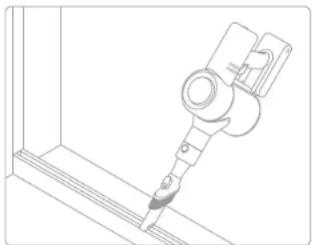
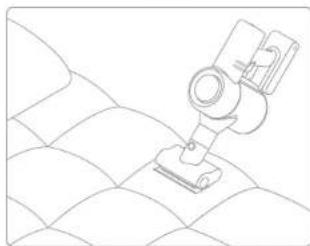
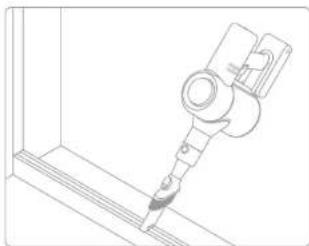
2-in-1 Crevice Nozzle: Suitable for vacuuming cracks, corners of doors and windows, stairs, and other hard-to-reach places.
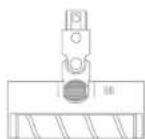
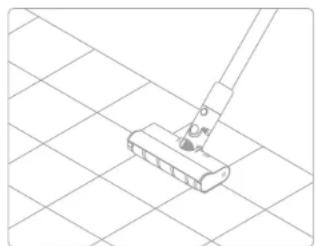
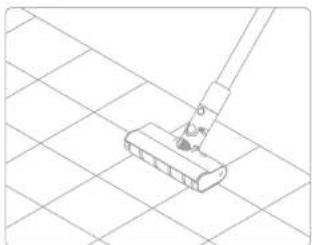
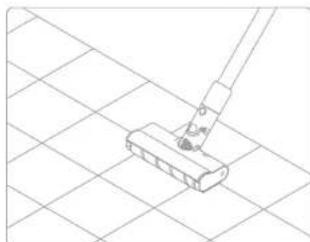
Soft Roller Nozzle:Suitable for vacuuming the hard surfaces such as floor, tile, marble, as well as for vacuuming up larger pieces of dirt and debris. The Soft Roller Nozzle can also be directly attached to the vacuum.
Care & Maintenance
Tips:
- Always use genuine parts to keep your warranty from being voided.
-
If the filter or nozzle becomes clogged, the vacuum will stop working shortly after being turned on. To restore functionality, clean the filter or nozzle.
-
If the vacuum will not be used for an extended period, fully charge it, unplug its power adapter, and store it in a cool, low-humidity environment away from direct sunlight. To avoid over-discharging the battery, recharge the vacuum at least once every 3 months.
Cleaning the Vacuum
Wipe the vacuum with a soft dry cloth.
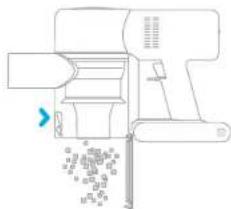
Cleaning the Dust Compartment
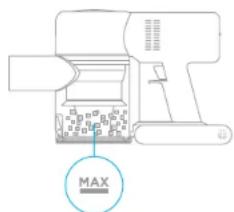
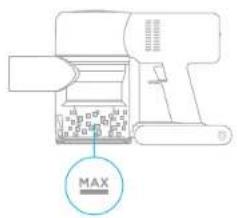
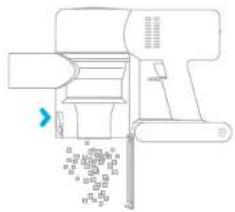
Before cleaning the dust compartment, disconnect the adapter and keep the vacuum's power switch in the off position. The vacuum's cleaning ability will be reduced if the dust compartment is filled to the "MAX" mark. To regain performance, empty the compartment.
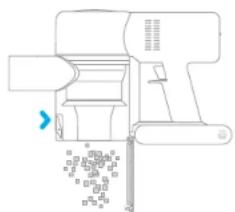
To empty the dust compartment: Press the release button on the bottom of the compartment, then empty its contents.
Note:
1. If any rotating part becomes stuck, the vacuum may turn off automatically. Remove any trapped foreign objects, then resume use.
2. The vacuum will automatically shut off if its motor enters overheat protection mode. Wait until the motor's temperature returns to normal before resume using.
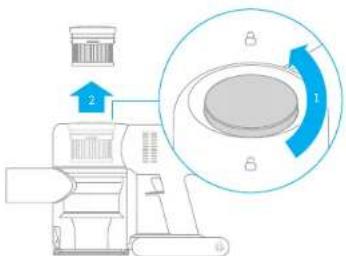
Care & Maintenance
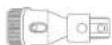
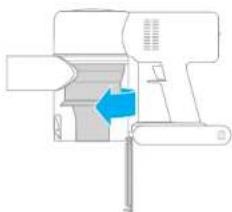
- Rotate the cyclone assembly in the direction illustrated to unlock it, then remove the cyclone assembly.

- Rinse the cyclone assembly with water until it is clean. To thoroughly dry the cyclone assembly, keep it in a ventilated or cool place for at least 24 hours. Caution: Do not clean the cyclone assembly in a dishwasher or washing machine, and do not attempt to dry it in a tumble dryer, oven, microwave, or near an open fire.
3.Once it is dry,reinstall the cyclone assembly.


Care & Maintenance
Cleaning the HEPA Filter Assembly Cleaning the Cyclone Assembly
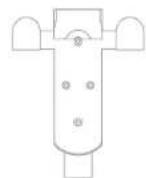
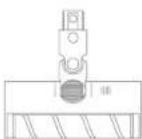
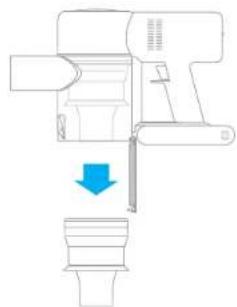
- Place the vacuum securely on a flat surface, then turn the HEPA filter assembly cover in the direction indicated and remove the HEPA filter assembly.
Note: Remove the built-in foam pad before cleaning the HEPA filter assembly. Rinse the HEPA filter and foam pad with water.

- Rinse the HEPA filter and foam pad with water. To thoroughly remove all dust caught in the filter, rotate the HEPA filter by 360 degrees while rinsing. Lightly tap the filter against a sink several times to remove any excess debris. Keep the HEPA filter in a well-ventilated and cool place to fully dry.
Note: Fully dry the filter (at least 24 hours) before reinstalling it.


Care & Maintenance
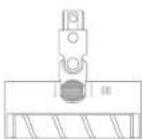
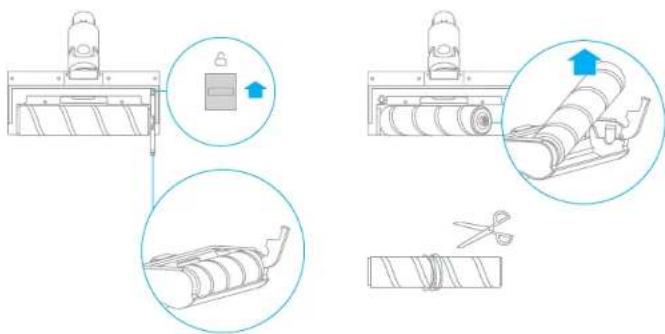
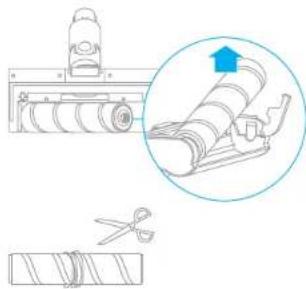
Cleaning the Soft Roller Nozzle and Mini-Motorized Nozzle
Note: To prevent injury from accidentally turning on the vacuum, make sure the Soft Roller Nozzle or Mini-Motorized Nozzle is detached from the vacuum before removing the head. The Mini-Motorized Nozzle and Soft Roller Nozzle contain electrical components, and the Soft Roller Nozzle head also contains bearings. Do not wash these parts with water. Be careful of sharp objects when removing debris caught in the heads of Soft Roller Nozzle and Mini-Motorized Nozzle.
Cleaning the Soft Roller Nozzle
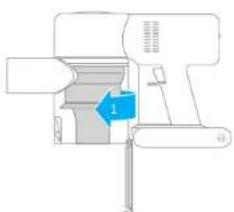
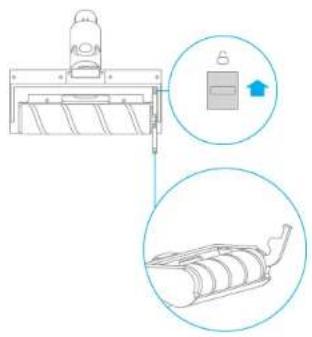
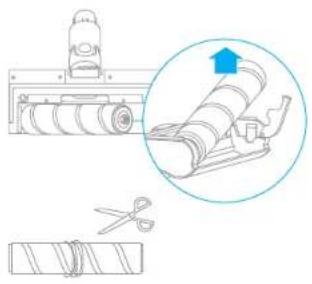
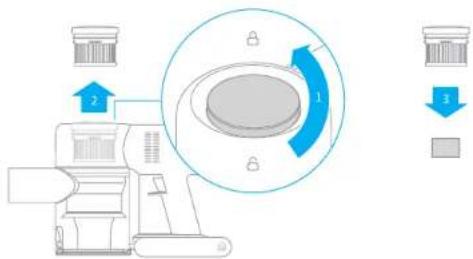
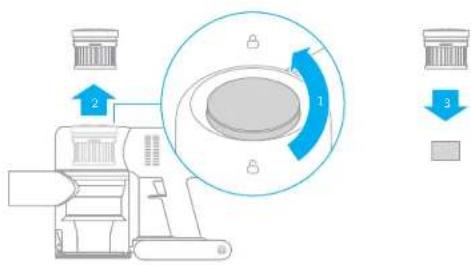
- Push the brushbar head release button in the direction of the arrow until the cover of the brushbar head pops to open, then remove the brushbar head by lifting it in the direction indicated.
- After you have finished cleaning the Soft Roller Nozzle, reinstall it by following the disassembly steps in reverse.
Care & Maintenance
Cleaning the Mini-Motorized Nozzle
-
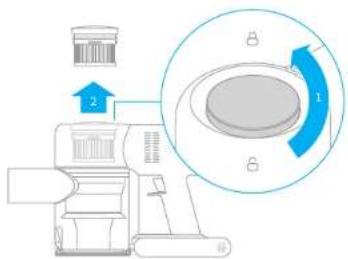
Use a coin as illustrated to rotate the lock counterclockwise until you hear a click.
-
After unlocking the brush head, remove it from the Mini-Motorized Nozzle, then rinse and clean the brush head.


-
Stand the brush head upright in a well-ventilated area for at least 24 hours until it is fully dry.
-
Once the Mini-Motorized Nozzle is dry, reinstall it by following the disassembly steps in reverse.

Troubleshooting
If the vacuum is not working properly, please refer to the troubleshooting table below.
| Errors Possible Causes Solutions | ||
| Vacuum does not work | Vacuum is out of battery or low on power. | Fully charge the vacuum, then resume use. |
| Overheat protection mode triggered by a blockage. | Wait until the vacuum cools down, then reactivate it. | |
| Suction opening or airway passage is blocked. | Clear any blockages from suction opening or airway passage. | |
| Weak suction force | Dust compartment is full and/or HEPA filter assembly is clogged. | Empty the dust compartment and clean the HEPA filter assembly. |
| Attachment is blocked. | Clear any blockages in the attachment. | |
| Motor makes a strange noise | Main suction opening or extension rod is blocked. | Clear any blockages in main suction opening or extension rod. |
| The first indicator is red after turning on the vacuum | Battery is damaged. | Please contact the after sales service department for maintenance. |
| The first indicator blinks red after turning on the vacuum. | Power adapter is incompatible. | Only use the original power adapter to charge the vacuum. |
| Battery indicator does not light up while charging | The adapter is not connected to the vacuum. | Make sure the power adapter is plugged in properly. |
| The battery is fully charged and went into sleep mode. | Can be used normally. | |
| If the problem persists after ruling out the above two possibilities. | Please contact the after-sales service department for maintenance. | |
| Charges slowly | Battery temperature is too low or too high. | Wait until the battery's temperature normalizes, then resume use. |
This product contains batteries that can only be replaced by qualified technicians or after-sales service.
This product contains batteries that are non-replaceable.
WEEE Information

All products bearing this symbol are waste electrical and electronic equipment (WEEE as in directive 2012/19/EU) which should not be mixed with unsorted household waste. Instead, you should protect human health and the environment by handing over your waste equipment to a designated collection point for the recycling of waste electrical and electronic equipment, appointed by the government or local authorities. Correct disposal and recycling will help prevent potential negative consequences to the environment and human health. Please contact the installer or local authorities for more information about the location as well as terms and conditions of such collection points.
He nCnoB3yIte nbineocDnIc6bOp aOCTbIX IN TBepbIX npEIMeTob,TAKNX KAK CTeKIO, TBO3DN,BHNTb HNNMOHTbIKOTOPbIE MOYr NOBpeNITbYCTPOINCTBO.
He npnckaiTe nonadnnaBnOnc, Cbo6DnH OOEkbdi, nabueb npyrInx qacte Tena ToBepcttn NduNkUuiece CaTt Nbluecoca. He HnapaBnIte 0hAanR, Tpy6ky nn INCTpymehntb B CTROPHYIa3 Nll uyyne HKeIaJIaNTe Ix ce6e B pot.
He KnaIaTe npEmeTb B OTEpCTN bIneocca. He IcnOpIb3yIte bIeLecoc, ecnn KaKoe-Jnlo BOETPcHBe 3aJIOkOpaHO. He DoryckaJIte nonadAnHbIy bIIN, pNYa, BONOC INIpynx npEmeTbO, KOtOpBIE MOYr yMeHbUHTb NTOK B03DyXa.
He octabnIte nbIeoc Ha CTyne,CTONE nn DpyrNHex HeycToHbBix NoBepxHOCTX, NOCKOJIbKBy 3TO MOKcET CTaB PpHHIOH NOBpeKeHEny UcTPOCTBa NN TpABMb. EJIN nbIeoc 6bl NOBpeHEn B peZbTe ApeHEn Hnn Meet dpYrO HenCnPABHOCb, O6paTIECB B haai ABTopnIOBAHH bcePBNCbH b ceHTp. He nbITaTecb pa06paTb yctpoCTBO CAMOCToREbHO.
Heo6xOIMO cTPOr CIEpO8aBt BCEM HnCTpyKuINM No 3ap4Je AkkymyIaTOpA, OINCAHbIM B 3OM pyKOBOCTBe. HenPabInbHaB 3Ap4Ja kAkkyMOnTuBpe Kya3AHHoFO TEmepAtpyHO Dnaia3OHA MOKeT CTatb PnNCHIO erO nobpeXeHnE.
IcnoIb3yIteToIbKO Oo6peHHbIE KOMnHaHneDreame npHapJeKHOCTN mEHHbIe detann.
He nCnIb3yIte nbinecoc,ecnnB Hero He yctaHOBneHb YnCTbO TCEK dIy nbInN
Y6ednctb, TTO bIeNOCOTKIOHEn, ECNI OH He IcNpOJIyETcB TceHHeIINTeHBOI nepoDa BpeMeHa, a TaXke nepeD BeInOJIHeHem KAKOrO-JIn6 O6CnyKBaHna IIN peMOHTa.
Bybte Oc06eHNO OCTOPOKHbI npu HcNOb3OBAHn NbIeCoCA HaJIecTHNIe.
He yctanabnBaBte, He 3apKaTe n He nCnoB3yTe 3To yCTpoiCTBO Ha yInue, BaHHbIX KOMHATax n H a TeppntOpin BOKpyg BacceHa.
OnaHocb8B0rappn. He nOIpb3yIte apoMaTHaTOpbI Ira fIinbtpa nbJncocca. DaHHb TINI npOyKTOB COpePKNI JIEKOBCNIAMEHIOUeCE XIMNKaTb, KOTOpbe MORYT CTb IPnuHNOB B0rOAPnHOB bJIeLOCocA.
3TOyCTPOINCTBO CO3dHO NCKHIOHTENbHO Dn6bITOBORO INCNOB3OBAHNA.
Mbl, KOMnHnna Dreame Trading (Tianjin) Co., Ltd. HactoIzIM 3aBbIyem, TTO daHnHO
60pyobahnne cootbetCTbyETpe6OBAHnM BCEx DeIcTByUoxNx DApEeKTHB EC n
eboneCknx CTanDapTO CImHeMeHNm N donolHeHnMn. POnHbY TeKT
dekLaupceoo COOTBETCBIN HopMaTINbHM Tpe6OBAHnM EC DoctyneH No
cnelyuouemy apecy: www.dreame-technology.com
O630p yctpoiCTBa

HaumehOBaHnIeTaeNei
0630p yctpoiCTBa

Akceccyyapbl

Aanntep nntaunuIeennnna H

UeTKa C MRAKMM BANNKOM 3NeKTPnuecka 1eTKa
npOTNBKneu

KpennneHme pna 3apnyn xpaenha "2B1"
[8000000200000000600]
YctaHOBka
CxemayctaHOBn nbIneocanakceccyapob

BCTaBnIte, noka He ycblHmTe JENHOK

YcTaHOBka
UcTaHOBKa KpennHeNnIa3apKnXpaHeHn"2B1"
1.KpnenneHnI3aJpynnI XpaHnEIN " 2 I" -3TO JOnOAnHnTeBnHbAkeccCyap, KOTOpB MOHOYCTAOHbTTPiNe HEOXoMIOChT.
2.KpeHHe He cyeT yctAHABHBtB CByXOM pOxNADHom MeTe, pOoTETKoi, BAnIOn OT pRmBbX coHHeHbX lyHei N IOBcpeXeHHbX BO3eCTBIO BnAri Obnactei, TaKix KAK KyXHa.
3. HadejHo yctahOBITE KpennnHc n cnoombIy noDxOgIero Ia Bb6paHoro Tnna CTHe bMOHTaXHO rO OOpYDbAHy. YSeIaTeC, 10oB oNacty CTHOBHX HET TaOboHX IN BOdoPBOhDx Tpy6, BcTHINLAIOHbIX xAXT, NekTPOecknx npoBod, Ka6eNei nn DpeHakbX Tyb.
4.Дяусганьк Крелпенярсимьуетсн_HаHTь npOeCECHHANI n ripn Heo6xOIMOCTH mTIOB3OaBb 3aUHTHyO OeKJy, 3aUHTbHE OeONK IN DpyTOE 3aUHTHOE 06OpD8aHMe.
5.C NOMOJIbHO 3NEKTPNCHCKI DPNCLOTMMeTBe H PPOCBEPNIte B HXYHOM MeCTe Ha CTHe DBA OTBEPNTNA DNAMETPOM 8 MM I rnybKO NKOKO 30 MCTBaTe JIOBENI O TBIPTCPNIA, YCTaHOBTE KPNPEHNE I INPKPNPENE ERO C TCEHE BHTAMTM VKMONKNTKA.
HnctpyKcna
PpmeuHne.
-
Jepn peBm icnoBbOaBHnem noHcTbIO 3aprnte pIneococ, 3to 3aimet oKO 4
2.HeHcnoIb3yIteIbIeCoc BO BpEma 3apdKn. -
JpOdoKnHTBnHOHCNOJI3OBaHHe NUNeCCoBa TYPbOpEKeHm PnpBODmT K HarpBeAHHIO AKKMyIITATOPa HyeBmEHNo BpEmeHn 3aepaKn. IpoQkDnte 30 MmHyT, YTO6bI PbIEcoc octbl, npKdJe Cemapakbtb Ero.
Bsn. Muae BKn.
noaOoHJTHyOBOPHNbTOPOINHx, yTnXh
BdEpeH NOKOH, HNaNcTeTHMIXxAeDpyTHx
TPyHOHOOCOTyTHMIXMeCTX.
LETKACMRAKIMBAHKMOM:
nNOxHOTIyBOPKTAeBbIOBNEpXHOCTei, TAKHXK KAN, PON, MADOP, A TAKQE KJ BYOPK KPYNBIIX KYCKOR I PRM IN MYCPOI. KPOME TOI, UETKY CMIKKBAIIMKMOHDO, PPNIKPPINP BPMIO KIPNEOCYC.
Yxod n TexHnueckoe o6cnyXnBaHne
COBETbl.
I. Icnonb3yte opurnhaabhbte 3aHactn, HhAe rapaHTW MoKet bhtb aHHynipoBaHa.
2. EcnI ΦnHbTn Hm HACaKa ZAcOpEnH, bIyNecO nPcKaTH pAbOtTaB cpa3y noCeE BKNUeHN. OChNTte ΦnHbTn Hm HACaDen, NTO6bI npDoJXnBt pbAOy.
- EcnIbncoc h6yder nCnONBcBtcb B TceHHeNmNTbHO rpeMoJaBPEMeHN, OTNHNOHTAaTINTEOTPO3ETKNPINOHN3APJKeXnXPAnHTeBOPNOxNADo CpeCe HnKIM yOBHEM BNkOHCTN BdAnl ON pPmBXoCoHNEHbXpyHeTTObIbN3EkeBaT bnpEeKBeHnAkyMHTIOTA 13-3a PpeMEpHO PA3pIKn, NpO3ApJKeYrTe PbNecoc He pKeXe OdoHO pa3a B 3 MecaJa.
YnCTKa nblneocca
Ipoptpnte nbileocmMgKoCxyoNtkaHbio.
OuNTKa OTceKa JnIy nbln
OTcOeHNHtAEaIITET NIEHApTHeNIEbIKIOUHTBe bIIIOUHTeB IITAHNEbIeOCa B nONIOKHeHE "Bbln." Pa6oTa bIeNocCA yHbUINCTC, Korga OTcEK dRn bIbIn 6yEd TAnONHeH OE tMTOE "MAX". OChuTte OTcEK dRn bIbIn, TcObSbBOCCsTAHOIBNTs HOpMaJIHy IOpaOTy.
TtO6bOuHCTNtBOTCEKdIyTBINHAKMNTe KHOKNY3BNEeHNB HHXHEHACTNOTcEKA, a 3aTeOMOnyTOwHTe erO copepHMnOE.
Pnmeaeahne.
Ee 1000000000000000000000000000000000000000000000000000
THIEOCATATMAHBEKBAHNNKCTTC,KOATAAHTARNEPEETPENPAETR PEPKNTZAAATOTNPOERETNAIOPTAE, NOKTEKENTEPATDAWATERTNHOAMMAYTCA, PNPDEE NEMPOJNDNNTBNCNBOAAN
Uxod n TexHnueckoe o6cnyKuBaHne
- NobePHNATE (UNKONHHB) 6NOK BYKA3AHHOM HANPABNEHH, qT6bI pa36NOKIPOBATb, a3TEM CHINMTEEO.
- IlpOmbaIte IcIKIOHbIbI 6IOK BODPI, NOKA OH NE CTAHET YIChTbIM. TTo6bTIuATeBbHO npocyUHTb IcIKIOHbIbI 6IOK, octabte Ito B pOxNIAHOM, XoPsoIO pOBETPiBaEMOM NOMeIeIN IO KpIeHN Mepe 24 hca.
BHHMaHHeI He Moiré ciUHIOHN B 6NIOCDOOMOH HIN iTHaPbIHO MauHne, He bIpaTae cyuSHn erO B CYUNHNE, neH, MAKPOBOHOBON NEH nn H y OKbPToRTO ORH.
3.KordaunHbM6nKbBOxHETyCTAHOBNTeeroHaMeCTo.


Uxod n TexHnueckoe o6cIyXuBaHne
Ouunctka 6Ioka HEPA-ΦnIbTpA OChCTKa UKNOHORO 6Ioka
- NomeCTne nIeNoc Hs Be3onacHyIO, POBHyIO NOBepxHOCTb, 3aTEM NOBEPHITe Kpbliky 6IOKA HEPA-CHIBTPA B yKAs3AHOM HAPpABHIN CHIMITE erO.
PnmeHne. Ieped OHCTKoB 6Ioka HEPA-phiNbtpa CHTMNE BCTpoEHHy neHONlactOByIO npoknaKy, Ppomoyte HEPAA-phiNbtpn cHONlactOByIO npoknaKy BOIO.


2.ПомонгHEPA-ФИБТРипенлбactOувупркладуВОД.ЧтБыТаTeьHу ydaNTbBcK3a6NByuOcRbIbN,BOBpeMЯЛь�OBpOuHauBteHEPA-ФИБТР no kpyr.CJIeKaIIOCTUHTeФИbTPOmpoKOBInHeckCOnIbkoPAS,CHtOБуYdANITb OCTaBnMaMycOP.OctaBTEHEPA-ФИБТВbPNOxlaHOM,xopoIoNoPobEtpBaEMOM MeCte,yTObshONoHOCTBU BvICox.
PnmeHne, PnoHocTbO BcCyuHTe pnt (B TeueHne No KpaHHe Mepe 24 YacOB) nePeTe TM, KaYcTaHOBHTe rho H MeCTo.


Yxod n TexHnueckoe o6cnyKuBaHne
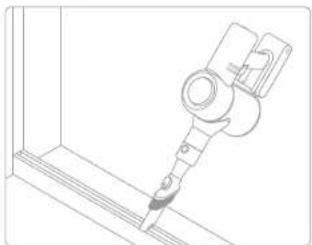
OuNTKa 1eTK C MRAKIM BAJIHKOM N 3NeKTPUyeCKO JETKN POTINB KLeue
PnmeHnB,Bo36KaHHe TpaBm,Bi3BaHHbix CnyaHbIM BKNUHcHMe NbIeCocA, PneKJe Hem ChmHbATy, bOeYtBCb, yEoTeKcA CMRKM BAIHKOM IIN 3NKeTPIeCKA 1pOtpKB KNeEeM OTOeDHNbIOT NbIeNcOca. IeTKeN pOtnIB KNeEeH N eTKCa M RAKHM BAJIHKOM COepeKAt 3NKeTPIeCKE KMOHENTH, a TOnOBKa 3NKeTKn C MRAKKM BAJIHKOM TAOKE CoepkNT NOuMHNNHKn. He npOMBAJte 3N Detann BOHO. OCTeperaTceB cOtpBx npDeMeTOB npUyaENH Mycopa, nONaBwero B TOnOBKn 3NKeTKn pOtnIB KNeEeH N eTKCa C MRKM BAJIHKOM.
OuNTKa 电ETKn C MraTKM BaNkOM
- HAnMMTE KHNKYNBNEHINI TNOOBN BYK33AHOM CTpeKNHnPAHBNEHINUyEPKNHNT, NOKA PNIHNI TNOOBN IETKHENTKPOETCR, 3AETM CHNMTE ee, NOHBB Yk33AHOM HnPAHBNCNHIN.
2.4TOb6YCTAHOBHTBtEETKCYMBAKMHNOMHcTOEHOHcHNTKN, BYINONNHTESTANBYaPbOxNBI BoAPTHOMNOPJrAe
Uxod n TexHnueckoe o6cIyXuBaHne
n nn nnnn nnnn nnnn nnnn nnnn nnnn nnnn nnnn nnnn nnnn nnnn nnnn nnnn nnnn nnnn nnnn nnnn nnnn nnnn nnnn nnnn nnnn nnnn nnnn nnnn nnnn nnnn nnnn nnnn nnnn nnnn nnnn nnnn nnnn
n nn nnnnnnnnnnnnnnnnnnnnnnnnnnnnnnnnnnnnnnnnnnnnnnnnnnnnnnnnnnnnnnnnnnnnnnnnnnnnnnnnnnnnnnnnnnnnnnnnnnnnnnnnnnnnn
yuyon dnnn nn nnnn nn nn nn nn nn nn nn nn nn nn nn nn nn nn nn nn nn nn nn nn nn nn nn nn nn nn nn nn nn nn nn nn nn nn nn nn nn nn nn nn nn nn nn nn nn nn nn nn nn nn nn nn nn nn nn nn nn nn nn nn nn nn nn nn nn nn nn nn nn nn nn nn nn nn nn nn nn nn nn nn nn nn nn nn nn nn nn nn nn nn nn nn nn nn nn nn nn
wnnnn nn nnnnnnnnnnnnnnnnnnnnnnnnnnnnnnnnnnnnnnnnnnnnnnnnnnnnnnnnnnnnnnnnnnnnnnnnnnnnnnnnnnnnnnnnnnnnnnnnnnnnnnnnnnnnnnnnnnnnn
ynnn nn nnnn nn nn nn nn nn nn nn nn nn nn nn nn nn nn nn nn nn nn nn nn nn nn nn nn nn nn nn nn nn nn nn nn nn nn nn nn nn nn nn nn nn nn nn nn nn nn nn nn nn nn nn nn nn nn nn nn nn nn nn nn nn nn nn nn nn nn nn nn nn nn nn nn nn nn nn nn nn
:YLS0241A-E300080 Input: 100-240v. -50 Hz/60 Hz; 0,8 A MAX Output: 30V--; 0,8 A
n nnnn nn nnnn nn nnnn nn nnnn nn nnnn nn
nnnn nnnn nnnn nn nnnn nnnn nnnn nnnn nnnn nnnn nnnn nnnn nnnn nnnn nnnn nnnn nnnn nnnn nnnn nnnn nnnn nnnn nnnn nnnn nnnn nnnn nnnn nnnn nnnn nnnn nnnn nnnn nnnn nnnn nnnn nnnn nnnn nnnn
n nnnn nn nnnn nn nnnn nnnn nnnn nnnn nnnn nnnn nnnn nnnn nnnn nnnn nnnn nnnn nnnn nnnn nnnn nnnn nnnn nnnn nnnn nnnn nnnn nnnn nnnn nnnn nnnn nnnn nnnn nnnn nnnn nnnn nnnn nnnn nnnn nnnn nn
nannnnnnnnnnnnnnnnnnnnnnnnnnnnnnnnnnnnnnnnnnnnnnnnnnnnnnnnnnnnnnnnnnnnnnnnnnnnnnnnnnnnnnnnnnnnnnnnnnnnnnnnnnnnnnnnnnnnnnnn
111 111 111 111 111 111 111 111 111 111 1
ipnnn nn nnnn nn nnnnnnnnnnnnnnnnnnnnnnnnnnnnnnnnnnnnnnnnnnnnnnnnnnnnnnnnnnnnnnnnnnnnnnnnnnnnnnnnnnnnnnnnnnnnnnnnnnnnnnnnnnnnn
y
nnon nnnn nnne nnnnnnnnnnnnnnnnnnnnnnnnnnnnnnnnnnnnnnnnnnnnnnnnnnnnnnnnnnnnnnnnnnnnnnnnnnnnnnnnnnnnnnnnnnnnnnnnnnnnnnnnn
Dreame 1y ynnn nn nnnnnnn
1.0000000000000000000000000000000
y
.1111111111111111111111111111
100000000000000000000000000000000000000
nnnnnnnnnnnnnnnnnnnnnnnnnnnnnnnnnnnnnnnnnnnnnnnnnnnnnnnnnnnnnnnnnnnnnnnnnnnnnnnnnnnnnnnnnnnnnnn
1
Dn nn nnnn nn nnnn nn nnnn nn nnnn nn nnnn nn nnnn nn nnnn nn nnnn nn nnnn nn nnnn nn nnnn nn nnnn nn nnnn nn nnnn nn nnnn nn nnnn nn nnnn nn nnnn nn nnnn nn nnnn nn nnnn nn nnnn nn nnnn nn nnnn nn nnnn nn nannn nn nnnn nn nnnn nn nnnn nn nnnn nn nnnn nn nnnn nn nnnn nn nnnn nn nnnn nn nnnn nn nnnn nn nnnn nn nnnn nn nnnn nn nnnn nn nnnn nn nnnn nn nnnn nn nnnn nn nnnn nn nnnn nn nnnn nn nnnn nn nnnn nn nennn nn nnnn nn nnnn nn nnnn nn nnnn nn nnnn nn
70
70
D7n n

17n27y7y7y7y
17n2n7n7n7n9

nna
7777777

y

77770
1n2monx7nnyp
(2Xyuyyn,2Xya)

nnpnn
DINANJNNN NNNN NNN
0723777719922

nappn
1n2nonnnnyonp
- 178n nnn nn nnn nnn nnn nnn nnn nnn nnn nnn nnn nnn nnn nnn nnn nnn nnn nnn nnn nnn nnn nnn nnn nnn nnn nnn nnn nnn nnn nnn nnn nnn nnn nnn nnn nnn nnn nnn nnn nnn nnn nnn nnn nnn
n" 30-8y pwwwnynpynynn 8y ynnn nnnn nn nnnn
000000000000000000000000000000000000000
#
271 A
1
10000000000000000000000000000000000000
an anan anan anan anan anan anan anan anan anan
307n7n7n7n7
yin 0 anann
nna nna nna 000
50% 50%
y 1
78Wn100N 360703
0279600000000000000000000000000000000000000000
#
的的
17n2 2
27
nnnnnnnnnnnnnnnnnnnnnnnnnnnnnnnnnnnnnnnnnnnnnnnnnnnnnnnnnnnnnnnnnnnnnnnnnnnnnnnnnnnnnnnnnnnnnnnnnnnnnnnnnnnnnnnnnnnnn
17m2 2n7n7n7n7n
y
三
200
mnnn nnnnnnnnnnnnnnnnnnnnnnnnnnnnnnnnnnnnnnnnnnnnnnnnnnnnnnnnnnnnnnnnnnnnnnnnnnnnnnnnnnnnnnnnnnnnnnnnnnnnnnnnnnnnnnnnnnnnnnnnn
nnn
:D'9'O
ywn by ynnn nn nnnn nn nn nn nn nn nn nn nn nn
2
y 3
1777 2xu 177
027047777777777777
172NNN 11
.
ynnn nn nnnn nn nnnnnnnnnnnnnnnnnnnnnnnnnnnnnnnnnnnnnnnnnnnnnnnnnnnnnnnnnnnnnnnnnnnnnnnnnnnnnnnnnnnnnnnnnnn

ninnni
1777777777 177
1
1
1


ninnni
HEPA-nponn
HEPA-1000
HEPA-00000000000000000000000000000000000000
0
n nnnn nnnn nnnn nnnn nnnn nnnn nnnn nnnn nnnn nnnn nnnn nnnn nnnn nnnn nnnn nnnn nnnn nnnn nnnn nnnn nnnn nnnn nnnn nnnn nnnn nnnn nnnn nnnn nnnn nnnn nnnn nnnn nnnn nnn
nnpnn nnpnn no (nne 4-2 ninn) npnn nnn


ninnni
yannnnn nn nnnn nn nnnn nn nnnn nn
y
nnnnnnnnnnnnnnnnnnnnnnnnnnnnnnnnnnnnnnnnnnnnnnnnnnnnnnnnnnnnnnnnnnnnnnnnnnnnnnnnnnnnnnnnnnnnnnnnnnnnnnnnnnnnnnnnnnnnnnn

nnn
ynnn nn n 19 17
yann anan anan anan yann anan anan 1
1


3
11111111111111111111111 1


NIXIX
y 1
| HON | JAN 2017 JAN 2018 | JAN 2019 |
| papirakiri kiputan kehormaikurunumu | papirakiri kiputan kehormaikurunumu | papirakiri kiputan kehormaikurunumu |
| papirakiri kiputan kehormaikurunumu | papirakiri kiputan kehormaikurunumu | papirakiri kiputan kehormaikurunumu |
| papirakiri kiputan kehormaikurunumu | papirakiri kiputan kehormaikurunumu | |
| HEPA-1 pape hong kong kehormaikurunumu | HEPA-1 pape hong kong kehormaikurunumu | HEPA-1 pape hong kong kehormaikurunumu |
| HEPA-1 pape hong kong kehormaikurunumu | HEPA-1 pape hong kong kehormaikurunumu | |
| HEPA-1 pape hong kong kehormaikurunumu | HEPA-1 pape hong kong kehormaikurunumu | HEPA-1 pape hong kong kehormaikurunumu |
| papirakiri kiputan kehormaikurunumu | papirakiri kiputan kehormaikurunumu | papirakiri kiputan kehormaikurunumu |
| papirakiri kiputan kehormaikurunumu | papirakiri kiputan lehong kong kehormaikurunumu | papirakiri kiputan kehormaikurunumu |
| papirakiri kiputan kehormaikurunumu | papirakiri kiputan kehormaikurunumu | papirakiri kiputan kehormaikurunumu |
| papirakiri kiputan lehong kong kehormaikurunumu | papirakiri kiputan kehormaikurunumu | papirakiri kiputan kehormaikurunumu |
| papirakiri kiputan kehormaikurunumu | papirakiri kiputan kehormaikurunumu | papirakiri kiputan kehORMA |
nnnnnnnnnnnnnnnnnnnnnnnnnnnnnnnnnnnnnnnnnnnnnnnnnnnnnnnnnnnnnnnnnnnnnnnnnnnnnnnnnnnnnnnnnnnnnnnnnnnnnnnnnnnnnnnnnnnnn
WEEE ytn
nnnnnnnnnnnnnnnnnnnnnnnnnnnnnnnnnnnnnnnnnnnnnnnnnnnnnnnnnnnnnnnnnnnnnnnnnnnnnnnnnnnnnnnnnnnnnnnnnnnnnnnnnnnnnnnnnnnnnnnnnnnnnnnnnnnnnnnnnnnnnnnnnnnnnnnnnnnnnnnnnnnnnnnnn
n nn nnn

11002/n12/7907 n14772 n1n02 n1nn
1
n nn nnnn nnnn nnnn nnnn nnnn nnnn nnnn nnnn nnnn nnnn nnnn nnnn nnnn nnnn nnnn nnnn nnnn nnnn nnnn nnnn nnnn nnnn nnnn nnnn nnnn nnnn nnnn nnnn nnnn nnnn nnnn nnnn nnnn nnnn nnne
nntnnn nnnn nn nnnn nnnn nnnn
nynnnn nnnn nn nnnn nnnn nnnn nnnn nnnn
,
ywnn nnnn nn nnnn nnnn nnnn nnnn nnnn nnnn

1,2,3 1,4,2\
y 1111111111111111111111111111111
aaiiie jaiy yjy Aaiy jaiy jay jay jay jay jay jay jay jay jay jay jay jay jay jay jay jay jay jay jay jay jay jay jay jay jay jay jay jay jay jay jay jay jay jay jay jay jay jay jay jay jay jay jay jay jay jay jay jay jay jay j
y, aaiai yaiiall gie piaiui haaiaai iie jzaiai gaiuaiaiy
Jaaa Jaaa aaiy jay aie yaae ayaae yaae yaae yaae
gtae puey yie gaiy aaiy gaiy aaiy ayaiy aaiy
gall 10 gany is yall gail 10 gany, ball 10 gny
g 1000000000000000000000000000000000000000000000000000
aie gaiy 1
.
paaa aal p aal aay aay aay aay aay aay aay aay aay aay aay aay aay aay aay aay aay aay aay aay aay aay aay aay aay aay aay aay aay aay aay aay aay aay aay aay aay aay aay aay aay aay aay aay aay aay aay aay aay aay ayy
:
Jauu Jauuall aay Jauaill jauil aal lll pssid
y 1
.
a aal lalal haghePA jahhieh,HEPA jae gaae gaii gai alal hali
360 HePA jai jil lal jali y jaiy jaiy jaiy jaiy jaiy jaiy jaiy jaiy jaiy jaiy jaiy jaiy jaiy jaiy jaiy jaiy jaiy jaiy jaiy jaiy jaiy jaiy jaiy jaiy jaiy jaiy jaiy jaiy jaiy jaiy jaiy jaiy jaiy jaiy
Hepa 1


aill, aiei
aill 11
a 1 1 1 1 1 1 1 1 1 1 1 1 1 1 1 1 1 1 1 1 1 1
i 1
Jalnnae Jauailll alghnn 150j2 jy jy
btaa 1000000000000000000000000000000000000000
A
aoclll ail sbwyl slw j: yac lai bii
Lepy jn 100
y

aillll
Joo 10000000000000000000000000000000000000000000
jji jy gaaa gaae aalll yieh
aIyJySlll ylls
y

y

1 1


- Warning
- Product Overview
- Installation
- Installing the 2-in-1 Charging & Storage Mount
- How to Use
- Note:
- Using Different Attachments
- Care & Maintenance
- Tips:
- Cleaning the Vacuum
- Cleaning the Dust Compartment
- Cleaning the HEPA Filter Assembly Cleaning the Cyclone Assembly
- Cleaning the Soft Roller Nozzle and Mini-Motorized Nozzle
- Cleaning the Soft Roller Nozzle
- Cleaning the Mini-Motorized Nozzle
- Troubleshooting
- WEEE Information
- O630p yctpoiCTBa
- 0630p yctpoiCTBa
- YctaHOBka
- UcTaHOBKa KpennHeNnIa3apKnXpaHeHn"2B1"
- HnctpyKcna
- PpmeuHne.
- Yxod n TexHnueckoe o6cnyXnBaHne
- COBETbl.
- YnCTKa nblneocca
- OuNTKa OTceKa JnIy nbln
- Uxod n TexHnueckoe o6cnyKuBaHne
- Uxod n TexHnueckoe o6cIyXuBaHne
- Ouunctka 6Ioka HEPA-ΦnIbTpA OChCTKa UKNOHORO 6Ioka
- Yxod n TexHnueckoe o6cnyKuBaHne
- OuNTKa 1eTK C MRAKIM BAJIHKOM N 3NeKTPUyeCKO JETKN POTINB KLeue
- OuNTKa 电ETKn C MraTKM BaNkOM
- 70
- nappn
- 1n2nonnnnyonp
- #
- 的的
- nnn
- ninnni
- NIXIX
- 11002/n12/7907 n14772 n1n02 n1nn
- 1,2,3 1,4,2\
- aill, aiei
- aillll
Brand : DREAME
Model : V9
Category : Handheld vacuum