
Basix - Car seat Foppapedretti - Free user manual and instructions
Find the device manual for free Basix Foppapedretti in PDF.
| Brand | Foppapedretti |
| Model | Basix (BS06N-T) |
| Product type | ISOFIX base for car seat |
| Mass group | Group 0+ (0-13 kg) |
| ISOFIX size class | C |
| Standard | ECE R44/04 |
| Approval type | Semi-universal |
| Compatible with | Foppapedretti car seat type BS06N (Group 0+) |
| Main functions | ISOFIX attachment, adjustable support leg with contact indicator (red/green), anti-rebound bar, car seat locking, connection indicators |
| Safety warnings | Do not use on seat with front airbag, replace after an accident, read the vehicle manual |
| Care and cleaning | Machine washable cover at 30°C (gentle cycle), plastic parts with mild soap and water, harness with warm soapy water |
| Spare parts | Replacement covers available from retailer |
| Warranty | Standard 12-month warranty from purchase date |
| Repairability | Do not modify or alter the base; contact the manufacturer for inspection after damage |
Frequently Asked Questions - Basix Foppapedretti
User questions about Basix Foppapedretti
0 question about this device. Answer the ones you know or ask your own.
Ask a new question about this device
Download the instructions for your Car seat in PDF format for free! Find your manual Basix - Foppapedretti and take your electronic device back in hand. On this page are published all the documents necessary for the use of your device. Basix by Foppapedretti.
USER MANUAL Basix Foppapedretti
natural_image
Line drawing of a medical device with internal components and a seat (no text or symbols)BASE (type BS06N-T) PER SEGGIOLINO AUTO GRUPPO 0+ (type BS06N)
Istruzioni di montaggio - Per bambini fino a 13 kg - Conforme alla Norma ECE R44-04
GB BASE (type type BS06N-T) FOR CAR SEAT GROUP 0+ (type BS06N)
Assembly instructions - For children up to 13 kg - Complies with ECE R44-04
F BASE (type type BS06N-T) POUR SIÈGE-AUTO GROUP 0+ (type BS06N)
Notice d'utilisation - Pour les enfants jusqu'à 13 kg - Conforme à la Norme ECE R44-04
D BASE (type type BS06N-T) FÜR AUTOSITZ GRUPPE 0+ (type BS06N)
Montageanweisungen - Für Kinder bis 13 kg - Entspricht der Norm ECE R44-04
E BASE (type type BS06N-T) PARA SILLITA PARA AUTO DEL GRUPO 0+ (type BS06N)
Manual de instrucciones - Para los niños de hasta 13 kg - Conforme a la Norma ECE R44-04
GR B'ASH (type type BS06N-T) ΓΙΑ ΠΑΙΔΙΚΟ ΚΑΘΙΣΜΑ ΑΥΤΟΚΙΝ'ΗΤΟΥ ΟΜΑΔΑΣ 0+ (type BS06N)
Εγχειρίδιο χρήσης - Για τα και παιδιά έως 13 kg - Σύμφωνη με τον κανονισμό ECE R44/04
RU БАЗА (мод type BS06N-T) ДЛЯ АВТОКРЕСЛА ГРУППА 0+ (мод BS06N)
Инструкция по установке - Для детей до 13 кг - Соответствует стандарту
ECE R44-04
IT. IMPORTANTE!
LEGGERE ATTENTAMENTE E
CONSERVARE PER FUTURE REFERENZE
GB. IMPORTANT!
READ THE INSTRUCTIONS CAREFULLY
AND KEEP FOR FUTURE REFERENCE
F. IMPORTANT!
LIRE ATTENTIVEMENT ET CONSERVER
SOIGNEUSEMENT A PORTEE DE MAIN
natural_image
Illustration of a hand using a device to adjust a seatbelt, with no visible text or symbols
natural_image
Illustration of a hand holding a device with a red circular arrow indicating rotation (no text or symbols)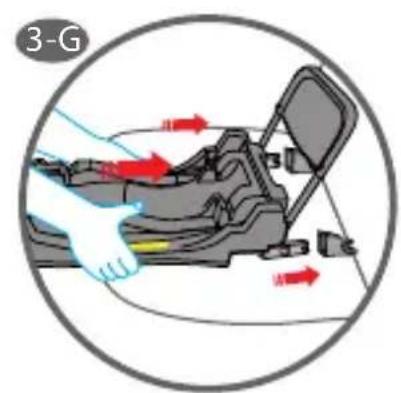

natural_image
Diagram of a mechanical device with a red X mark and ground symbol, enclosed in a circle (no text or labels)
natural_image
Diagram of a mechanical device with a green checkmark and red baseline, no text or symbols present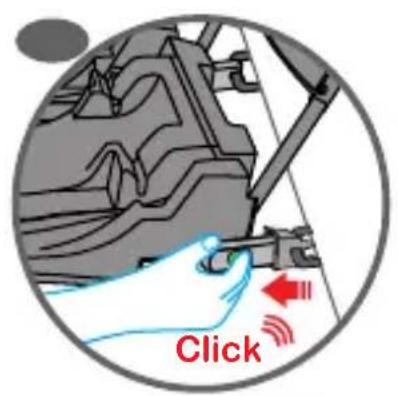

natural_image
Mechanical component diagram showing a housing with red curved arrows indicating motion or rotation (no text or symbols)natural_image
Mechanical component diagram showing a cylindrical assembly with flanges and a central shaft (no text or symbols)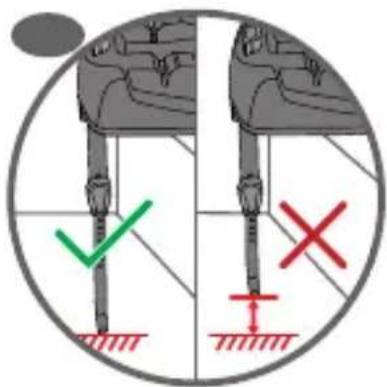

natural_image
Illustration of a car seatbelt with a green checkmark indicating a safety inspection (no text or symbols present)Use in the car...... Page _23
Fastening the infant carrier using the
ISOFIX base...... Page _25
Adjusting the support leg...... Page _26
Locking the infant carrier...... Page _27
Removal of the infant carrier .... Page _28
Removal the ISOFIX base...... Page _28
Fitting your infant carrier with ISOFIX
base correctly Page_29
Maintenance and cleaning...... Page _30
Formal guarantee...... Page _31
WARNING
- The ISOFIX Base (BASIX type BS06N-T) is only compatible with the type BS06N series car seats.
- Please read the installation manual of the ISOFIX Base (Type BS06N-T) on the car seat before using in cars equipped with ISOFIX anchoring systems.
- This is an ISOFIX child restraint device approved in accordance with the minimum safety requirements established by the European Regulation ECE R44/04 for general use in vehicles equipped ISOFIX with anchoring systems.
- The device can be mounted in cars with positions approved as ISOFIX positions, as specified in the car manual, according to the category of child car seat and to the fixing system.
- The mass group and the ISOFIX size class for which the device is usable are: Group 0+ (0-13 kg), Class C.

- ISOFIX, installation label
- Anti-rebound bar
- Car seat fastening brackets
- Car seat release button
- Safety leg
- Adjustment button for the support leg
- Support leg
- Base
- ISOFIX release buttons
- ISOFIX connectors
- Plastic guide for ISOFIX connectors
1. Notice
- This is an ISOFIX child restraint de vice. It is approved to ECE R44/04 Standards for general use in vehicles equipped with ISOFIX safety anchor age systems.
- To use the SEMI-UNIVERSAL ISOFIX system, it is necessary to read the instructions in the vehicle handbook before installing the child car seat in side the car. The vehicle manual will indicate the seats compatible with the class and age group of the child car seat.
-The child mass group and ISOFIX size class for which the child restraint may be used are: GROUP 0+ (0-13+), Class C.

- It is a classified as a "Semi-Universal" device which is compatible for use in the vehicles indicated in the relative "List of approved vehicles" list.
- If in doubt, consult either the child restraint device manufacturer or your retailer.
| Car seat model | Conforms to standard ECE R 44/04 | ||||
| WeightGroup | |||||
| BS06N+BS06N-T Base ISOFIX |  | 0+ | 0 - 13 kg | Semi-universal | |
| BS06N |  | 0 - 13 kg0+ | Universal | ||
Note: About the car seat installation instructions, please refer to the car seats 0+ "type BS06N" installation manual.
WARNING
WARNING: Read these instructions carefully before use and keep this manual for future reference. Failure to comply with these instructions may put your child's safety at risk.
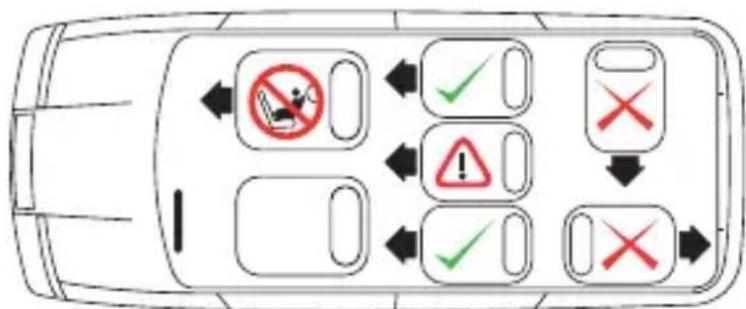
NEVER use the Car Seat on a passenger seat fitted with a front air bag.
- The “base isofix BASIX – BS06N-T” is standard approved according to the regulation ECE R44/04, the European regulation concerning the safety of infant car seats and it must only be used together with the infant car seat Group 0+ (type BS06N/ECE R44-04-044521). The model of the infant car seat is stated on the label fitted on the product.
- This approval will be invalidated if you make any modification or alteration to the base of the infant carrier.
Any modification can be only be made by the manufacturer. - Make sure that your vehicle/s is listed in the vehicle application list which is provided with this base.
- Read the whole instruction guide and make sure that you fully understand how to install and use the "BASIX – type BS06N-T" correctly.
- Do not place anything such as a towel or cushion under the “BASIX – type BS06N-T”. This could affect the performance of the base in an accident. Never buy a second hand base.
- Always replace a “BASIX – type BS06N-T” after an accident. It may have unseen damage.
- Always secure the "BASIX – type BS06N-T" on the vehicles ISOFIX points. All occupants in the vehicle must be correctly restrained complying with the current law.
- Do not place any objects in the foot well in front of the "BASIX – type BS06N-T".
- Do not make unauthorised modifications or alterationsto the "BASIX – type BS06N-T".
- Do not allow children to play with or adjust the "BASIX – type BS06N-T".
- Do not leave children alone in the vehicle.
- Never leave your child unattended in the car seat.
- Do not place the "BASIX – type BS06N-T" on a table or work top, always use the floor.
- Make sure your "BASIX – type BS06N-T" does not become trapped in the door of the vehicle or by a folding seat.
- Make sure that all folding vehicle seats are securely latched.
- Do not fix the "BASIX – type BS06N-T" on a side or rear facing vehicle seat.
- Always store the "BASIX – type BS06N-T" in a safe, dry place when it is not being used.
2. Use in the car
DANGER!
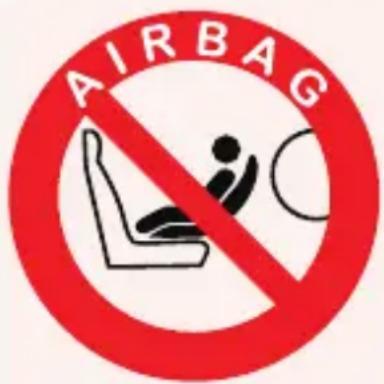
DO NOT USE THE CAR SEAT POSITIONED ON A PASSENGER SEAT WHICH IS FITTED WITH AN AIRBAG.
The opening of the airbag against the car seat can cause serious, if not fatal, injury to the child. Consult the vehicle instruction manual with regard to the use of car seats.
2.1 Possible seating positions
- Before installation, check that the car is fitted with Isofix anchorage points, which will be found between the backrest and seat of the car.
- The “BASIX – type BS06N-T” is approved to “Semi-Universal” standards which means it is not compatible for use on all car models, but only those indicated in the “List of vehicles” booklet attached.
For advice as to the suitability of this "BASIX – type BS06N-T" please consult the vehicle application list before you purchase and install the base to make sure that the make, model and year of your vehicle/s is suitable.
Please consult the vehicle handbook to locate the vehicle ISOFIX points.
Never use the "BASIX – type BS06N-T" on a passenger seat fitted with a front airbag, It is very dangerous.
3. Installation in the vehicle
For the safety of your child
- Never leave your child unattended while in the car seat.
- Do not leave objects in the footwell in front of the ISOFIX.
For the safety of the passengers
In the event of sudden braking or in an accident, people or objects which are not secured or which are placed in an unsafe way could result in injury to the other passengers. Always ensure that:
- the seatbacks are locked (e.g. the folding rear seats are clicked into place);
- all heavy or sharp objects inside the passenger compartment (e.g. on the parcel shelf) are positioned securely;
- all passengers in the car are wearing seat belts;
- the child car seat is always securely hooked on the passenger seat, even when not in use.
3.1 Fastening the infant carrier using the ISOFIX base
Make sure that your vehicle has ISOFIX anchor points and is approved in the vehicle application list which is supplied with the base.
Locate the vehicle ISOFIX points. if any problem please consult the vehicle manual. They are usually between the vehicle seat base and back.
natural_image
Illustration of a hand using a seatbelt to adjust the seat, with a red curved arrow indicating rotation (no text or symbols)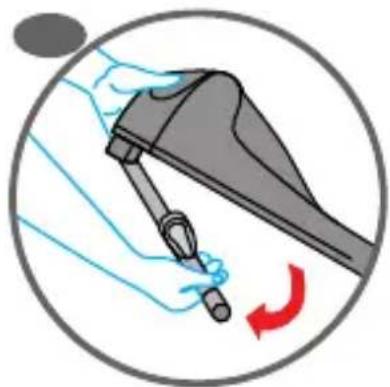
natural_image
Illustration of a hand holding a tool with a red circular arrow indicating rotation (no text or symbols)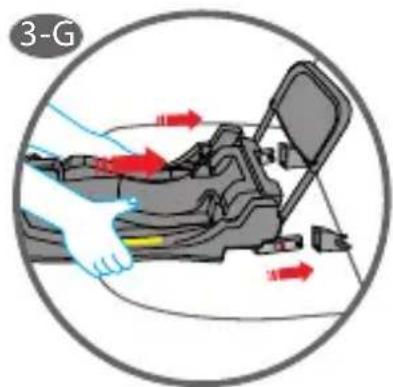
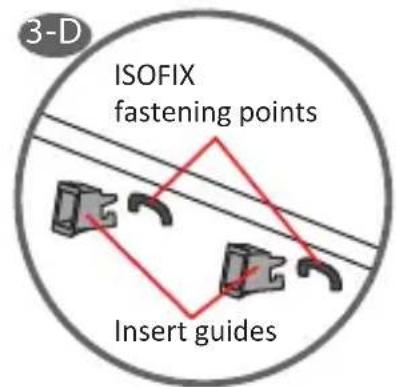
1 Insert the two plastic ISOFIX guides and hook them onto the vehicle ISOFIX points. The plastic guides can help identify the vehicle ISOFIX points and make installation easier. They can also help with the protection of your vehicle seat. (3-D).
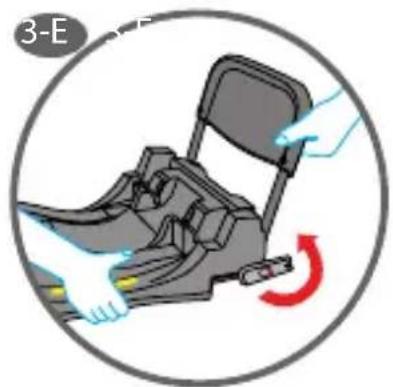
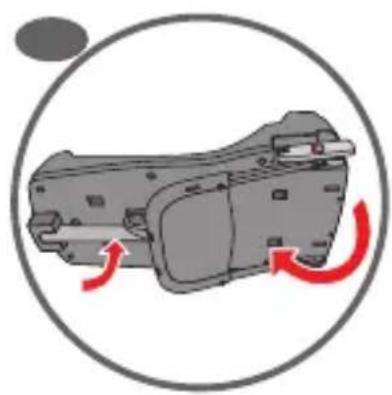
2 Fold up the anti-rebound bar and the two connectors on the ISOFIX base (fig. 3-E).
Warning! Always lock the anti-rebound bar when transporting the Isofix base to prevent it from folding up (risk of injury).
3 Fold down the support leg placed on the ISOFIX base (fig. 3-F).
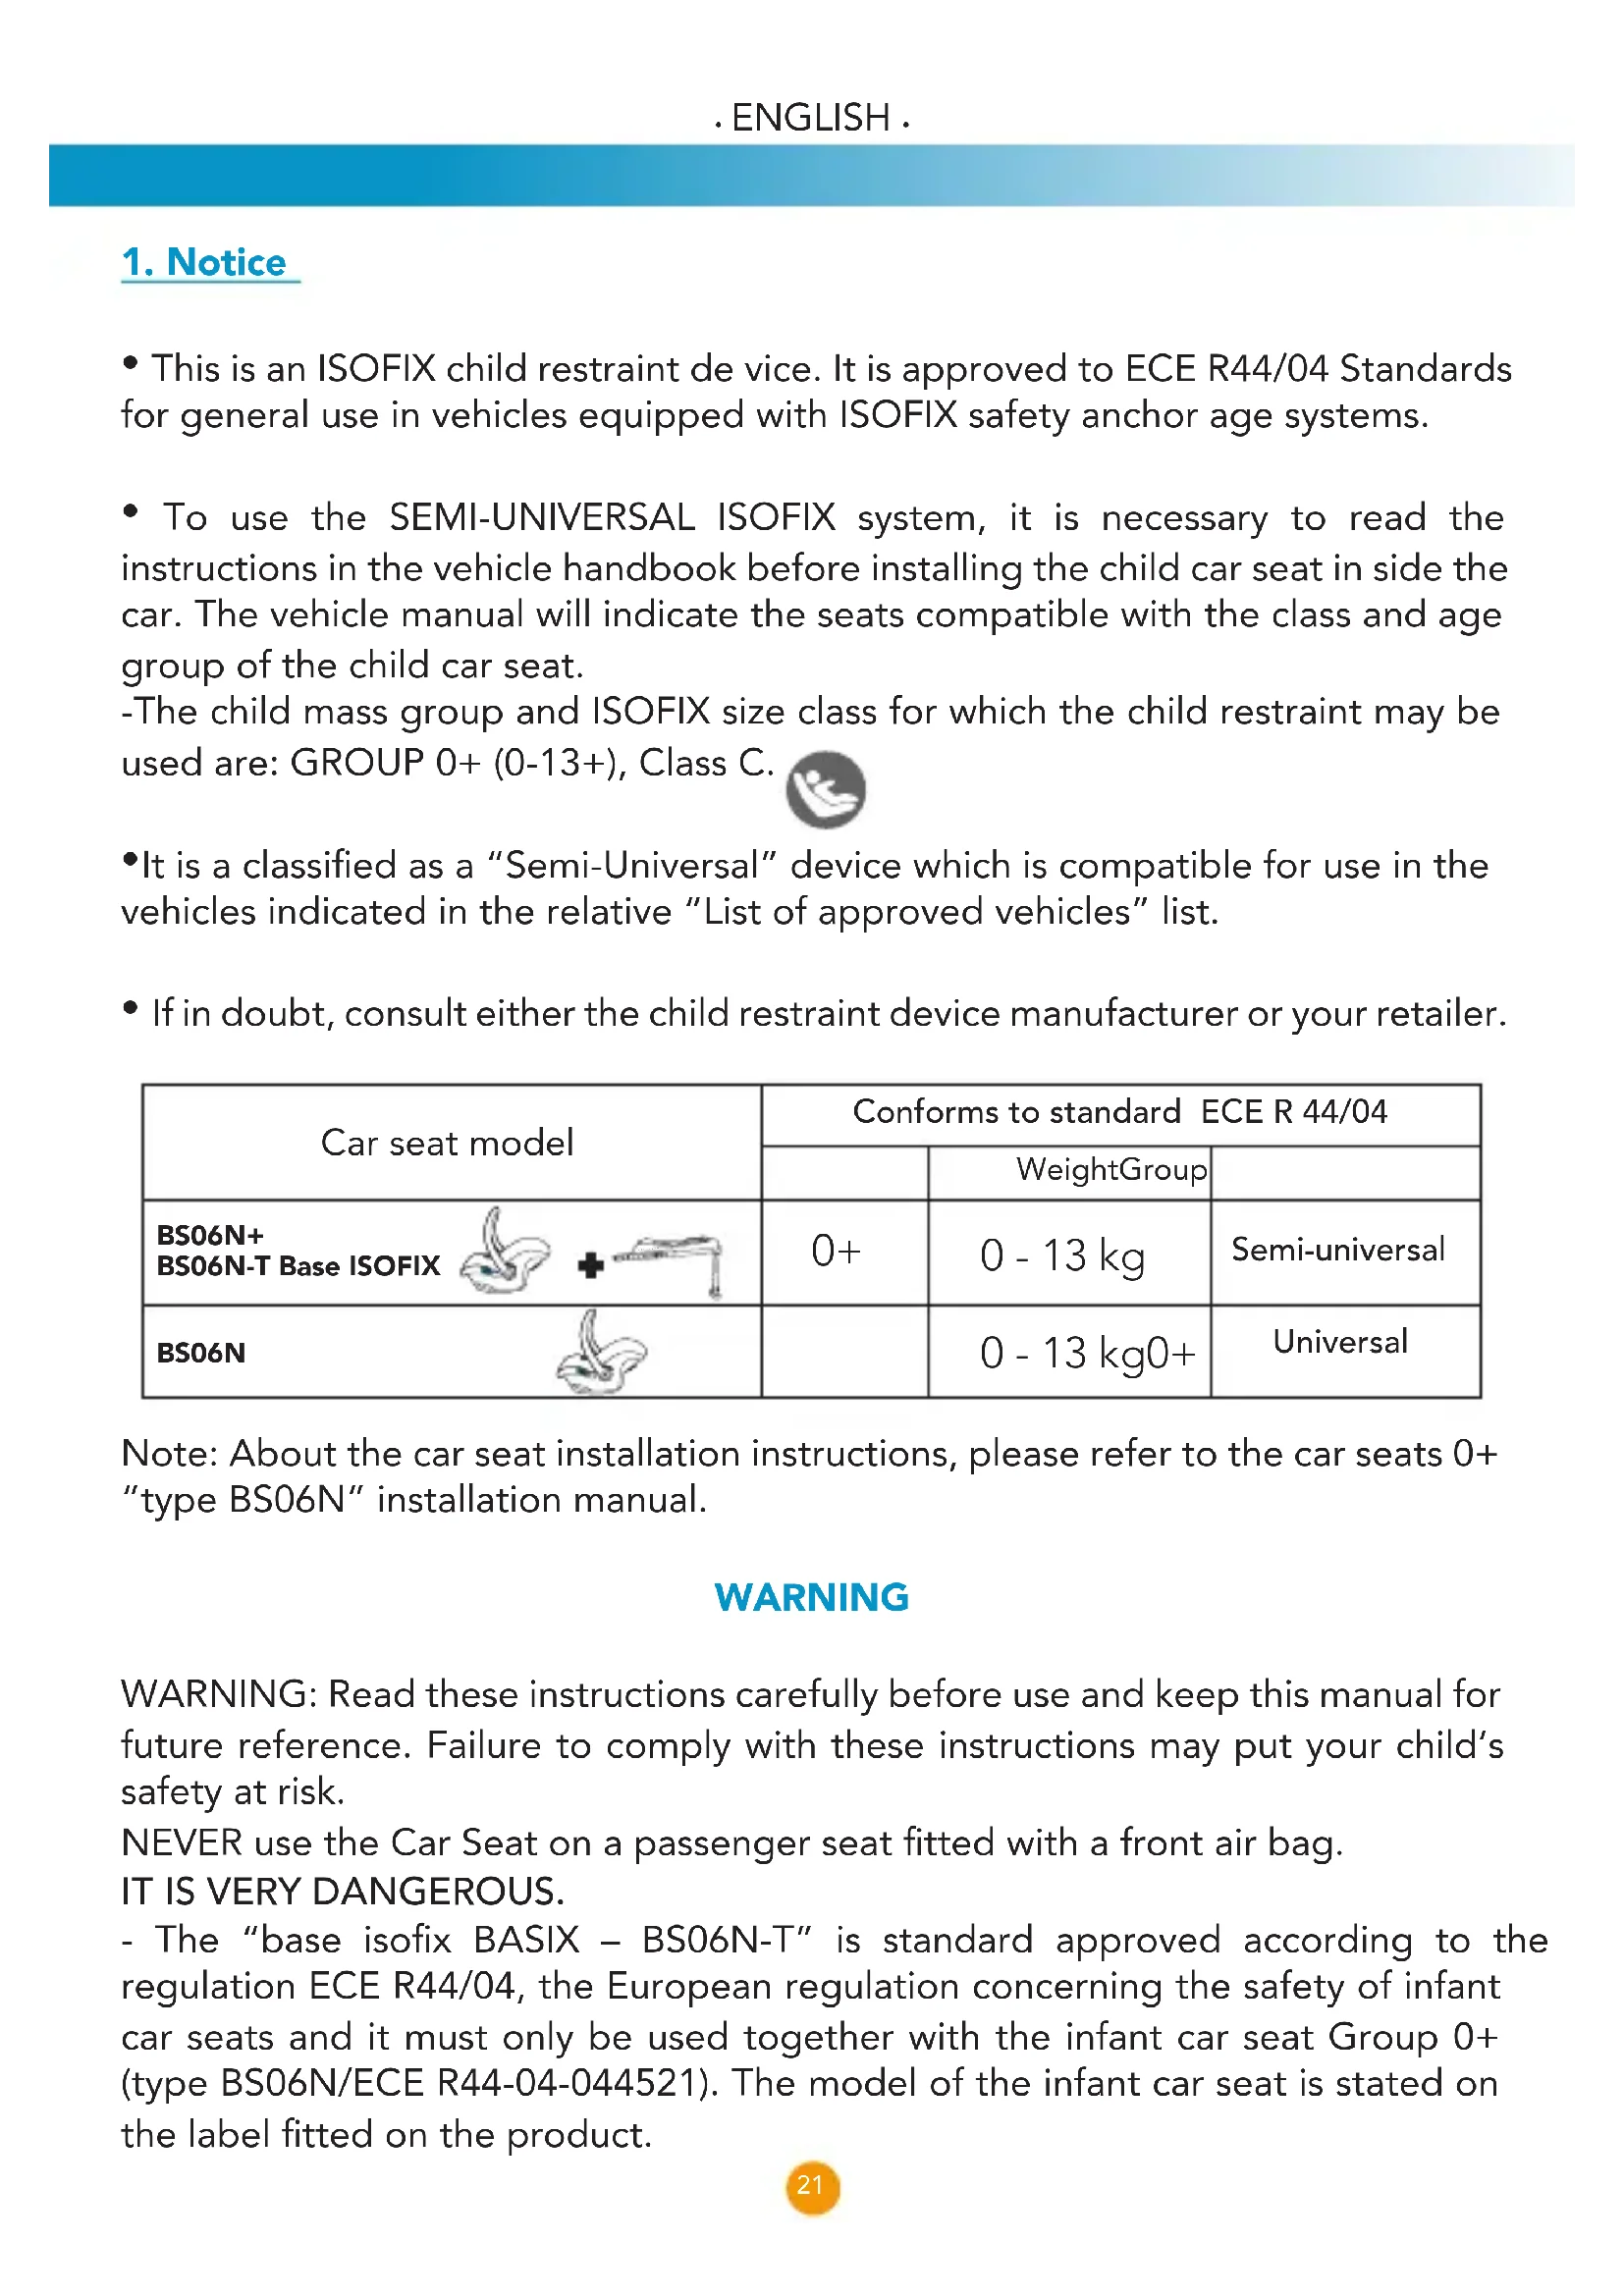
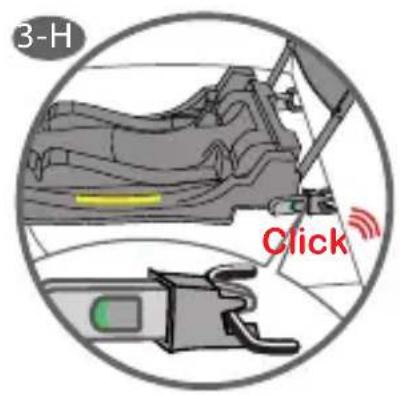
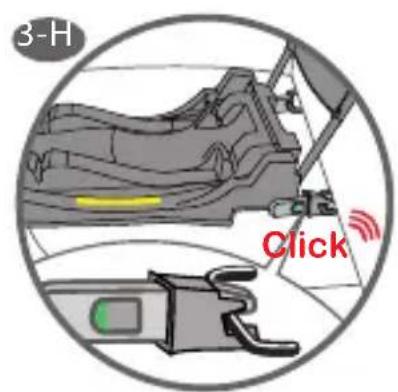
4 Hold the ISOFIX base still with both hands (fig. 3-G).
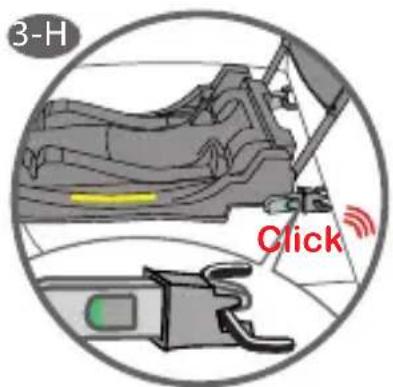
5 Push the two ISOFIX connectors into the appropriate yellow-coloured guides until you hear the "CLICK" sound which indicates that it is fastened on both sides (fig. 3-H).
3.2 Adjusting the support leg

natural_image
Diagram of a mechanical device with a red X mark and ground symbol, enclosed in a circle (no text or labels)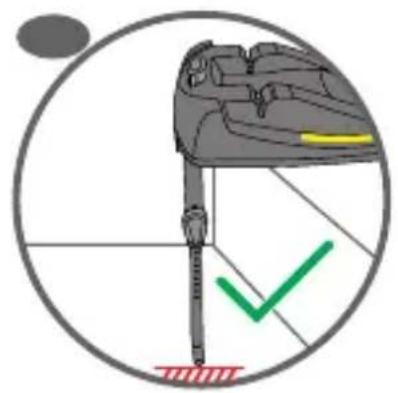
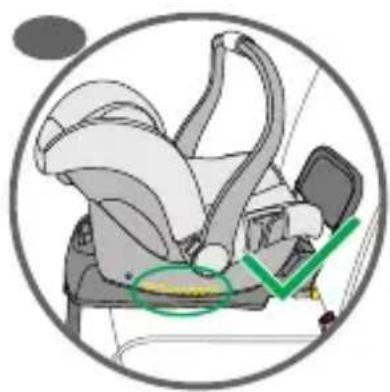
natural_image
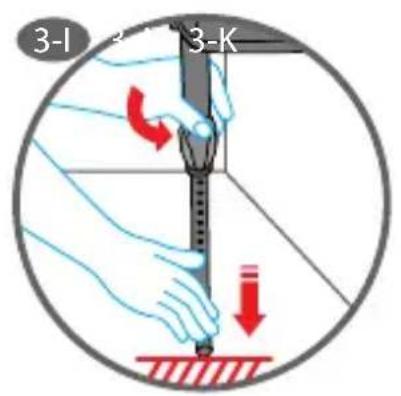
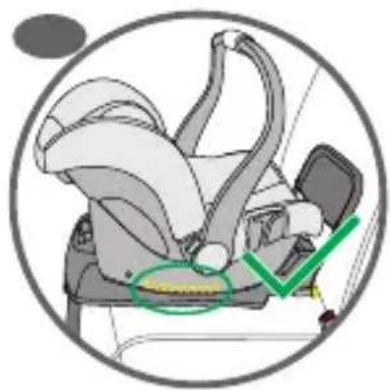
Diagram of a device with a green checkmark and red baseline, no readable text or symbols presentPush the support leg adjuster and adjust the support leg so that it makes full and firm contact with the vehicle floor. The two pressure monitors at the base of the support leg must turn from red to green confirming firmly contact. Check that the front support leg clicks into position and is correctly adjusted. (fig. 3-1).
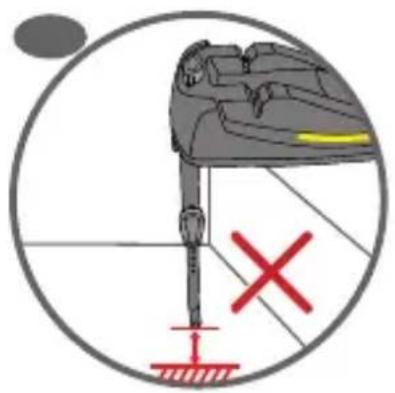
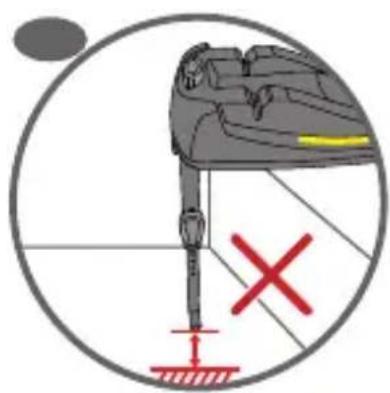
Make sure that the support leg does not raise the base from the surface of the vehicle seat (fig. 3-J e 3-K).
- Do not place the front support leg on a floor storage compartment lid. The front support leg MUST make full and firm contact with the vehicle floor.
- Not all infant carrier bases fit all vehicles. For advice as to the suitability of this infant carrier base please consult the vehicle application list before you purchase the base and make sure that the make, model and year of your vehicle/s is suitable.
3.3 Locking the infant carrier

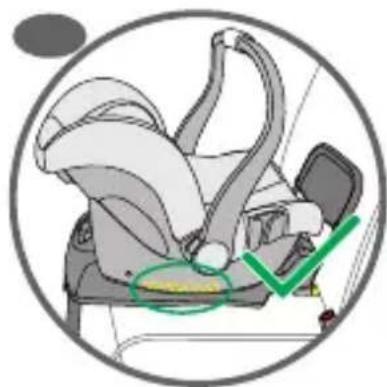
- Make sure that the upper surface of the ISOFIX base is free from foreign bodies.
• Make sure that the handle is in a vertical position (letter A, fig. 3-L). - Position the seat on the ISOFIX base so that it is opposite to the direction of travel (baby facing backwards). Then fasten it (a "CLICK" sound will indicate that it has been fixed in place (fig. 3-M).
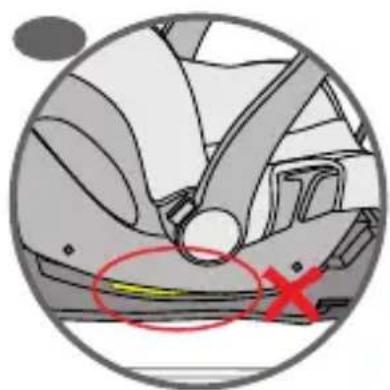
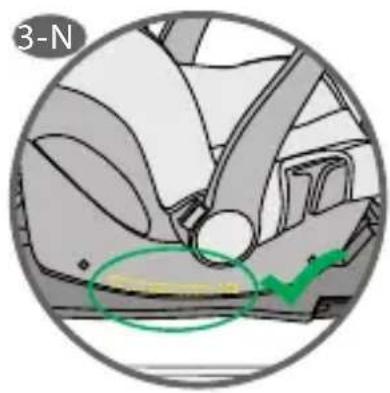
- Warning! The yellow sign on the sides of the ISOFIX base must not be visible (fig. 3-N).
- Lift the car seat to make sure that all four connections have engaged correctly and the connection indicators have changed from red to green.
4. REMOVAL OF THE INFANT CARRIER AND ISOFIX BASE
4.1 Removal the infant carrier
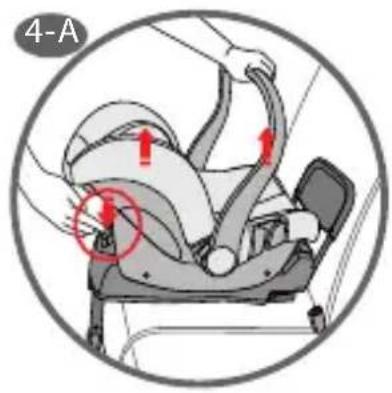
- Press the car seat release button (grey-coloured) and lift up the seat at the same time (fig. 4-A).
Important! When used on a daily basis you can leave the ISOFIX base mounted on board the car, simply removing the car seat.
4.2 Removal the ISOFIX base

natural_image
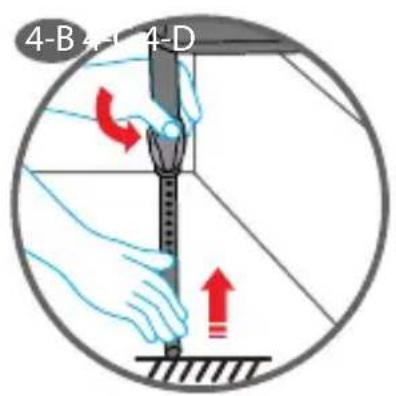
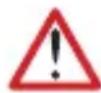
Mechanical component diagram showing a housing with red directional arrows indicating motion (no text or symbols)- Slide the support leg until it stops (fig. 4-B).
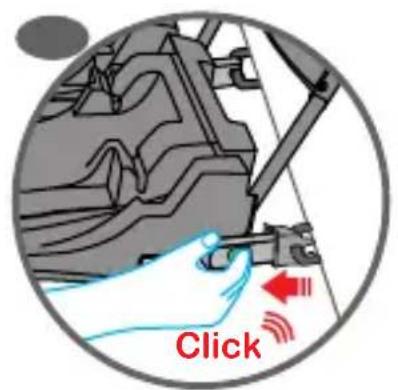
- Press the safety button (red-coloured) and push forward the ISOFIX release buttons placed on the two connectors to unclip them (fig. 4-C).
- Rotate downwards the ISOFIX connectors and the anti-rebound bar (fig. 4-D).
Important! This protects the ISOFIX connectors from any damage. - Carefully remove from your vehicle.
5. Fitting your infant carrier with ISOFIX base correctly

For the safety of your child make sure that...
natural_image
Mechanical component diagram showing a piston and shaft assembly inside a circular housing (no text or symbols)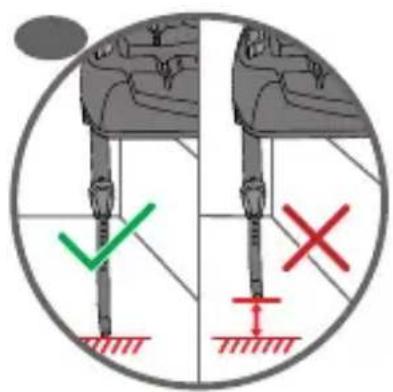
natural_image
Illustration of a car seatbelt with a green checkmark indicating a safety inspection (no text or symbols present)- The ISOFIX base is hooked on both sides and that the connectors are inserted in the appropriate ISOFIX anchoring points (fig. 5-A);
- The support leg is firmly placed on the floor of the vehicle and that the ISOFIX base is not displaced from the seat (fig. 5-B);
- The car seat is firmly locked inside the ISOFIX base and that the yellow sign on the sides of the base is not visible (fig. 5-C).
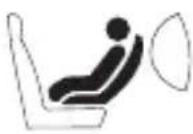
- The car seat is fixed in a rear-facing position;
- The front airbag has been deactivated when the car seat is fixed to the passenger seat.
6. Maintenance
For effective protection
- In the event of an accident with an impact speed of over 10 km/h, it is possible that the car seat may have damage which is not necessarily visible.
- In this case it is of fundamental importance to replace the car seat, disposing of the damaged one in a correct way.
- Regularly check that all major components are not damaged.
- Check that all the mechanical components are working correctly.
- To prevent the car seat from becoming damaged or broken, ensure that it does not get caught in the door of the car, or between the scroll bars of the seats, etc.
- If the car seat is damaged (for example as a result of being dropped) it must be inspected by the manufacturer.
6.1 Cleaning
Use the original covers only, as they have a direct impact on the correct operation of the device. Replacement covers are available from your dealer and/or from our headquarters.
It is strictly forbidden to use the car seat without the cover.
The cover can be removed and washed in a washing machine with a mild detergent, using the delicate fabric cycle (30°C). Follow the instructions shown on the washing label of the cover. The colours may fade if washed at temperatures higher than those indicated. Do not spin dry or dry clean (the fabric could become detached from the padding).
The plastic parts may be cleaned with water and soap. DO NOT use harsh detergents (such as solvents).
The harness may be removed and washed with soap and warm water.
Warning! Never remove the tabs of the buckles from the straps.
The contents of this document as stated below will come into effect as from 01.01.2005 and replace, on every account and in full, any previous message referring to the guarantee provided by Foppa Pedretti S.p.A.
FORMAL GUARANTEE
Foppa Pedretti S.p.A. the head office of which is located at n. 11 Via Volta, Grumello del Monte (Italy), guarantees directly to the Consumer that this brand new product is free of faults with regard to the materials, design and manufacture and that it complies with the characteristics as declared by the manufacturer.
This formal guarantee is valid in all Member Countries of the European Union and it neither excludes nor limits the Consumer's rights in accordance with mandatory measures provided for by the law with regard to the Retailer of the Product.
To take advantage of this formal guarantee, the Consumer must return the faulty product to the Retailer, presenting to the same the proof of purchase of the Product which must clearly show the Retailer's address, the date of purchase of the Product with the Retailer's stamp and signature and an indication of the Product itself or, alternatively, the receipt which must not have been altered and which must clearly show the same information as that referred to above.
The manufacturer's formal guarantee is valid for twelve (12) months from the date of purchase of the Product. During this period, Foppa Pedretti S.p.A. will repair or replace the faulty product, at its own discretion.
The formal guarantee is granted to the end buyer of the Product (Consumer) and it neither excludes nor limits the mandatory rights of the Consumer as provided for by the law and/or the rights that the Consumer may have with regard to the Dealer/Retailer of the Product.
EXCLUSIONS TO THE FORMAL GUARANTEE.
The formal guarantee is excluded in the case of damage caused to the Product for the following reasons: if the product is used in a way that does not comply with the information contained in the use and assembly instruction sheet, if the product is knocked or dropped, if the Product is exposed to humidity or extreme heat or environmental conditions, or to sudden changes in the same, corrosion, oxidization, unauthorized alterations or repairs to the Product, repairs using unauthorised spare parts, improper use, improper maintenance or failure to carry out the same, improper maintenance compared to the information given on the use and assembly instruction sheet, incorrect assembly, accidents, damage caused by food or drink, damage caused by chemical products, cases of force majeure.
In any case, Foppa Pedretti S.p.A. declines all responsibility for damage caused to persons or to property, other than the Product, when such damage is caused by a failure to comply with the instructions/advice/warnings contained in the manual or, alternatively, in the use and assembly instruction sheet provided with each Product for the owner/user. (Purely as an example, in the case of a cot: "Check your baby constantly. Make sure that the sheets and blankets do not cover the baby's head...").
Furthermore, Foppa Pedretti S.p.A. declines all responsibility for damage to persons and to property when the breakage of its products is due to a deterioration in the components of the Product that are subject to wear. All the components of the Product made of plastic are considered to be components subject to wear.
2.1 Positions assises possibles
natural_image
Illustration of a hand using a device to lift a seatbelt, with a red curved arrow indicating rotation (no text or symbols)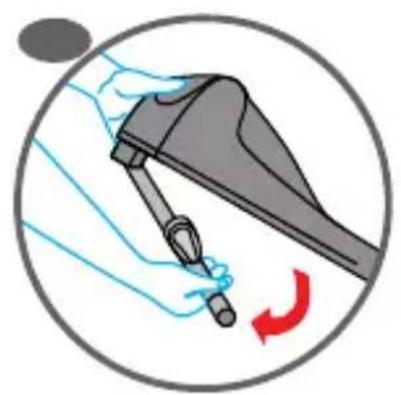
natural_image
Illustration of a hand holding a device with a red curved arrow indicating rotation (no text or symbols)

natural_image
Diagram of a mechanical device with a red X mark and ground symbol, no readable text or labels present.
natural_image
Diagram of a device with a green checkmark and red baseline, no readable text or symbols present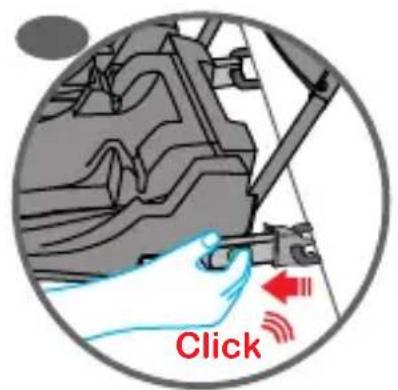

natural_image
Mechanical component diagram showing a housing with red directional arrows indicating motion (no text or symbols)natural_image
Mechanical component diagram showing a cylindrical assembly with flanges and a central shaft (no text or symbols)
natural_image
Interior view of a car seatbelt with a green checkmark indicating a safety inspection (no text or symbols present)EXCLUSIONS DE LA GARANTIE CONVENTIONNELLE.
natural_image
Illustration of a car seatbelt being adjusted for a hand, showing no text or symbols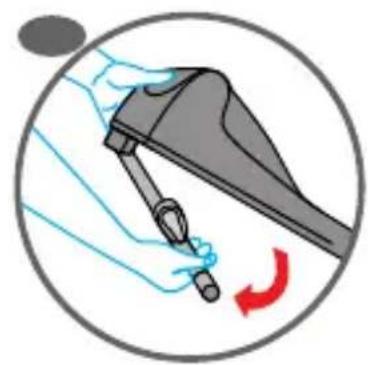
natural_image
Illustration of a hand holding a device with a red curved arrow indicating rotation (no text or symbols)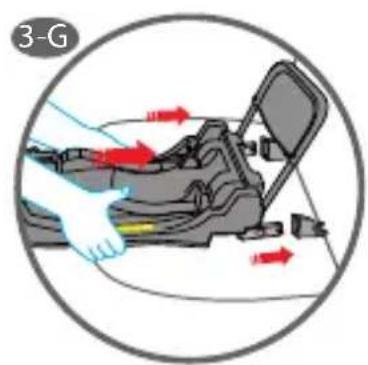

natural_image
Diagram of a mechanical device with a red X mark and a ground symbol, no readable text or labels present.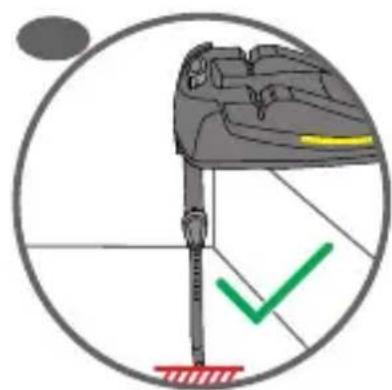
natural_image
Diagram of a mechanical device with a green checkmark and red base, no readable text or symbols present.natural_image
Anatomical diagram of a biological structure with labeled parts A, B, and C, enclosed in a circular boundary (no text or symbols beyond labels)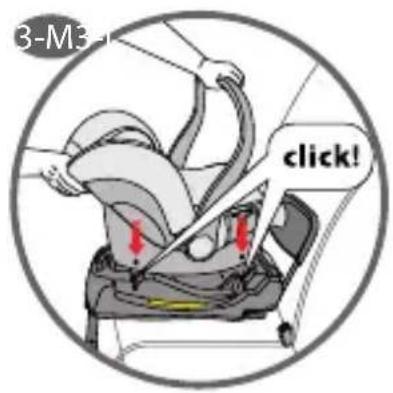

natural_image
Close-up of a car's seatbelt mechanism with a green circular highlight on the side (no text or symbols)
natural_image
Close-up of a car interior showing steering wheel and dashboard (no text or symbols visible)
natural_image
Close-up of a car's seatbelt with a red X mark and a yellow circular highlight (no text or symbols)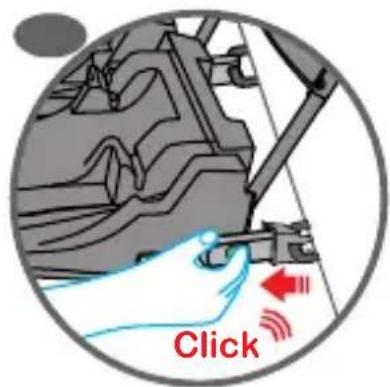

natural_image
Mechanical component diagram showing a housing with red curved arrows indicating motion or force (no text or symbols)natural_image
Mechanical component diagram showing a cylindrical assembly with flanges and a central shaft, enclosed in a circular frame (no text or symbols)

natural_image
Illustration of a car seatbelt with a green checkmark indicating a safety inspection (no text or symbols present)natural_image
Illustration of a hand holding a pen and tool, with a red curved arrow indicating rotation (no text or symbols)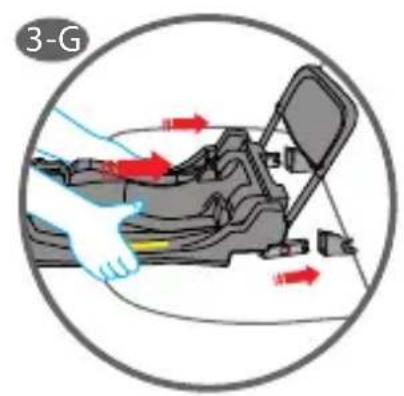

natural_image
Diagram of a mechanical device with a red X mark and ground symbol, enclosed in a circle (no text or labels)
natural_image
Diagram of a device with a green checkmark and red baseline, no readable text or symbols present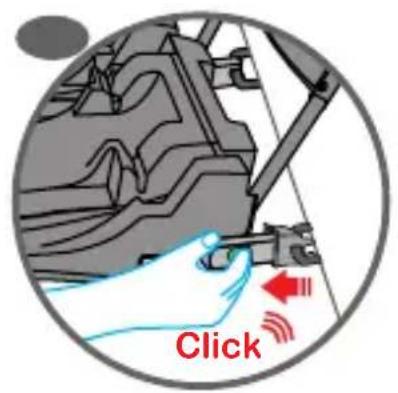

natural_image
Mechanical component diagram showing a housing with red curved arrows indicating motion or rotation (no text or symbols)natural_image
Mechanical component diagram showing a cylindrical assembly with mounting flanges and a central shaft (no text or symbols)
natural_image
Illustration of a car seat with a green checkmark indicating a safety inspection (no text or symbols present)natural_image
Illustration of a hand using a seatbelt to adjust the seat, with a red curved arrow indicating rotation (no text or symbols)
natural_image
Illustration of a hand holding a device with a red curved arrow indicating rotation (no text or symbols)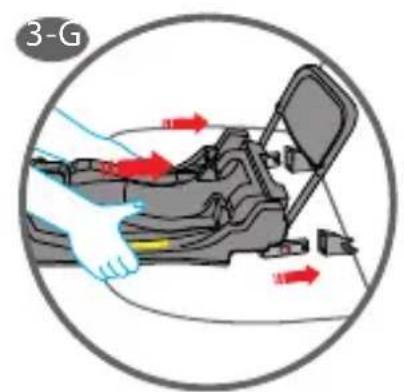
natural_image
Diagram of a hand holding a tool with a red X mark and a yellow bar, enclosed in a circle (no text or symbols)
natural_image
Diagram of a mechanical device with a green checkmark and red base, no text or symbols presentnatural_image
Anatomical diagram of a biological structure with labeled parts A, B, and C, enclosed in a circular boundary (no text or symbols beyond labels)
natural_image
Close-up of a car's seatbelt mechanism with a green circular annotation highlighting the component (no text or symbols present)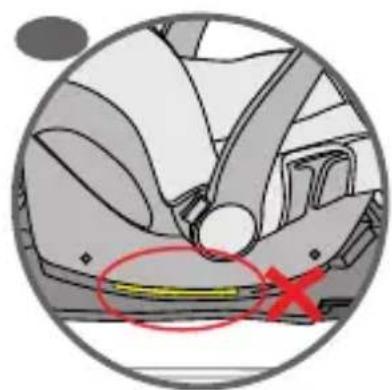
natural_image
Close-up of a car interior showing steering wheel and dashboard (no text or symbols visible)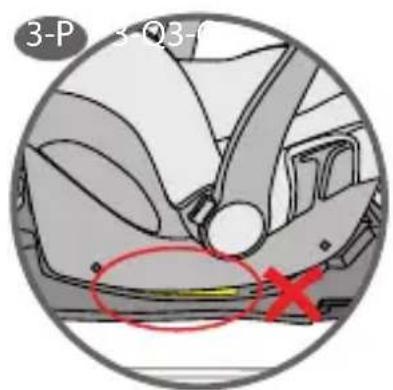

natural_image
Close-up of a car's seatbelt with a red X mark and a yellow circular highlight (no text or symbols)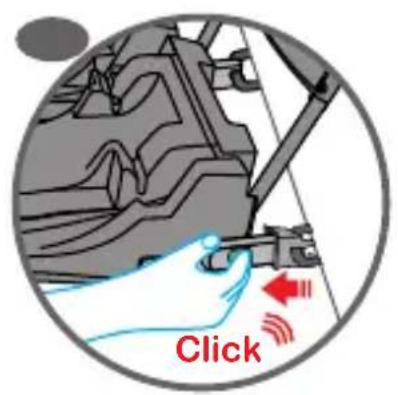
natural_image
Mechanical component diagram showing internal structure with red curved arrows indicating motion or force (no text or symbols)natural_image
Mechanical component diagram showing a cross-section with no visible text or symbols

natural_image
Interior view of a car seatbelt with a green checkmark indicating a location (no text or symbols present)natural_image
Illustration of a hand using a seatbelt to lift a vehicle, with a red curved arrow indicating motion (no text or symbols)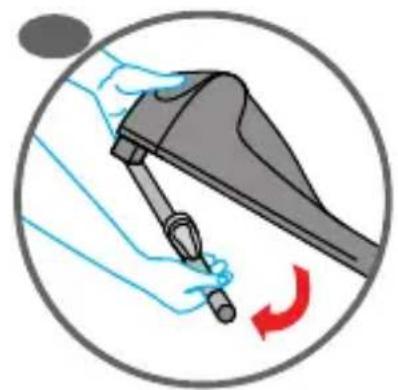
natural_image
Illustration of a hand holding a pen and a tool, with a red curved arrow indicating rotation (no text or symbols)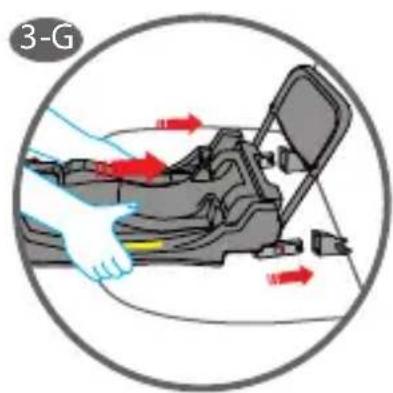

natural_image
Diagram of a medical or surgical device with a red X mark and a circular background, no readable text or symbols present.
natural_image
Diagram of a helmet with a green checkmark and red base, enclosed in a circular frame (no text or symbols)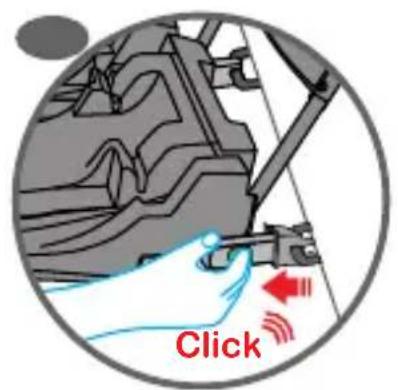

natural_image
Mechanical component diagram showing internal structure with red curved arrows indicating motion (no text or symbols)natural_image
Mechanical component diagram showing a cross-section with no visible text or symbols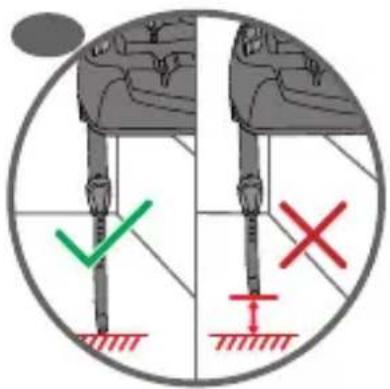

natural_image
Illustration of a car seatbelt with a green checkmark indicating a safety inspection (no text or symbols present)VEHICLE APPLICATION LIST
BASIX can only be installed on seats in vehicles indicated on this list. Please note that this list undergoes ongoing revision procedures, with changes and additions of vehicles accordingly. The up to date list can be consulted on our web site: www.foppapedretti.it
Semi-Universal approved to ECE-R44.04 for use in the vehicles listed in the vehicle application list.
INFORMATION
- Do not place the front support leg on a floor storage compartment lid, the floor storage compartment lidsupport leg make a full&firm contact withthe veichle chassis.
- Please consult with the vehicle manufacturer regarding access to ISOFIX points.
- Because of the vehicle seat position care must be taken to correctly attach the child restraint system to the ISOFIX points.
- Vehicle seat (mid row) must be adjusted forward.
- Adjust the vehicle seat so that the base front support leg does not make contact
with the floor storage compartment.
- Vehicle seat has to be fully adjusted to the rear most position.
DO NOT USE ON A PASSENGER SEAT WITH A FRONT AIRBAG
CHECK
WARNING: before purchasing, consult the vehicle Use and Maintenance Guide to ensure the ISOFIX anchor is present, as this could be an optional.
LISTE DER ZUGELASSENEN FAHRZEUGE
ПРИЛАГАЕМЫЙ СПИСОК АВТОМОБИЛЕЙ
| Since ISOFIX | ||||||
| ALFA ROMEO | ||||||
| 156 -156 Sport Wagon | 2004 NO | YES | NO | YESYES | ||
| 159 | 2005 NOYESNOYESYES | |||||
| 159 Wagon | 2006 NOYESNOYESYES | |||||
| GT | 2004 NOYESNOYESYES | |||||
| Brera | 2005 NOYESNOYESYES | |||||
| Mi.To | 2008 NOYESNOYESYES | |||||
| AUDI | ||||||
| A 2 (4 seats) | 2000 NO | YES | NO | YESYES | ||
| A 2 (5 seats) | 2000 NOYESNOYESYES | |||||
| A 3, S 3, (AB 1) | 1997 NOYESNOYESYES | |||||
| A3, (AB 2) | 2003 NOYESNOYESYES | |||||
| A 3, Sportback | 2004 NOYESNOYESYES | |||||
| A3 Cabrio | 2008 NOYESNOYESYES | |||||
| A 4, S 4, Limousine, Avant | 1998 NOYESNOYESYES | |||||
| A 4, S 4, Limousine, Avant | 2000 NOYESNOYESYES | |||||
| A 4, S 4,RS 4,Limousine,Avant | 2004 NOYESNOYESYES | |||||
| A4 Limousine | 2007 NOYESNOYESYES | |||||
| A4 Avant | 2008 NO | YES | NO | YESYES | ||
| A 4 Cabrio | 2002 NOYESNOYESYES | |||||
| S 4 Cabrio | 2003 NOYESNOYESYES | |||||
| A 4 Cabrio | 2005 NOYESNOYESYES | |||||
| S 4 Cabrio | 2004 NOYESNOYESYES | |||||
| A5 (2 doors) | 2007 NOYESNOYESYES | |||||
| A5 Cabrio | 2009 NOYESNOYESYES | |||||
| A5 Sportback | 2009 NOYESNOYESYES | |||||
| S5 | 2007 NOYESNOYESYESSince ISOFIX | |||||
| AUDI | ||||||
| A 6, Avant | 2001-2004 | NOYESNOYESYES | ||||
| A 6 Lim. | 2004 NO | YES | NO | YESYES | ||
| A 6 Avant, all road | 2005 NOYESNOYESYES | |||||
| A8 (4 doors) | 2005 NOYESNOYESYES | |||||
| Q5 | 2008 NOYESNOYESYES | |||||
| Q7 (5 doors) | 2006 NOYESNOYESYES | |||||
| RS4 Cabrio (3 doors) | 2006 NOYESNOYESYES | |||||
| S3 (3 doors) | 2003 NOYESNOYESYES | |||||
| S5 Cabrio | 2009 NOYESNOYESYES | |||||
| TT (3 doors) | 2006 NOYESNOYESYES | |||||
| BMW | ||||||
| 1 Series | 2004 NOYESNOYESYES | |||||
| 1 Series Coup | 2007 NO | YES | NO | YESYES | ||
| 1 Series Cabrio | 2008 NOYESNOYESYES | |||||
| 3 Series | 1998 NOYESNOYESCHECK | |||||
| 3 Series Cabrio | 2000 NOYESNOYESYES | |||||
| 3 Series Touring | 2008 NOYESNOYESYES | |||||
| X1 | 2009 NOYESNOYESYES | |||||
| X3 (5 doors) | 2004 NOYESNOYESYES | |||||
| X5 | 2006 NOYESNOYESYES | |||||
| X5 (5 doors) | 199-2006 NOYESNOYESYES | |||||
| X6 | 2008 NOYESNOYESYES | |||||
| 5 Series (5 doors) | 2004-2010 | NOYESNOYESYES | ||||
| 5 Series GT | 2010 NOYESNOYESYESSince ISC |  |  | 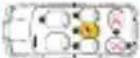 | 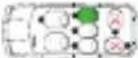 | |
| BMW | ||||||
| 5 Series Touring | 2004-2010 | NOYESNOYESYES | ||||
| 6 Series Coupe | 2003 NOYESNOYESYES | |||||
| 6 Series Cabrio | 2003 NOYESNOYESYES | |||||
| 7 Series | 2005 NOYESNOYESYES | |||||
| Mini Cooper | 2006 NOYESNOYESYES | |||||
| Mini Cooper Cabrio | 2006 NOYESNOYESNO | |||||
| Mini 2ND GEN. | 2006 NOYESNOYESYES | |||||
| Mini Club Man | 2007 NOYESNOYESYES | |||||
| CADILLAC | ||||||
| CTS | 2007 NOYESNOYESYES | |||||
| CHRYSLER | ||||||
| Voyager | 2001 NONONONO | |||||
| Grand voyager | 2006 NOYESNOYESYES | |||||
| PT Cruiser | 2000 NOYESYESYESYES | |||||
| 300 | 2004 NOYESNOYESYES | |||||
| 300C | 2008 NOYESNOYESYES | |||||
| Jeep Grand CH. | 2005 NOYESNOYESYES | |||||
| Crossfire | 2005 NOYESNOYESYES | |||||
| Viper | 2005 NOYESNOYESYES | |||||
| Sebring | 2007 NOYESNOYESYES | |||||
| Dodge Caliber | 2007 NOYESNOYESYES | |||||
| Dodge Nitro | 2007 NOYESNOYESYES | |||||
| Dodge Avenger | 2007 NOYESNOYESYES | |||||
| Dodge Dakota | 2007 NOYESNOYESYES | |||||
| Jeep Cherokee | 2002 NOYESNOYESYES | |||||
| Jeep Commander | 2006 NOYESNOYESYES | |||||
| CITROEN | ||||||
| BERLINGO | 2008 NOYESNOYESYES | |||||
| BERLINGO MULTI SPACE | 2009 NOYESYESYESYES | |||||
| C1 (5 doors, 4seater) | 2005 NOYESNOYESYES | |||||
| C2 | 2003 NOYESNOYESYES | |||||
| C 3 (5 doors) | 2002 NOYESNOYESYES | |||||
| C 3 Picasso | 2009 NOYESNOYESYES | |||||
| C4 (5 doors) | 2004 NOYESNOYESYES | |||||
| C4 Picasso | 2007 NOYESYESYESYES | |||||
| C4 Grand Picasso | 2006 NOYESYESYESYES | |||||
| C5 | 2008 NOYESNOYESYES | |||||
| C8 | 2003 NOYESNOYESYES | |||||
| C -Crosser | 2007 NOYESNOYESYES | |||||
| NEMO | 2007 NOYESNOYESYES | |||||
| DACIA | ||||||
| Logan MCV | 2005 NOYESNOYESYES | |||||
| Sandero | 2008 NOYESNOYESYES | |||||
| LOGAN PICK UP | 2008 NONONONONO | |||||
| DUSTER | 2010 NOYESNOYESYES | |||||
| DAIHATSU | ||||||
| Sirion | 2005 NOYESNOYESYES | |||||
| Cuore, Charade | 2005 NOYESNOYESYES | |||||
| Compact Wagon | 2006 NOYESNOYESYES | |||||
| Terios | 2006 NOYESNOYESYES | |||||
| Trevis | 2009 NOYESNOYESYES | |||||
| DAEWOO | ||||||
| Kalos | 2002 NOYESNOYESYES | |||||
| Cruze | 2009 NOYESNOYESYES | |||||
| Epica | 2006 NOYESNOYESYES | |||||
| Matiz | 2005 NOYESNOYESYES | |||||
| HHR | 2009 NOYESNOYESYES | |||||
| Lacetti | 2004 NOYESNOYESYES | |||||
| Nubira | 2004-2006 | NOYESNOYESYES | ||||
| Nubira Combi | 2004-2009 | NOYESNOYESYES | ||||
| FIAT | ||||||
| 500 (2007) | 2007 NOYESNOYESYES | |||||
| 500 CC | 2007 NOYESNOYESYES | |||||
| Punto 188 (3+5 D) | 2003-2007 | NOYESNOYESYES | ||||
| Punto EVO (5 doors) | 2009 NOYESNOYESYES | |||||
| Multipla | 2004-2007 | NOYESNOYESYES | ||||
| Panda | 2003 NOYESNOYESYES | |||||
| Sedici | 2006 NOYESNOYESYES | |||||
| Stilo (5 doors) | 2001-2007 | NOYESNOYESYES | ||||
| Idea (5 doors) | 2003-2007 | NOYESNOYESYES | ||||
| Ulysse | 2002 NOYESNOYESYES | |||||
| Croma (5 doors) | 2005 NOYESNOYESYES | |||||
| Croma Combi | 2008 NOYESNOYESYES | |||||
| Bravo | 2007 NOYESNOYESYES | |||||
| Doblo II | 2010 NOYESYESYESYES | |||||
| Fiorino Qubo | 2008 NOYESNOYESYES | |||||
| FORD | ||||||
| KA | 2009 NOYESNOYESYES | |||||
| Fiesta (3+5 Doors) | 2008 NOYESNOYESYES | |||||
| Fiesta (3 D,5 D,ST) | 2001 NONONONONO | |||||
| Focus C-MAX (5D) | 2003 NONONONONO | |||||
| Focus (5 doors) | 2008 NOYESNOYESYES | |||||
| Focus | 2005-2008 | NOYESNOYESYES | ||||
| Focus II CABRIO | 2004 NOYESNOYESYES | |||||
| Focus II COUPE | 2004 NOYESNOYESYES | |||||
| Focus ST (3 doors) | 2004 NOYESNOYESYES | |||||
| Fusion | 2005 NONONONONO | |||||
| Galaxy | 2006 NONONONONO | |||||
| Kuga | 2008 NONONONONO | |||||
| Maverick | 2000-2007 | NOYESNOYESYES | ||||
| Mondeo | 2000 NOYESNOYESCHECK | |||||
| Mondeo CD | 2007 NOYESNOYESYES | |||||
| Ranger Double Cab | 2007 NOYESNOYESYES | |||||
| S-MAX | 2006 NONONONONO | |||||
| Tourneo Connect | 2003 NOYESNOYESYES | |||||
| Tourneo Connect | 2009 NOYESNOYESYES | |||||
| HONDA | ||||||
| Accord Tourer | 2002-2008 | NOYESNOYESYES | ||||
| Accord 4-door and 5-door | 2008 NOYESNOYESYES | |||||
| CITY (4 doors) | 2009 NOYESNOYESYES | |||||
| Civic | 2006 NOYESNOYESYES | |||||
| CR-V | 2006 NOYESNOYESYES | |||||
| CR-V | 2001 NOYESNOYESYESSince ISC  | 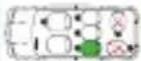 | 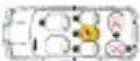 |  | ||
| HONDA | ||||||
| FR-V (6 seats) | 2004 YESYESNOYESYES | |||||
| Jazz | 2002 NONONONONO | |||||
| INSIGHT | 2009 NOYESNOYESYES | |||||
| HYUNDAI | ||||||
| ALTO VII | 2009 NOYESNOYESYES | |||||
| GETZ | 2002-2008 | NOYESNOYESYES | ||||
| i10 | 2008 NOYESNOYESYES | |||||
| i20 | 2009 NOYESNOYESYES | |||||
| i30 | 2007 NOYESNOYESYES | |||||
| i30CW | 2008 NOYESNOYESYES | |||||
| iX55 | 2009 NOYESNOYESYES | |||||
| Tiburon | 2005 NOYESNOYESYES | |||||
| Matrix | 2002 NOYESNOYESYES | |||||
| Elantra | 2002 NOYESNOYESYES | |||||
| Santa Fe Type SM | 2002 NOYESNOYESYES | |||||
| Santa Fe Type CM | 2006 NOYESNOYESYES | |||||
| Sonata i40 | 2008 NOYESNOYESYES | |||||
| Terracan | 2002 NOYESNOYESYES | |||||
| Tucson | 2001 NOYESNOYESYES | |||||
| XG 250, XG 300, XG 350 | 2002 NOYESNOYESYES | |||||
| H1 TRAVEL | 2008 NOYESNOYESYES | |||||
| INFINITY | ||||||
| P53B | 2008 NOYESNOYESYES | |||||
| P53C | 2008 NOYESNOYESYES | |||||
| D53A | 2008 NOYESNOYESYES | |||||
| L53A | 2008 NOYESNOYESYES | |||||
| Since ISC | | | 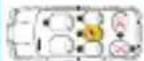 | | ||
| JAGUAR | ||||||
| S-Type | 2000 NOYESNOYESYES | |||||
| XJ-Type | 2003 NOYESNOYESYES | |||||
| X-Type | 2001 NOYESNOYESCHECK | |||||
| XJ-Type | 2010 NOYESNOYESYES | |||||
| JEEP | ||||||
| Wrangler | 2006 NOYESNOYES | |||||
| Commander | 2006 NOYESNOYESYES | |||||
| Grand Cherokee | 2006 NOYESNOYESYES | |||||
| CompassD | 2007 NOYESNOYESYES | |||||
| KIA | ||||||
| Carens | 2006 NOYESNOYESYES | |||||
| Carnival, Sedona, Typ UP | 2002 NOYESNOYESYES | |||||
| Carnival Typ VQ | 2005 NOYESNOYESYES | |||||
| Ceed | 2005 NOYESNOYESYES | |||||
| Ceed | 2006 NOYESNOYESYES | |||||
| Ceed SW | 2007 NOYESNOYESYES | |||||
| Proceed | 2008 NOYESNOYESYES | |||||
| Magentis, Optima Typ GE | 2002 NOYESNOYESYES | |||||
| Magentis Typ MG | 2006 NOYESNOYESYES | |||||
| Picanto | 2008 NOYESNOYESYES | |||||
| Rio | 2002 NOYESNOYESYES | |||||
| Opirus | 2003 NOYESNOYESYES | |||||
| Opirus FL | 2006 NOYESNOYESYES | |||||
| Sorento | 2003 NOYESNOYESYES | |||||
| Sorento FL | 2009 NOYESNOYESYES | |||||
| Sportage | 2004-2008 | NOYESNOYESYES | ||||
| LAND ROVER | ||||||
| Discovery | 2004 NOYESNOYESYES | |||||
| FRERLANDER 2 | 2007 NOYESNOYESYES | |||||
| Range Rover | 2002 NOYESNOYESYES | |||||
| Range Rover Sport | 2006 NOYESNOYESYES | |||||
| LANCIA | ||||||
| Musa | 2007 NOYESNOYESYES | |||||
| Phedra | 2004 NOYESNOYESYES | |||||
| YPSILON | 2007 NOYESNOYESYES | |||||
| Thesis | 2003 NOYESNOYESYES | |||||
| Delta | 2008 NOYESNOYESYES | |||||
| LEXUS | ||||||
| IS 200/300 | 2001 NOYESNOYESYES | |||||
| IS 250/220d | 2005 NOYESNOYESYES | |||||
| GS300/430/LS400 | 2005 NOYESNOYESYES | |||||
| LS460 | 2007 NOYESNOYESYES | |||||
| RX300/400h | 2003 NOYESNOYESYES | |||||
| RX 350 | 2006 NOYESNOYESYES | |||||
| LS 460 | 2007 NOYESNOYESYES | |||||
| IS-F | 2008 NOYESNOYESYES | |||||
| MAZDA | ||||||
| 2 | 2007 NOYESNOYESYES | |||||
| 2 (4 doors) | 2007 NOYESNOYESYES | |||||
| 2 (2 doors) | 2008 NOYESNOYESYES | |||||
| 3 | 2003 NOYESNOYESYES | |||||
| 3MPS | 2007 NOYESNOYESYES | |||||
| 323F | 2001 NOYESNOYESYES | |||||
| MAZDA | ||||||
| 5 | 2008 NOYESNOYESYES | |||||
| 6 | 2005 NOYESNOYESYES | |||||
| 6 Sedan | 2007 NOYESNOYESYES | |||||
| 6 Hatchback | 2007 NOYESNOYESYES | |||||
| 6 Kombi | 2007 NOYESNOYESYES | |||||
| Demio | 2003 NOYESNOYESYES | |||||
| MPV | 2002 NOYESNOYESYES | |||||
| Premacy | 2001 NOYESNOYESYES | |||||
| CX7 | 2007 NOYESNOYESYES | |||||
| RX8 | 2003 NOYESNOYESYES | |||||
| MX5 (TYP NB) | 1998-2005 | NONONONONO | ||||
| MASERATI | ||||||
| Grand Turismo | 2008 NOYESNOYESYES | |||||
| Quadroporte | 2007 NOYESNOYESYES | |||||
| MERCEDES | ||||||
| A-Class | 2004 NOYESNOYESCHECK | |||||
| B-Class | 2008 NOYESNOYESYES | |||||
| R | 2005 NOYESNOYESYES | |||||
| C-Class | 2000 NOYESNOYESYES | |||||
| C MODEL T | 2007 NOYESNOYESYES | |||||
| E-Class | 2003 NOYESNOYESYES | |||||
| E 300T/TD | 1985-2002 | NONONONONO | ||||
| E COUPE | 2009 NOYESNOYESYES | |||||
| E MODEL T | 2009 NOYESNOYESYES | |||||
| G | 2008 NOYESNOYESYES | |||||
| S-Class | 2002 NOYESNOYESYES | |||||
Since ISC  | |  | 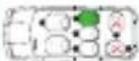 | |||
| MERCEDES | ||||||
| CLK | 2002 NONONONO | |||||
| CLK | 2009 NOYESNOYESYES | |||||
| M-Class | 2001 NOYESNOYESYES | |||||
| GL | 2007 NOYESNOYESYES | |||||
| GLK | 2008 NOYESNOYESYES | |||||
| CLS | 2008 NOYESNOYESYES | |||||
| ML | 1997 NOYESNOYESYES | |||||
| Vaneo | 2001-2005 | NOYESYESYESYES | ||||
| SL | 2001 NONONONO | |||||
| Vito | 2006 NOYESYESYESYES | |||||
| MITSUBISHI | ||||||
| Colt (5 doors) | 2005 NOYESNOYESYES | |||||
| Colt (3 doors) | 2004-2008 | NOYESNOYESYES | ||||
| Grandis | 2004 NOYESNOYESYES | |||||
| Lancer | 2007 NOYESNOYESYES | |||||
| OUTLANDER | 2006 NOYESNOYESYES | |||||
| Lancer/Evolution | 01/2004 NOYESNOYESYES | |||||
| Lancer SALOON | 02/2005 NOYESNOYESYES | |||||
| Lancer Sport back | 08/2008 NOYESNOYESYES | |||||
| L200 | 2006 NOYESNOYESYES | |||||
| Pajero V80 | 02/2007 NOYESNOYESYES | |||||
| NISSAN | ||||||
| Almera | 2001 NOYESNOYESYES | |||||
| Micra | 2000 NOYESNOYESYES | |||||
| Micra CC | 2005 NONONONO | |||||
| Primera Hatchback | 1999 NOYESNOYESYES | |||||
| NISSAN | ||||||
| Primera Sedan/Saloon | 1999 NOYESNOYESYES | |||||
| X-Trail | 2001 NOYESNOYESYES | |||||
| Murano | 2008 NOYESNOYESYES | |||||
| Pathfinder | 2007 NOYESNOYESYES | |||||
| Navara King Cab | 2005 NOYESNOYESYES | |||||
| Navara Double Cab | 2005 NOYESNOYESYES | |||||
| Navara | 2007 NOYESNOYESYES | |||||
| Patrol | 2006 NOYESNOYESYES | |||||
| Qashqai | 2007 NOYESNOYESYES | |||||
| Qashqai +2 | 2008 NOYESNOYESYES | |||||
| Tilda Hatchback | 2007 NOYESNOYESYES | |||||
| Tilda Sedan/Saloon | 2007 NONONONONO | |||||
| Note | 2006 NOYESNOYESYES | |||||
| Infiniti EX | 2008 NOYESNOYESYES | |||||
| Infiniti FX | 2008 NOYESNOYESYES | |||||
| Infiniti G Sedan | 2008 NOYESNOYESYES | |||||
| Infiniti | 2008 NOYESNOYESYES | |||||
| OPEL | ||||||
| Astra | 03/2004 NOYESNOYESYES | |||||
| Astra Twin Top | 2006 NOYESNOYESYES | |||||
| Astra Caravan | 09/2004 NOYESNOYESYES | |||||
| Astra GTC | 02/2005 NOYESNOYESYES | |||||
| Astra Cabrio IT | 02/2006 NOYESNOYESYES | |||||
| Corsa C | 2000-2006 NOYESNOYESYES | |||||
| Corsa (3+5 doors) | 09/2006 NOYESNOYESYES | |||||
| Corsa D (OPC) | 2006 NOYESNOYESYES | |||||
| Since ISOFIX | ||||||
| OPEL | ||||||
| Corsa D (5 doors) | 2006 NOYESNOYESYES | |||||
| Meriva A | 05/03-05/2010 | NOYESNOYESYES | ||||
| Meriva B | 2010 NOYESNOYESYES | |||||
| Agila | 09/2002 NOYESNOYESYES | |||||
| Insignia | 2008 NOYESNOYESYES | |||||
| Insignia ST | 2009 NOYESNOYESYES | |||||
| Agila | 03/2008 NOYESNOYESYES | |||||
| Zafira (5 doors) | 1999-2004 | NOYESNOYESYES | ||||
| Zafira B | 06/2005 NOYESNOYESYES | |||||
| Combo C | 09/2001 NOYESNOYESYES | |||||
| Vectra (4 doors) | 02/2002 NOYESNOYESYES | |||||
| Vectra C (5 doors) | 2003 NOYESNOYESYES | |||||
| Signum | 02/2003 NOYESNOYESYES | |||||
| Antara | 11/2006 NOYESNOYESYES | |||||
| PEUGEOT | ||||||
| 106 | 03/2000 NOYESNOYESYES | |||||
| 107 (2 doors) | 2005 NOYESNOYESYES | |||||
| 206 SW | 2002 NOYESNOYESYES | |||||
| 206 CC (convertible) | 2000/2007 | NONONONONO | ||||
| 207 (2 doors) | 2006 NOYESNOYESYES | |||||
| 207 (3+5 doors) | 2006 NOYESNOYESYES | |||||
| 207 CC | 2006 NONONONONO | |||||
| 207 SW | 2006 NOYESNOYESYES | |||||
| 307 | 2001 NOYESNOYESYESSince ISC |  |  | 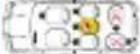 | 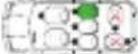 | |
| PEUGEOT | ||||||
| 307 SW | 2002 NOYESNOYESYES | |||||
| 307 SW (5 doors) | 2007 NOYESNOYESYES | |||||
| 307 CC | 2003/2007 | NOYESNOYESYES | ||||
| 308 | 2007 NOYESNOYESYES | |||||
| 308 CC | 2009 NOYESNOYESYES | |||||
| 308 SW | 2008 NOYESNOYESYES | |||||
| 308 Crossover | 2009 NOYESNOYESYES | |||||
| 407 | 2004 NOYESNOYESYES | |||||
| 406 Limousine | 04/2000 NOYESNOYESYES | |||||
| 4007 | 2007 NOYESNOYESYES | |||||
| 407 SW | 2004 NOYESNOYESYES | |||||
| 5008 | 09/2009 NOYESNOYES | |||||
| 607 | 04/2000 NOYESNOYESYES | |||||
| 807 | 2002 NOYESNOYESYES | |||||
| Partner (5 doors) | 1996 NOYESNOYESYES | |||||
| Partner Tepee | 2008 NOYESNOYESYES | |||||
| PONTIAC | ||||||
| GRAND AM (4 doors) | 1998/2004 | NOYESNOYESYES | ||||
| PORSCHE | ||||||
| CAYENNE | 2007 NOYESNOYESYES | |||||
| PANAMERA | 2009 NOYESNOYESYES | |||||
| RENAULT | ||||||
| CLIO | 1998/2005 | NOYESNOYESYES | ||||
| CLIO (4 doors) | 2005 NOYESNOYESYES | |||||
| CLIO (3 doors) | 1998/2005 | NOYESNOYESYES | ||||
| CLIO (4 doors) | 2008 NOYESNOYESYES | |||||
| RENAULT | ||||||
| CLIO GRANDTOUR | 2008 NOYESNOYESYES | |||||
| Espace | 2003 NOYESYESYESYES | |||||
| Grand Espace | 2002/2008 | NOYESYESYESYES | ||||
| Kangoo | 2008 NOYESNOYESYES | |||||
| Kangoo Be Top | 2009 NOYESNOYESYES | |||||
| KOLEOS | 2008 NONONONONO | |||||
| Laguna | 2001 NOYESNOYESYES | |||||
| Megane II | 2002/2008 | NOYESNOYESYES | ||||
| Megane III | 2008 NOYESNOYESYES | |||||
| Megane III Grandtour | 2009 NOYESNOYESYES | |||||
| Modus | 2008 NOYESNOYESYES | |||||
| Grande Modus | 2008 NOYESNOYESYES | |||||
| Scenic | 2003 NONONONONO | |||||
| Scenic | 2009 NOYESYESYESYES | |||||
| Grande Scenic | 2009 NONOYESNOYES | |||||
| Twingo I | 2003/2007 | NOYESNOYESYES | ||||
| Twingo II | 09/2007 NOYESNOYESYES | |||||
| Vel Satis | 2002 NOYESNOYESYES | |||||
| Vel Satis (5 doors) | 2002 NOYESNOYESYES | |||||
| SAAB | ||||||
| 9-3 | 2000 NOYESNOYESYES | |||||
| 9-5 | - NOYESNOYESCHECK | |||||
| SEAT | ||||||
| Altea Fr, Freetrack | 2004 NOYESNOYESYES | |||||
| Altea XL | 2006 NOYESNOYESYES | |||||
| Alhambra | 2000 NOYESNOYESYES | |||||
| Since ISC | | | | |||
| SEAT | ||||||
| Alhambra | 2001 NOYESYESYESYES | |||||
| EXEO | 2009 NOYESNOYESYES | |||||
| IBIZA | 2002 NOYESNOYESYES | |||||
| IBIZA 6J | 2008 NOYESNOYESYES | |||||
| LEON | 1999 NOYESNOYESYES | |||||
| Toledo | 1999 NOYESNOYESYES | |||||
| SKODA | ||||||
| FABIA | 1997/2001 | NONONONONO | ||||
| FABIA | 1999-12/2006 | NOYESNOYESYES | ||||
| FABIA II | 2007 NOYESNOYESYES | |||||
| Octavia | 2000 NOYESNOYESYES | |||||
| Octavia II | 2004 NOYESNOYESYES | |||||
| Octavia II | 2009 NOYESNOYESYES | |||||
| Oktavia II Estate | 2004 NOYESNOYESYES | |||||
| Roomster | 2006 NOYESNOYESYES | |||||
| Superb I | 2006/2008 | NOYESNOYESYES | ||||
| Superb II | 2008 NOYESNOYESYES | |||||
| YETI | 2009 NOYESNOYESYES | |||||
| SMART | ||||||
| Fourfour | 2004/2006 | NOYESNOYESYES | ||||
| Fortwo II | 2003 NONONONONO | |||||
| SUBARU | ||||||
| Forester III | 2008 NOYESNOYESYES | |||||
| IMPREZA | 2005 NOYESNOYESYES | |||||
| IMPREZA | 2007 NOYESNOYESYES | |||||
| Legacy Outback | 2002 NOYESNOYESYES | |||||
| Since ISOFIX | ||||||
| SUBARU | ||||||
| Legacy | 2007 NOYESNOYESYES | |||||
| Outback | 2007 NOYESNOYESYES | |||||
| Tribecca | 2006 NOYESNOYESYES | |||||
| SUZUKI | ||||||
| Grand Vitara | 2002 NOYESNOYESYES | |||||
| IGNIS | 2001 NOYESNOYESYES | |||||
| LIANA | 2004/2007 | NOYESNOYESYES | ||||
| Swift 4th Gen. | 2005 NOYESNOYESYES | |||||
| Splash | 2007 NOYESNOYESYES | |||||
| SX 4 | 2006 NOYESNOYESYES | |||||
| TOYOTA | ||||||
| Auris (5 doors) | 2007 NOYESNOYESYES | |||||
| Avensis (5 doors) | 2003 NOYESNOYESYES | |||||
| Avensis | 2009 NOYESNOYESYES | |||||
| Avensis Verso | 2001 NOYESNOYESYES | |||||
| Aygo (5 doors) | 2005 NOYESNOYESYES | |||||
| Corolla Combi | 2000 NOYESNOYESYES | |||||
| Corolla (5 doors) | 2002 NOYESNOYESYES | |||||
| Corolla Verso | 2004 NOYESNOYESYES | |||||
| IQ | 2009 NOYESNOYESYES | |||||
| Land Cruiser | 2002 NOYESNOYESYES | |||||
| Previa | 2000 NOYESNOYESYES | |||||
| Prius | 2003 NOYESNOYESYES | |||||
| Rav 4 (5 doors) | 2006 NOYESNOYESYES | |||||
| Urban Cruiser | 2009 NONONOYESYES | |||||
| Yaris | 1999/2005 | NOYESNOYESYES | ||||
| Yaris 2nd Gen. | 2006 NOYESNOYESYES | |||||
| Since ISC | | |  | |||
| VOLVO | ||||||
| C 30 | 2006 NOYESNOYESYES | |||||
| C 70 | 2005 NOYESNOYESYES | |||||
| CX 70 | 2007 NOYESNOYESYES | |||||
| S 40 | 2003/2007 | NOYESNOYESYES | ||||
| S 80 | 2002 NOYESNOYESYES | |||||
| S 80 (TYP AS) | 2009 NOYESNOYESYES | |||||
| V 40 | 2004 NOYESNOYESYES | |||||
| V 50 | 2004 NOYESNOYESYES | |||||
| V 70 | 2000 NOYESNOYESYES | |||||
| V 70 Combi | 2000 NOYESNOYESYES | |||||
| XC 60 | 2008 NOYESNOYESYES | |||||
| XC 70 | 2000 NOYESNOYESYES | |||||
| XC90 (5+7 Seats) | 2002 NOYESNOYESYES | |||||
| VW | ||||||
| BORA | 1999/2005 | NOYESNOYESYES | ||||
| Caddy Life | 2004 NOYESNOYESYES | |||||
| EOS | 2006 NOYESNOYESYES | |||||
| FOX | 2005 NOYESNOYESYES | |||||
| Golf III Cabrio | 1998/2001 | NONONONONO | ||||
| Golf V Plus | 2006 NOYESNOYESYES | |||||
| Golf IV Variant | 1996/2006 | NOYESNOYESYES | ||||
| Golf V (3+5 doors) | 2003 NOYESNOYESYES | |||||
| Golf V (R32) | 2005 NOYESNOYESYES | |||||
| Golf V GTI (5 doors) | 2006 NOYESNOYESYES | |||||
| Golf V Variant | 2007 NOYESNOYESYES | |||||
| Golf VI | 2008 NOYESNOYESYES | |||||
| Since ISC |  |  |  |  | ||
| VW | ||||||
| Golf VI Plus | 2009 NOYESNOYESYES | |||||
| Golf VI Variant | 2009 NOYESNOYESYES | |||||
| Jetta V | 2005 NOYESNOYESYES | |||||
| New Beattle | 1998 NOYESNOYESYES | |||||
| New Beattle Cabrio | 2002 NOYESNOYESYES | |||||
| Passat | 1998 NOYESNOYESYES | |||||
| Passat Variant | 2005 NOYESNOYESYES | |||||
| Passat CC | 2008 NOYESNOYESYES | |||||
| Phaeton | 2002 NOYESNOYESYES | |||||
| Polo III Variant | 1999/2001 | NOYESNOYESYES | ||||
| Polo IV | 2001/2005 | NOYESNOYESYES | ||||
| Polo (3+5 doors) | 2005 NOYESNOYESYES | |||||
| Polo Cross | 2006 NOYESNOYESYES | |||||
| Polo V | 2009 NOYESNOYESYES | |||||
| Scirocco III | 2008 NOYESNOYESYES | |||||
| Sharan | 1998 NOYESYESYESYES | |||||
| Tiguan | 2007 NOYESNOYESYES | |||||
| Touareg | 2007 NOYESNOYESYES | |||||
- WARNING
- Notice
- Use in the car
- DANGER!
- Possible seating positions
- Installation in the vehicle
- For the safety of your child
- For the safety of the passengers
- Fastening the infant carrier using the ISOFIX base
- Make sure that your vehicle has ISOFIX anchor points and is approved in the vehicle application list which is supplied with the base.
- Adjusting the support leg
- Locking the infant carrier
- REMOVAL OF THE INFANT CARRIER AND ISOFIX BASE
- Removal the infant carrier
- Removal the ISOFIX base
- Fitting your infant carrier with ISOFIX base correctly
- For the safety of your child make sure that...
- Maintenance
- For effective protection
- Cleaning
- It is strictly forbidden to use the car seat without the cover.
- FORMAL GUARANTEE
- EXCLUSIONS TO THE FORMAL GUARANTEE.
- Positions assises possibles
- EXCLUSIONS DE LA GARANTIE CONVENTIONNELLE.
- VEHICLE APPLICATION LIST
- INFORMATION
- CHECK
- LISTE DER ZUGELASSENEN FAHRZEUGE
- ПРИЛАГАЕМЫЙ СПИСОК АВТОМОБИЛЕЙ
Brand : Foppapedretti
Model : Basix
Category : Car seat