CCBC 301 - Battery charger EINHELL - Free user manual and instructions
Find the device manual for free CCBC 301 EINHELL in PDF.
| Product Type | Battery Charger |
| Brand | Einhell |
| Model | CCBC 301 |
| Input Voltage | 230 V ~ 50 Hz |
| Rated Input Current | 2.3 A |
| Rated Power Consumption | 430 W |
| Output Voltages | 6 V, 12 V, 24 V DC |
| Max Rated Output Current (6 V) | 21 A arithmetical / 30 A effective |
| Max Rated Output Current (12 V) | 20 A arithmetical / 30 A effective |
| Max Rated Output Current (24 V) | 14 A arithmetical / 20 A effective |
| Compatible Battery Capacity | 6 V: 5-400 Ah, 12 V: 3-400 Ah, 24 V: 4-400 Ah |
| Max Starting Aid Current | 80 A arithmetical / 100 A effective |
| Compatible Battery Type | Lead-acid with maintenance (not gel/AGM) |
| Protection | Overload switch, 50 A blade fuse |
| Functions | Battery charging, starting aid |
| Maintenance and cleaning | Clean with a damp cloth and mild soap; store in a dry place |
| Safety | Disconnect before cleaning; do not use outdoors; keep away from flames |
| Spare parts and repairability | Parts available via ISC GmbH; replaceable fuse |
| General information | 24-month warranty, household use only |
Frequently Asked Questions - CCBC 301 EINHELL
User questions about CCBC 301 EINHELL
0 question about this device. Answer the ones you know or ask your own.
Ask a new question about this device
Download the instructions for your Battery charger in PDF format for free! Find your manual CCBC 301 - EINHELL and take your electronic device back in hand. On this page are published all the documents necessary for the use of your device. CCBC 301 by EINHELL.
USER MANUAL CCBC 301 EINHELL
When using the equipment, a few safety precautions must be observed to avoid injuries and damage. Please read the complete operating instructions and safety regulations with due care. Keep this manual in a safe place, so that the information is available at all times. If you give the equipment to any other person, hand over these operating instructions and safety regulations as well. We cannot accept any liability for damage or accidents which arise due to a failure to follow these instructions and the safety instructions.
1. Safety regulations
The corresponding safety information can be found in the enclosed booklet.
Danger!
Read all safety regulations and instructions. Any errors made in following the safety regulations and instructions may result in an electric shock, fire and/or serious injury.
Keep all safety regulations and instructions in a safe place for future use.
This equipment can be used by children of 8 years and older and by people with limited physical, sensory or mental capacities or those with no experience and knowledge if they are supervised or have received instruction in how to use the equipment safely and understand the dangers which result from such use. Children are not allowed to play with the equipment. Unless supervised, children are not allowed to clean the equipment and carry out user-level maintenance work.
Waste disposal
Batteries: Only dispose of these items through motor vehicle workshops, special collection points or special waste collection points. Ask your local council.
2. Layout and items supplied
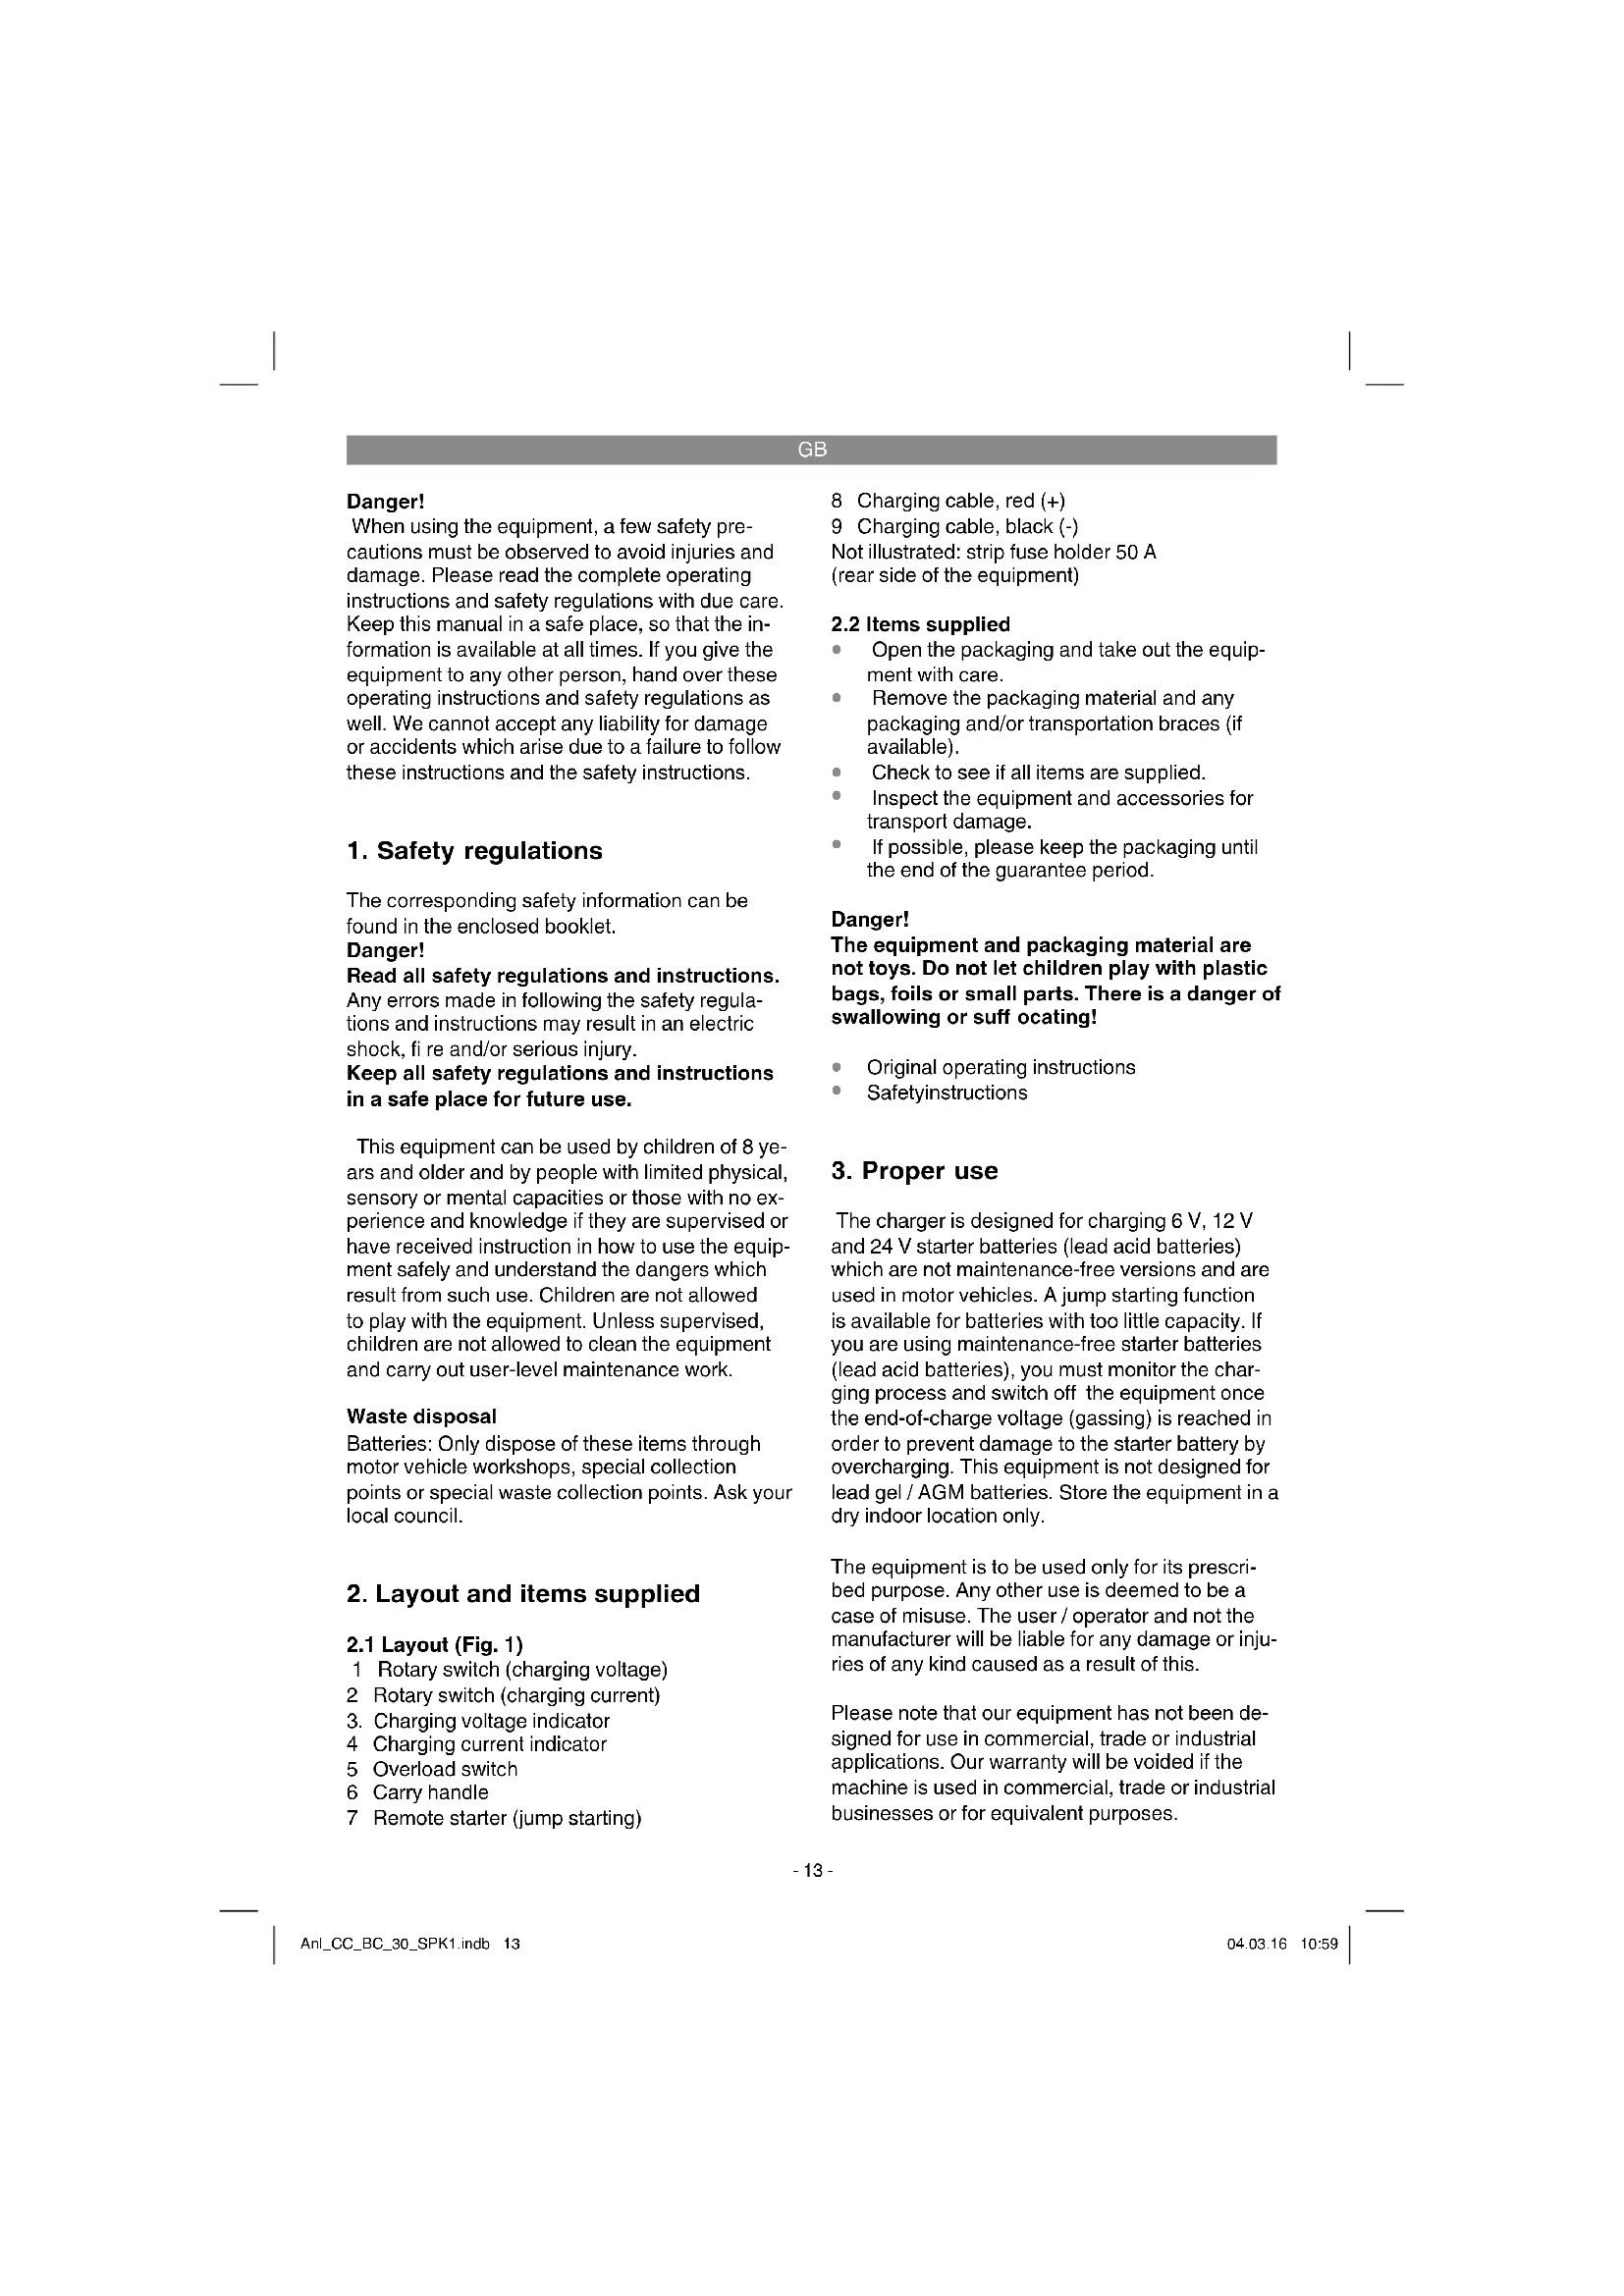
2.1 Layout (Fig. 1)
1 Rotary switch (charging voltage)
2 Rotary switch (charging current)
3. Charging voltage indicator
4 Charging current indicator
5 Overload switch
6 Carry handle
7 Remote starter (jump starting)
8 Charging cable, red (+)
9 Charging cable, black (-)
Not illustrated: strip fuse holder 50 A (rear side of the equipment)
2.2 Items supplied
- Open the packaging and take out the equipment with care.
- Remove the packaging material and any packaging and/or transportation braces (if available).
Check to see if all items are supplied. - Inspect the equipment and accessories for transport damage.
If possible, please keep the packaging until the end of the guarantee period.
Danger!
The equipment and packaging material are not toys. Do not let children play with plastic bags, foils or small parts. There is a danger of swallowing or suffocating!
- Original operating instructions
- Safetyinstructions
3. Proper use
The charger is designed for charging 6 V, 12 V and 24 V starter batteries (lead acid batteries) which are not maintenance-free versions and are used in motor vehicles. A jump starting function is available for batteries with too little capacity. If you are using maintenance-free starter batteries (lead acid batteries), you must monitor the charging process and switch off the equipment once the end-of-charge voltage (gassing) is reached in order to prevent damage to the starter battery by overcharging. This equipment is not designed for lead gel / AGM batteries. Store the equipment in a dry indoor location only.
The equipment is to be used only for its prescribed purpose. Any other use is deemed to be a case of misuse. The user / operator and not the manufacturer will be liable for any damage or injuries of any kind caused as a result of this.
Please note that our equipment has not been designed for use in commercial, trade or industrial applications. Our warranty will be voided if the machine is used in commercial, trade or industrial businesses or for equivalent purposes.
GB
4. Technical data
Mains voltage: 230V 50 Hz
Rated input current 2.3 A
Power rating: 430 W
| Ratedout- put voltage | 6 V d.c. 12 | V d.c 24 V d | c. |
| Rated output current min | 0,7 A arith. 0,9 A eff . | 1,0 A arith. 1,6 A eff . | 1,8 A arith. 3,0 A eff . |
| Rated output current max. | 21 A arith. 30 A eff . | 20 A arith. 30 A eff . | 14 A arith. 20 A eff . |
| Battery capacity | 5-400 Ah 3 | 400 Ah 4-400 | Ah |
| Jumpstar- ting current max. | 80 A arith. 100 A eff . | 80 A arith. 100 A eff . | 80 A arith. 100 A eff . |
Minimum battery capacity setting 1-6
| 1 | 2 | 3 | 4 | |||
| 6 V | 5 Ah | 7 Ah | 10 Ah | 25 Ah | 70 Ah | 150 Ah |
| 12 V | 3 Ah | 5 Ah | 7 Ah | 18 Ah | 45 Ah | 80 Ah |
| 24 V | 4 Ah | 5 Ah | 7 Ah | 15 Ah | 33 Ah | 50 Ah |
5. Before starting the equipment
The jump starting function provides welcome help with starting difficulties due to too little battery capacity.
Most motor vehicle manufacturers recommend that the battery should be disconnected from the vehicle's electrical system before being charged. We would like to point out that even standard vehicles are fitted with a whole host of electronic equipment (such as ABS, ASR, injection pump and on-board computer). Any voltage peaks that occur may cause defects in these electronic modules. Therefore the battery should be disconnected from the electrical system before being charged.
Please also refer to the instructions in the owner's manuals for the car, radio, navigation system, etc.
Charging for 10 minutes at the highest charge setting is usually sufficient for starting a vehicle without jump starting.
5.1 Charging the battery:
- Release or remove the battery stoppers (if fitted) from the battery.
- Check the acid level in the battery. If necessary, top up the battery with distilled water (if possible). Important. Battery acid is aggressive. Rinse off any acid splashes thoroughly with lots of water and seek medical advice if necessary.
- Select the charging voltage. Pay particular attention to the voltage details on the battery you wish to charge. Select the charging current (amps) according to numbers 1 (lowest charging current) to 6 (highest charging current). Note the minimum capacity of the battery in section 4. Technical data.
- First connect the red charging cable to the positive pole of the battery.
- Then connect the black charging cable to the bodywork of the vehicle away from the battery and the petrol pipe.
- Warning! Under normal circumstances the negative battery pole is connected to the bodywork and you proceed. In exceptional cases it is possible that the positive battery pole is connected to the bodywork (positive earthing). In this case connect the black charging cable to the negative pole on the battery. Then connect the red charging cable at a point away from the battery and the petrol pipe.
After the battery has been connected to the charger, you can connect the charger to a socket supplying 230V - 50Hz . Do not connect it to a socket that supplies any other mains voltage. Important. Charging may create dangerous explosive gas and therefore you should avoid spark formation and naked flames whilst the battery is charging. There is a risk of explosion!
Calculating the charging time
The charging time depends on the charge status of the battery. If the battery is fully discharged, the approximate charging time can be calculated using the following formula:
Battery capacity in Ah Charging time/h = Amp. (arithmetic charging current)
GB
24 Ah
Example = - = 9,6h .
2.5A
A high initial current, approximately equal to the rated current will flow in a normally discharged battery. As the charging time increases, the charging current will fall.
Old batteries for which the charging current does not fall are suffering from a defect, such as a cell short circuit or ageing damage.
The charging current should be 1/10 to 1/6 of the battery capacity.
Important! Do not exceed the charging time.
After the end of the charging time pull the plug out of the socket and disconnect the charger from the battery.
A high charge can only be identified by measuring the acid density using an acid tester. Note! Gases are released during the charging process (bubbles will form on the surface of the battery fluid). It is essential that you ventilate the rooms well.
Acid density values (kg/l at 20°C)
1.28 Battery charged
1.21 Battery semi-charged
1.16 Battery discharged
5.2 Finishing charging the battery
- When charging is completed, turn the charging voltage switch to "0".
Pull the plug out of the socket. - First disconnect the black charging cable from the bodywork.
- Then release the red charging cable from the positive pole on the battery.
- Important! In case of positive earthing, first disconnect the red charging cable from the bodywork and then the black charging cable from the battery.
- Screw or push the battery stoppers back into position (if there are any).
5.3 Jump starting function
6-24V 80 A arithm./100A eff.
- Set the battery voltage (6V / 12V or 24V)
- Move the current setting switch to setting 6. (Fig. 3).
- Pre-charge the battery for 5-10 minutes as described in point 5.1 "Charging the battery".
- Press the pushbutton of the remote starting device and simultaneously start the vehicle
(Figure 4).
The overload switch switches off the equipment after a short time. If starting has failed, you can press the button of the overload switch back in again after approx. 3 minutes and repeat the starting operation. Starting is easier if the battery is charged at the highest charge setting for approx. 10 minutes prior to starting.
After you have finished jump starting, place the device out of operation as described in 5.2.
6. Overload cut-out
Fig. 5:
The integral overload switch protects the device from overloads and short circuits. When the overload switch trips, its pushbutton will jump further outwards; after a brief cooling break of approx. 5 minutes it can be pushed in again. The thermal cut-out wound into the transformer protects the equipment from overheating.
Fig. 6:
The strip fuse on the rear side of the equipment protects the equipment from short circuits and polarity reversal. Changing the strip fuse: Use a fuse with the same ampere value.
Note:
In the case of fl at batteries, an overload switch may trip at the upper charge settings in particular when the mains voltage is excessively high. In this case it makes sense to pre-charge the battery at a low charge setting (if available) for a short time until the overload cut-out holds.
7. Maintenance and care of the battery
- Ensure that your battery is always fitted securely.
A perfect connection to the cable network of the electrical system must be ensured at all times. - Keep the battery clean and dry. Apply a thin coating of grease to the connection terminals using an acid-free, acid-resistant grease (Vaseline).
- Check the level of the acid in batteries that are not maintenance-free versions approximately every 4 weeks and top up with distilled
GB
water if necessary.
8. Cleaning, maintenance and ordering of spare parts
be taken to a suitable collection center for proper disposal. If you do not know the whereabouts of such a collection point, you should ask in your local council offices.
Danger!
Always pull out the mains power plug before starting any cleaning work.
8.1 Cleaning
- Keep all safety devices, air vents and the motor housing free of dirt and dust as far as possible. Wipe the equipment with a clean cloth or blow it with compressed air at low pressure.
We recommend that you clean the device immediately each time you have finished using it.
Clean the equipment regularly with a moist cloth and some soft soap. Do not use cleaning agents or solvents; these could attack the plastic parts of the equipment. Ensure that no water can seep into the device. The ingress of water into an electric tool increases the risk of an electric shock.
The charger should be placed in a dry room for storage. Any corrosion must be cleaned off the charging terminals.
8.2 Maintenance
There are no parts inside the equipment which require additional maintenance.
8.3 Ordering replacement parts:
Please quote the following data when ordering replacement parts:
Type of machine
Article number of the machine
Identification number of the machine
- Replacement part number of the part required
For our latest prices and information please go to www.isc-gmbh.info
9. Disposal and recycling
The equipment is supplied in packaging to prevent it from being damaged in transit. The raw materials in this packaging can be reused or recycled. The equipment and its accessories are made of various types of material, such as metal and plastic. Never place defective equipment in your household refuse. The equipment should
GB
10. Troubleshooting
If the equipment is operated properly you should experience no problems with malfunctions or faults. In the event of any malfunctions or faults, please check the following before you contact your customer services.
| Fault Possible cause Remedy | ||
| Overloadcut-out trips | - Charger clamps connected incorrectly | - Connect the red clamp to the positive pole and the back clamp to the bodywork |
| - Contact between the charger clamps | - Prevent contact | |
| - Battery highly discharged | - Select a lower charging current | |
| - Battery defective | - Have the battery checked by an expert and replace it if necessary | |
| Charging current indicators does not work | - Poor contact between the charger clamps and battery poles | - Clean the contacts and charger clamps |
| - Battery defective | - Have the battery checked by an expert and replace it if necessary | |
| - Defective charging current indicator | - Check the function of the equipment using a different battery | |
GB

For EU countries only
Never place any electric power tools in your household refuse.
To comply with European Directive 2012/19/EC concerning old electric and electronic equipment and its implementation in national laws, old electric power tools have to be separated from other waste and disposed of in an environment-friendly fashion, e.g. by taking to a recycling depot.
Recycling alternative to the return request:
As an alternative to returning the equipment to the manufacturer, the owner of the electrical equipment must make sure that the equipment is properly disposed of if he no longer wants to keep the equipment. The old equipment can be returned to a suitable collection point that will dispose of the equipment in accordance with the national recycling and waste disposal regulations. This does not apply to any accessories or aids without electrical components supplied with the old equipment.
The reprinting or reproduction by any other means, in whole or in part, of documentation and papers accompanying products is permitted only with the express consent of the iSC GmbH.
Subject to technical changes
GB
Warranty certificate
Dear Customer,
All of our products undergo strict quality checks to ensure that they reach you in perfect condition. In the unlikely event that your device develops a fault, please contact our service department at the address shown on this guarantee card. You can also contact us by telephone using the service number shown. Please note the following terms under which guarantee claims can be made:
- These guarantee terms apply to consumers only, i.e. natural persons intending to use this product neither for their commercial activities nor for any other self-employed activities. These warranty terms regulate additional warranty services, which the manufacturer mentioned below promises to buyers of its new products in addition to their statutory rights of guarantee. Your statutory guarantee claims are not affected by this guarantee. Our guarantee is free of charge to you.
- The warranty services cover only defects due to material or manufacturing faults on a product which you have bought from the manufacturer mentioned below and are limited to either the rectification of said defects on the product or the replacement of the product, whichever we prefer. Please note that our devices are not designed for use in commercial, trade or professional applications. A guarantee contract will not be created if the device has been used by commercial, trade or industrial business or has been exposed to similar stresses during the guarantee period.
-
The following are not covered by our guarantee:
-
Damage to the device caused by a failure to follow the assembly instructions or due to incorrect installation, a failure to follow the operating instructions (for example connecting it to an incorrect mains voltage or current type) or a failure to follow the maintenance and safety instructions or by exposing the device to abnormal environmental conditions or by lack of care and maintenance.
- Damage to the device caused by abuse or incorrect use (for example overloading the device or the use or unapproved tools or accessories), ingress of foreign bodies into the device (such as sand, stones or dust, transport damage), the use of force or damage caused by external forces (for example by dropping it).
-
Damage to the device or parts of the device caused by normal or natural wear or tear or by normal use of the device.
-
The guarantee is valid for a period of 24 months starting from the purchase date of the device. Guarantee claims should be submitted before the end of the guarantee period within two weeks of the defect being noticed. No guarantee claims will be accepted after the end of the guarantee period. The original guarantee period remains applicable to the device even if repairs are carried out or parts are replaced. In such cases, the work performed or parts fitted will not result in an extension of the guarantee period, and no new guarantee will become active for the work performed or parts fitted. This also applies if an on-site service is used.
-
To make a claim under the guarantee, please register the defective device at: www.isc-gmbh.info. Please keep your bill of purchase or other proof of purchase for the new device. Devices that are returned without proof of purchase or without a rating plate shall not be covered by the guarantee, because appropriate identification will not be possible. If the defect is covered by our guarantee, then the item in question will either be repaired immediately and returned to you or we will send you a new replacement.
Of course, we are also happy offer a chargeable repair service for any defects which are not covered by the scope of this guarantee or for units which are no longer covered. To take advantage of this service, please send the device to our service address.
Also refer to the restrictions of this warranty concerning wear parts, consumables and missing parts as set out in the service information in these operating instructions.
F
Danger!
Chere cliente, cher client,
(apparatets bagside)
2.2 Leveringsomfang
GB explains the following conformity according to EU directives and norms for the following product
□90/396/EC_2009/142/EC
89/686/EC_96/58/EC
2011/65/EU
2006/42/EC
Annex IV
Notified Body: Notified Body
Noitiae Body No.: Reg.No.:
2000/14/EC_2005/88/EC
Annex V
Annex VI
Noise: measured LPA = dB (A); guaranteed LPA = dB (A)
P = KW; L/0 = cm
Notified Body:
2004/26/EC
Emission No.:
Standard references: EN 60335-1; EN 60335-2-29; EN 62233; EN 55014-1; EN 55014-2; EN 61000-3-2; EN 61000-3-3
Subject to change without notice
Archive-File/Record: NAPR013450
Documents registrar: Landauer Josef
Wiesenweg 22, D-94405 Landau/Isar

EH 03/2016 (01)