
Sysrock BR 10 - Radio FESTOOL - Free user manual and instructions
Find the device manual for free Sysrock BR 10 FESTOOL in PDF.
| Product type | DAB+/FM radio with Bluetooth |
| Brand | Festool |
| Model | Sysrock BR 10 |
| Dimensions (W x H x D) | 100 x 150 x 105 mm |
| Weight (without external battery) | 0.7 kg |
| Power supply | Mains adapter 19 V / 1.2 A or Festool battery 10.8-18 V (recommended 18 V) |
| FM frequency range | 87.50 - 108 MHz |
| DAB frequency range | 174.928 - 239.200 MHz |
| Bluetooth | Version 4.1 EDR, profiles HFP, A2DP, AVRCP, range up to 10 m |
| Output power | 10 W (3% THD) at 19 V |
| Speaker | 2.5" 8 Ω x1 |
| Auxiliary input | 3.5 mm jack (AUX IN) |
| USB port | 5 V / 1.2 A for smartphone charging |
| Station presets | 4 (DAB/FM) |
| Display | Screen with station info, time, battery level |
| Hands-free kit | Built-in microphone and Bluetooth call button |
| Operating temperature | -10 °C to +45 °C |
| Antenna | Adjustable telescopic antenna |
| Mounting | Foldable handle for hanging, tripod thread UNC 1/4"-20 |
| Maintenance | Clean with a soft dry cloth; do not use solvents |
| Safety | Do not expose to water, do not open the casing, unplug during storms |
| Spare parts | Use only original Festool parts |
| Warranty | Warranty void if casing opened or unauthorized modification |
Frequently Asked Questions - Sysrock BR 10 FESTOOL
User questions about Sysrock BR 10 FESTOOL
0 question about this device. Answer the ones you know or ask your own.
Ask a new question about this device
Download the instructions for your Radio in PDF format for free! Find your manual Sysrock BR 10 - FESTOOL and take your electronic device back in hand. On this page are published all the documents necessary for the use of your device. Sysrock BR 10 by FESTOOL.
USER MANUAL Sysrock BR 10 FESTOOL
natural_image
Illustration of a portable electronic device with control panel and display (no visible text or symbols)Festool GmbH
Wertstraße 20
73240 Wendlingen
Germany
+49 (0)70 24/804-0
www.festool.com 10472417_C / 2022-06-01


1
2A


2B

1 Symbole

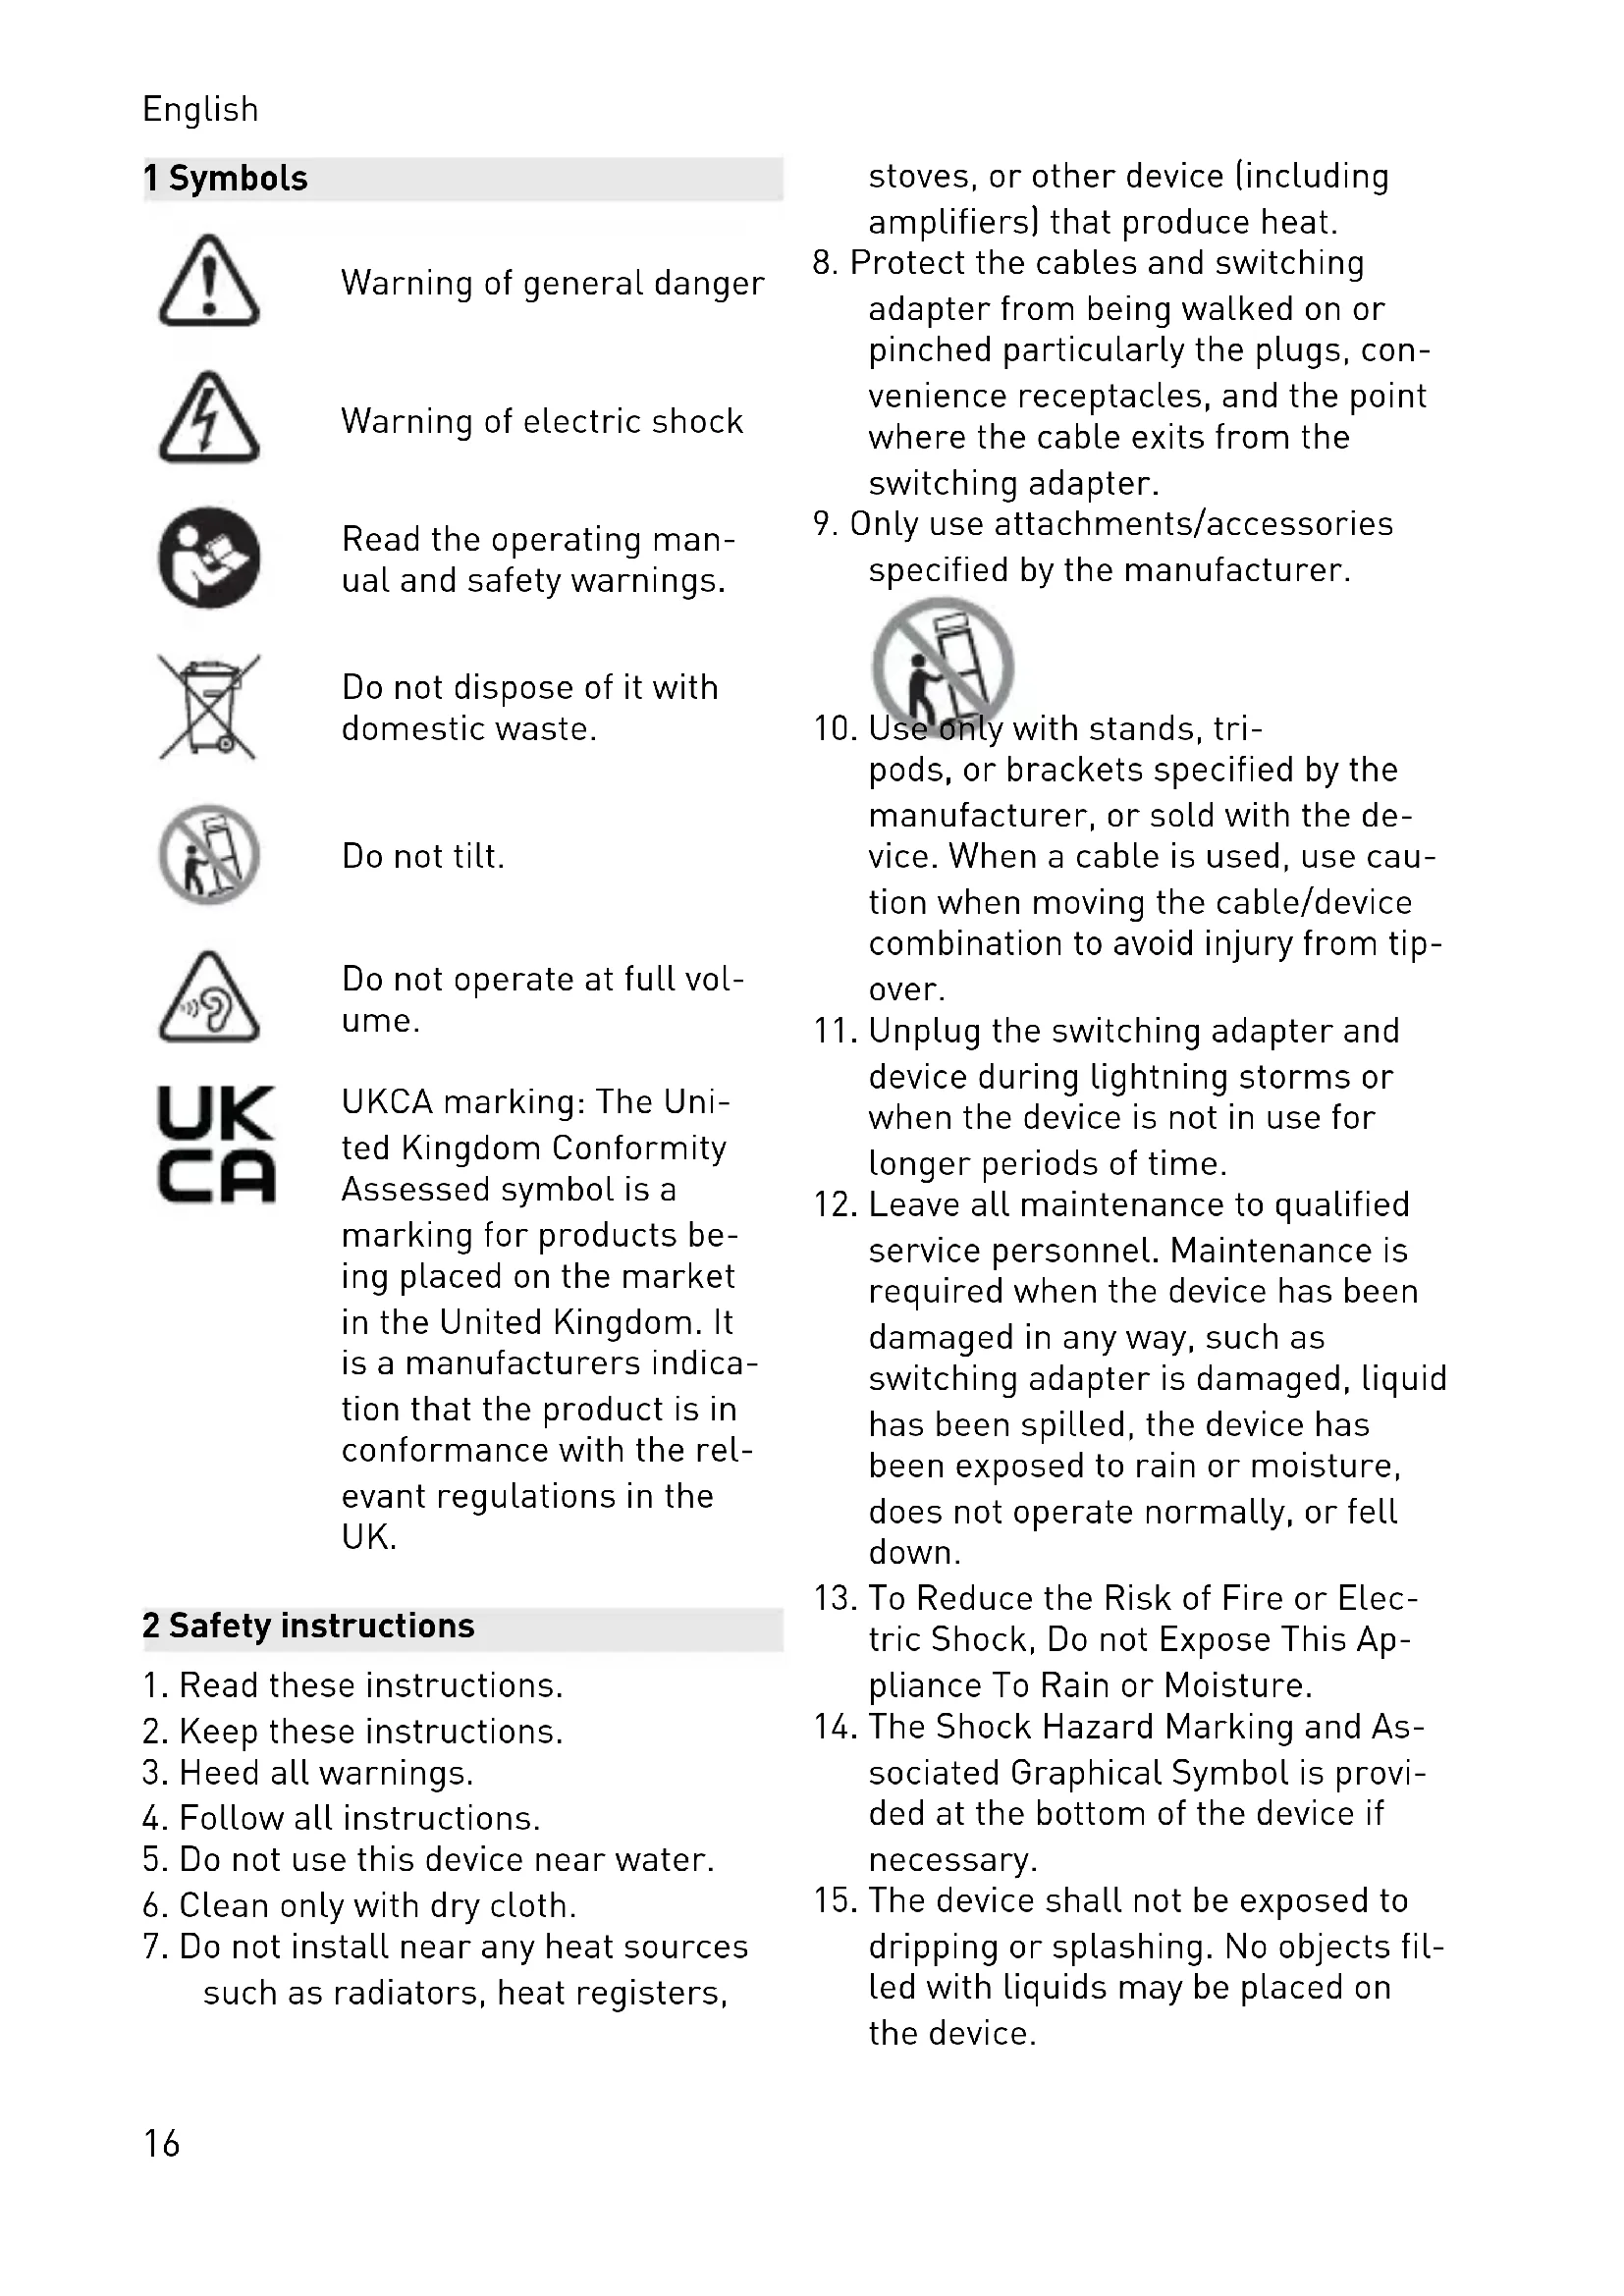
Warning of general danger
Warning of electric shock

Read the operating manual and safety warnings.
Do not dispose of it with domestic waste.

Do not tilt.
Do not operate at full volume.

UKCA marking: The United Kingdom Conformity Assessed symbol is a marking for products being placed on the market in the United Kingdom. It is a manufacturers indication that the product is in conformance with the relevant regulations in the UK.
2 Safety instructions
- Read these instructions.
- Keep these instructions.
- Heed all warnings.
- Follow all instructions.
- Do not use this device near water.
- Clean only with dry cloth.
- Do not install near any heat sources such as radiators, heat registers,
stoves, or other device (including amplifiers) that produce heat.
- Protect the cables and switching adapter from being walked on or pinched particularly the plugs, convenience receptacles, and the point where the cable exits from the switching adapter.
- Only use attachments/accessories specified by the manufacturer.

-
Use only with stands, tri-pods, or brackets specified by the manufacturer, or sold with the device. When a cable is used, use caution when moving the cable/device combination to avoid injury from tip-over.
-
Unplug the switching adapter and device during lightning storms or when the device is not in use for longer periods of time.
-
Leave all maintenance to qualified service personnel. Maintenance is required when the device has been damaged in any way, such as switching adapter is damaged, liquid has been spilled, the device has been exposed to rain or moisture, does not operate normally, or fell down.
-
To Reduce the Risk of Fire or Electric Shock, Do not Expose This Appliance To Rain or Moisture.
-
The Shock Hazard Marking and Associated Graphical Symbol is provided at the bottom of the device if necessary.
-
The device shall not be exposed to dripping or splashing. No objects filled with liquids may be placed on the device.
-
The switching adapter should not be removed far from the radio, and remain easily accessible so that during an emergency, the power source can be easily removed.
- Where the MAINS plug or an appliance coupler is used as the disconnect device, the disconnected device shall remain readily operable.
- The battery pack shall not be exposed to excessive heat such as direct sunlight, fire etc.
For more information read the safety instructions provided with your battery pack.
- To prevent possible hearing loss, do not listen at high volume levels for extended periods of time periods.
CAUTION: To reduce the risk of electric shock, do not perform any maintenance other than that detailed in the operating instructions unless you are qualified to do so.
WARNING! Warranty becomes void once the radio housing has been opened or any modifications or alterations to the radio have been made!
3 Technical data
| Radio SYSROCK BR 10 DAB+ | ||
| Power requirements switching adapter Output: DC 19 V/1.2 A cen-ter pin positive | ||
| battery pack 10.8 - 18 V | recommended: 18 V | |
| Frequency coverage FM 87.50 - 108 MHz | ||
| DAB 174.928 - 239.200 MHz | ||
| Bluetooth® | version 4.1 EDR compliant | |
| profiles HFP, A2DP, AVRCP profiles | ||
| Frequency 2402 - 2480 MHz | ||
| Equivalent Isotropically Radiated Power (EIRP) | <10 dBm | |
| transition range max. | 10 m (varies according to us-age conditions) | |
| Supported codec SBC/ACC | ||
| Circuit feature Loudspeaker 2.5" 8 Ω x1 | ||
| Output power 19 V: 10 W 3 % THD | ||
English
| Radio SYSROCK BR 10 DAB+ | |
| Input terminal 3.5 mm dia. (AUX IN) | |
| USB socket 5 V/1.2 A | |
| Permitted operating temperature range -10 °C to +45 °C | |
| Dimension (W x H x D) 100 x 150 x 105 mm | |
| Weight (without external battery pack) 0.7 kg | |
| Mains power pack BQ30A-1901200 | |
| Input voltage 100–240 V | |
| Input alternating current frequency 50–60 Hz | |
| Output voltage 19 V DC | |
| Output current 1.2 A | |
| Output 22.8 W | |
| Average efficiency in operation 87% | |
| Efficiency at low load (10%) 84% | |
| No-load power consumption ≤ 0.078 W |
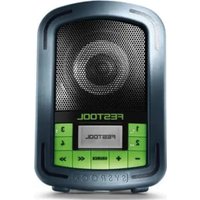
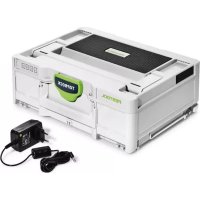
4 Machine features
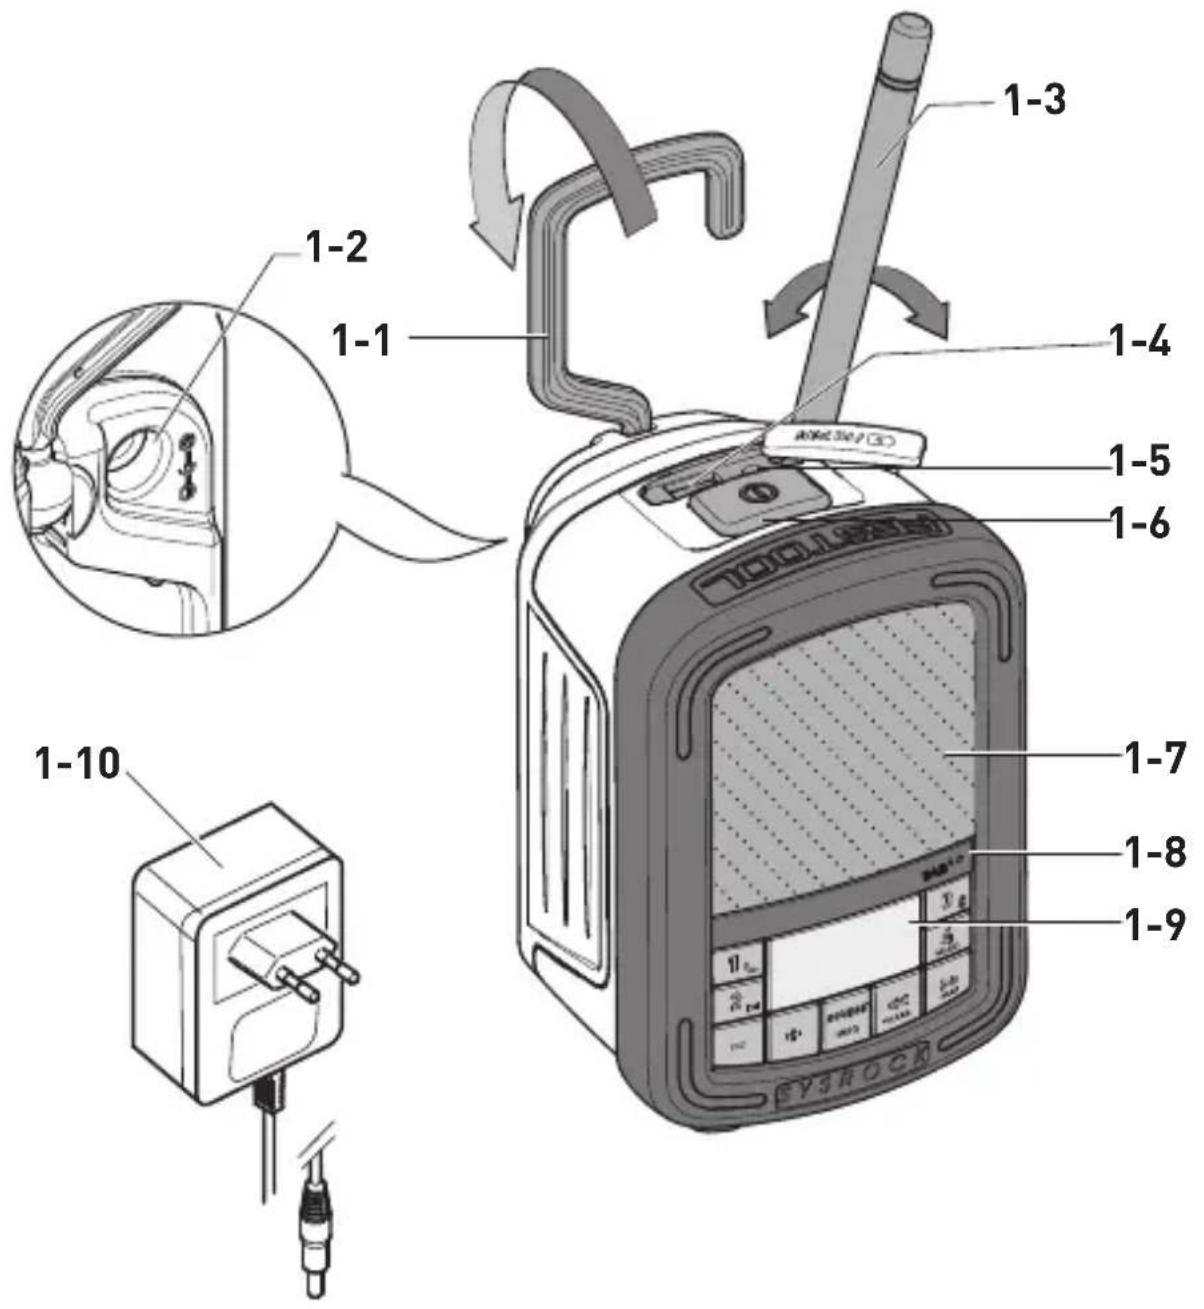
Radio - SysRock
| [1-1] | Folding attachment handle |
| [1-2] | Connecting socket for switching adapter |
| [1-3] | Antenna |
| [1-4] | USB socket |
| [1-5] | Auxiliary input (AUX-IN) |
| [1-6] | Power button |
| [1-7] | Speaker |
| [1-8] | Built-in microphone |
| [1-9] | Display |
| [1-10] | Switching adapter |
| [2-1] | Threaded socket for tripod UNC 1/4"-20 |
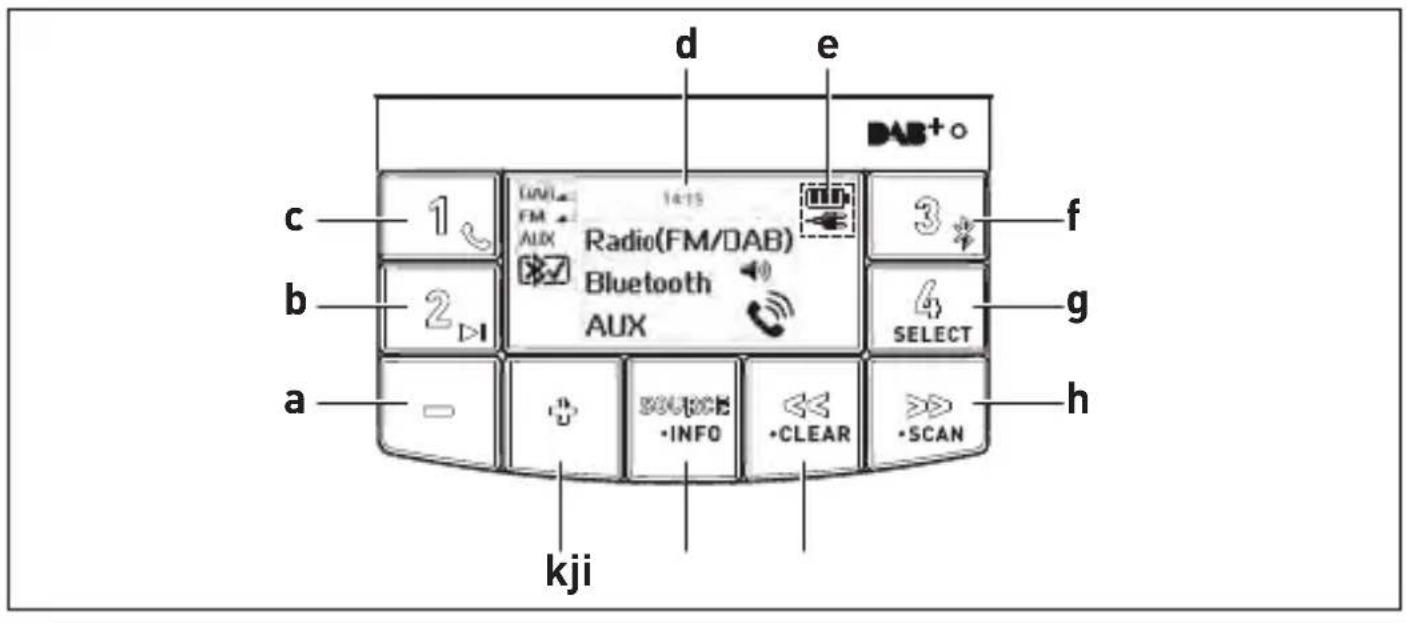
Menu buttons and display
[a] Volume control -
[b] Preset button 2
Bluetooth ^® mode: Play and pause
[c] Preset button 1
Bluetooth ^® mode: Call button
[d] Clock time (available from DAB and FM RDS-CT)
[e] Battery status indicator
[f] Preset button 3
Bluetooth ^® mode: Pair button
[g] Preset button 4
SELECT button
[h] DAB/FM mode: Tuning control-up
Bluetooth® mode: next track
DAB Modus: scan button
[i] DAB/FM mode: Tuning control - down
Bluetooth® mode: previous track
DAB mode: clear button
[j] Source button
DAB mode: info button
[k] Volume control +
Accessories shown or described are not always included in the scope of delivery.
The specified illustrations appear at the beginning of the operating manual.
5 Commissioning
5.1 Operating with switching adapter
Plug in switching adapter [1-10] in connecting
socket [1-2] and power outlet.
IMPORTANT:
The switching adapter is used as the means of connecting the radio to the power supply. The switching adapter used for the radio must remain accessible during normal use in order to disconnect the radio from the power supply completely, the switching adapter should be removed from the power supply outlet completely.
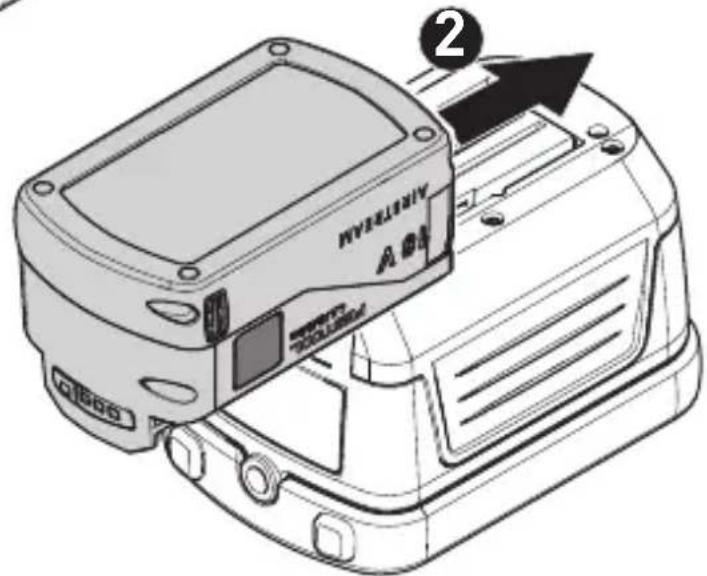
5.2 Operating with external Festool battery pack [2A] + [2B]
The device can operate with any Festool battery pack from the BP, BPC or BPS series. When connected to the external Festool battery pack, the device only consumes power from this battery pack.
CAUTION always attach the battery pack completely. If not, it may accidentally fall out of the battery bay, causing injury to you or someone around you.
CAUTION Do not force attach the battery pack. If the battery pack does not slide in smoothly and does not engage, it is not being inserted correctly.
CAUTION For optimal performance, we recommend connecting to an 18V Li-Ion battery pack.
5.3 Switch on/off
▶ To switch on: Press the power button [1-6].
The radio is ready for operation.
▶ To switch off: Press the power button [1-6].
5.4 Volume control

Press the volume control [a]
and [k] to adjust the desired volume.

For a better sound quality using an external device, adjust the volume on the external device to maximum 70%.
5.5 Checking battery status
To check the current battery level, press the power button [1-6] to switch on the radio. The battery status indicator [e] will show the current battery level (only with Li-Ion battery pack).

Battery is fully charged

Battery is partially charged

Battery low - charging required

battery critical - alternative power source required immediately.
5.6 Operating your radio - DAB
▶ Straighten up the antenna [1-3].
▶ Press the Power button [1-6] to switch on your radio.
▶ Press the source button [j] until the DAB mode is selected.
If this is the first time the radio is used, a quick scan of Band III DAB channels will be carried out. If the radio has been used before, the last used station will be selected.
During the scanning process, as new stations are detected, the station counter will increase and stations will be added to the list. The display shows a bar graph indicating the progress of the scan.
When the scanning is completed, the first station (in numeric-alpha order 0...9...A...Z) will be selected.
If the station list is still empty after the scan, your radio will display
If no signals are found, it may be necessary to relocate your radio to a position giving better reception.
Selecting a station - DAB
▶ Press the Power button [1-6] to switch on your radio.
▶ Press the source button [j] until the DAB mode is selected. The display will show the name of the radio station currently selected.
▶ Press the Tuning control [i] , [h] to scroll through the list of available stations.
▶ Press the Select button [g] to select the station. The display may show
▶ Adjust the Volume control [a], [k] to the required setting.
NOTE: If after selecting a station, the station is not found it may be necessary to relocate your radio to a position giving better reception.
Secondary service - DAB
Certain radio stations have one or more secondary services associated with them. If a station has a secondary service associated with it, the display will show this information under the station name.
Most secondary services do not broadcast continually and if the selected service is not available, the radio will re-tune to the associated primary service.
Display mode - DAB
Your radio has a range of display options when in DAB mode:
▶ Press and hold the Info button [j] more than 2 seconds until
| a. Signal strength | Displays the signal strength of radio reception. The clear un-filled rectangle indicates minimum signal level required for satisfactory reception. |
| b. Program type | Displays type of station being listened to e.g. Pop, Classic, News etc. |
| c. Multi-plex name | Displays name of multiplex to whichcurrent station be- longs. |
| d. Fre- quency | Displays current fre- quency. |
| e. Bit rate / audio type | Displays the digital bit rate and the audio type for the currently tuned DAB station. |
| f. Date Displays the current date. | |
| g. DL Plus Information | Some stations may provide other pro- gramme related in- formation for the dis- play in addition to the regular text. If none is available, a messageis dis- played. |
| h. Scrolling text (DLS) | Displays scrolling text messages such as ar- tist/track name, phone in number, etc. |
Finding new stations - DAB
As time passes new stations may become available. To find new stations proceed as follows:
▶ Press the Power button [1-6] to switch on your radio.
▶ Press the source button [j] until the DAB mode is selected.
▶ To carry out a full scan of the entire DAB Band III frequencies press and hold the Tuning control [h] more than 2 seconds. As new stations are found, the station counter on the display will increase and stations will be added to the list. The bar graph indicates the progress of the scan.
Clear stations (Prune function)- DAB
If you move to a different part of the country, some of the stations which were listed may no longer be available. Also from time to time, some DAB services may stop broadcasting, or may change location or frequency. Stations which cannot be found, or which have not been received for a very long time are shown in the station list with a question mark. The Prune stations function (Clear) [i] will delete the marked DAB stations from your station list.
▶ Press the Power button [1-6] to switch on your radio.
▶ Press the source button [j] until the DAB mode is selected.
▶ Press and hold Clear button [i] more than 2 seconds until
▶ Press and release the Tuning control [i], [h] to select
▶ To enter the Prune function select
NOTE: If you have moved your radio to a different part of the country you should also carry out a search for new stations (please
English
see the section 'Finding new stations').
5.7 Operating your radio - FM
▶ Straighten up the antenna [1-3].
▶ FM ▪ Press the source button [j] until the FM mode is selected.
FM auto-tune
▶ Press and hold (\~2 sec.) the Tuning control [i], [h] to carry out an auto-tune.
Your radio will stop scanning when it finds a station of sufficient strength.
The display will show the frequency of the signal found. If the signal is strong enough and there is RDS data present, the radio may display the station name, radio text and clock time.
Finding other stations
▶ Press the Tuning control [i], [h] as before.
When the end of the waveband is reached, your radio will restart tuning from the opposite end of the waveband.

If you find that FM reception is poor, try repositioning the antenna.
Manual tuning -FM
▶ Press the Tuning control [i], [h] to tune to a station.
The frequency will change in steps of 0.1 MHz.
5.8 Using preset stations in DAB/FM mode
You may store your preferred DAB/FM radio stations to the preset stations. There are four memory presets each for DAB and FM radio. They are used in the same way for each operating mode.
▶ Press the Power button [1-6] to switch on your radio.
▶ Press and hold (\~2 sec.) the Preset button [b], [c], [f] or [g] until the display show
The station will be accessible via the chosen preset button. The preset number P1 to P4 will be shown in the display.
Repeat this procedure as required for the remaining presets. Stations stored in preset memories may be overwritten by retracing the steps above.
Recalling preset stations in DAB/FM mode
▶ Press the required Preset button [b], [c], [f] or [g] to tune to the station stored in preset memory.
5.9 Clock time - automatically updating the clock
Your radio will normally update the clock time [d] automatically using the DAB or FM RDS-CT signal. After a power failure the radio will then set its clock the next time that you turn on the radio in DAB or FM mode.

NOTE: If no signal is found you should either position the radio or its aerial so that a signal can be received.
When you set the clock time using the FM RDS (Radio Data System) function, your radio will synchronize and display clock time [d] whenever it tunes to a radio station using RDS with CT signals. If the station has sufficient signal strength the clock will automatically synchronize within one or two minutes. The radio clock time will be valid for 24 hours each time the radio time is synchronized with RDS CT.
If no RDS-signal is received, the clock time is not shown.
5.10 Listening to music via Bluetooth® streaming
You need to pair your Bluetooth® device with your SysRock before you can auto-link to play/stream Bluetooth® music through your SysRock. Pairing creates a "bond" so two devices will recognize each other and establish a link that enables data transfer.
Pairing your Bluetooth® device for the first time
▶ Press the Source button [j] to select the Bluetooth ^® mode.

The Bluetooth® status icon flashes to show the SysRock is discoverable.
▶ Activate Bluetooth ^® on your mobile device according to the device's user manual to link up to the SysRock.
- Locate the Bluetooth ^ device list and select

Once the connection is established, the Bluetooth ^® icon will cease flashing and display a check mark next to it. Simply select and play any music from your source device.
NOTE:
- If two Bluetooth ^ devices, which are not yet paired to the SysRock both simultaeneously search for your SysRock, it will show its availability
on both devices. However, if one device establishes a connection with the SysRock first, then the other Bluetooth® device won't find it on its list.
- If you take your source device out of range, the connection will be temporarily lost. Your SysRock will automatically reconnect, if the source device is brought back in range. Be aware that while the connection is lost, no other Bluetooth® device can pair or link with your SysRock.
- If
- The effective operation range between the system and the paired device is approximately 10 meters (30 feet). Any obstacle between the system and the device can reduce the operational range.
- Bluetooth ^ connectivity performance may vary depending on the connected Bluetooth ^ devices. Please review the Bluetooth ^ capabilities of your device before connecting to your SysRock. Some features may not be supported on your Bluetooth ^ device.
Playing audio files in Bluetooth® mode
As soon as your SysRock is successfully connected with the chosen Bluetooth ^® device, you can start to play your music using the controls on your connected Bluetooth ^® device.
▶ Once the SysRock plays adjust the volume to the desired level using
English
the Volume control [a], [k] on either your SysRock or your connected Bluetooth® device.
▶ Use the controls on your device to play/pause and navigate tracks. Alternatively, control the playback using Play/Pause [b], Next track [h], Previous track buttons [i] on the SysRock.
The currently-played track information (i.e. the track name /the artist name) will be displayed as scrolling text at the bottom of display.
NOTE:
- Some player applications or devices may not respond to all of these controls.
- Some mobile phones may temporarily disconnect from your SysRock when you make or receive calls. Some devices may temporarily mute their Bluetooth® audio streaming when they receive text messages, emails or for other reasons unrelated to audio streaming. Such behaviour is a function of the connected device and does not indicate a fault with your SysRock.
Playing previously-paired devices
This unit can save up to 8 sets of paired devices. When the amount is exceeded, the earliest device will be over written. If your Bluetooth ^® device has already been paired with the SysRock previously, the unit will recognize your Bluetooth ^® device and will automatically attempt to reconnect with the device it was last connected with. If the last connected device is not available, the SysRock will try to connect to the second last device, and so forth.
Deleting Bluetooth® device pairings
▶ To delete all Bluetooth ^ device pairings, press and hold the Preset 4 button [g] until
Disconnecting your Bluetooth ^® device
▶ Press the Source button [j] to select any mode other than Bluetooth® mode.
▶ Alternatively, press (\~2 sec.) the Bluetooth ^® pair button [f] to disconnect the link.
▶ You can also turn off Bluetooth ^® on your Bluetooth ^® device to disable the connection.
If you disconnect the Bluetooth ^® device when you are in Bluetooth ^® mode, the Bluetooth ^® icon will then start to flash, indicating Bluetooth ^® is available again for pairing.
Using your hands-free call feature

Your unit can be used as a hands-free accessory for your phone. When music is playing through your
SysRock and you receive a call on your phone it can pause the music automatically to allow you to answer your phone.
▶ If you receive a call while playing music through your SysRock, press and release the Call button [c] to answer your phone call.
▶ Speak in direction of the built-in microphone [1-8].
(i) Note that a very high volume setting may decrease sound quality.
▶ Press and release the Call button [c] to end the phone call.
5.11 AUX input (AUX-IN)
A 3.5 mm AUX input [1-5] is attached to the upper part of SysRock and enables the playback of an audio signal from an external audio device, such as an MP3 or CD player.
- Connect a stereo or mono audio source (such as an MP3 or CD player) at the AUX input [1-5].
▶ Press Source [j] in order to select AUX mode.
▶ Set the volume on the MP3 or CD player (max. 70%) in order to ensure a sufficient signal, then adapt the volume on SysRock for comfortable listening.
Never use the AUX input in the rain or under humid conditions, in order to prevent moisture penetrating into SysRock. Keep the rubber cover on the reverse tightly closed in just such conditions.
5.12 USB socket for smartphone charging
Your radio has a USB socket which is intended only for charging a smartphone or similar devices. Charge time may vary and in some cases may take longer to charge than when using the manufacturers charging unit supplied with the smartphone. The radio can charge the smartphone or similar devices when the radio is in power on mode and in DAB/FM radio mode, Bluetooth® mode or AUX mode.
▶ Connect your smartphone to the USB charging socket [1-4] on the top of your radio.
▶ Your smartphone will begin to charge.
▶ Once your smartphone has fully charged remove the USB cable.
NOTE: Charging mobile phones (for example) or other devices may affect the listening quality while listening to the DAB/FM stations.
CAUTION
- The charger may not supply power to some USB devices.
- When not using or after charging, remove the USB cable.
- Do not connect power source to USB port. Otherwise there is a risk of fire. The USB port is only intended for charging lower voltage device.
- Do not insert a nail, wire, etc. into the USB power supply port. Otherwise a circuit short may cause smoke and fire.
- Do not connect this USB socket with your PC USB port, as it is highly possible that it may cause breakdown of the units.
- Never use the USB socket in rainy or moist conditions to prevent moisture from entering the radio.
- Close the USB socket after use with the protective cap to prevent contamination.
5.13 Setup options
Mounting bracket [1-1]
The pushable mounting bracket allows the device to be hung up on scaffolding or the like.
English

The mounting bracket must be removed for operation with an external Festool battery pack [2A].
Tripod
A standard UNC 1/4"-20 photo tripod socket can be screwed onto the tripod socket bushing [2-1].
6 Service and maintenance

Customer service and repairs must only be carried out by the manufacturer or service workshops. Find the nearest address
at: www.festool.co.uk/service
Always use original Festool spare parts. Order no. at: www.festool.co.uk/service
- Clean the display [1-9] and loudspeaker [1-7] on the radio with a soft, dry cloth to prevent damage. Do not use solvents.
- Keep contacts on SysRock and on the battery pack clean.
7 Environment
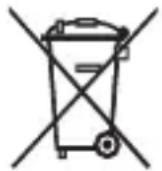
Do not dispose of the device in the household
waste! Recycle devices, accessories and packaging.
Observe applicable national
regulations.
EU only: In accordance with the European Directive on waste electrical and electronic equipment and implementation in national law, used power tools must be collected separately and handed in for environmentally friendly recycling.
Information about collection points for correct disposal is available at www.festool.co.uk/recycling.
Information on REACH:
www.festool.co.uk/reach
8 General information
The company reserves the right to amend the specification without notice.
Imported into the UK by
Festool UK Ltd
1 Anglo Saxon Way
Bury St Edmunds
IP30 9XH
Great Britain
8.1 Information about Bluetooth®
As soon as the tool is connected to the mobile device via Bluetooth ^® and the secure connection has been authorised, the tool will connect automatically to the mobile device from this point onwards.
The Bluetooth® word mark and the logos are registered trademarks of Bluetooth SIG, Inc.; they are used by TTS Tooltechnic Systems AG & Co. KG, and therefore by Festool, under licence.
1 Symboles

[j] Sorgente (SOURCE)
5.11 Ingresso AUX (AUX-IN)
[1-5] AUX-ingang (AUX-IN)
[1-6] Aan-/uit-toets
[1-7] Luidspreker
[1-10] Lichtnetadapter
[e] Accupack-statusindicator
[f] Zendergeheugen 3
Bluetooth ^® modus: koppelen
[g] Zendergeheugen 4
5.11 AUX-ingang (AUX-IN)
Pluggadapter BQ30A-1901200
Inngangsspenning 100–240 V
[1-5] AUX-inngang (AUX-IN)
[1-6] På/av-knapp
[1-7] Høyttalere
[1-8] Integrert mikrofon
[1-9] Display
[1-10] Nettadapter
5.11 AUX-inngang (AUX-IN)
EN IEC 62311:2020, EN IEC 63000:2018

Head of Product Development

Christian Bader
Head of Development Functions
Declaration of Conformity
We as the manufacturer Festool GmbH, Wertstraße 20, 73240 Wendlingen, Germany declare under our sole responsibility that the product[s]:
Designation: Radio (with power supply GA 190012E or BQ30A-1901200)
Designation of Type[s]: BR 10 DAB+
Serial number[s] ^1 : 202114
fulfills all the relevant provisions of the following UK Regulations:
• S.I. 2016/1101 Electrical Equipment (Safety) Regulations 2016
• S.I. 2017/1206 Radio Equipment Regulations 2017
• S.I. 2010/2617 The Ecodesign for Energy-Related Products Regulations 2010
• S.I. 2012/3032 Restriction of the Use of Certain Hazardous Substances in Electrical and Electronic Equipment Regulations 2012
and are manufactured in accordance with the following designated standards:
• BS EN 55032:2015
• BS EN 55035:2017
• BS EN 50563:2011 + A1:2013
• BS EN 50564:2011
• BS EN 62368-1:2014 + A11:2017
• BS EN IEC 61000-3-2:2019
• BS EN 61000-3-3:2013
• BS EN 61000-4-2:2009
• BS EN IEC 61000-4-3:2020
• EN 300 328:2019 V2.2.2
• EN 301 489-1:2017 V2.1.1
• EN 301 489-17:2017 V3.1.1
• BS EN 62479:2010
• BS EN IEC 63000:2018
11 in the specified serial number range [S-Nr.] from 400000000 - 499999999

Place and date of declaration: Wendlingen, 05.08.2021
Signed on behalf of and in name of Festool GmbH
$$ p p a 1 5 8 2 $$
Markus Stark
Head of Productdevelopment

Ralf Brandt
Head of Productconformity
- Symbole
- Safety instructions
- Machine features
- Menu buttons and display
- Commissioning
- Operating with switching adapter
- Operating with external Festool battery pack [2A] + [2B]
- Switch on/off
- Volume control
- Checking battery status
- Operating your radio - DAB
- Selecting a station - DAB
- Secondary service - DAB
- Display mode - DAB
- Finding new stations - DAB
- Clear stations (Prune function)- DAB
- English
- Operating your radio - FM
- FM auto-tune
- Finding other stations
- Manual tuning -FM
- Using preset stations in DAB/FM mode
- Recalling preset stations in DAB/FM mode
- Clock time - automatically updating the clock
- Listening to music via Bluetooth® streaming
- Pairing your Bluetooth® device for the first time
- NOTE:
- Playing audio files in Bluetooth® mode
- Playing previously-paired devices
- Deleting Bluetooth® device pairings
- Disconnecting your Bluetooth ® device
- Using your hands-free call feature
- AUX input (AUX-IN)
- USB socket for smartphone charging
- CAUTION
- Setup options
- Mounting bracket [1-1]
- Tripod
- Service and maintenance
- Environment
- Do not dispose of the device in the household
- Information on REACH:
- General information
- Imported into the UK by
- Information about Bluetooth®
- Symboles
- Ingresso AUX (AUX-IN)
- AUX-ingang (AUX-IN)
- Pluggadapter BQ30A-1901200
- AUX-inngang (AUX-IN)
- Declaration of Conformity
Brand : FESTOOL
Model : Sysrock BR 10
Category : Radio