
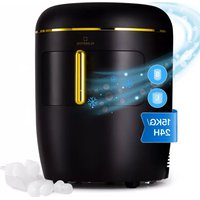
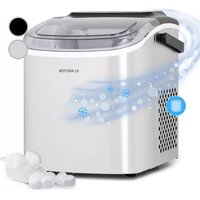
Powericer XL - Ice machine Klarstein - Free user manual and instructions
Find the device manual for free Powericer XL Klarstein in PDF.
| Product type | Automatic ice machine |
| Brand | Klarstein |
| Model | Powericer XL |
| Power supply | 220-240 V ~ 50-60 Hz |
| Power | 145-260 W depending on variant |
| Dimensions (W×D×H) | 380×477×590 mm to 98×604×831 mm depending on variant |
| Refrigerant | R600a (Isobutane), flammable |
| Required water pressure | 1.5 bar minimum, 5 bar maximum |
| Ice cube tray capacity | Automatic full-level detection |
| Main functions | Automatic ice cube production, automatic stop when tray full, indicator lights (ICE FULL, WATER LOW, FAULT) |
| Water connection | Water inlet (3/4 inch hose) and water outlet (hose included) |
| Included accessories | Supply hose, drain hose, sealing gasket, ice scoop |
| Maintenance | Interior cleaning with warm soapy water; water filter to be cleaned regularly |
| Safety | Earth connection mandatory; do not immerse; do not use near water; do not damage the refrigerant circuit |
| Recommended use | Indoors only, on a flat surface, at least 15 cm free space around |
| Automatic stop | In case of full tray (ICE FULL) or low water level (WATER LOW) |
| Fault indicator | FAULT lights up in case of mechanical or rotation problem |
| Minimum ambient temperature | 10 °C |
| Minimum water temperature | 7 °C |
| Recycling | Follow local regulations for appliances containing flammable gases |
Frequently Asked Questions - Powericer XL Klarstein
User questions about Powericer XL Klarstein
0 question about this device. Answer the ones you know or ask your own.
Ask a new question about this device
Download the instructions for your Ice machine in PDF format for free! Find your manual Powericer XL - Klarstein and take your electronic device back in hand. On this page are published all the documents necessary for the use of your device. Powericer XL by Klarstein.
USER MANUAL Powericer XL Klarstein
INHALTSVERZEICHNIS
Artikelnummer 10013324/10013325
natural_image
Close-up of a mechanical or electronic component with wires and connectors, no visible text or symbolsnatural_image
Symbol of a trash bin crossed with a diagonal line, no text or numbers presentBerlin Brands Group UK Limited
PO Box 42
272 Kensington High Street
London, W8 6ND
United Kingdom
Congratulations on purchasing this device. Please read the following instructions carefully and follow them to prevent possible damages. We assume no liability for damage caused by disregard of the instructions and improper use. Scan the QR code to get access to the latest user manual and more product information.

CONTENT
Safety Instructions 14
Product Description 16
Accessories 17
Use and Operation 17
Care and Cleaning 18
Troubleshooting 19
Disposal Considerations 20
Manufacturer & Importer (UK) 20
TECHNICAL DATA
| Item number | 1001332310036152 | 10013324 100 | 3325 |
| Power supply 220-2 | 40 V ~ 50-60 Hz | ||
| Power consumption | 145 W 160 W | 260 W | |
| Dimensions | 380×477×590 mm | 420×514×655 mm | 98×604×831 mm |
SAFETY INSTRUCTIONS
- Check that the mains voltage corresponds to the rating of the appliance before operating.
- Use handles or knobs when moving. Place on a flat stable surface for use. Do not use outdoors.
- Do not use near or in the immediate vicinity of a bath or swimming pool or any source of liquid.
- Unplug from socket outlet when not in use.
• To protect against electric shock, do not immerse cord or plug in water or any other liquid. - The use of accessory attachments not recommended by the appliance manufacturer, may cause injury.
- Do not locate this appliance immediately below a socket outlet.
- Do not allow cord to overhang the counter top where it can be easily pulled by children.
- Do not use this appliance for anything else other than its intended use.
- Do not overfill as this may cause a hazard. Ensure lid is closed when in operation
- To remove plug from outlet, do not pull on supply cord. Grasp plug firmly and pull to remove.
- No liability can be accepted for any damage caused by non compliance with these instructions or any other improper use or mishandling. This appliance is for household use only
- This appliance is not intended to be operated by means of an external timer or separate remote control system.
• This appliance is not intended to be immersed in water. - If the supply cord is damaged, it must be replaced by the manufacturer or its service agent or a similarly qualified person in order to avoid a hazard.
- Please according to local regulations regarding disposal of the appliance for its flammable blowing gas.
- Do not store explosive substances such as aerosol cans with a flammable propellant in this appliance.
- Fill with potable water only.
- This appliance is not intended for use by persons (including children) with reduced physical, sensory or mental capabilities, or lack of experience and knowledge, unless they have been given supervision or instruction concerning use of the appliance by a person responsible for their safety. Children should be supervised to ensure that they do not play with the appliance.
This appliance contains the coolant isobutane (R600a), a natural gas which is environmentally friendly. Although it is flammable, it does not damage the ozone layer and does not increase the greenhouse effect. The use of this coolant has, however, led to a slight increase in the noise level of the appliance. In addition to the noise of the compressor, you might be able to hear the coolant flowing around the system. This is unavoidable, and does not have any adverse effect on the performance of the appliance. Care must be taken during the transportation and setting up of the appliance that no parts of the cooling system are damaged. Leaking coolant can damage the eyes.
WARNING
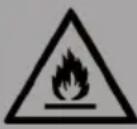
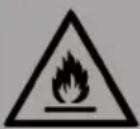
Danger from fi re/fl ammable materials. Please observe the local regulations for the disposal of units with fl ammable refrigerants and gases.
- Keep ventilation openings in the unit housing free of obstacles.
- Do not damage the refrigerant circuit.
- Do not use any mechanical devices or other means to accelerate the defrosting process or the ice recovery process.
- Do not use other types of electrical appliances inside the ice cube machine.
Special Notes
- When positioning the unit, make sure that the power cord is not pinched or damaged.
- Make sure that there are no multiple sockets or power supplies on the back of the unit.
To avoid contamination of food, please follow the instructions below:
- Regularly clean surfaces that may come into contact with food. Clean the water drain regularly.
- If the appliance contains a water tank, clean it if it has not been used for 48 hours. Rinse the tank if no water has been removed for 5 days.
WARNING
When using, servicing and disposing of the unit, pay attention to the left symbol on the rear of the unit or on the compressor. This symbol warns of possible fires. There are flammable substances in the refrigerant lines and in the compressor. Keep the appliance away from sources of fire during use, maintenance and disposal.
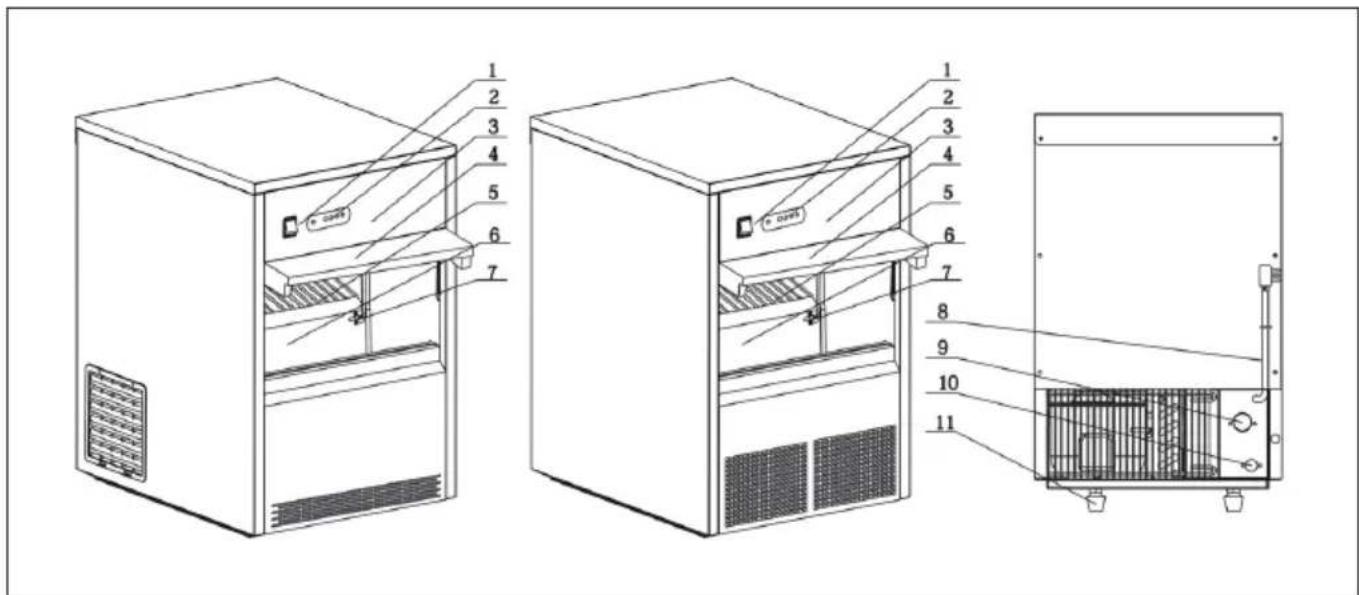
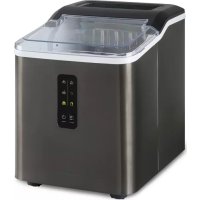
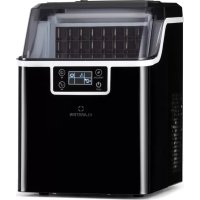
PRODUCT DESCRIPTION
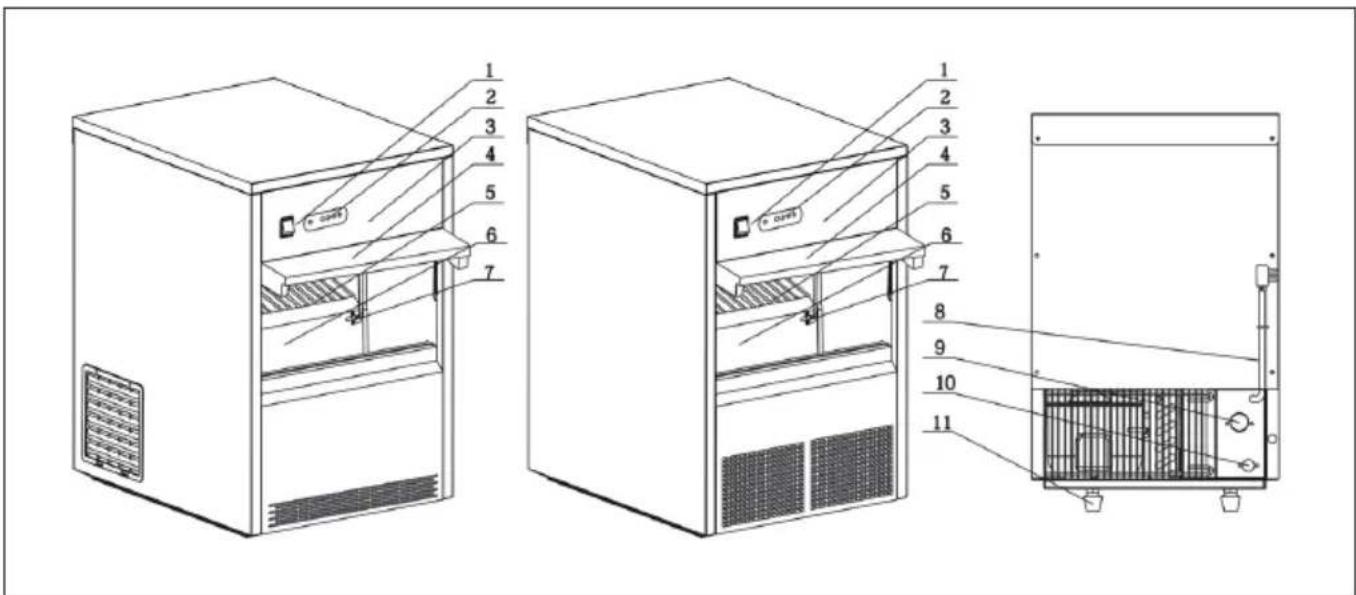
Item number 10013323
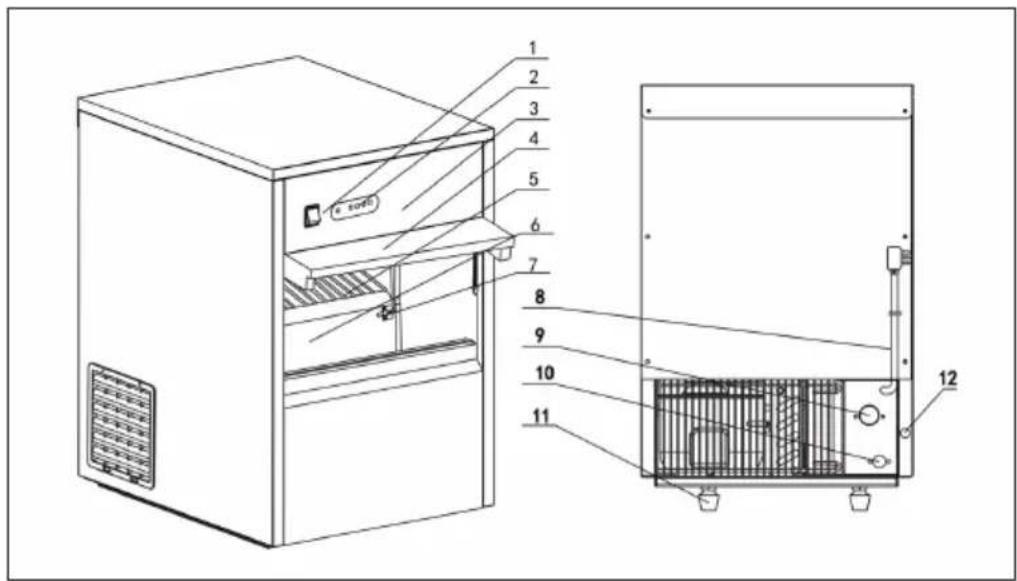
Item number 10013324/10013325

| 1 Power Switch 2 Display panel | |
| 3 Front Panel 4 Door | |
| 5 Ice Bouncing Shelf 6 Ice Storage Container | |
| 7 Ice Lever Sensor 8 Power Cord | |
| 9 Water inlet Valve 10 Drainage Tube | |
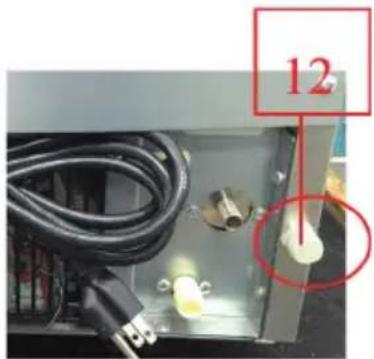
| 11 Feet 12 Drainage valve |
ACCESSORIES
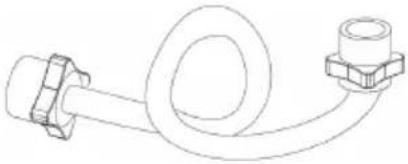 | 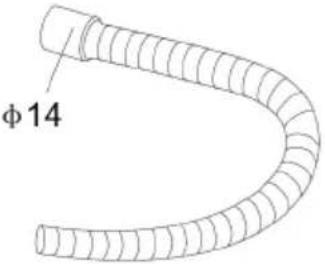 |
| Water Inlet Tube Water Drainage Pipe | |
 | 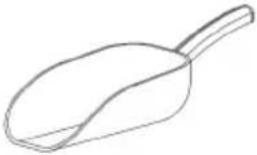 |
| Sealing Washer Ice Spoon | |
USE AND OPERATION
1 Unpack the Ice Baby from it's carton, then remove the ice scoop, inlet/outlet tubes and sealing washers from the container in the icemaker where they are stored for transit.
2 Position the Ice Baby in a well ventilated place, leaving at least a 150 mm gap between the ice maker and the walls/ceiling etc. The icemaker must be level, and situated away from any heat source.
3 Attach one end of the 14mm flexible plastic corrugated pipe to the water outlet on the back of the machine. The other end of the pipe should be inserted into a waste pipe or a suitable container for the collection of the waste water.
4 Connect the 3/4" water inlet hose supplied with the ice maker to a drinking water supply and then connect the other end to the water inlet on the back of the machine. When connecting this hose, use the sealing washers supplied with the Ice Baby to eliminate the risk of a water leak.
Note: The minimum inlet water pressure is 1.5 bar. The maximum inlet water pressure is 5 bar.
5 Plug the power lead into the supply socket, then press the green on/off switch on the ice machine to start it - the green „run“ light will be lit. The Ice Baby will start to operate.
6 The operation of the Ice Baker is completely automatic including. water inlet, ice making, ice transfer and ice storage.
7 If the storage container is full, the "ice full" indicator on the display panel will be lit, and the ice machine will stop automatically. Remove the ice from the storage container, wait for five minutes, then restart the ice maker.
8 Should the water supply be restricted or fail, the „water low“ LED will be lit. The ice maker will stop automatically. When the water supply is restored, wait for at least five minutes, then re-start the unit.
Important Notes on Use
- If the compressor stops for any reasons such as water shortage, too much ice, power off etcetera, don't restart it right away. You can restart it after 5 minutes in order to protect the compressor.
- Check the connectors of the water inlet and outlet, tubes and drain regularly for surplus water that may be present.
- When plugging in or unplugging, the plug should be held by hand and the wires should not be dragged heavily.
CARE AND CLEANING
• Always switch off and disconnect the power supply before cleaning
- Warm, soapy water is recommended for cleaning. Cleaning agents may leave harmful residues. Do not wash the base unit, instead wipe the exterior with a damp cloth. Do not immerse in water, or use steam/jet washers to clean the unit.
- Check regularly the connectors of the water inlet and outlet tubes and drain the little surplus water that may leak.
- Clean the water filter regularly with a small brush, particularly in hard water ares. The water filter is located just inside the water inlet at the back of the appliance.
- Replace any unused water in the tank at least once every 24 hours.
- The inner removable parts and water tank should be cleaned regularly.
Special Note on Item number 10013323
If the ice maker will be unused for long periods, please screw off the plastic drainage connector screw (12) on the back of the unit in order to drain the surplus water in the water groove, then screw it back on. Wipe the inner liner of the ice storage container with a clean cloth.
TROUBLESHOOTING
| Problem Possible | Cause Suggested Solution | |
| The unit does not work. | The voltage is out of limit. Stop the | ice maker and restart it until the voltage is normal. |
| The ambient temp is lower than 10°C. | Try again when the ambient temperature higher than 10°C. | |
| Water shortage indicator lights on. | Water shortage from the water supply system. | Check the water supply. If it is OK, restart the unit. |
| Water valve damaged. Check the | water valve. | |
| Tap water pressure too low. Be sure the tap water pressure is higher than 1kg/cm2. | ||
| Compressor doesn't work. | Water shortage. Check the water | supply system (water valve and water supply tube). |
| Ice bucket is full. Take out some ice. | ||
| Problem Possible Cause Suggested Solution | ||
| Compressor works, but no ice is made. | Refrigerant leakage. Refer all servicing to qualified service personnel. | |
| The refrigerating system is blocked. | ||
| Ice is not dropping. | Water temperature or ambient temperature is too low. | Check whether the ambient temperature is too low (Lower than 10 °C) or water temperature is too low(lower than 7 °C) |
| The solenoid valve is damaged. | Refer all servicing to qualified service personnel. | |
| Trouble indicator lights. | The water box does not tilt. Unplug the power, check the tiling motor and relative system. 3~5 minutes later restart the machine. | |
DISPOSAL CONSIDERATIONS
natural_image
Symbol of a trash bin crossed with a diagonal line, no text or numbers presentIf there is a legal regulation for the disposal of electrical and electronic devices in your country, this symbol on the product or on the packaging indicates that this product must not be disposed of with household waste. Instead, it must be taken to a collection point for the recycling of electrical and electronic equipment. By disposing of it in accordance with the rules, you are protecting the environment and the health of your fellow human beings from negative consequences. For information about the recycling and disposal of this product, please contact your local authority or your household waste disposal service.
MANUFACTURER & IMPORTER (UK)
Manufacturer:
Chal-Tec GmbH, Wallstrasse 16, 10179 Berlin, Germany.
Importer for Great Britain:
Berlin Brands Group UK Limited
PO Box 42
272 Kensington High Street
London, W8 6ND
United Kingdom
Chère cliente, cher client,
SOMMAIRE
natural_image
Symbol of a trash bin crossed with a diagonal line, no text or numbers presentBerlin Brands Group UK Limited
PO Box 42
272 Kensington High Street
London, W8 6ND
United Kingdom
Gentile cliente,
INDICE
Numero articolo 10013324/10013325
natural_image
Symbol of a trash bin crossed with a diagonal line, no text or numbers presentPRODUTTORE E IMPORTATORE (UK)
Produttore:
Chal-Tec GmbH, Wallstraße 16, 10179 Berlino, Germania.
Berlin Brands Group UK Limited
PO Box 42
272 Kensington High Street
London, W8 6ND
United Kingdom
Estimado cliente,
ÍNDICE DE CONTENIDOS
natural_image
Close-up of a mechanical or electronic component with wires and connectors, no visible text or symbolsnatural_image
Symbol of a trash bin crossed with a diagonal line, no text or numbers presentBerlin Brands Group UK Limited
PO Box 42
272 Kensington High Street
London, W8 6ND
United Kingdom

area
| Category | Value | |---|---| | 1 | 100 | | 2 | 100 | | 3 | 100 | | 4 | 100 | | 5 | 100 | | 6 | 100 | | 7 | 100 | | 8 | 100 | | 9 | 100 | | 10 | 100 | | 11 | 100 | | 12 | 100 | | 13 | 100 | | 14 | 100 | | 15 | 100 | | 16 | 100 | | 17 | 100 | | 18 | 100 | | 19 | 100 | | 20 | 100 | | 21 | 100 | | 22 | 100 | | 23 | 100 | | 24 | 100 | | 25 | 100 | | 26 | 100 | | 27 | 100 | | 28 | 100 | | 29 | 100 | | 30 | 100 | | 31 | 100 | | 32 | 100 | | 33 | 100 | | 34 | 100 | | 35 | 100 | | 36 | 100 | | 37 | 100 | | 38 | 100 | | 39 | 100 | | 40 | 100 | | 41 | 100 | | 42 | 100 | | 43 | 100 | | 44 | 100 | | 45 | 100 | | 46 | 100 | | 47 | 100 | | 48 | 100 | | 49 | 100 | | 50 | 100 | | 51 | 100 | | 52 | 100 | | 53 | 100 | | 54 | 100 | | 55 | 100 | | 56 | 100 | | 57 | 100 | | 58 | 100 | | 59 | 100 | | 60 | 100 | | 61 | 100 | | 62 | 100 | | 63 | 100 | | 64 | 100 | | 65 | 100 | | 66 | 100 | | 67 | 100 | | 68 | 100 | | 69 | 100 | | 70 | 100 | | 71 | 100 | | 72 | 100 | | 73 | 100 | | 74 | 100 | | 75 | 100 | | 76 | 100 | | 77 | 100 | | 78 | 100 | | 79 | 100 | | 80 | 100 | | 81 | 100 | | 82 | 100 | | 83 | 100 | | 84 | 100 | | 85 | 100 | | 86 | 100 | | 87 | 100 | | 88 | 100 | | 89 | 100 | | 90 | 100 | | 91 | 100 | | 92 | 100 | | 93 | 100 | | 94 | 100 | | 95 | 100 | | 96 | 100 | | 97 | 100 | | 98 | 100 | | 99 | 100 | | Note: The actual values in the 'Value' column are not provided in the code. I have used the label 'The Region' to represent the 'Region'. The values are estimated based on the provided code.
KLARSTEIN
- INHALTSVERZEICHNIS
- CONTENT
- SAFETY INSTRUCTIONS
- WARNING
- Special Notes
- PRODUCT DESCRIPTION
- ACCESSORIES
- USE AND OPERATION
- Important Notes on Use
- CARE AND CLEANING
- Special Note on Item number 10013323
- TROUBLESHOOTING
- DISPOSAL CONSIDERATIONS
- MANUFACTURER & IMPORTER (UK)
- Manufacturer:
- Importer for Great Britain:
- Chère cliente, cher client,
- SOMMAIRE
- Gentile cliente,
- INDICE
- PRODUTTORE E IMPORTATORE (UK)
- Produttore:
- Estimado cliente,
- ÍNDICE DE CONTENIDOS
- KLARSTEIN
Brand : Klarstein
Model : Powericer XL
Category : Ice machine