Areal Bar 750 - Soundbar Auna - Free user manual and instructions
Find the device manual for free Areal Bar 750 Auna in PDF.

User questions about Areal Bar 750 Auna
0 question about this device. Answer the ones you know or ask your own.
Ask a new question about this device
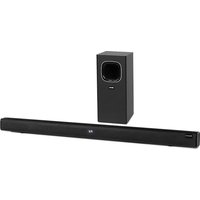
Download the instructions for your Soundbar in PDF format for free! Find your manual Areal Bar 750 - Auna and take your electronic device back in hand. On this page are published all the documents necessary for the use of your device. Areal Bar 750 by Auna.
USER MANUAL Areal Bar 750 Auna
The lighting flash and arrow head within the triangle is warning sign alerting you of dangerous voltage inside the product
CAUTION
RISK OF ELECTRIC SHOCK DO NOT OPEN
CAUTION:TO REDUCE THE RISK OF ELECTRIC SHOCK DO NOT REMOVE COVER (OR BACK).NO USER SERVICIABLE PARTS INSIDE.REFER SERVICING TO QUALIFIED SERVICE PERSONNEL.

The excclamation point within the triangle is a warning sign alerting you of important instructions accompanying the product
Unit 6 Riverside Business Centre
Brighton Road
Shoreham-by-Sea
BN436RE
United Kingdom
Congratulations on purchasing this equipment. Please read this manual carefully and take care of the following hints to avoid damages. Any failure caused by ignoring the items and cautions mentioned in the instruction manual are not covered by our warranty and any liability. Scan the QR code to get access to the latest user manual and other information about the product.

CONTENTS
Technical Data 22
Safety Instruction 24
Overview 26
Connections and Placement 30
Operation 32
Cleaning and Maintenance 36
Troubleshooting 37
Disposal Considerations 38
Declaration of Conformity 38
TECHNICAL DATA
| Item number | 10034560 |
| Power Input (Sound Bar) D C = 18 V /2.0A | |
| Power of Remote Control 2 x AAA/R03 Batteries [included) | |
| Remote Control Distance up to 6 m (Angle:530') | |
| Protection Class II | |
| Unit Dimension [ Sound Bar] 100 x 7 x 4.9 cm (L X W X H) | |
| Unit Dimension ( Subwoofer) 20 x 10 x 40 cm (L X W X H) | |
| Working Temperature 0-35 °C | |
| Working Humidity 20-80 % | |
| BT | |
| BT support V 5.0 | |
| Operation range up to 10m | |
| Transmission frequency 2.4 GHz | |
| Protocols A2DP 1.2 | |
The lighting flash and arrow head within the triangle is warning sign alerting you of dangerous voltage inside the product
CAUTION
RISK OF ELECTRIC SHOCK DO NOT OPEN
CAUTION:TO REDUCE THE RISK OF ELECTRIC SHOCK DO NOT REMOVE COVER (OR BACK).NO USER SERVICIABLE PARTS INSIDE.REFER SERVICING TO QUALIFIED SERVICE PERSONNEL.

The excclamation point within the triangle is a warning sign alerting you of important instructions accompanying the product
CAUTION: TO REDUCE THE RISK OF ELECTRIC SHOCK AND SERIOUS PERSONAL INJURY, DO NOT REMOVE ANY COVER. NO USER-SERVICABLE PARTS INSIDE. REFER SERVICING TO QUALIFIED SERVICE PERSONNEL ONLY. WARNING. TO REDUCE THE RISK OF FIRE OR ELECTRICAL SHOCK, DO NOT EXPOSE THIS PRODUCT TO WATER, RAIN OR MOISTURE.
Triangle with lightning plus explanation as follows:
DANGEROUS VOLTAGE: The lightning flash with arrowhead symbol within the equilateral triangle is intended to alert the user to the presence of uninsulated dangerous voltage within the product's enclosure that may be of sufficient magnitude to constitute a risk of electric shock to persons.
Triangle with exclamation point plus explanation as follows:
ATTENTION: The exclamation point within the equilateral triangle is intended to alert the user to the presence of important operating and maintenance (servicing) instructions in the literature accompanying this product.
CAUTION: Danger of hearing damage
To avoid possible hearing damage, do not listen to this Retro turntable at high volume levels for long periods of time. Always keep the volume within reasonable limits.
SAFETY INSTRUCTION
Please read these instructions fully before installing or operating.
General safety information
- Keep the product and all its parts out of reach of small children.
- This product is not intended for use by persons (including children) with reduced physical, sensory or mental capabilities, or lack of experience and knowledge, unless they have been given supervision or instruction concerning the use of the appliance by a person responsible for their safety.
- Do NOT place foreign objects into the CD compartment. Use of controls or adjustments other than those specified herein, may result in hazardous laser light beam exposure. Do NOT open the cover and do NOT attempt to repair it yourself. Refer servicing to qualified personnel. This product does not contain any user serviceable parts. Unauthorized handling of the device may damage it and will void your warranty.
Power source
- Only use the power supply that came with the product. Using an unauthorised power supply will invalidate your guarantee and may irrecoverably damage the product.
- Disconnect your Retro Turntable from the mains power supply during thunderstorms.
- Always check that you have completely switched off your Retro Turntable, before you change or disconnect the power supply.
- Where the mains power plug or an appliance coupler is used as the disconnect device, the disconnect device shall remain readily operable.
- The power socket must be within easy reach
- In order to avoid electric shock, do not bend, stretch or pull the power supply cable.
- Switch the Retro Turntable off at the mains power socket and unplug it if you are leaving it unattended for a long period of time (holidays etc).
- Do not attempt to open the product. This product does not contain any user serviceable parts.
- Unauthorised handling of the product may damage it and will void your warranty.
Moisture and water: To reduce the risk of fire or electric shock:
- Do not use this product near water or moisture.
-
Do not use this product near a bath or sink, near a swimming pool or anywhere else that water or moisture is present.
-
Do not place objects filled with water, such as a vase, on or near the product.
- Keep it dry. Avoid exposure to precipitation, humidity and liquids which could all affect the product circuitry.
Heat sources and flames
- Do not leave this product in high temperatures as electronic devices and plastic parts may warp in heat.
- Keep it away from bright sunlight or heat sources, such as a radiator.
- Never place any type of candle or naked flame on top of, or near the product.
Ventilation
- Do not install this product in a confined space.
- Allow adequate ventilation to prevent heat build-up.
- Do not block or cover slots, holes or openings on the product by placing on soft furnishings such as carpets, rugs or beds as these are provided for functionality and/or ventilation to ensure safe operation of the product.
- For indoor use only.
Care and cleaning
- All care and cleaning operations should be carried out with the device unplugged from the mains power.
- Occasionally wipe the cabinet with a lint free cloth.
- Never clean the unit with liquids or solvents.
OVERVIEW
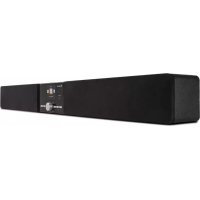
Sound Bar
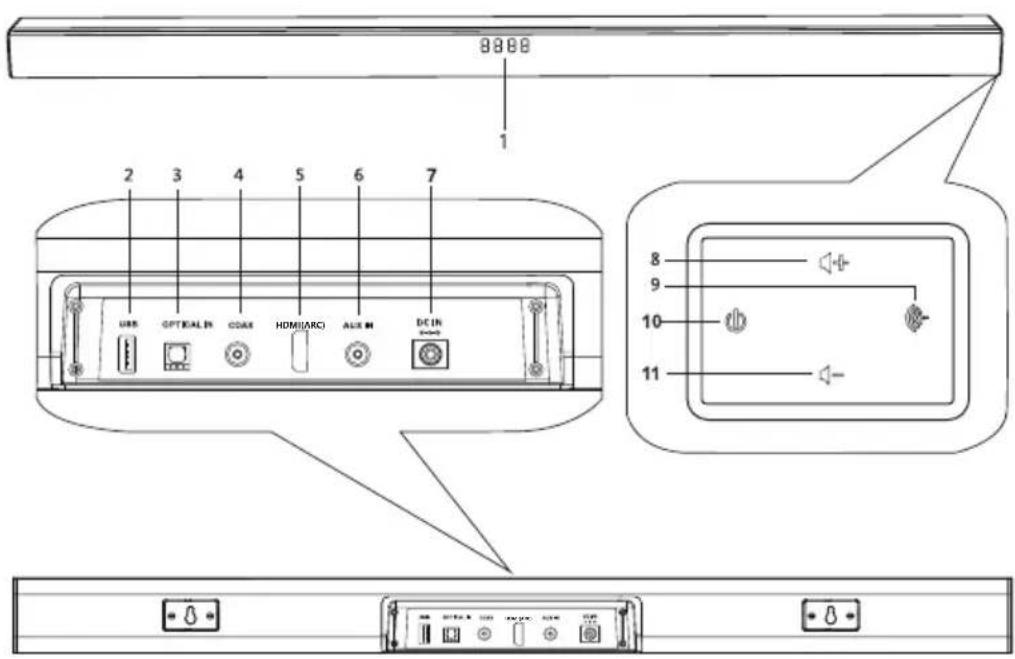
1 Indicator and Display
2 USB Input
3 Optical Input
4 COAX Input
5HDMl(ARC)
6 AUX Input
7 DC In
8 Volume Up(+)
Press to increase the volume level.
9 Mode Button (Cycle through different inputs) Press this button to select different operating modes [BT, USB, OPTICAL, COAXIAL,AUX).
10 Power/Standy Button Press to switch the unit between ON and STANDBY mode.
11 Volume Down[-] Press to decrease the volume level.
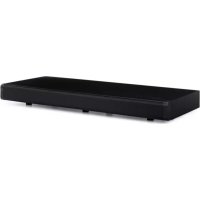
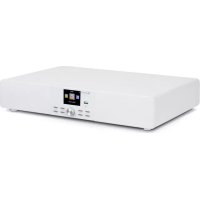
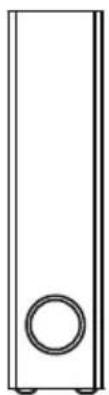
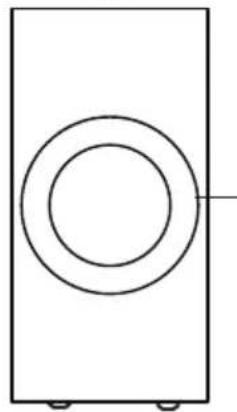
Subwoofer
Front
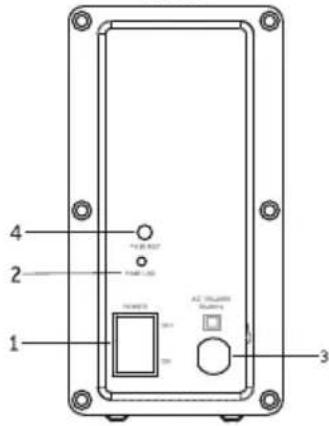
Back
Left
1 Power On/Off Switch
2 Wireless Pairing Indicator [Steady Red =Linked, Dim =Unlinked)
3 AC Socket
4 Pair key
5 Subwoofer Speaker
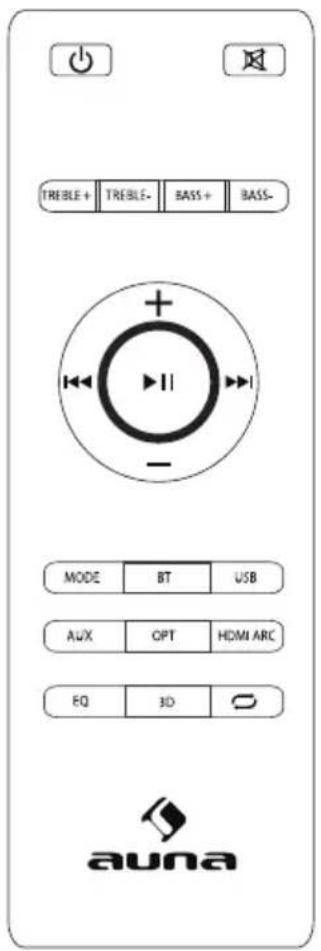
| Button Function | |
| Starting up or Power off | |
| Mute or recover the volume | |
| Treble+/- | Treble volume up or down |
| VOL+ | Volume turning up |
| VOL- | Volume turning down |
| K | USB and BT Previous |
| II | USB and BT Pause or Play |
| USB and BT Next | |
| Bass+/- | Bass volume Up or down |
| MODE | Line in,USB,BT,Optical,Coaxial,HDMI input shifting |
| BT Shifting into BT Mode | |
| USB Shifting into USB Mode | |
| HDMI Shifting into HDMI(ARL) Mode | |
| LINE Shifting into Line In Mode | |
| OPT Shifting into Optical In Mode | |
| Repeat | |
| 3D 3D Surround Open or closed | |
| EQ Shifting to different EQ | |
Insert/Replace Batteries in the Remote Control
- Open the battery compartment on the underside of the remote control.
- Insert 2pcs AAA/RO3 1.SV type batteries. Pay attention to the correct polarity (see the bottom of the battery compartment)!
- Close the battery compartment.
Note: Remove the batteries, if the remote control is not to be used for a long period of time [more than a month], as it might be damaged by a leaking battery.
Precautions Concerning Batteries
- If the battery leaks, wipe away the leakage inside the battery compartment and replace the battery with a new one.
- Do not use any batteries other than those specified.
- Do not heat or disassemble batteries. Never throw them in fire or water.
- Do not carry or store batteries with other metallic objects.
CONNECTIONS AND PLACEMENT
Connecting an external device using 3.Smma audio(analog) cable or coaxial/ optical (digital) cable
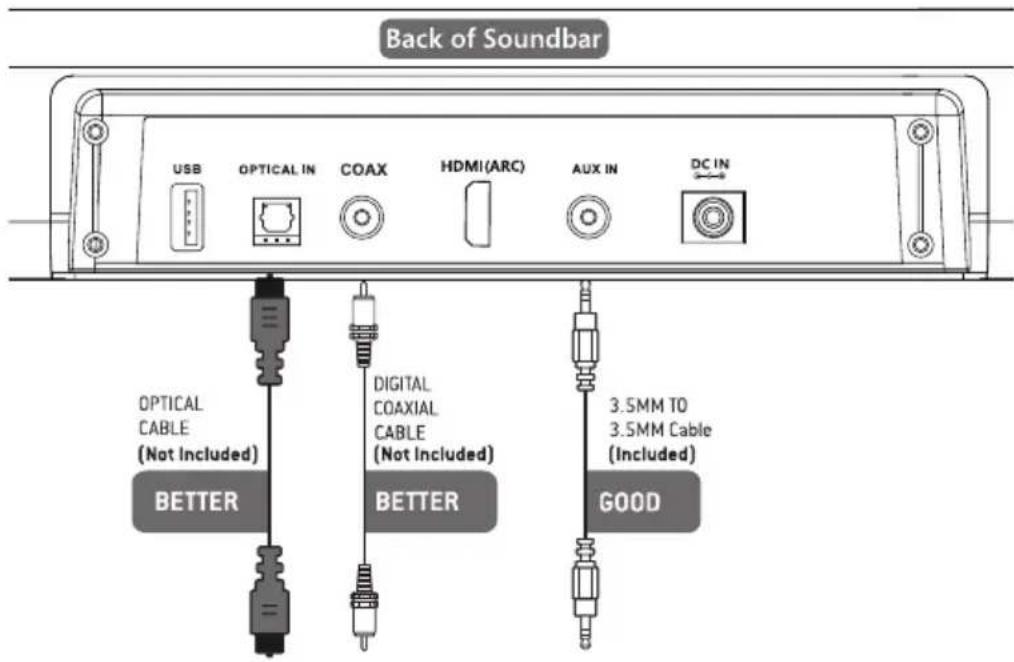
Not all TVs have the audio outputs shown above. To connect the Sound Bar directly to your other devices (Blu-ray player, game system, etc) see your device's user manual.
Placing the soundbar on a table
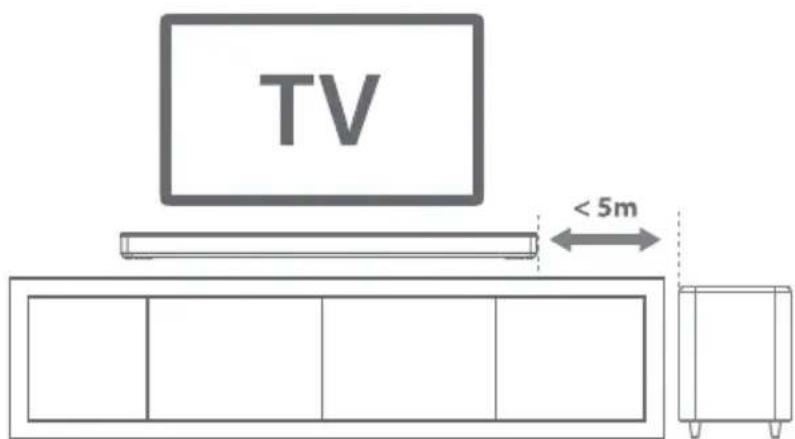
If your TV is placed on a table, you can place the sound bar on the table directly in front of the TV stand, centred with the TV screen.
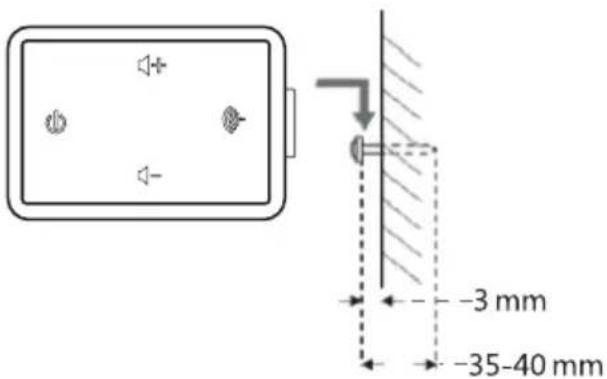
Wall-mounting the soundbar
- Drill 2 parallel holes(CD6mm each) in the wall, please refer picture below.
wall mounting holes

- Firmly fix 1 dowel into each hole in the wall if necessary dowels.
Dowel
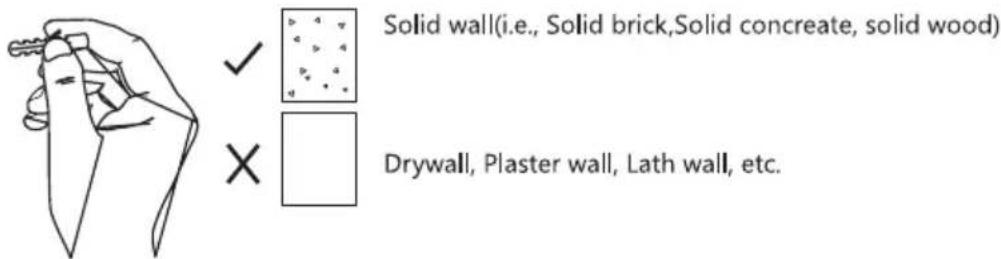
- Put the speaker onto the screws in the wall.
If you are unfamiliar with power tools or the layout of electrical wiring in the walls of your home.consult a professional installer.
OPERATION
Power on/standby 8c pairing the subwoofer to the sound bar at the first time use
Before connecting the AC power, ensure that the power supply voltage corresponds to the voltage printed on the back or the underside of the unit.
- Insert the DC plug of the AC-DC power adaptor into the DC IN jack on the back of the main unit, then connect the AC-DC adapter to a convenient wall outlet.
- Press the O button to switch the sound bar on. The LED display will light up and show the current playback mode.
- Plug the plug of subwoofer into the main power supply.
- Press the Power On/Off Switch on the back of the subwoofer to "ON" position to turn it on, the subwoofer will wirelessly connect with the sound bar automatically, the Wireless Pairing Indicator changes to steady red once the connection is carried out successfully.
Note: Only one playback unit can be connected to the speaker. If the speaker is already connected to another playback unit, the speaker will not appear in the BT selection list.
- If your device asks for a passkey [depending on the device manufacturers, model, and software version], then enter digits "OOOO"(four zeros) and press OK. If pairing has been carried out successfully, a prompt sound is heard, meanwhile, the "BT" symbol stops flashing.
- After the connection is complete, you can listen to music wirelessly through BT and select music from your BT device.
- Press the / buttons on the remote control or the" + / - " buttons on the main unit to raise/ lower the volume level.
- To disconnect the BT function, switch to another function on the unit or disable the function from your BT device.
Select different input mode
Press the Mode button repeatedly on the main unit or press Mode button on the remote control to select relevant input mode.
Notes:
- The LED display will go off automatically if the sound bar is sitting idle during any playback mode or there is no input signal received for about 3 minutes, press any button once to light up the display again.
- When the sound bar is sitting idle and no input signals are being received for about 15 minutes, the sound bar will automatically switch to
Standby mode.Playback with BT device
This device offers you the possibility to use a BT enabled device. The functional radius is limited to approx.10 metres depending on the surroundings and the unit used.
Logging on devices (Pairing)
Before using your speaker with a compatible device, such as a mobile phone, for the first time, you must pair and connect it to the device.
- Ensure, that the BT function is activated on your player (e.g. mobile phone).
- While in Power On mode, press the Mode button on the main unit or the BT button on the remote control to select the BT mode. "BT" flashes to show that the pairing mode is activated.
Pair the Speaker
- If you haven't paired the speaker with a device, or the paired devices list is empty, pairing mode is activated.
- Activate BT on the compatible device, and set it to search for compatible devices.
- Select the speaker name: "Areal Bar 750" from the list of found devices.
Note: Only one playback unit can be connected to the speaker. If the speaker is already connected to another playback unit, the speaker will not appear in the BT selection list.
- If your device asks for a passkey [depending on the device manufacturers, model, and software version], then enter digits "OOOO"(four zeros) and press OK. If pairing has been carried out successfully, a prompt sound is heard, meanwhile, the "BT" symbol stops flashing.
- After the connection is complete, you can listen to music wirelessly through BT and select music from your BT device.
- Press the / buttons on the remote control or the "+"/ "-" buttons on the main unit to raise/lower the volume level.
- To disconnect the BT function, switch to another function on the unit or disable the function from your BT device.
Tips:
- If a mobile phone on which you are playing music receives a call, the music will be interrupted. The sound however is not played back via the speaker. After you have ended the call, the devices are connected to each other again and playback continues.
- If there is an existing connection, press and hold the BT button on the
remote control for 3 seconds to break the current connection and initiate pairing mode
- The player will also be disconnected when your device is moved beyond the operational range. If you want to reconnect your device to this player, place it within the operational range.
- If the device is moved beyond the operational range, when it is brought back, check to see if the device is still connected to the player.
- If the connection is lost, follow the instructions above to pair your device to the player again.
- Press the / buttons on the remote control or the" ^+ /"-buttons on the main unit to raise/ lower the volume level.
- To disconnect the BT function, switch to another function on the unit or disable the function from your BT device.
Tips:
- If a mobile phone on which you are playing music receives a call, the music will be interrupted. The sound however is not played back via the speaker. After you have ended the call, the devices are connected to each other again and playback continues.
- If there is an existing connection, press and hold the BT button on the remote control for 3 seconds to break the current connection and initiate pairing mode
- The player will also be disconnected when your device is moved beyond the operational range. If you want to reconnect your device to this player, place it within the operational range.
- If the device is moved beyond the operational range, when it is brought back, check to see if the device is still connected to the player.
- If the connection is lost, follow the instructions above to pair your device to the player again.
Optical/coaxial (digital inputs) operation
- Ensure that the unit is well connected to the TV or other audio device via Optical cable [not included) or Coaxial cable [not included).
- While in Power On mode, press the Mode button on the main unit or press the Mode button on the remote control to select the OPTICAL or COAXIAL mode.
- Operate your audio device directly for playback features.
- Press the / buttons on the remote control or the "+"/ "-" buttons on the main unit to raise/lower the volume level.
Note: If there is no sound coming out from the sound bar make sure the audio [digital output) setting of your source player [e.g. TV, DVD player, game player] is set to PCM.
3.5 mm aux inputs operation
- Ensure that the unit is well connected to the TV or other audio device via a 3.5mm audio cable (Included].
- In Power On mode, press the Mode button on the main unit or the Mode button on the remote control to select the ALIX input mode.
- Operate your audio device directly for playback features.
Usb playback
This sound bar has also been developed in line with the latest technical advances in the USB field.
The wide range of different USB storage devices of all types which are currently on the market,
unfortunately do not allow us to guarantee full compatibility with all USB storage devices. For this
reason, in rare cases there may be problems in playing back files from USB storage devices. This is not a malfunction of the device.
- Connect a USB storage device directly into the port, after a few seconds, it will start music playback automatically.
- Press the or buttons on the remote control to skip to the previous or next track
HDML(ARC)
Use to connect compatible devices using a HDMI cable(not provided)
Note: During any input mode, if you plug a USB storage device into the unit, the input mode will automatically change to USB playback mode.
CLEANING AND MAINTENANCE
- Do not subject the unit to excessive force, shock, dust or extreme temperature.
- Do not tamper with the internal components of the unit.
- Clean the unit with a damp [never wet] cloth except metal contact or speaker grille. Solvent or detergent should never be used.
- Avoid leaving your unit in direct sunlight or in hot, humid or dusty places. Keep your unit away from heating appliances and sources of electrical noise such as fluorescent lamps or motors.
Cleaning the unit
- To prevent fire or shock hazard, disconnect your unit from the AC power source when cleaning.
- The finish on the unit may be cleaned with a dust cloth and cared for as other furniture, use caution when cleaning and wiping the plastic parts.
- If the cabinet becomes dusty wipe it with a soft dry dust cloth. Do not use any wax or polish sprays on the cabinet.
- If the front panel becomes dirty or smudged with fingerprints it may be cleaned with a soft cloth slightly dampened with a mild soap and water solution. Never use abrasive cloths or polishes as these will damage the inish of your unit.
TROUBLESHOOTING
Should you experience difficulties in the use of this player, refer to the following chart.
| Problem Possible Cause | Solution | |
| No power The unit is disconnected from the AC outlet. AC outlet is not functioning. | Reconnect to the AC outlet. Change to another outlet. | |
| Remote control does not work | Battery empty Installed battery wrong polarity Too far from the main unit. | Replace battery Re-install battery in correct polarity. Reduce the distance. |
| No sound Select wrong source input. | Select correct source input. | |
| Sound is distorted Volume level is set too high. | Decrease the volume level. | |
| Unit gets warm after extended play at high volume | This is normal. Turn the unit off for a period of time or lower the volume. | |
| Speaker cannot be connected via BT | BT is switched off at the audio source. The speaker has already connected with another device via BT. | Switch on the BT function in the audio source. Press and hold the BT button on the remote control for 3 seconds to break the current connection and initiate pairing mode. |
| No sound when playing audio via BT | Your BT device has not been paired. The volume control of your BT device is set at too low. The volume control of main unit is set too low. | Pair the speaker again to the audio source. Increase the volume of your BT device. Increase the volume of the main unit. |
| Poor sound quality from a BT device | BT device is almost out of range of the Sound Bar. | Move your BT device closer to the Sound Bar. |
If there is a legal regulation for the disposal of electrical and electronic devices in your country, this symbol on the product or on the packaging indicates that this product must not be disposed of with household waste. Instead, it must be taken to a collection point for the recycling of electrical and electronic equipment. By disposing of it in accordance with the rules, you are protecting the environment and the health of your fellow human beings from negative consequences. For information about the recycling and disposal of this product, please contact your local authority or your household waste disposal service.
This product contains batteries. If there is a legal regulation for the disposal of batteries in your country, the batteries must not be disposed of with household waste. Find out about local regulations for disposing of batteries. By disposing of them in accordance with the rules, you are protecting the environment and the health of your fellow human beings from negative consequences.
DECLARATION OF CONFORMITY

Manufacturer:
Chal-Tec GmbH, Wallstrasse 16, 10179 Berlin, Germany.
Importer for Great Britain:
Chal-Tec UK limited
Unit 6 Riverside Business Centre
Brighton Road
Shoreham-by-Sea
BN43 6RE
United Kingdom
The complete declaration of conformity of the manufacturer can be found at the following link: https://use.berlin/10034560
Chere cliente, cher client,
The lighting flash and arrow head within the triangle is warning sign alerting you of dangerous voltage inside the product
CAUTION
RISK OF ELECTRIC SHOCK DO NOT OPEN
CAUTION:TO REDUCE THE RISK OF ELECTRIC SHOCK DO NOT REMOVE COVER (OR BACK).NO USER SERVICIABLE PARTS INSIDE.REFER SERVICING TO QUALIFIED SERVICE PERSONNEL.

The excclamation point within the triangle is a warning sign alerting you of important instructions accompanying the product
ATTENTION : POUR RÉDUIRE LES RISQUES DE CHOÇS ÉLECTRIQUES, NE DEMIONTEZ AUCUN Cache. L'APPAREIL NE CONTIEN AUCUNE PIECE À ENTRETENIR. ADRESSEZ-VOUS UNIQUÉMENT À DES PERSONNELS QUALIFIÉS POUR LA MAINTENANCE. MISE EN GARDE / POUR RÉDUIRE LE RISQUE D'INCENDIE ET DE CHOC ÉLECTRIQUE, NE PLONGEZ PAS L'APPAREIL DANS L'EAU ET NE L'EXPOSEZ PAS À LA PLUIE OU À L'HUMIDITÉ.

Unit 6 Riverside Business Centre
Brighton Road
Shoreham-by-Sea
BN43 6RE
United Kingdom
The lighting flash and arrow head within the triangle is warning sign alerting you of dangerous voltage inside the product
CAUTION
RISK OF ELECTRIC SHOCK DO NOT OPEN
CAUTION:TO REDUCE THE RISK OF ELECTRIC SHOCK DO NOT REMOVE COVER (OR BACK).NO USER SERVICIABLE PARTS INSIDE.REFER SERVICING TO QUALIFIED SERVICE PERSONNEL.

The excclamation point within the triangle is a warning sign alerting you of important instructions accompanying the product
ATENCION: NO ABRIR LA CARCASA PARA EVITAR UNA DESCARGA ELECTRICA Y LESIONES PERSONALES GRAVES. EN EL INTERIOR NO EXISTE NINGUN COMPONENTE QUE EL CLIENTE PUEDA REPARAR. CONTACTE EXCLUSIVAMENTE CON UN SERVICIO TECNICO CUALIFICADO.
ADVERTENCIA. PARA REDUCIR EL PELIGRO DE INCENDIO O DESCARGA ELECTRICA, NO EXPONGA EL APARATO AL AGUA, A LA LLUVIA O A LA HUMEDAD.
Unit 6 Riverside Business Centre
Brighton Road
Shoreham-by-Sea
BN436RE
United Kingdom
Unit 6 Riverside Business Centre
Brighton Road
Shoreham-by-Sea
BN436RE
United Kingdom