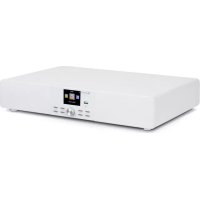
Stealth Base Connect - Soundbar Auna - Free user manual and instructions
Find the device manual for free Stealth Base Connect Auna in PDF.


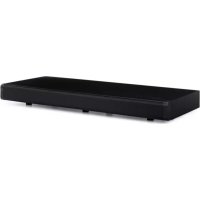
| Product Type | Connected soundbar |
| Brand | Auna |
| Model | Stealth Base Connect |
| Power supply | 100-240 V ~ 50/60 Hz |
| Total RMS power | 2 x 15 W + 30 W |
| Wireless connectivity | WiFi 802.11b/g/n (2.4 GHz), Bluetooth |
| Radio | FM (87.5-108 MHz), DAB (174-240 MHz) |
| Streaming | UPnP, DLNA, Internet Radio |
| Supported audio formats | MP3, WMA, WAV, AAC |
| Connectors | USB, Line-In, Line-Out, Aux In, Optical, Coaxial, IEC Antenna |
| Screen | LCD TFT 2.8" |
| Remote control | Yes (with AAA batteries) |
| Mobile app | Air Music Control (iOS/Android) |
| Batteries for remote control | 2 x AAA (not included) |
| Safety instructions | Read the manual carefully, do not open, unplug before cleaning |
| Cleaning | Unplug, use a dry cloth, no chemicals |
| Recycling | Do not dispose of in household waste, comply with local regulations |
| Compliance | Directive 2014/53/EU (RED) |
| Repairability | Repair only by qualified service, do not open |
Frequently Asked Questions - Stealth Base Connect Auna
User questions about Stealth Base Connect Auna
0 question about this device. Answer the ones you know or ask your own.
Ask a new question about this device
Download the instructions for your Soundbar in PDF format for free! Find your manual Stealth Base Connect - Auna and take your electronic device back in hand. On this page are published all the documents necessary for the use of your device. Stealth Base Connect by Auna.
USER MANUAL Stealth Base Connect Auna
Stealth Base Connect Database 25308
Soundbase 10035308
10035307
a u
www.auna-multimedia.com

bar
| Category | Value | |---|---| | Category 1 | 100 | | Category 2 | 100 | | Category 3 | 100 | | Category 4 | 100 | | Category 5 | 100 | | Category 6 | 100 | | Category 7 | 100 | | Category 8 | 100 | | Category 9 | 100 | | Category 10 | 100 | | Category 11 | 100 | | Category 12 | 100 | | Category 13 | 100 | | Category 14 | 100 | | Category 15 | 100 | | Category 16 | 100 | | Category 17 | 100 | | Category 18 | 100 | | Category 19 | 100 | | Category 20 | 100 | | Category 21 | 100 | | Category 22 | 100 | | Category 23 | 100 | | Category 24 | 100 | | Category 25 | 100 | | Category 26 | 100 | | Category 27 | 100 | | Category 28 | 100 | | Category 29 | 100 | | Category 30 | 100 | | Category 31 | 100 | | Category 32 | 100 | | Category 33 | 100 | | Category 34 | 100 | | Category 35 | 100 | | Category 36 | 100 | | Category 37 | 100 | | Category 38 | 100 | | Category 39 | 100 | | Category 40 | 100 | | Category 41 | 100 | | Category 42 | 100 | | Category 43 | 100 | | Category 44 | 100 | | Category 45 | 100 | | Category 46 | 100 | | Category 47 | 100 | | Category 48 | 100 | | Category 49 | 100 | | Category 50 | 100 | | Category 51 | 100 | | Category 52 | 100 | | Category 53 | 100 | | Category 54 | 100 | | Category 55 | 100 | | Category 56 | 100 | | Category 57 | 100 | | Category 58 | 100 | | Category 59 | 100 | | Category 60 | 100 | | Category 61 | 100 | | Category 62 | 100 | | Category 63 | 100 | | Category 64 | 100 | | Category 65 | 100 | | Category 66 | 100 | | Category 67 | 100 | | Category 68 | 100 | | Category 69 | 100 | | Category 70 | 100 | | Category 71 | 100 | | Category 72 | 100 | | Category 73 | 100 | | Category 74 | 100 | | Category 75 | 100 | | Category 76 | 100 | | Category 77 | 100 | | Category 78 | 100 | | Category 79 | 100 | | Category 80 | 100 | | Category 81 | 100 | | Category 82 | 100 | | Category 83 | 100 | | Category 84 | 100 | | Category 85 | 100 | | Category 86 | 100 | | Category 87 | 100 | | Category 88 | 100 | | Category 89 | 100 | | Category 90 | 100 | | Category 91 | 100 | | Category 92 | 100 | | Category 93 | 100 | | Category 94 | 100 | | Category 95 | 100 | | Category 96 | 100 | | Category 97 | 100 | | Category 98 | 100 | | Category 99 | 100 | | Total (Total) |INHALT
Technische Daten 4
natural_image
Front view of a control panel with buttons and a central square (no text or symbols visible)Gerät

natural_image
Simple geometric diagram with a vertical line dividing a rectangle (no text or symbols)Batteriehinweise:
2

- Favorite Station
- Favorite Location/Genre
- My Local Station
- Manually Add

Wireless Network (WPS PBC)
Datum und Uhrzeit


Wecker
INTERNETRADIO

Member of Berlin Brands Group
Handwerkerstr. 11
15366 Dahlwitz-Hoppegarten
Deutschland
natural_image
Symbol of a trash bin crossed out by a diagonal line, with no text or labels present.Berlin Brands Group UK Ltd
PO Box 1145
Oxford, OX1 9UW
United Kingdom
Congratulations on purchasing this equipment. Please read this manual carefully and take care of the following hints to avoid damages. Any failure caused by ignoring the items and cautions mentioned in the instruction manual are not covered by our warranty and any liability. Scan the QR code to get access to the latest user manual and other information about the product.

CONTENTS
Technical Data 36
Safety Instructions 37
Scope of Supply 38
Overview 39
Remote Control 41
Getting started 42
About Music Streaming 46
Menu Overview 48
Main Menu 50
Internet Radio 57
Media Center 59
Information Center 59
FM 60
DAB 60
BT 61
Aux In 61
Remote Control Via Apps 62
Disposal Considerations 63
Declaration of Conformity 63
TECHNICAL DATA
Item number 10035307, 10035308
Power supply 100-240 V \~ 50/60 Hz
RMS power 2 × 15 W + 30 W
WLAN 802.11b/g/n Encryption: WEP, WPA, WPA 2(PSK), WPS Frequency: 2.4 GHz Radio-transmission power: 14-20 dBm
BT Frequency band: 2402-2480 MHz Radio-transmission power: 10 dBm
FM Radio 87.5–108 MHz
DAB Radio 174-240 MHz
Streaming UPnP, DLNA
Supported file formats WMA, MP3
SAFETY INSTRUCTIONS
Read the safety instructions and the manual carefully, before operating the appliance.
- Keep the instructions manual in a safe play, so you can refer to it later.
- Follow all necessary operating steps.
- Do not place the appliance in a humid location, neither a place which with electromagnetic fields, direct sunlight, and do not expose it to high temperatures.
- If you do not use the appliance for a ling time, pull the plug and take the batteries out of the microphone.
- Pull the plug before cleaning the unit. Do not use volatile gasses, thinners or other chemical cleaners.
- Only use accessories produced by the manufacturer.
- The appliance must only be powered according the ratings on the rating label.
- Do not carry out maintenance and repairs by yourself. The dangerous voltage in the appliance can cause an electric shock, when being opened. Repairs must only be carried out by the qualified customer service.
- If a part must be replaced, it must comply with the manufacturer's specification or be an original spar part.
- If the appliance is broken or does not function properly, contact the customer service. Do not open the housing to make any repairs.
Designated use
- This device is for the reproduction of sound. It is solely designed and may only be used for this purpose. It may only be used in the manner described in this manual.
- This appliance is not intended for use by persons (including children) with reduced physical, sensory or mental capabilities, or lack of experience and knowledge, unless they have been given supervision or instruction concerning use of the appliance by a person responsible for their safety.
SCOPE OF SUPPLY

natural_image
Pure electrical circuit lines without any symbolsDevice

natural_image
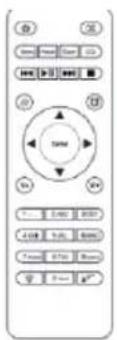
Simple geometric diagram with a vertical line dividing a rectangle (no text or symbols)User manualRemote
OVERVIEW
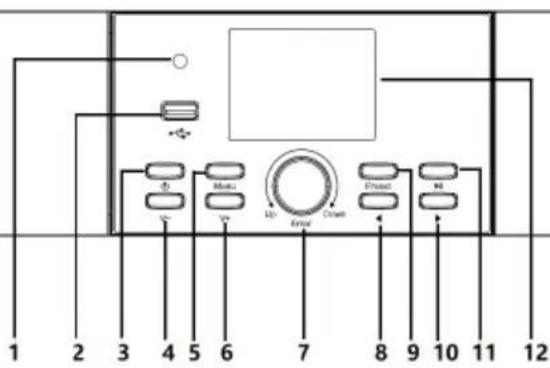
Front view

1 Remote Control Receiver
2 USB Jack
3 Power Button
4 Volume - Button
5 Menu Button
6 Volume + Button
7 Vol-/+UP/DOWN/ENTER Button
8 Left Button
9 Preset Button
10 Right Button
11 Play/Pause Button
12 TFT 2.8" LCD Display
Rear view

13 AC Cable
14 Line out jack
15 Line in jack
16 Aux in jack
17 Optical jack
18 Coaxial jack
19 IEC Antenna jack

20 Bass driver
Symbols on the display
 | Connection is being established, device functioning |
 | No wireless connection |
 | Wireless connection |
 | VHF radio reception: Mono |
 | VHF radio reception: Stereo |
 | VHF radio function select |
 | AUX Function select |
 | Speaker off |
 | Search |
 | Alarm on |
 | Internet radio station saved as preset |
 | FM radio station saved |

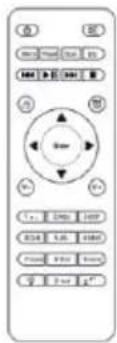
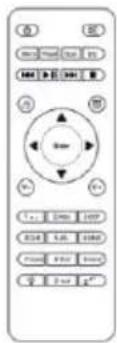
1 Standby button
2 Switch speaker ON/OFF
3 EQButton
4 Dimmer Button
5 Sleep Button
6 Alarm Button
7 Prev Button
8 Next Button
9 Stop Button
10 Play/Pause Button
11 Mode Button
12 MenuButton
13 Up cursor button
14 Left cursor button
15 OK Confirm selection
16 Right Cursor button
17 Down cursor button
18 Decrease volume
19 Increase volume
20 0.....9 Call up favourites/Memory;input letters and numbers
21 Fav Button
22 Fav+ Button
GETTING STARTED
Battery installation (remote control)
Battery installation(Battery not included):
- Press the tab on the battery door and lift it off.
- Install two (2) x AAA size batteries into the battery compartment as the figure on right and the polarity markings inside battery compartment.
- Replace the battery door.

natural_image
Diagram showing a battery cell with positive and negative terminals, connected to two batteries (no text or symbols present)Follow these precautions when using a battery in this device:
- Use only the size and type of battery specified.
- Besure to follow the correct polarity when installing the battery as indicated in the battery compartment. A reversed battery may cause damage to the device. batteries to prevent damage or injury from possible battery leakage.
- Do not dispose of battery in fire. Battery may explode or leakage.
- Clean the battery contacts and also those of the device prior to battery installation.
- Do not mix different types of batteries together (e.g. Alkazline and Carbon-zinc) or old batteries with fresh ones.
- If the batteries in the device are consumed or the device is not to be used for a long period of time, remove the
- Do not try to recharge the battery not intended to be recharged; it can overheat and rupture.
Get the network ready
For wireless LAN(WLAN) network connection: Check if WLAN LINK/ACT light of the wired/wireless access point or router is illuminated. Consult the user guide of that for any questions.
Note: WiFi allows date transfer over short distances within 20 meters without the need of cabling between the devices. Any walls or ceilings may reduce the strength of the WiFi connectivity.
- Therefore try to locate the StealthBaseConnect and/or the access point within the distance above, and avoid any obstacles between two devices.
- Connect the power adaptor to the back of the appliance and plug into DC IN socket.
- When it is first time running the device, the system will ask you to set Language and Network Configurations.
123


- Select Yes to establish connection to the network
- Select Yes(WPS)(Only for WPS routers). Then press the WPS button on your router.
If you answer 'Yes', the display goes to scanning for Wireless Network and shortly afterwards a list of available wireless networks will appear.
1

2

The number of bars in the wireless symbol in front the network name(SSID) shows the relative signal strength of the network. The key symbol indicates that the network is password-protected.
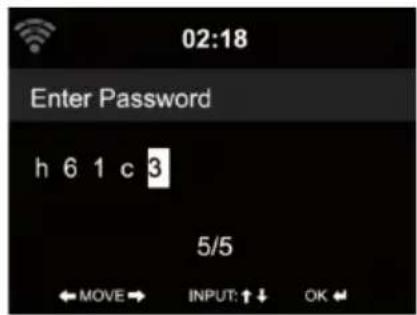
If the device does not find any wireless networks, No wireless Networks found' appears on the display. Change your location, if necessary. And check your WLAN router. You can find the SSID of your Access Point in the configuration of the Access Point(Router). Select your network and confirm with OK. If your WLAN is password-protected, you will be prompted to enter your password. Enter the password using the buttons on the device.
Note the use of upper and lower case when entering the password. You can rotate reel to choose the code. If it is accidentally pressed '▶' to move a redundant entry. Press '◀' to correct.
With remote control
The cursor indicates the current entry space.
Press the corresponding number button repeatedly.
0 0(delete entry)
1 1(space) @" # \$ % & ( ) * ' + - { \ | } < >?......
2 2 ABC abc
3 3DEFdef
4 4 G H l g h i
5 5JKLjkl
6 6MNOmno
7 7PQRSpqrs
8 8TUVtuv
9 9WXYZwxyz
buttons:
◀: Go to previous entry space, entry can be overwritten
▶: Go to next entry space, the last entry is saved
▼ ▲ Select number/letter
OK on the remote control to confirm entire entry.
It may take a few seconds to establish the connection to the network.

Once the connection is established, the main menu appears with the main menu items;
- Internet Radio: Access to worldwide radio stations
• Media Centre: Access to your UPnP devices via software with streaming capability.
• Information Center: Access to weather, financial and system information - Configuration: Various system settings
- Local Radio: Access to radio stations in a particular region (e.g. only German stations)
- My media U :Access to an online media library. This menu item only appears if the function has already been enabled under Confi guration
- Manage my media U.

Press the standby button to enter standby mode. The time, date and any active alarm times display on the screen.
![3/3/2018 Sat 12 9 3 6 [06:30] [08:00]](/content/2026/03/554405/images/31cca8a39f5cd041fecaaa5893c049d56d23c579453db3c9a582d0f0c709e7e5.jpg)
If you have setup a network connection, and use 'StealthBaseConnect' again within the network. StealthBaseConnect will automatically make the connection. In case you desire to change the network, enter configuration to setup the corresponding connection.
Rotate the UP/DOWN roll to input numbers/letters.
Once you are on the letter you want, press ▶ to move to the next entry. When you are at the end the input, press Enter to confirm. You can press ◀ to move to previous entry.
Rotate the volume reel to adjust the volume.
ABOUT MUSIC STREAMING
'StealthBaseConnect' is the default device name for DLNA, and you may rename it as you like.
The information below is the introduction of how to setup up media steaming from PC or other media server. Study the own instruction of the software of apps you use to enjoy music streaming if necessary.
Make sure the music files are in the format of MP3. WMA, WAV or AAC for music steaming to StealthBaseConnect.
Refer to section "Media Center" for the details of the control on StealthBaseConnect for music steaming playback.
UPnP
To enjoy the streaming music form PC, the following steps are to be done on the PC:
Connect the PC to the network.
Ensure StealthBaseConnect is powered on and connected to the same network.
Open the UPnP platform Windows Media Player (11 or later).
Alternatively, other platforms or server such as Windows Media Connection may be used.
Add the audio files and folders you want to share with StealthBaseConnect to the media library.
You may also enjoy the streaming music from other music server. Such as smart phone (Android platform).
- Connect the mobile to the network
- Search and install media sharing apps form Google Play.
- Add the audio files form your mobile you want to share.
After setup the shared server, choose the music and control playback on StealthBaseConnect.
DLNA Function
Besides UPnP, StealthBaseConnect supports DLNA function, you share the music files form PC or Android mobile, and you use your PC, Android mobile or iPhone / iPad to control music playback on the StealthBaseConnect. (It is not required to control each playback on the StealthBaseConnect)
The PC system requirement for DLNA is Windows 7 and Windows Media Player 12 minimum. Setup as below:
Firstly, share the media on your PC to StealthBaseConnect. Control Panel > Network and Internet Network and sharing Center > Media streaming options.
You may search and install any free or commercial DLNA apps from Google Play or Apple Store if you are using Android mobile, tablet or iPhone/iPad. It is suggested to use Bubble UPnP, Media Share on Android mobile, tablet or iPhone/iPad.
Some apps may not support streaming music form iPhone/iPod but iPhone/iPod could still be used to control steaming music from other servers. Procedures for playing shared music on the app are as follows:
Select StealthBaseConnect as the player. Some apps may allow to play the music to multi players at the same time. Select music server and choose the music. Some app can create a playlist if you choose several music.
When using DLNA music steaming function on Music Link, you can only control the volume and standby via the unit. It is restricted to control the other functions.
Stop DLNA on PC, mobile or tablet before you resume Music Link's own control.
MENU OVERVIEW

flowchart
graph TD
    A["Standby"] --> B["My mediaU"]
    B --> C["Internet Radio"]
    C --> D["My Favourite"]
    C --> E["Radio Station Music"]
    C --> F["Sleep Radio"]
    C --> G["History"]
    C --> H["Service"]
    I["Local Radio"] --> J["Information Center"]
    J --> K["Weather information"]
    J --> L["Financial information"]
    J --> M["System Information"]
    N["DAB Radio"] --> O["FM Radio"]
    P["Media Center UPnF"] --> Q["My Playlist"]
    P --> R["Clear My Playlist"]
    S["BT"] --> T["End"]
Menu overview page 2

flowchart
graph TD
    A["AUX"] --> B["AUX IN"]
    B --> C["Line in"]
    C --> D["Optical"]
    D --> E["Coaxial"]
    F["Configuration"] --> G["Manage my mediaU"]
    G --> H["Network"]
    H --> I["Date & Time"]
    I --> J["Alarm"]
    J --> K["Timer"]
    K --> L["Language"]
    L --> M["Dimmer"]
    M --> N["Display"]
    N --> O["Power management"]
    O --> P["Sleep Timer"]
    P --> Q["Buffer"]
    Q --> R["Weather"]
    R --> S["FM Setup"]
    S --> T["DAB Radio Setup"]
    T --> U["Local Radio Setup"]
    U --> V["Playback Setup"]
    V --> W["DNLA Setup"]
    W --> X["Equalizer"]
    X --> Y["Resume when power on"]
    Y --> Z["Software update"]
    Z --> AA["Reset to default"]
MAIN MENU

Under the main menu, you can select the following modes: My media U, FM Radio, Internet Radio, Local Radio, Configuration, Information Center, Media Center.
Configuration


Manage my mediaU
My mediaU media library – managing radio stations via Internet.
In order to access your favourite radio stations worldwide, at any time and using any device with streaming capability, you can create a free account for a media library at www.mediayou.net and add as many devices as you like. You can access the service with a username and password of your choice.

You must also know the MAC address of your device (called a serial number on Media You) in order to register this device under" Personalize Your Internet Radio".
You can find the AC address of the Internet radio under Information Center > System information > Wireless Info > MAC Address.
After registering the device, you must enable this function under
Configuration > Manage my mediaU. So that the Internet radio can access the media library.

The device automatically connects to your account and displays what has been saved there:
- Favourite Station
• Favourite Location/Genre - My Local Station
- Manually Add
Depending on your personal My mediaU settings, the display on the Internet radio may look different.
If the device has not yet been registered with MediaYou, a corresponding message appears when you wish to enable My mediaU.
If you have registered a device with multiple accounts, these will be dispolayed after the activation and you can select the account you wish to use. It is not necessary to enter a password.
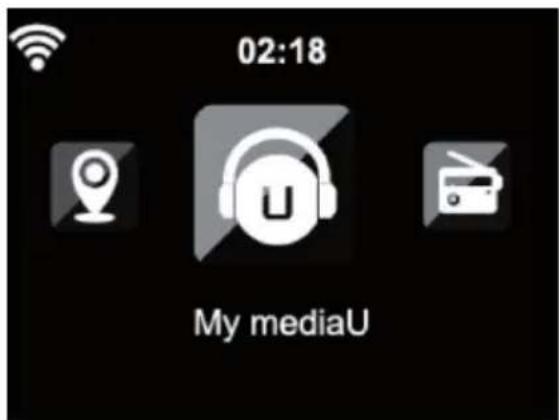
The menu Item my mediaU also appears in the main menu. You can find the selection again here:
- Favourite Station
• Favourite Location/Genre - My Local Station
- Manually Add
You can also find this selection in the media library, where you can assign and manage the radio stations accordingly.


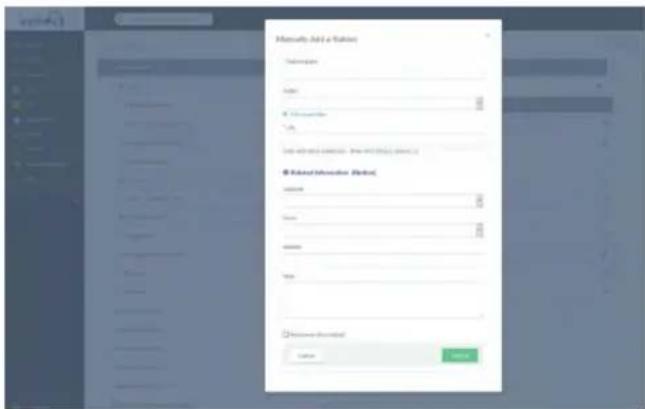
Under add manually, you can link the device to podcasts, for example. You must know the URL of the podcast for this purpose.
- Fill in the highlighted fields in your MediaYou account under "Add Manually".
- On the Internet radio., go to Configuration > Manage my mediaU and enable once again.
- Under My mediaU > Manually Add, you can find all manually added folders and addresses and can select the podcast.
The following podcast formats are supported:
- asx
- m3u
- pls
- pure streaming with HTTP, RTSP, MMS protocol
Network

Wireless Network Configuration
Enable / disable WiFi network. When you enable the WiFi network, the system will connect automatically.
You may refer to the section 3, Getting Started for the network setting.
Wireless Network (WPS PBC)
If you are using a router with WPS/QSS button, you may set up the network connection simple via WPS function. Enter it go to press the WPS/QSS button on your router within 120 seconds. The connection between the router and StealthBaseConnect will then be configured automatically.
Manual Configuration
You can choose DHPC (which IP assigned automatically) or manually input IP address for wireless network connection.
When you select manual setting for wired connection, the following to be entered:
- SSID (the name of Access Point);
- IP Addressd
- Subnet Mask;
- Default Gateway;
- Preferred DNS Server;
- Alternate DNS Server.
You may choose (Manage) specific network if you have setup more than one network connection within an area.


Check Network when Power On
Enable / disable WiFi network.
When you enable the WiFi network, the system will automatically search the available AP. Select you required AP. Enter WEP or WPA code to connect the WIFI. If the wireless network connection is not existed or failed, the icon at the top left corner will have a cross on it.
Date and Time

The date and time settings can only be made if the Internet radio is connected to a wireless network.
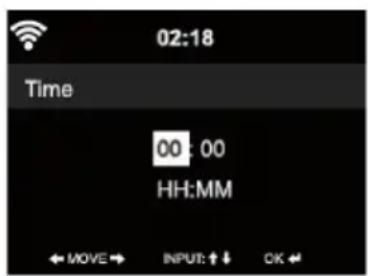
Setup the date and time: The internet radio takes the date and time automatically from a central server once a network connection has been established. However, you will need to change the time manually to account for the change from winter time to summer time.
- Set time format display as 12 Hour or 24 Hour.
- Set date format in the positions of YY (year), MM (month) and DD (day)
- YY/MM/DD, DD/MM/YY or MM/DD/YY.
- Turn on/off the Daylight Saving Time (DST).
- Confirm with Enter or by pressing the reel.
With a wireless network connected, GMT (+01:00) time is a time reference of time setting. Add or deduce the hour according to your time zone when you set the time.
Alarm

There are three independent alarms – 2 alarms of absolute time setting (Alarm 1 and Alarm 2) and 1 alarm for relative time setting (NAP Alarm). Select Alarm in the menu.


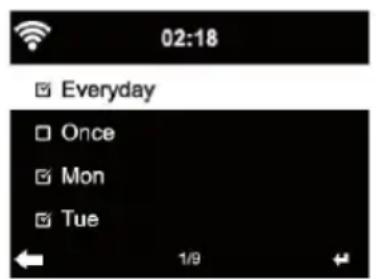
The first two alarms are similar to the normal alarm, turn on then set the time and set it alarms Everyday, Once or every specific day of week.
Select Alarm time. Set the respective values using the Navigate reel on the device and switch to the next entry field using the Confirm or by pressing the reel.
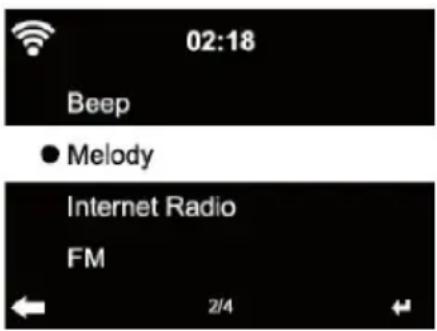
Choose Sound to set the sound to Beep, Melody or IR/DAB/FM. An alarm symbol will appear on the top of the display next to the time.
Note that the alarm source is from the favourite internet radio stations if Alarm Sound is set to be IR/DAB/FM. It Can only set one same IR/DAB/FM station for alarm 1 and Alarm 2. When it reached the alarm time, if set the alarm source is internet Radio, the unit connects to the internet if the set network is available. Therefore there may be some delay from the alarm to the radio play. If no network is connection in one minute, the alarm will change to melody automatically.
After NAP Alarm is set, it alarms once in 5/10/20/30/60/90/120 minutes depending on which one you have set.
You may choose Alarm Volume to configure the volume of the alarms. When the alarm(s) is /are set, there will be a clock icon at the bottom of the display. The clock icon with alarm time will also clearly display on the standby mode screen.
You may choose Alarm Volume to configure the volume of the alarms. When the alarm(s) is /are set, there will be a clock icon at the bottom of the display. The clock icon with alarm time will also clearly display on the standby mode screen.
During alarm, press Standby button to stop the alarm, Press the SLEEP button on the device or press any key to enter to snooze mode. It will alarm again in 5 minutes.
Language
Select the OSD language: English /German/ French /Hungarian/ Czech/ Slovakian /Polish /Turkish.
Dimmer
Configure the brightness of backlight on the display.
Select "Power Saving" to set the brightness of backlight in standby mode, and select "Turn On" to set that in operation mode.
Choose Dimmer Timer to set the duration of the radio changing backlight when you are not controlling it.
Display
Set the display to Color display or Monochrome display.
Power Management
Configure to go to standby mode automatically during in the menu or/and without Wifi signal.
Choose the power management timer (5/15/30mins) to set the duration of the radio to switch standby mode automatically when you are not controlling it.
Choose "Turn Off" to ignore the power management function.
Sleep Timer
Turn off or set the sleep time of 15/30/60/90/120/150/180 minutes. Once the time is set, there will be a bed icon with remaining minutes at the top right corner and StealthBaseConnect will turn to standby then.
Buffer
Configure the buffer time of the music playback, 2/4 /8 seconds.
Weather
StealthBaseConnect is able to display the current weather information (refer to 5.9.1) under standby mode. Turn on Standby Display and set Temperature Unit (°C or °F) to get the weather displayed at the standby mode.
When it is turned on, the current time and the current weather will display in alternative 10 seconds.
Playback Setup
Select the playback mode of media center – Off (no repeat or shuffle), Repeat all, Repeat one, or Shuffle.
DLNA Setup
Default device name for DLNA is StealthBaseConnect. You may rename it for DLNA setup on the PC or mobile.
Equalizer
Default equalizer is Normal. You may change to Normal, Flat, Jazz, Rock, Soundtrack, Classical, Pop, or News.
Resume When Power On
The system is default to resume the main menu when switching on the unit. If turn this setting on, the system will remain in the internet radio playback. If you were listening to internet radio or media center before switch off the unit.
Software Update
Update software. If there is an updated software version on the server, the system will notify you when you return to the main menu.
Reset
Restore the default settings.
After the device is reset, the system will move to Language setting menu.
And it will automatically turn to Network setting menu once the OSD language is elected.
FM Setup
Choose MONO/STEREO mode when listening to FM station.
My MediaU
Display and playback your own mediaU station list on the mediaU server. Set your account first.
INTERNETRADIO
After the connection of any station is succeeded, the bit rate and the format of the station will display on the playing screen.
My Favourite
List of my favourite preset stations. It supports 250 favourite entries including station and folder.
During the station playing screen, press and hold Preset to save the station as my favourite. You may replace the previous saved station to the new one.
The folder symbol 📋 appears in the top line of the display while the device is saving. Or press and hold the shortcut preset number key (1, 2, 3) on the device to save the station on its location Preset #1, #2, #3.
If the Selected station have been saved, you cannot save it again.
The saved stations are showed under this menu. You may also press Preset to enter the saved station list.
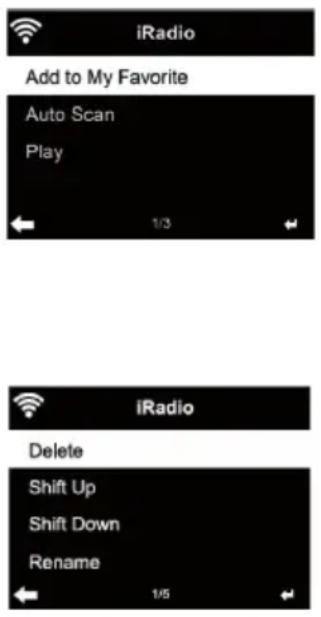
Under the preset station list, move to your station, press Enter to listen, You may also press ▶ to enter its submenu to Delete (deletes a radio station from the favourites list), Shift Up/down along the list, Rename (you can give the radio station a name of your choice), Play, or Use as Alarm Sound (if you chose internet as alarm sound in alarm configuration).
Press PRESET, then rotate the UP/DOWN reel on the device to recall the saved station.
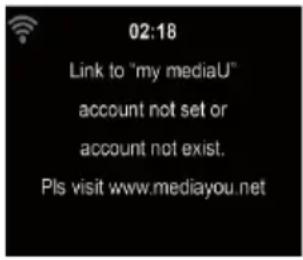
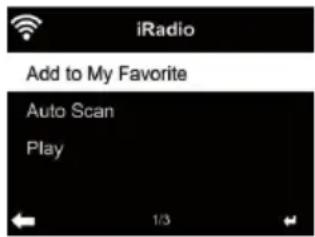

250 storage spaces are available for your favourites.
Radio Station/Music
Stations are categorized into Global Top 20, Genre, Country/Location and Highlight.
Enter to continue the subcategories and choose the station to listen.
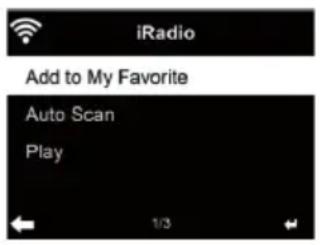
For each station, press Enter to play directly. You may press Right to enter its submenu – you can Add to Favourite, Auto Scan, Play or Use as Alarm Sound (if you chose internet as alarm sound in alarm configuration).
If you select Auto Scan, it becomes the playback of marquee for each station in the subcategory. Each station plays 30 seconds until all have played. Or your press Enter to stop the marquee listening. Press Info to view the display information of the station.
History
A list of last listened stations. It can save up to 10 history stations. For each station, press Enter to play directly. You press ▶ to enter its submenu – you can select Add to Favourite, Auto Scan, Play or Use as Alarm Sound (if you chose internet as alarm sound in alarm configuration).
When you choose Auto Scan, it becomes the playback of marquee for each station in the history. Each station plays 30 seconds until all have played or you press Enter to stop the marquee listening.
Local Radio
There is a shortcut Local Radio under internet radio so that you can easily go to the station list of your location.
The device can use the IP address to detect its current location and can then automatically generate a list of local radio stations. However, you can also enter a different country.
MEDIA CENTER
UPnP
If you have set up shared media, you should see the shared media form UPnP.
If you have more than one computer sharing media, the alternative are listed. SELECT the shared media you want to play.
Press Menu to view the display information of the playing track.
Tips. The radio can only read the track with the file name less than 40 characters. And the characters should be in European language. If you encounter failure of reading the track under UPnP mode, you may try to rename the file. However, if the track is still unable to play, you can try converting the file to different formats.
My Playlist
You can create a play list of favourable music from UPnP. When you playing the music, press and hold Enter to save it into My Playlist.
Clear My Playlist
You can remove all the saved music under My Playlist
INFORMATION CENTER
Weather Information
There are weather information and forecasts for 2000 cities. Select the country and then the city for the weather details.
It is able to display the weather information on this standby mode. On the weather information page, press Right, then show "Add to Standby". If you want the weather of the city you selected displaying on the Standby, press Enter to set the city to displaying on the standby mode.
Financial Service
View the stock index from around the world.
System Information
Check out the version of the system, and the details of connected network. The information includes MAC address which you are required to fill in when registration of my mediaU membership.
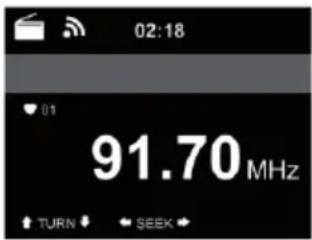
FM
FM radio mode receives analogue radio from the FM band
Press Left/Right button on the device or using the Left/Right button of remote control to search FM station, The frequency display starts to run up as the device scans the FM band, It stops when it has received a station. You may press UP/DOWN on the remote control to tune station manually, Each step moves 0.05MHz.
Preset and Recall
Press and hold the Preset button on the device or press the FAV+ button on the remote control to save the station.
You can save up to 99 station, Press PRESET button on the device or FAV button on the remote control, then press on the remote control or press PRESET button on the device to recall the saved station.
Alternatively, you can let the system scan ALL station for you by pressing ENTER or Scan on the remote control. The searched station will automatically be stored in preset station list.
DAB
Press the MENU button or on the remote control and device (if in FM mode) to switch to DAB mode. The display will show 'DAB Mode'.
*To listen to the stored DAB stations use either up and down buttons or either Left and Right buttons on the remote control to cycle through the stations. When you reach the desired station press the OK button on the remote control and the Enter button on the device in to begin playback of that station.
DAB quick scan
Press the left button button on the device and remote control to begin the scan. You will see the scan slide chart to indicate the progress.
Once the scan has finished, the radio will select the first alphanumeric station and begin playback.
Preset and Recall
Press and hold the Preset button on the device or press the FAV+ button on the remote control to save the station.
You can save up to 99 station, Press PRESET button on the device or FAV button on the remote control, then press on the remote control or press PRESET button on the device to recall the saved station.
BT
Press the MENU button or on the remote control and device (if in FM mode) to switch to BT mode. The display will show 'BT Disconnected'.
Make sure that no other BT device is connected to the radio. "No Connection" will appear on the display.
Activate BT mode on the device that you want to connect. Look for The radio on the list of detected devices on the BT device (refer to the instruction manual of the device). Once the devices have found each other, the radio will appear as 'StealthBaseConnect' on the BT device.
Select 'StealthBaseConnect' from the list. If you are required to enter a PIN code, enter 0000 (four zeros). Certain devices may also require you to approve the connection.
Once the connection has been successful, "Connected" will appear on the display of the radio.
Start playback on your BT device.
Control the playback from the BT device or from the radio using the Vol+/Vol- on the device. Adjust the volume both on the BT device and the radio. To disconnect a connected BT device: Press and hold down the Enter button for 3 seconds. The message "No Connection" will appear on the display.
AUX IN
Connect an external audio source (e.g MP3-Player/set top box) with the AUX-Input at the back of the device, to play the audio via the RFA2011 IR.
You can use the UP/DOWN to select the AUX/LINE IN/OPTICAL/COAXIAL, press Enter button on the device or OK button on the remote control to selected.
REMOTE CONTROL VIA APPS
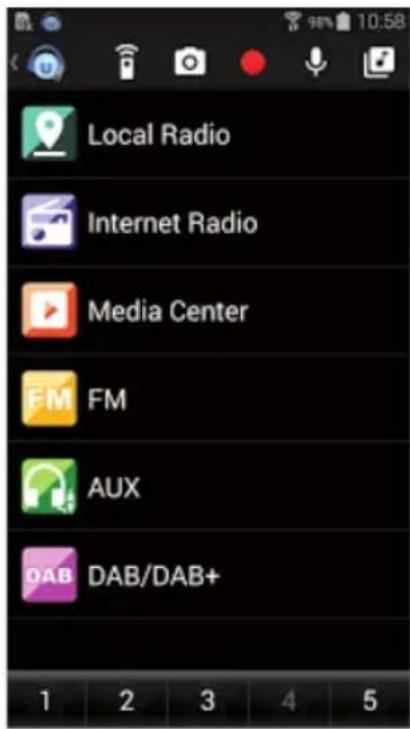
Some apps for Android, e. g. Air Music Control, let you control the internet radio from your smart phone or tablet.
As soon as the devices are connected, the same menu structure shown on the internet radio will appear on the smart phone/tablet. You can select all functions just like on the radio. The selected functions /menu items shown on the radio will change according to the actions taken on your mobile device.
If you are controlling the internet radio via app, a UPnP connection to Windows Media Player may not be possible.
Control via Air Music Control
You can operate the internet radio via you smartphone or tablet.
Download "Air Music Control" from the "Google Play Store" or "Apple AppStore".
The devices must be connected to the same network.
DISPOSALCONSIDERATIONS

natural_image
Symbol of a trash bin crossed with a diagonal line, no text or labels presentIf there is a legal regulation for the disposal of electrical and electronic devices in your country, this symbol on the product or on the packaging indicates that this product must not be disposed of with household waste. Instead, it must be taken to a collection point for the recycling of electrical and electronic equipment. By disposing of it in accordance with the rules, you are protecting the environment and the health of your fellow human beings from negative consequences. For information about the recycling and disposal of this product, please contact your local authority or your household waste disposal service.
This product contains batteries. If there is a legal regulation for the disposal of batteries in your country, the batteries must not be disposed of with household waste. Find out about local regulations for disposing of batteries. By disposing of them in accordance with the rules, you are protecting the environment and the health of your fellow human beings from negative consequences.
DECLARATION OF CONFORMITY

Manufacturer:
Chal-Tec GmbH, Wallstrasse 16, 10179 Berlin, Germany.
Importer for Great Britain:
Berlin Brands Group UK Ltd PO Box 1145 Oxford, OX1 9UW United Kingdom
Hereby, Chal-Tec GmbH declares that the radio equipment type Stealth Base Connect is in compliance with Directive 2014/53/EU. The full text of the EU declaration of conformity is available at the following internet address: use.berlin/10035307
For Great Britain: Hereby, Chal-Tec GmbH declares that the radio equipment type Stealth Base Connect is in compliance with the relevant statutory requirements. The full text of the declaration of conformity is available at the following internet address: use.berlin/10035307
Chère cliente, cher client,
SOMMAIRE
Fiche technique 66
Appareil


natural_image
Simple geometric diagram with a vertical line dividing a rectangle (no text or symbols)natural_image
Diagram showing a battery cell with positive and negative terminals, connected to two batteries (no text or symbols present)2


Date et heure


Alarme
INTERNETRADIO
•
BT
CONTRÔLE PAR APPLICATIONS
Certaines applications Android telles que Air Music Control permettent de
natural_image
Symbol of a trash bin crossed out by a diagonal line, with no text or labels present.DÉCLARATION DE CONFORMITÉ

Fabricant :
Chal-Tec GmbH, Wallstraße 16, 10179 Berlin, Allemagne.
CONTENIDO
Datos técnicos 96
natural_image
Front view of a control panel with buttons and a central square (no text or symbols visible)Aparato

natural_image
Simple geometric diagram with a vertical line dividing a rectangle (no text or symbols)18 Conector coaxial
19 Antena IEC

2


Fecha y hora


Despertador
BT
natural_image
Symbol of a trash bin crossed out by a diagonal line, with no text or labels present.INDICE
Dati tecnici 126
natural_image
Front view of a control panel with buttons and a central square (no text or symbols visible)Dispositivo


natural_image
Simple geometric diagram with a vertical line dividing a rectangle (no text or symbols)ManualeTelecomando
DESCRIZIONE DEL DISPOSITIVO
Parte frontale
2
Rete wireless (WPS PBC)

Data e ora


Sveglia
RADIOINTERNET
La mia playlist
BT
natural_image
Symbol of a trash bin crossed out by a diagonal line, with no text or labels present.natural_image
Abstract white logo design on dark background, resembling stylized letter 'S' or wave form (no text or symbols)
- Stealth Base Connect Database 25308
- a u
- INHALT
- Batteriehinweise:
- Wireless Network (WPS PBC)
- Datum und Uhrzeit
- Wecker
- INTERNETRADIO
- Member of Berlin Brands Group
- CONTENTS
- TECHNICAL DATA
- SAFETY INSTRUCTIONS
- Designated use
- SCOPE OF SUPPLY
- OVERVIEW
- GETTING STARTED
- Battery installation (remote control)
- Follow these precautions when using a battery in this device:
- Get the network ready
- With remote control
- ABOUT MUSIC STREAMING
- UPnP
- DLNA Function
- MENU OVERVIEW
- MAIN MENU
- Configuration
- Manage my mediaU
- Network
- Wireless Network Configuration
- Manual Configuration
- Check Network when Power On
- Date and Time
- Alarm
- Language
- Dimmer
- Display
- Power Management
- Sleep Timer
- Buffer
- Weather
- Playback Setup
- DLNA Setup
- Equalizer
- Resume When Power On
- Software Update
- Reset
- FM Setup
- My MediaU
- My Favourite
- Radio Station/Music
- History
- Local Radio
- MEDIA CENTER
- My Playlist
- Clear My Playlist
- INFORMATION CENTER
- Weather Information
- Financial Service
- System Information
- FM
- Preset and Recall
- DAB
- DAB quick scan
- BT
- Start playback on your BT device.
- AUX IN
- REMOTE CONTROL VIA APPS
- Control via Air Music Control
- DISPOSALCONSIDERATIONS
- DECLARATION OF CONFORMITY
- Manufacturer:
- Importer for Great Britain:
- SOMMAIRE
- Date et heure
- Alarme
- CONTRÔLE PAR APPLICATIONS
- DÉCLARATION DE CONFORMITÉ
- Fabricant :
- CONTENIDO
- Information
- Adjust Information (Result)
- Fecha y hora
- Despertador
- INDICE
- DESCRIZIONE DEL DISPOSITIVO
- Parte frontale
- Rete wireless (WPS PBC)
- Data e ora
- Sveglia
- RADIOINTERNET
- La mia playlist
Brand : Auna
Model : Stealth Base Connect
Category : Soundbar