Areal Bar 650 - Soundbar Auna - Free user manual and instructions
Find the device manual for free Areal Bar 650 Auna in PDF.

User questions about Areal Bar 650 Auna
0 question about this device. Answer the ones you know or ask your own.
Ask a new question about this device
Download the instructions for your Soundbar in PDF format for free! Find your manual Areal Bar 650 - Auna and take your electronic device back in hand. On this page are published all the documents necessary for the use of your device. Areal Bar 650 by Auna.
USER MANUAL Areal Bar 650 Auna
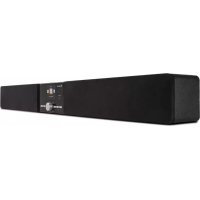
Areal Bar 650 Sound System
2.15 83
10032983
a u
www.auna-multimedia.com

bar
| Category | Value | |---|---| | Category 1 | 100 | | Category 2 | 100 | | Category 3 | 100 | | Category 4 | 100 | | Category 5 | 100 | | Category 6 | 100 | | Category 7 | 100 | | Category 8 | 100 | | Category 9 | 100 | | Category 10 | 100 | | Category 11 | 100 | | Category 12 | 100 | | Category 13 | 100 | | Category 14 | 100 | | Category 15 | 100 | | Category 16 | 100 | | Category 17 | 100 | | Category 18 | 100 | | Category 19 | 100 | | Category 20 | 100 | | Category 21 | 100 | | Category 22 | 100 | | Category 23 | 100 | | Category 24 | 100 | | Category 25 | 100 | | Category 26 | 100 | | Category 27 | 100 | | Category 28 | 100 | | Category 29 | 100 | | Category 30 | 100 | | Category 31 | 100 | | Category 32 | 100 | | Category 33 | 100 | | Category 34 | 100 | | Category 35 | 100 | | Category 36 | 100 | | Category 37 | 100 | | Category 38 | 100 | | Category 39 | 100 | | Category 40 | 100 | | Category 41 | 100 | | Category 42 | 100 | | Category 43 | 100 | | Category 44 | 100 | | Category 45 | 100 | | Category 46 | 100 | | Category 47 | 100 | | Category 48 | 100 | | Category 49 | 100 | | Category 50 | 100 | | Category 51 | 100 | | Category 52 | 100 | | Category 53 | 100 | | Category 54 | 100 | | Category 55 | 100 | | Category 56 | 100 | | Category 57 | 100 | | Category 58 | 100 | | Category 59 | 100 | | Category 60 | 100 | | Category 61 | 100 | | Category 62 | 100 | | Category 63 | 100 | | Category 64 | 100 | | Category 65 | 100 | | Category 66 | 100 | | Category 67 | 100 | | Category 68 | 100 | | Category 69 | 100 | | Category 70 | 100 | | Category 71 | 100 | | Category 72 | 100 | | Category 73 | 100 | | Category 74 | 100 | | Category 75 | 100 | | Category 76 | 100 | | Category 77 | 100 | | Category 78 | 100 | | Category 79 | 100 | | Category 80 | 100 | | Category 81 | 100 | | Category 82 | 100 | | Category 83 | 100 | | Category 84 | 100 | | Category 85 | 100 | | Category 86 | 100 | | Category 87 | 100 | | Category 88 | 100 | | Category 89 | 100 | | Category 90 | 100 | | Category 91 | 100 | | Category 92 | 100 | | Category 93 | 100 | | Category 94 | 100 | | Category 95 | 100 | | Category 96 | 100 | | Category 97 | 100 | | Category 98 | 100 | | Category 99 | 100 | | Total (Total) |text_image
QR code image containing encoded data, no visible human-readable textINHALT
Technische Daten 4
natural_image
Symbol of a trash bin crossed with a diagonal line, no text or numbers presentCongratulations on purchasing this equipment. Please read this manual carefully and take care of the following hints to avoid damages. Any failure caused by ignoring the items and cautions mentioned in the instruction manual are not covered by our warranty and any liability. Scan the QR code to get access to the latest user manual and other information about the product.

text_image
QR code image containing encoded data, no visible human-readable textCONTENTS
Specifications 18
Safety Instructions 19
Getting started 21
Device Description 22
Controls on Panel Interface 23
Remote control 24
Operation 26
Troubleshooting 28
Disposal Considerations 29
Declaration of Conformity 29
SPECIFICATIONS
Item number 10032983
Power supply 110-240 V\~ 50/60 Hz
Drive units
RMS power 60 W + 30 W x 2
S/N ratio ≥ 70 dB
Sensitivity
Subwoofer 400 mV + 50 mV
Main soundbar 550 mV + 50 mV
SAFETY INSTRUCTIONS
- Read this Instruction Manual before you attempt to connect or operate the appliance.
- Keep these instructions in good condition. Heed all warnings. Follow all instructions.
- Save this Instruction Manual for future reference.
- The apparatus shall not be exposed to dripping or splashing and no objects filled with liquids, such as vases, shall be placed on the product. Dry location use only.
- No naked flame source, such as candles, should be placed on the product.
- Children should be supervised to ensure that they do not play with the appliance.t
- Ventilation should not be impeded by covering the ventilation openings.
- Ensure that the unit is plugged into an AC 100-240V 50/60Hz power outlet. Using higher voltage may cause the unit to malfunction or even fire catching. Turn off the unit before unplugging it from power source to completely switch it off.
- Do not plug/unplug the power plug into/from an electrical outlet with wet hands.
- If the power plug does not fit into your outlet, do not force the plug into an electrical socket if it does not fit.
- Use replacement parts, which are specified by the manufacturer.
- Install the unit in accordance with the manufacturer's instructions.
- Place the unit where there is good ventilation. Place the system on a flat, hard and stable surface. Do not expose to temperatures above 40 °C. Allow at least 30 cm clearance from the rear and the top of the unit and 5 cm from each side.
- Press the buttons of the unit gently. Pressing them too hard can damage the unit.
- Dispose of used batteries in an environmental-responsible manner.
- Always ensure that the product is unplugged from the electrical outlet before moving or cleaning. Clean it with dry cloth only.
- Unplug the product during lightning, storms or when it will not be used for long periods of time.
- This product has no user-serviceable parts. Do not attempt to repair this product yourself. Only qualified service personnel should perform servicing. Take the product to the electronics repair shop of your choice for inspection and repair.
- NEVER let anyone, especially children, push anything into holes, slots or any other openings in the unit's casing as this could result in a fatal electric shock.
- Don't mount this product on a wall or ceiling.
- Do not place the unit near TVs, speakers and other objects that generate strong magnetic fields.
EN
- Do not leave the unit unattended when it is in use.
- To disconnect the system completely if it not to be used for a long time, remove the AC power plug from the wall outlet.
GETTING STARTED
Power supply
- Power supply: The product can use AC voltage 110-240V/50HZ, as stated in the operation manual or marked on the unit.
- Power cable:
When pulling out the power cable, it is better to hold the plug section.
Do not touch the AC power supply plug when your hands are wet, since it may cause an electric shock.
Do not use AC power cables that are too thin or too long as this may cause a fire or an electric shock.
-
Insert the end of the power cable into the power outlet., then power on the system and start operations. While the unit powered on, if the LED display light on -- means its under a standby mode, A long press to the POWER button to start a normal playing/operation.
-
When the product is not used for a long time, pull out the AC power supply plug from the AC power supply outlet.
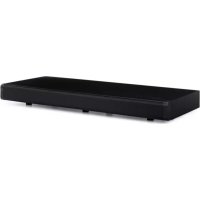
DEVICEDESCRIPTION
text_image
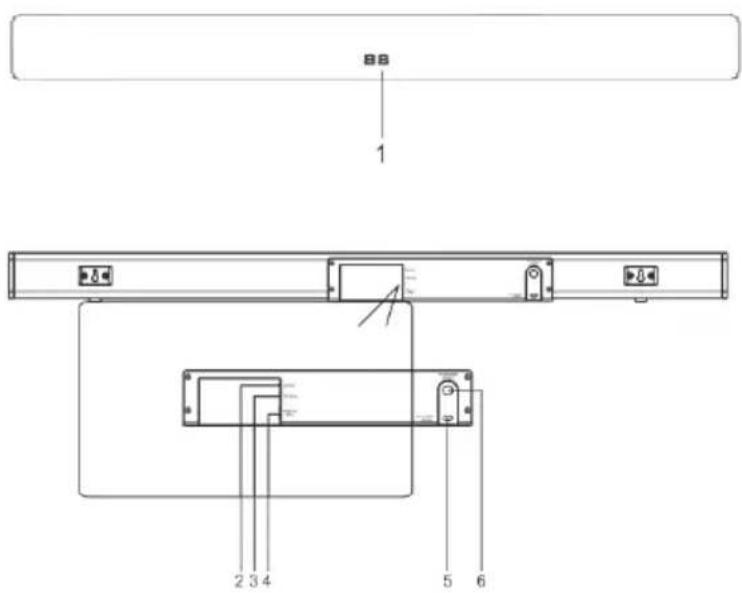
88 1 2 3 4 5 61 LED display.
2 AUX: connect with TV, MP3/MP4 player, Mobile, PC etc. er PC Mobile etc.)
3 OPTICAL: Use Optical cable connecting with TV or other device with optical output port.
4 HDMI(ARC): Use HDMI cable connecting with TV HDMI(ARC) port.
5 AC power cable: Plug in AC power outlet.
6 OUTPUT: Connect with passive subwoofer.
CONTROLS ON PANEL INTERFACE
- POWER: Power on or off the system.
-
- Press it or volume up
-
- press it for volume down
- USB: slot for USB flash plug in and play
REMOTE CONTROL
text_image
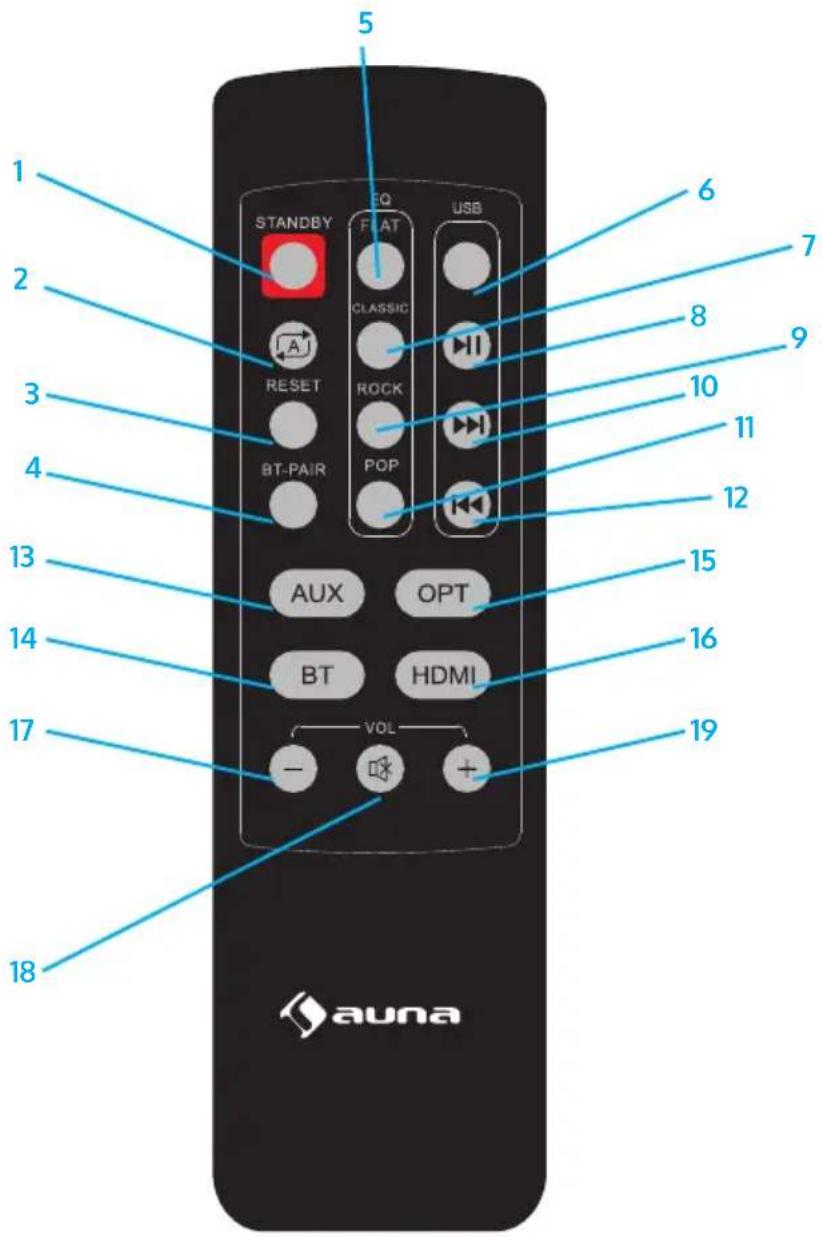
5 1 STANDBY EQ CLASSIC FAST RGB RESET ROCK BT-PAIR POP 6 7 8 9 10 11 12 13 AUX OPT 15 14 BT HDMI 16 17 VOL + 19 18 aunaNote: when using the remote, be sure to aim at the remote signal receiver located on the front of the subwoofer.
Function keys on the remote cotrol
1 STAND-BY: Press it for a stand-by mode, re-press it shift to be normal playing mode.:
2 REPEAT: Press it to repeat the single playing file/song and the LED display will show letters of ONE, re-press it to repeat whole file playing and the LED display will show letter of ALL, press again to cancel repeating.
3 RESET: Press it back to initial settings.
4 BT Pair: Press it for a fast/direct BT pairing or off pairing under BT mode
5 FLAT: Press it for a FLAT sound effect (EQ mode) and the LED display will show E1.
6 USB: press it for a direct USB playback mode.
7 CLASSIC: Press it for a classic sound effect (EQ mode) and the LED display will show E2
8 Press it to play or pause playing.
9 ROCK: Press it for a rock sound effect (EQ mode) and the LED display will show E3
10 Press it to play the next file/song, Long press it for a fast forward playing.
11 POP: Press it for pop sound effect (EQ mode) and the LED display will show E4.
12 Press it to play the previous file/song, long press it for a fast rewind playing.
13 AUX: Press it for a direct AUX in working mode
14 BT: Press it for a direct BT working mode and the speaker ready for BT pairing.
15 OPT: Press it for a Optical input playing mode.
16 HDMI: Press it for a HDMI (ARC) input playing mode, can play files/songs from TV tHDMI connected.
17 VOL-: Press it to weak or decrease the sound volume.
18 Mute: Press it for no sound or silent mode.
19 VOL+ : Press it to boost or louder the sound volume.
OPERATION
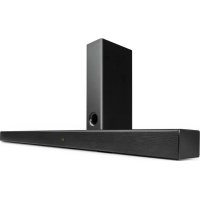
Before operations, please plug the main bar and its external subwoofer separately. The connect the main bar and the external subwoofer unit to delivery you a rich bass beating. Simply just insert the subwoofer cable into the SW output port.
BT operation
- First plug the subwoofer cable and the main bar with the AC socket,. the LED will show --, Long press the POWER to power on the system and the LED display will light on -- . Press to the POWER button to select BT mode. The LED display will then flash "bt" which means it is ready for pairing.
- Use the controls on your BT device to select "Areal Bar 650" in your BT settings. If your device requests a password, enter the default password 0 0 0 0, when successfully paired.
- Press to the + or - button to increase or decrease sound volume slightly.
- A long press to the + or - button to fast increase or decrease sound volume.
- Keep pressing the POWER button to power on or power off the system.
- For more function control. Please use the attached remote control.
USB operation
- With the unit powered on, press to the POWER button to select USB mode.
- Press to the + or - button to increase or decrease sound volume slightly.
- A long press to the + or - button to fast increase or decrease sound volume.
- For more function control. Please use the attached remote control.
Optical connection
- Use the attached optical cable to connect the unit (Optical input port) with your DVD player (Optical output port) or other device with optical port..
- With the unit powered on, A long press the POWER button to select Optical mode, (the LED display will show letter "opt", to play files/songs from the device connected.
- Press to the + or - button to increase or decrease slightly.
- A long press to the + or - button to fast increase or decrease sound volume.
- For more function control. please use the attached remote control.
HDMI (ARC) connection
- To use the attached HDMI cable to connect the unit (HDMI (ARC) input port) with your TV television (HDMI (ARC) output port).
- With the unit powered on, press the POWER button to select HDMI mode, (the LED display will show letters "Hd")
- Set up your TV audio to support external speaker system. Then you can play music from your TV television.
- Press to the + or - button to increase or decrease slightly. A long press to the + or - button to fast increase or decrease sound volume.
- For more function control. Please use the attached remote control.
AUX IN connection
- Insert one terminal of the signal input cable into the AUX port of the system and the other end into the output port of the external audio device.
- With the unit powered on, A long press the POWER button to select AUX mode, (the LED display will show letters of "AUH", to play files/songs from the device connected.
- Press to the + or - button to increase or decrease slightly.
- A long press to the + or - button to fast increase or decrease sound volume.
- For more function control. Please use the attached remote control.
- Long press to the INPUT button to power ON or power OFF the system.
TROUBLESHOOTING
| Problem Possible problem Solution | ||
| No function light & no sound | Plug is not well connected. | Insert the plug into electric outlet. |
| The power button is not turned on. | Turn on the button. | |
| Function light on but no sound or no bass beating. | Stereo input cable not well connected. | Turn off the power,check connection between the bar and external device (TV, PC, MP3 player etc) |
| Main bar and subwoofer not well connected. | Power off system and check the sub. cable connection. | |
| The HDMI /Optical cable low quality or destroyed. | Change a good HDMI/ Optical cable | |
| HDMI/Optical cable not connected properly. | Re-connect the cable and make sure a right connection. | |
| If the problem exist after checking related procedures above. Please refer the appointed service agent or professional technician to fix it. Do not attempt to open the cover otherwise we assumes no responsibility. | ||

natural_image
Symbol of a trash bin crossed with a diagonal line, no text or labels presentIf there is a legal regulation for the disposal of electrical and electronic devices in your country, this symbol on the product or on the packaging indicates that this product must not be disposed of with household waste. Instead, it must be taken to a collection point for the recycling of electrical and electronic equipment. By disposing of it in accordance with the rules, you are protecting the environment and the health of your fellow human beings from negative consequences. For information about the recycling and disposal of this product, please contact your local authority or your household waste disposal service.
This product contains batteries. If there is a legal regulation for the disposal of batteries in your country, the batteries must not be disposed of with household waste. Find out about local regulations for disposing of batteries. By disposing of them in accordance with the rules, you are protecting the environment and the health of your fellow human beings from negative consequences.
DECLARATION OF CONFORMITY

text_image
CE UK CAManufacturer:
Chal-Tec GmbH, Wallstrasse 16, 10179 Berlin, Germany.
Importer for Great Britain:
Berlin Brands Group UK Ltd PO Box 1145 Oxford, OX1 9UW United Kingdom
Hereby, Chal-Tec GmbH declares that the radio equipment type Areal Bar 650 is in compliance with Directive 2014/53/EU. The full text of the EU declaration of conformity is available at the following internet address: use.berlin/10032983
For Great Britain: Hereby, Chal-Tec GmbH declares that the radio equipment type Areal Bar 650 is in compliance with the relevant statutory requirements. The full text of the declaration of conformity is available at the following internet address: use.berlin/10032983
Chère cliente, cher client,
text_image
QR code image containing encoded data, no visible human-readable textSOMMAIRE
Fiche technique 32
natural_image
Symbol of a trash bin crossed with a diagonal line, no text or numbers presentDÉCLARATION DE CONFORMITÉ

text_image
CE UK CAFabricant :
Chal-Tec GmbH, Wallstraße 16, 10179 Berlin, Allemagne.
text_image
QR code image containing encoded data, no visible human-readable textÍNDICE
Datos técnicos 44
natural_image
Symbol of a trash bin crossed with a diagonal line, no text or numbers presentBerlin Brands Group UK Ltd
PO Box 1145
Oxford, OX1 9UW
United Kingdom
text_image
QR code image containing encoded data, no visible human-readable textINDICE
Dati tecnici 56