Lift - Chair Foppapedretti - Free user manual and instructions
Find the device manual for free Lift Foppapedretti in PDF.
| Product type | Chair booster with 3-point safety harness |
| Brand | Foppapedretti |
| Model | Lift |
| Category | Table chair / Booster |
| Recommended age | From ability to sit unassisted up to 3 years |
| Maximum child weight | 15 kg |
| Seat height adjustment | 3 positions (via buttons under seat) |
| Removable tray | Yes, with depth adjustment |
| Safety harness | 3-point, adjustable, with buckle and waist and crotch straps |
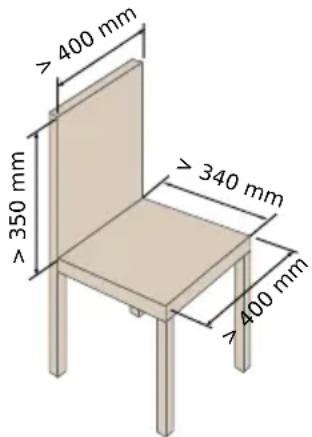
| Minimum adult chair dimensions required | Seat width: 400 mm, Depth: 340 mm, Backrest height: 350 mm |
| Attachment to adult chair | Rear and lower attachment straps |
| Armrests | Foldable up and down |
| Cover | Removable and washable |
| Care | Clean with sponge, warm water and mild soap; dry thoroughly |
| Prohibited cleaning products | Abrasives, ammonia, bleach, alcohol |
| Inspection frequency | Regularly: locking devices, wear of straps and harness |
| Replacement parts | Only approved by the manufacturer |
| Standard warranty | 12 months from purchase date |
| Outdoor use | Not recommended (only on stable indoor adult chair) |
| Country of manufacture | Italy (headquarters Foppa Pedretti S.p.A.) |
Frequently Asked Questions - Lift Foppapedretti
User questions about Lift Foppapedretti
0 question about this device. Answer the ones you know or ask your own.
Ask a new question about this device
Download the instructions for your Chair in PDF format for free! Find your manual Lift - Foppapedretti and take your electronic device back in hand. On this page are published all the documents necessary for the use of your device. Lift by Foppapedretti.
USER MANUAL Lift Foppapedretti
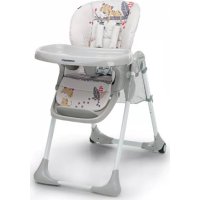
natural_image
Product photo of a modern baby boom chair with teal and white coloring, no visible text or symbols on the body.EN 16120: 2012+A1:2014
ITAL ZO SEDIA Istruzioni di montaggio, leggere attentamente e conservare per future referenze
Per bambini capaci di stare seduti da soli senza bisogno di aiuto, fino a 3 anni di età o con peso massimo di 15 kg.
EN BOOSTER CHAIR Assembly instructions, read carefully and keep for future reference
This product is intended for children able to sit up unaided and up to 3 years or a maximum weight of 15 kg.
FR REHAUSSEUR DE CHAISE Notice de montage, à lire attentivement et à conserver pour toute consultation future
Ce produit est destiné à des enfants sachant s'assoir seuls jusqu'à 3 ans ou pesant jusqu'à 15 kg.
ES ELEVADOR PARA SILLA Instrucciones de montaje, lea atentamente y guarde para futuras referencias
El producto está destinado a niños de hasta 3 años, o con un peso de hasta 15 kg, capaces de mantenerse sentados solos.
DE SITZERHÖHUNG Montageanleitung: aufmerksam lesen und für künftiges Nachschlagen aufbewahren
Für Kinder in der Lage allein und ohne Hilfe zu sitzen, bis zu 3 Jahren oder bis zu einem Gewicht von maximal 15 Kg.
PT CADEIRA ELEVATÓRIA Instruções de montagem: ler atentamente e conservar para referência futura
Para crianças que podem se sentar sozinhas, sem ajuda, até 3 anos ou com um peso máximo de 15 kg.
EL ΚΑΘΙΣΜΑ ΠΡΟΣΑΡΜΟΖΟΜΕΝΟ ΣΕ ΚΑΡΕΚΛΑ Οδηγίες συναρμολόγησης, διαβάστε προσεκτικά και φυλάξτε τις για
μελλοντική αναφορά - Το προϊόν προορίζεται για παιδιά που μπορούν να παραμένουν σε καθιστή θέση αυτόνομα έως την ηλικία των 3 ετών ή βάρος έως 15 κιλά.
HR BOOSTERA Uputstva; pažljivo pročitajte i sačuvajte za buduće korištenje.
Ovaj proizvod namijenjen je djeci koja mogu sjediti samostalno do 3 godine života i težine do 15kg.
IT. IMPORTANTE! LEGGERE ATTENTAMENTE E CONSERVARE PER FUTURE REFERENZE
EN. IMPORTANT! READ THE INSTRUCTIONS CAREFULLY AND KEEP FOR FUTURE REFERENCE
FR. IMPORTANT! LIRE ATTENTIVEMENT ET CONSERVER SOIGNEUSEMENT A PORTEE DE MAIN POUR UNE UTILISATION ULTERIEURE
ES. IMPORTANTE! LEER ATENTAMENTE Y CONSERVAR PARA FUTURAS REFERENCIAS
natural_image
Line drawing of a small robotic car with visible engine and dashboard components (no text or symbols)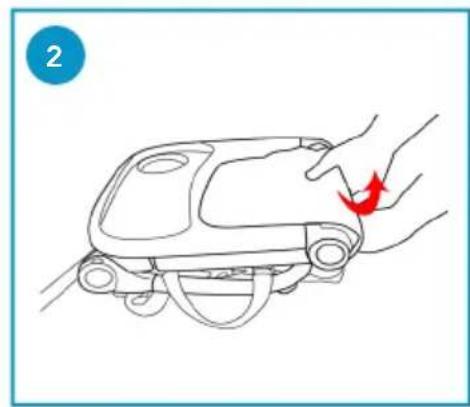
natural_image
Line drawing of a robotic car with a hand pressing a button, showing motion direction (no text or symbols)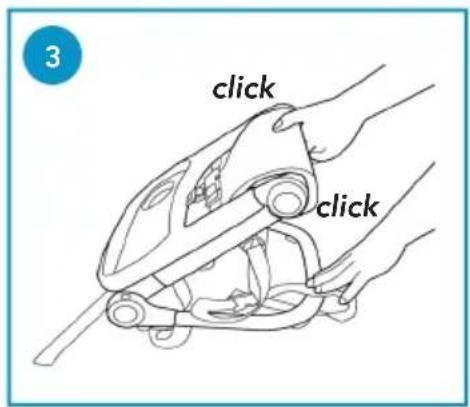
text_image
3 click click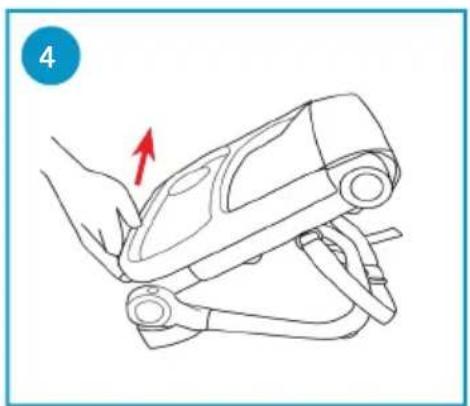
natural_image
Line drawing of a mechanical device with a red arrow indicating rotation (no text or symbols)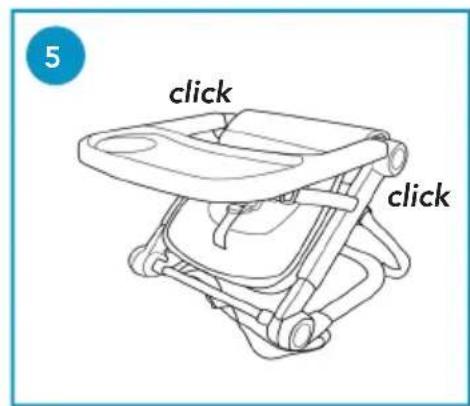
text_image
5 click click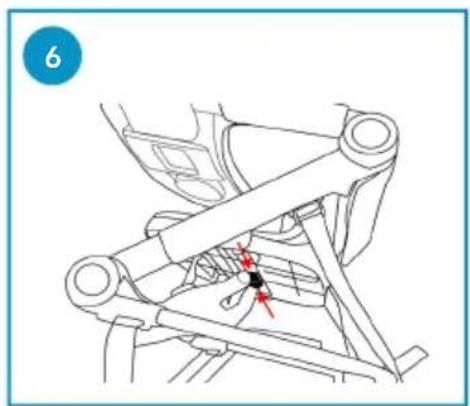
natural_image
Technical line drawing of a mechanical assembly with no visible text or symbols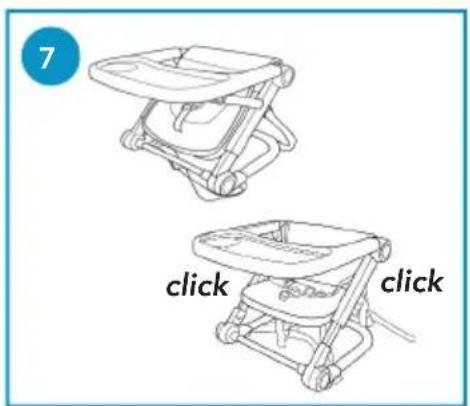
text_image
7 click click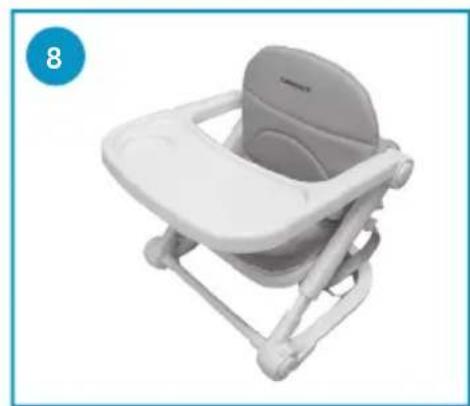
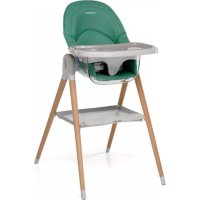
natural_image
White baby care seat with backrest and seat cover, no visible text or symbols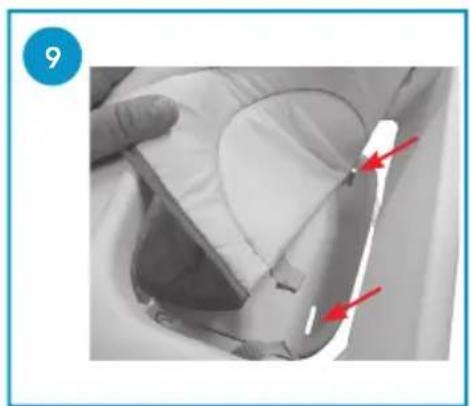
natural_image
Close-up of a hand holding a medical device with red arrows pointing to a component (no visible text or symbols)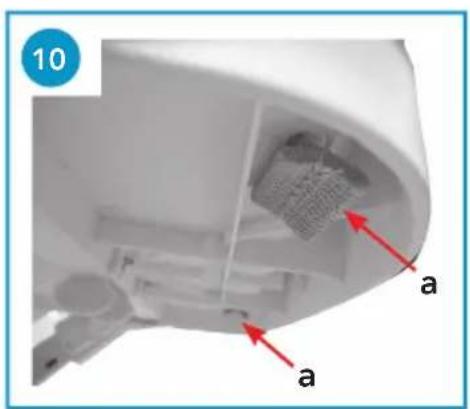
text_image
10 a a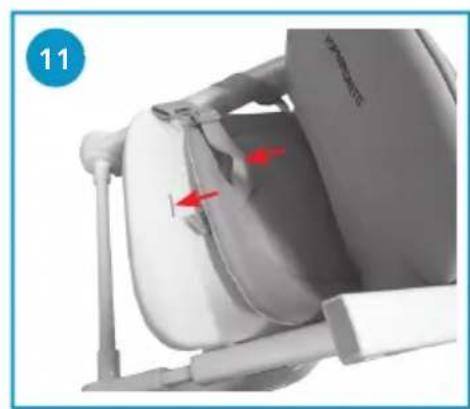
natural_image
Close-up of a white ergonomic chair with red arrows pointing to the seat area (no text or symbols visible)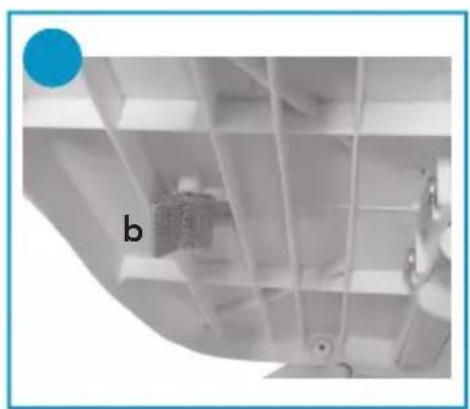
natural_image
Interior view of a mechanical or structural component with grid lines and a blue circular marker labeled 'b' (no readable text or symbols beyond label)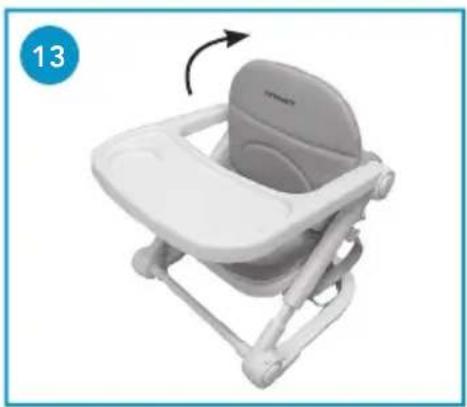
natural_image
White baby care seat with a backrest, shown in a simple white photo (no text or symbols visible)
text_image
14 a a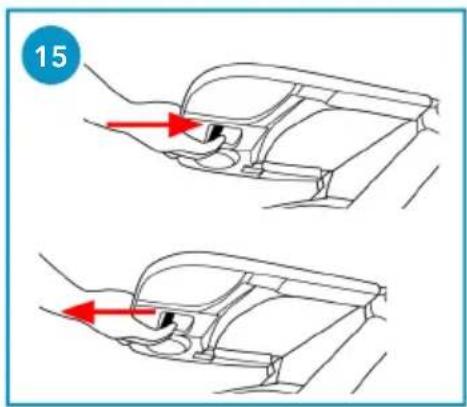
text_image
15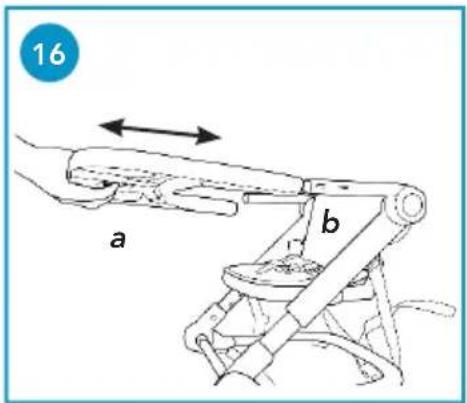
text_image
16 a b
text_image
17 click click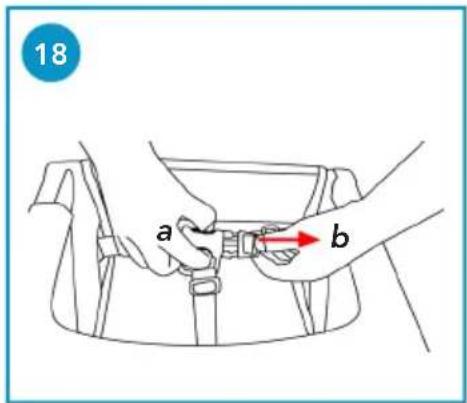
text_image
18 a b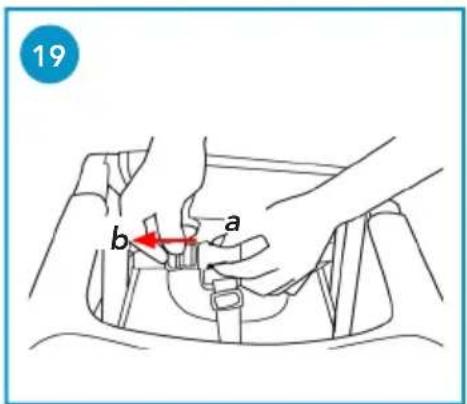
text_image
19 b a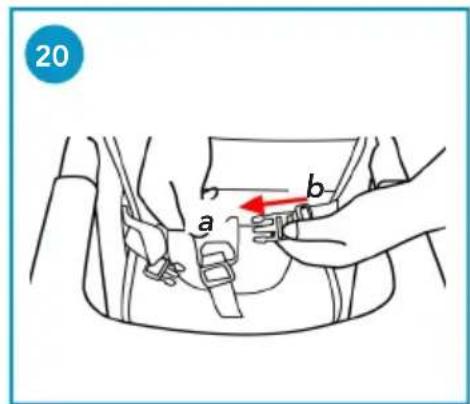
text_image
20 a b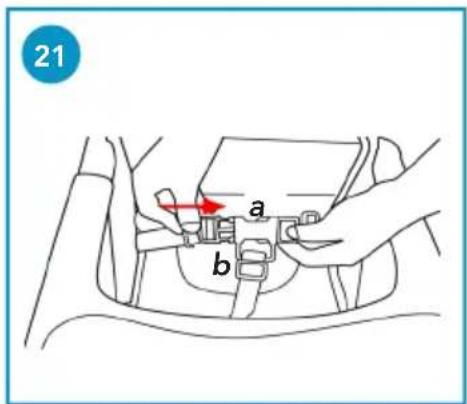
text_image
21 a b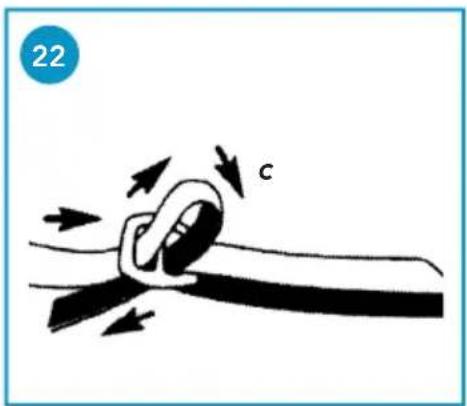
text_image
22 c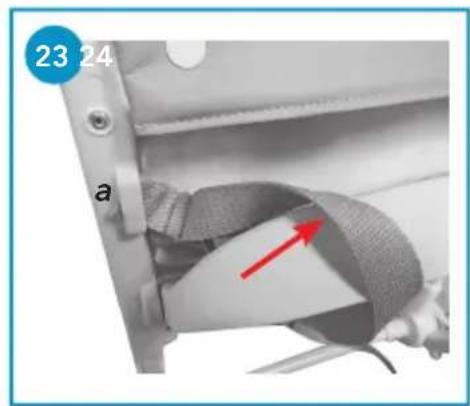
natural_image
Close-up of a mechanical component with a red arrow pointing to a textured area, labeled 'a' and page number 23-24 (no readable text or symbols beyond labels)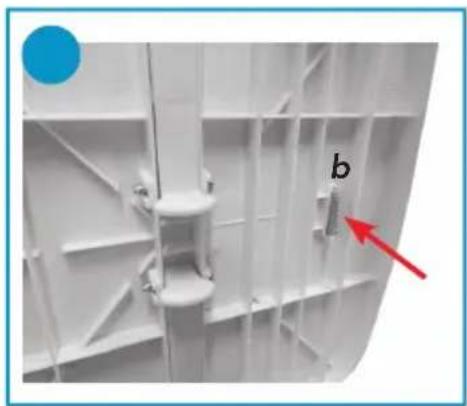
natural_image
Close-up of a white industrial vessel interior with structural beams and a labeled component 'b' (no text or symbols beyond label)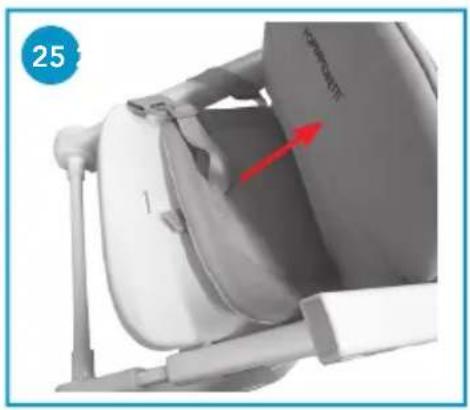
natural_image
Close-up of a white baby seat with a red arrow pointing to the backrest area, no visible text or symbols.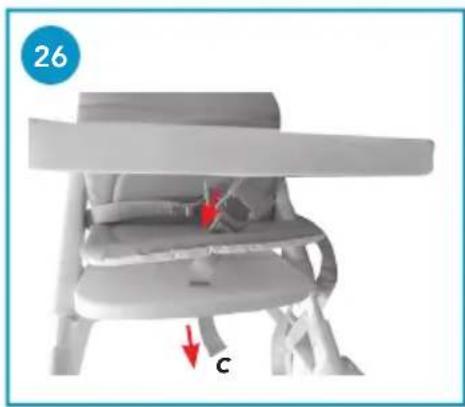
natural_image
Close-up of a baby boom chair with red arrows indicating movement or change (no text or symbols)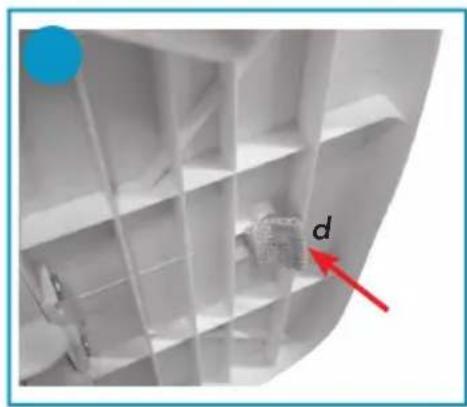
natural_image
Close-up of a white plastic shelf with a blue circular object and a red arrow pointing to a textured surface (no text or symbols)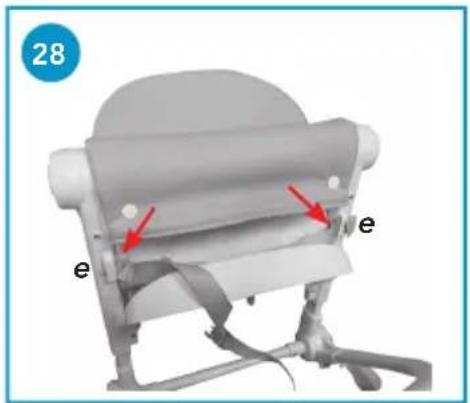
text_image
28 e e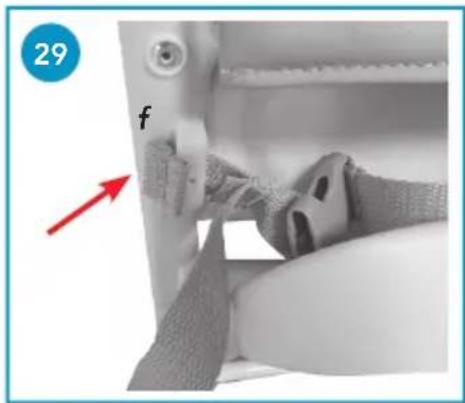
natural_image
Close-up of a mechanical component with a red arrow pointing to a feature labeled 'f', no readable text or symbols present.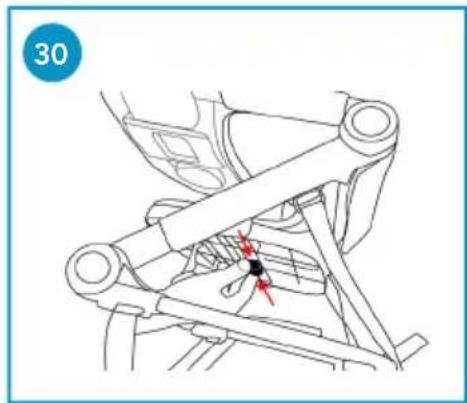
natural_image
Technical line drawing of a mechanical assembly with no visible text or symbols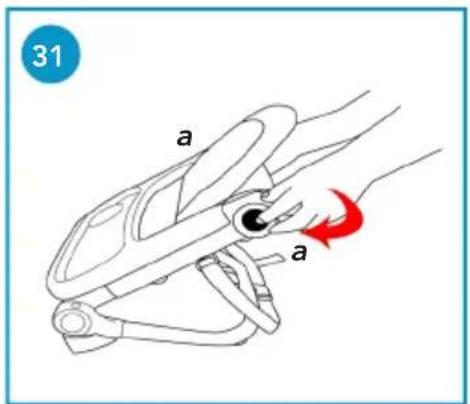
text_image
31 a a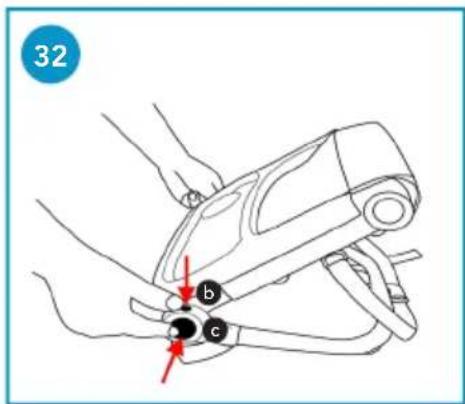
text_image
32 b c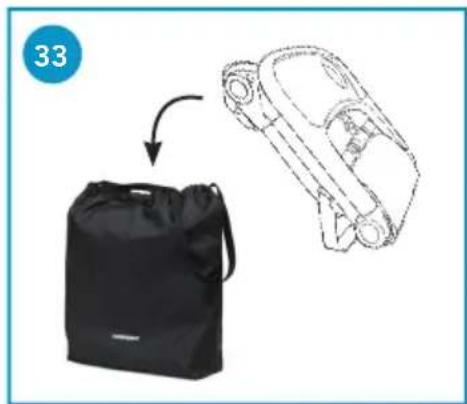
natural_image
Illustration of a black bag being lifted by a handbag, with no visible text or symbols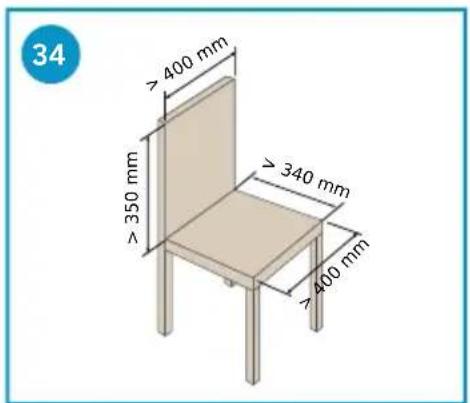
text_image
34 > 400 mm > 350 mm > 340 mm > 400 mm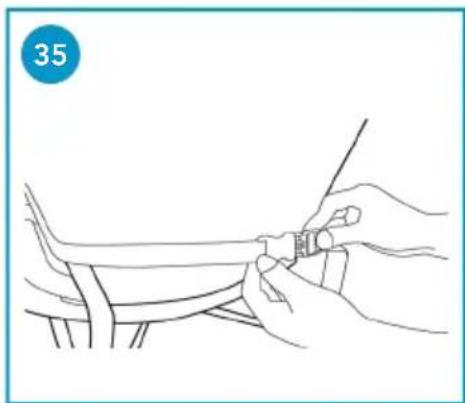
natural_image
Line drawing of hands holding a small object over a curved surface, no text or symbols present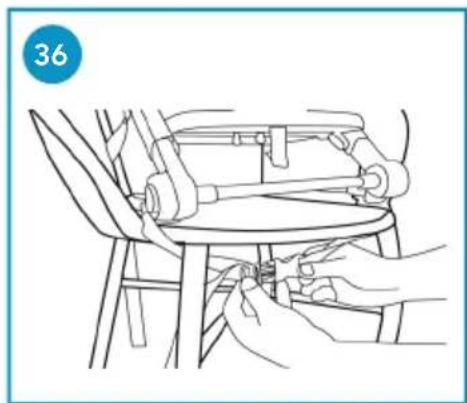
natural_image
Line drawing of hands operating a mechanical device on a chair (no text or symbols)
text_image
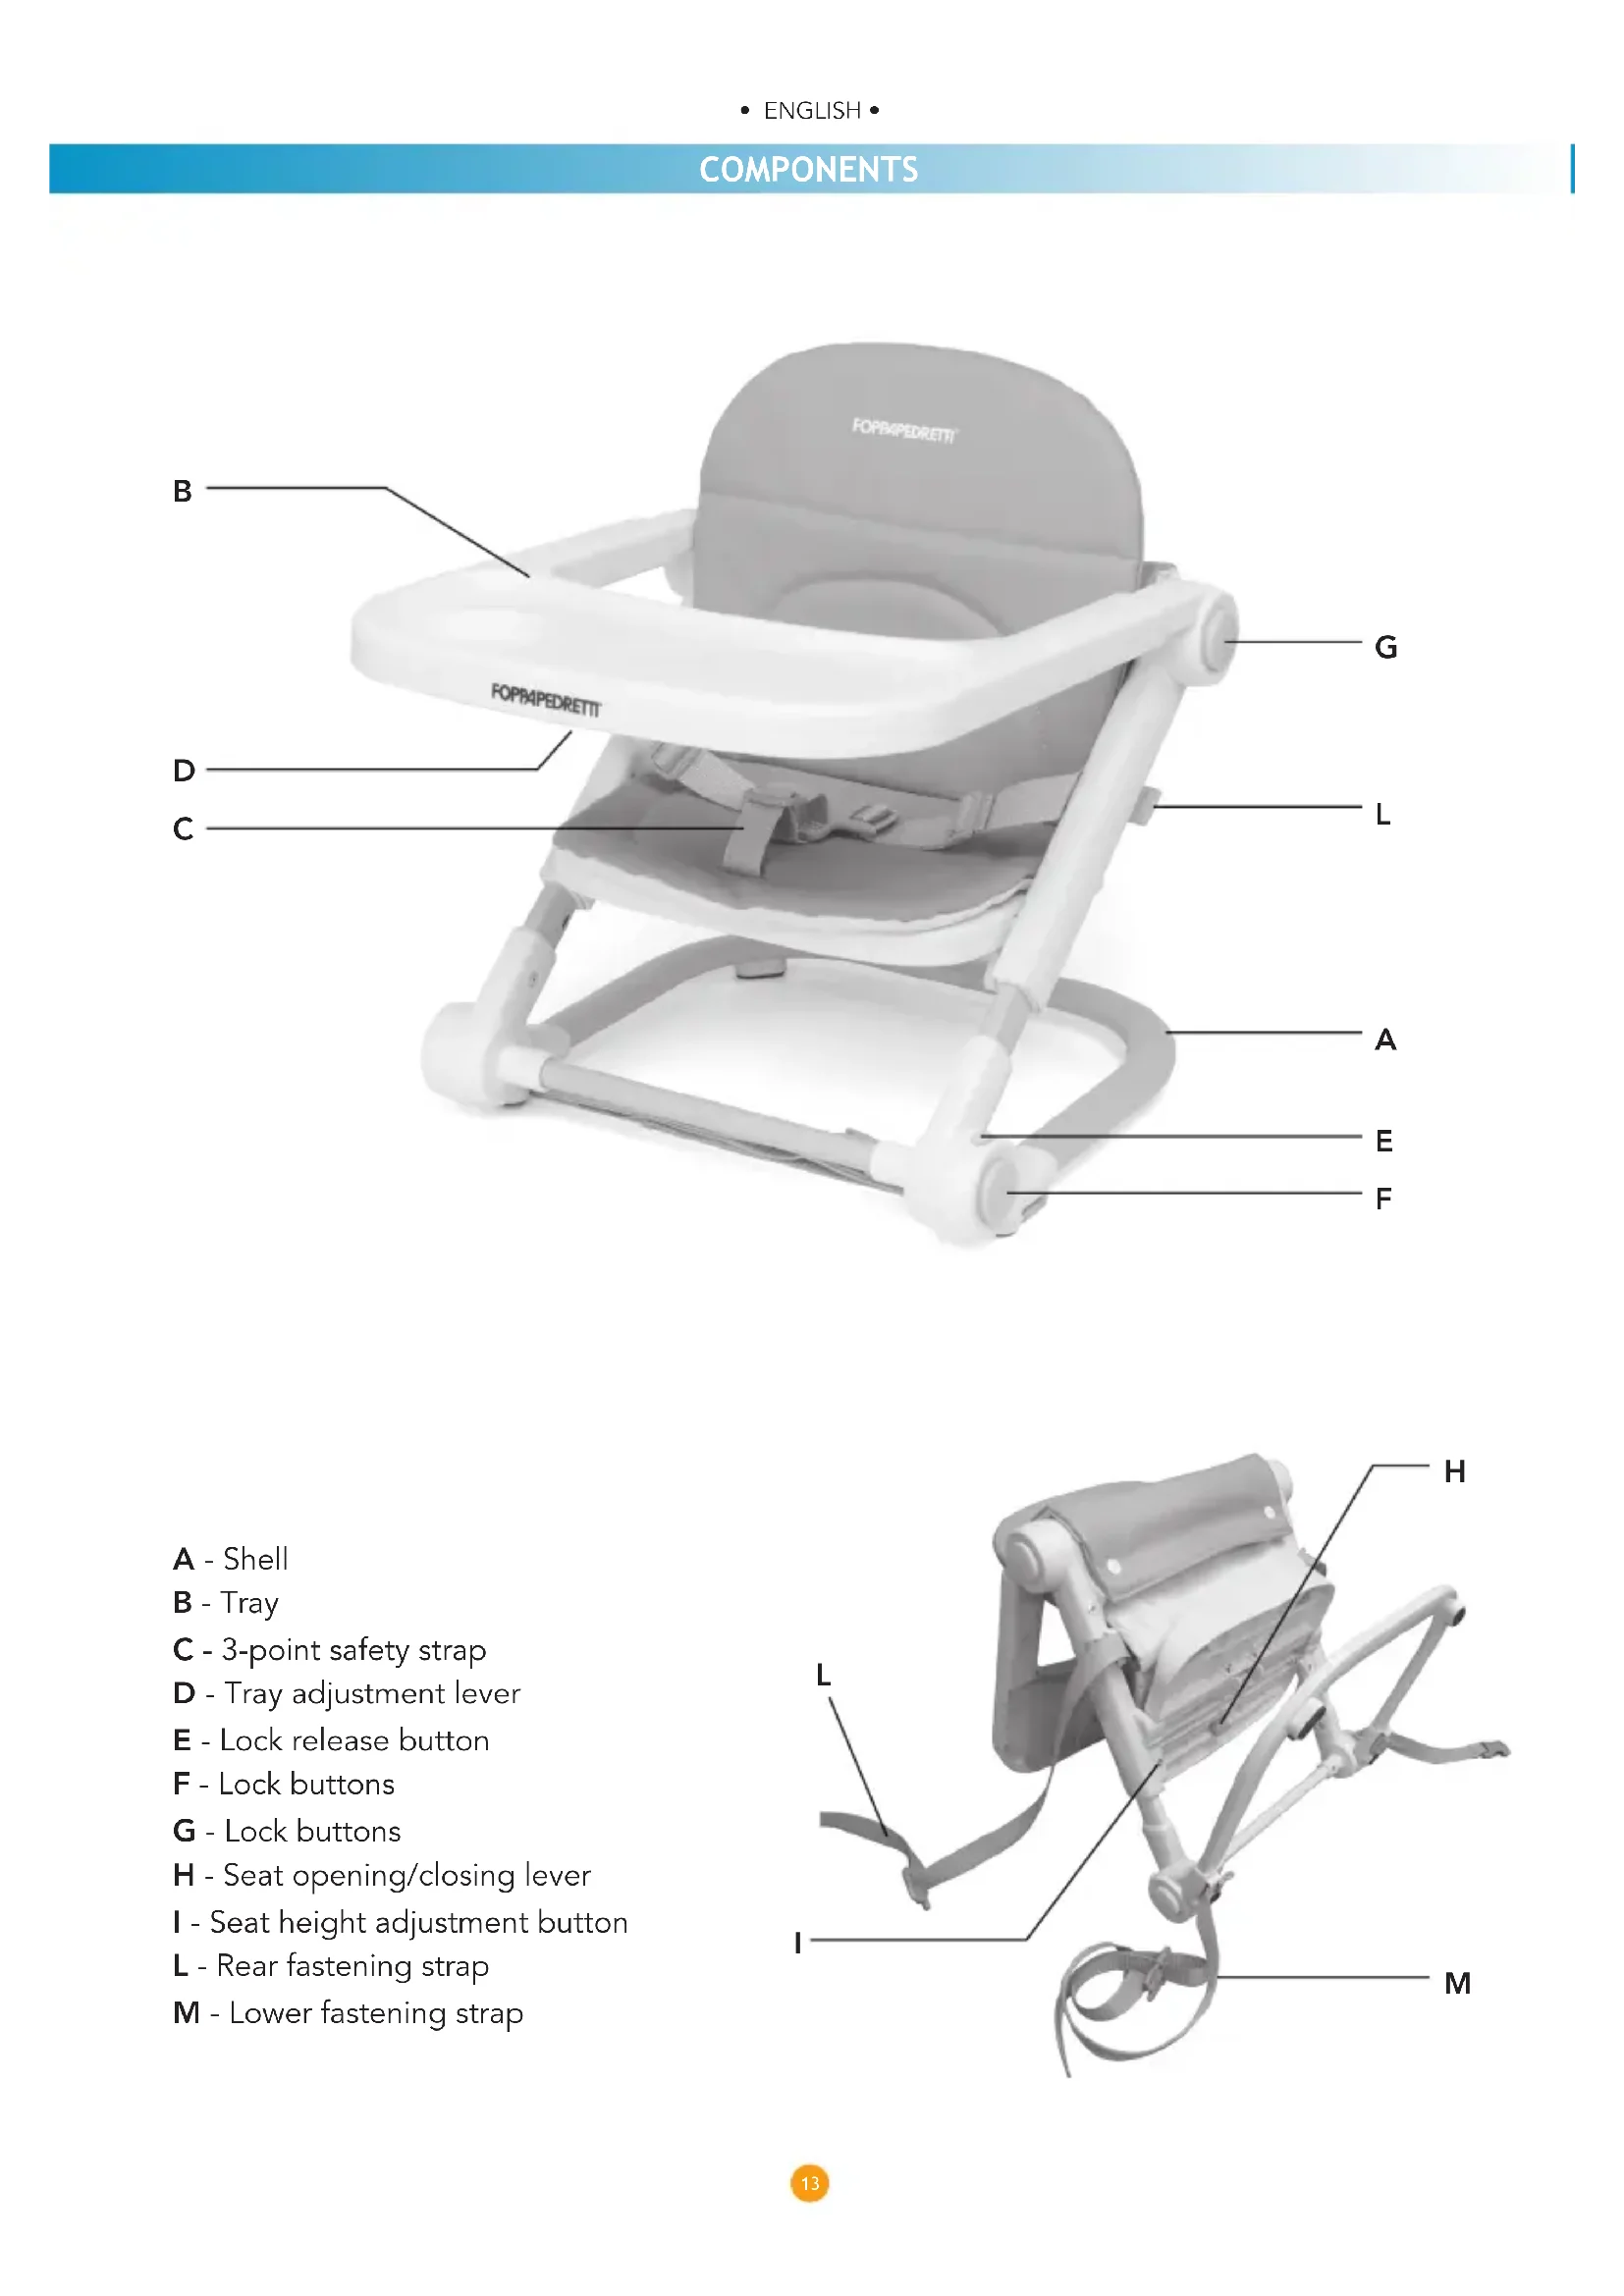
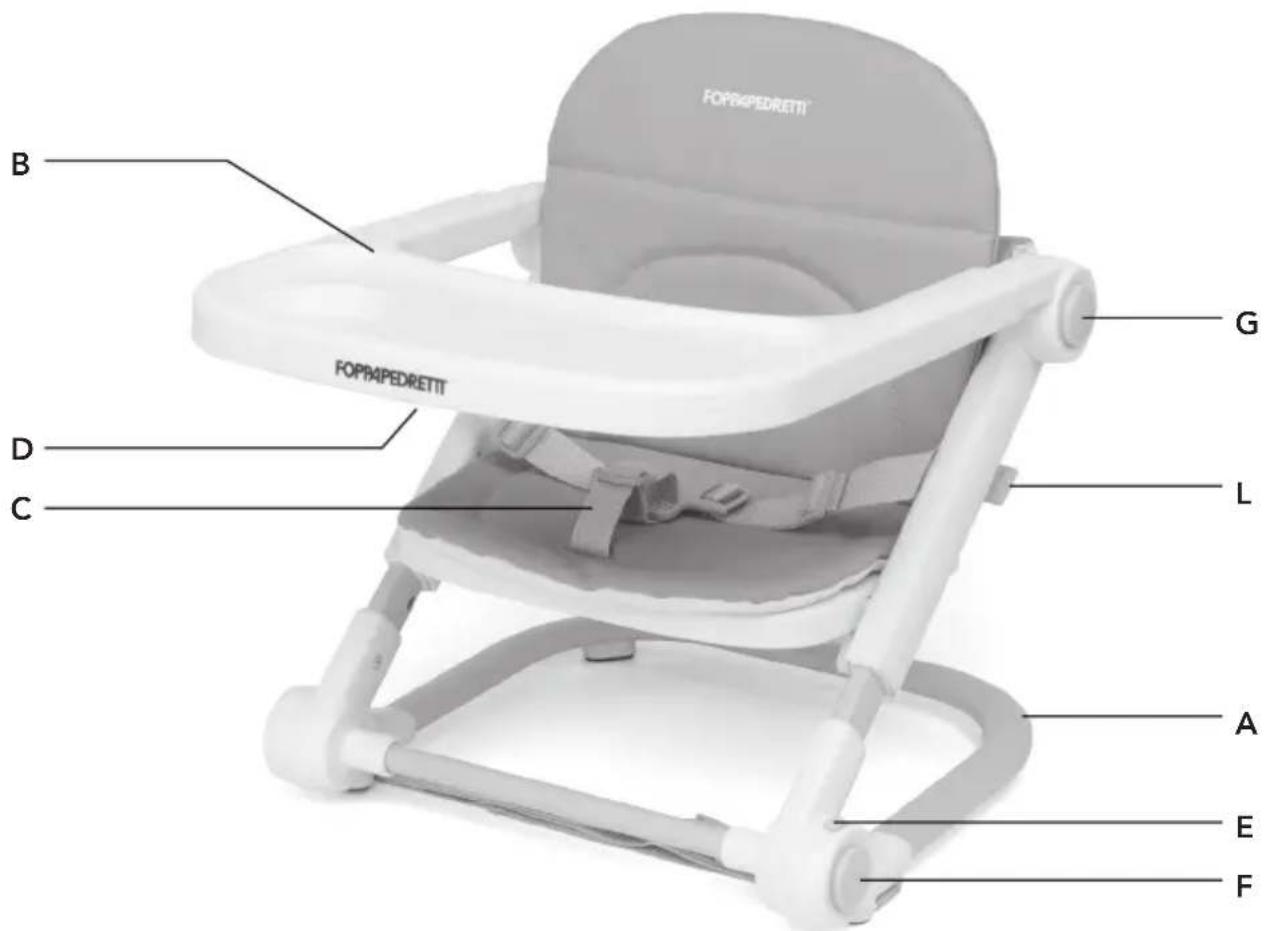
FOPBAPEDRETTI FOPBAPEDRETTI B G D C L A E FA - Struttura
B - Vassoio
C - 3-point safety strap
D - Tray adjustment lever
E - Lock release button
F - Lock buttons
G - Lock buttons
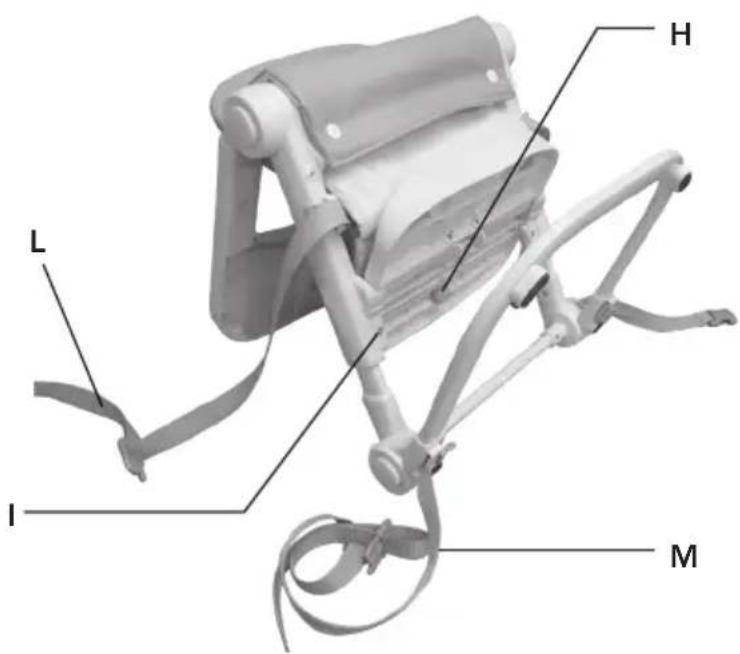
H - Seat opening/closing lever
I - Seat height adjustment button
L - Rear fastening strap
M - Lower fastening strap
text_image
H L I MIMPORTANT! READ CAREFULLY AND KEEP FOR FUTURE REFERENCE.
ATTENTION
- Never leave your child unattended.
- Always use the restraint system and make sure that it is correctly assembled and adjusted.
- Always use the seat attachment system and make sure that it is properly fixed before use.
- Always check the safety and stability of the product on the seat before use.
- Do not use this product on stools or benches.
This product is intended for children able to sit up unaided and up to 3 years or a maximum weight of 15 kg.
text_image
> 400 mm > 350 mm > 340 mm > 400 mm- The minimum dimensions of the adult chair recommended for use with this product are: seat width 400 mm; seat depth 340 mm; backrest height 350 mm.
- Make sure that, when the booster chair is attached, the adult chair is positioned in an area where the child cannot push his feet against the table or any other furniture that may cause the adult chair supporting the booster chair to fall over.
- Before attaching the booster chair to the seat, always check that the floor and the seat of the chair are horizontal; do not use the product fixed on the chair on sloping floors.
• Do not use if any part is broken or missing. - Do not use accessories or replacement parts other than those approved by manufacturer.
- Never attach to swivel chairs or chairs with wheels, stools, folding chairs, or any other surface that is not
• entirely stable. Only attach to chairs with 4 legs. - Do not open and close the booster chair while the child is sitting on it.
• Do not use the booster chair on the floor.
• This booster chair must only be assembled by an adult. - Do not place on a table or any other raised surface. Never use it on a sofa or as a car seat.
- Do not open and close the booster chair while the child is sitting on it.
- The opening, adjusting and closing of the booster chair must only be carried out by an adult.
• It is dangerous to use the product on an elevated surface. - Do not use the booster chair without the seat padding.
- When not in use, the booster chair must be kept out of reach of the child.
OPENING (fig. 1-7)
Grasp the booster chair as shown and lift up the top part; you will hear a click when it is opened correctly (fig. 3). Lift the front part upwards (fig. 4); you will hear a click when it is opened correctly (fig. 5).
Press the buttons on the underside of the seat, as shown in the figure (fig. 6) and lower the seat to the horizontal position while keeping the buttons pressed down. Release the buttons and make sure the seat is properly locked (fig. 7).
ASSEMBLING THE PADDING (fig.8-13)
Place the padding on the seat.
Completely insert the end with the stitched turn-up (a) of the strap through the corresponding slot in the seat shell (fig. 9). If necessary, use a flat-head tool. Rotate the end of the strap which is protruding from the slot in the shell (fig. 10).
Completely insert the end with the stitched turn-up (b) of the crotch safety strap through the fabric slot and the corresponding slot in the seat shell (fig. 11). If necessary, use a flat-head tool. Rotate the end of the strap which is protruding from the slot in the shell (fig. 12).
Make sure that it is correctly assembled and locked. When pulling the safety strap from the inside of the seat, it should not slip through the slot.
Attach the press studs on the back side of the backrest.
Lift up the padded backrest by attaching it with the velcro on the back side (fig. 13).
SEAT HEIGHT ADJUSTMENT (fig. 14)
ATTENTION: The height cannot be adjusted when the child is sitting in the booster chair.
Simultaneously press the two height adjustment buttons (a) located on the legs under the seat and select the desired height. Release the buttons and make sure that the seat is correctly locked in the new position on both sides. The seat can be adjusted to 3 different heights.
TRAY ASSEMBLY AND ADJUSTMENT (fig. 15-17)
Hold down the lever on the underneath of the tray (fig. 15) and place the tray on the seat, checking that the armrests are inside the guides located on the bottom of the tray itself (fig. 16).
Release the lever and push the tray towards the inside of the booster chair until it locks in place. A click will indicate that it has locked correctly (fig. 17).
To adjust the tray, press the lever and pull or push the tray towards the inside of the booster chair until it is locked in the new position (fig. 15). A click will indicate that it has locked in position correctly.
IMPORTANT: Check before use that the tray is correctly locked in the chosen position by pulling it outwards without pressing the lever; the tray should stay in place.
IMPORTANT: The booster chair can be used without a tray, but always with the side armrests in the raised position. The side armrests fold up to allow the product to be closed.
SAFETY HARNESS (fig. 18-22)
CAUTION: Using a safety harness with leg separator is essential to ensure your child's safety.
CAUTION: The tray alone being attached to the seat does not guarantee that your child is secured. Always use the safety harness!
The booster chair is equipped with a 3-point safety strap.
- Unclipping the buckle: Press the button (a) and pull out the components (b).
- Clip the buckle: Insert the components (b) into the buckle (a); you will hear a click when they are attached correctly. Adjust the harness depending on the size of the child, using the adjusters (c) (fig. 22).
Unclip the buckle and place the child on the booster chair. It is easier to do this when the tray is removed.
Attach the two tabs to the buckle. Make sure that the child is correctly restrained by the strap and that it is adjusted to the correct size.
IMPORTANT: The harness must only be used with all the components attached.
IMPORTANT: Adjust the harness correctly each time the HIGH CHAIR is used.
SAFETY STRAP ASSEMBLY/DISASSEMBLY (fig. 23-29)
Remove the safety strap; rotate the end with the stitched turn-up (a) to secure the "lap" safety strap and pull out the strap from the inside of the seat, through the slots in the seat shell. Rotate the end with the stitched turn-up (b) to secure the "crotch" safety strap and pull out the strap from the inside of the seat, through the slots in the seat shell and the padding.
Assemble the safety strap; completely insert the end with the stitched turn-up (c) of the "crotch" safety strap through the fabric slots and the corresponding slots in the seat shell. If necessary, use a flat-head tool. Rotate the end of the strap, which is protruding from the slots in the shell (d). Make sure that it is assembled and locked correctly. When pulling the safety strap from the inside of the seat, it should not slip through the slots.
Completely insert the end with the stitched turn-up (e) of the "lap" safety strap through the corresponding slots in the seat shell. If necessary, use a flat-head tool. Rotate the end of the strap, which is protruding from the slots in the shell (f). Make sure that it is assembled and locked correctly. When pulling the safety strap from the inside of the seat, it should not slip through the slots.
CLOSING (fig. 30-33)
Remove the child from the booster chair.
Unclip the buckles on the backrest and seat fixing strap to remove the product from the adult chair.
Press the buttons on the underside of the seat, as shown in the figure (fig. 30) and lift up the seat while keeping them pressed down.
Unhook the padded part of the backrest secured with veltro and fold it over the tray.
Press the (a) buttons simultaneously and fold down the side armrests (fig. 31).
Press the closing lock button (b) and, holding it down, press both (c) buttons to close the shell (fig. 32-33).
PLACING THE BOOSTER ON THE ADULT CHAIR (fig. 34-36)
Place the product on a stable adult chair (Fig. 34). Make sure the booster chair is in a central position and does not protrude from the front or sides of the chair (refer to the warnings in this manual for further information).
Use the booster chair with an adult chair that has the minimum dimensions required and shown in figure (34), a seat of at least 400 mm in width and 340 mm in length, and a backrest of at least 350 mm.
Attach the rear fastening strap (Fig. 35) by passing it behind the backrest of the adult chair and pass the lower fastening strap around the seat (Fig. 36). Make sure that you hear a "click" to indicate that it has attached correctly.
Pull the free end of the rear and lower strap to secure the booster to the adult chair.
After correctly attaching the booster to the adult chair, the child can be placed in it.
ATTENTION: Make sure that the straps securing the booster to the adult chair are not twisted.
ATTENTION: Make sure that the straps securing the booster to the adult chair are always taut before using the product.
REMOVING THE PADDING FOR WASHING
- Remove the padding's strap, see paragraph "Assembling the padding"
-
Remove the crotch safety strap from the padding, see paragraph "Safety strap assembly/disassembly".
-
Unhook the press studs on the back side of the backrest.
- Remove the padding.
ASSEMBLING THE PADDING
• See paragraph "Assembling the padding".
MAINTENANCE AND CLEANING
- Make sure that all the locking devices are functioning properly and check regularly that the safety devices are correctly engaged and locked.
- Check all parts subject to wear or tear regularly.
- Do not use spray lubricants, do not use aggressive substances.
• To clean the booster chair, use a sponge, hot water and soap or a mild detergent, and dry thoroughly. - Stubborn stains may be removed with a mild detergent.
- Never use abrasive substances or those containing ammonia or bleach, or alcohol-based detergents.
FORMAL GUARANTEE
The contents of this document as stated below will come into effect as from 01.01.2005 and replace, on every account and in full, any previous message referring to the guarantee provided by Foppa Pedretti S.p.A.
FORMAL GUARANTEE
Foppa Pedretti S.p.A. the head office of which is located at n. 11 Via Volta, Grumello del Monte (Italy), guarantees directly to the Consumer that this brand new product is free of faults with regard to the materials, design and manufacture and that it complies with the characteristics as declared by the manufacturer.
This formal guarantee is valid in all Member Countries of the European Union and it neither excludes nor limits the Consumer's rights in accordance with mandatory measures provided for by the law with regard to the Retailer of the Product.
To take advantage of this formal guarantee, the Consumer must return the faulty product to the Retailer, presenting to the same the proof of purchase of the Product which must clearly show the Retailer's address, the date of purchase of the Product with the Retailer's stamp and signature and an indication of the Product itself or, alternatively, the receipt which must not have been altered and which must clearly show the same information as that referred to above.
The formal guarantee is valid for twelve (12) months from the date of purchase of the Product. During this period, Foppa Pedretti S.p.A. will repair or replace the faulty product, at its own discretion. The formal guarantee is granted to the end buyer of the Product (Consumer) and it neither excludes nor limits the mandatory rights of the Consumer as provided for by the law and/or the rights that the Consumer may have with regard to the Dealer/Retailer of the Product.
EXCLUSIONS TO THE FORMAL GUARANTEE.
The formal guarantee is excluded in the case of damage caused to the Product for the following reasons: if the product is used in a way that does not comply with the information contained in the use and assembly instruction sheet, if the product is knocked or dropped, if the Product is exposed to humidity or extreme heat or environmental conditions, or to sudden changes in the same, corrosion, oxidization, unauthorized alterations or repairs to the Product, repairs using unauthorised spare parts, improper use, improper maintenance or failure to carry out the same, improper maintenance compared to the information given on the use and assembly instruction sheet, incorrect assembly, accidents, damage caused by food or drink, damage caused by chemical products, cases of force majeure.
In any case, Foppa Pedretti S.p.A. declines all responsibility for damage caused to persons or to property, other than the Product, when such damage is caused by a failure to comply with the instructions/advice/warnings cont a ined in the manua I or, alternatively, in the use and assembly instruction sheet provided with each Product for the owner/user. (Purely as an example, in the case of a cot: "Check your baby constantly.
Make sure that the sheets and blankets do not cover the baby's head...").
Furthermore, Foppa Pedretti S.p.A. declines all responsibility for damage to persons and to property when the breakage of its products is due to a deterioration in the components of the Product that are subject to wear. All the components of the Product made of plastic are considered to be components subject to wear.
LISTE DES COMPOSANTS
text_image
FOPPAPEDRETTI B G FOPPAPEDRETTI D C L A E FA - Structure
B - Tablette