Meeting - Chair Foppapedretti - Free user manual and instructions
Find the device manual for free Meeting Foppapedretti in PDF.
User questions about Meeting Foppapedretti
0 question about this device. Answer the ones you know or ask your own.
Ask a new question about this device
Download the instructions for your Chair in PDF format for free! Find your manual Meeting - Foppapedretti and take your electronic device back in hand. On this page are published all the documents necessary for the use of your device. Meeting by Foppapedretti.
USER MANUAL Meeting Foppapedretti
natural_image
Exterior view of a baby boom chair with pink teddy bear decoration (no text or symbols visible)EN HIGH CHAIR Instruction manual, read carefully and keep for future reference
Conforms to standards EN 14988:2017
EN. IMPORTANT! READ THE INSTRUCTIONS CAREFULLY AND KEEP FOR FUTURE REFERENCE
FR. IMPORTANT! LIRE ATTENTIVEMENT ET CONSERVER SOIGNEUSEMENT A PORTEE DE MAIN POUR UNE UTILISATION ULTERIEURE
ES. IMPORTANTE! LEER ATENTAMENTE Y CONSERVAR PARA FUTURAS REFERENCIAS
text_image
clack! clack!COMPONENTI
A

natural_image
Two identical line drawings of a pair of mechanical clamps or tools with no text or symbolsB

natural_image
Simple line drawing of a curved rectangular shape with a circular hole at the center (no text or symbols)©
D

natural_image
Simple line drawing of a U-shaped object with two vertical posts (no text or symbols)
natural_image
Simple line drawing of a U-shaped mechanical component with two black ends (no text or symbols)E

natural_image
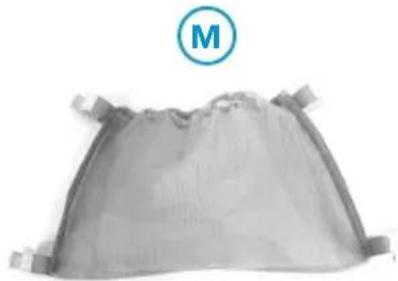
Gray fabric or material sample with a circular label marked 'M' in the top-left corner (no other text or symbols)
text_image
N(R) N(L)F

natural_image
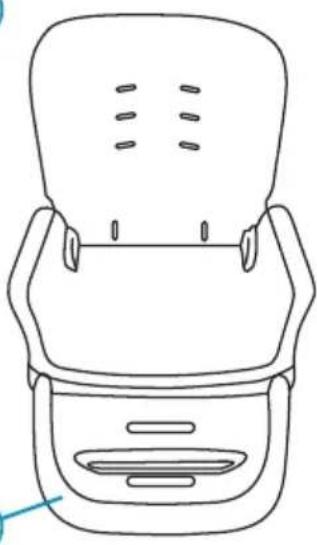
Line drawing of a car seat with ventilation slots and frontrest (no text or symbols)H

natural_image
Technical line drawing of two symmetrical mechanical components with no text or symbolsi
natural_image
Simple line drawing of a bear seatbelt (no text or symbols)L
natural_image
Mechanical diagram showing a lever mechanism with an arrow indicating direction (no text or symbols present)natural_image
Diagram of a mechanical assembly with an arrow indicating direction (no text or symbols present)
text_image
clack! R-LMONTAGGIO

natural_image
Line drawing of a hand holding a small object, possibly a tool or device, with no visible text or symbols.
text_image
"CLICK" 1aAGGANCIARE ALLA SEDUTA LO SNODO DI REGOLAZIONE ALTEZZA (1)
natural_image
Technical line drawing of a mechanical clamp or lever mechanism with directional arrows indicating motion (no text or symbols)
natural_image
Diagram showing two mechanical tool tips with arrows indicating motion (no text or symbols)MONTAGGIO SEDUTA AL TELAIO GAMBE (2)
natural_image
Line drawing of a mechanical device with arrows indicating motion or force direction (no text or symbols)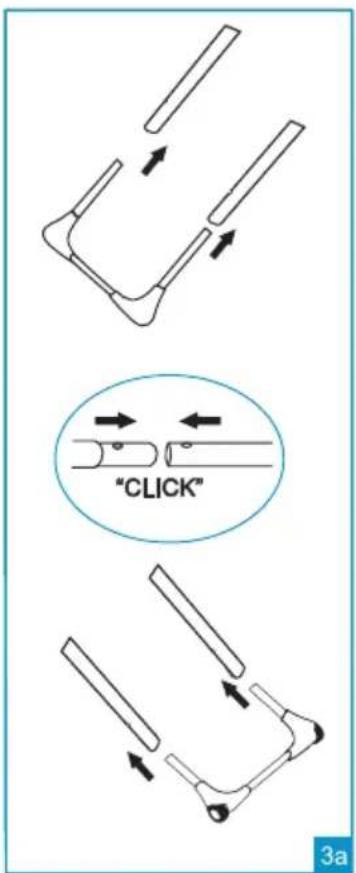
text_image
"CLICK" 3aMONTAGGIO GAMBE ANTERIORE E POSTERIORE (3)
natural_image
Diagram of a mechanical device with motion arrows indicating movement, no text or symbols presentnatural_image
Line drawing of a car wheel assembly with hand positioning and motion arrows (no text or symbols)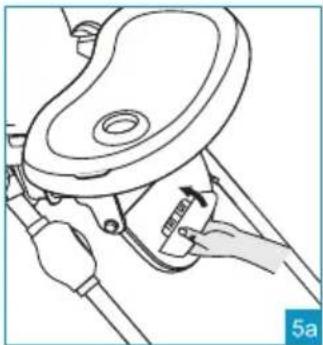
natural_image
Line drawing of a hand holding a tool interacting with a mechanical component (no text or symbols)natural_image
Line drawing of a baby in a chair with an inset showing hand positioning (no text or symbols)REGOLAZIONE ALTEZZA DELLA SEDUTA DEL SEGGIOLONE (6)
natural_image
Line drawing of a hand holding a rope tied around a circular object (no text or symbols)
natural_image
Line drawing of a person using a chair to lift a seat, showing motion arrows (no text or symbols)natural_image
Line drawing of a mechanical component with arrows indicating motion or force direction (no text or symbols)RIMUOVERE IL VASSOIO INTERNO (8)
natural_image
Line drawing of a mechanical device with no visible text or symbolsRIPORRE IL VASSOIO (9)
natural_image
Side view of a modern chair seat with adjustable legs and backrest (no text or symbols visible)MONTAGGIO CESTINO
natural_image
Two identical line drawings of a pair of metal tools or probes (no text or symbols)B

natural_image
Simple line drawing of a curved rectangular shape with a circular hole at the center (no text or symbols)C
D

natural_image
Simple line drawing of a U-shaped object with two vertical posts (no text or symbols)
natural_image
Simple line drawing of a mechanical component with two ends and a central curved body (no text or symbols)E
natural_image
Gray fabric or material sample with a circular label marked 'M' in the top-left corner (no other text or symbols)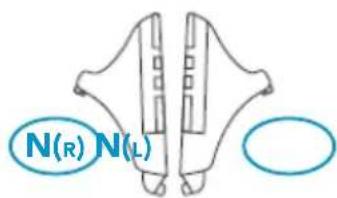
text_image
N(R) N(L)F

natural_image
Line drawing of a car seat with ventilation slots and frontrest (no text or symbols)H
natural_image
Technical line drawing of two symmetrical mechanical components with no text or symbolsi
natural_image
Simple line drawing of a bear seatbelt with two straps (no text or symbols)L
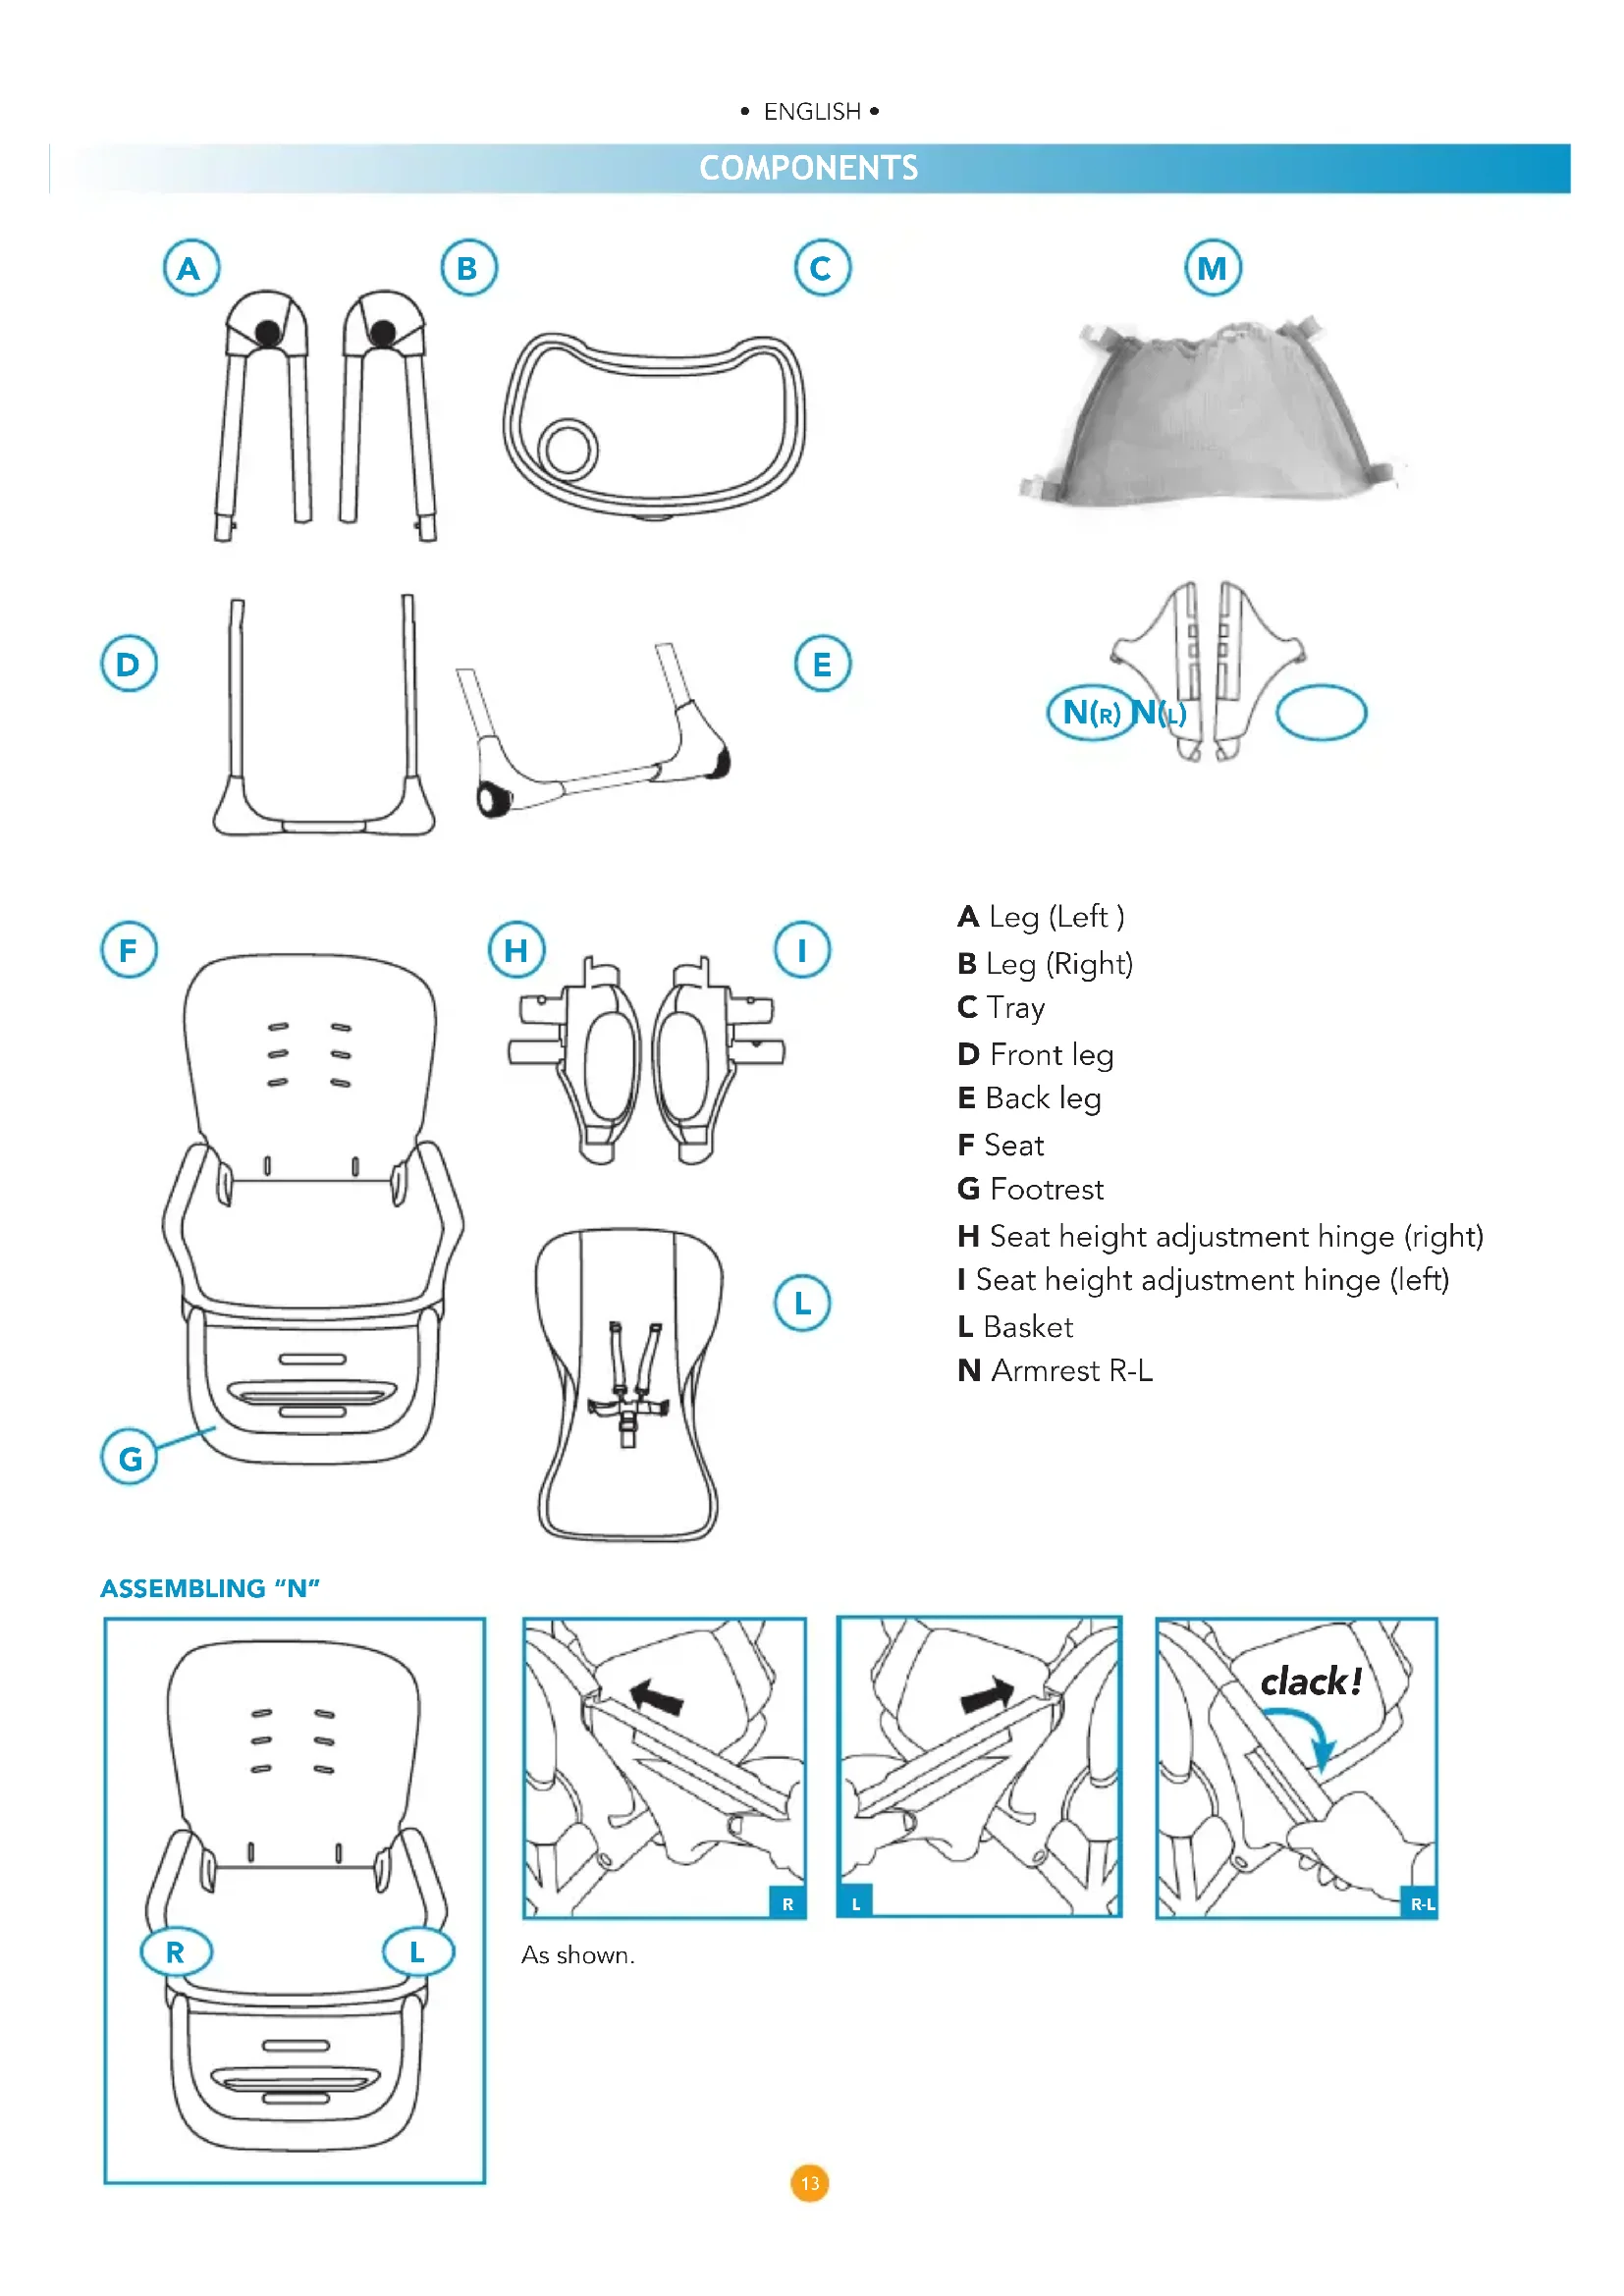
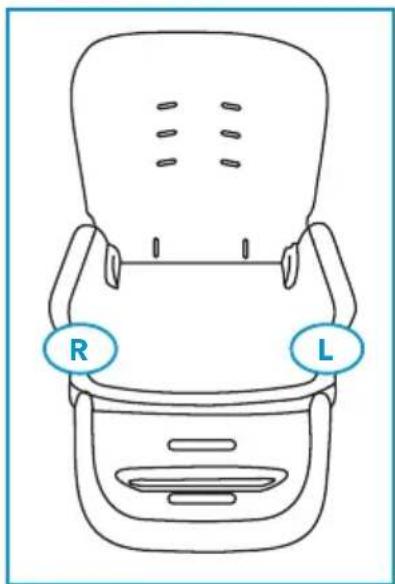
A Leg (Left)
B Leg (Right)
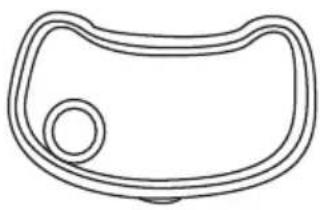
C Tray
D Front leg
E Back leg
F Seat
G Footrest
H Seat height adjustment hinge (right)
I Seat height adjustment hinge (left)
L Basket
N Armrest R-L
ASSEMBLING "N"
text_image
R L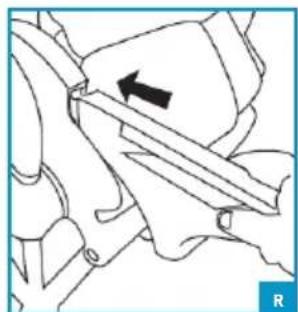
natural_image
Mechanical diagram showing a lever mechanism with an arrow indicating direction (no text or symbols present)As shown.

natural_image
Diagram of a mechanical assembly with an arrow indicating direction (no text or symbols present)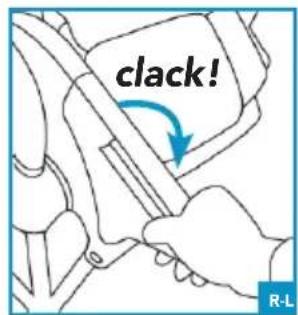
text_image
clack! R-L
natural_image
Line drawing of a hand holding a small object, possibly a device or tool, with no visible text or symbols.
text_image
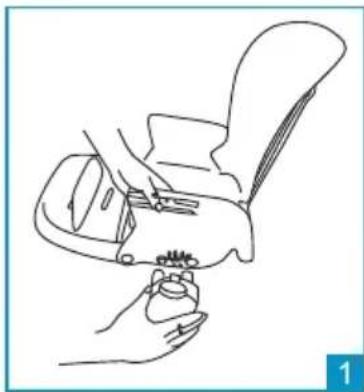
"CLICK" 1aATTACHING THE HEIGHT ADJUSTMENT HINGE TO THE SEAT (1)
CAUTION: The left and right adjustment hinge attachments have a different shape to prevent them being assembled the wrong way around.
Fix the left "L" height adjustment hinge to the seat, as shown in figure 1. Holding down the metal pins located at the ends of the tubes in the lower part of the seat, insert the hinge (L-L). The parts are correctly engaged when the metal pins are released into the holes located on the components; you will hear a click when they are correctly locked in place (fig. 1a).
Repeat this process for the right "R" seat height adjustment hinge, on the opposite side of the seat (R-R).
natural_image
Technical line drawing of a mechanical clamp or lever mechanism with directional arrows indicating motion (no text or symbols)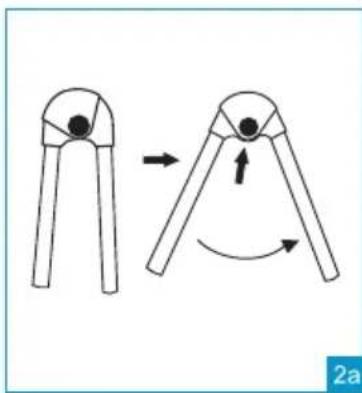
natural_image
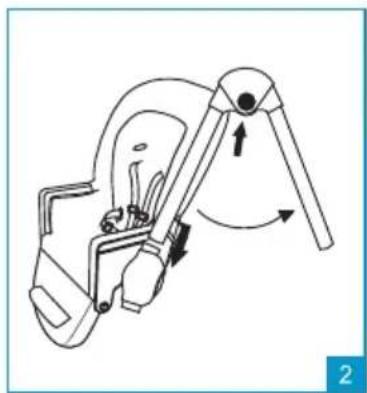
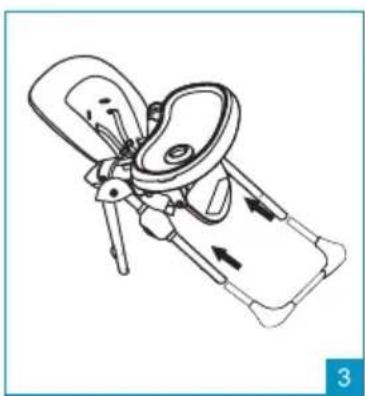
Diagram showing two mechanical tool configurations with arrows indicating motion (no text or symbols)MOUNTING THE SEAT ON THE LEG FRAME (2)
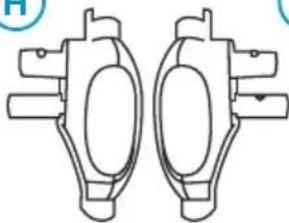
CAUTION: The left and right leg frames have a different shape to prevent them being assembled the wrong way around.
Press the open / close button on the frame and expand the legs until you hear a click to indicate that they are locked in an open position (Fig.2a).
Repeat the same process with the second leg frame.
Leaving the open / close button facing outwards, insert the front leg of the left frame into the left seat adjustment hinge (L-L), as shown in figure 2.
Repeat this process with the second leg frame (R-R).
Once assembly is complete, lift the seat upwards until it locks in one of the 6 possible positions. Check that the seat is locked in the same position on each leg frame.
natural_image
Line drawing of a mechanical device with arrows indicating motion or force direction (no text or symbols)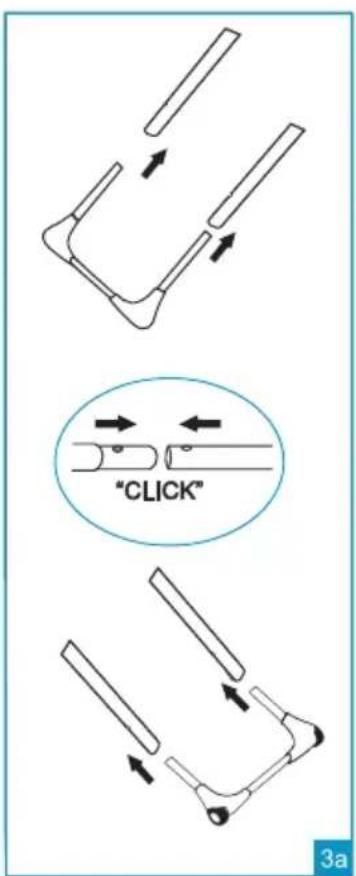
text_image
"CLICK" 3aASSEMBLING THE FRONT AND BACK LEGS (3)
CAUTION: The front and back leg attachments have a different shape to prevent them being assembled the wrong way around.
Front legs (component without the wheels): Holding down the metal pins located at the ends of the tubes, insert the "front legs" component into the leg frame on the front side (fig.3).
The parts are correctly engaged when the metal pins are released into the holes located on the components; you will hear a click when they are correctly locked in place (fig. 3a).
Back legs (component with wheels): Holding down the metal pins located at the ends of the tubes, insert the "back legs" component into the leg frame on the back (fig.3).
The parts are correctly engaged when the metal pins are released into the holes located on the components; you will hear a click when they are correctly locked in place (fig. 3a).
natural_image
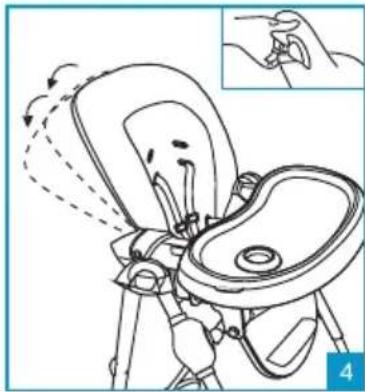
Line drawing of a mechanical device with motion arrows and a magnified inset showing hand positioning (no text or symbols)ADJUSTING THE BACKREST (4)
The high chair backrest can be reclined in 3 positions.
To adjust the backrest, press the button located at the top on the back, lift up or recline the backrest to the desired position and release the lever. The backrest will lock in one of the three positions, in the rear part of the armrests and you will hear a click when it is engaged (Fig. 4). This process can also be carried out with the child in the high chair.

natural_image
Line drawing of a car wheel assembly with gear and valve mechanism (no text or symbols)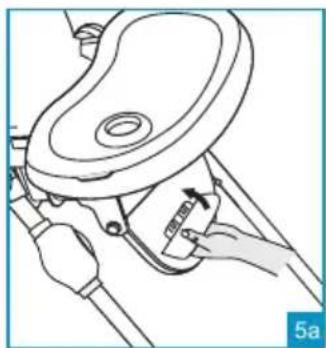
natural_image
Line drawing of a hand holding a device with a circular component, no text or symbols presentADJUSTING THE LEG REST (5)
The leg rest can be adjusted to 2 positions.
Press the two side adjustment buttons at the same time and raise or lower the leg rest.
Release the buttons and check that the leg rest has locked correctly in the desired position.
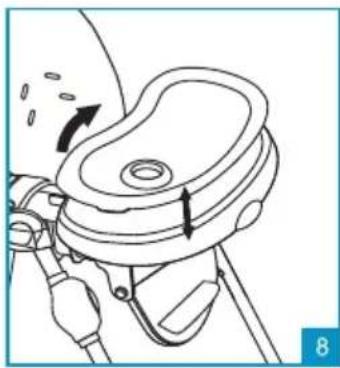
ADJUSTING THE FOOTREST (5a)
The high chair is equipped with a footrest which can be positioned at 3 different heights.
From the position of use, rotate the footrest upwards to remove it
from the seat (Fig. 5a).
Remove and reinsert the footrest at the desired height.
Rotate the footrest downwards to lock it in the new position. Before use, check that it is locked correctly.
natural_image
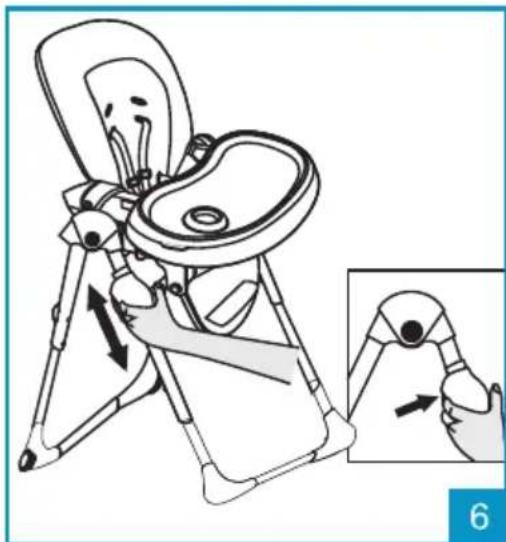
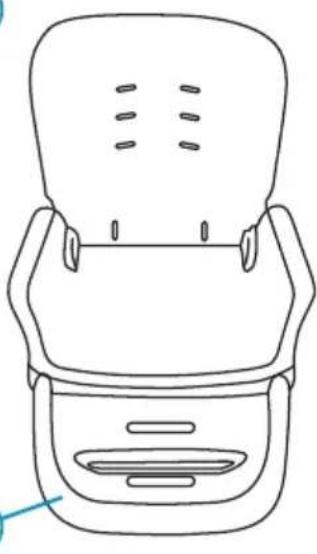
Line drawing of a baby in a chair with an inset showing hand positioning (no text or symbols)ADJUSTING THE HEIGHT OF THE HIGH CHAIR SEAT (6)
The HIGH CHAIR can be positioned at 6 different heights.
- To lift up the seat: Hold the backrest at the top and pull it upwards until you reach the desired height.
- To lower the seat: Simultaneously press the buttons on each height adjustment hinge and lower the seat to the desired position. Release the buttons.
Make sure that the seat is correctly locked in the new position and that the number indicating the adjustment position is the same on both sides.
CAUTION: Make sure you adjust the seat without the child placed in the HIGH CHAIR.
natural_image
Line drawing of a hand holding a rope tied around a curved object (no text or symbols)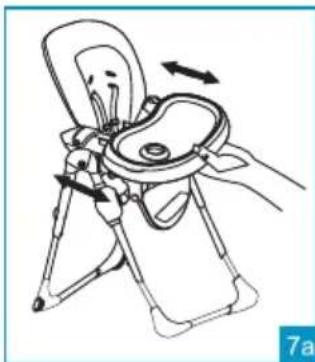
natural_image
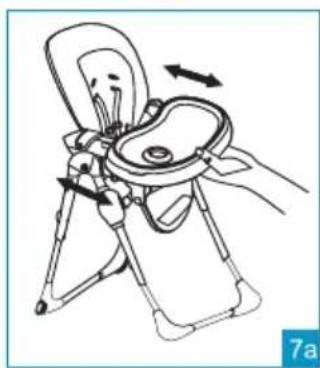
Line drawing of a person using a chair to lift a seat, showing motion arrows (no text or symbols)ASSEMBLING THE TRAY (7)
Hold down the lever on the underneath of the tray (7) and place the tray on the seat, checking that the armrests are inside the guides located on the bottom of the tray itself.
Release the lever and push the tray towards the inside of the HIGH CHAIR, until it locks in place. A click will indicate that it has locked in position correctly.
CAUTION: Always check before use that the tray is attached and locked correctly on the armrests.
CAUTION: Never leave the tray in a position where the danger symbol is visible on the armrests: this is NOT safe!
IMPORTANT: Check before use that the tray is correctly locked in the chosen position by pulling it outwards without pressing the lever; the tray should stay in place.
ASSEMBLY
natural_image
Line drawing of a mechanical device with directional arrows indicating motion (no text or symbols)REMOVING THE INNER TRAY (8)
To remove the inner tray (8) pull the clips on the sides and lift it up.
The inner tray is fixed to the main tray using a pressure mechanism. To attach the inner tray, place it on top of the main tray and press downwards; the securing clips will lock the inner tray to the main tray.
CAUTION: Always make sure that the inner tray is correctly clipped to the main tray, before each use.
natural_image
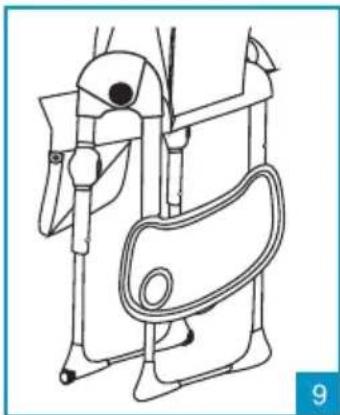
Line drawing of a mechanical device with no visible text or symbolsSTORING THE TRAY (9)
When not in use, the tray can be attached to the rear of the frame using the two hooks (Fig.9).
Remove the tray from the seat and position it as shown in the figure. Align and insert the attachment pins on the leg frame into the attachment guides located on the underneath of the tray itself.
Press downwards to attach the tray to the frame.
To remove the tray from the frame, lift it upwards.
text_image
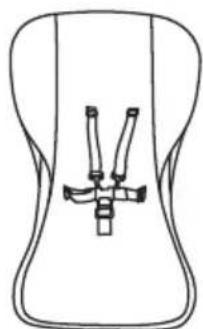
4 a b c d eSAFETY HARNESS (10)
CAUTION: Using a safety harness with leg separator is essential to ensure your child's safety.
CAUTION: The tray alone being attached to the seat does not guarantee that your child is secured. Always use the safety harness!
The HIGH CHAIR is equipped with a 5-point safety harness.
- Unclipping the buckle: Press the button (a) and pull out the components (b).
- Clip the buckle: Insert the components (b) into the buckle (a); you will hear a click when they are attached correctly.
Adjust the harness depending on the size of the child, using the adjusters (c). Adjust the position of the straps, or chest belts, depending on the height of the child. The straps must be adjusted in the slots close to the child's shoulders.
- To adjust the straps or to remove the safety harness, rotate the plastic locking ring of the safety harness "straps" and "lap belt" on the rear side of the backrest (d), and remove the harness by pulling it from the inner side of the seat, through the slots in the seat shell and padding.
- To refit the straps, insert the plastic ring, fixed to the end of the strap, through the slots in the fabric and the corresponding slots in the seat shell. Rotate the ring into a vertical position, on the outer side of the backrest (e).
Make sure that it is correctly mounted and locked. When pulling the straps from the inner side of the seat, the belts should not disengage.
Always make sure that the straps are positioned in the backrest slots located at the same height.
IMPORTANT: The harness must only be used with all the components attached.
IMPORTANT: Adjust the harness correctly each time the HIGH CHAIR is used.
text_image
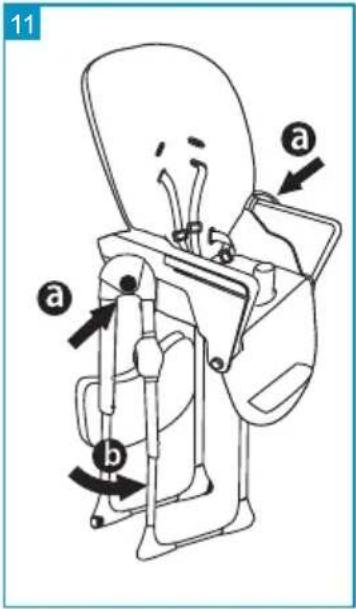
11 a a bCLOSING THE HIGH CHAIR (11)
TO CLOSE
CAUTION: Make sure that the child, and any other children, are at a safe distance away when carrying out these steps. Make sure that the moving parts of the HIGH CHAIR do not come into contact with the child's body during these steps.
CAUTION: If in use, remove the tray before closing by attaching it to the back of the frame using the two hooks. See step 9.
Adjust the backrest and the leg rest to a vertical position.
To reduce its dimensions, we recommend that you adjust the seat to the lowest position; see step 6.
Press the buttons located at the centre of the hinges on the leg frame and, at the same time, using your foot to help you, close up the HIGH CHAIR legs (Fig. 11), until you hear a click to indicate that they are locked in the closed position.

text_image
12 a b c dREMOVING THE PADDING FOR WASHING (12)
Rotate the plastic locking ring of the safety harness "straps" and "lap belt" on the rear side of the backrest (a), and remove the harness by pulling it from the inner side of the seat, through the slots in the seat shell and padding.
Rotate the plastic locking ring of the leg separator on the underneath of the seat and remove the belt by pulling it from the inner side of the seat, through the slots in the seat shell and padding.
Unclip the press stud that secures the fabric at the sides to the armrest (b).
Remove the lining from the seat.
ASSEMBLING THE PADDING
Place the padding on the seat.
Insert the plastic ring, fixed to the end of the strap, through the slots in the fabric and the corresponding slots in the seat shell.
Rotate the ring into a vertical position, on the outer side of the backrest. Check that it has locked correctly.
Insert the plastic ring, fixed to the end of the lap belt, through the slots in the fabric and the corresponding slots in the seat shell.
Rotate the ring into a vertical position, on the outer side of the backrest. Check that it has locked correctly.
Insert the plastic ring, fixed to the end of the leg separator belt, through the slots in the fabric and the corresponding slots in the seat shell.
Rotate the ring into a horizontal position, on the underneath of the backrest. Check that it has locked correctly.
natural_image
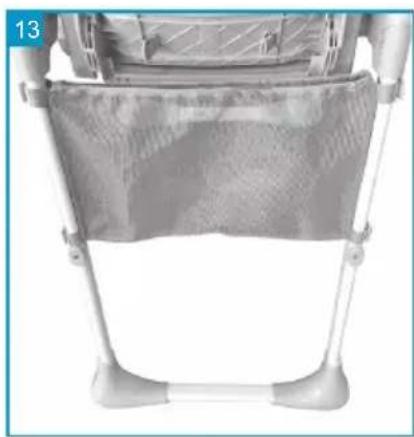
Top-down view of a person wearing a gray ergonomic chair seat with mesh backrest (no text or symbols visible)ASSEMBLING THE BASKET
Fasten the basket using the Velcro tabs, as shown.
IMPORTANT!
READ CAREFULLY AND KEEP FOR FUTURE REFERENCE.
WARNING
- "WARNING: Never leave the child unattended".
- "Always use the restraint system".
- "Falling hazard: Prevent your child from climbing on the product".
- "Do not use the product unless all components are correctly fitted and adjusted".
- "Be aware of the risk of open fire and other sources of strong heat in the vicinity of the product"
-
"Be aware of the risk of tilting when your child can push its feet against a table or any other structure".
-
In order to guarantee the safety of your child when using this product as a High chair it is necessary to use the safety harness with crotch strap correctly fitted to the seat, the restraint barrier and the padded seat reducer. Always use the safety harness.
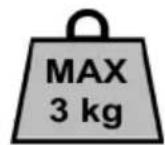
- This product is intended for children able to sit up unaided and up to 3 years or a maximum weight of 15 kg.
- WARNING: This HIGH CHAIR must only be assembled by an adult.
- Ensure that it is correctly assembled before use.
- WARNING: Do not use this HIGH CHAIR if any part is broken, torn or missing.
- WARNING: This HIGH CHAIR must not be used if one of the elements has not been assembled or attached correctly and adequately.
- Do not use components, spare parts or accessories that have not been supplied or approved by the manufacturer.
- WARNING: Only use the HIGH CHAIR when your child is able to sit upright unaided and is aged over 6 months.
- WARNING: The HIGH CHAIR is suitable for children with a maximum weight of 15 kg.
- WARNING: Never leave your child unattended in the HIGH CHAIR.
- WARNING: Always use the safety harness to prevent the child being seriously injured by falling or sliding out of the product.
- WARNING: Check regularly that the harness is correctly attached and not damaged or frayed.
- WARNING: Make sure that the child always has the harness properly secured and adjusted to the right size.
- IMPORTANT: The harness must only be used with all the components attached.
- CAUTION: The tray alone being attached to the seat does not guarantee that your child is secured. Always use the safety harness!
- WARNING: NEVER lift the HIGH CHAIR or adjust the height of the seat with your child placed inside.
- CAUTION: Do not place the HIGH CHAIR near to windows or walls, or where there are cords, curtains or similar, which may be used by the child to climb or cause suffocation or strangulation.
- WARNING: Proximity to fire or other sources of strong heat, such as electric or gas heaters, can be dangerous.
- Do not place the product near to stairs.
- Do not place it on a raised surface, e.g. on a table or a worktop.
- Use the product only on flat surfaces.
- Do not use as a car seat or travel seat.
- Do not move or carry the product with your child inside it.
- CAUTION: Make sure that your child is at a safe distance when opening or closing. When adjusting the HIGH CHAIR (tilting the backrest or positioning the tray) make sure that the moving parts of the HIGH CHAIR do not come into contact with your child's body.
- Do not allow your child to climb into the HIGH CHAIR unaided or to play in it or dangle out of it. This product is not a toy.
- This product is intended for use by a single child.
- Check periodically that all the components are locked correctly.
- Remove and dispose of the packaging safely. Plastic bags can be dangerous, with a risk of suffocation, if handled by children.
-
Make sure that all users are aware of how to work the product correctly.
-
Make sure that all the locking devices are functioning properly and check regularly that the safety devices are correctly engaged and locked.
- Check all parts subject to wear or tear regularly.
- Do not use spray lubricants, do not use aggressive substances.
• To clean the HIGH CHAIR, use a sponge, hot water and a mild soap or detergent, and dry thoroughly. - Stubborn stains may be removed with a mild detergent. Never use abrasive substances, products containing ammonia or bleach, or alcohol-based detergents.
- To clean the lining, follow the instructions on the washing label.
The contents of this document as stated below will come into effect as from 01.01.2005 and replace, on every account and in full, any previous message referring to the guarantee provided by Foppa Pedretti S.p.A.
FORMAL GUARANTEE
Foppa Pedretti S.p.A. the head office of which is located at n. 11 Via Volta, Grumello del Monte (Italy), guarantees directly to the Consumer that this brand new product is free of faults with regard to the materials, design and manufacture and that it complies with the characteristics as declared by the manufacturer.
This formal guarantee is valid in all Member Countries of the European Union and it neither excludes nor limits the Consumer's rights in accordance with mandatory measures provided for by the law with regard to the Retailer of the Product.
To take advantage of this formal guarantee, the Consumer must return the faulty product to the Retailer, presenting to the same the proof of purchase of the Product which must clearly show the Retailer's address, the date of purchase of the Product with the Retailer's stamp and signature and an indication of the Product itself or, alternatively, the receipt which must not have been altered and which must clearly show the same information as that referred to above.
The formal guarantee is valid for twelve (12) months from the date of purchase of the Product. During this period, Foppa Pedretti S.p.A. will repair or replace the faulty product, at its own discretion. The formal guarantee is granted to the end buyer of the Product (Consumer) and it neither excludes nor limits the mandatory rights of the Consumer as provided for by the law and/or the rights that the Consumer may have with regard to the Dealer/Retailer of the Product.
EXCLUSIONS TO THE FORMAL GUARANTEE.
The formal guarantee is excluded in the case of damage caused to the Product for the following reasons: if the product is used in a way that does not comply with the information contained in the use and assembly instruction sheet, if the product is knocked or dropped, if the Product is exposed to humidity or extreme heat or environmental conditions, or to sudden changes in the same, corrosion, oxidization, unauthorized alterations or repairs to the Product, repairs using unauthorised spare parts, improper use, improper maintenance or failure to carry out the same, improper maintenance compared to the information given on the use and assembly instruction sheet, incorrect assembly, accidents, damage caused by food or drink, damage caused by chemical products, cases of force majeure.
In any case, Foppa Pedretti S.p.A. declines all responsibility for damage caused to persons or to property, other than the Product, when such damage is caused by a failure to comply with the instructions/advice/warnings cont a ined in the manua I or, alternatively, in the use and assembly instruction sheet provided with each Product for the owner/user. (Purely as an example, in the case of a cot: "Check your baby constantly.
Make sure that the sheets and blankets do not cover the baby's head...").
Furthermore, Foppa Pedretti S.p.A. declines all responsibility for damage to persons and to property when the breakage of its products is due to a deterioration in the components of the Product that are subject to wear. All the components of the Product made of plastic are considered to be components subject to wear.
LISTE DES COMPOSANTS
A

natural_image
Two identical line drawings of a pair of mechanical clamps or tools with no text or symbolsB

natural_image
Simple line drawing of a curved rectangular shape with a circular hole at the center (no text or symbols)©
D

natural_image
Simple line drawing of a U-shaped object with two vertical posts (no text or symbols)
natural_image
Simple line drawing of a mechanical component with two ends and a central curved body (no text or symbols)E

natural_image
Gray fabric bag with a circular label marked 'M' above it, no visible text or symbols on the bag itself.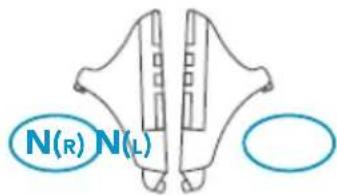
text_image
N(R) N(L)F
natural_image
Line drawing of a car seat with ventilation slots and front-mounted door (no text or symbols)H

natural_image
Technical line drawing of two symmetrical mechanical components with no text or symbolsi

natural_image
Simple line drawing of a bear seatbelt (no text or symbols)L
natural_image
Mechanical diagram showing a lever mechanism with an arrow indicating direction (no text or symbols present)
natural_image
Diagram of a mechanical assembly with an arrow indicating direction (no text or symbols present)
text_image
clack! R-Lnatural_image
Line drawing of a hand holding a small object, possibly a device or tool, with no visible text or symbols.
text_image
"CLICK" 1aACCROCHER LES ARTICULATIONS DE RÉGLAGE DE LA HAUTEUR AU SIÈGE (1)
natural_image
Technical line drawing of a mechanical clamp or lever mechanism with directional arrows indicating motion (no text or symbols)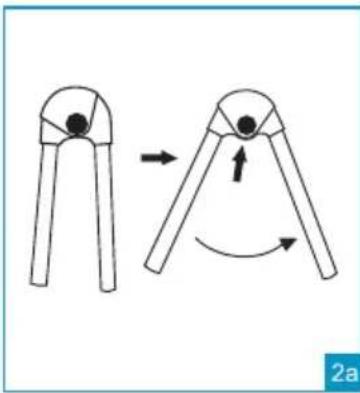
natural_image
Diagram showing two mechanical parts with arrows indicating motion, no text or symbols presentMONTAGE DU SIÈGE SUR LES MONTANTS DES PIEDS (2)
natural_image
Line drawing of a mechanical device with arrows indicating motion or force direction (no text or symbols)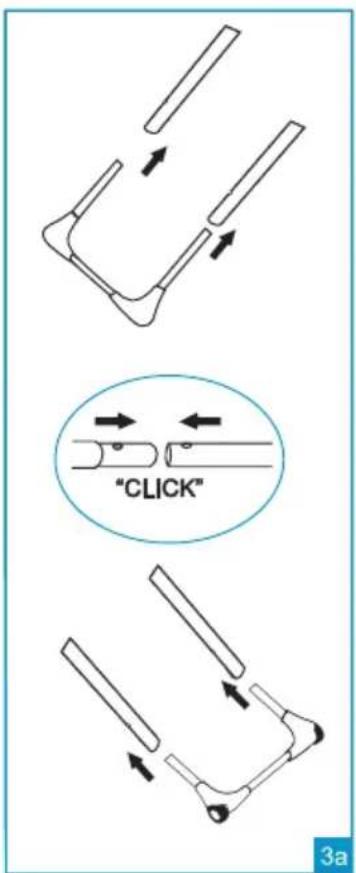
text_image
"CLICK" 3aMONTAGE DES PIEDS AVANT ET ARRIÈRE (3)
natural_image
Diagram of a mechanical device with motion arrows indicating movement, no text or symbols presentRÉGLAGE DE L'INCLINAISON DU DOSSIER (4)
natural_image
Line drawing of a car seatbelt mechanism with no text or symbols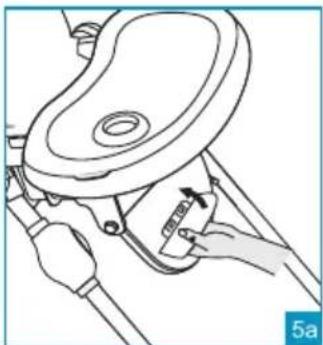
natural_image
Line drawing of a hand holding a tool interacting with a mechanical component (no text or symbols)RÉGLAGE DU REPOSE-PIEDS (5)
natural_image
Illustration of a baby seat with hand positioning guide (no text or symbols)RÉGLAGE DE LA HAUTEUR DU SIÈGE DE LA CHAISE HAUTE (6)
natural_image
Line drawing of a rope knot with a hand adjusting the rope (no text or symbols)
natural_image
Illustration of a person using a folding chair to lift a seat, showing motion arrows (no text or symbols)MONTAGE DU PLATEAU (7)
natural_image
Line drawing of a mechanical device with arrows indicating motion or force direction (no text or symbols)RETIRER LA TABLETTE (8)
natural_image
Line drawing of a mechanical device with handle and seat (no text or symbols)RANGER LE PLATEAU (9)
natural_image
Side view of a modern chair seat with mesh backrest and adjustable legs (no text or symbols visible)MONTAGE DU PANIER
EXCLUSIONS DE LA GARANTIE CONVENTIONNELLE.
natural_image
Two identical line drawings of a pair of tweezers or pliers with no text or symbolsB

natural_image
Simple line drawing of a curved rectangular shape with a circular hole at the center (no text or symbols)C

natural_image
Gray fabric or mesh material with a circular label marked 'M' in the top-left corner (no other text or symbols)D

natural_image
Simple line drawing of a U-shaped object with two vertical posts (no text or symbols)
natural_image
Simple line drawing of a mechanical lever or fulcrum (no text or symbols)E

text_image
N(R) N(L)F
natural_image
Line drawing of a car seat with ventilation slots and frontrest (no text or symbols)H

natural_image
Technical line drawing of two symmetrical mechanical components with no text or symbolsi

natural_image
Simple line drawing of a bear seatbelt (no text or symbols)L
natural_image
Mechanical assembly diagram showing a belt switch mechanism with an arrow indicating direction (no text or symbols present)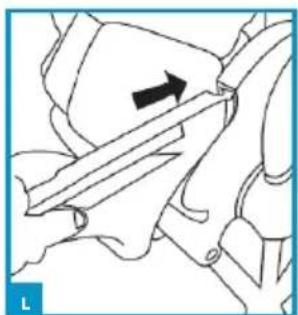
natural_image
Diagram of a hand holding a tool with an arrow indicating direction (no text or symbols present)
text_image
clack! R-Lnatural_image
Line drawing of a hand holding a small object, possibly a tool or device, with no visible text or symbols.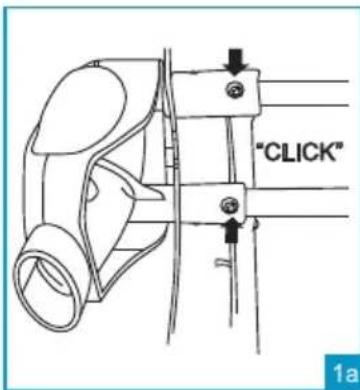
text_image
"CLICK" 1aENGANCHAR AL ASIENTO LA UNIÓN ARTICULADA PARA REGULAR LA ALTURA (1)
natural_image
Technical line drawing of a mechanical clamp or lever mechanism with directional arrows indicating motion (no text or symbols)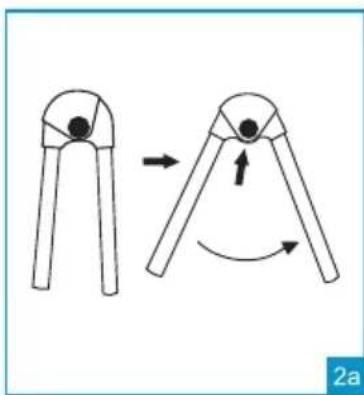
natural_image
Diagram showing two mechanical tool tips with arrows indicating motion (no text or symbols)MONTAJE DEL ASIENTO EN LA ESTRUCTURA DE LAS PATAS (2)
natural_image
Line drawing of a mechanical device with arrows indicating motion or force direction (no text or symbols)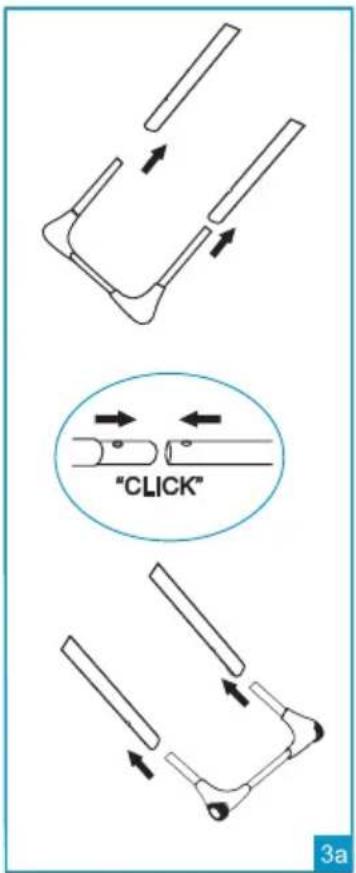
text_image
"CLICK" 3aMONTAJE DE LA PATA ANTERIOR Y DE LA POSTERIOR (3)
natural_image
Line drawing of a mechanical device with motion arrows and a magnified inset showing hand positioning (no text or symbols)natural_image
Line drawing of a mechanical assembly with a curved component and directional arrows (no text or symbols)
natural_image
Line drawing of a hand holding a device with a circular component, no text or symbols presentnatural_image
Illustration of a baby seat with hand positioning guide (no text or symbols)natural_image
Line drawing of a hand connecting a rope to a cable (no text or symbols)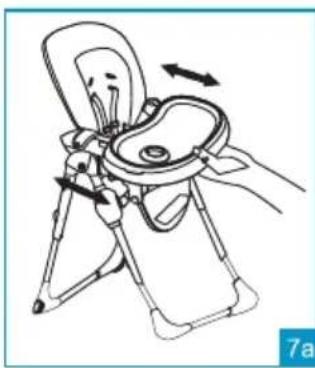
natural_image
Illustration of a person using a chair to lift a seat, showing motion arrows (no text or symbols)MONTAJE DE LA BANDEJA (7)
natural_image
Line drawing of a mechanical device with arrows indicating motion or force direction (no text or symbols)QUITAR LA BANDEJA INTERIOR (8)
natural_image
Line drawing of a mechanical device with handle and seat (no text or symbols)VOLVER A COLOCAR LA BANDEJA (9)
text_image
Diagram of a car seatbelt device with labeled parts (a, b) and directional arrows indicating movement or force.CERRAR LA TRONA (11)
CIERRE
text_image
Technical diagram showing a person using a device to adjust or install a seat, with labeled parts (a, b, c) and directional arrows indicating movement.natural_image
Top-down view of a person wearing a gray ergonomic chair seat with mesh backrest (no text or symbols visible)MONTAJE DELA CESTA
natural_image
Two identical line drawings of a pair of tweezers or pliers with no text or symbolsB

natural_image
Simple line drawing of a curved rectangular shape with a circular hole at the center (no text or symbols)©
D

natural_image
Simple line drawing of a U-shaped object with two vertical posts (no text or symbols)
natural_image
Simple line drawing of a mechanical lever or fulcrum (no text or symbols)E

natural_image
Gray fabric or material sample with a circular label marked 'M' in the top-left corner (no other text or symbols)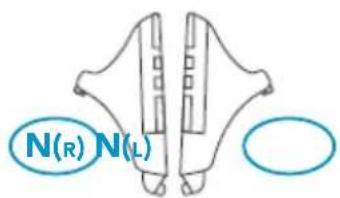
text_image
N(R) N(L)F

natural_image
Line drawing of a car seat with ventilation slots and frontrest (no text or symbols)H

natural_image
Technical line drawing of two symmetrical mechanical components with no text or symbolsI

natural_image
Simple line drawing of a bear seatbelt (no text or symbols)L
natural_image
Mechanical assembly diagram showing a belt switch mechanism with an arrow indicating direction (no text or symbols present)Όπως φαίνεται.

natural_image
Diagram of a hand holding a tool with an arrow indicating direction (no text or symbols present)
text_image
clack! R-LΣΥΝΕΛΕΥΣΗ
natural_image
Line drawing of a hand holding a small object, possibly a tool or device, with no visible text or symbols.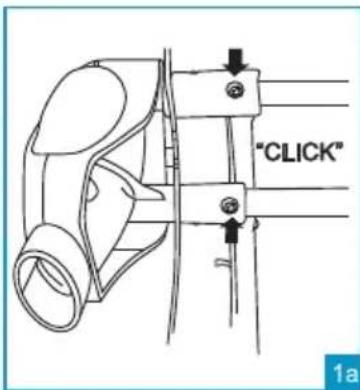
text_image
"CLICK" 1a
natural_image
Technical line drawing of a mechanical clamp or lever mechanism (no text or symbols)
natural_image
Diagram showing two mechanical tool tips with arrows indicating motion (no text or symbols)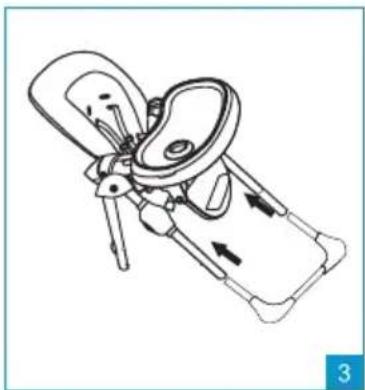
natural_image
Technical line drawing of a mechanical device with directional arrows indicating motion (no text or symbols)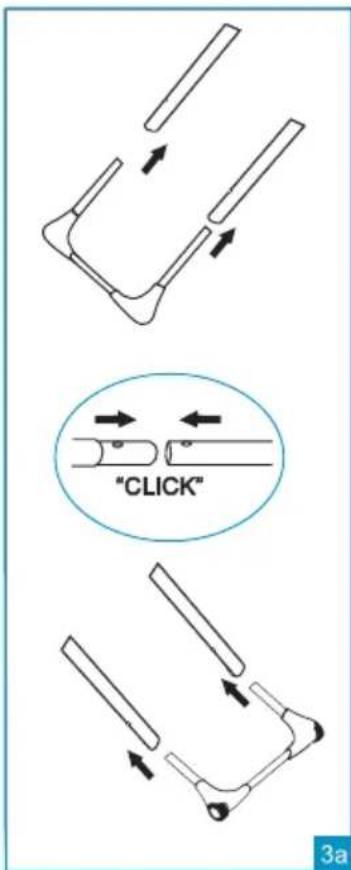
text_image
"CLICK" 3anatural_image
Illustration of a mechanical device with motion arrows indicating movement, no text or symbols presentnatural_image
Line drawing of a car seatbelt with a handle and gear shift (no text or symbols)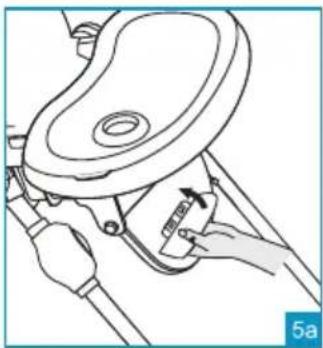
natural_image
Line drawing of a mechanical assembly with hands holding a tool, no text or symbols presentnatural_image
Illustration of a baby seat with hand positioning guide (no text or symbols)natural_image
Line drawing of a hand holding a rope tied around a curved object (no text or symbols)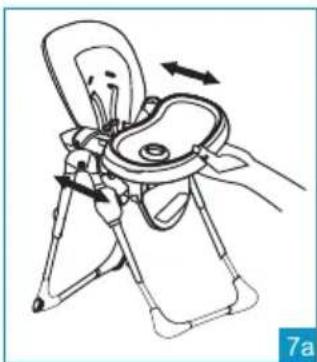
natural_image
Line drawing of a person using a seatbelt device to lift a seatbelt, with directional arrows indicating movement (no text or symbols)natural_image
Line drawing of a mechanical component with arrows indicating motion or force direction (no text or symbols)natural_image
Line drawing of a mechanical device with handle and mounting bracket (no text or symbols)natural_image
Top-down view of a gray ergonomic chair seat with mesh backrest and side legs (no text or symbols visible)natural_image
Two identical line drawings of a pair of tweezers or pliers with no text or symbolsB

natural_image
Simple line drawing of a curved rectangular shape with a circular hole at the center (no text or symbols)©
D

natural_image
Simple line drawing of a U-shaped object with two vertical posts (no text or symbols)
natural_image
Simple line drawing of a mechanical lever or fulcrum (no text or symbols)E
natural_image
Gray plastic bag with a circular label marked 'M' above it, no visible text or symbols on the bag itself.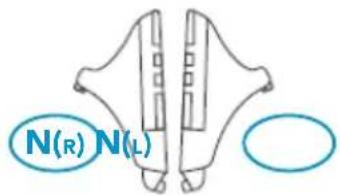
text_image
N(R) N(L)F
natural_image
Line drawing of a car seat with ventilation slots and frontrest (no text or symbols)H

natural_image
Technical line drawing of two symmetrical mechanical components with no text or symbolsi

natural_image
Simple line drawing of a bear seatbelt (no text or symbols)L
natural_image
Mechanical diagram showing a lever mechanism with an arrow indicating direction (no text or symbols present)natural_image
Diagram of a mechanical assembly with an arrow indicating direction (no text or symbols present)
text_image
clack! R-L
natural_image
Line drawing of a hand holding a small object, possibly a tool or device, with no visible text or symbols.
text_image
"CLICK" 1anatural_image
Technical line drawing of a mechanical clamp or lever mechanism with directional arrows (no text or symbols)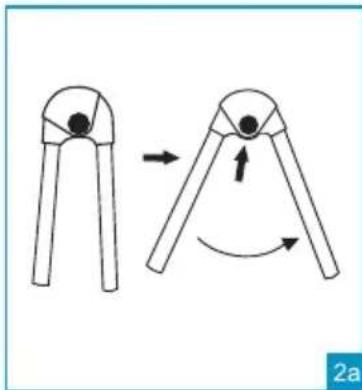
natural_image
Diagram showing two mechanical tool tips with arrows indicating motion (no text or symbols)natural_image
Line drawing of a mechanical device with arrows indicating motion or force direction (no text or symbols)
text_image
"CLICK" 3anatural_image
Diagram of a mechanical device with motion arrows indicating movement, no text or symbols presentРЕГУЛЯЦИЯ НАКЛОНА СПИНКИ (4)
natural_image
Line drawing of a car wheel assembly with hand positioning and motion arrows indicating movement (no text or symbols)
natural_image
Line drawing of a hand holding a tool interacting with a mechanical component (no text or symbols)natural_image
Illustration of a baby chair with hand positioning guide (no text or symbols)natural_image
Line drawing of a rope knot with a hand adjusting the rope (no text or symbols)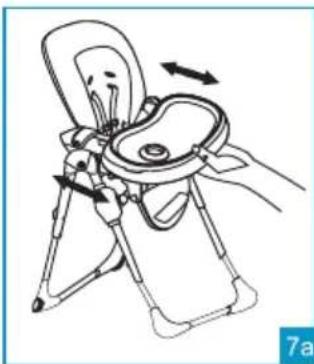
natural_image
Illustration of a person using a chair to lift a seat, showing motion arrows (no text or symbols)СБОРКА СТОЛИКА (7)
natural_image
Line drawing of a mechanical device with directional arrows indicating motion (no text or symbols)СНЯТЬ ВНУТРЕННИЙ ПОДНОС (8)
natural_image
Line drawing of a mechanical device with no visible text or symbolsУБРАТЬ СТОЛИК (9)
natural_image
Top-down view of a person wearing a gray ergonomic chair seat with mesh backrest (no text or symbols visible)КАК НАДЕТЬ КОРЗИНА
natural_image
Two identical line drawings of a pair of mechanical clamps or tools with no text or symbolsB
natural_image
Simple line drawing of a curved rectangular shape with a circular hole at the center (no text or symbols)C
natural_image
Gray fabric bag with a circular label marked 'M' above it, no visible text or symbols on the bag itself.D
natural_image
Simple line drawing of a U-shaped object with two vertical posts (no text or symbols)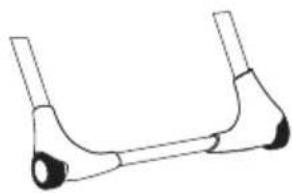
natural_image
Simple line drawing of a mechanical component with two curved arms and a central knob (no text or symbols)E

text_image
N(R) N(L)F

natural_image
Line drawing of a car seat with ventilation slots and frontrest (no text or symbols)H

natural_image
Technical line drawing of two symmetrical mechanical components with no text or symbolsi

natural_image
Simple line drawing of a bear seatbelt (no text or symbols)L
A. Cadru Picioare (STANGA)
B. Cadru Picioare (DREAPTA)
C. Tavita
D. Picion Din Fata
E. Picion Din Spate
F. Sezut/Scaun
G. Suport Pentru Picioare
H. Scaun Cu Articulatie De Reglare A Inaltimii (DREAPTA)
I. Scaun Cu Articulatie De Reglare A Inaltimii (STANGA)
natural_image
Mechanical diagram showing a lever mechanism with an arrow indicating direction (no text or symbols present)După cum se arată.

natural_image
Diagram of a mechanical assembly with an arrow indicating direction (no text or symbols present)
text_image
clack! R-LASAMBLARE

natural_image
Line drawing of a hand holding a small object, possibly a tool or device, with no visible text or symbols.
text_image
"CLICK" 1aATASAREA BALAMALELOR DE AJUSTARE A INALTIMII SCAUNULUI (1)
natural_image
Technical line drawing of a mechanical clamp or lever mechanism with directional arrows indicating motion (no text or symbols)
natural_image
Diagram showing two mechanical tool configurations with arrows indicating motion (no text or symbols)MONTAREA SCAUNULUI PE CADRUL PICIOARELOR (2)
natural_image
Line drawing of a mechanical device with directional arrows indicating motion or movement (no text or symbols)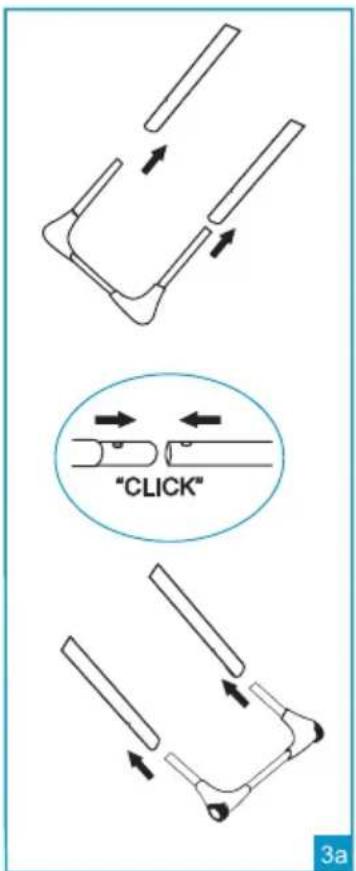
text_image
"CLICK" 3aASAMBLAREA PICIOARELOR DIN FATA SI DIN SPATE (3)
natural_image
Line drawing of a mechanical device with motion arrows indicating movement, no text or symbols presentREGLAREA SPATARULUI (4)
natural_image
Line drawing of a mechanical assembly with a curved component and directional arrows (no text or symbols)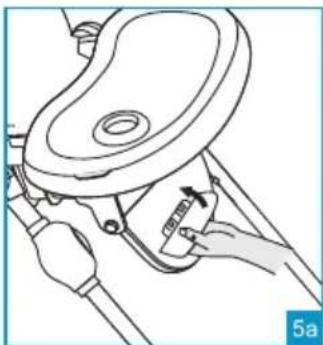
natural_image
Line drawing of a hand holding a small object with a ruler, no text or symbols presentREGLAREA SUPORTULUI PENTRU PICIOARE (5)
natural_image
Line drawing of a baby seat with hand gestures and an inset showing the same leg (no text or symbols)REGLAREA INALTIMII SCAUNULUI DE MASA (6)
natural_image
Line drawing of a rope knot with a hand holding the rope (no text or symbols)