Moving 120 - Hi-fi system Auna - Free user manual and instructions
Find the device manual for free Moving 120 Auna in PDF.
User questions about Moving 120 Auna
0 question about this device. Answer the ones you know or ask your own.
Ask a new question about this device
Download the instructions for your Hi-fi system in PDF format for free! Find your manual Moving 120 - Auna and take your electronic device back in hand. On this page are published all the documents necessary for the use of your device. Moving 120 by Auna.
USER MANUAL Moving 120 Auna
www.auna.multimedia.com

Congratulations on purchasing this equipment. Please read this manual carefully and take care of the following hints on installation and use to avoid technical damages. Any failure caused by ignoring the mentioned items and cautions mentioned in the operation and installation instructions are not covered by our warranty and any liability.
TECHNICAL DATA
| Item number 100322 | 89 10032290 | |
| Power supply 230 V~ 50 Hz | ||
| RMS 35 W 35 W | ||
ACCESSIONS
- Instruction Booklet.
- AC Cord
Remote Control - Wireless Microphone
- 3.5mm to 3.5mm AUX-in Cable
- RCA to RCA AUX-In Cable
DC Cord (with 2 clips at one end)
SAFETY INSTRUCTIONS
- Read these instructions. Guard this manual. Obey all alerts. Follow all instructions.
- WARNING: To prevent fire or shock hazard, do not expose this equipment to rain or moisture. Do not store and operate this product near liquid.
Clean only with dry cloth. - Do not store and not operate this product near any heat sources such as radiators and heat registers, stove or other appliances (including amplifiers) that produce heat. Keep this product in a well ventilated place.
- Protect all wires connected to this unit from being walked on or pinched, particularly at plugs and the point where the cord exits the unit. When unplugging from the electrical outlet, grasp the plug and do not pull the cord.
- Disconnect the unit during lightning storms or when long period is to remain unused.
- Keep this unit off when connecting all the devices connected to it.
- After finishing the installation and connections, connect all your equipment with low volume level. Once all devices are connected, slowly increase the volume or level controls to achieve the proper position.
- All services should be performed by qualified professionals
Special Safety Instructions
- The apparatus must not be exposed to dripping or splashing and no objects filled with liquids, such as vases, shall be placed on the apparatus.
- Keep a minimum distance for 30cm around the apparatus for sufficient ventilation.
- The ventilation should not be impeded by covering the ventilation opening with items, such as newspapers, table-cloths, curtains, etc.
- When the mains plug or an appliance coupler is used as the disconnect device, the disconnect device shall remain readily operable.
- The main plug of apparatus should not be obstructed or should be easily accessed during intended use.
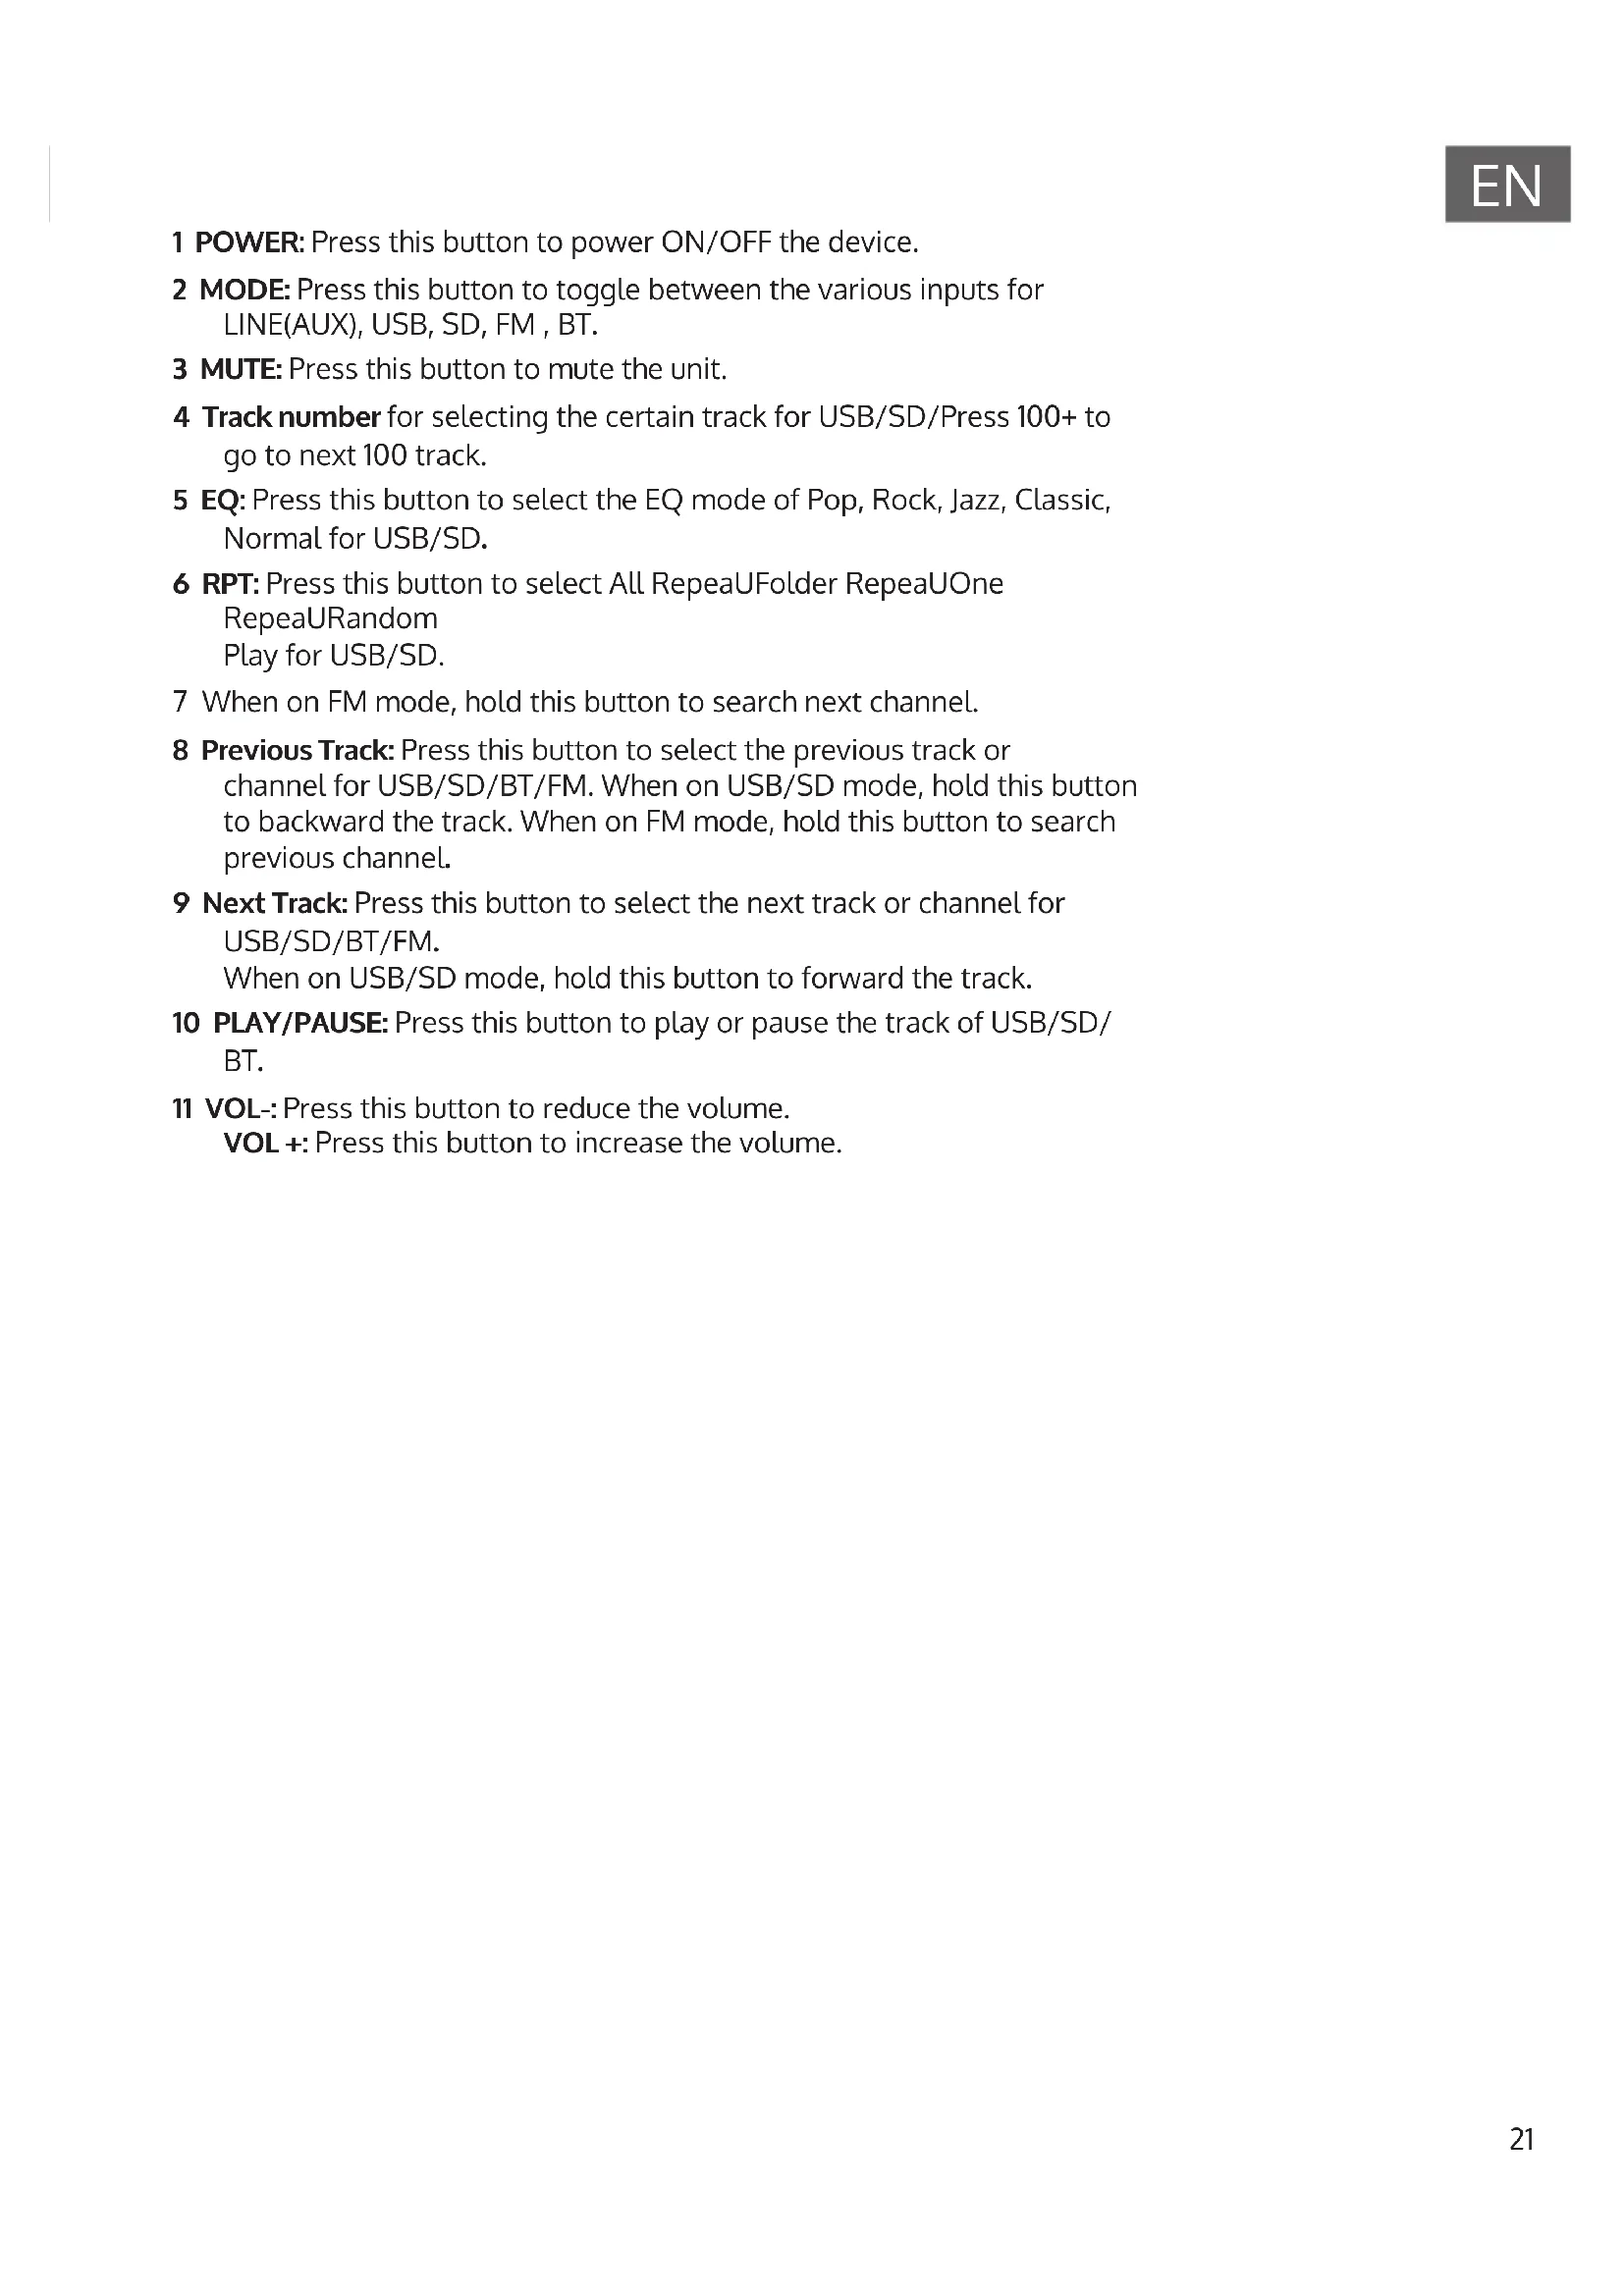
1 Microphone Input(1/4"): Connect a microphone to this microphone input terminal.
2 Seven Band Equalizer: Move the individual sliders to adjust certain frequencies to desires levels.
3
USB/SD/BT: press this button to move to the previous track.
UKW-Radio: press this button to move to the previous channel. Hold it to reduce the volume.
4 MODE: Press this button to toggle between the various inputs (LINE, USB, SD ,FM, BT)..
5 II
When on the mode of USB/SD, press this button to pause or play. Hold it to select the repeat modes for USB/SD.
When on BT mode, press this button to pause, hold it to disconnect pairing.
6
FM radio: press this button to move to the next channel. Hold it to increase the volume.
7 USB/SD card slot
Connect your USB memory storage or SD card device here. The speaker will only play music files from USB/SD input. Do not connect your computer to this input as it will not play files directly from a computer. Important: The USB port is intended only for data transfer only, other devcs cannot be used with this USB connection. The use of USB extension cords is not recommended.
8 Charging indicator: When the unit is fully charged, the LED will light up solid.
9 Master Level Control: Turn this knob to adjust the master volume.
10 Power and BT indicator
The power indicator will light up solid when the unit is ON. BT indicator will light up solid when in connecting, and it flashes when paring.
11 TREBLE: Turn this knob to adjust the treble.
12 BASS: Turn this knob to adjust the bass.
13 ECHO: Use this knob to adjust the microphone volume level of the microphone input.
14 MIC VOLUME: Turn this knob to adjust the microphone volume level of the microphone input.
15 GUITAR: Turn this knob to adjust the volume level of your guitar.
16. Guitar Input (1 / 4^ ) : Connect a guitar to this input terminal.
17 AUX (3,5 mm): The input is designed to connect directly to a music player or any other level audio device.
18 IT remote receiver
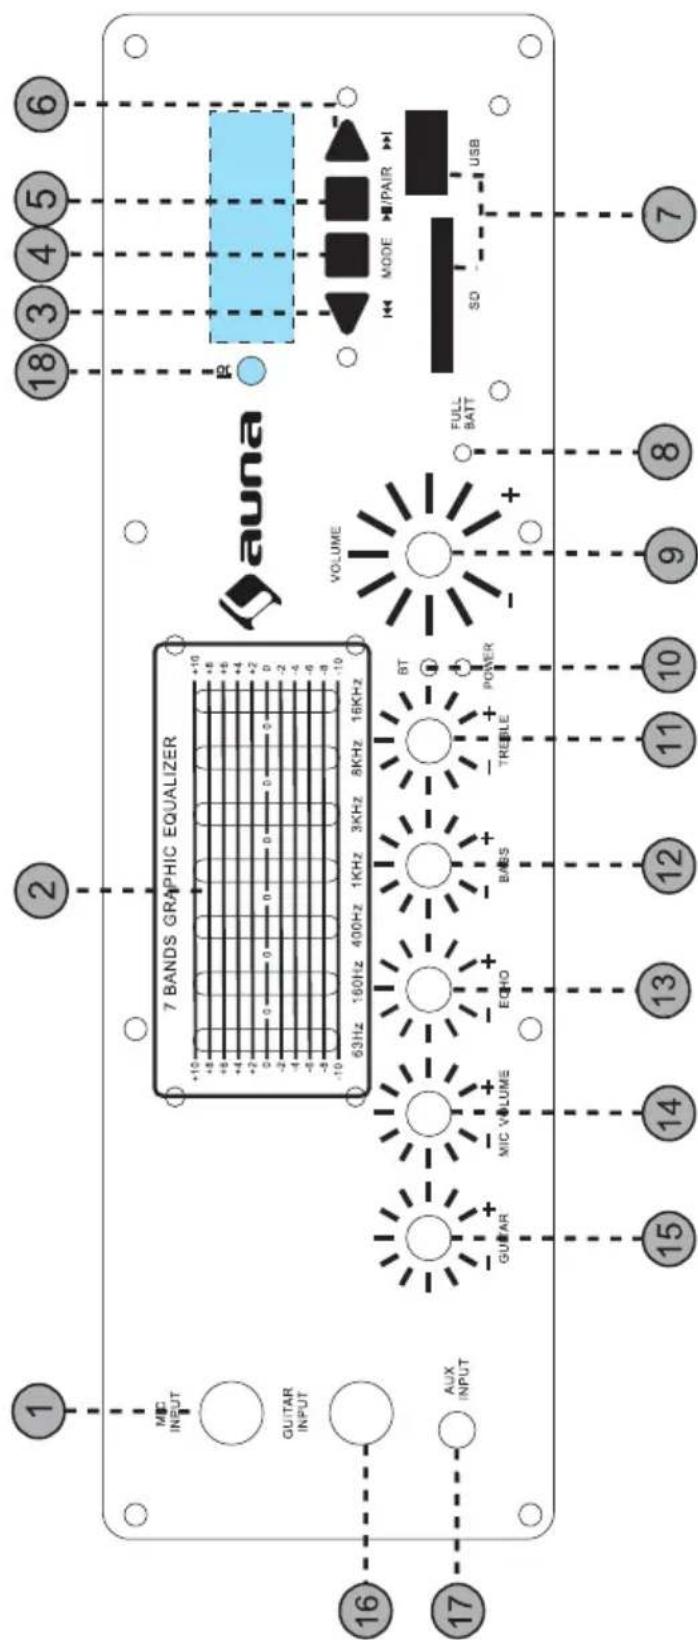
REAR PANEL
1 AUX Input (RCA): The RCA Input is designed to connect directly to a CD/DVD/TV or any other stereo level audio device. Please note that there are two LINE (AUX) Inputs, RCA and 1/8". If both the RCA and 1/8"inputs are connected the unit is automatically play from the 1/8" Line input. To play from the RCA Line input, please disconnect the 1/8" connection from the 1/8" Line Input.
2 AC voltage selector (optional).
3 Antenna is for receiving the FM signal. Before use, pull up the telescopic FM antenna. After use, pack up the FM antenna to protect it.
4 Power Button/AC socket: Press this button to power the unit on the unit. If the battery needs to be charged, set the button to AC and connect the power cable to the rear of the unit. When set to AC, the unit can also be powered by an external power supply (electrical outlet) even if the battery is dead. To turn the unit off set the power button to OFF. It is recommended to fully charge the battery prior to using the unit for the first time. It is also recommended to charge the battery at least every 2-3 months to keep the battery operating to its highest capacity.
5 DC 12V IN is for connecting to 12V external battery if needed.
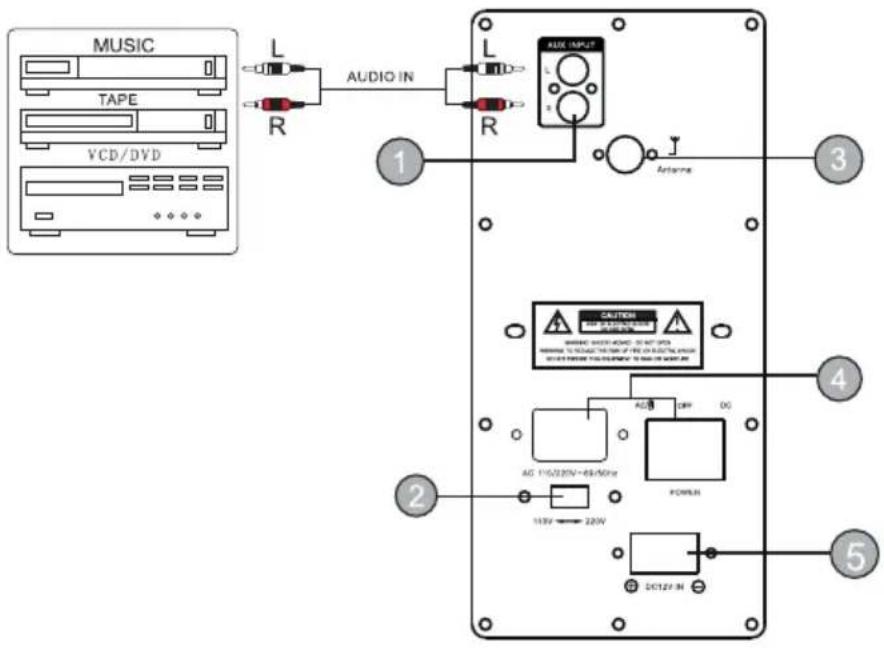
REMOTE CONTROL
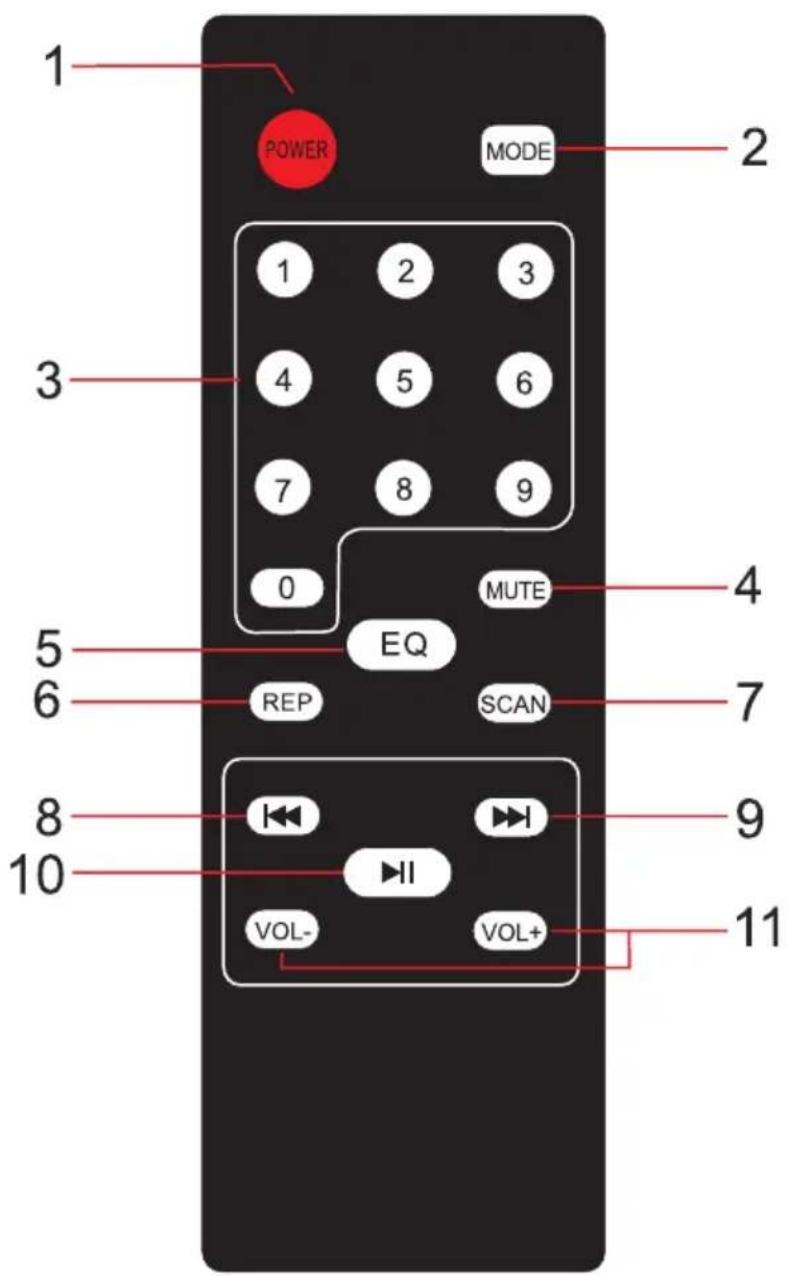
1 POWER: Press this button to power ON/OFF the device.
2 MODE: Press this button to toggle between the various inputs for LINE(AUX), USB, SD, FM, BT.
3 MUTE: Press this button to mute the unit.
4 Track number for selecting the certain track for USB/SD/Press 100+ to go to next 100 track.
5 EQ: Press this button to select the EQ mode of Pop, Rock, Jazz, Classic, Normal for USB/SD.
6 RPT: Press this button to select All RepeaUFolder RepeaUOne RepeaURandom Play for USB/SD.
7 When on FM mode, hold this button to search next channel.
8 Previous Track: Press this button to select the previous track or channel for USB/SD/BT/FM. When on USB/SD mode, hold this button to backward the track. When on FM mode, hold this button to search previous channel.
9 Next Track: Press this button to select the next track or channel for USB/SD/BT/FM. When on USB/SD mode, hold this button to forward the track.
10 PLAY/PAUSE: Press this button to play or pause the track of USB/SD/ BT.
11 VOL: Press this button to reduce the volume.
VOL+: Press this button to increase the volume.
MICROPHONE
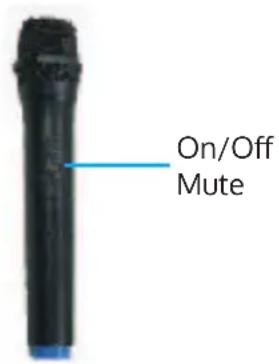
- Before powering on the microphone, be sure to set the Microphone Volume Knob to zero. Once the microphone is powered on, slowly increase the microphone volume.
- If you notice static or distortion in the microphone, check if XLR is fixed to the body properly of echo volume is too high.
- When not in use, turn off the power of the microphone.
DIGITAL DISPLAY
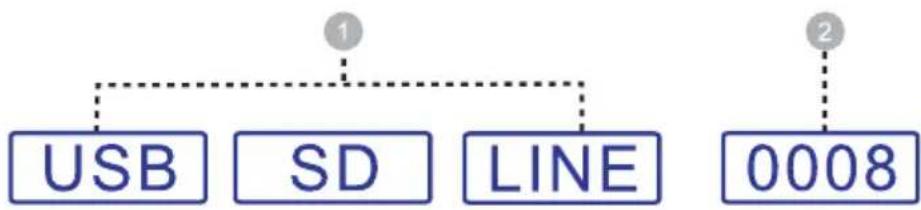
INPUT MODES: The LED display screen will display the information of input modes for USB/SD/LINE(AUX)/FM/BT..
- When a USB flash drive/SO card is inserted into the USB/SD input, the unit will automatically switch to USB/SD mode and begin playing audio files from the USB/SD card. EQ Mode:
EQ modes will display here, Pop, Rock, Jazz, Classic, Normal for USB/SD.
Repeat Mode: When the USB flash or SD card mode is selected, press the RPT button on remote to select All RepeaUFolder RepeaUOne RepeaURandom Play for USB/SD. - Track Number: The track number from the USB/SD will display at the beginning:

- FM Mode: All FM channels display here. Hold "PLAY/PUASE" button on front panel for scanning all channels.
- BT Mode: To disconnect pairing, Hold the "PLAY/PAUSE" button on front panel.
BT OPERATION
Pairing
- Turn on your BT device.
- Turn on the speaker BT. the unit will automatically go into pairing mode to search for BT device. You will know you are in pairing mode when the LED is flashing.
- If your BT device is not able to pair to the unit, disconnect the unit's BT to break the previous BT connections and reset the BT module.
- Navigate to your BT device's setup screen, find Moving80-Moving120 and connect.
- BT indicator light will light up solid when in connecting.F lashes twice when pause playback,flashes when ready for paring.
- To disconnect pairing, hold PLAY /PA USE button.
Note: You can connect with a smart phones or tablet PC with BT.
BATTERY
- The unit is a battery powered loudspeaker. Be sure that you have completely charged the battery prior to first use to maximize the battery's lifespan. The unit takes approximately 8 hours to fully charge. The unit will automatically begin charging once the power cord is connected to a power source and Power button is set to AC.
The unit will also power on when connected to a power source even if the battery power is low.
When connected to a power source, the unit will play while also charging the battery.
When the battery is full, the full charging indicator light on front panel will ON.t - Upon completion of the charging, Please disconnect the power cable.
- If all green battery indicator turned off and only the red low LED lights up, please power off the unit and begin charging the battery.
- With standard usage, a fully charged battery can play for about 4-5 hours.
- Battery can be recharged about 300 times in its life time.
- When not in use, the speaker should always be set to OFF to prevent the unit from draining the battery.
- When the unit is not used for prolonged periods of time, the battery will gradually lose its power. It is recommended to fully charge the battery at least every 60 days.
DISPOSAL CONSIDERATIONS

According to the European waste regulation 2012/19/EU this symbol on the product or on its packaging indicates that this product may not be treated as household waste. Instead it should be taken to the appropriate collection point for the recycling of electrical and electronic equipment. By ensuring this product is disposed of correctly, you will help prevent potential negative consequences for the environment and human health, which could otherwise be caused by inappropriate waste handling of this product. For more detailed information about recycling of this product, please contact your local council or your household waste disposal service.
Your product contains batteries covered by the European Directive. 2006/66/EC, which cannot be disposed of with normal household waste. Please check local rules on separate collection of batteries. The correct disposal of batteries helps prevent potentially negative consequences on the environment and human health.

Declaration of Conformity
Producer: Chal-Tec GmbH, Wallstraße 16, 10179 Berlin. Germany
This product is conform to the following European Directives:
2011/65/EU (RoHS)
2014/53/EU (RED)
2014/35/EU (LVD)
Chere cliente, cher client,
Chere cliente, cher client,