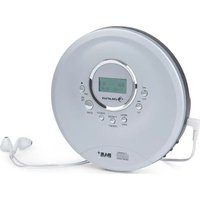
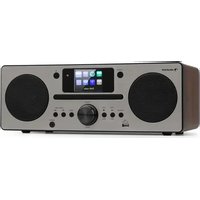
Ultrasonic CD - Hi-fi system Auna - Free user manual and instructions
Find the device manual for free Ultrasonic CD Auna in PDF.

User questions about Ultrasonic CD Auna
0 question about this device. Answer the ones you know or ask your own.
Ask a new question about this device
Download the instructions for your Hi-fi system in PDF format for free! Find your manual Ultrasonic CD - Auna and take your electronic device back in hand. On this page are published all the documents necessary for the use of your device. Ultrasonic CD by Auna.
USER MANUAL Ultrasonic CD Auna
www.auna.multimedia.com

Berlin Brands Group UK Ltd
PO Box 1145
Oxford, OX1 9UW
United Kingdom
Congratulations on purchasing this equipment. Please read this manual carefully and take care of the following hints to avoid damages. Any failure caused by ignoring the items and cautions mentioned in the instruction manual are not covered by our warranty and any liability. Scan the QR code to get access to the latest user manual and other information about the product.

CONTENTS
Technical Data 24
Safety Instructions 26
Product Overview 28
Getting started 30
Operation Instruction 30
CD/MP3 Operation 32
USB Operation 34
BT Operation 35
AUX-IN Operation 35
MIC jack Operation 35
Compact Disc Maintenance 36
Disposal Considerations 37
Declaration of Conformity 37
TECHNICAL DATA
| Item number 10035208 | |
| Power supply 100-240 V~ 50/60 Hz Battery: 12 V= 4 Ah | |
| Power consumption 39 W | |
| Power output 2x22 W RMS | |
| AUX in jack 3.5 mm | |
| Microphone jack 6.3 mm | |
| Working temperattrue 5 °C | +35 °C |
| BT frequency 2402-2480 MHz | |
| BT radio-frequency power (max.) | 4.05 dBm |
| Reception Range 10 metres | (line-of-sight distance) |
| Compatible profiles Advanced Audio Distribution Profile (A2DP) | |
Accessories
Unit
- Instruction manual
- AC power cord
EXPLANATION OF THE WARNING SYMBOLS
| CAUTION RISK OF ELECTRIC SHOCK DO NOT OPEN | A |
| AUTION: TO REDUCE THE RISK OF ELECTRIC SHOCK AND SERIOUS PERSONAL INJURY, DO NOT REMOVE ANY COVER. NO USER-SERVICABLE PARTS INSIDE. REFER SERVICING TO QUALIFIED SERVICE PERSONNEL ONLY. | |
| WARNING. TO REDUCE THE RISK OF FIRE OR ELECTRICAL SHOCK, DO NOT EXPOSE THIS PRODUCT TO WATER, RAIN OR MOISTURE. | |
|  | Triangle with lightning plus explanation as follows: DANGEROUS VOLTAGE: The lightning flash with arrowhead symbol within the equilateral triangle is intended to alert the user to the presence of uninsulated dangerous voltage within the product's enclosure that may be of sufficient magnitude to constitute a risk of electric shock to persons. |
|  | Triangle with exclamation point plus explanation as follows: ATTENTION: The exclamation point within the equilateral triangle is intended to alert the user to the presence of important operating and maintenance (servicing) instructions in the literature accompanying this product. |
| INVISIBLE LASER RADIATION WHEN OPEN AND INTERLOCK FAILLED OR DEFEATED. AVOID DIRECT EXPOSURE TO LASER BEAN | Laser safety This equipment uses an optical laser system in the CD mechanism, which is equipped with built-in safety devices. Do not attempt to disassemble the unit, but contact qualified service personnel. Exposure to this invisible laser beam may be harmful to the human eye. |
THIS IS A CLASS 1 LASER PRODUCT. USE OF CONTROLS OR ADJUSTMENTS OR PROCEDURES OTHER THAN THOSE SPECIFIED HEREIN MAY RESULT IN HAZARDOUS EXPOSURE OF THE LASER BEAM.
SAFETY INSTRUCTIONS
Read these instructions. All uses guidelines must be read before using the device. Keep the instructions for future use.
- Children over the age of 8 and persons with reduced physical, sensory or mental capabilities or those with a lack of experience and knowledge may only use the device if they are instructed on how to do so by a person responsible for their safety, or if they are supervised and understand the hazards associated with the use of the device.
- Attention, use and security guidelines must be respected.
- The device must not be used near water or be put in contact with moisture.
- Make sure has no liquid is spilled on device and device openings.
- Move device carefully, avoid shocks.
- Do not block the breakdown of the device outputs.
- Do not place the device near from a heat source (e.g. radiator). Do not expose it to the Sun.
- Plug the device as indicate on this information form.
- This device has a connection with overload protection. Replacement should only be done bt an experienced technician or the device manufacturer.
- For cleaning the device, please follow the recommendations of the notice.
- The power cord should be unplugged when not using for a long period of time.
Device shall be repaired by a qualified person when:
a. the power cord is damaged,
b. objects have fallen into the apparatus or a liquid has been spilled into device,
c. device was exposes to the rain,
d. device does not work correctly without notable exterior change,
e. device is broken.
- The user shall not try to maintain device beyond that which is described in this information form.
- The apparatus shall not be exposed to dripping or splashing and that no objects filled with liquids, such as vases, shall be placed on apparatus.
- To be completely disconnect the power input, the mains plug of apparatus shall be disconnected from the mains, as the disconnect devices is the mains plug of apparatus.
- The mains plug of apparatus should not be obstructed OR should be
easily accessed during intended use.
- Battery shall not be exposed to excessive heat such as sunshine, fire or the like.
- Excessive sound pressure form earphones and headphones can cause hearing loss.
- Minimum distance (8 cm) around the apparatus for sufficient ventilations;
- The ventilation should not be impeded by covering the ventilation opening with items such as newspaper, table-cloths, curtain etc;
- No naked flame sources such as lighted candles should be placed on the apparatus;
- Attention should be drawn to the environmental aspects of battery disposal;
- The use of apparatus in moderate climates.
- Danger of explosion if battery is incorrectly replaced.
- Replace only with the same or equivalent type.
- The main plug shall remain readily operable.
Before use
Avoid installing this unit in places exposed to direct sunlight or close to heat radiating appliances such as electric heaters, on top of other stereo equipment that radiates too much heat, places lacking ventilation or dusty areas, places subject to constant vibration and/or humid or moist areas.
Do not attempt to clean this unit with chemical solvents as this might damage the finish. Use a clean dry cloth. Operate controls and switches as described in the manual. Before turning On the power, make certain the AC power cord is plugged in.
Power source
- This system is designed to operate on normal AC 100-240V ~ 50/60 Hz only.
- Attempting to operate from any other power source may cause damage to the system, and such damage is not covered by your warranty.
NOTE: If this plug will not fit into your outlet you probably have an outdated non-polarized AC outlet. You should have your outlet changed by a qualified licensed electrician.
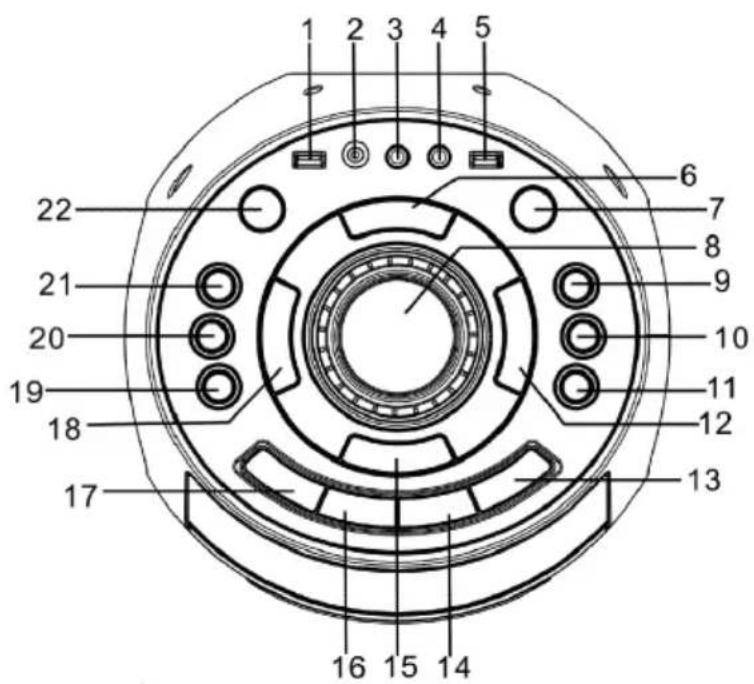
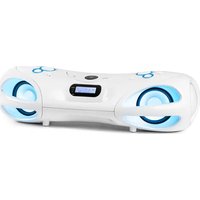
Top view
1 USB port
2 3.5mm AUX IN jack
3 6.3mm mic jack1
4 6.3mm mic jack 2
5 USB charge port
6 Stop button
7 Standby button
8 Volume control
9 10/Folder + button
10 10/Folder - button
11 EQ button
12▶Button
13 Function button
14 Light button
15 Pair button
16 Prog./P-mode button
17 Open/close button
18 KButton
19 Echo button
20 Mic vol.-Button
21 Mic vol.+ Button
22 Bass button
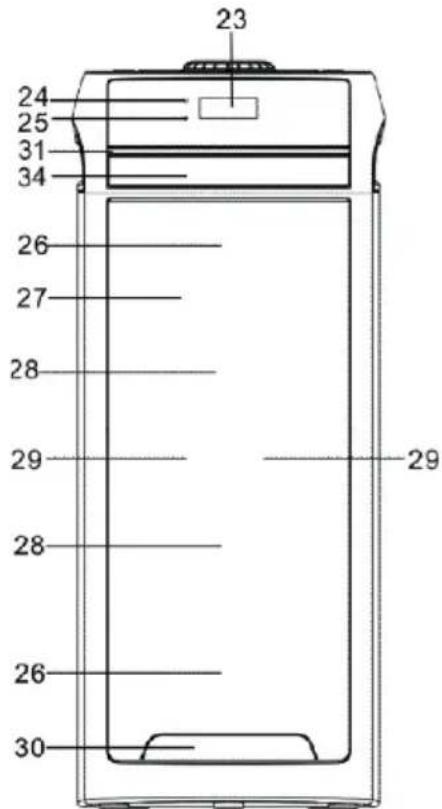
23 LCD display
24 Pair indicator
25 Charge indicator
26 disco led light
27 Speaker grille
28 Speakers
29 Tweeter
30 Projection light
31 Strobe light
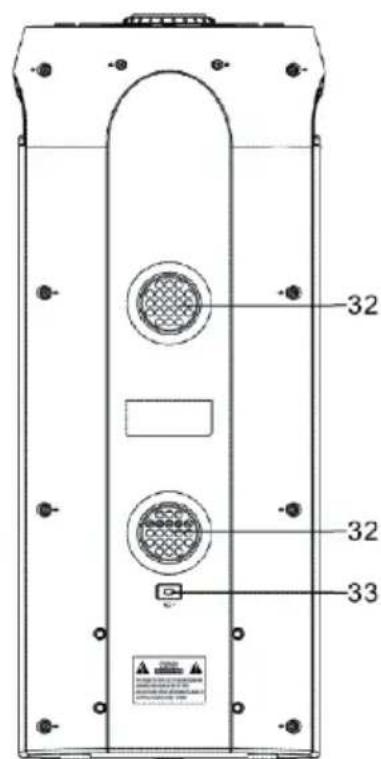
32 Ventilation holes
33 AC socket
34 CD door
GETTING STARTED
Power source
This unit works with rechargeable lead-acid battery (the battery capacity 4000 mAh). Fully charge the unit (around 7 hours) before using the product for the first time. The playback time has about 2 hours after full charging. Unplug the AC Power cord from the AC socket to work on the battery pack after fully charged. Plugging the AC Power cord while the battery pack is attached initiates the charging of this battery, the charge LED indicator lights red during charging, when the battery is fully charged the indicator will turn to green. When the unit is with low battery, the LED indicator will flash in red.
Warning: Do not change the battery, only high-qualified personnel can perform this operation.
Turning the unit on/off
Press the 已 button to switch the unit on/off.
NOTE: In CD/USB/Bluetooth/AUX mode, when the unit is not providing the main function for around 15 minutes, the unit will automatically switch into standby mode. Press the button to turn on the unit again.
Please note that low volume setting in the audio source may be recognized as "no audio signal", this will affect the capability of signal detection from the device and can also originate an automatic switch into standby mode. If this happens please reactivate the audio signal transmission or increase the volume setting on the audio source player in order to resume playback.
Electrostatic Discharge hints - The unit may reset or may not reset to normal operation mode due to electrostatic discharge, just switch it off and reconnect again.
Setting the function mode
To change the function modes, press the FUNCTION button repeatedly to choose CD/USB/BLUETOOTH/AUX function.
Adjusting the volume
-
Rotate the VOLUME knob on the unit to increase or decrease the music volume.
-
Press the MIC VOL.+/- button on the unit to increase or decrease the microphone volume.
Bass adjustment
Press the BASS button on unit to increase the bass effect.
Equalizer (eq) function
This unit has a built-in equalizer system, press the EQ button on unit to select a setting that best matches the music style: FLAT, POP, CLASSIC, JAZZ, and ROCK.
USB charging
This unit provides a 5V 1A USB charging port for charging your smart phone. Connect the USB cable of your smart phone to the USB CHARGE port for charging.
Microphone echo adjustment
Press the ECHO button on unit turn on or off the microphone echo effect.
Flashing light
There are 5 flashing modes for the DISCO LED lights. Press the LIGHT button to choose the light modes. To turn off the light, press the LIGHT button until "OFF" showed on the display.
The projection light and strobe light will flash to the music beat in all light modes. Press and hold the LIGHT button to turn it on or off..
CD/MP3 OPERATION
Discs for Playback
This system only can playback digital audio CD/MP3, finalized digital audio CD-Recordable (CD-R) discs, finalized digital audio CD-Rewritable (CD-RW) discs and CD-DA format digital audio CD/CD-R/CD-RW discs.
Loading a disc
- Press the FUNCTION button on the unit to select "CD" mode.
- Press the OPEN/CLOSE button to open the CD door, "OPEN" will be shown on the display.
- Place an audio CD/MP3 DISC into the tray with the front side facing up.
- Close the CD door.
The display will show the "READING", then the total number of tracks would be shown, if contain several folders, the total no. of folders would be showed, and the playback will starts from the first track.
- To remove the CD, press STOP button to stop playback, and then press OPEN/CLOSE button to open CD door, the display will show "OPEN". Hold the CD by its edges, and carefully take it out.
Notes:
- Make sure the disc is stopped before opening the CD DOOR.
- To ensure good system performance; wait until the unit completely reads the disc before proceeding.
- If no disc loaded into the tray, or the disc is unreadable, the display will show "NO DISC".
Playing a disc
- The unit will start playback from track 1 after reading finished. The track no. and play time would be shown on the display. To pause playback, press the / PAIR button. The play time will flash and current track no. will show on the display. To resume playback, press the / PAIR button again.
- To stop playback, press the STOP button, the total number of tracks will show on the display.
Selecting a desired track/passage
To select a desired track press the or button in stop mode or during play until the desired track appears on the display. It will start play automatically.
To search for a particular passage during playback (track scanning at high speed) press and hold the or button to scan the current playing
track at high speed until desired point passage, and then release the button. Playback will start again from this point.
To select a song which track number exceeds 10 (for MP3 disc only) press the 10/FOLD.- or 10/FOLD.+ button.
To Select A Desired Folder for MP3 disc that contains more than one folder: To select a desired folder during playback, press and hold the 10/FOLD.- or 10/FOLD.+ button
Programming tracks
Programming tracks of disc are possible when playback is stopped. Up to 20 tracks for CD disc and 99 tracks for MP3 disc can be stored in the memory in any order.
- In stop mode, press the PROG./P-MODE button to enter program setting, the PROG logo will flash on the display and show P01.
- Press the or button to select the first desired track to be programmed.
- Press the PROG./P-MODE button to enter. The display would flash PORG and show P02.
- Repeat steps 2 & 3 to store other desired tracks until all tracks are programmed.
- Press the / PAIR button to start playback from the first programmed track.
- Press the STOP button to stop program playback. To clear the program, you may press the STOP button when the disc stopped and open the CD Door, program will be erased.
Repeat play
You can play one track or all tracks on the disc repeatedly. To Repeat a Single Track
- Press PROG./P-MODE button on unit during play, the display will show "C" and the current track will be played over and over again.
- To cancel repeat play, press PROG./P-MODE button on unit until "C" disappears from the display.
To repeat all the Tracks
- Press PROG./P-MODE button on unit until the " ALL" shows steadily on the display, all tracks on the USB will be played over and over again.
- To cancel repeat play, press the PROG./P-MODE button on unit until "C ALL" disappears from the display.
To repeat the folder (only for USB which contains more than one folder)
- Press the PROG./P-MODE button on unit until "C DIR" shows steadily on the display, the current folder will be repeated over and over again.
- To cancel repeat play, press the PROG./P-MODE button on unit until "C DIR" disappears from the display.
Random play
Press the PROG./P-MODE button on unit in play mode till the "RAN" shows steadily on the display, the random play will start from next track automatically. Press the PROG./P-MODE button on unit again until the "RAN" disappears from the display to cancel.
Intro play
Press the PROG./P-MODE button on unit in play mode till the "INTRO" shows steadily on the display, the intro play will start and scan 10 seconds for every track. To cancel intro play, press the PROG./P-MODE button until "INTRO" disappear from the display.
USB OPERATION
- Press the FUNCTION button on unit to select "USB" mode.
- Plug the USB memory stick to the USB port on top of the unit. Playback will start automatically from Track 1.
- To pause playback, press the / PAIR button on unit. The playing time will flash on the display.
- To resume playback, press the / PAIR button again.
- To select a desired track, press the or button respectively during playing until the desired track appears on the display. The unit will start play automatically.
- To search for a particular passage during playback, press and hold the or button to scan the current playing track at high speed until desired point (passage) appears, then release the button for normal playback mode.
- To select a song which track number exceeds 10, press the 10/FOLDER + or 10/FOLDER - button each time to skip forward/backward 10 tracks, then press the or button to select desired track.
- To select a desired folder (if the USB contains more than one folder), press and hold the 10/FOLDER + or 10/FOLDER - button each time to skip forward/backward a folder, then press the or button to select desired track.
- Proceed program play/repeat play (repeat one- repeat all- repeat all)/ random play/ intro play operation as the same described in above "CD/ MP3 OPERATION")
Important: The USB port is intended for data transfer only, other devices cannot be used with this USB connection. The use of USB extension cords is not recommended. Don't plug the USB from the unit when playing or reading the USB device.
BT OPERATION
- Press the FUNCTION button on unit to switch to BT function, the LCD will display "BT" and the pair indicator will flash at high speed.
- Turn on the BT function on the device, scan the unit "KCD818BT" and connect, then input the password 0000 if required, the pair indicator keep light up to indicate connection done, and the display will show "bt". Press Play to start playback.
- Rotate the VOLUME knob on the unit or adjust the volume on the external device to increase or decrease the music volume to your desired level.
- Press the / PAIR button to disconnect BT, Press / PAIR button again to play music.
Note: The BT works best within 10 meters in open air.
AUX-IN OPERATION
- Press the FUNCTION button on unit to select the "AUX" mode.
- Connect your audio device to the AUX IN jack on the top panel of the unit with an AUX IN cable.(audio cable is not included)
- Rotate the VOLUME knob on the unit or adjust the volume on the external device to increase or decrease the music volume to your desired level.
- Control the playback with your audio device.
MIC JACK OPERATION
Microphone input is available in all modes.
- Connect your microphone to the 6.3mm MIC JACK found on the top panel of the unit.
- Press the MIC VOL.+/- button on the unit to increase or decrease the microphone volume.
- Press the ECHO Button to turn on or off the echo effect of the microphone.

COMPACT DISC MAINTENANCE
-
Always use a compact disc bearing the mark as shown.
-
Notes on handling discs
-
Removing the disc from its storage case and loading it.
- Do not touch the reflective recorded surface.
- Do not stick paper or write anything on the surface.
- Do not bend the disc.
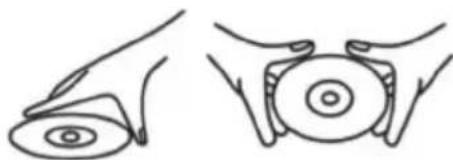
Handle disc only as shown
-
Storage
-
Store the disc in its case.
- Do not expose discs to direct sunlight or high temperatures, high humidity or dusty places.
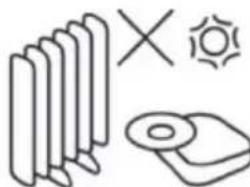
Do not store near heat
-
Cleaning a disc
-
Should the disc become soiled, wipe off dust, dirt and fingerprints with a soft cloth.
- The disc should be cleaned from the center to the edge.
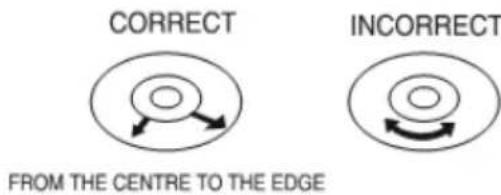
- Never use benzene, thinners, record cleaner fluid or anti-static spray.
- Be sure to close the CD door, so the lens is not contaminated by dust.
- Do not touch the lens.
DISPOSAL CONSIDERATIONS
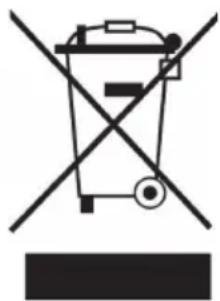
If there is a legal regulation for the disposal of electrical and electronic devices in your country, this symbol on the product or on the packaging indicates that this product must not be disposed of with household waste. Instead, it must be taken to a collection point for the recycling of electrical and electronic equipment. By disposing of it in accordance with the rules, you are protecting the environment and the health of your fellow human beings from negative consequences. For information about the recycling and disposal of this product, please contact your local authority or your household waste disposal service.
This product contains batteries. If there is a legal regulation for the disposal of batteries in your country, the batteries must not be disposed of with household waste. Find out about local regulations for disposing of batteries. By disposing of them in accordance with the rules, you are protecting the environment and the health of your fellow human beings from negative consequences.
DECLARATION OF CONFORMITY

Manufacturer:
Chal-Tec GmbH, Wallstrasse 16, 10179 Berlin, Germany.
Importer for Great Britain:
Berlin Brands Group UK Ltd PO Box 1145 Oxford, OX1 9UW United Kingdom
The complete declaration of conformity of the manufacturer can be found at the following link: https://use.berlin/10035208
Chere cliente, cher client,
Berlin Brands Group UK Ltd
PO Box 1145
Oxford, OX1 9UW
United Kingdom
CBerlin Brands Group UK Ltd PO Box 1145 Oxford, OX1 9UW United Kingdom