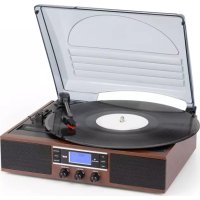
TT138 DAB - Media player Auna - Free user manual and instructions
Find the device manual for free TT138 DAB Auna in PDF.


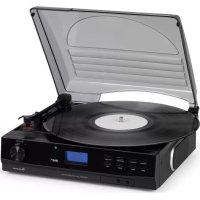
| Product type | Multimedia player with turntable and DAB/FM radio |
| Brand | Auna |
| Model | TT138 DAB |
| Power supply | 230–240 V~ 50/60 Hz |
| Speaker power | 2 x 1.5 W RMS |
| Turntable | Belt drive |
| Playback speeds | 33 and 45 RPM |
| FM radio | 87.5 – 108 MHz |
| DAB radio | 2.4 – 2.48 GHz |
| Station memory | Up to 40 presets (20 FM + 20 DAB) |
| Display | LCD |
| Connectivity | 3.5 mm headphone jack, FM antenna, RCA line output |
| Functions | Auto search, treble adjustment, volume, multilingual menu |
| Included accessories | FM antenna, 45 RPM adapter |
| Safety | Overload protection, automatic turntable stop |
| Cleaning | Dry, soft cloth |
| Repairability | Refer to a qualified technician |
Frequently Asked Questions - TT138 DAB Auna
User questions about TT138 DAB Auna
0 question about this device. Answer the ones you know or ask your own.
Ask a new question about this device
Download the instructions for your Media player in PDF format for free! Find your manual TT138 DAB - Auna and take your electronic device back in hand. On this page are published all the documents necessary for the use of your device. TT138 DAB by Auna.
USER MANUAL TT138 DAB Auna
INHALT
Technische Daten 3
The lighting flash and arrow head within the triangle is warning sign alerting you of dangerous voltage inside the product
CAUTION
RISK OF ELECTRIC SHOCK DO NOT OPEN
CAUTION: TO REDUCE THE RISK OF ELECTRIC SHOCK DO NOT REMOVE COVER (OR BACK). NO USER SERVICIABLE PARTS INSIDE. REFER SERVICING TO QUALIFIED SERVICE PERSONNEL.

The exclamation point within the triangle is a warning sign alerting you of important instructions accompanying the product

Member of Berlin Brands Group
Handwerkerstr. 11
15366 Dahlwitz-Hoppegarten
Deutschland
natural_image
Symbol of a trash bin crossed out by a diagonal line, with no text or labels present.Congratulations on purchasing this equipment. Please read this manual carefully and take care of the following hints to avoid damages. Any failure caused by ignoring the items and cautions mentioned in the instruction manual are not covered by our warranty and any liability. Scan the QR code to get access to the latest user manual and other information about the product.
CONTENTS
Technical Data 17
Safety Instructions 19
Overview 21
FM Radio 22
DAB-Radio 23
Stereo Phonograph Operation 25
Line out connection 25
Disposal Considerations 26
Declaration of Conformity 26
TECHNICAL DATA
| Item number 10034092 | |
| Power supply | 230–240 V~ 50/60 Hz |
| RMS power | 2 x 1.5 W RMS |
| TurntableDrivePlay speeds | belt drive33/45 RPM |
| Radio frequencies FM: | 87.5 – 108 MHzDAB: 2.4 GHz – 2.48 GHz |
WARNING
 | CAUTION |  |
| RISK OF ELECTRIC SHOCKDO NOT OPEN | ||
| CAUTION: TO REDUCE THE RISK OF ELECTRIC SHOCK AND SERIOUS PERSONAL INJURY, DO NOT REMOVE ANY COVER. NO USER-SERVICABLE PARTS INSIDE. REFER SERVICING TO QUALIFIED SERVICE PERSONNEL ONLY.WARNING. TO REDUCE THE RISK OF FIRE OR ELECTRICAL SHOCK, DO NOT EXPOSE THIS PRODUCT TO WATER, RAIN OR MOISTURE. | ||


Triangle with lightning plus explanation as follows: DANGEROUS VOLTAGE: The lightning flash with arrowhead symbol within the equilateral triangle is intended to alert the user to the presence of uninsulated dangerous voltage within the product's enclosure that may be of sufficient magnitude to constitute a risk of electric shock to persons. Triangle with exclamation point plus explanation as follows: ATTENTION: The exclamation point within the equilateral triangle is intended to alert the user to the presence of important operating and maintenance (servicing) instructions in the literature accompanying this product.
To reduce the risk of electric shock do not use this plug with an extension cord or receptacle.

CAUTION: Danger of personal injury
Never touch or look into the optical lens within the CD compartment. This is a CLASS-1 laser product.

CAUTION: Danger of hearing damage
To avoid possible hearing damage, do not listen to this Retro turntable at high volume levels for long periods of time. Always keep the volume within reasonable limits.
SAFETY INSTRUCTIONS
Read these instructions. All uses guidelines must be read before using the device. Keep the instructions for future use.
- Attention, use and security guidelines must be respected.
- The device must not be used near water or be put in contact with moisture.
- Make sure has no liquid is spilled on device and device openings.
- Move device carefully, avoid shocks.
- Do not block the breakdown of the device outputs.
- Do not place the device near from a heat source (e.g. radiator). Do not expose it to the Sun.
- Plug the device as indicate on this information form.
- This device has a connection with overload protection. Replacement should only be done by an experienced technician or the device manufacturer.
- For cleaning the device, please follow the recommendations of the notice.
- The power cord should be unplugged when not using for a long period of time.
• Device shall be repaired by a qualified person when:
a. the power cord is damaged,
b. objects have fallen into the apparatus or a liquid has been spilled into device,
c. device was exposes to the rain,
d. device does not work correctly without notable exterior change,
e. device is broken.
- The user shall not try to maintain device beyond that which is described in this information form.
- The apparatus shall not be exposed to dripping or splashing and that no objects filled with liquids, such as vases, shall be placed on apparatus.
- To be completely disconnect the power input, the mains plug of apparatus shall be disconnected from the mains." as the disconnect devices is the mains plug of apparatus.
- The mains plug of apparatus should not be obstructed OR should be easily accessed during intended use.
- Battery shall not be exposed to excessive heat such as sunshine, fire or the like.
- Excessive sound pressure form earphones and headphones can cause hearing loss.
- Minimum distance (8 cm) around the apparatus for sufficient ventilations;
- The ventilation should not be impeded by covering the ventilation opening with items such as newspaper, table-cloths, curtain etc;
- No naked flame sources such as lighted candles should be placed on the apparatus;
- Attention should be drawn to the environmental aspects of battery disposal;
- The use of apparatus in moderate climates.
- Danger of explosion if battery is incorrectly replaced.
- Replace only with the same or equivalent type.
- The main plug shall remain readily operable.
OVERVIEW
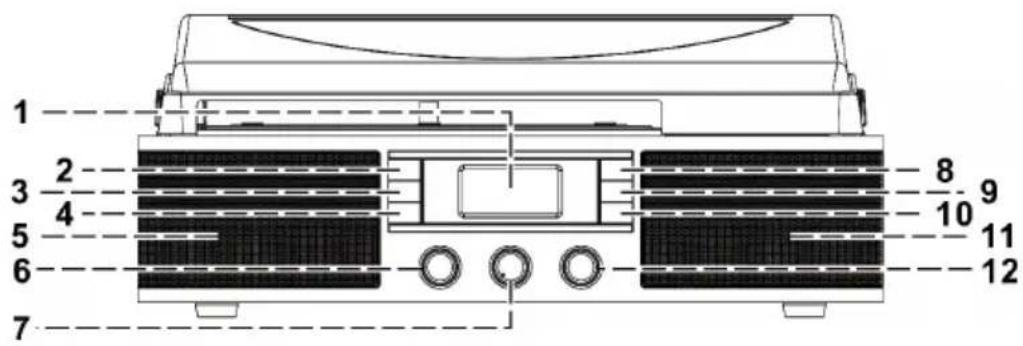
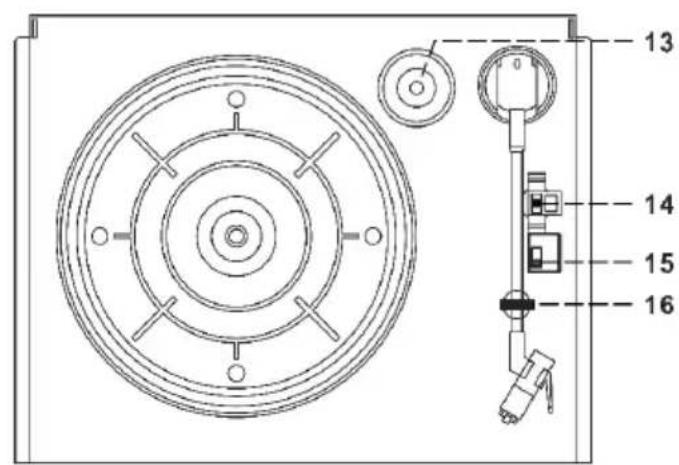

1 LCD display
2 Power ON-OFF button
3 Menu button
4 Info button
5 Left Speaker
6 Volume knob
7 Pitch Adjustment knob
8 Function button
9 Scan button
10 Pre / Memory button
11 Right Speaker
12 Push Select knob
13 45 RPM Record Adaptor
14 Turntable Speed Selector
15 Auto Stop Switch
16 Tone Arm Rest/Holder
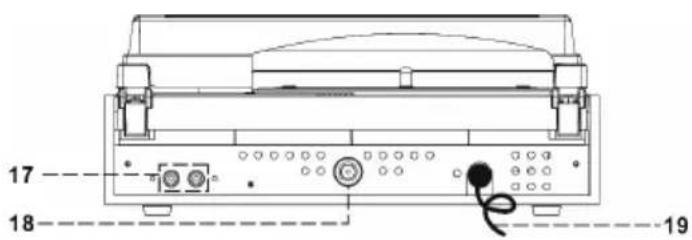
17 Line Out Socket (L/R)
18 FM Antenna Socket
19 AC Power Cord
Connections
- Connect the power cord to an AC outlet.
- Connect the provided FM Antenna to the FM Antenna Socket (18).
- Turn on the power by pressing the Power On/Off button (2) and the LCD display (1) will light up, your system is now ready to play your music. Please refer to the Operations section of this Manual for details.
FM RADIO
Getting started: Connect the provided FM Antenna to the FM Antenna Socket (18).
Manual tuning
- Turn on the unit by pressing the Power On/Off (2) and press the Function button (8) to enter to FM mode.
- Tune to requested radio station by pressing the Skip up /down button (7)
- Adjust the Power ON-OFF/ Volume Control Knob (15) to desired volume level.
Auto tuning
- Set the unit to FM mode.
- Press the Scan button (9) once, unit will start to scan at tuning up direct until radio station received. Press and hold the Scan button (9) for a second, the unit will scan to tuning down direction.
- If the radio data system (RDS) broadcasting signal received, the unit will set the actual time automatically.
- Adjust the Power ON-OFF/ Volume Control Knob (2) to desired volume level.
FM scan setting
After auto tuning if many unwanted weakness radio station received, you can select strong station only to filter the weakness signal station.
- In FM mode, Press and hold the Menu/Info button (3) to enter the "Menu", then press Skip up / down button (12) button to select "Scan setting".
- Press the Push Select button (12) to enter the "Scan setting", then rotate the Push Select button (12) to select "Strong station only". Then press the Push Select button (12) to confirm the setting.
- The display will automatically return to the radio station. Perform the auto tuning operation again as above.
FM-Stereo reception
Follow the below procedure to select FM reception in Stereo (Auto) or Mono:
- In FM mode, press the Menu button (3) to enter the "Menu", then rotate the Push Select button (12) to select "Audio setting".
- Press the Push Select button (12) to enter the "Audio setting", then rotate the Push Select button (12) to select "Stereo" or "Mono". Then press the Push Select button (12) to confirm the setting.
- In particular when stereo signals are weak, it is preferable to receive the program in Mono.
Radio data system (RDS)
This is the feature to display the information which released from the radio broadcast and will show on LCD display step by step as below by pressing the Menu/Info button (3) button continuously. Signal strength→ frequency → program type → time / date → mono/stereo → radio text.
DAB-RADIO
- After turning on the unit, set the unit to DAB mode by pressing the Function button (8).
- Press the Scan (9) button once, unit will start to full scan from range 11b-12d one time within around 2 second. Then rotate the Push Select button (12) to select your desired DAB channel.
- Press the Info button (4) continuously to check the below info released by DAB.
Scrolling text → time date → frequency → transfer rate → group name → signal strength → program type. - Adjust the Volume Knob (6) to desired volume level.
Preset stations
You can store up to total of 40 radio stations in the memory (20-FM/20-DAB).
- Set to FM/DAB mode
- Turn to the desired radio station by "manual" or "auto" tuning method.
- Press and hold the Pre / Memory button (10) around two second to enable memory state, the preset station will flash on LCD display.
- Rotate the Push Select button (12) button to select the desired station memory for storage.
- Press Push Select button (12) to confirm the preset memory and the
display will show "presetneg stored".
- Repeat step 2 to 5 to store other stations.
Recall preset stations
- Press the Pre / Memory button (10) once to enable recall state
- Rotate the Push Select button (12) to select the desired memory station.
-
Press Push Select button (12) to confirm the recall the memory station.
-
The pre-set memories will be cancelled completely if disconnecting the main power supply and back up battery did not installed. You are recommended to switch the system into standby mode for convenience usage.
- There are 3 seconds for program state, after 10 sec. This state would resume to normal tuner mode automatically.
- You can overwrite a present station by storing another frequency in its place.
Hints for best reception: FM the receiver has an external FM wire antenna to connect to the antenna socket at the back of the unit. This antenna should be totally unravelled and extended for best reception. Move the antenna to obtain the best reception.
Language setting
This device provides 5 language for FM/DAB operation display.
- In DAB/FM mode, Press and hold the Menu/Info button (3) to enter the "Menu", then press Skip up / down button (7) button to select "Language".
- Press Select button (9) to enter language mode setting, then press Skip up / down button (7) button to select your desired language between English/ German/ French/ Italian. Then press Select button (9) to confirm the setting.
- In any state press Menu/Info button (3) to quit the setting mode.
DAB/FM reset :
If case would like to erase all the FM/DAB programmed memory station, operation as below.
- Set in DAB or FM mode, Press and hold the Menu/Info button (3) to enter the "Menu", then press Skip up / down button (7) button to select "Reset".
- Press the Push Select button (12) to enter and the display will show "Press Enter to confirm reset...". Apparatus will erase all the programmed memory station, perform the preset station again as above.
-
Press the Push Select button (12) again to confirm and the display will show "system reset" then "ok". Then the unit will start auto scan and return to the radio afterwards.
-
The device will erase all the programmed memory stations. Perform the preset station again as above.
STEREO PHONOGRAPH OPERATION
Please note before use
- Remove the stylus protector.
-
Make sure that the tone arm is unlocked and free to move from the tone arm rest prior to operating. Lock the tone arm again when not in use.
-
Turn on the unit by pressing the Power On/Off button (2) and press the Function button (8) to enter to PHONO mode.
- Raise the turntable dust cover.
- Place the record on the platter (use the 45 RPM record adaptor (16) if you are playing 45 RPM records).
- Set the speed selector (14) to the proper position for the record you are playing.
- Lift the tone arm from the rest (16) and slowly move it over the record. The platter will begin spinning.
- Place the tone arm down onto the record in the location that you want to play.
- Adjust the volume (6) to the desired level.
- At the end of record, the platter will automatically stop spinning. Lift the tone arm from the record and return it to the rest.
- To stop playing manually, lift the tone arm from the record and return it to the rest.
NOTE: Some types of records may have an auto-stop area outside the preset limit, so the turntable may stop before the last track finishes. In this case, set the AUTO-STOP switch to the "OFF" position. This allows the record to play to the end, but please note that it will not stop automatically. You must manually raise the tone arm and place it back in the rest and then turn off the power to stop the turntable from spinning.
LINE OUT CONNECTION
You can connect this unit to your external Hi-Fi / AMPLIFIER system by connecting the LINE OUT socket (20) to the auxiliary input socket of your Hi-Fi / AMPLIFIER system with a RCA cable (not included).
Note: The Volume control will not function when using the LINE OUT.
DISPOSAL CONSIDERATIONS

natural_image
Symbol of a trash bin crossed with a diagonal line, representing no waste or discharge (no text or labels)If there is a legal regulation for the disposal of electrical and electronic devices in your country, this symbol on the product or on the packaging indicates that this product must not be disposed of with household waste. Instead, it must be taken to a collection point for the recycling of electrical and electronic equipment. By disposing of it in accordance with the rules, you are protecting the environment and the health of your fellow human beings from negative consequences. For information about the recycling and disposal of this product, please contact your local authority or your household waste disposal service.
This product contains batteries. If there is a legal regulation for the disposal of batteries in your country, the batteries must not be disposed of with household waste. Find out about local regulations for disposing of batteries. By disposing of them in accordance with the rules, you are protecting the environment and the health of your fellow human beings from negative consequences.
DECLARATION OF CONFORMITY

Manufacturer:
Chal-Tec GmbH, Wallstrasse 16, 10179 Berlin, Germany.
Importer for Great Britain:
Berlin Brands Group UK Ltd PO Box 1145 Oxford, OX1 9UW United Kingdom
Hereby, Chal-Tec GmbH declares that the radio equipment type TT-138 is in compliance with Directive 2014/53/EU. The full text of the EU declaration of conformity is available at the following internet address: use.berlin/10034092
For Great Britain: Hereby, Chal-Tec GmbH declares that the radio equipment type TT-138 is in compliance with the relevant statutory requirements. The full text of the declaration of conformity is available at the following internet address: use.berlin/10034092
Chère cliente, cher client,
SOMMAIRE
Fiche technique 27
The lighting flash and arrow head within the triangle is warning sign alerting you of dangerous voltage inside the product
CAUTION
RISK OF ELECTRIC SHOCK DO NOT OPEN
CAUTION: TO REDUCE THE RISK OF ELECTRIC SHOCK DO NOT REMOVE COVER (OR BACK). NO USER SERVICIABLE PARTS INSIDE. REFER SERVICING TO QUALIFIED SERVICE PERSONNEL.

The exclamation point within the triangle is a warning sign alerting you of important instructions accompanying the product
ATTENTION : POUR RÉDUIRE LES RISQUES DE CHOCS ÉLECTRIQUES, NE DÉMIONTEZ AUCUN CACHE. L'APPAREIL NE CONTIEN AUCUNE PIÈCE À ENTRETENIR. ADRESSEZ-VOUS UNIQUEMENT À DES PERSONNELS QUALIFIÉS POUR LA MAINTENANCE. MISE EN GARDE / POUR RÉDUIRE LE RISQUE D'INCENDIE ET DE CHOC ÉLECTRIQUE, NE PLONGEZ PAS L'APPAREIL DANS L'EAU ET NE L'EXPOSEZ PAS À LA PLUIE OU À L'HUMIDITÉ.


Radio data system (RDS)
natural_image
Symbol of a trash bin crossed out by a diagonal line, with no text or labels present.DÉCLARATION DE CONFORMITÉ

Fabricant :
Chal-Tec GmbH, Wallstraße 16, 10179 Berlin, Allemagne.
INDICE
Dati tecnici 39
The lighting flash and arrow head within the triangle is warning sign alerting you of dangerous voltage inside the product
CAUTION
RISK OF ELECTRIC SHOCK DO NOT OPEN
CAUTION: TO REDUCE THE RISK OF ELECTRIC SHOCK DO NOT REMOVE COVER (OR BACK). NO USER SERVICIABLE PARTS INSIDE. REFER SERVICING TO QUALIFIED SERVICE PERSONNEL.

The exclamation point within the triangle is a warning sign alerting you of important instructions accompanying the product

natural_image
Symbol of a trash bin crossed out by a diagonal line, with no text or labels present.ÍNDICE
Datos técnicos 51
The lighting flash and arrow head within the triangle is warning sign alerting you of dangerous voltage inside the product
CAUTION
RISK OF ELECTRIC SHOCK DO NOT OPEN
CAUTION: TO REDUCE THE RISK OF ELECTRIC SHOCK DO NOT REMOVE COVER (OR BACK). NO USER SERVICIABLE PARTS INSIDE. REFER SERVICING TO QUALIFIED SERVICE PERSONNEL.

The exclamation point within the triangle is a warning sign alerting you of important instructions accompanying the product

natural_image
Symbol of a trash bin crossed with a diagonal line, representing no waste or discharge (no text or labels)Berlin Brands Group UK Ltd
PO Box 1145
Oxford, OX1 9UW
United Kingdom
natural_image
Abstract white logo design on dark background, resembling stylized letter 'S' or wave form (no text or symbols)
- INHALT
- CAUTION
- RISK OF ELECTRIC SHOCK DO NOT OPEN
- Member of Berlin Brands Group
- CONTENTS
- TECHNICAL DATA
- WARNING
- CAUTION: Danger of personal injury
- CAUTION: Danger of hearing damage
- SAFETY INSTRUCTIONS
- OVERVIEW
- Connections
- FM RADIO
- Manual tuning
- Auto tuning
- FM scan setting
- FM-Stereo reception
- Radio data system (RDS)
- DAB-RADIO
- Preset stations
- Recall preset stations
- Language setting
- DAB/FM reset :
- STEREO PHONOGRAPH OPERATION
- Please note before use
- LINE OUT CONNECTION
- DISPOSAL CONSIDERATIONS
- DECLARATION OF CONFORMITY
- Manufacturer:
- Importer for Great Britain:
- SOMMAIRE
- DÉCLARATION DE CONFORMITÉ
- Fabricant :
- INDICE
- ÍNDICE
Brand : Auna
Model : TT138 DAB
Category : Media player