Vertiplay - Mp3 player Auna - Free user manual and instructions
Find the device manual for free Vertiplay Auna in PDF.

User questions about Vertiplay Auna
0 question about this device. Answer the ones you know or ask your own.
Ask a new question about this device
Download the instructions for your Mp3 player in PDF format for free! Find your manual Vertiplay - Auna and take your electronic device back in hand. On this page are published all the documents necessary for the use of your device. Vertiplay by Auna.
USER MANUAL Vertiplay Auna
Berlin Brands Group UK Ltd
PO Box 1145
Oxford, OX1 9UW
United Kingdom
Congratulations on purchasing this equipment. Please read this manual carefully and take care of the following hints to avoid damages. Any failure caused by ignoring the items and cautions mentioned in the instruction manual are not covered by our warranty and any liability. Scan the QR code to get access to the latest user manual and other information about the product.

CONTENTS
Technical Data 19
Safety Instructions 20
Device Description 22
Getting started 24
FM Radio Mode 24
CD Player 25
USB Function 27
BT28
Alarm 28
Disposal Considerations 30
Declaration of Conformity 30
TECHNICAL DATA
| Item number 10032898 10032899 | |
| Power supply 100-240 V~ 50/60 Hz | |
| Power consumption 12 W | |
| Functions FM, CD, MP3, USB, BT, AUX |
Features
Digital FM Radio (PLL)
- Station Memory preset 20 FM
Alarm/Clock
CD Player: CD, CD-R/RW
- USB port for Playback MP3 song
BT
- Digital Clock/Time with Backlight display
Night light Function
AUX-in
SAFETY INSTRUCTIONS
General safety instructions
- Read all the instructions carefully before using the unit and keep them for future reference.
- Check that the voltage marked on the rating label matches your mains voltage.
- The unit must be placed on a flat stable surface and should not be subjected to vibrations.
- Do not place the unit on sloped or unstable surfaces as the unit may fall off or tip over.
- The mains socket must be located near the unit and should be easily accessible.
- Avoid extreme degrees of temperature, either hot or cold. Place the unit well away from heat sources such as radiators or gas/electric fires. Avoid exposure to direct sunlight and other sources of heat.
- Never place any type of candle or naked flame on the top of or near the unit.
- To reduce the risk of fire, electric shock or product damage, do not expose this unit to rain, moisture, dripping or splashing. No objects filled with liquids, such as vases, should be placed on the unit.
- If you spill any liquid into the unit, it can cause serious damage. Switch it off at the mains immediately. Withdraw the mains plug and consult your dealer.
- To prevent the risk of electric shock or fire hazard due to overheating, ensure that curtains and other materials do not obstruct the ventilation vents.
- Do not install or place this unit in a bookcase, built-in cabinet or in another confined space. Ensure that a minimum of 10cm should be kept around the unit for ventilation.
Safety
- Always disconnect the unit from the mains supply before connecting/disconnecting other devices or moving the unit.
- Unplug the unit from the mains socket during a lightning storm.
- This unit will become warm when used for a long period of time. This is normal and does not indicate a problem with the unit.
Mains adapter
-
Make sure the unit is not resting on top of the mains cable, as the weight of the unit may damage the cable and create a safety hazard.
-
If the mains cable is damaged it must be replaced by the manufacturer, its service agent, or similarly qualified persons in order to avoid a hazard.
Interference
- Do not place the unit on or near appliances which may cause electromagnetic interference. If you do, it may adversely affect the operating performance of the unit, and cause a distorted sound.
Supervision
Children should be supervised to ensure that they do not play with the unit.
- Never let anyone especially children push anything into the holes, slots or any other openings in the case - this could result in a fatal electric shock.
Service/Maintenance
- To reduce the risk of electric shock, do not remove screws. The unit does not contain any user serviceable parts.
- Leave all maintenance work to qualified personnel.
- Do not open any fixed covers as this may expose dangerous voltages.
- Ensure to unplug the unit from the mains socket before cleaning.
- Do not use any type of abrasive pad or abrasive cleaning solutions as these may damage the unit's surface.
- Do not use liquids to clean the unit.
DEVICEDESCRIPTION
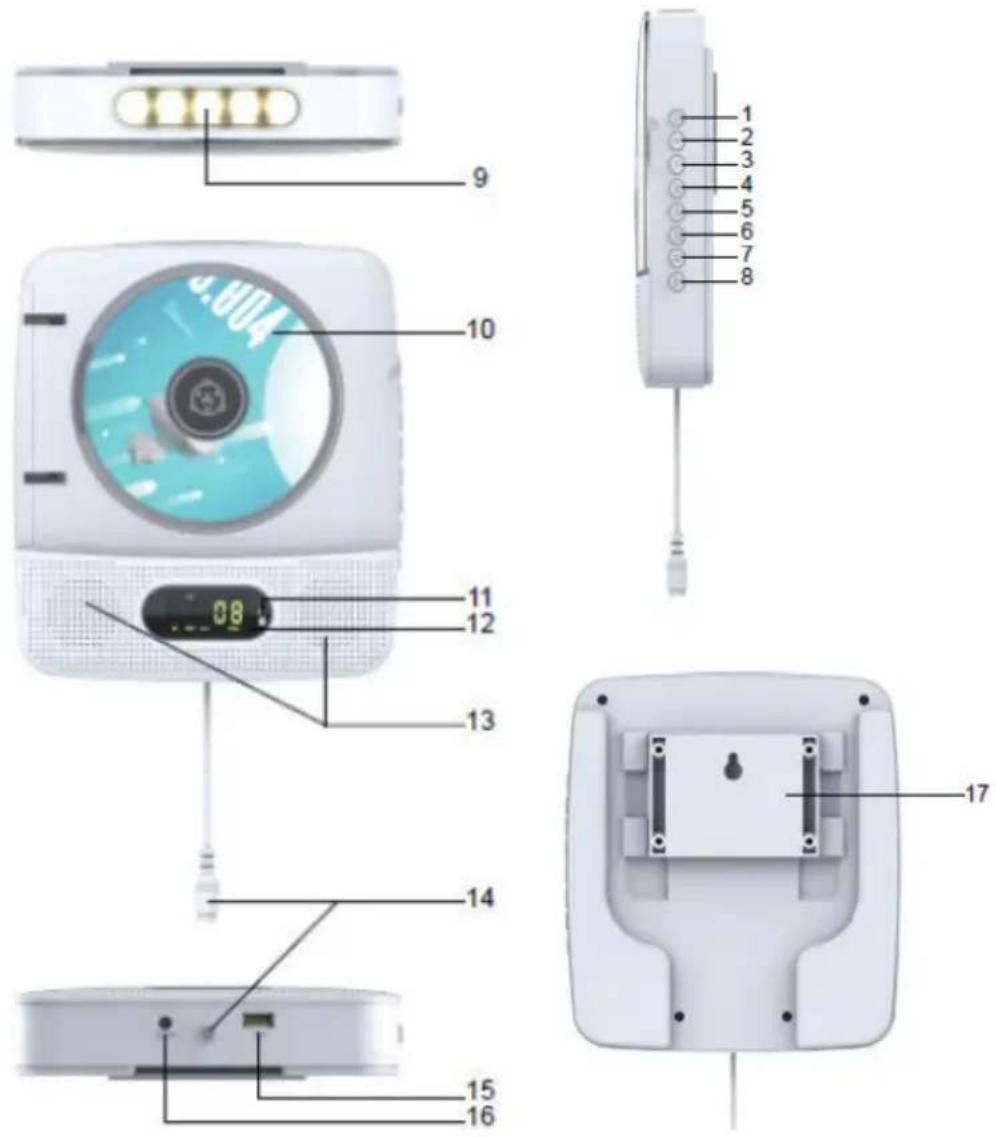
1 Power/Source
2 Volume+
3 Volume-
4 Skip/Tun+
5 Skip/Tun
6 Mode/Timeset
7 Play/Pause
8 Stop/Pair
9 LEDLight
10 CDDoor
11 BT Light
12 LED Display
13 SPEAKER
14 Pull Power
15 USB Port
16 Aux-in Jack
17 Wall mounting
Remote control
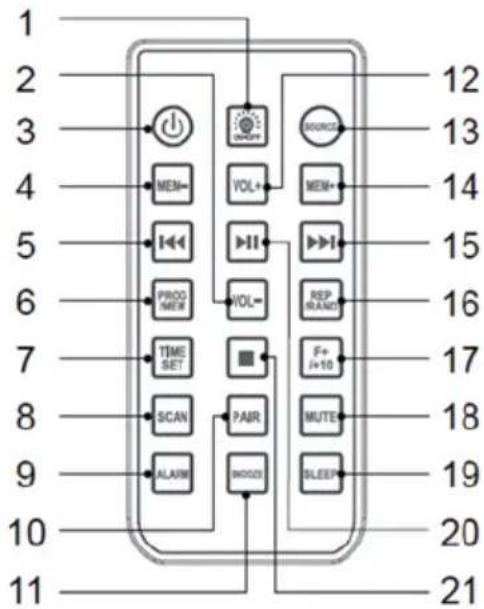
1 Light on/off
2 Volume
3 Power on/Off
4 MEM-
5 Skip+/Tun+
6 Program/Memory
7 Time Set
8 Scan
9 Alarm
10 Pair
11 Snooze
12 Volume+
13 Source
14 MEM+
15 Skip-/Tun-
16 Repeat/Random
17 Folder+/+10
18 Mute
19 Sleep
20 Play/Pause
21 Stop
GETTING STARTED
Before using the unit, check that the local mains supply is compatible with the 100-240 V~V/ 50Hz, Do not plug or unplug the power cable when your hands wet. When planning not to use this unit for long periods of time, please disconnect the plug from the wall outlet. When disconnecting the power cord from the wall outlet, grasp the plug; do not pull the cord inorder to avoid shock risks caused by the damaged cable. Put the DC Adaptor jack connected with the main unit Cable jack, then plug in wall outlet and the AC socket.
FM RADIO MODE
- Press POWER/SOURCE button to switch on, Default at FM mode;
- SKIP/TUN± the station:long press the SKIP/TUN±button, Will automatically search and stop, then you can short press SKIP/TUN± button to manually search the radio.
- Save the station, Listening Station as 100.8MHz, short press MODE button, LCD will display "P01" and flash display "MEM". Press the SKIP± button to select the save station No. as P05, then short press MODE button to confirm, this station 100.8MHz saved to No. "P05", total of 20 radio stations can be saved.
- Select station: If you want to listen to the saved station, press the MODE button briefly, press the SKIP ± button, select the station No. to save.
- Scan the station: Short press the SCAN button on the remote control, will automatically scan start by 87.5MHz, and save the search to the radio.
CD PLAYER
Press POWER/SOURCE button power on, then press POWER/SOURCE switch to CD function, The function as below:
1. STOP
Press STOP button to stop CD play the LED displays the total number of tracks.
2. PLAY/PAUSE
a Short press SKIP + / TUN + button to skip next play
b Long press SKIP+/TUN+ button beyond 2s as fast forward, until the FF button is released.
3. SKIP+/TUN+
a Short press SKIP + / TUN+ button to skip next play
b Long press SKIP+/TUN+ button beyond 2s as fast forward, until the FF button is released.
4. SKIP/TUN
a Short press SKIP-/TUN- button, skip back to playing.
b Continuous press twice SKIP-/TUN- button,skip to last playing.
c Long press SKIP-/TUN- button beyond 2s,as quickly return.
CD/MP3 playing mode
a At first short press MODE button to repeat tracks;
b The second short press MODE button to repeat the folder;
c The third short press MODE button to repeat playing all tracks;
d The forth short press MODE button to random;
e The fifth short press MODE button to cancel repeat function.
CD/MP3 pause mode
a On the CD/MP3 stopping mode, short press MODE button, LCD showing "P01", flickering display "PROG"
b Press SKIP/TUN± button to select the program (If the MP3 mode, long or short press 10 + / FOLDER + button to select folder.
c Press MODE button to confirm.
d Repeat step from b to c. Press PLAY/PAUSE button to play the
programming, then the LCD showing"PROG"
- CD can be programmed 20pcs, MP3 programming 99 pcs
-10+/FOLDER+ - On CD playing mode, short press 10+/FOLDER+ button, Can be 10 + selections
- On MP3 playing mode, long press 10+ /FOLDER+ button, to select folder. Short press 10+ /FOLDER button to enter selections.
Other
- Open the CD door, the LED will showing the OPEN;
- Reading mode,LED will flash and showing " - - - "
After read the total will automatically play - NO disc or can't read dish, LED display "NO CD".
USB FUNCTION
Press POWER/SOURCE button to power on, then press POWER/SOURCE button to switch USB function. The function as below:
1. STOP
Press STOP button to stop USB play, LED showing the total number of tracks.
2. PLAY/PAUSE
- USB stopping, press the PLAY/PAUSE button to play USB, The LED display lights up the playback symbol for the start of playback.
- USB playing, press the PLAY/PAUSE button to pause, The display screen's playback symbol flashing.
3. SKIP + / TUN +
- Short press the SKIP + / SKIP- button to skip next program playing
- Long press the SKIP+/SKIP- button beyond 2s as fast forward, until the FF button is released.
4. SKIP-/SKIP+
- Short press SKIP-/TUN- button, skip to the current tracks.
- Short twice press in continuously,skip to last tracks.
- Long press SKIP-/TUN- button beyond 2s,is quick to return.
5. On the USB playing mode
- At first short press MODE button to repeat tracks;
- The second short press MODE button to repeat the folder;
- The third short press MODE button to repeat playing all tracks;
- The forth short press MODE button to random;
- The fifth short press MODE button to cancel repeat function
6. On the USB stopping MODE
- On the USB stopping, short press the MODE button, LCD showing "P01""USB""MP3""WMA", flickering display "PROG";
- Press the SKIP/TUN± button to select programs(On the MP3MODE,long or short press 10+ /FOLDER+ button to select folder or +10)
- Press MODE button.
- Repeat step from 1-3,press PLAY/PAUSE button can play the programming, then the LCD showing "PROG"
- You can programme 20 tracks for CD or 99 MP3 files.
7. 10 + / FOLDER+
- Playing CD,short press the 10+ FOLDER+ button to select the song.
- Playing MP3, Long press the 10 + / FOLDER + button to select a folder and
short press the 10 + / FOLDER + button 10+ to select songs.
Other
- Reading USB mode, LCD flash display " - - - "
After reading the total number will automatically play. - NO USB or can't reading USB, LCD will display "NO USB".
AUX function
- Press the POWER/SOURCE button to switch AUX function, LCD displaying "AUX".
- Insert an external source at the LINE IN jack.
BT
- Press POWER/SOURCE button to power on. Switch to BT function. The LCD flashes slowly "bt".
- If the pairing has been successful, an accounting signal will sound. When disconnecting another sound indicates the .
- LCD before connecting the BT device "bt" characters on the slow flash, through a BT device set PAIR, long after the connection is successful "bt", long press PAIR disconnected, "bt" slow flash.
- By mobile phone equipment operation you can select play, pause, volume control. Short press VOL VOL + or - button can control the size of the volume.
- Automatic connection: KCR001 first pair with the same BT device, the boot into the BT mode, again KCR001 automatically search paired BT devices, and automatically connected with them..
ALARM
- Make sure the unit is in power off (standby) mode before setting. Short press the ALARM Button, until the alarm icon and hour digital display begins to blink, then release the button.
- Short press the SKIP± Buttons to adjust the hour.
- Short press the ALARM Button, until the minute digital display begins to blink.
- Short press the SKIP± Button to adjust the minute.
- Short Press the ALARM Button to finish setting the time, then "BUZZER" digital display begins to blink.
- Short press the SKIP± Button to switch between Buzzer,FM,CD,USB
function, then press ALARM Button to confirm the setting, the display will indicate the following: FM for FM,bu for Buzzer,cd for CD,usb for USB.
- Use the SKIP± Button to adjust the volume of the alarm, except when set to Buzzer.
- Once the set alarm time is reached, the alarm will sound.
- To set the ather alarm, follow the above steps and choose the alarm not currently set.
- Then short press the ALARM Button to cancel the clock setting.

If there is a legal regulation for the disposal of electrical and electronic devices in your country, this symbol on the product or on the packaging indicates that this product must not be disposed of with household waste. Instead, it must be taken to a collection point for the recycling of electrical and electronic equipment. By disposing of it in accordance with the rules, you are protecting the environment and the health of your fellow human beings from negative consequences. For information about the recycling and disposal of this product, please contact your local authority or your household waste disposal service.
This product contains batteries. If there is a legal regulation for the disposal of batteries in your country, the batteries must not be disposed of with household waste. Find out about local regulations for disposing of batteries. By disposing of them in accordance with the rules, you are protecting the environment and the health of your fellow human beings from negative consequences.
DECLARATION OF CONFORMITY
CE UK CA
Manufacturer:
Chal-Tec GmbH, Wallstrasse 16, 10179 Berlin, Germany.
Importer for Great Britain:
Berlin Brands Group UK Ltd
PO Box 1145
Oxford, OX1 9UW
United Kingdom
Hereby, Chal-Tec GmbH declares that the radio equipment type Vertiplay is in compliance with Directive 2014/53/EU. The full text of the EU declaration of conformity is available at the following internet address: use.berlin/10032898
For Great Britain: Hereby, Chal-Tec GmbH declares that the radio equipment type Vertiplay is in compliance with the relevant statutory requirements. The full text of the declaration of conformity is available at the following internet address: use.berlin/10032898
Chere cliente, cher client,
Berlin Brands Group UK Ltd
PO Box 1145
Oxford, OX1 9UW
United Kingdom