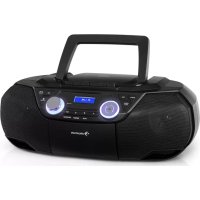
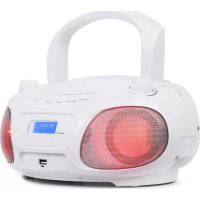
Roadie 2K - Mp3 player Auna - Free user manual and instructions
Find the device manual for free Roadie 2K Auna in PDF.


| Product type | Multimedia audio player with DAB+/FM radio, CD player, cassette, Bluetooth, USB, AUX input |
| Brand | Auna |
| Model | Roadie 2K |
| Mains power supply | 230 V ~ 50 Hz |
| Battery power | 6 LR14 batteries (1.5 V type C) |
| Battery type | Alkaline recommended |
| FM radio frequency | 87.5 – 108 MHz |
| DAB+ radio frequency | 174.928 – 239.2 MHz (Band III, channels 5A to 13F) |
| CD player | Audio CD and MP3 |
| CD laser output | Less than 44.6 μW |
| Supported USB formats | MP3 |
| Maximum USB capacity | 32 GB |
| Cassette | Type I (normal), 4 tracks 2 stereo channels |
| Cassette frequency response | 80 Hz – 10 000 Hz (type I) |
| Bluetooth frequency | 2400 – 2480 MHz |
| Bluetooth max RF power | 4 dBm |
| AUX input | 3.5 mm jack |
| Headphone output | 3.5 mm jack |
| Station memory | 20 DAB stations and 20 FM stations |
| CD programming | Up to 32 tracks |
| Playback modes | Repeat (one track, folder, all), random |
| Auto standby | After 15 minutes without operation or audio signal |
| Antenna | Telescopic for DAB/FM |
| Maintenance | Clean with a damp cloth; clean cassette heads every 10 hours of use |
| Safety | Do not open the casing (laser radiation); observe battery precautions |
| Recycling | Compliant with WEEE; dispose of batteries at a collection point |
Frequently Asked Questions - Roadie 2K Auna
User questions about Roadie 2K Auna
0 question about this device. Answer the ones you know or ask your own.
Ask a new question about this device
Download the instructions for your Mp3 player in PDF format for free! Find your manual Roadie 2K - Auna and take your electronic device back in hand. On this page are published all the documents necessary for the use of your device. Roadie 2K by Auna.
USER MANUAL Roadie 2K Auna
Roadie 2K DAB Boombox
10034920 10034921
aui
www.auna-multimedia.com

bar
| Category | Value | |---|---| | Category 1 | 100 | | Category 2 | 100 | | Category 3 | 100 | | Category 4 | 100 | | Category 5 | 100 | | Category 6 | 100 | | Category 7 | 100 | | Category 8 | 100 | | Category 9 | 100 | | Category 10 | 100 | | Category 11 | 100 | | Category 12 | 100 | | Category 13 | 100 | | Category 14 | 100 | | Category 15 | 100 | | Category 16 | 100 | | Category 17 | 100 | | Category 18 | 100 | | Category 19 | 100 | | Category 20 | 100 | | Category 21 | 100 | | Category 22 | 100 | | Category 23 | 100 | | Category 24 | 100 | | Category 25 | 100 | | Category 26 | 100 | | Category 27 | 100 | | Category 28 | 100 | | Category 29 | 100 | | Category 30 | 100 | | Category 31 | 100 | | Category 32 | 100 | | Category 33 | 100 | | Category 34 | 100 | | Category 35 | 100 | | Category 36 | 100 | | Category 37 | 100 | | Category 38 | 100 | | Category 39 | 100 | | Category 40 | 100 | | Category 41 | 100 | | Category 42 | 100 | | Category 43 | 100 | | Category 44 | 100 | | Category 45 | 100 | | Category 46 | 100 | | Category 47 | 100 | | Category 48 | 100 | | Category 49 | 100 | | Category 50 | 100 | | Category 51 | 100 | | Category 52 | 100 | | Category 53 | 100 | | Category 54 | 100 | | Category 55 | 100 | | Category 56 | 100 | | Category 57 | 100 | | Category 58 | 100 | | Category 59 | 100 | | Category 60 | 100 | | Category 61 | 100 | | Category 62 | 100 | | Category 63 | 100 | | Category 64 | 100 | | Category 65 | 100 | | Category 66 | 100 | | Category 67 | 100 | | Category 68 | 100 | | Category 69 | 100 | | Category 70 | 100 | | Category 71 | 100 | | Category 72 | 100 | | Category 73 | 100 | | Category 74 | 100 | | Category 75 | 100 | | Category 76 | 100 | | Category 77 | 100 | | Category 78 | 100 | | Category 79 | 100 | | Category 80 | 100 | | Category 81 | 100 | | Category 82 | 100 | | Category 83 | 100 | | Category 84 | 100 | | Category 85 | 100 | | Category 86 | 100 | | Category 87 | 100 | | Category 88 | 100 | | Category 89 | 100 | | Category 90 | 100 | | Category 91 | 100 | | Category 92 | 100 | | Category 93 | 100 | | Category 94 | 100 | | Category 95 | 100 | | Category 96 | 100 | | Category 97 | 100 | | Category 98 | 100 | | Category 99 | 100 | | Total (Total) |INHALT
Technische Daten 4

Member of Berlin Brands Group
Handwerkerstr. 11
15366 Dahlwitz-Hoppegarten
Deutschland
natural_image
Symbol of a trash bin crossed with a diagonal line, no text or labels presentCongratulations on purchasing this device. Please read the following instructions carefully and follow them to prevent possible damages. We assume no liability for damage caused by disregard of the instructions and improper use. Scan the QR code to get access to the latest user manual and more product information.
CONTENTS
Technical Data 30
Safety Instructions 31
Product Description 33
Power sources 35
DAB+ Operation 37
FM OPERATION 40
CD/MP3 Operation 42
USB operation 43
Audio-in Operation 44
Playing a Tape 44
BT Operation 46
Care and Maintenance 47
Troubleshooting 49
Disposal Considerations 51
Declaration of Conformity 51
TECHNICAL DATA
Item number
10034920, 10034921
Power supply
Main unit AC
230 V \~ 50 Hz
Main unit batteries (DC)
6 x 1.5 V = Typ C (LR14)
CD player
System
Compact disc and digital audio system laser diode properties
Emission duration
Continuous
Laser output
Less than 44.6 µ W (This output is the value measurement at a distance of 200 mm from the objective lens surface on the optical pick-up block with 7 mm aperture.)
FM radio
Tuning range 87.5 Mhz - 108 MHz
DAB radio
Tuning range 174.9-239.2 MHz
Tape deck section
Recording system 4-track 2-channel, stereo
Frequency response Type I (normal): 80 Hz – 10,000 Hz
BT frequency
2400-2480 MHz
BT radio-frequency power (max.)
4 dBm
SAFETY INSTRUCTIONS
Explanation of the symbols on the appliance

CAUTION
RISK OF ELECTRIC SHOCK DO NOT OPEN

WARNING: TO REDUCE THE RISK OF ELECTRIC SHOCK; DO NOT REMOVE THE COVER OR BACK. NO USER-SERVICEABLE PARTS INSIDE: REFER SERVICING TO QUALIFIED PERSONNEL.

The lightning symbol is intended to alert you to the presence of uninsulated, dangerous voltage within this product's enclosure that might be of sufficient magnitude to constitute a risk of electric shock. Do not open the product case.

The exclamation symbol is intended to inform you that important operating and maintenance instructions are included in the literature accompanying this product..
Children over the age of 8 and persons with reduced physical, sensory or mental capabilities or those with a lack of experience and knowledge may only use the device if they are instructed on how to do so by a person responsible for their safety, or if they are supervised and understand the hazards associated with the use of the device.
If the mains cord is damaged, you must have it replaced by supplier, or a service centre or similarly qualified persons in order to avoid a hazard.
On protection against laser energy exposure
- As the laser beam used in this compact disc player is harmful to the eyes, do not attempt to disassemble the casing.
- Stop operation immediately if any liquid or solid object should fall into the cabinet.
- Do not touch the lens or poke at it. If you do, you may damage the lens and the player may not operate properly.
- Do not put anything in the safety slot. If you do, the laser diode will be "ON" when the CD door is still open.
- If the unit is not to be used for a long period of time, make sure that the power source is disconnected from the unit. Unplug the AC cord from the wall outlet. Make it a practice to remove the AC cord by grasping the main body and not by pulling the cord.
- This unit employs a laser. The use of controls or adjustment or performance of procedures other than those specified here may result in exposure to hazardous radiation.
On placement
- Do not use the unit in places which are extremely hot, cold, dusty or humid.
- Place the unit on a flat and even surface.
- Do not restrict the air flow of the unit by placing it in a place with poor ventilation, by covering it with a cloth or by placing it on a carpet.
- Use only with the cart, stand, tripod, bracket, or table specified by the manufacturer, or sold with the apparatus. When a cart is used, use caution when moving the cart/apparatus combination to avoid injury from tipover.
On condensation
- When left in a heated room where it is warm and damp, water droplets or condensation may form inside the unit.
- When there is condensation inside the unit, the unit may not function normally.
- Let it stand for 1 to 2 hours before turning the power on, or gradually heat the room up and dry the unit before use.
- Should any trouble occur, remove the power source and refer servicing to qualified personnel.
Battery Precautions
- Replacement of batteries must be done by an adult.
- The supply terminals are not to be short-circuited.
• Non-rechargeable batteries are not to be recharged. - Exhausted batteries are to be removed.
- Only batteries of the equivalent type are to be used.
- Batteries are to be inserted with the correct polarity.
- Dispose of batteries properly. Do not dispose of batteries in fire. The batteries may explode or leak.
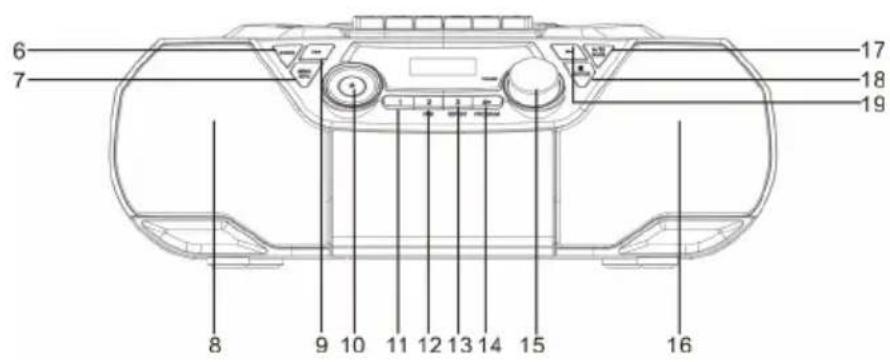
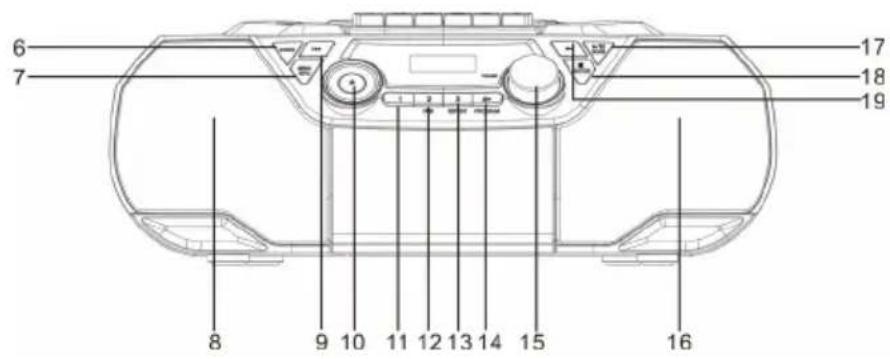
PRODUCT DESCRIPTION

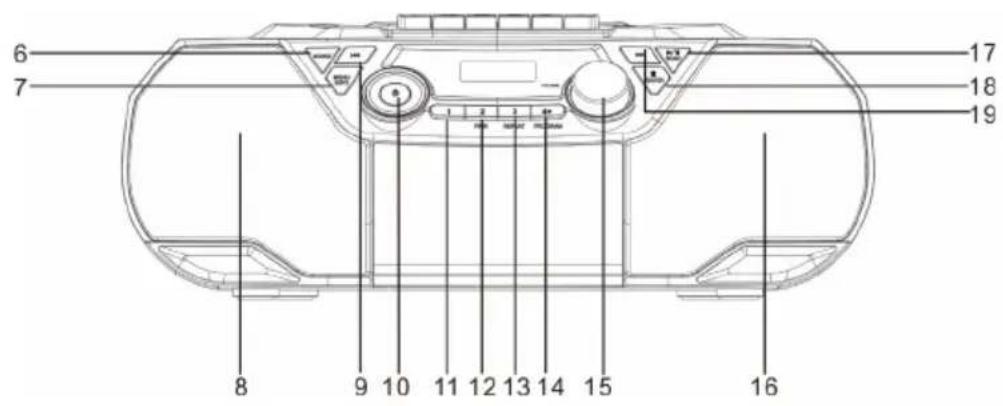

1 Carrying Handle
2 USB Jack
3 Telescopic Antenna
4 CD Door Open
5 TAPE(PLAY,RECO,NEXT,PREV,OPEN) Key
6 Source button (FM/DAB/CD/USB/AUX/BT) button.
7 MENU/INFO button
8 Left speaker
9 Skip/Search backward /TUNE- button
10 Power ON/OFF button
11 Presets 1 / folder button
12 Presets 2 / BT pair button
13 Presets 3 / CD repeat button
14 Presets 4+ / CD program button
15 Volume control knob
16 Right speaker,
17 Play/Pause button DAB /FM scan button
18 Stop /Enter Button
19 Skip/search forward/TUNE+ button
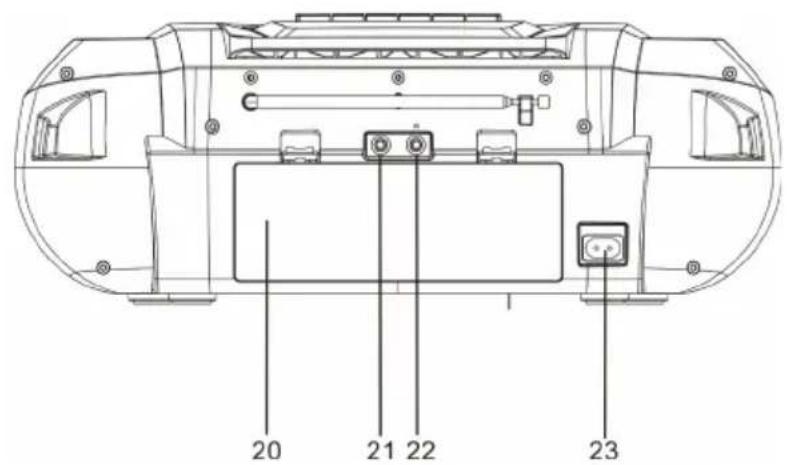
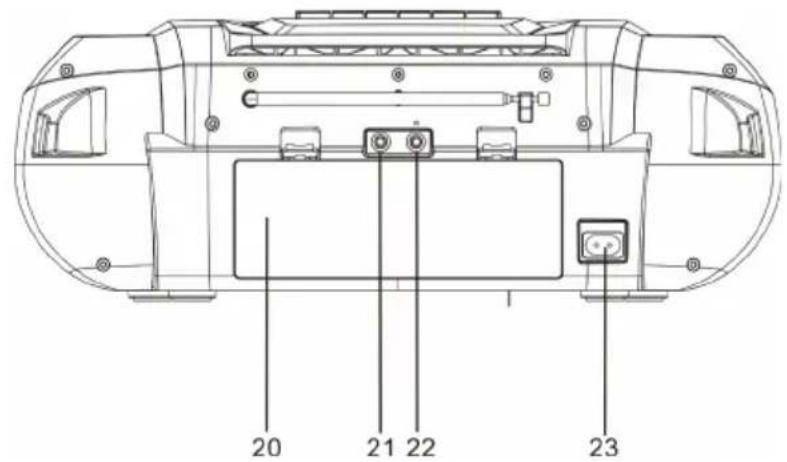
20 Battery Compartment Door
21 Aux in jack
22 Headphone jack
23 AC power socket
POWER SOURCES
This unit operates on AC 230V\~ 50Hz or 6 pieces of 1.5V "C" (UM-2) batteries. Do not attempt to operate the radio on any other power source. You could cause damage to the unit and void your warranty. Please be sure the power outlet you plug this unit into is working and receives constant (unswitched) power.
A. Battery operation
- Remove the Battery Door.
- Install 6 x DC1.5V "C" (UM-2) batteries (not included) according to the polarity diagram inside the battery compartment.
IMPORTANT: Be sure that the batteries are installed correctly. Wrong polarity may damage the unit.
- Close the battery compartment door.
Note: For best performance, alkaline-type batteries are recommended.
- Press and hold the POWER button for 3 seconds to turn on the power of the unit.
Battery note and care
- Danger of explosion if the battery is replaced incorrectly. Replace only with the same or equivalent type
- Do not mix old and new batteries.
- Do not mix alkaline, standard (carbon-zinc) or rechargeable (nickel-cadmium) batteries.
- If the unit is not to be used for an extended period of time, remove the batteries. Old or leaking batteries can cause damage to the unit and may void the warranty.
- Do not try to recharge batteries not intended to be recharged; they can overheat and rupture. (Follow battery manufacturer's directions).
- Do not dispose of batteries in fire, batteries may leak or explode.
Battery replacement
When the output sound of this unit becomes distorted or the CD player operation appears unstable, the batteries are weak. You need to replace all the exhausted batteries at the same time as soon as possible to avoid battery leakage.
B. AC operation
Plug the detachable AC cord A into a standard AC outlet (230V\~50Hz).
- When the AC power cord (included) is connected to the AC Power Socket on the back of the unit and the other end is plugged into a 230V AC\~50Hz wall outlet, the unit will disconnect the batteries automatically, and operate on AC Power only.
- Press POWER button to turn on the power of the unit.
Note: This unit is equipped with an automatic standby function. With this function, the unit enters standby mode automatically after about 15 minutes if there is no operation or audio signal output.
Volume control
Turn the VOLUME control control to change the volume.
DAB+ OPERATION
If the unit is connected to the mains power and then switched on from standby for the first time, the unit will automatically enter into the DAB mode and perform auto scan function. During the scan the display will show "Scanning..." together with a slide bar that indicates the progress of the scan and the amount of stations that have been found so far. Once the scan has finished, the unit will select the first alphanumerically found station. To explore the found stations, press the ◀◀ or ▶▶ buttons.
Full scan
The full scan will search for the entire DAB+ Band III channels. After the scan has finished, the first alphanumerically found station will be automatically selected.
- To activate auto scan, press the SCAN button and the display will show "Scanning ..." and a progressing slide bar.
- All the stations that have been found will be stored automatically. To explore and listen to the found stations, press the ◀ or ▶ buttons to select. Then press the ENTER button confirm into stations.
Manual Tuning
As well as the auto tune function, you can manually tune the receiver. This can help you when aligning your aerial or when adding stations that were missed while auto tuning.
- Press the MENU button to display the menu.
- Press ◀ or ▶ buttons select 'Manual'.
- Press the ENTER button to confirm Manual tune.
- Press the TUNE-/TUNE+ buttons to cycle through the DAB+ channels, which are numbered from 5A to 13F.
- After your desired channel number is selected, press the ENTER button to confirm. The display will show the multiplex.
- Press the MENU button again to add selected channel to station list.
DRC (Dynamic compression)
If you are listening to music with high dynamic range in a noisy environment, you may wish to compress the audio dynamic range.
- Press the MENU button to display the menu.
- Press the ◀ or ▶ buttons to select "DRC" and then press the ENTER button to confirm DRC menu.
- Press the ◀ or ▶ to select off / high / low.
- Press the ENTER button to confirm.


Prune
You may remove all unavailable stations from the list
- During DAB mode, press the MENU button to display the menu.
- Press the ◀ or ▶ buttons to select "Prune" and then press the ENTER button to confirm.
- Press the ◀ or ▶ to select
, and then press the ENTER button to delete the unavailable stations. - You can press the ◀ or ▶ to select
, and then press the ENTER button to cancel.
Software information
- In DAB mode, press and hold the MENU button to display the menu.
- Press the ◀ or ▶ buttons to select "SYSTEM" and then press the ENTER button to confirm.
- Press the ◀ or ▶ buttons to select "SW version".
- Press the ENTER button to display the software version.
- Press the MENU button to exit.
Secondary Devices
You may see a "◀" symbol after the name of the station, this indicates that there are secondary services available to that station. These secondary services contain extra services that are related to the primary station. e.g. a sports station may want to add extra commentaries. The secondary services are inserted directly after the primary station in the station list.
To select the secondary station, press the MENU button when "▶" appears in the display before the station name. When the secondary service ends, the unit will automatically switch back to the primary station.
DAB INFO modes
Press the INFO button, the display will switch through the following display modes. The information of each display mode is displayed on the lower segment of the display.
Signal strength
The display will show a slide bar to indicate the signal strength, the stronger the signal, the longer the bar will be from left to right.
Programme type
This describes the "style" or "genre" of the programme that is being broadcast.
Ensemble
This displays the name of the multiplex that contains the station you are listening to. A multiplex is a collection of radio stations that are bundled and transmitted on one frequency. There are national and local multiplexes. Local ones contain stations that are specific to that area.
NOTE
DAB – unlike normal radio, groups together several radio stations and transmits them on one frequency.
Frequency
This displays the frequency of the present station, such as "11C 220.352 MHz".
Signal Error
This displays a number showing the error rate. If the number is 0, it means the signal received is error free and the signal strength is strong. If the error rate is high, it is recommended to re-orient the aerial or re-position the unit.
Audio Bit Rate
The display will show the digital audio bit rate being received.
DLS (Dynamic Label Segment)
Dynamic label segment is a scrolling message that the broadcaster may include with their transmissions. The message usually includes information, such as program me details etc.
FM OPERATION
SWITCHING FROM DAB TO FM MODE
To switch the unit to FM mode, press the SOURCE button repeatedly to select FM mode. The display will show the frequency.
Auto scan
Press the SCAN/▶/Ⅱ button until the tuner starts searching for a station. To scan down the frequency band, press and hold the SCAN ▶/Ⅱ button. Once a station has been found, the scanning will stop automatically.
Manual Scan
To search for FM stations manually, press the ◀ or ▶, buttons repeatedly until your desired frequency is reached.
Scan setting
This is a scanning option to scan all stations, or just scan stations with a strong signal.
- Press the MENU button, then press the ◀ or ▶ buttons to select "Scan setting". Press the ENTER button to confirm.
- Press the ◀ or ▶ buttons to select "All stations" or "Strong stations only". Press the ENTER button to confirm.
Audio setting
This unit will automatically switch between stereo and mono mode, but you can override this and switch this function manually. This can be helpful when receiving poor signal reception.
- Press and hold the MENU button to display the menu. Then press the buttons to select "Audio". Press the SELECT button to confirm.
- Press the buttons to select "Stereo" or "mono" and then press the SELECT button to confirm.
FM display modes
Press the INFO button. The display will switch through the following display modes. The information of each display mode is displayed on the lower segment of the display.
Radio text
As with DAB, the broadcaster can include a scrolling text that displays information about the current program.
Programme type
This describes the "style" or "genre" of the programme that is being broadcast.
Frequency
This displays the frequency of the present station, such as "87.50 MHz".
Audio type
This displays if the station being received is in mono or stereo.
Using radio presets
You can store up to 20 digital radio and 20 FM radio stations for quick access.
To quick-store a station to a preset button (1-3)
Tune to the digital or FM radio station you want to store. Press and hold one of the numbered Preset buttons (1-3) for two seconds until you see a message to confirm that the preset has been stored.
To store a station to the preset list (4-20)
-
Tune to the digital or FM radio station you want to store.
-
Hold the 4+ button to view the numerical list of stored presets, then turn and press the ◀ or ▶ button. Select Preset number between 4 and 20. Then press the ENTER button to save You can overwrite existing presets.
To recall a preset when listening to digital radio or FM radio
-
To tune to Presets 1 to 3, press the corresponding numbered button on the front panel.
-
To access presets 4 to 20 on the front panel press the 4+ button, Press the ◀ or ▶ button Select right or left to scroll through the list of presets, then ENTER button selected preset.
CD/MP3 OPERATION
CD mechanisms used in devices like this are designed to read all commercial CDs. It will also read self-compiled MP3, CD-R/CD-RW discs, but it may take up to 10 seconds for the actual playback to begin. If playback does not start, it is likely due to the quality of the CD-R/RW disc and/or the compatibility of the CD compilation software. The manufacturer is not responsible for the playback quality of CD-R/RW discs.
Do not attach a label or seal to either side of the CD-R/RW disc. It may cause a malfunction.
Play mode
- Slide the SOURCE Button select the "CD" position. The LCD DISPLAY will light.
- Open the CD DOOR, load a CD with the label side facing upward and then close the CD door. A few seconds later the total number of tracks on the CD will appear on the LCD display. Press the PLAY/PAUSE BUTTON to start playing the CD from the first track. The PLAY/PAUSE PLAY (▶ II) icon will be displayed.
- While playing, press the ▶ II BUTTON once to pause, the unit will go to pause mode and the PLAY ( ▶ II) icon and number of track will be flashing.
- Adjust the VOLUME CONTROL to the desired volume level.
- Press STOP ■ BUTTON to stop playing.
To pause playback
- Press the ▶/Ⅱ button to pause the playback.
- To resume playback, press the ▶/Ⅱ button again.
To stop playback.
Press the STOP button to stop playback.
Skipping to another track
- Press the ◀ or ▶ buttons to skip backwards to the beginning of the track or previous track or skip forwards to the next track.
- Press and hold the ◀ or ▶ buttons to perform fast forward/reverse playback.
Program setting
User can program up to 32 tracks desired order. Programme mode is activated while in STOP mode.
- Press the MEMORY button to enter programme mode.
- Press the ◀ or ▶ buttons to select the track that you want to preset.
-
Press the MEMORY button to confirm the track.
-
Repeat steps 2-3 to programme more tracks. Once it is completed, press the SCAN/ button to start playback of the programmed tracks.
To cancel the programme, press the button twice, or open the disk tray and then close it again.
USB OPERATION
USB slot operation
If there is not a compact disc in the CD compartment.
-
Press the SOURCE button to enter USB mode.
-
Insert a USB drive to the USB port
-
The operation of PLAY/PAUSE, STOP, REPEAT and PROGRAM is the same as CD/MP3.
REP_ONE: Press the REPEAT button once, "REP_ONE" will show on the display. It will play the current track repeatedly.
REP_ALBUM: Press the REPEAT button twice, "REP_ALBUM" will show on the display. It will play the current folder repeatedly.
REP_ALL: Press the REPEAT button three times, "REP_ALL" will show on the display. It will play all files repeatedly.
RANDOM: Press the REPEAT button four times, "RANDOM" will show on the display. It will play all files repeatedly.
Notes
- The unit can only play MP3 file format in USB operation.
- If your USB device is loaded with MP3's but the display keeps showing "NO" on the display, the format of your USB device might not be compatible with the unit.
• This unit supports USB versions 1.1 and 2.0. - The unit can support USB devices with up to 32GB of memory.
- The unit may not be compatible with all USB devices and memory cards, this is not an indication of a problem with the unit.
AUDIO-IN OPERATION
This allows you to connect an external player's sound through your unit.
- Plug a 3.5mm audio cable (not included) into your external player's line out and the other end into the AUDIO IN jack.
- Press the SOURCE button to enter AUDIO IN mode. Display shows "AUDIO IN"
- Start your external player to play music.
- The unit will output the sound.
PLAYING A TAPE
Check the following items before starting operation.
- Use Type I (normal) tapes only. Type II (high position), Type III (ferro-
- chrome) and Type IV (metal) tapes are not supported.
-
If there is tape slack, rewind the slack using a pencil to avoid damaging the tape or the unit
-
Press ■ insert a cassette tape into the cassette tape compartment (2) and then close the compartment cover.

- Press ◀ to start playback.
Operations
| Symbol Press to | |
| ◀ Start play back | |
| ■▲ Stop playbackEject the cassette | |
| || Pause playbackPress again to resume playback | |
| ▶ Fast forward | |
| ◀ Fast rewind |
Recording on a tape
Check the following items before starting operation.
- Use Type I (normal) tapes only. Type II (high position), Type III (ferrochrome) and Type IV (metal) tapes are not supported.
- Make sure that the overwrite protection tab has not been removed. If the tab has been removed, cover the broken tab using adhesive tape.
-
Be sure to connect the AC power cord to avoid an unexpected recording failure.
-
Press the power button to turn on the power of the unit, and then prepare the source you want to record.
-
To record CD-DA tracks or MP3 files on a disc Place a disc in the CD compartment. Make sure
- not to start playback. See "CD /USB optional."
- To record a radio program Press FM/DAB repeatedly to select a band and tune to the desired station. See "DAB /FM radio optional."
• To record sound from a connected optional component Press AUDIO IN and connect an optional component such as a TV, portable digital Music player, etc. to the AUDIO IN jack, and then start playback

- Press ■ insert a cassette tape into the cassette tape compartment (2) and then close the compartment cover
- Press ● to start recording (the play button will depress automatically at the same time).
When recording from a disc: Playback starts automatically and recording of all the tracks/files on the disc proceeds from the first track/file. When the tape reaches the end, recording stops automatically.
When recording a radio program or sound from a connected optional component: Recording continues until the tape reaches the end.
BT OPERATION
Please follow the pairing instructions below to link the unit to your BT device.
- Press the SOURCE button repeatedly to enter the BT mode. The display will show "BT". It will start searching and will display a flashing "BT LINK".
- If the unit has never been paired with a BT device before or cannot find the last paired device, the display and the BT status indicator will keep on flashing. Turn on the BT function of your device and enable the search until "Roadie 2k" is found. Select "Roadie 2k" on the BT device to make connection. Enter the pass code "0000" if required.
- After successfully paired the unit will display steady "BT LINK".
- You can now start playing music from your smartphone wirelessly to the speaker.
- You can press the BT PLAY/PAUSE ▶/Ⅱ button to pause or resume the playback.
- You can press the BT PREVIOUS ◀ or BT NEXT ▶ button to search to the previous or next song.
Pressing and holding the PAIR button on the unit will disconnect the current connection and start to search another new BT device.
CARE AND MAINTENANCE
• Children should be supervised when using this appliance.
- Never wrap the earphone lead around any animal or person. Special care should be taken with long wires.
- Clean your unit with a damp (never wet) cloth. Solvent or detergent should never be used.
- Avoid leaving your unit in direct sunlight or in hot, humid or dusty places.
- Keep your unit away from heating appliances and sources of electrical noise such as fluorescent lamps or motors.
- If drop-outs or interruptions occur in the music during CD play, or if the CD fails to play at all, its bottom surface may require cleaning. Before playing, wipe the disc from the center outwards with a good soft cleaning cloth.
Cleaning the tape heads and tape path
Failure to clean the tape heads can cause degraded sound quality or inability of the unit to play or record tapes. Clean the capstan, pinch roller, play/recording head, and erase-head after every 10 hours of use using a commercially available cleaning kit. Clean their surfaces as shown below using a cotton swab moistened with cleaning fluid included in the kit.
To clean the pinch roller, capstan and play/recording head Press (1) and then perform cleaning (4).
To clean the erase-head
Press ● (3) while holding down the lever (2) with your finger, and then perform cleaning (4).
Notes on cassettes
Remove the overwrite protection tab from side A or B to prevent accidental recording. If you want to reuse the tape for recording, cover the broken tab using adhesive tape.

Notes on cassettes
Remove the overwrite protection tab from side A or B to prevent accidental recording. If you want to reuse the tape for recording, cover the broken tab using adhesive tape.

The use of a cassette tape with more than 90 minutes of play time is not recommended except for long, continuous recording or playback
TROUBLESHOOTING
| Symptom Possible Cause Solution | ||
| Noise or sound distorted on DAB/FM broadcast | - Station not tuned properly for DAB or FM.- DAB/FM telescopic antenna is not extended. | - Retune the DAB or FM broadcast station.- DAB/FM: Extend DAB or FM telescopic antenna. |
| CD player will not play Unit not in CD function mode.- If the CD is self-compiled, the media used may not be compatible with the player.- Exhausted battery | - Select CD function mode.- Load CD with label side up.- Use better quality blank media and retest.- Replace all old batteries. | |
| CD skips while playing Disc is dirty or scratched. | - Wipe CD with clean cloth or use another disc. | |
| Intermittent sound from CD player | - Dirty or defective disc- Dirty pick up lens- Player is subject to excessive shock or vibration | - Clean or replace the defective disc.- Use a CD lens cleaning disc to clean the lens.- Relocate the player away from shock or vibration. |
| BT: no sound - BT speaker is not linked with the mobile device- Speaker placement out of range | - Go through the "BT Operations" process to link the speakers.- Relocate the speaker within BT operating range. | |
| Sound appears distorted at high volume setting | - Volume control is set to maximum.- Batteries become low. | Adjust Volume Control to a lower comfortable level.- Replace all the old batteries with new ones. |
| Symptom Possible Cause Solution | ||
| Cassette Player no sound | - Unit not at TAPE function mode- Volume at minimum | - Slide Source selector to TAPE- Increase volume |
| Sound distorted Speed varies | - Dirty tape head- Tape old or worn- Dirty roller and capstan | Clean the head- Replace the tape- Clean roller and capstan |
| Cassette Recorder will not record | Prevention tab removed | Cover hole with tape |
| Distorted sound on playback | Defective tape or dirty tape head | Replace tape or clean tape head |
DISPOSAL CONSIDERATIONS
natural_image
Symbol of a trash bin crossed with a diagonal line, no text or labels presentIf there is a legal regulation for the disposal of electrical and electronic devices in your country, this symbol on the product or on the packaging indicates that this product must not be disposed of with household waste. Instead, it must be taken to a collection point for the recycling of electrical and electronic equipment. By disposing of it in accordance with the rules, you are protecting the environment and the health of your fellow human beings from negative consequences. For information about the recycling and disposal of this product, please contact your local authority or your household waste disposal service.
This product contains batteries. If there is a legal regulation for the disposal of batteries in your country, the batteries must not be disposed of with household waste. Find out about local regulations for disposing of batteries. By disposing of them in accordance with the rules, you are protecting the environment and the health of your fellow human beings from negative consequences.
DECLARATION OF CONFORMITY

Manufacturer:
Chal-Tec GmbH, Wallstrasse 16, 10179 Berlin, Germany.
Importer for Great Britain:
Berlin Brands Group UK Ltd PO Box 1145 Oxford, OX1 9UW United Kingdom
Hereby, Chal-Tec GmbH declares that the radio equipment type Roadie 2K is in compliance with Directive 2014/53/EU. The full text of the EU declaration of conformity is available at the following internet address: use.berlin/10034920
For Great Britain: Hereby, Chal-Tec GmbH declares that the radio equipment type Roadie 2K is in compliance with the relevant statutory requirements. The full text of the declaration of conformity is available at the following internet address: use.berlin/10034920
Chère cliente, cher client,
SOMMAIRE
Fiche technique 54

natural_image
Symbol of a trash bin crossed with a diagonal line, no text or labels presentDÉCLARATION DE CONFORMITÉ

Fabricant :
Chal-Tec GmbH, Wallstraße 16, 10179 Berlin, Allemagne.
CONTENIDO
Datos técnicos 78

natural_image
Symbol of a trash bin crossed with a diagonal line, no text or labels presentBerlin Brands Group UK Ltd
PO Box 1145
Oxford, OX1 9UW
United Kingdom
INDICE
Dati tecnici 102
6 x 1.5 V --- Tipo C (LR14)
Lettore CD
μ
Sistema
Compact disc e sistema audio digitale

Note sulle cassette
natural_image
Symbol of a trash bin crossed with a diagonal line, no text or labels presentBerlin Brands Group UK Ltd
PO Box 1145
Oxford, OX1 9UW
United Kingdom
natural_image
Abstract white logo design on dark background, resembling stylized letter 'S' or wave form (no text or symbols)
- Roadie 2K DAB Boombox
- aui
- INHALT
- Member of Berlin Brands Group
- Handwerkerstr. 11
- Dahlwitz-Hoppegarten
- Deutschland
- CONTENTS
- TECHNICAL DATA
- Item number
- Power supply
- CD player
- FM radio
- DAB radio
- Tape deck section
- BT frequency
- SAFETY INSTRUCTIONS
- CAUTION
- On protection against laser energy exposure
- On placement
- On condensation
- Battery Precautions
- PRODUCT DESCRIPTION
- POWER SOURCES
- Battery operation
- Battery note and care
- Battery replacement
- AC operation
- Volume control
- DAB+ OPERATION
- Full scan
- Manual Tuning
- DRC (Dynamic compression)
- Prune
- Software information
- Secondary Devices
- DAB INFO modes
- Signal strength
- Programme type
- Ensemble
- NOTE
- Frequency
- Signal Error
- Audio Bit Rate
- DLS (Dynamic Label Segment)
- FM OPERATION
- SWITCHING FROM DAB TO FM MODE
- Auto scan
- Manual Scan
- Scan setting
- Audio setting
- FM display modes
- Radio text
- Audio type
- Using radio presets
- To store a station to the preset list (4-20)
- To recall a preset when listening to digital radio or FM radio
- CD/MP3 OPERATION
- Play mode
- To pause playback
- To stop playback.
- Skipping to another track
- Program setting
- USB OPERATION
- USB slot operation
- Notes
- AUDIO-IN OPERATION
- PLAYING A TAPE
- Operations
- Recording on a tape
- BT OPERATION
- CARE AND MAINTENANCE
- Cleaning the tape heads and tape path
- To clean the erase-head
- Notes on cassettes
- TROUBLESHOOTING
- DISPOSAL CONSIDERATIONS
- DECLARATION OF CONFORMITY
- Manufacturer:
- Importer for Great Britain:
- SOMMAIRE
- DÉCLARATION DE CONFORMITÉ
- Fabricant :
- CONTENIDO
- INDICE
- Lettore CD
- Sistema
- Note sulle cassette
Brand : Auna
Model : Roadie 2K
Category : Mp3 player