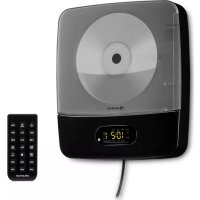
Roadie Sing - Mp3 player Auna - Free user manual and instructions
Find the device manual for free Roadie Sing Auna in PDF.

User questions about Roadie Sing Auna
0 question about this device. Answer the ones you know or ask your own.
Ask a new question about this device
Download the instructions for your Mp3 player in PDF format for free! Find your manual Roadie Sing - Auna and take your electronic device back in hand. On this page are published all the documents necessary for the use of your device. Roadie Sing by Auna.
USER MANUAL Roadie Sing Auna
text_image
QR code image containing encoded data, no visible human-readable textINHALT
Technische Daten 4
CLASS 1 LASER PRODUCT
CLASS 1 LASER PRODUCT APPAREIL À LASER DE CLASSE 1 PRODUCTO LÁSER DE CLASE 1
CAUTION INVISIBLE LASER RADIATION WHEN OPEN AND INTERLOCKS DEFEATED. AVOID EXPOSURE TO BEAM.

This product contains a low power laser device.
text_image
A To AC IN jack AC power cord (supplied) To a wall outletWICHTIG
text_image
PROG FUL CDMember of Berlin Brands Group
Handwerkerstr. 11
15366 Dahlwitz-Hoppegarten
Deutschland
natural_image
Symbol of a trash bin with crossed lines and a horizontal bar below (no text or labels)Berlin Brands Group UK Ltd
PO Box 1145
Oxford, OX1 9UW
United Kingdom
Congratulations on purchasing this device. Please read the following instructions carefully and follow them to prevent possible damages. We assume no liability for damage caused by disregard of the instructions and improper use. Scan the QR code to get access to the latest user manual and more product information.

text_image
QR code image containing encoded data, no visible human-readable textCONTENTS
Specifications 22
Safety Instructions 23
Product Overview 25
Commissioning and Operation 27
Radio Operation 28
CD Operation 29
USB Slot Operation 31
AUX IN Operation 31
LED Light Shows 33
MIC IN (Karaoke) 33
Care and Maintenance 33
Troubleshooting 34
Disposal Considerations 35
Declaration of Conformity 35
SPECIFICATIONS
Item number 10032056, 10032057, 10032058, 10038358, 10038359
Power supply 230 V / 50 Hz Power Adaptor 230 V\~ Batteries 6 x 1.5 V = (LR 14)
CD-Player
Supported audio format MP3 (MPEG 1 Audio Layer-3)
FM Radio
Tuning range 87.5 MHz - 108 MHz
BT
Profile A2DP, AVRCP
Frequency 2402–2480 MHz
Maximum radio-frequency power 4 dBm
CLASS 1 LASER PRODUCT
CLASS 1 LASER PRODUCT APPAREIL À LASER DE CLASSE 1 PRODUCTO LÁSER DE CLASE 1
CAUTION INVISIBLE LASER RADIATION WHEN OPEN AND INTERLOCKS DEFEATED. AVOID EXPOSURE TO BEAM.

This product contains a low power laser device.
Follow the advice below for safe operations.
ON PROTECTION AGAINST LASER ENERGY EXPOSURE
- As the laser beam used in this compact disc player is harmful to the eyes, do not attempt to disassemble the casing.
- Stop operation immediately if any liquid or solid object should fall into the cabinet.
- Do not touch the lens or poke at it. If you do, you may damage the lens and the player may not operate properly.
- Do not put anything in the safety slot. If you do, the laser diode will be "ON" when the CD door is still open.
- If the unit is not to be used for a long period of time, make sure that the power source is disconnected from the unit. Unplug the AC cord from the wall outlet. Make it a practice to remove the AC cord by grasping the main body and not by pulling the cord.
- This unit employs a laser. The use of controls or adjustment or performance of procedures other than those specified here may result in exposure to hazardous radiation.
GENERAL INSTRUCTIONS
• Children should be supervised when using this appliance.
- Never wrap the earphone lead around any animal or person.
- Special care should be taken with long wires, as they can easily become a tripping hazard.
ON PLACEMENT
- Do not use the unit in places which are extremely hot, cold, dusty or humid.
- Do not expose the unit to direct sunlight.
- Keep the unit away from heating devices and sources of electrical noise, such as fluorescent lamps or motors.
-
Place the unit on a flat and even surface.
-
Do not restrict the air flow of the unit by placing it in a place with poor ventilation, by covering it with a cloth or by placing it on a carpet.
- Use only with the cart, stand, tripod, bracket, or table specified by the manufacturer, or sold with the apparatus. When a cart is used, use caution when moving the cart/apparatus combination to avoid injury from tipover.
ON CONDENSATION
- When left in a heated room where it is warm and damp, water droplets or condensation may form inside the unit.
- When there is condensation inside the unit, the unit may not function normally.
- Let it stand for 1 to 2 hours before turning the power on, or gradually heat the room up and dry the unit before use.
- If you experience any problems with the unit, please contact customer service.
BATTERY NOTES AND CARE
- Danger of explosion if the battery is replaced incorrectly. Replace only with the same or equivalent type
- Do not mix old and new batteries.
- Do not mix alkaline, standard (carbon-zinc) or rechargeable (nickel-cadmium) batteries.
- If the unit is not to be used for an extended period of time, remove the batteries. Old or leaking batteries can cause damage to the unit and may void the warranty.
- Do not try to recharge batteries not intended to be recharged; they can overheat and rupture. (Follow battery manufacturer's directions).
- Do not dispose of batteries in fire, batteries may leak or explode.
text_image
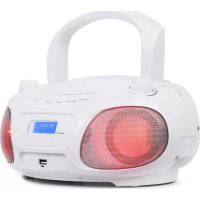
1 2 3 4 5 6 7 8 9 10 11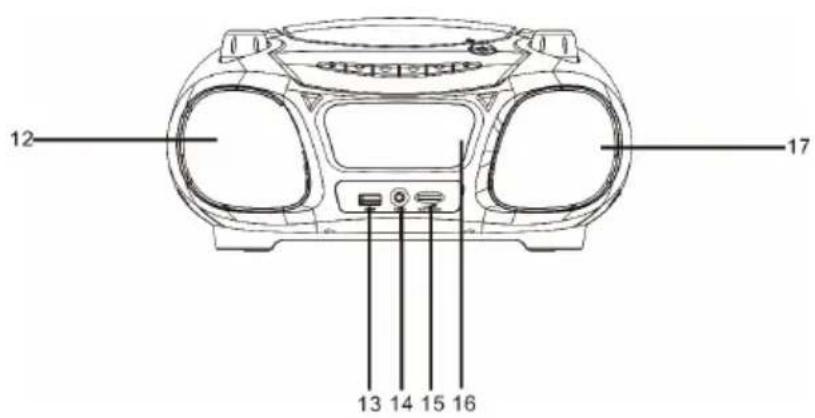
text_image
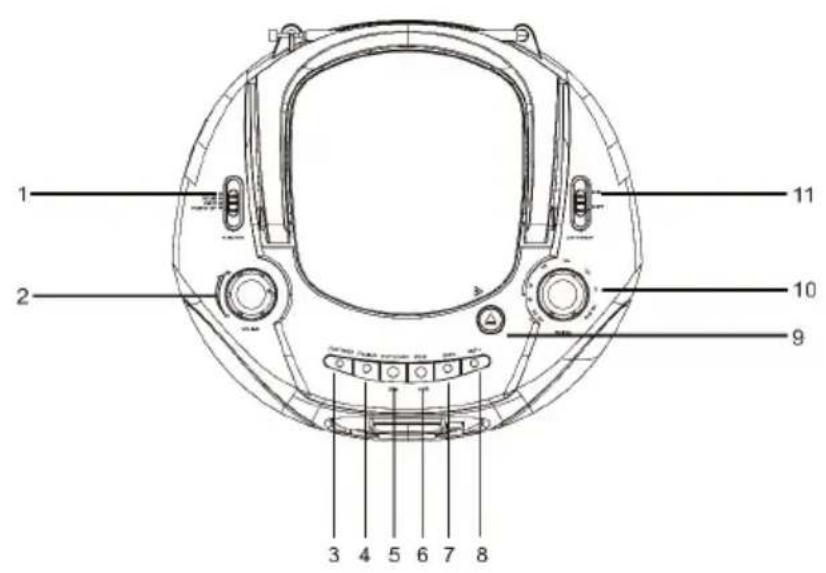
12 17 13 14 15 16
text_image
18 19 20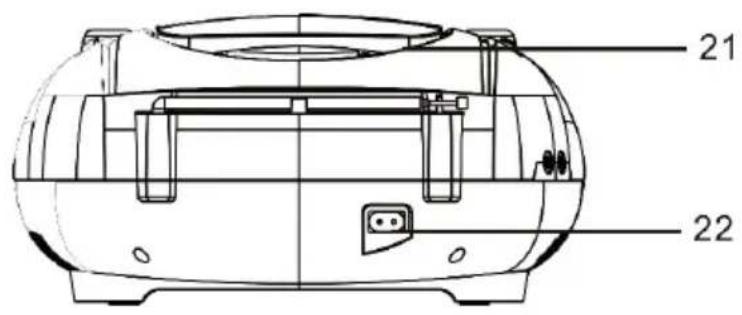
text_image
21 22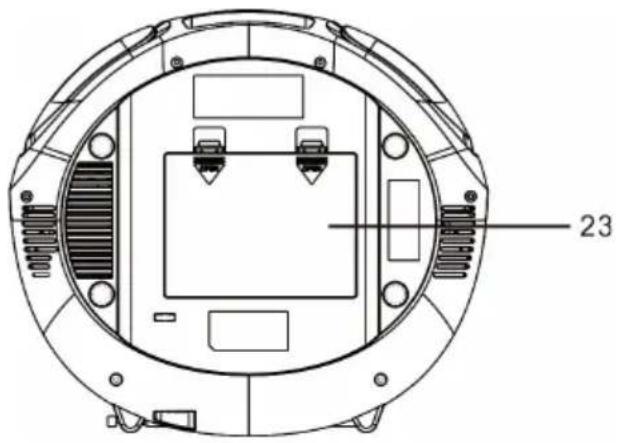
text_image
231 Function switch (OFF/FM/CD/USB/AUX BT)
2 Volume control knob
3 Play mode button
4 MP3 folder button
5 Play/Pause button
USB function button
6 Stop button, PAIR button
7 Skip/Search backward button
8 Skip/Search forward button
9 CD door open
10 Tuning control knob
11 Light ON/OFF switch
12 Left speaker
13 USB jack
14 Mic in jack
15 Mic volume control
16 LCD display
17 Right speaker
18 Telescopic antenna
19 Aux jack
20 Headphone jack
21 Carrying handle
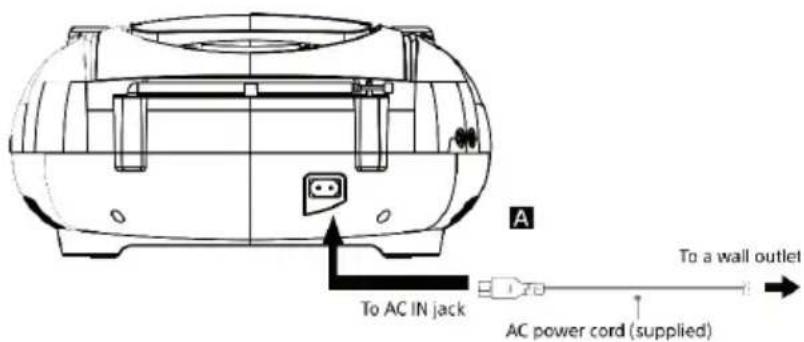
22 AC Power socket
23 Battery compartment door
COMMISSIONING AND OPERATION
Power Sources
This unit operates on AC 230V\~ 50Hz or 6 pieces of 1.5V "C" (UM-2) batteries. Do not attempt to operate the radio on any other power source. You could cause damage to the unit and void your warranty. Please be sure the power outlet you plug this unit into is working and receives constant (unswitched) power.
- Remove the Battery Door.
- Install 6 x DC1.5V "C" (UM-2) batteries (not included) according to the polarity diagram inside the battery compartment.
IMPORTANT: Be sure that the batteries are installed correctly. Wrong polarity may damage the unit.
- Close the Battery Door.
NOTE: For best performance, alkaline-type batteries are recommended.
BATTERY REPLACEMENT
When the output sound of this unit becomes distorted or the CD player operation appears unstable, the batteries are weak. You need to replace all the exhausted batteries at the same time as soon as possible to avoid battery leakage.
B. AC OPERATION
Plug the detachable AC cord A into a standard AC outlet (230V\~50Hz).
-
When the AC power cord (included) is connected to the AC Power Socket on the back of the unit and the other end is plugged into a 230V AC\~50Hz wall outlet, the unit will disconnect the batteries automatically, and operate on AC Power only.
-
Slide the FUNCTION SWITCH to "CD/USB" for CD or USB play, "FM" for FM radio, "BT/AUX" for BT or AUX play and "OFF" for unit power off.
text_image
A To AC IN jack AC power cord (supplied) To a wall outletIMPORTANT
To use the power-management function (European models only). This unit is equipped with an automatic standby function. With this function, the unit enters standby mode automatically after about 15 minutes if there is no operation or audio signal output.
RADIO OPERATION
- Slide the FUNCTION SWITCH to "FM ST." as desired.
- Rotate the TUNING CONTROL KNOB to your desired radio station according to the DIAL SCALE on the knob.
- Rotate the VOLUME CONTROL KNOB to adjust to the desired output level.
- To turn off the radio, slide the FUNCTION SWITCH to "OFF" position.
TIPS FOR BEST RECEPTION
FM – If a stereo broadcast program is being received, during FM or FM Stereo reception, always keep the FM TELESCOPIC ANTENNA fully extended for best performance. However, if FM reception is weak, try repositioning the unit near an open window until you get the best reception.
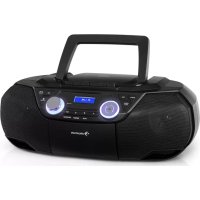
CD OPERATION
PLEASE READ THIS IMPORTANT INFORMATION:
CD mechanisms used in devices like this are designed to read all commercial CDs. It will also read self-compiled MP3, CD-R/CD-RW discs, but it may take up to 10 seconds for the actual playback to begin. If playback does not start, it is likely due to the quality of the CD-R/RW disc and/or the compatibility of the CD compilation software. The manufacturer is not responsible for the playback quality of CD-R/RW discs. Do not attach a label or seal to either side of the CD-R/RW disc. It may cause a malfunction.
PLAY MODE
- Slide the FUNCTION SWITCH to the "CD/USB" position. The LCD DISPLAY will light.
- Open the CD DOOR, load a CD with the label side facing upward and then close the CD door. A few seconds later the total number of tracks on the CD will appear on the LCD display.
Press the PLAY/PAUSE▶ II button to start playing the CD from the first track. The PLAY/PAUSE PLAY (▶II) icon will be displayed. - While playing, press the ▶ button once to pause, the unit will go to pause mode and the PLAY (▶) icon and number of track will be flashing.
- Adjust the VOLUME CONTROL to the desired volume level.
- Press STOP (■) button to stop playing.
- To turn off the CD player, slide the FUNCTION SWITCH to "OFF" position. The LCD DISPLAY will go off.
NOTE: If skipping occurs during CD play, try turning the volume down. Do not open the CD DOOR when a CD is playing.
FOLDER MODE (CD/MP3/USB)
- If "FOLDER" buttons is short pressed during PLAYBACK/PAUSE/STOP mode, it will go to the next folder and display the folder number.
- If "FOLDER" buttons is long pressed during PLAYBACK/PAUSE/STOP mode, it will go to the next 10 tracks and display the track number.
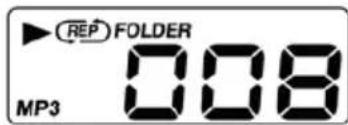
REPEAT MODE (REPEAT/REPEAT ALL/REPEAT OFF)
- Press the "PLAY MODE" button one time during playback or pause mode, is displayed with flashing, the current single track can be repeated.
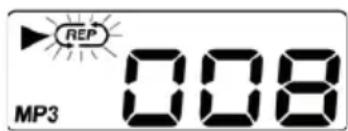
text_image
REP MP3 008- Press the "PLAY MODE" button two times during playback or pause mode, (RE) FOLDER is displayed, the current folder can be repeated.
text_image
▶(REP) FOLDER 008 MP3- Press the "PLAY MODE" button three times during playback or pause mode, is displayed without flashing, all tracks can be repeated.
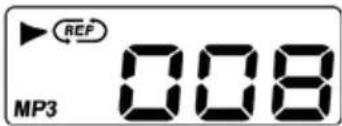
text_image
REF MP3 008- Press the "PLAY MODE" button four times during playback or pause mode, as displayed, repeating cancelled.
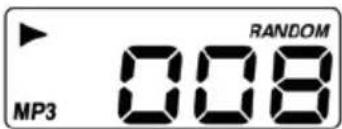
text_image
▶ MP3 008 RANDOMPROGRAM MODE (CD/MP3/USB)
Up to 20 (CD)/99 (MP3) tracks can be programmed for disc playback in any order.
- Press the "PLAY MODE" button short time during stop mode, LCD display will show P01 and flash.
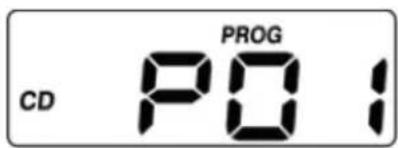
text_image
PROG CD POI- Select a desired track by using the "SKIP-/SKIP+" buttons.
- Press the "PLAY MODE" button to enter the track into setting.
- LCD display changes P02.
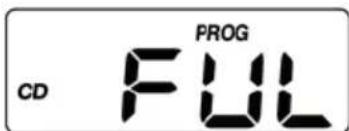
- Repeat 2\~4 step, up to 20(CD)/99 (MP3,WMA) tracks, the display will show FUL when the programmed tracks arrive 20 (CD)/99 (MP3, WMA).
text_image
PROG FUL CDNOTE: To complete programming and start playback, short press "PLAY/PAUSE" button, program playback starts automatically. To terminate programming, short press "STOP" button twice to cancel the program mode.
USB SLOT OPERATION
Do not have a compact disc in CD compartment.
- Slide the "FUNCTION" switch to CD/USB position.
- Insert a USB drive to the USB port
- The operation of PLAY/PAUSE, STOP, SKIP-, SKIP+, REPEAT and PROGRAM is the same as CD/MP3.
- Press ▶ II button long time changing USB mode.
Have compact disc in CD compartment.
- Slide the "FUNCTION" switch to CD/USB position.
- Insert a USB drive to the USB port
- Press "PLAY/PAUSE" button long time to change CD to USB mode
- The operation of PLAY/PAUSE, STOP, SKIP-, SKIP+, REPEAT and PROGRAM is the same as CD/MP3.
AUX IN OPERATION
This CD features an AUX-IN jack for connecting your iPod, MP3 player or other digital music player.
- Connect the headphone jack of your external device to the AUX IN jack located on the back of this CD player (The connection cable is not included).
- Turn on the CD player and slide the FUNCTION switch to AUX/BT position, unit will enter the AUX function mode once an external device is plugged into the AUX IN jack.
- Start to play your iPod, MP3 player or other external audio device.
- Slowly adjust both volume controls on your CD player and the external device.
- Turn off your iPod, MP3 player and etc. when finish listening. Turn the CD player off and unplug the AUX IN jack.
NOTE: Once the AUX IN jack is plugged, the BT/AUX player will automatically enter the AUX mode when the FUNCTION switch is in BT/AUX mode. Remember to disconnect the cable from the unit after use in order to be able to listen to the BT mode again.
BT OPERATION
Press Slide the "FUNCTION" switch to AUX/BT position. to turn ON the unit and follow the directions below to connect via BT. (disconnect the AUX in cable).
PAIRING (Linking) a BT ENABLED cell phone OR OTHER BT ENABLED DEVICE to the Roadie
If the Roadie has never been paired with a BT device before. You need to follow the pairing instructions below to link the Roadie with your BT device.
- Press Slide the "FUNCTION" switch to AUX/BT position.
- BT "bt" message appears in display and flashing.
- If the Roadie has never been paired with a BT device before or cannot find the last paired device, the flashing "bt" on LCD will indicate the Roadie is in search mode. You need to follow the pairing instructions below to link the Roadie with your BT device.
- Turn on the BT function of your BT device and enable the search or scan function to find the Roadie
- Select "Roadie" from the device list when it appears on your device screen. If required, enter the pass code "0000" to pair (link) the Roadie with your device.
- After successfully pairing (linking), display will change to show "bt" steadily, the BT icon also will show in display. You can begin playing music from your BT device wirelessly to the speaker.
- After selecting your favourite song, press PLAY/PAUSE button on the unit to play or pause the song.
- Adjust the VOLUME CONTROL to the desired volume level.
- Press ▶ or ◀ Button on main unit to skip to previous or next song.
- If you want to pair the Roadie with another BT enabled device, press and hold the PAIR Button for 3 seconds or turn off the BT function of device currently paired with Roadie then repeat step 3 above.
NOTES:
- Refer to the manual of your cell phone, tablet PC, computer or other BT enabled devices for BT operation since it may vary from model to model.
- If your BT enabled device does not support A2DP profile, it will not play the music through the speaker, even if paired (linked).
- If you are pairing (linking) your computer to the unit using BT, you may need to set the speaker as your computer's default sound device.
LED LIGHT SHOWS
- The LED light shows inside the speaker and around the centre display of the unit are created automatically based on the music source being played at the time.
- To turn on the LED light show, slide LIGHT switch to ON position.
- To turn off the LED light show, slide LIGHT switch to OFF position.
Note: If the brightness is glaring, turn on room lights or turn off LED light show.
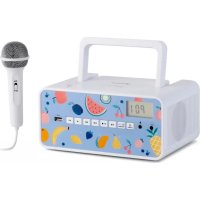
MIC IN (KARAOKE)
The unit provides a feature of mixing the microphone input to the played sound. The MIC In jack is located at the unit front panel.
- Plug in the microphone into the MIC In jack.
- Adjust the microphone volume by tuning the MIC VOLUME CONTROL located at the front panel.
NOTE: At no microphone connected, it is better to adjust the microphone volume to minimum.
CARE AND MAINTENANCE
- Clean your unit with a damp (never wet) cloth. Solvent or detergent should never be used.
- If drop-outs or interruptions occur in the music during CD play, or if the CD fails to play at all, its bottom surface may require cleaning. Before playing, wipe the disc from the centre outwards with a good soft cleaning cloth.
TROUBLESHOOTING
| Symptom Possible Cause Solution | ||
| Noise or sound distorted on FM broadcast. | - Station not tuned properly for FM.- FM telescopic antenna is not extended. | - Retune the FM broadcast station.- FM; Extend FM telescopic antenna. |
| CD player will not play Unit | not in CD function mode.- If the CD is self-compiled, the media used may not be compatible with the player.- Exhausted battery. | - Select CD function mode.- Load CD with label side up.- Use better quality blank media and retest.- Replace all old batteries. |
| CD skips while playing - Disc | is dirty or scratched. - Wipe | CD with clean cloth or use another disc. |
| Intermittent sound from CD player | - Dirty or defective disc.- Dirty pick up lens.- Player is subject to excessive shock or vibration. | - Clean or replace the defective disc.- Use a CD lens cleaning disc to clean the lens.- Relocate the player away from shock or vibration. |
| BT: no sound - Bluetooth speaker | is not linked with the cell phone.- Speaker placement out of range.- Unit not in BT function mode. | - Go through the "BT Operations" process to link the speakers.- Relocate the speaker within BT operating range.- Unplug cable plugged in AUX IN jack. |
| Sound appears distorted at high volume setting | -Volume control is set to maximum.- Batteries become low. | - Adjust Volume Control to a lower comfortable level.- Replace all the old batteries with new ones. |
DISPOSAL CONSIDERATIONS

natural_image
Symbol of a trash bin crossed with a diagonal line, no text or numbers presentIf there is a legal regulation for the disposal of electrical and electronic devices in your country, this symbol on the product or on the packaging indicates that this product must not be disposed of with household waste. Instead, it must be taken to a collection point for the recycling of electrical and electronic equipment. By disposing of it in accordance with the rules, you are protecting the environment and the health of your fellow human beings from negative consequences. For information about the recycling and disposal of this product, please contact your local authority or your household waste disposal service.
This product contains batteries. If there is a legal regulation for the disposal of batteries in your country, the batteries must not be disposed of with household waste. Find out about local regulations for disposing of batteries. By disposing of them in accordance with the rules, you are protecting the environment and the health of your fellow human beings from negative consequences.
DECLARATION OF CONFORMITY

text_image
CE UK CAManufacturer:
Chal-Tec GmbH, Wallstrasse 16, 10179 Berlin, Germany.
Importer for Great Britain:
Berlin Brands Group UK Ltd
PO Box 1145
Oxford, OX1 9UW
United Kingdom
Hereby, Chal-Tec GmbH declares that the radio equipment type Roadie Sing is in compliance with Directive 2014/53/EU. The full text of the EU declaration of conformity is available at the following internet address: use.berlin/10032056
For Great Britain: Hereby, Chal-Tec GmbH declares that the radio equipment type Roadie Sing is in compliance with the relevant statutory requirements. The full text of the declaration of conformity is available at the following internet address: use.berlin/10032056
Chère cliente, cher client,
text_image
QR code image containing encoded data, no visible human-readable textSOMMAIRE
Fiche technique 38
CLASS 1 LASER PRODUCT
CLASS 1 LASER PRODUCT APPAREIL À LASER DE CLASSE 1 PRODUCTO LÁSER DE CLASE 1
CAUTION INVISIBLE LASER RADIATION WHEN OPEN AND INTERLOCKS DEFEATED. AVOID EXPOSURE TO BEAM.

This product contains a low power laser device.
text_image
A To AC IN jack AC power cord (supplied) To a wall outletImportant
text_image
PROG FUL CDFONCTIONNEMENT AUX-IN
natural_image
Symbol of a trash bin crossed with a diagonal line, no text or labels presentDÉCLARATION DE CONFORMITÉ

text_image
CE UK CAFabricant : Chal-Tec GmbH, Wallstraße 16, 10179 Berlin, Allemagne.
Berlin Brands Group UK Ltd
PO Box 1145
Oxford, OX1 9UW
United Kingdom
text_image
QR code image containing encoded data, no visible human-readable textINDICE
Dati tecnici 54
CLASS 1 LASER PRODUCT
CLASS 1 LASER PRODUCT APPAREIL À LASER DE CLASSE 1 PRODUCTO LÁSER DE CLASE 1
CAUTION INVISIBLE LASER RADIATION WHEN OPEN AND INTERLOCKS DEFEATED. AVOID EXPOSURE TO BEAM.

This product contains a low power laser device.
text_image
PROG FUL CDnatural_image
Symbol of a trash bin crossed with a diagonal line, no text or labels presentBerlin Brands Group UK Ltd
PO Box 1145
Oxford, OX1 9UW
United Kingdom
text_image
QR code image containing encoded data, no visible human-readable textÍNDICE
Datos técnicos 70
CLASS 1 LASER PRODUCT
CLASS 1 LASER PRODUCT APPAREIL À LASER DE CLASSE 1 PRODUCTO LÁSER DE CLASE 1
CAUTION INVISIBLE LASER RADIATION WHEN OPEN AND INTERLOCKS DEFEATED. AVOID EXPOSURE TO BEAM.

This product contains a low power laser device.
text_image
A To AC IN jack AC power cord (supplied) To a wall outletIMPORTANTE
text_image
PROG FUL CDnatural_image
Symbol of a trash bin crossed with a diagonal line and a horizontal line, representing waste sorting or disposal (no text present)Berlin Brands Group UK Ltd
PO Box 1145
Oxford, OX1 9UW
United Kingdom
text_image
QR code image containing encoded data, no visible human-readable textINHOUD
CLASS 1 LASER PRODUCT
CLASS 1 LASER PRODUCT APPAREIL À LASER DE CLASSE 1 PRODUCTO LÁSER DE CLASE 1
CAUTION INVISIBLE LASER RADIATION WHEN OPEN AND INTERLOCKS DEFEATED. AVOID EXPOSURE TO BEAM.

This product contains a low power laser device.