
ME 3P80 RC - Weather Station Trevi - Free user manual and instructions
Find the device manual for free ME 3P80 RC Trevi in PDF.
| Product type | Weather station |
| Brand | Trevi |
| Model | ME 3P80 RC |
| Main unit power supply | 3 AAA batteries (not included) |
| External sensor power supply | 2 AAA batteries (not included) |
| Maximum number of external sensors | 3 channels |
| Indoor temperature | -10°C to +50°C |
| Outdoor temperature | -40°C to +70°C (with sensor) |
| Indoor humidity range | 1% to 99% |
| Temperature accuracy | 0.1°C |
| Humidity accuracy | 1% |
| Radio time signal reception | DCF-77 (77.5 kHz) up to 1500 km |
| Max wireless range | 30 meters |
| Main functions | Radio-controlled clock, alarm, weather forecast, indoor/outdoor temperature/humidity, MAX/MIN memory, backlight |
| Weather forecast types | Sunny, partly cloudy, cloudy, rainy, stormy |
| Comfort indicator | Dry (<40%), Comfortable (40-70%), Humid (>70%) |
| Backlight setting | Activation by SNZ/LIGHT button, duration 8 seconds |
| Maintenance and cleaning | Keep away from magnetic fields and direct weather. Clean with a dry cloth. |
| Safety | Do not expose to water. Disposal in accordance with local regulations (separate collection). |
| Warranty | 24 months from the date of manufacture |
| Spare parts | Additional external sensors (max 3), AAA batteries |
| Repairability | Repair by TREVI service centers |
Frequently Asked Questions - ME 3P80 RC Trevi
User questions about ME 3P80 RC Trevi
0 question about this device. Answer the ones you know or ask your own.
Ask a new question about this device
Download the instructions for your Weather Station in PDF format for free! Find your manual ME 3P80 RC - Trevi and take your electronic device back in hand. On this page are published all the documents necessary for the use of your device. ME 3P80 RC by Trevi.
USER MANUAL ME 3P80 RC Trevi
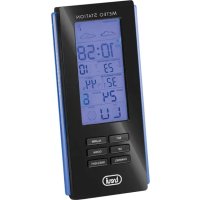
natural_image
Five black-and-white weather icons: sun, cloudy, sunny, rain with raindrops, and cloudy with stars (no text or symbols)Trasmissione: 30m, RF 433MHz, 10mW
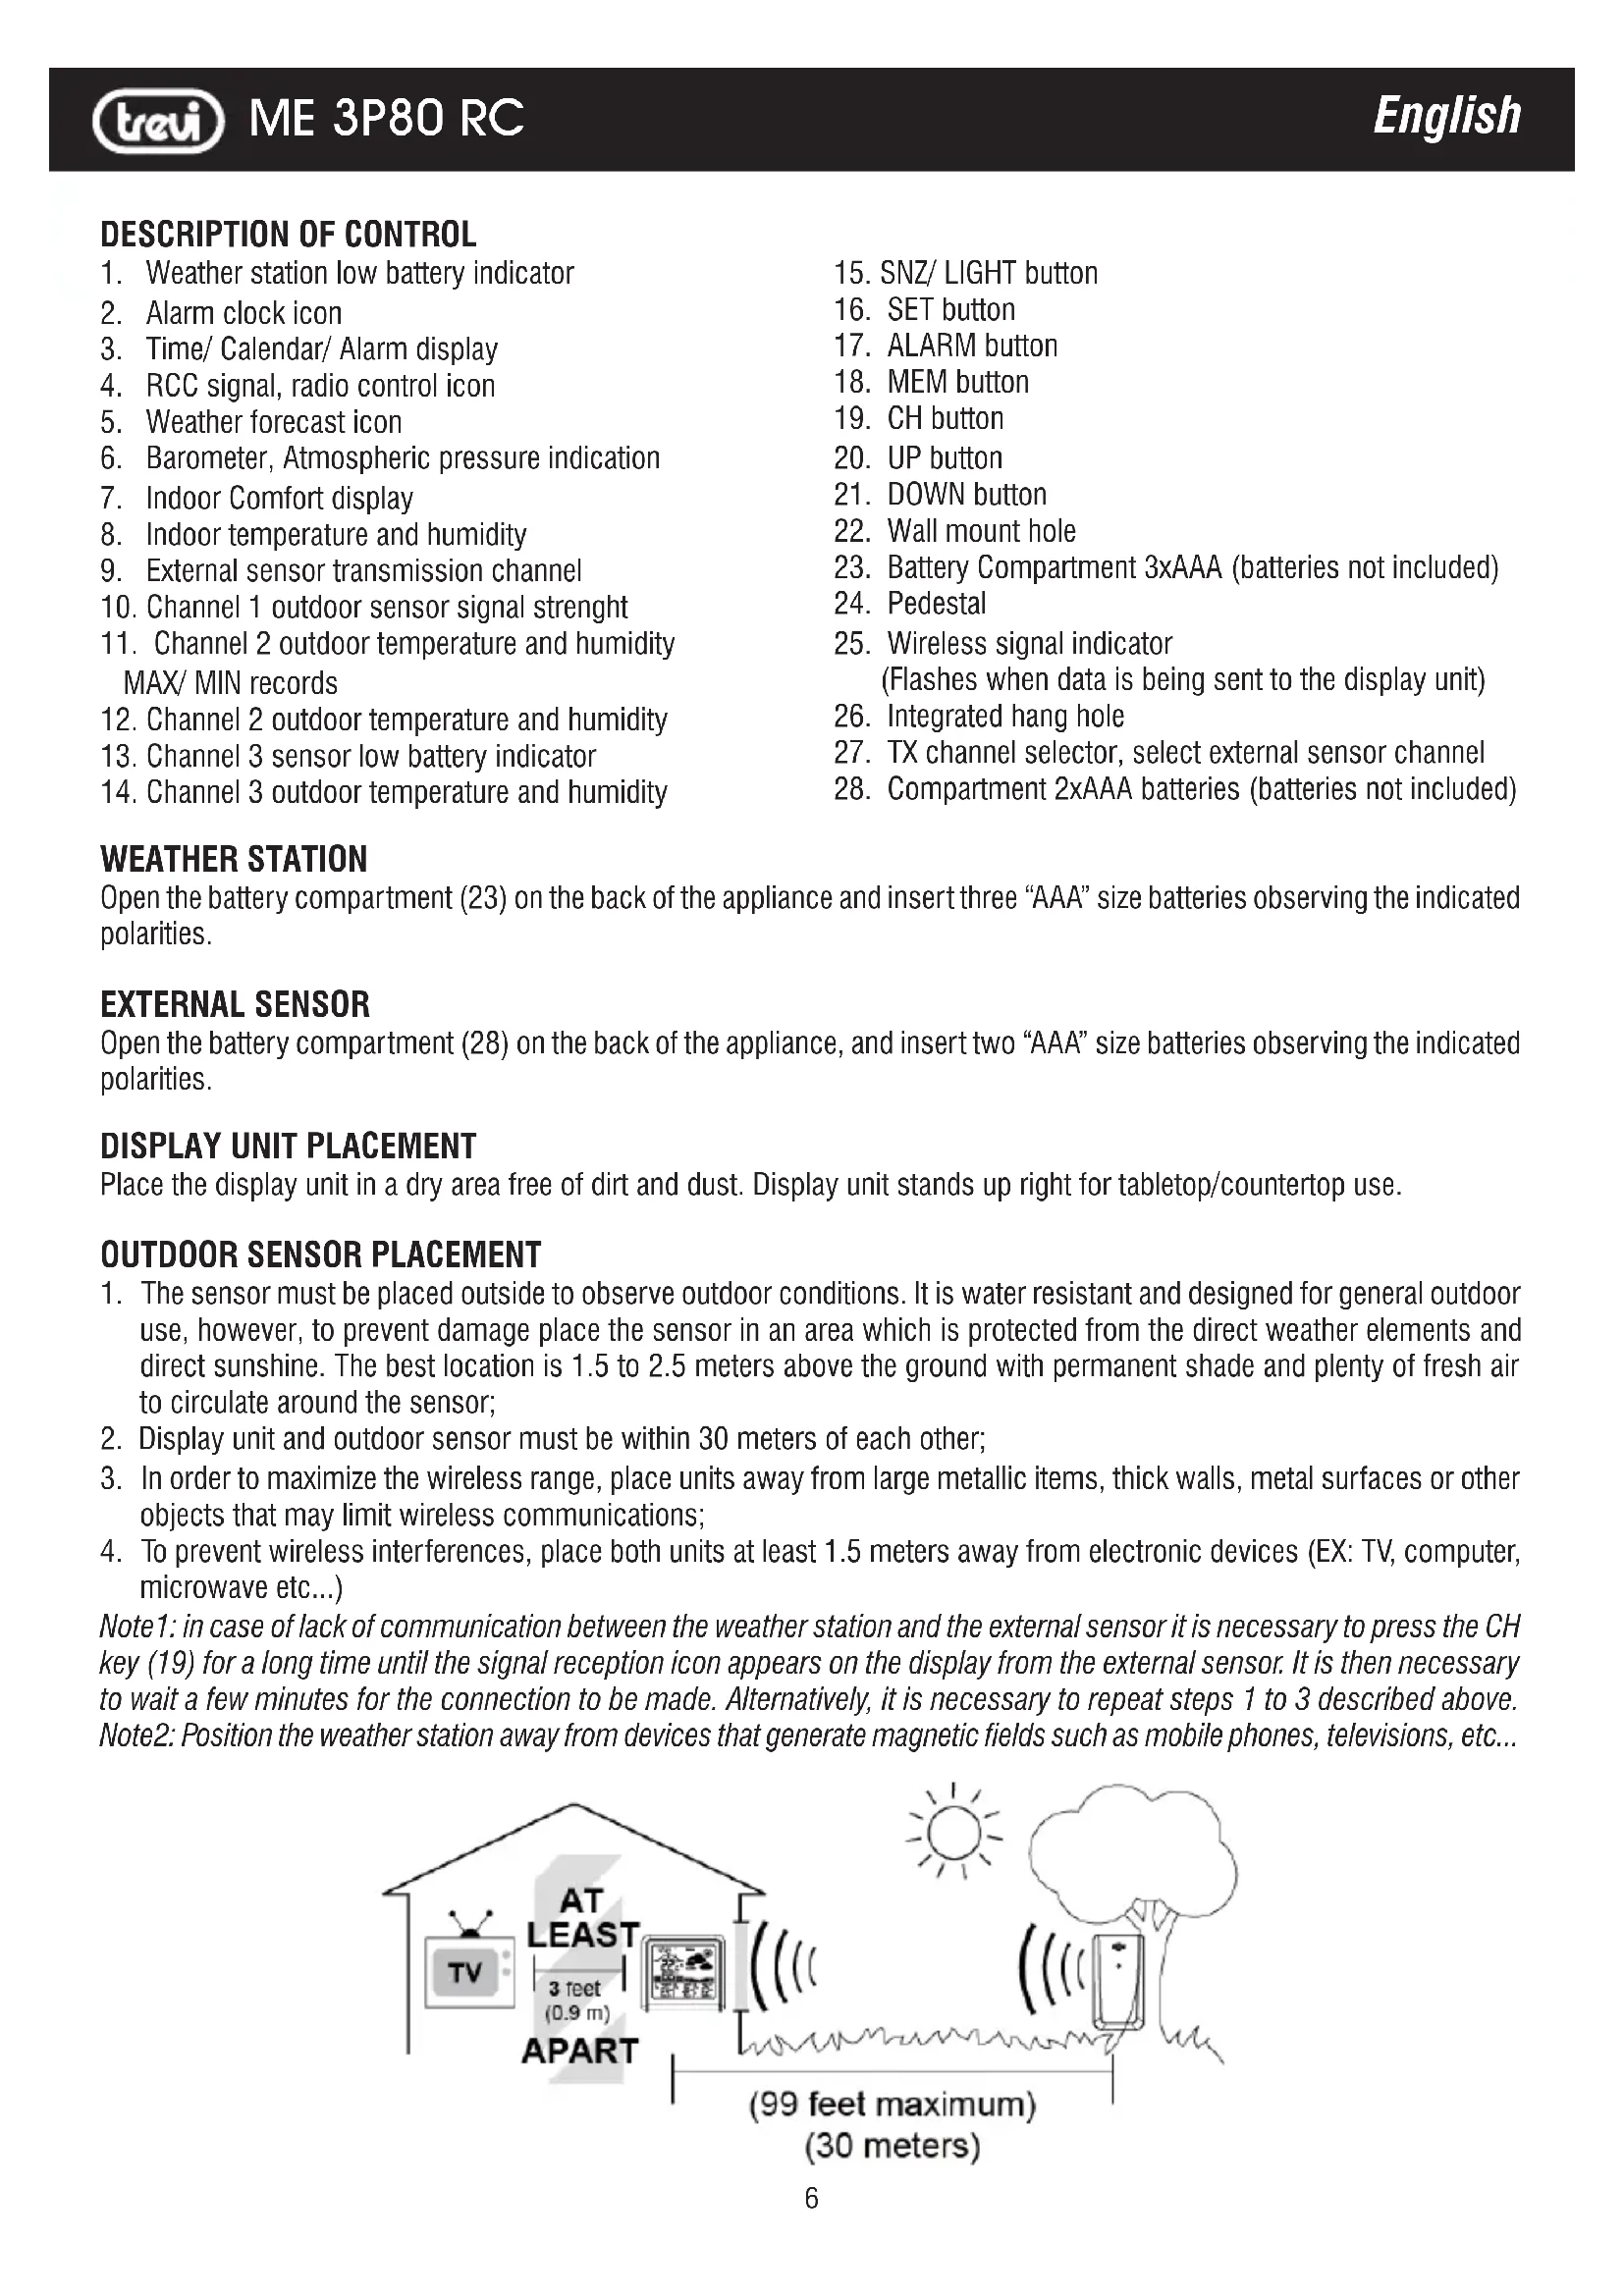
- Weather station low battery indicator
- Alarm clock icon
- Time/ Calendar/ Alarm display
- RCC signal, radio control icon
- Weather forecast icon
- Barometer, Atmospheric pressure indication
- Indoor Comfort display
- Indoor temperature and humidity
- External sensor transmission channel
- Channel 1 outdoor sensor signal strength
- Channel 2 outdoor temperature and humidity MAX/ MIN records
- Channel 2 outdoor temperature and humidity
- Channel 3 sensor low battery indicator
-
Channel 3 outdoor temperature and humidity
-
SNZ/ LIGHT button
- SET button
- ALARM button
- MEM button
- CH button
- UP button
- DOWN button
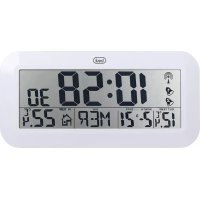
- Wall mount hole
- Battery Compartment 3xAAA (batteries not included)
- Pedestal
- Wireless signal indicator (Flashes when data is being sent to the display unit)
- Integrated hang hole
- TX channel selector, select external sensor channel
- Compartment 2xAAA batteries (batteries not included)
WEATHER STATION
Open the battery compartment (23) on the back of the appliance and insert three “AAA” size batteries observing the indicated polarities.
EXTERNAL SENSOR
Open the battery compartment (28) on the back of the appliance, and insert two “AAA” size batteries observing the indicated polarities.
DISPLAY UNIT PLACEMENT
Place the display unit in a dry area free of dirt and dust. Display unit stands up right for tabletop/countertop use.
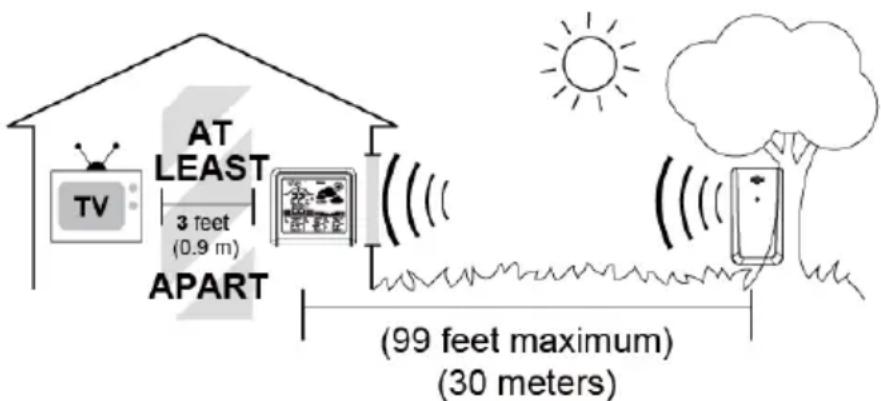
OUTDOOR SENSOR PLACEMENT
- The sensor must be placed outside to observe outdoor conditions. It is water resistant and designed for general outdoor use, however, to prevent damage place the sensor in an area which is protected from the direct weather elements and direct sunshine. The best location is 1.5 to 2.5 meters above the ground with permanent shade and plenty of fresh air to circulate around the sensor;
- Display unit and outdoor sensor must be within 30 meters of each other;
- In order to maximize the wireless range, place units away from large metallic items, thick walls, metal surfaces or other objects that may limit wireless communications;
- To prevent wireless interferences, place both units at least 1.5 meters away from electronic devices (EX: TV, computer, microwave etc...)
Note1: in case of lack of communication between the weather station and the external sensor it is necessary to press the CH key (19) for a long time until the signal reception icon appears on the display from the external sensor. It is then necessary to wait a few minutes for the connection to be made. Alternatively, it is necessary to repeat steps 1 to 3 described above.
Note2: Position the weather station away from devices that generate magnetic fields such as mobile phones, televisions, etc...
OUTDOOR SENSOR FUNCTION
Setting the channel connection between the display unit and outdoor sensor:
- To change the channel option on the outdoor sensor open the battery compartment cover, on the upper left side is a button;
- Always make sure the channel chosen on the display unit matches the channel option chosen on the outdoor sensor;
- Once the display unit has been set up and the channel synchronized with the outdoor sensor, the display unit will begin the registration process. It can take up to 3 minutes to complete the registration, where the display unit will search for an RF (Radio Frequency) signal from the outdoor sensor. The outdoor sensor signal strength will show the connection strength to the outdoor sensor. If there are no bars or if bars are not showing at its maximum strength (5 bars) try placing the outdoor sensor or display unit elsewhere for better connection;
- If the RF Signal was lost and not reconnected, the outdoor temperature and humidity level will begin to flash after 1 hour of lost connection. If no connection was found after 2 hours only a dotted line ‘- - - ’ will be displayed in place of the temperature and humidity level;
- To manually restart the RF registration, press and hold the "CH" button for 3 seconds. The display unit will now search for the RF signal for the next 3 minutes.
If the low battery indicator is displayed on the LCD for either the outdoor sensor or the display unit, immediately change the batteries to prevent disruptions in communications of the devices
TIME DISPLAY BY RADIO CONTROL
This device is equipped with a receiver capable of receiving the time signal of the Physikalisch Technische Bundesanstalt Braunschweig (central Germany) receivable within a radius of 1500Km. After the power supply was established, the clock will automatically search for the radio signal. This will take approximately 3 to 8 minutes to finish this process.
If the radio signal 📁 is received correctly, the date and time will be set automatically and the radio control signal icon turns on. If the clock fails to receive the time signal, go ahead with the following steps:
-
Press and hold the UP button for approx. 2 seconds to re-initialize radio signal reception;
-
Is the device still not receiving the signal, the time must be set manually.
Note1: when the flashing radio control symbol appears on the display, no manual adjustment is possible.
Note2: when the symbol remains on, it means that the signal has been correctly received.
Note3: the time is transmitted from central Germany, so if we are in a country with a different time than Germany it is necessary to set the time zone manually.
Note4: position the weather station away from devices that generate magnetic fields such as mobile phones, televisions, etc.
Not all areas of Europe may be able to receive the radio control signal. In this case it is necessary to set the time manually.
MANUALLY SETTING THE TIME, DATE & UNITS
- Press and hold down the SET button (16) for 2 seconds the hour display starts to flash, use UP(20) or DOWN(21) buttons to set the correct hour;
- Press SET button (16) to confirm your setting, the minute display starts to flash, use UP(20) or DOWN(21) buttons to set the correct minute;
- Press SET button (16) to confirm your setting, the year display starts to flash, use UP(20) or DOWN(21) buttons to set the correct year;
- Press SET button (16) to confirm your setting, the Month and Date icon display starts to flash, use UP(20) or DOWN(21) buttons to set the date display on Month/Date or Date/Month;
- Press SET button (16) to confirm your setting, the month display starts to flash, use UP(20) or DOWN(21) buttons to set the correct month;
- Press SET button (16) to confirm your setting, the date display starts to flash, use UP(20) or DOWN(21) buttons to set the correct date;
- Press SET button (16) to confirm your setting, the pressure units start to flash, use UP(20) or DOWN(21) buttons set the correct units;
- Press SET button (16) to confirm your setting, the ON/OFF RCC start to flash, use UP(20) or DOWN(21) buttons set the correct setting;
-
Press SET button (16) to confirm your setting, the time zone start to flash, use UP(20) or DOWN(21) buttons set the correct time zone;
-
Press SET button (16) to confirm your setting and to end the setting procedures, enter the normal mode.
Note1: You will automatically exit settings mode if no buttons are pressed for 20 seconds. Enter settings mode again at any time by pressing and holding the SET button (16) for 3 seconds.
Note2: Under normal mode, press SET button (16) to check the calendar.
ALARM ADJUSTMENT
- Press and hold the ALARM button (17), located on the back of the display unit for about 3 seconds to set the alarm time. The alarm hour will begin blinking on the display where the clock time is usually shown;
- To adjust the alarm hour, press the UP(20) or DOWN(21) buttons (press and hold to fast adjust). When alarm hour is set to your satisfaction, press the ALARM button (17) to proceed to the alarm minute preference. Press the UP(20) or DOWN(21) buttons (press and hold to fast adjust), press the ALARM button (17) again to exit alarm settings;
- To turn the alarm ON or OFF, press the ALARM button (17) to enter alarm mode, press the ALARM button (17) again to ON or OFF the alarm. The 🔍 symbol should show on the top of the clock display when alarm is set to ON. Press the ALARM button (17) again to turn off the alarm, when the alarm is set to OFF, the 🔍 symbol should not display.
- When the alarm is in operation it will begin beeping with one short beep and continue with many short beeps if the alarm rings longer than 20 seconds. You can snooze the alarm for 5 minutes by pressing the SNZ/ LIGHT button (15).
WEATHER FORECAST
The digital barometer automatically detects changes in atmospheric pressure and consequently displays the weather forecast symbol (5). This forecast concerns the following 12/24 hours.
For example: if the barometer detects a high pressure, the sun symbol will appear on the display, but outside it may rain, because the forecast is for the next 12/24 hours.
Weather forecasts can take 5 different views:

natural_image
Five black-and-white weather icons: sun, cloudy, sunny, rain with raindrops, and cloudy with stars (no text or symbols)Sunny StormyRainyCloudyPartly claudy
N.B. Weather forecast symbols may not reflect current weather conditions. They refer only to future conditions.
Forecasts may not be 100% safe due to various factors.
The manufacturer is not responsible for any damage or situations caused by an incorrect forecast.
COMFORTABLE LEVEL (Icon 7)
| Icon Display Conditions | |
| Dry | Indoor humidity <40% |
| Comfortable | Indoor temperature is between 20°C to 28°C and indoor humidity is between 40% to 70% |
| Wet | Indoor humidity >70% |
| Not Display | Indoor temperature is between 20°C to 28°C and indoor humidity is outside 40% to 70% |
SETTING THE TEMPERATURE AND CHECKING THE MAX/ MIN TEMPERATURE AND HUNIDITY
To switch the temperature measurement between Celsius and Fahrenheit, press the UP button (20) which is also the C/F option button. You can switch between Celsius and Fahrenheit at any time (except when setting other setting options).
Minimum/ Maximum values of the day:
- Press the MEM button (18) to check MAX/ MIN temperature and humidity;
- Press and hold the MEM button (18) to clear the record of MAX/MIN temperature and humidity when display shows MAX or MIN temperature and humidity.
ADJUSTMENT OF THE BACKLIGHT
When the display unit is powered by battery only the back light will be off to preserve the battery. Press the SNZ/ LIGHT button (15) to turn the back light on for 8 seconds.
TECHNICAL DATA
Weather station: from -10^ C to +50^ C
Internal humidity: .... from 1% to 99%
External sensor: from -40°C to +70°C
Channels: max. 3 external sensors
Radio control signal reception: 77.5 KHz
Transmission: 30m, RF 433MHz, 10mW
Unit feed rate: 0,1°C for temperature - 1% for humidity
Main unit power supply: 3xAAA batteries (not supplied)
External sensor power supply: 2xAAA batteries (not supplied) for each sensor
DESCRIPTION DU CONTRÔLE
natural_image
Five black-and-white weather icons: sun, cloudy, sunny, rain with raindrops, and cloudy with stars (no text or symbols)NIVEAU CONFORTABLE (Icône 7)
Transmission: 30 m, RF 433MHz, 10mW
natural_image
Five black-and-white weather icons: sun, cloudy, sunny, rain with raindrops, and cloudy with stars (no text or symbols)natural_image
Five black-and-white weather icons: sun, cloudy, sunny, rain with raindrops, and cloudy with stars (no text or symbols)Soleado TormentosoLluviosoNubladoParcialmente nublado
NIVEL CONFORTABLE (Icono 7)
■ Precautions for correct disposal of the product
The symbol shown on the equipment indicates that waste must be disposed of in “separate collection” and so the product must not be disposed of together with urban waste. The user must take the product to special “separate waste collection centres” provided by local government, or deliver it to the retailer against the purchase of a new product.
Separate collection of waste and subsequent treatment, recycling and disposal operations promotes the production of equipment with recycled materials and limits negative effects on the environment and on health caused by improper handling of waste.
Illegal disposal of the product leads to the enforcement of administrative penalties.
- This unit is guaranteed for a period of 24 months from the date of production printed on the product itself or on label on product.
- The warranty is valid only if the unit has not been tampered with. The warranty is valid only at authorized TREVI assistance centres, that will repair manufacturing defects, excluded replacement of labels and removable parts.
- TREVI is not liable for damage to people or things caused by the use of this unit or by the interruption in the use of this unit.
GARANTIE
SIMPLIFIED EU DECLARATION OF CONFORMITY
Hereby TREVI Spa declares that the radio equipment type ME 3P80 RC is in compliance with directive 2014/53/EU.
The full text of the EU declaration of conformity is available at the following internet address https://www.trevi.it/dms/zidi/TREVI/DOCME3P80RC.pdf


- WEATHER STATION
- EXTERNAL SENSOR
- DISPLAY UNIT PLACEMENT
- OUTDOOR SENSOR PLACEMENT
- OUTDOOR SENSOR FUNCTION
- TIME DISPLAY BY RADIO CONTROL
- MANUALLY SETTING THE TIME, DATE & UNITS
- ALARM ADJUSTMENT
- WEATHER FORECAST
- SETTING THE TEMPERATURE AND CHECKING THE MAX/ MIN TEMPERATURE AND HUNIDITY
- Minimum/ Maximum values of the day:
- ADJUSTMENT OF THE BACKLIGHT
- TECHNICAL DATA
- DESCRIPTION DU CONTRÔLE
- ■ Precautions for correct disposal of the product
- GARANTIE
- SIMPLIFIED EU DECLARATION OF CONFORMITY
Brand : Trevi
Model : ME 3P80 RC
Category : Weather Station