Skyscraper Ice - Air Conditioning Klarstein - Free user manual and instructions
Find the device manual for free Skyscraper Ice Klarstein in PDF.
User questions about Skyscraper Ice Klarstein
0 question about this device. Answer the ones you know or ask your own.
Ask a new question about this device
Download the instructions for your Air Conditioning in PDF format for free! Find your manual Skyscraper Ice - Klarstein and take your electronic device back in hand. On this page are published all the documents necessary for the use of your device. Skyscraper Ice by Klarstein.
USER MANUAL Skyscraper Ice Klarstein
text_image
QR code image containing encoded data, no visible human-readable textINHALTSVERZEICHNIS
Berlin Brands Group UK Ltd
PO Box 1145
Oxford, OX1 9UW
United Kingdom
SICHERHEITSHINWEISE
natural_image
Interior view of a white appliance with transparent glass cover containing a blue plastic bag (no text or symbols visible)TASTENFUNKTIONEN DER FERNBEDIENUNG
line
| Zeit (Stunde) | Windgeschwindigkeit | | ------------- | ------------------- | | 0.0 | H | | 0.1 | M | | 0.2 | L | | 0.3 | H | | 0.4 | M | | 0.5 | H | | 0.6 | L | | 0.7 | H | | 0.8 | M | | 0.9 | L | | 1.0 | H | | 1.1 | M | | 1.2 | L | | 1.3 | H | | 1.4 | M | | 1.5 | L |line
| Time (Stunde) | Windgeschwindigkeit | | ------------- | ------------------- | | 0 | H | | 1 | M | | 2 | L | | 3 | H | | 4 | M | | 5 | L | | 6 | H | | 7 | M | | 8 | L | | 9 | H | | 10 | M | | 11 | L | | 12 | H | | 13 | M | | 14 | L | | 15 | H | | 16 | M | | 17 | L | | 18 | H | | 19 | M | | 20 | L | | 21 | H | | 22 | M | | 23 | L | | 24 | H | | 25 | M | | 26 | L | | 27 | H | | 28 | M | | 29 | L | | 30 | H | | 31 | M | | 32 | L | | 33 | H | | 34 | M | | 35 | L | | 36 | H | | 37 | M | | 38 | L | | 39 | H | | 40 | M | | 41 | L | | 42 | H | | 43 | M | | 44 | L | | 45 | H | | 46 | M | | 47 | L | | 48 | H | | 49 | M | | 50 | L | | 51 | H | | 52 | M | | 53 | L | | 54 | H | | 55 | M | | 56 | L | | 57 | H | | 58 | M | | 59 | L | | 60 | H | | 61 | M | | 62 | L | | 63 | H | | 64 | M | | 65 | L | | 66 | H | | 67 | M | | 68 | L | | 69 | H | | 70 | M | | 71 | L | | 72 | H | | 73 | M | | 74 | L | | 75 | H | | 76 | M | | 77 | L | | 78 | H | | 79 | M | | 80 | L | | 81 | H | | 82 | M | | 83 | L | | 84 | H | | 85 | M | | 86 | L | | 87 | H | | 88 | M | | 89 | L | | 90 | H | | 91 | M | | 92 | L | | 93 | H | | 94 | M | | 95 | L | | 96 | H | | 97 | M | | 98 | L | | 99 | H | | 100 | M |line
| Zeit (Stunde) | Windgeschwindigkeit | | ------------- | ------------------- | | 0 | H | | 1 | M | | 2 | L | | 3 | H | | 4 | M | | 5 | L | | 6 | H | | 7 | M | | 8 | L | | 9 | H | | 10 | M | | 11 | L | | 12 | H | | 13 | M | | 14 | L | | 15 | H | | 16 | M | | 17 | L | | 18 | H | | 19 | M | | 20 | L | | 21 | H | | 22 | M | | 23 | L | | 24 | H | | 25 | M | | 26 | L | | 27 | H | | 28 | M | | 29 | L | | 30 | H | | 31 | M | | 32 | L | | 33 | H | | 34 | M | | 35 | L | | 36 | H | | 37 | M | | 38 | L | | 39 | H | | 40 | M | | 41 | L | | 42 | H | | 43 | M | | 44 | L | | 45 | H | | 46 | M | | 47 | L | | 48 | H | | 49 | M | | 50 | L | | 51 | H | | 52 | M | | 53 | L | | 54 | H | | 55 | M | | 56 | L | | 57 | H | | 58 | M | | 59 | L | | 60 | H | | 61 | M | | 62 | L | | 63 | H | | 64 | M | | 65 | L | | 66 | H | | 67 | M | | 68 | L | | 69 | H | | 70 | M | | 71 | L | | 72 | H | | 73 | M | | 74 | L | | 75 | H | | 76 | M | | 77 | L | | 78 | H | | 79 | M | | 80 | L | | 81 | H | | 82 | M | | 83 | L | | 84 | H | | 85 | M | | 86 | L | | 87 | H | | 88 | M | | 89 | L | | 90 | H | | 91 | M | | 92 | L | | 93 | H | | 94 | M | | 95 | L | | 96 | H | | 97 | M | | 98 | L | | 99 | H | | 100 | M |Member of Berlin Brands Group
Handwerkerstr. 11
15366 Dahlwitz-Hoppegarten
Deutschland
natural_image
Symbol of a trash bin crossed with a diagonal line, no text or numbers presentCongratulations on purchasing this device. Please read the following instructions carefully and follow them to prevent possible damages. We assume no liability for damage caused by disregard of the instructions and improper use. Scan the QR code to get access to the latest user manual and more product information.

text_image
QR code image containing encoded data, no visible human-readable textCONTENTS
Safety Instructions 18
Product Overview 19
Start and Operation 20
Button Functions of the Remote Control 21
Key Functions and Display Indicators on the Device 21
Wind Pattern 23
Cleaning and Care 26
Troubleshooting 27
Disposal Considerations 28
TECHNICAL DATA
| Item number 10028303, 100293 | 28, 10034651, 10035835 |
| Power supply 220-240 V ~ 50/60 Hz | |
MANUFACTURER & IMPORTER (UK)
Manufacturer:
Chal-Tec GmbH, Wallstrasse 16, 10179 Berlin, Germany.
Importer for Great Britain:
Berlin Brands Group UK Ltd
PO Box 1145
Oxford, OX1 9UW
United Kingdom
SAFETY INSTRUCTIONS
- Use this evaporative cooler only as instructed in this owner's manual. Other uses may cause electric shock, injury or fire.
- Close supervision is required if this cooler is used near children or pets.
- To protect against electric shock, do not immerse this cooler or its plug and cord in water.
- If the cooler is being transported or will not be in use, disconnect it from the power supply by tightly gripping the plug and pulling it from the power outlet. Do not disconnect the power supply by pulling on the evaporative cooler's power cord.
- Avoid contact with any of the evaporative cooler's moving parts.
- Place the evaporative cooler on a level surface.
- This evaporative cooler is intended to fit into a matching receptacle. Under no circumstances should the plug be altered in any way. An improper connection can result in electric shock.
- If possible, avoid using extension cords with this evaporative cooler. If an extension cord is absolutely necessary, do not use more than one extension cord to operate more than one cooler.
- Do not insert objects or allow fingers to enter into the cooler's grills, as this may cause electric shock or bodily injury. Do not block or tamper with the evaporative cooler while it is in operation.
- Do not run the power cord under mats or carpeting, and do not cover the power cord with
- runners. Arrange the power cord away from room traffic and where it can be tripped over.
- Do not operate this evaporative cooler in the presence of flammable substances or explosives.
- Do not place the cooler near an open flame or cooking/heating appliances.
- This product is not intended for use in wet or damp areas.
- If the evaporative cooler will not be in use, empty the tank of any remaining water.
- If the cooler's plug or power cord is damaged, do not attempt to repair the components yourself.
- Please contact our customer service or have the unit examined by an authorized service provider.
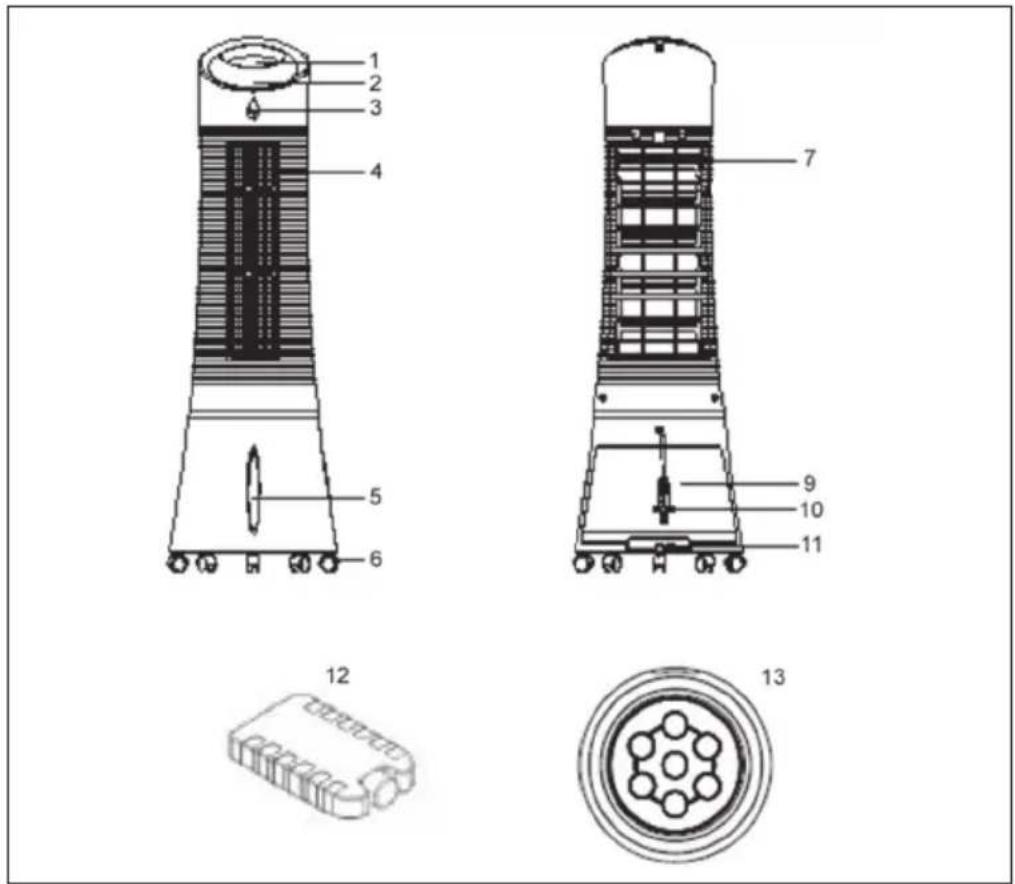
PRODUCT OVERVIEW
text_image
1 2 3 4 5 6 7 9 10 11 12 13| 1 Control panel 9 Water tank | |
| 2 Display panel 10 Power cord | |
| 3 Remote control receiver 11 Water tank knob | |
| 4 Air louvers 12 Ice pack | |
| 5 Water level indicator 13 Remote control | |
| 6 Caster | |
| 7 Dustproof air filter |
START AND OPERATION
Carefully remove all packaging materials and retain for future storage/use. Make sure there is no residual foam left in any of the components. No tools will be required to assemble this tower evaporative cooler.
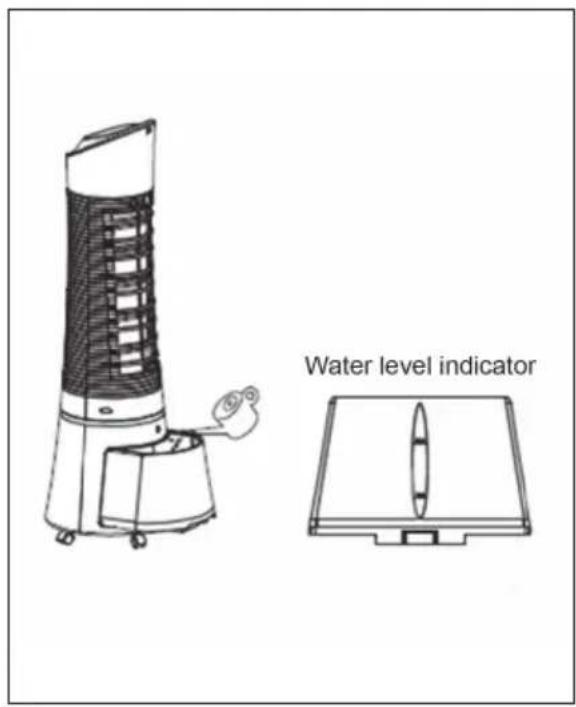
Filling the Water Tank
- Locate the water tank knob and turn it counterclockwise 90° to unlock the tank. Pull out the tank from the back of the cooler.
- Fill the tank with clean water. Pay attention to the water level indicator located on the front of the cooler to avoid overfilling the evaporative cooler. Do not fill the tank above the MAX water level line or below the MIN water level line. The approximate tank size of the unit is 6 liters.
- Push the water tank back into the rear o the unit and turn the water tank knob clockwise 90° to lock the water tank back into place.
text_image
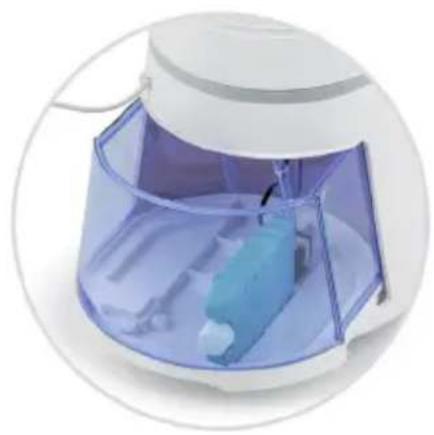
Water level indicatorUsing the Ice Pack
- The tower evaporative cooler includes an optional ice pack for added cooling.
- There is an indentation at the bottom of the tank that allows the pad to be placed on its long/narrow side, like shown in the picture.
• Alternatively, the pad can just simply be put into the watertank without any problem.
natural_image
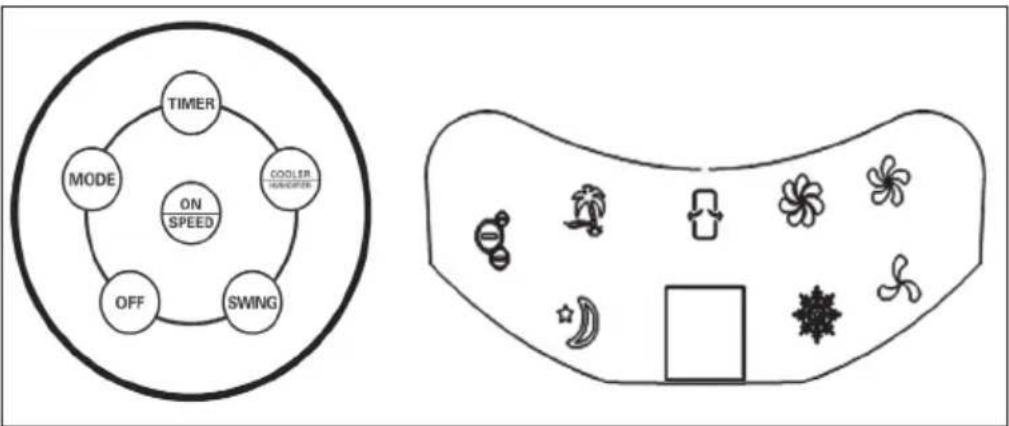
Close-up of a white electric oven with a transparent plastic cover containing a blue battery and a small white object inside (no text or symbols visible)BUTTON FUNCTIONS OF THE REMOTE CONTROL
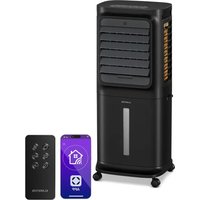
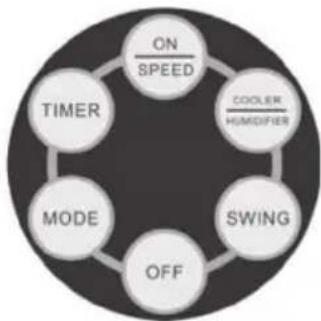
The unit is equipped with a remote control. A replacement battery is included for your convenience. To put the battery inside the remote control, insert a coin into the slot located on the back of the remote control and turn it as directed on the remote control. To use the remote control, aim it at the unit's remote control receiver and select one of the functions on the remote control. The effective distance is approximately 60 cm.
flowchart
graph TD
    A["ON SPEED"] --> B["COOLER HUMIDIFIER"]
    B --> C["SWING"]
    C --> D["OFF"]
    D --> E["MODE"]
    E --> F["TIMER"]
| ON/SPEED | Power ON and adjusts speed. |
| OFF | Power OFF. |
| TIMER | Timer function of up to 7.5 hours. |
| SWING | Oscillating air louvers. |
| COOLER/HUMIDIFYER | Controls cooling/humidification function. |
| MODE | Adjusts the airflow mode. |
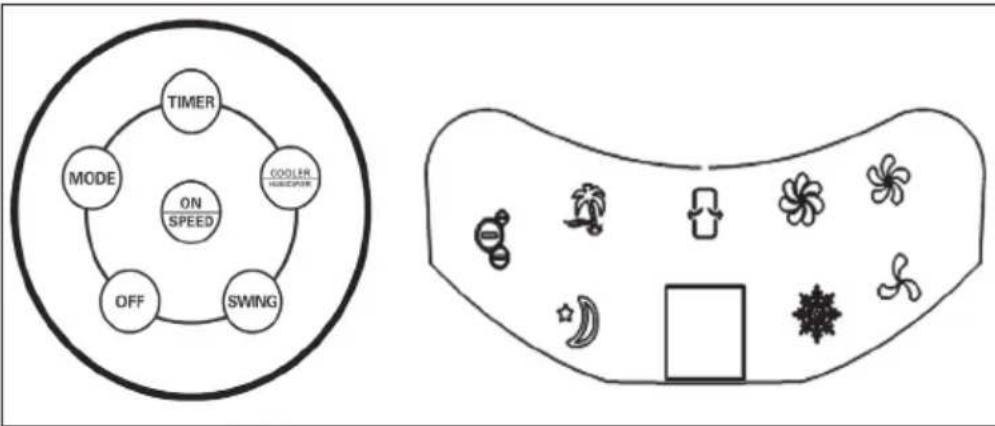
KEY FUNCTIONS AND DISPLAY INDICATORS ON THE DEVICE
flowchart
graph TD
    A["TIMER"] --> B["MODE"]
    B --> C["ON / SPEED"]
    C --> D["SWING"]
    D --> E["COOLER HISPOPER"]
    E --> F["OFF"]
    F --> A
    G["Fan Icon"] --> H["Air Icon"]
    H --> I["Bottle Icon"]
    I --> J["Air Icon"]
    J --> K["Bottle Icon"]
    K --> L["Air Icon"]
    L --> M["Bottle Icon"]
Note: The ionization function is started automatically as soon as the user switches on the unit.
| ON/SPEED & OFF | After the tank is filled with water, connect the tower evaporative cooler to a power outlet. The unit will beep twice, indicating that the cooler is in standby mode at this time. Press the ON/SPEED button to turn on the tower evaporative cooler. To adjust the fan speed, press the ON/SPEED button again until your desired speed has been reached. To turn the tower evaporative cooler off and revert back to standby mode, press the OFF button. |
| COOLER/HUMIDIFIER | After the desired fan speed has been selected, press the COOLER/HUMIDIFIER button to activate the cooling/humidifying function. This powers the water pump, cools the air and adds moisture to your air at the same time. The snowflake icon will also be visible on the display panel once the cooling/humidifying function has been selected. |
| MODE | Setting the airflow mode is optional. To set the airflow mode, press the MODE button.Manual Mode: Indicated by the three circular icons on the display panel, this allows you to set the fan speeds manually.Sleep Mode: Indicated by the moon icon on the display panel, this setting will gradually lower the fan speed at different intervals. If the fan speed is set to high, the cooler will run for 30 minutes on high speed, 30 minutes on medium speed and then continue to operate on low speed.Natural Mode – Indicated by the palm tree icon on the display panel, this setting will adjust the airflow speed between low, medium and high. |
| TIMER | This tower evaporative cooler is equipped with a 7.5 hour programmable timer. To set the timer, press the TIMER button. Each press of this button will add 0.5 hours to the set time. The set time will be indicated in the middle of the display panel. |
| SWING | To activate the oscillation feature, press the SWING button. The evaporative cooler's air louvers will automatically move from side to side, which increases air circulation and distributes air more evenly. |
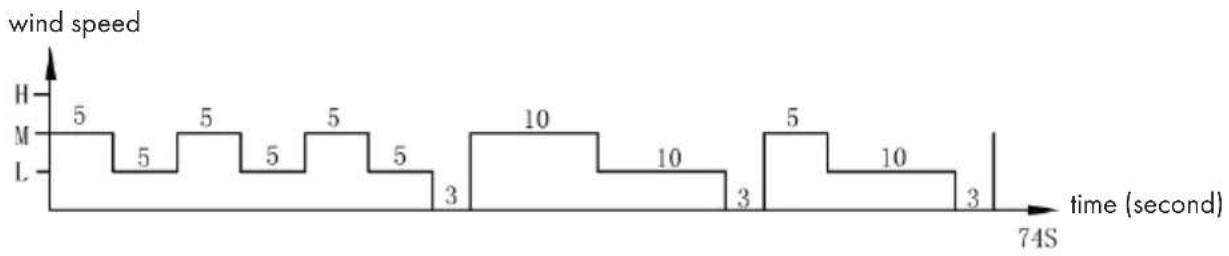
WIND PATTERN
1. Natural mode
This mode is based on the set speed. The exact wind pattern is as follows:
Natural mode in high speed

line
| Time (second) | Wind Speed | |---|---| | 0 | 5 | | 1 | 5 | | 2 | 5 | | 3 | 3 | | 4 | 10 | | 5 | 10 | | 6 | 5 | | 7 | 5 | | 8 | 3 | | 9 | 5 | | 10 | 10 | | 11 | 5 | | 12 | 5 | | 13 | 5 | 76S at start, no data shown for the entire period.Natural mode in medium speed
line
| Time (second) | Wind Speed | |---|---| | 0 | 5 | | 1 | 5 | | 2 | 5 | | 3 | 5 | | 4 | 5 | | 5 | 3 | | 6 | 10 | | 7 | 10 | | 8 | 3 | | 9 | 5 | | 10 | 10 | | 11 | 3 | | 12 | 10 | | 13 | 3 | 74S at time (second)Natural mode in low speed
line
| time (second) | wind speed | | ------------- | ---------- | | 1 | 10 | | 2 | 5 | | 3 | 10 | | 4 | 5 | | 5 | 3 | | 6 | 10 | | 7 | 5 | | 8 | 5 | | 9 | 3 | | 10 | 5 | | 11 | 5 | | 12 | 3 |Example: Wind pattern for natural mode in high speed
The motor will run in high speed at an interval of 5 seconds, in mid speed at an interval of 5 seconds, runs to low speed per 5 seconds, then stops 3 seconds without any wind.
And again the motor runs in mid speed 10 seconds, then to high speed for 10 seconds, then in mid speed 5 seconds, then runs to low speed for 5 seconds, then stops 3 seconds!
Again the motor runs to mid speed for 5 seconds, then in high speed for 10 seconds, then runs to mid speed for 5 seconds, then in low speed for 5 seconds.
The whole cycle lasts 76 seconds and is repeated continuously.
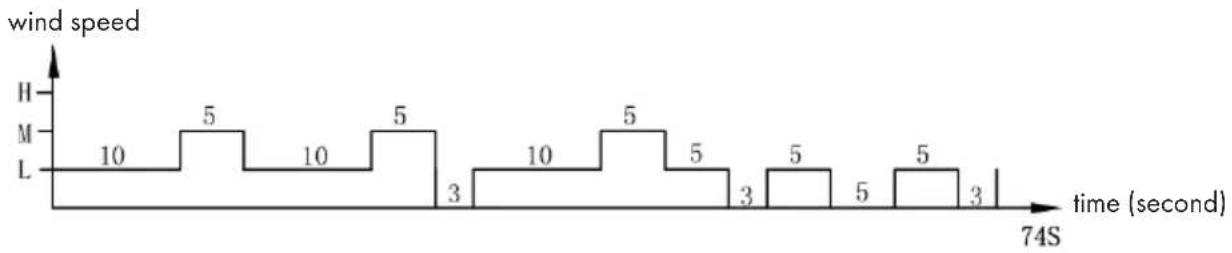
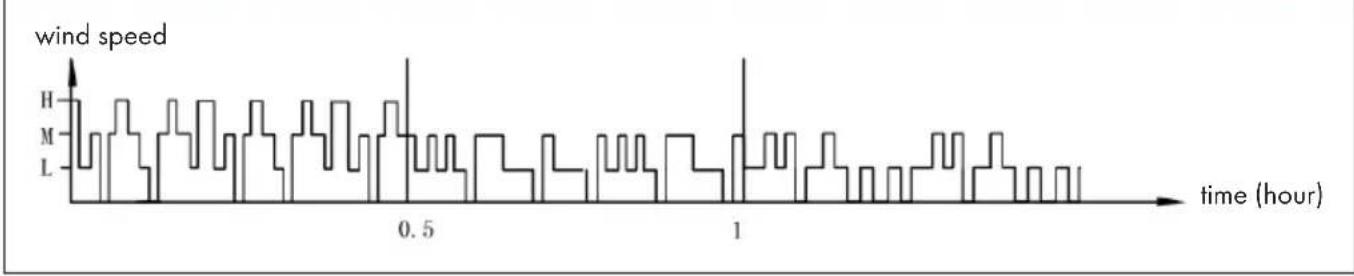
2. Night mode
In this mode, the speed is gradually reduced, depending on the set speed. The exact wind scheme is as follows:
Night mode in natural wind of high speed
line
| time (hour) | wind speed | | ----------- | ---------- | | 0.0 | H | | 0.1 | M | | 0.2 | L | | 0.3 | H | | 0.4 | M | | 0.5 | H | | 0.6 | L | | 0.7 | H | | 0.8 | M | | 0.9 | L | | 1.0 | H | | 1.1 | M | | 1.2 | L | | 1.3 | H | | 1.4 | M | | 1.5 | L | | 1.6 | H | | 1.7 | M | | 1.8 | L | | 1.9 | H | | 2.0 | M |When in night mode, for instance, if you set high speed with natural mode, the motor will run 30 minutes in high speed under natural wind mode first, then 30 minutes in mid speed under natural wind mode, then to low speed and keep this speed until the end.
Night mode in natural wind of medium speed

line
| time (hour) | wind speed | | ----------- | ---------- | | 0.0 | H | | 0.1 | M | | 0.2 | L | | 0.3 | H | | 0.4 | M | | 0.5 | H | | 0.6 | L | | 0.7 | H | | 0.8 | M | | 0.9 | L | | 1.0 | H | | 1.1 | M | | 1.2 | L | | 1.3 | H | | 1.4 | M | | 1.5 | L | | 1.6 | H | | 1.7 | M | | 1.8 | L | | 1.9 | H | | 2.0 | M | | 2.1 | L | | 2.2 | H | | 2.3 | M | | 2.4 | L | | 2.5 | H | | 2.6 | M | | 2.7 | L | | 2.8 | H | | 2.9 | M | | 3.0 | L | | 3.1 | H | | 3.2 | M | | 3.3 | L | | 3.4 | H | | 3.5 | M | | 3.6 | L | | 3.7 | H | | 3.8 | M | | 3.9 | L | | 4.0 | H | | 4.1 | M | | 4.2 | L | | 4.3 | H | | 4.4 | M | | 4.5 | L | | 4.6 | H | | 4.7 | M | | 4.8 | L | | 4.9 | H | | 5.0 | M | | 5.1 | L | | 5.2 | H | | 5.3 | M | | 5.4 | L | | 5.5 | H | | 5.6 | M | | 5.7 | L | | 5.8 | H | | 5.9 | M | | 6.0 | L | | 6.1 | H | | 6.2 | M | | 6.3 | L | | 6.4 | H | | 6.5 | M | | 6.6 | L | | 6.7 | H | | 6.8 | M | | 6.9 | L | | 7.0 | H | | 7.1 | M | | 7.2 | L | | 7.3 | H | | 7.4 | M | | 7.5 | L | | 7.6 | H | | 7.7 | M | | 7.8 | L | | 7.9 | H | | 8.0 | M | | 8.1 | L | | 8.2 | H | | 8.3 | M | | 8.4 | L | | 8.5 | H | | 8.6 | M | | 8.7 | L | | 8.8 | H | | 8.9 | M | | 9.0 | L | | 9.1 | H | | 9.2 | M | | 9.3 | L | | 9.4 | H | | 9.5 | M | | 9.6 | L | | 9.7 | H | | 9.8 | M | | 9.9 | L | | 10.0 | H | | 10.1 | M | | 10.2 | L | | 10.3 | H | | 10.4 | M | | 10.5 | L | | 10.6 | H | | 10.7 | M | | 10.8 | L | | 10.9 | H | | 11.0 | M | | 11.1 | L | | 11.2 | H | | 11.3 | M | | 11.4 | L | | 11.5 | H | | 11.6 | M | | 11.7 | L | | 11.8 | H | | 11.9 | M | | 12.0 | L | | 12.1 | H | | 12.2 | M | | 12.3 | L | | 12.4 | H | | 12.5 | M | | 12.6 | L | | 12.7 | H | | 12.8 | M | | 12.9 | L | | 13.0 | H | | 13.1 | M | | 13.2 | L | | 13.3 | H | | 13.4 | M | | 13.5 | L | | 13.6 | H | | 13.7 | M | | 13.8 | L | | 13.9 | H | | 14.0 | M | | 14.1 | L | | 14.2 | H | | 14.3 | M | | 14.4 | L | | 14.5 | H | | 14.6 | M | | 14.7 | L | | 14.8 | H | | 14.9 | M | | 15.0 | L | | 15.1 | H | | 15.2 | M | | 15.3 | L | | 15.4 | H | | 15.5 | M | | 15.6 | L | | 15.7 | H | | 15.8 | M | | 15.9 | L | | 16.0 | H | | 16.1 | M | | 16.2 | L | | 16.3 | H | | 16.4 | M | | 16.5 | L | | 16.6 | H | | 16.7 | M | | 16.8 | L | | 16.9 | H | | 17.0 | M | | 17.1 | L | | 17.2 | H | | 17.3 | M | | 17.4 | L | | 17.5 | H | | 17.6 | M | | 17.7 | L | | 17.8 | H | | 17.9 | M | | 18.0 | L | | 18.1 | H | | 18.2 | M | | 18.3 | L | | 18.4 | H | | 18.5 | M | | 18.6 | L | | 18.7 | H | | 18.8 | M | | 18.9 | L | | 19.0 | H | | 19.1 | M | | 19.2 | L | | 19.3 | H | | 19.4 | M | | 19.5 | L | | 19.6 | H | | 19.7 | M | | 19.8 | L | | 19.9 | H | | 20.0 | M | | \ | |If you set mid speed with night mode, the motor will run 30 minutes in mid speed under natural wind mode first, then to low speed and keep this speed until the end.
Night mode in natural wind of low speed

line
| time (hour) | wind speed | | ----------- | ---------- | | 0 | H | | 1 | M | | 2 | L | | 3 | H | | 4 | M | | 5 | L | | 6 | H | | 7 | M | | 8 | L | | 9 | H | | 10 | M | | 11 | L | | 12 | H | | 13 | M | | 14 | L | | 15 | H | | 16 | M | | 17 | L | | 18 | H | | 19 | M | | 20 | L | | 21 | H | | 22 | M | | 23 | L | | 24 | H | | 25 | M | | 26 | L | | 27 | H | | 28 | M | | 29 | L | | 30 | H | | 31 | M | | 32 | L | | 33 | H | | 34 | M | | 35 | L | | 36 | H | | 37 | M | | 38 | L | | 39 | H | | 40 | M | | 41 | L | | 42 | H | | 43 | M | | 44 | L | | 45 | H | | 46 | M | | 47 | L | | 48 | H | | 49 | M | | 50 | L | | 51 | H | | 52 | M | | 53 | L | | 54 | H | | 55 | M | | 56 | L | | 57 | H | | 58 | M | | 59 | L | | 60 | H | | 61 | M | | 62 | L | | 63 | H | | 64 | M | | 65 | L | | 66 | H | | 67 | M | | 68 | L | | 69 | H | | 70 | M | | 71 | L | | 72 | H | | 73 | M | | 74 | L | | 75 | H | | 76 | M | | 77 | L | | 78 | H | | 79 | M | | 80 | L | | 81 | H | | 82 | M | | 83 | L | | 84 | H | | 85 | M | | 86 | L | | 87 | H | | 88 | M | | 89 | L | | 90 | H | | 91 | M | | 92 | L | | 93 | H | | 94 | M | | 95 | L | | 96 | H | | 97 | M | | 98 | L | | 99 | H | | 100 | M |If it's low speed with night mode at the very first time, it will keep this speed all the time.
Note: It is recommended to select the low speed mode for night mode when sleeping, as this mode is intended to give the user a more comfortable feeling of wind. If you run the appliance at a high speed all the time in night mode, you may feel uncomfortable and get cold at night.
CLEANING AND CARE
- Regular cleaning and maintenance is an essential step in maintaining the longevity of your tower evaporative cooler and ensuring that it operates free of defects.
- Always unplug the evaporative cooler from the power supply before servicing or cleaning.
- Use a soft cloth and a mild soap and warm water solution to clean the unit's exterior. Do not use harsh cleaners, gasoline, paint thinner, benzene, etc., as these substances can damage the evaporative cooler. Thoroughly dry all of the cooler's parts with a soft cloth before reconnecting the unit to the power supply.
- If the evaporative cooler will not be in use for an extended period of time, place the unit back in its original carton and keep it stored in a clean, dry place.
Cleaning the Dust Filter & Cooling Pad
- The evaporative cooler's filter and cooling pad will need to be removed prior to cleaning. Once all of the different components have been cleaned, place them back into the unit in this order: water tank, cooling pad and dust filter. To prevent clogging of the dust filter, we recommend cleaning the filter at least once a month.
- To clean the dust filter, remove it from the back of the unit by pushing down on the two tabs located above the filter and pull it out. Gently scrub it with a soft brush and rinse with water. Allow it to thoroughly air dry before placing it back in the unit. To clean the cooling pad, first remove the dust filter to expose the pad. Remove the cooling pad from the back of the evaporative cooler, rinse it with clean water and allow it to thoroughly air dry before placing it back into the unit.
TROUBLESHOOTING
| Problem Possible Cause(s) | Possible Solution | |
| There is no airflow. The power cord is not plugged in. | Check to make sure the plug is plugged into an outlet. The unit should beep twice once the power supply is connected. | |
| The water tank is not locked into the unit. | ||
| The unit does not cool at all. | There is insufficient water in the tank. | Check the water level in the tank and make sure there is enough water. |
| The cooler/humidifier button was not pressed. | Press the COOLER/HUMIDIFIER button. | |
| The pump is defective. Contact customer service if there is an issue with the water pump. | ||
| Cooling is not sufficient. The cooling pad is not sufficiently saturated with water. | Wait a few minutes for the cooling pad to be fully saturated with water. | |
DISPOSAL CONSIDERATIONS

natural_image
Symbol of a trash bin crossed with a diagonal line, no text or numbers presentIf there is a legal regulation for the disposal of electrical and electronic devices in your country, this symbol on the product or on the packaging indicates that this product must not be disposed of with household waste. Instead, it must be taken to a collection point for the recycling of electrical and electronic equipment. By disposing of it in accordance with the rules, you are protecting the environment and the health of your fellow human beings from negative consequences. For information about the recycling and disposal of this product, please contact your local authority or your household waste disposal service.
This product contains batteries. If there is a legal regulation for the disposal of batteries in your country, the batteries must not be disposed of with household waste. Find out about local regulations for disposing of batteries. By disposing of them in accordance with the rules, you are protecting the environment and the health of your fellow human beings from negative consequences.
Estimado cliente:
text_image
QR code image containing encoded data, no visible human-readable textÍNDICE
Berlin Brands Group UK Ltd
PO Box 1145
Oxford, OX1 9UW
United Kingdom
natural_image
Close-up of a white electric shaver with blue internal components, enclosed in a transparent casing (no text or symbols visible)line
| Tiempo (horas) | Velocidad de la brisa | | -------------- | --------------------- | | 0.0 | H | | 0.1 | M | | 0.2 | L | | 0.3 | H | | 0.4 | M | | 0.5 | H | | 0.6 | L | | 0.7 | H | | 0.8 | M | | 0.9 | L | | 1.0 | H | | 1.1 | M | | 1.2 | L | | 1.3 | H | | 1.4 | M | | 1.5 | L | | 1.6 | H | | 1.7 | M | | 1.8 | L | | 1.9 | H | | 2.0 | M | | 2.1 | L | | 2.2 | H | | 2.3 | M | | 2.4 | L | | 2.5 | H | | 2.6 | M | | 2.7 | L | | 2.8 | H | | 2.9 | M | | 3.0 | L | | 3.1 | H | | 3.2 | M | | 3.3 | L | | 3.4 | H | | 3.5 | M | | 3.6 | L | | 3.7 | H | | 3.8 | M | | 3.9 | L | | 4.0 | H | | 4.1 | M | | 4.2 | L | | 4.3 | H | | 4.4 | M | | 4.5 | L | | 4.6 | H | | 4.7 | M | | 4.8 | L | | 4.9 | H | | 5.0 | M | | 5.1 | L | | 5.2 | H | | 5.3 | M | | 5.4 | L | | 5.5 | H | | 5.6 | M | | 5.7 | L | | 5.8 | H | | 5.9 | M | | 6.0 | L | | 6.1 | H | | 6.2 | M | | 6.3 | L | | 6.4 | H | | 6.5 | M | | 6.6 | L | | 6.7 | H | | 6.8 | M | | 6.9 | L | | 7.0 | H | | 7.1 | M | | 7.2 | L | | 7.3 | H | | 7.4 | M | | 7.5 | L | | 7.6 | H | | 7.7 | M | | 7.8 | L | | 7.9 | H | | 8.0 | M | | 8.1 | L | | 8.2 | H | | 8.3 | M | | 8.4 | L | | 8.5 | H | | 8.6 | M | | 8.7 | L | | 8.8 | H | | 8.9 | M | | 9.0 | L | | 9.1 | H | | 9.2 | M | | 9.3 | L | | 9.4 | H | | 9.5 | M | | 9.6 | L | | 9.7 | H | | 9.8 | M | | 9.9 | L | | 10.0 | H |natural_image
Symbol of a trash bin crossed out by a diagonal line, with no text or labels present.text_image
QR code image containing encoded data, no visible human-readable textSOMMAIRE
Berlin Brands Group UK Ltd
PO Box 1145
Oxford, OX1 9UW
United Kingdom
CONSIGNES DE SÉCURITÉ
natural_image
Close-up of a white industrial machine with transparent lid and internal blue plastic component (no visible text or symbols)FONCTIONS DES BOUTONS DE LA TÉLÉCOMMANDE
flowchart
graph TD
    A["TIMER"] --> B["MODE"]
    B --> C["ON / SPEED"]
    C --> D["COOLER / SPEED"]
    D --> E["SWING"]
    E --> F["OFF"]
    F --> G["Top Row Icon with icons like wings, stars, flowers, and door"]
line
| Temps (heures) | Voltage (Vitesse du vent) | | -------------- | ------------------------- | | 0 | H | | 1 | M | | 2 | L | | 3 | H | | 4 | M | | 5 | L | | 6 | H | | 7 | M | | 8 | L | | 9 | H | | 10 | M | | 11 | L | | 12 | H | | 13 | M | | 14 | L | | 15 | H | | 16 | M | | 17 | L | | 18 | H | | 19 | M | | 20 | L | | 21 | H | | 22 | M | | 23 | L | | 24 | H | | 25 | M | | 26 | L | | 27 | H | | 28 | M | | 29 | L | | 30 | H | | 31 | M | | 32 | L | | 33 | H | | 34 | M | | 35 | L | | 36 | H | | 37 | M | | 38 | L | | 39 | H | | 40 | M | | 41 | L | | 42 | H | | 43 | M | | 44 | L | | 45 | H | | 46 | M | | 47 | L | | 48 | H | | 49 | M | | 50 | L | | 51 | H | | 52 | M | | 53 | L | | 54 | H | | 55 | M | | 56 | L | | 57 | H | | 58 | M | | 59 | L | | 60 | H | | 61 | M | | 62 | L | | 63 | H | | 64 | M | | 65 | L | | 66 | H | | 67 | M | | 68 | L | | 69 | H | | 70 | M | | 71 | L | | 72 | H | | 73 | M | | 74 | L | | 75 | H | | 76 | M | | 77 | L | | 78 | H | | 79 | M | | 80 | L | | 81 | H | | 82 | M | | 83 | L | | 84 | H | | 85 | M | | 86 | L | | 87 | H | | 88 | M | | 89 | L | | 90 | H | | 91 | M | | 92 | L | | 93 | H | | 94 | M | | 95 | L | | 96 | H | | 97 | M | | 98 | L | | 99 | H | | 100 | M |natural_image
Symbol of a trash bin crossed with a diagonal line, no text or numbers presenttext_image
QR code image containing encoded data, no visible human-readable textINDICE
PRODUTTORE E IMPORTATORE (UK)
Produttore:
Chal-Tec GmbH, Wallstraße 16, 10179 Berlino, Germania.
Berlin Brands Group UK Ltd
PO Box 1145
Oxford, OX1 9UW
United Kingdom
AVVERTENZE DI SICUREZZA
ACCENSIONE E UTILIZZO
natural_image
Interior view of a white appliance with transparent lid and blue plastic container (no visible text or symbols)FUNZIONI DEI PULSANTI SUL TELECOMANDO
flowchart
graph TD
    subgraph Left_Circle
        Timer["Timer"]
        MODE["MODE"]
        ON["ON SPEED"]
        OFF["OFF"]
        SWING["SWING"]
        Timer --> ON
        Mode --> ON
        Off --> ON
        Timer --> COOLER["COOLER SPEED"]
        Off --> SWING
    end
    subgraph Right_Circle
        Speed["Speed Control Icon"] --> Home["Home Placement Icon"]
        Speed --> Air["Air Icon"]
        Speed --> Wind["Bright Wind Icon"]
        Speed --> Power["Air Power Icon"]
        Speed --> Solar["Air Solar Icon"]
        Speed --> Air["Air Air Icon"]
    end
natural_image
Symbol of a trash bin crossed with a diagonal line, no text or numbers presenttext_image
QR code image containing encoded data, no visible human-readable textINHOUDSOPGAVE
Berlin Brands Group UK Ltd
PO Box 1145
Oxford, OX1 9UW
Verenigd Koninkrijk
VEILIGHEIDSINSTRUCTIES
natural_image
Interior view of a white appliance with a transparent plastic cover containing a blue and white object (no text or symbols visible)FUNCTIES VAN DE KNOPPEN VAN DE AFSTANDSBEDIENING
flowchart
graph TD
    A["TIMER"] --> B["MODE"]
    B --> C["ON / SPEED"]
    C --> D["SWING"]
    D --> E["OFF"]
    E --> F["COOLER NOODDER"]
    F --> G["FLUORATOR"]
    G --> H["FLUORATOR"]
    H --> I["FLUORATOR"]
    I --> J["FLUORATOR"]
    J --> K["FLUORATOR"]
    K --> L["FLUORATOR"]
    L --> M["FLUORATOR"]
    M --> N["FLUORATOR"]
    N --> O["FLUORATOR"]
    O --> P["FLUORATOR"]
    P --> Q["FLUORATOR"]
    Q --> R["FLUORATOR"]
    R --> S["FLUORATOR"]
    S --> T["FLUORATOR"]
    T --> U["FLUORATOR"]
    U --> V["FLUORATOR"]
    V --> W["FLUORATOR"]
    W --> X["FLUORATOR"]
    X --> Y["FLUORATOR"]
TOETSFUNCTIONS EN
DISPLAY-AANDUIDINGEN OP HET APPARAAT
line
| Tijd (our) | Ventilatiesnelheid | | ---------- | ------------------ | | 0.0 | H | | 0.1 | M | | 0.2 | L | | 0.3 | H | | 0.4 | M | | 0.5 | H | | 0.6 | L | | 0.7 | H | | 0.8 | M | | 0.9 | L | | 1.0 | H | | 1.1 | M | | 1.2 | L | | 1.3 | H | | 1.4 | M | | 1.5 | L |line
| Tijd (uur) | Ventilatiesnelheid | | ---------- | ------------------ | | 0 | H | | 1 | M | | 2 | L | | 3 | H | | 4 | M | | 5 | L | | 6 | H | | 7 | M | | 8 | L | | 9 | H | | 10 | M | | 11 | L | | 12 | H | | 13 | M | | 14 | L | | 15 | H | | 16 | M | | 17 | L | | 18 | H | | 19 | M | | 20 | L | | 21 | H | | 22 | M | | 23 | L | | 24 | H | | 25 | M | | 26 | L | | 27 | H | | 28 | M | | 29 | L | | 30 | H | | 31 | M | | 32 | L | | 33 | H | | 34 | M | | 35 | L | | 36 | H | | 37 | M | | 38 | L | | 39 | H | | 40 | M | | 41 | L | | 42 | H | | 43 | M | | 44 | L | | 45 | H | | 46 | M | | 47 | L | | 48 | H | | 49 | M | | 50 | L | | 51 | H | | 52 | M | | 53 | L | | 54 | H | | 55 | M | | 56 | L | | 57 | H | | 58 | M | | 59 | L | | 60 | H | | 61 | M | | 62 | L | | 63 | H | | 64 | M | | 65 | L | | 66 | H | | 67 | M | | 68 | L | | 69 | H | | 70 | M | | 71 | L | | 72 | H | | 73 | M | | 74 | L | | 75 | H | | 76 | M | | 77 | L | | 78 | H | | 79 | M | | 80 | L | | 81 | H | | 82 | M | | 83 | L | | 84 | H | | 85 | M | | 86 | L | | 87 | H | | 88 | M | | 89 | L | | 90 | H | | 91 | M | | 92 | L | | 93 | H | | 94 | M | | 95 | L | | 96 | H | | 97 | M | | 98 | L | | 99 | H | | 100 | M |line
| Tijd (uur) | Ventilatiesnelheid | | ---------- | ------------------ | | 0 | H | | 1 | M | | 2 | L | | 3 | H | | 4 | M | | 5 | L | | 6 | H | | 7 | M | | 8 | L | | 9 | H | | 10 | M | | 11 | L | | 12 | H | | 13 | M | | 14 | L | | 15 | H | | 16 | M | | 17 | L | | 18 | H | | 19 | M | | 20 | L | | 21 | H | | 22 | M | | 23 | L | | 24 | H | | 25 | M | | 26 | L | | 27 | H | | 28 | M | | 29 | L | | 30 | H | | 31 | M | | 32 | L | | 33 | H | | 34 | M | | 35 | L | | 36 | H | | 37 | M | | 38 | L | | 39 | H | | 40 | M | | 41 | L | | 42 | H | | 43 | M | | 44 | L | | 45 | H | | 46 | M | | 47 | L | | 48 | H | | 49 | M | | 50 | L | | 51 | H | | 52 | M | | 53 | L | | 54 | H | | 55 | M | | 56 | L | | 57 | H | | 58 | M | | 59 | L | | 60 | H | | 61 | M | | 62 | L | | 63 | H | | 64 | M | | 65 | L | | 66 | H | | 67 | M | | 68 | L | | 69 | H | | 70 | M | | 71 | L | | 72 | H | | 73 | M | | 74 | L | | 75 | H | | 76 | M | | 77 | L | | 78 | H | | 79 | M | | 80 | L | | 81 | H | | 82 | M | | 83 | L | | 84 | H | | 85 | M | | 86 | L | | 87 | H | | 88 | M | | 89 | L | | 90 | H | | 91 | M | | 92 | L | | 93 | H | | 94 | M | | 95 | L | | 96 | H | | 97 | M | | 98 | L | | 99 | H | | 100 | M |INSTRUCTIES VOOR AFVOER
natural_image
Symbol of a trash bin crossed with a diagonal line, no text or numbers presenttext_image
QR code image containing encoded data, no visible human-readable textINNEHÅLLSFÖRTECKNING
Berlin Brands Group UK Ltd
PO Box 1145
Oxford, OX1 9UW
United Kingdom
SÄKERHETSHÄNVISNINGAR
natural_image
Close-up of a white industrial machine with transparent internal casing and blue internal component (no visible text or symbols)FUNKTIONER HOS FJÄRRKONTROLLENS KNAPPAR
line
| Tid (timme) | Vindhastighet | | ----------- | ------------- | | 0.0 | H | | 0.1 | M | | 0.2 | L | | 0.3 | H | | 0.4 | M | | 0.5 | H | | 0.6 | L | | 0.7 | H | | 0.8 | M | | 0.9 | L | | 1.0 | H | | 1.1 | M | | 1.2 | L | | 1.3 | H | | 1.4 | M | | 1.5 | L | | 1.6 | H | | 1.7 | M | | 1.8 | L | | 1.9 | H | | 2.0 | M |line
| Time (min) | Value | | ---------- | ----- | | 0 | H | | 1 | M | | 2 | L | | 3 | H | | 4 | M | | 5 | L | | 6 | H | | 7 | M | | 8 | L | | 9 | H | | 10 | M | | 11 | L | | 12 | H | | 13 | M | | 14 | L | | 15 | H | | 16 | M | | 17 | L | | 18 | H | | 19 | M | | 20 | L | | 21 | H | | 22 | M | | 23 | L | | 24 | H | | 25 | M | | 26 | L | | 27 | H | | 28 | M | | 29 | L | | 30 | H | | 31 | M | | 32 | L | | 33 | H | | 34 | M | | 35 | L | | 36 | H | | 37 | M | | 38 | L | | 39 | H | | 40 | M | | 41 | L | | 42 | H | | 43 | M | | 44 | L | | 45 | H | | 46 | M | | 47 | L | | 48 | H | | 49 | M | | 50 | L | | 51 | H | | 52 | M | | 53 | L | | 54 | H | | 55 | M | | 56 | L | | 57 | H | | 58 | M | | 59 | L | | 60 | H | | 61 | M | | 62 | L | | 63 | H | | 64 | M | | 65 | L | | 66 | H | | 67 | M | | 68 | L | | 69 | H | | 70 | M | | 71 | L | | 72 | H | | 73 | M | | 74 | L | | 75 | H | | 76 | M | | 77 | L | | 78 | H | | 79 | M | | 80 | L | | 81 | H | | 82 | M | | 83 | L | | 84 | H | | 85 | M | | 86 | L | | 87 | H | | 88 | M | | 89 | L | | 90 | H | | 91 | M | | 92 | L | | 93 | H | | 94 | M | | 95 | L | | 96 | H | | 97 | M | | 98 | L | | 99 | H | | 100 | M |natural_image
Symbol of a trash bin crossed with a diagonal line, no text or numbers presenttext_image
QR code image containing encoded data, no visible human-readable textSISÄLLYSLUETTELO
Chal-Tec GmbH, Wallstraße 16, 10179 Berlin, Germany.
Maahantuoja Isoon-Britanniaan:
Berlin Brands Group UK Ltd
PO Box 1145
Oxford, OX1 9UW
United Kingdom
TURVALLISUUSOHJEET
natural_image
Close-up of a white appliance with a transparent lid and internal blue components (no visible text or symbols)KAUKOSÄÄTIMEN NÄPPÄINTOIMINNOT
NÄPPÄINTOIMINNOT JA NÄYTÖN MERKINNÄT LAITTEESSA
flowchart
graph TD
    A["TIMER"] --> B["MODE"]
    B --> C["ON SPEED"]
    C --> D["SWING"]
    D --> E["OFF"]
    E --> F["COOLER HENDER"]
    F --> G["风扇图标"]
    G --> H["风扇图标"]
    H --> I["风扇图标"]
    I --> J["风扇图标"]
    J --> K["风扇图标"]
    K --> L["风扇图标"]
    L --> M["风扇图标"]
    M --> N["风扇图标"]
    N --> O["风扇图标"]
    O --> P["风扇图标"]
    P --> Q["风扇图标"]
    Q --> R["风扇图标"]
    R --> S["风扇图标"]
    S --> T["风扇图标"]
    T --> U["风扇图标"]
    U --> V["风扇图标"]
line
| Aika (tunti) | Value | | ------------ | ----- | | 0.0 | H | | 0.1 | M | | 0.2 | L | | 0.3 | H | | 0.4 | M | | 0.5 | H | | 0.6 | L | | 0.7 | H | | 0.8 | M | | 0.9 | L | | 1.0 | H | | 1.1 | M | | 1.2 | L | | 1.3 | H | | 1.4 | M | | 1.5 | L | | 1.6 | H | | 1.7 | M | | 1.8 | L | | 1.9 | H | | 2.0 | M | | 2.1 | L | | 2.2 | H | | 2.3 | M | | 2.4 | L | | 2.5 | H | | 2.6 | M | | 2.7 | L | | 2.8 | H | | 2.9 | M | | 3.0 | L | | 3.1 | H | | 3.2 | M | | 3.3 | L | | 3.4 | H | | 3.5 | M | | 3.6 | L | | 3.7 | H | | 3.8 | M | | 3.9 | L | | 4.0 | H | | 4.1 | M | | 4.2 | L | | 4.3 | H | | 4.4 | M | | 4.5 | L | | 4.6 | H | | 4.7 | M | | 4.8 | L | | 4.9 | H | | 5.0 | M | | 5.1 | L | | 5.2 | H | | 5.3 | M | | 5.4 | L | | 5.5 | H | | 5.6 | M | | 5.7 | L | | 5.8 | H | | 5.9 | M | | 6.0 | L | | 6.1 | H | | 6.2 | M | | 6.3 | L | | 6.4 | H | | 6.5 | M | | 6.6 | L | | 6.7 | H | | 6.8 | M | | 6.9 | L | | 7.0 | H | | 7.1 | M | | 7.2 | L | | 7.3 | H | | 7.4 | M | | 7.5 | L | | 7.6 | H | | 7.7 | M | | 7.8 | L | | 7.9 | H | | 8.0 | M | | 8.1 | L | | 8.2 | H | | 8.3 | M | | 8.4 | L | | 8.5 | H | | 8.6 | M | | 8.7 | L | | 8.8 | H | | 8.9 | M | | 9.0 | L | | 9.1 | H | | 9.2 | M | | 9.3 | L | | 9.4 | H | | 9.5 | M | | 9.6 | L | | 9.7 | H | | 9.8 | M | | 9.9 | L | | 10.0 | H | | 10.1 | M | | 10.2 | L | | 10.3 | H | | 10.4 | M | | 10.5 | L | | 10.6 | H | | 10.7 | M | | 10.8 | L | | 10.9 | H | | 11.0 | M | | 11.1 | L | | 11.2 | H | | 11.3 | M | | 11.4 | L | | 11.5 | H | | 11.6 | M | | 11.7 | L | | 11.8 | H | | 11.9 | M | | 12.0 | L | | 12.1 | H | | 12.2 | M | | 12.3 | L | | 12.4 | H | | 12.5 | M | | 12.6 | L | | 12.7 | H | | 12.8 | M | | 12.9 | L | | 13.0 | H | | 13.1 | M | | 13.2 | L | | 13.3 | H | | 13.4 | M | | 13.5 | L | | 13.6 | H | | 13.7 | M | | 13.8 | L | | 13.9 | H | | 14.0 | M | | 14.1 | L | | 14.2 | H | | 14.3 | M | | 14.4 | L | | 14.5 | H | | 14.6 | M | | 14.7 | L | | 14.8 | H | | 14.9 | M | | 15.0 | L | | 15.1 | H | | 15.2 | M | | 15.3 | L | | 15.4 | H | | 15.5 | M | | 15.6 | L | | 15.7 | H | | 15.8 | M | | 15.9 | L | | 16.0 | H | | 16.1 | M | | 16.2 | L | | 16.3 | H | | 16.4 | M | | 16.5 | L | | 16.6 | H | | 16.7 | M | | 16.8 | L | | 16.9 | H | | 17.0 | M | | 17.1 | L | | 17.2 | H | | 17.3 | M | | 17.4 | L | | 17.5 | H | | 17.6 | M | | 17.7 | L | | 17.8 | H | | 17.9 | M | | 18.0 | L | | 18.1 | H | | 18.2 | M | | 18.3 | L | | 18.4 | H | | 18.5 | M | | 18.6 | L | | 18.7 | H | | 18.8 | M | | 18.9 | L | | 19.0 | H | | 19.1 | M | | 19.2 | L | | 19.3 | H | | 19.4 | M | | 19.5 | L | | 19.6 | H | | 19.7 | M | | 19.8 | L | | 19.9 | H | | nan | |natural_image
Symbol of a trash bin crossed with a diagonal line, no text or numbers presentbar
| Category | Value | |---|---| | Category 1 | 100 | | Category 2 | 100 | | Category 3 | 100 | | Category 4 | 100 | | Category 5 | 100 | | Category 6 | 100 | | Category 7 | 100 | | Category 8 | 100 | | Category 9 | 100 | | Category 10 | 100 | | Category 11 | 100 | | Category 12 | 100 | | Category 13 | 100 | | Category 14 | 100 | | Category 15 | 100 | | Category 16 | 100 | | Category 17 | 100 | | Category 18 | 100 | | Category 19 | 100 | | Category 20 | 100 | | Category 21 | 100 | | Category 22 | 100 | | Category 23 | 100 | | Category 24 | 100 | | Category 25 | 100 | | Category 26 | 100 | | Category 27 | 100 | | Category 28 | 100 | | Category 29 | 100 | | Category 30 | 100 | | Category 31 | 100 | | Category 32 | 100 | | Category 33 | 100 | | Category 34 | 100 | | Category 35 | 100 | | Category 36 | 100 | | Category 37 | 100 | | Category 38 | 100 | | Category 39 | 100 | | Category 40 | 100 | | Category 41 | 100 | | Category 42 | 100 | | Category 43 | 100 | | Category 44 | 100 | | Category 45 | 100 | | Category 46 | 100 | | Category 47 | 100 | | Category 48 | 100 | | Category 49 | 100 | | Category 50 | 100 | | Category 51 | 100 | | Category 52 | 100 | | Category 53 | 100 | | Category 54 | 100 | | Category 55 | 100 | | Category 56 | 100 | | Category 57 | 100 | | Category 58 | 100 | | Category 59 | 100 | | Category 60 | 100 | | Category 61 | 100 | | Category 62 | 100 | | Category 63 | 100 | | Category 64 | 100 | | Category 65 | 100 | | Category 66 | 100 | | Category 67 | 100 | | Category 68 | 100 | | Category 69 | 100 | | Category 70 | 100 | | Category 71 | 100 | | Category 72 | 100 | | Category 73 | 100 | | Category 74 | 100 | | Category 75 | 100 | | Category 76 | 100 | | Category 77 | 100 | | Category 78 | 100 | | Category 79 | 100 | | Category 80 | 100 | | Category 81 | 100 | | Category 82 | 100 | | Category 83 | 100 | | Category 84 | 100 | | Category 85 | 100 | | Category 86 | 100 | | Category 87 | 100 | | Category 88 | 100 | | Category 89 | 100 | | Category 90 | 100 | | Category 91 | 100 | | Category 92 | 100 | | Category 93 | 100 | | Category 94 | 100 | | Category 95 | 100 | | Category 96 | 100 | | Category 97 | 100 | | Category 98 | 100 | | Category 99 | 100 | | Total (Total) = [sum of bars] / [values] * (sum of bars + bars) * (sum of bars + bars) * (sum of bars + bars) * (sum of bars + bars) * (sum of bars + bars) * (sum of bars + bars) * (sum of bars + bars) * (sum of bars + bars) * (sum of bars + bars) * (sum of bars + bars) * (sum of bars + bars) * (sum of bars + bars) * (sum of bars + bars) * (sum in brackets) * (sum in brackets) * (sum in brackets) * (sum in brackets) * (sum in brackets) * (sum in brackets) * (sum in brackets) * (sum in brackets) * (sum in brackets) * (sum in brackets) * (sum in brackets) * (sum in brackets) * (sum in brackets) * (sum in brackets) * (sum in brackets) * (sum in brackets) * (sum in brackets) * (total).* (sum in brackets) * (sum in brackets) * (sum in brackets) * (sum in brackets) * (sum in brackets) * (sum in brackets) * (sum in brackets) * (sum in brackets) * (sum in brackets) * (sum in brackets) * (sum in brackets) * (sum in brackets) * (total).* (sum in brackets) * (sum in brackets) * (sum in brackets) * (sum in brackets)