Mydrive - Car seat Foppapedretti - Free user manual and instructions
Find the device manual for free Mydrive Foppapedretti in PDF.
| Product type | Child car seat |
| Brand | Foppapedretti |
| Model | Mydrive |
| Standard | ECE R44-04 |
| Weight groups | Group 0+: 0-13 kg; Group 1: 9-18 kg |
| Orientation | Group 0+: rearward-facing; Group 1: forward-facing |
| Installation | Vehicle 3-point seat belt |
| Recline adjustment | 4 positions (Group 0+: position 4 only; Group 1: positions 1-3) |
| Harness adjustment | Multi-level shoulder strap height adjustment; strap tightening |
| Buckle | With red release button |
| Protections | Chest pads, crotch strap, headrest reducer |
| Belt locking device | Integrated for diagonal belt |
| Materials | Plastic, fabric (removable cover) |
| Cover maintenance | Hand wash at max 30°C; do not use bleach, do not tumble dry, do not iron |
| Plastic parts cleaning | Damp sponge, air dry |
| Safety | Do not use on seat with active airbag; harness tight (1 cm slack); replace after accident |
| Warranty | 12 months (manufacturer's conventional warranty) |
| Service life | Recommended replacement after 6 years or after an accident |
| Vehicle compatibility | Seats with UN/ECE No. 16 or equivalent approved 3-point belt |
| Included accessories | Large reducer (gr. 0+/1), small reducer (gr. 0+), chest pads, crotch strap |
Frequently Asked Questions - Mydrive Foppapedretti
User questions about Mydrive Foppapedretti
0 question about this device. Answer the ones you know or ask your own.
Ask a new question about this device
Download the instructions for your Car seat in PDF format for free! Find your manual Mydrive - Foppapedretti and take your electronic device back in hand. On this page are published all the documents necessary for the use of your device. Mydrive by Foppapedretti.
USER MANUAL Mydrive Foppapedretti
natural_image
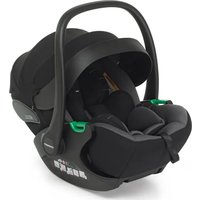
Modern baby car seat with gray and white design, no visible text or symbolsEN CAR SEAT - Assembly instructions
Complies with ECE R44-04
FR SIÈGE-AUTO – Instructions de montage
EN. IMPORTANT! READ THE INSTRUCTIONS CAREFULLY AND KEEP FOR FUTURE REFERENCE
FR. IMPORTANT! LIRE ATTENTIVEMENT ET CONSERVER SOIGNEUSEMENT A PORTEE DE MAIN POUR UNE UTILISATION ULTERIEURE
ES. IMPORTANTE! LEER ATENTAMENTE Y CONSERVAR PARA FUTURAS REFERENCIAS
PT. IMPORTANTE! LER ATENTAMENTE E GUARDAR PARA FUTURA CONSULTA
natural_image
Technical line drawing of a mechanical device with internal components and mounting holes (no text or symbols)text_image
Diagram showing car seatbelt with red X and ✓ symbols indicating absence or check, likely for safety or inspection purposes.text_image
Diagram of a car with multiple lanes and marked inspection points, including red checkmarks and question marksnatural_image
Illustration of hands adjusting a seatbelt with red arrows indicating force or pressure points (no text or symbols)Fig. 1
text_image
CLICKFig. 2
natural_image
Diagram of a car seatbelt buckle assembly with a red arrow indicating the grip (no text or symbols present)Fig. 3
text_image
Illustration showing a child in a safety harness being lifted, with a magnified inset highlighting the seatbelt mechanism.Allentare l'imbracatura
natural_image
Illustration of a baby wearing a full-body safety harness, holding a medical device with a red arrow indicating force (no text or symbols)natural_image
Diagram of a mechanical or structural assembly with no visible text, numbers, or symbols.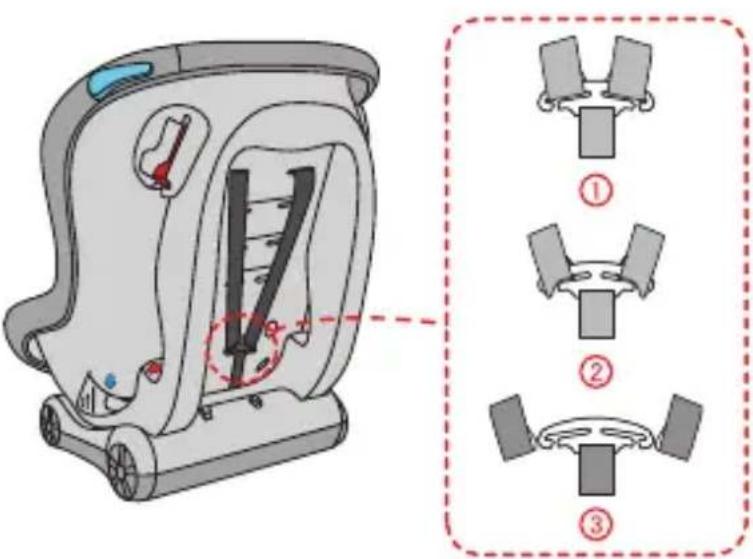
text_image
Diagram of a car seatbelt device with three labeled parts and a highlighted section showing internal structure.text_image
Diagram of a mechanical component with labeled parts A, B, and CLINO AUTO
text_image
Diagram of a mechanical or structural assembly with labeled components D and E, likely illustrating a gear or linkage mechanism.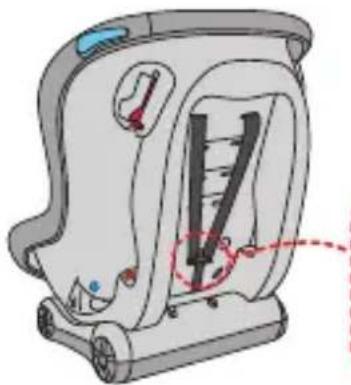
natural_image
Mechanical device diagram showing internal components and a red dashed circle highlighting a specific section (no text or symbols present)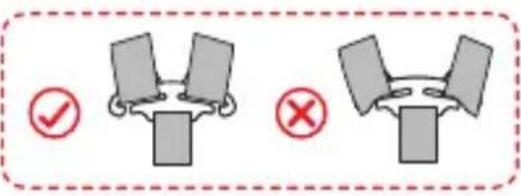
text_image
Diagram showing two identical configurations of a table with check and cross icons, indicating selection or cancellation.natural_image
Illustration of a red fire extinguisher inside a vehicle, with a magnified inset showing the internal components (no text or symbols)natural_image
Illustration of a car seat with highlighted seat area and red dashed line indicating a specific point (no text or symbols present)
text_image
OPEN
natural_image
Illustration of a hand holding a red object over a curved surface, with no visible text or symbols.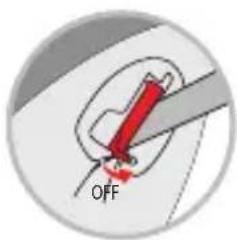
text_image
OFFFig.1 Fig.2 Fig.3
text_image
Diagram of car seat assembly with directional arrows and a warning label showing '4 NO' in a circular inset.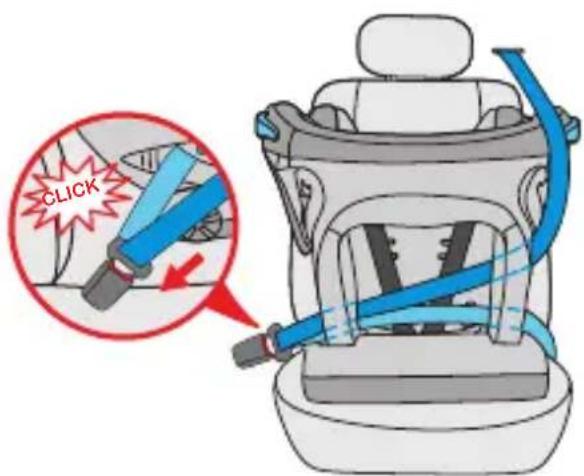
text_image
CLICKtext_image
Diagram illustrating car seatbelt usage with blue bandages and red arrows indicating force directionsEL SEGGIOLINO AUTO
text_image
Diagram illustrating car seatbelt usage with blue and red arrows indicating force or movement, showing a highlighted section of the seat.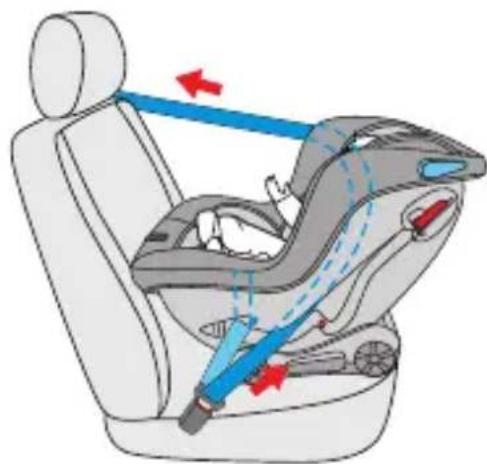
natural_image
Diagram of a car seatbelt with blue arrows indicating force or movement, showing no text or symbolstext_image
Diagram showing car seatbelt buckle assembly with numbered instructions and directional arrows indicating movementnatural_image
Illustration of a car seat assembly with red belt and arrows indicating force or movement (no text or symbols)
natural_image
Illustration of a car seat with red arrows indicating seat movement and a magnified inset showing the cable being inserted (no text or symbols present)natural_image
Illustration of a child in a car seat with red safety stripes, no text or symbols presentCar seat components PAG 22
2.1 Installing the car seat in the vehicle PAG 23
2.2 Checking the height of the straps PAG 23
2.3 Using the buckle PAG 24
2.4 Adjusting and using the harness PAG 24
2.5 Adjusting the inclination of the car seat PAG 25
2.6 Adjusting the height of the straps PAG 26
2.7 Removing the protective crotch padding and the buckle PAG 27
2.8 Using the locking device PAG 27
-
Installing the car seat PAG 28
-
Maintenance and cleaning PAG 31
Conventional warranty PAG 32
IMPORTANT NOTES
- This is a “universal” child restraint system. It is approved under regulation no.44, series of amendments 04, and is intended for general use on vehicles. It can be adapted to most vehicle seats, but not at all.
- The restraint system can be installed correctly if the manufacturer has declared in the vehicle manual that the vehicle can be equipped with a “universal” type restraint system for children in this age group.
- The child restraint system has been classified as "universal" under more stringent conditions than those applied to previous versions which do not have this notice.
- If in doubt, contact the manufacturer of the restraint system, or the retailer.
Can only be installed in vehicles equipped with three-point seat belts, approved according to UN/ECE Regulation no.16 or other equivalent standards.
SAFETY WARNINGS
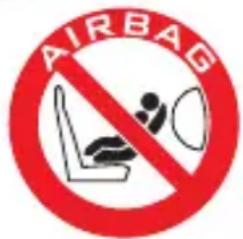
WARNING: DO NOT install the car seat in the rear-facing position on front passenger seats equipped with active airbags. This could result in SERIOUS INJURY OR EVEN DEATH.
text_image
AIRBAGFor the safety of the child, please read the instructions carefully before use and keep them for future reference. Failure to follow these warnings can result in serious injury to the child.
- This car seat can only be used for children weighing less than 18 kg (group 0+, weighing less than 13 kg; group 1, weighing between 9 and 18 kg).
- This car seat can be installed in a forward- or rear-facing position by using a 3-point lap and diagonal seat belt.
- Important: Do not install the car seat in the forward-facing position until the child has reached a weight exceeding 9 kg.
- These instructions can be stored in the special compartment on the car seat during the period of use.
- Do not use the car seat in the house. It has not been designed for domestic use and must only be used in the car.
WARNINGS
• Do not leave your children unattended in the car seat.
- Do not install the car seat in the rear-facing position on front passenger seats equipped with active airbags. This can cause death or serious injury.
- If the car seat has been subjected to violent stresses following an accident, it must be replaced.
- For safety reasons, when inside the car, the car seat must be secured using the three-point seat belt, even if it is not being used.
• Always check that the belts on the child restraint are tight and the straps not twisted, and that they are properly adjusted according to the size of the child.
- Make sure that the lap belt is positioned as low as possible so that the sides are properly secured in the event of stress.
- Do not use anchoring points other than those listed in these instructions and shown on the child restraint system.
- Immobilise any luggage or objects that may cause injury in the event of an accident.
- The rigid and plastic components on the child restraint must be positioned and secured so as not to get trapped between the passenger seats or in a door during daily use of the product.
- Always fasten the seat belts to your child to prevent them from falling out of the car seat.
- Any alteration or modification to the device, without prior permission from the competent authority, or any improper use of the device, may cause hazards.
- This seat is designed for children from birth up to 18 kg. Never overload the car seat by making more than one child sit in it or by placing additional weights on it.
- Do not use the car seat without the lining.
- Do not replace the car seat lining with another one that has not been approved by the manufacturer, as the lining is an integral part of the child restraint system.
- Remove the child from the car seat before adjusting any of its mobile or adjustable parts.
- NEVER leave the child placed in the seat while the car is parked, particularly if it is exposed to direct sunlight or on a hot day.
- NEVER leave the car seat exposed to the sun for hours as this could be dangerous for your child: the metal and plastic parts may get hot. The fabric could fade. Cover the car seat with a towel if the car is parked in the sun.
- Never use the product second-hand because the details of its previous use are unknown.
CAR SEAT COMPONENTS

text_image
Headrest reducer for large model (gr. 0+/1) and for small model (gr. 0+) Chest protectors Reducer Crotch protection Harness adjustment device (under the lining) Harness adjustment strap Backrest Buckle Lap belt loop for group 1 Lap belt loop for group 0+ Recline handle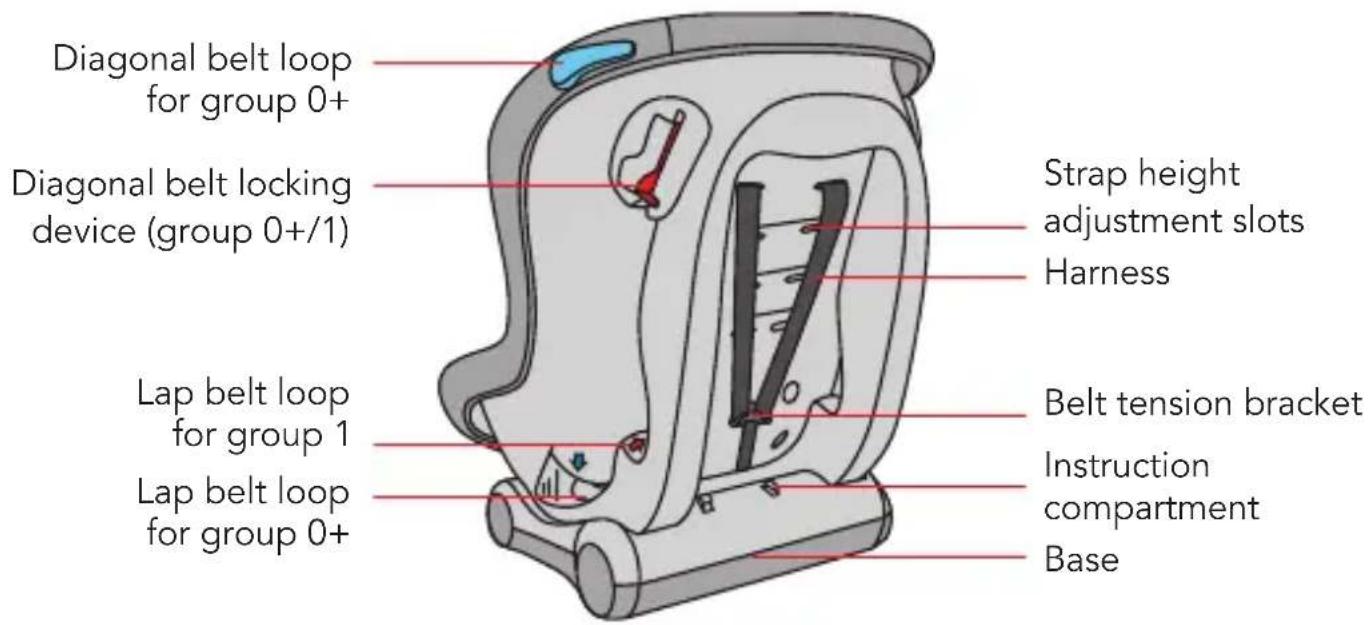
text_image
Diagonal belt loop for group 0+ Diagonal belt locking device (group 0+/1) Lap belt loop for group 1 Lap belt loop for group 0+ Strap height adjustment slots Harness Belt tension bracket Instruction compartment BaseUSING THE CAR SEAT
2.1 INSTALLING THE CAR SEAT IN THE VEHICLE
text_image
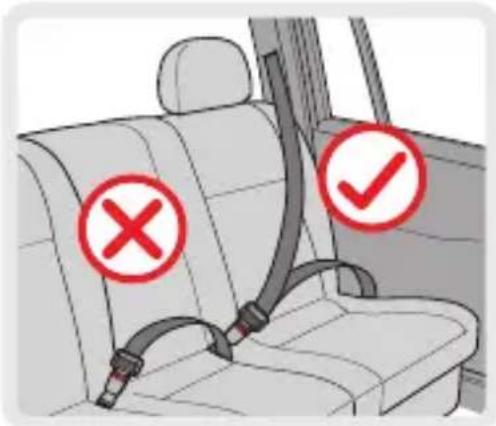
Diagram showing car seatbelt with red X and ✓ symbols indicating absence or check, likely for safety or inspection purposes.This car seat is suitable for conventional use in all models equipped with three-point seat belts, installed in compliance with European standards (ECE 44 or equivalent standards).
IMPORTANT: The car seat must only be installed using the three-point seat belt (both lap and diagonal belt) supplied with the vehicle.
text_image
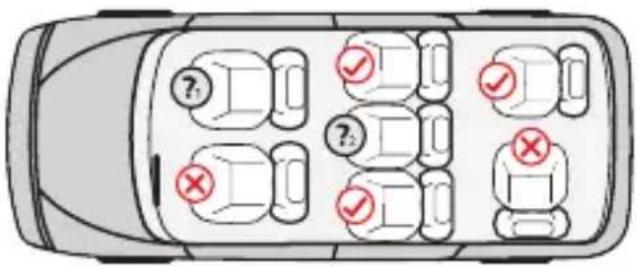
Diagram of a car with multiple lanes and marked checkmarks indicating status or failure pointsInstallation allowed
Installation not allowed
Do not use on the passenger seat shown in the illustration if the front passenger's airbag is active.
Use on this passenger seat only if it is equipped with a 3-point seat belt (both lap and diagonal belt).
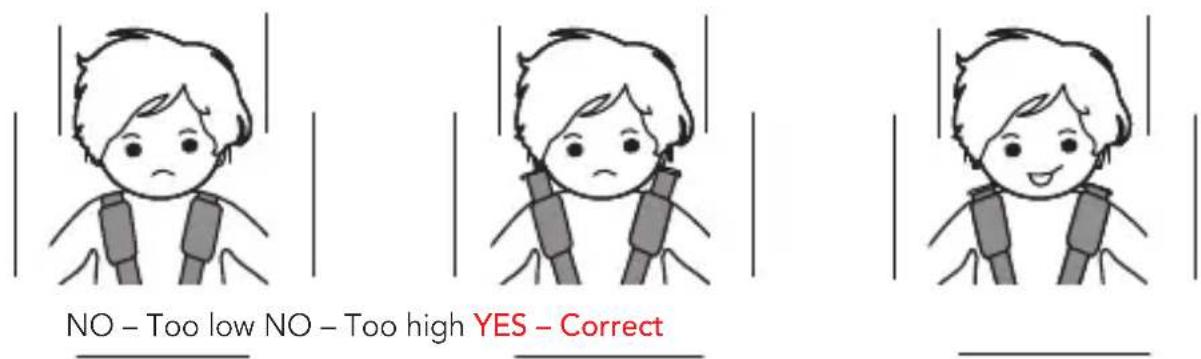
2.2 CHECKING THE HEIGHT OF THE STRAPS
text_image
NO – Too low NO – Too high YES – CorrectUSING THE CAR SEAT
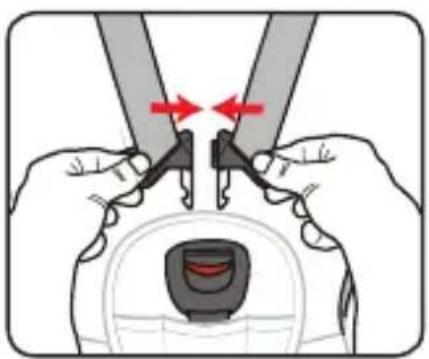
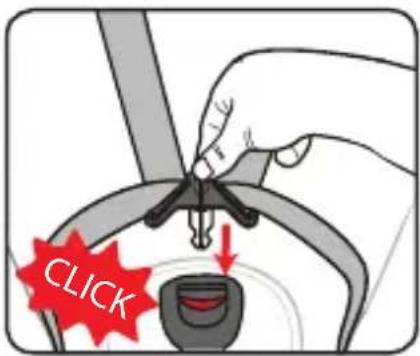
2.3 USING THE BUCKLE
natural_image
Illustration of hands adjusting a belt buckle with red arrows indicating motion (no text or symbols)Fig. 1

text_image
CLICKFig. 2

natural_image
Diagram of a car seatbelt buckle with a red arrow indicating the grip point (no text or symbols present)Fig. 3
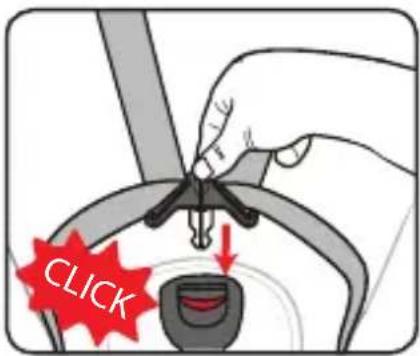
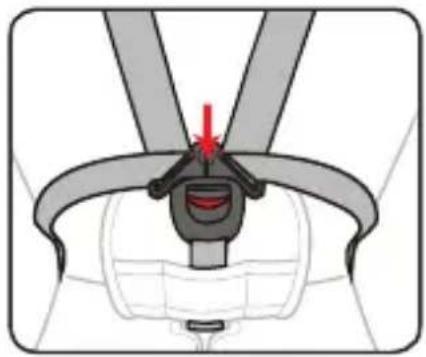
After adjusting the height of the straps, as shown in section 2.6, proceed as follows:
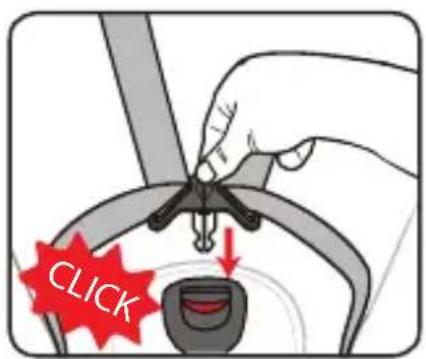
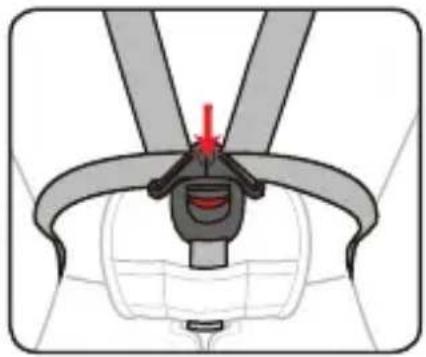
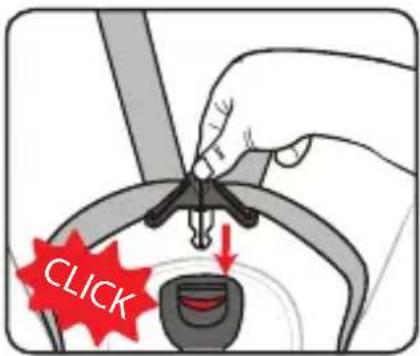
Step1. Join the two metal parts of the buckle connectors together.
Step 2. Insert the two buckle connectors into the buckle slot until you hear a "click".
Step 3. Check that the harness is correctly fastened by pulling on the straps upwards. To unclip the harness, press the red button on the buckle.
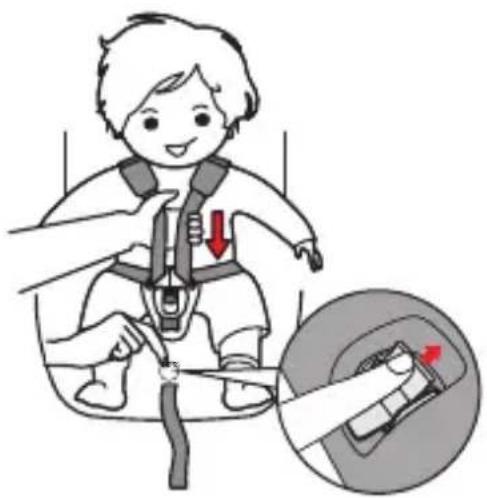
2.4 ADJUSTING AND USING THE HARNESS
natural_image
Illustration of a child in a safety harness being lifted, with a magnified inset showing the cable being inserted (no text or symbols present)Loosening the harness
To loosen the harness, press the adjustment device lever (under the lining) located on the front part of the car seat.
With one hand, hold the adjustment devise lever down and, with the other hand, pull on the straps (chest belts) by gripping them on the lower part, below the chest protector padding, to loosen them.
IMPORTANT: Do not pull on the straps by gripping the chest protector padding.
USING THE CAR SEAT
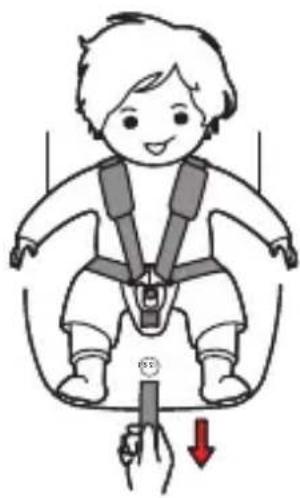
Tightening the harness
Pull on the harness adjustment strap to tighten the harness correctly for your child.
The harness is correctly tightened when you are able to insert one finger (1 cm) in the upper part above the shoulder.
A loose harness can be dangerous. Check the harness and tighten it each time that your child is placed in the seat.
natural_image
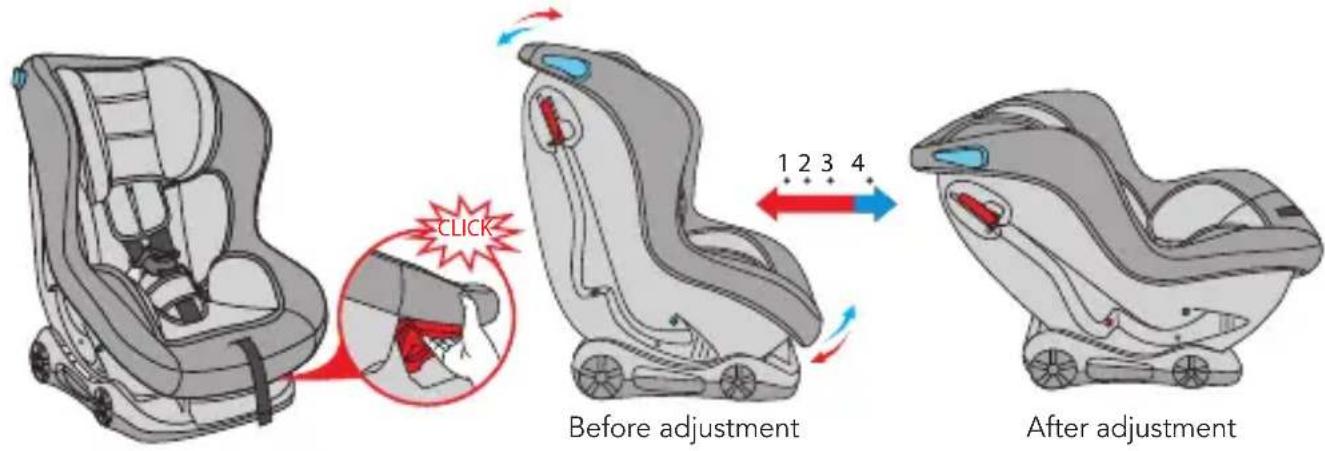
Illustration of a baby wearing a full-body safety harness, holding a medical device with a red arrow indicating force (no text or symbols)2.5 ADJUSTING THE INCLINATION OF THE CAR SEAT
text_image
CLICK Before adjustment 1 2 3 4 After adjustmentThe car seat can be placed in 4 different inclination positions.
When the car seat is rear-facing (group 0+), you can only use it in position 4.
Pull the tilt adjustment handle (located under the front part of the car seat) upwards and move the seat forwards or backwards to obtain the desired position. Release the adjustment handle and move the seat forwards or backwards until you hear a "click" which indicates that it is locked.
IMPORTANT: Make sure that the car seat is properly locked in the desired position.
USING THE CAR SEAT
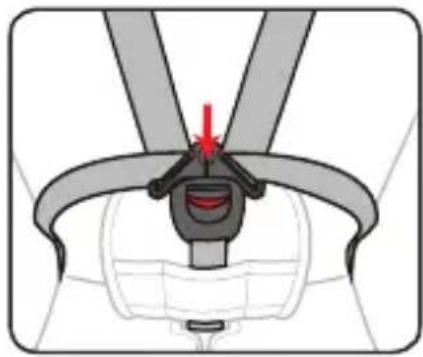
Adjusting the position of the straps (chest belts), according to the height of the child's shoulders, is a necessary step in order to adapt the car seat to the growth of the child. Make sure that the height of the straps is adapted to the height of the child before installing the car seat in the vehicle.
In the backrest of the car seat there are pairs of slots, at different heights, intended for this purpose. The straps must be adjusted in the slots close to the child's shoulders. If the height of the car seat straps is not in line with the height of the child, follow the steps below:
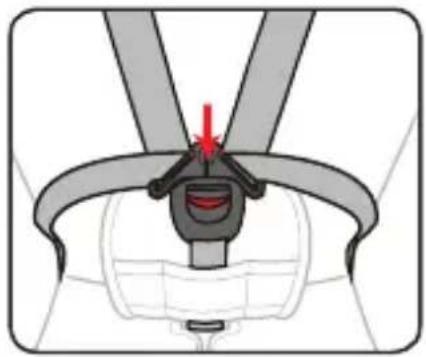
Step 1. Loosen the chest belts (see point 2.4) and turn the car seat backwards. Unclip the harness straps on the back of the backrest, taking the chest protector straps off the hook (D) and removing the two straps from the belt tension (bracket fig.1, fig.2, fig.3.
natural_image
Diagram of a mechanical or structural assembly with no visible text, numbers, or symbols.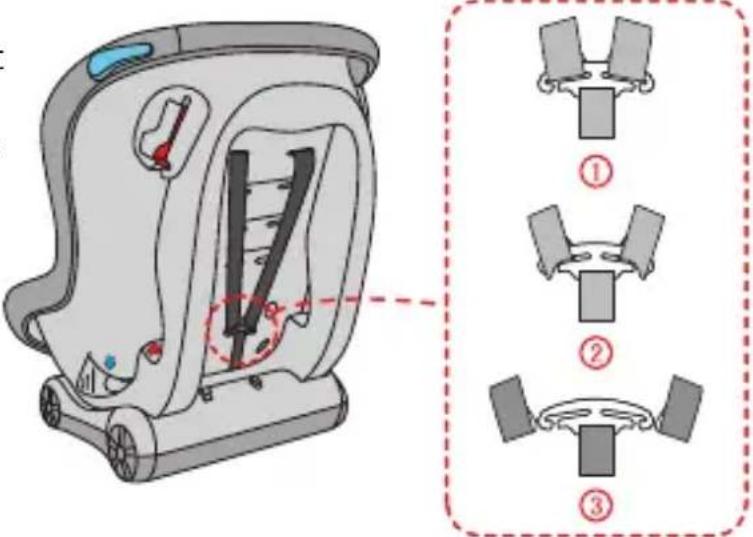
text_image
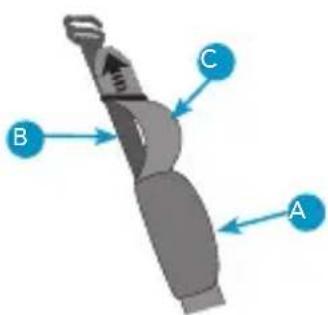
Technical diagram of a vehicle seatbelt device with three labeled parts and a highlighted section showing internal structure.Step 2. Adjust one strap at a time, pulling the belt and the chest protector straps inwards, preventing them from getting twisted together. Repeat the same steps for the second strap.
Step 3. Insert the chest belt and chest protector strap into the slot on the backrest at the desired height, inserting the belts into the headrest reducer slot first, then into the lining slot and the corresponding slot in the backrest shell. Make sure that the chest belt is inserted inside the chest protector (A) and that the chest protector strap (B) is underneath the chest belt (C). Repeat the same steps for the second chest belt.
text_image
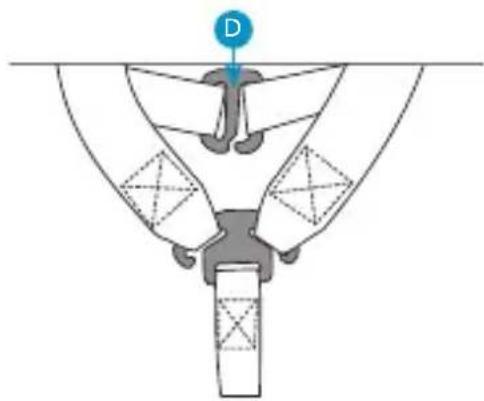
Diagram of a mechanical component with labeled parts A, B, and CIMPORTANT: The straps must be inserted into a respective pairs of slots aligned at the same height.
IMPORTANT: Check that none of the belts are twisted. Reconnect the chest protector straps together through the hook (D) and thread the belts of the straps through the metal belt tension bracket (E).
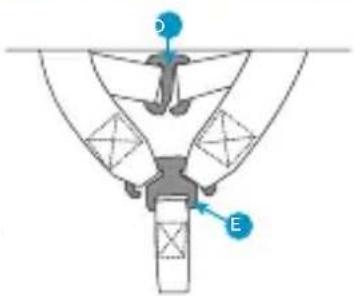
text_image
Diagram of a mechanical or structural assembly with labeled components D and E, likely from an engineering or physics context.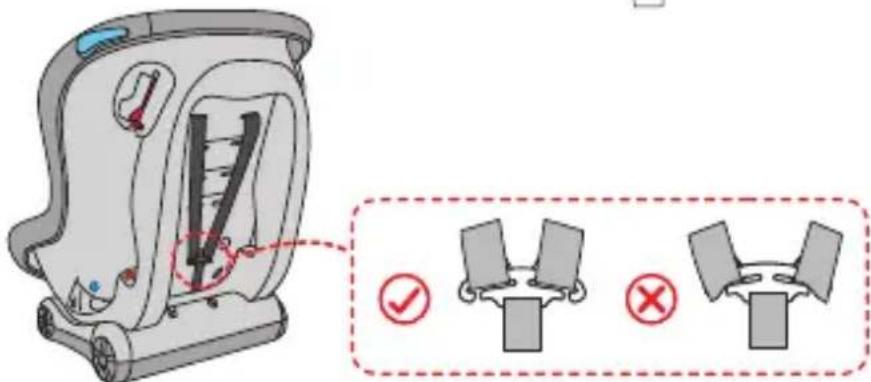
text_image
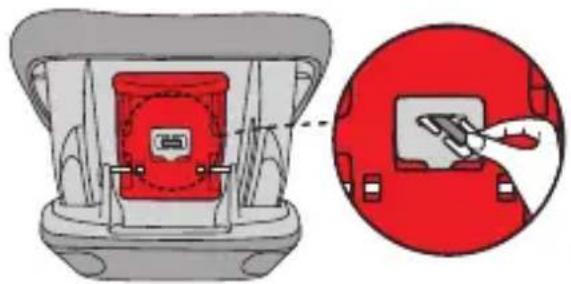
Diagram showing a device with a switch and three labeled buttons (✓, ×, ×) indicating different switch states or conditions.2.7 REMOVING THE PROTECTIVE CROTCH PADDING AND THE BUCKLE
To remove the crotch strap, adjust the car seat into the most inclined position (4).
From the seat side, push the strap downwards through the hole. Locate the locking clip from the underside and rotate it, passing it through the slot, while pulling the crotch belt upwards from the seat side.
natural_image
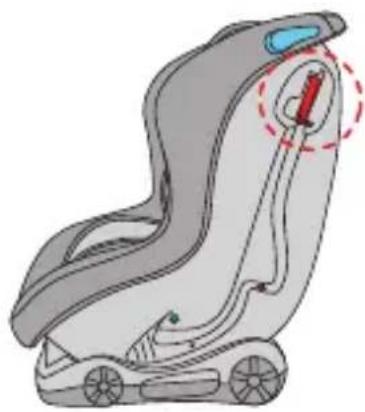
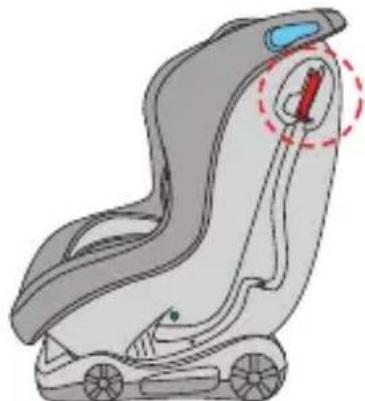
Illustration of a red fire extinguisher inside a container with a magnified view showing its internal components (no text or symbols)2.8 USING THE LOCKING DEVICE
Press down the lever on the red locking device, insert the diagonal belt, and release it to activate the locking.
natural_image
Illustration of a car seat with a highlighted grip and blue visor (no text or symbols)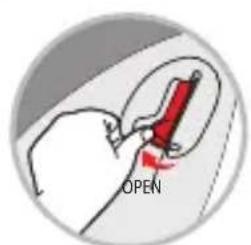
text_image
OPEN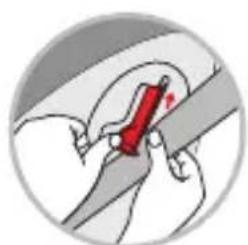
natural_image
Illustration of a hand using a red tool to lift a car seatbelt (no text or symbols visible)
text_image
OFFFig.1 Fig.2 Fig.3
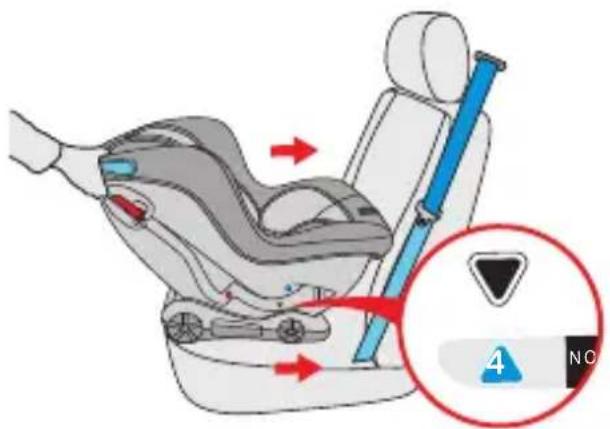
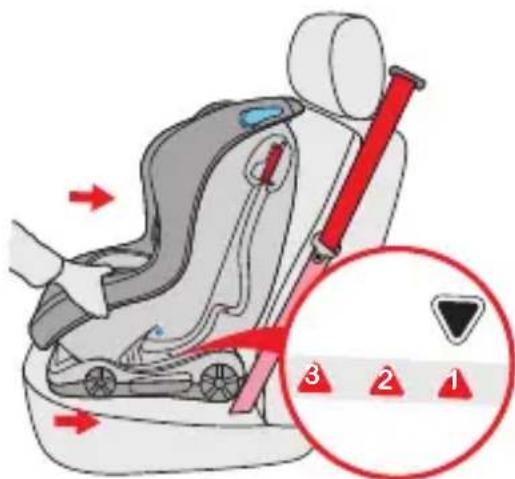
3. INSTALLING THE CAR SEAT
3.1 Installing the car seat in group 0+ (for children from 0 to 13 kg)
DO NOT USE THIS CAR SEAT ON A PASSENGER SEAT FITTED WITH A FRONT AIRBAG.
The car seat can only be fixed on passenger seats equipped with a 3-point seat belt (both diagonal and lap belt) with a deactivated airbag. The car seat, when in group 0+, must always be rear-facing i.e. with the child facing backwards.
Step 1: Adjust the car seat in position 4. Position the car seat facing backwards on the seat, making sure that the front part rests firmly against the backrest of passenger seat.
text_image
Diagram of car seatbelt mechanism with directional arrows and a warning label showing '4 NO' in a circular icon.
text_image
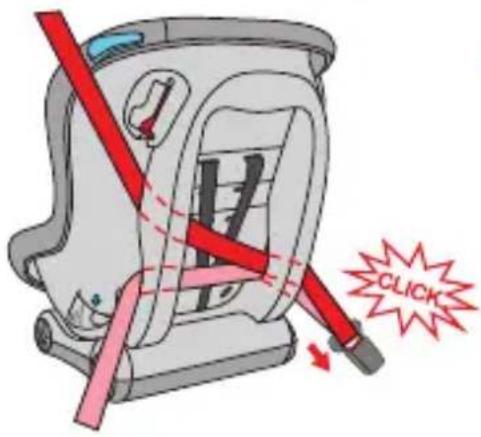
CLICKStep 2: Pull out the vehicle's seat belt (diagonal and lap belt) and insert it through the belt loop in the backrest, then clip in the seat belt buckle. A "click" will indicate that it is attached correctly.
Step 3: Insert the seat belt into red/blue locking device and over the blue loop, placed on the same side (see point 2.8). Insert the lap belt into the belt loop (group 0+).
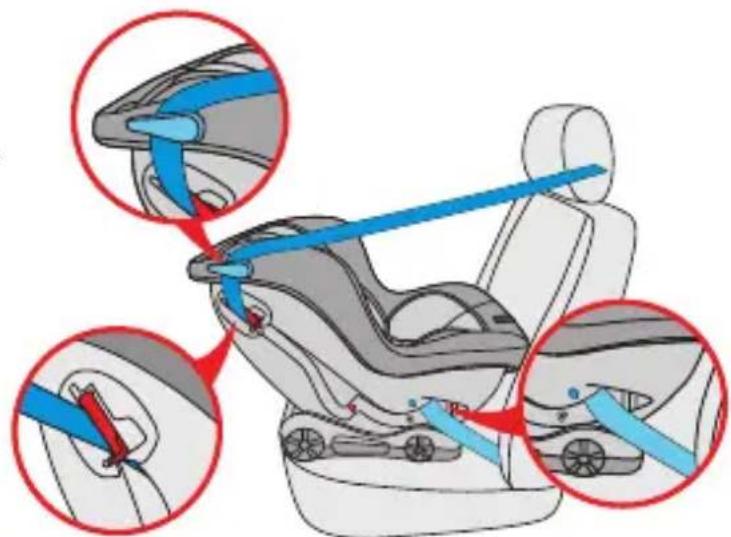
text_image
Diagram showing car seatbelt buckle assembly with blue belt and red clasp, highlighting seatbelt componentsT
Step 4: Insert the lap belt into the belt loop (group 0+) on the opposite side.
text_image
Diagram illustrating car seatbelt usage with blue and red arrows indicating force or movement, showing a highlighted section of the seat.
natural_image
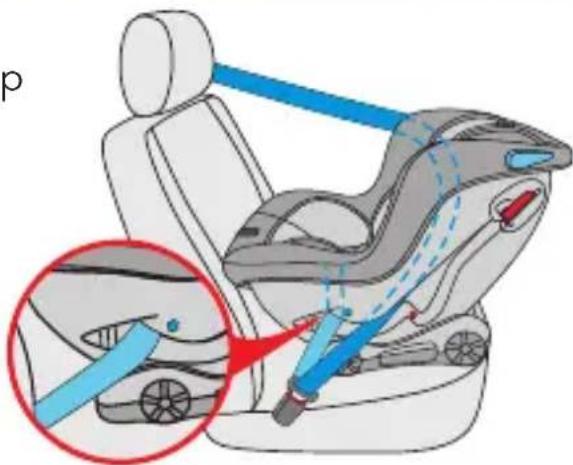
Diagram of a car seatbelt with blue arrows indicating force or movement, showing no text or symbolsStep 5: Tighten the belt to the maximum, by pulling it in the direction of the red arrow, first on the lap area then on the diagonal area. If necessary, push down the locking device lever, let the belt slide, and then release the lever. Make sure that the belt is not twisted and that it fits tightly.
Place your child in the car seat and fasten the harness, ensuring that it is not twisted.
3.2 INSTALLING THE CAR SEAT IN GROUP 1 (FOR CHILDREN FROM 9 TO 18 KG)
The car seat can only be fixed on passenger seats equipped with a 3-point seat belt. The car seat, when in group 1, must always be forward-facing i.e. with the child facing the front of the vehicle.
text_image
Diagram showing car seatbelt buckle assembly with numbered instructions and directional arrows indicating movementStep 1: Adjust the car seat in the desired position: 1, 2 or 3.
Place the car seat facing forwards on the passenger seat and make sure that the backrest of the car seat rests firmly against that of the passenger seat.
INSTALLING THE CAR SEAT
text_image
CLICKStep 2: Pull out the vehicle's seat belt (diagonal and lap belt) and insert it through the belt loop in the backrest. Clip in the seat belt buckle. A "click" will indicate that it is attached correctly.
Step 3: Insert the belt into the red and blue locking device (see point 2.8). Insert the lap belt into the belt loop (group 1).

natural_image
Illustration of a car seat with red belt and two magnified views showing side details (no text or symbols)
natural_image
Illustration of a car seat with red arrows indicating seat movement and a magnified inset showing the cable being inserted (no text or symbols present)Step 4: Insert the lap belt into the belt loop (group 1) on the opposite side.
Tighten the belt to the maximum, by pulling it in the direction of the red arrow, first on the lap area then on the diagonal area. If necessary, push down the locking device lever, let the belt slide, and then release the lever. Make sure that the belt is not twisted and that it fits tightly.
Step 5: Place your child in the car seat and fasten the harness, ensuring that it is not twisted.
IMPORTANT: The reclined positions (1, 2 and 3) are only suitable when the car seat is forward-facing. The adjustment can be carried out before or after installation.

natural_image
Illustration of a child in a car seat with red safety stripes, no text or symbols present4. MAINTENANCE AND CLEANING
4.1 Daily maintenance
- In the case of daily use, check the conditions of the car seat periodically, making sure that it is replaced after an accident.
• Store the car seat in a dry and ed place to avoid mould. - If the car seat gets dusty, clean the belt and the plastic components using a damp sponge and leave it to dry in the open air.
- If food or drink is accidentally spilled on the buckle, remove the belt from the car seat and rinse gently with warm water. Leave to dry in the open air.
- For more details on cleaning the entire fabric lining, see section 4.2. "Washing instructions".
4.2 Washing instructions
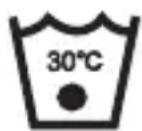
Hand wash in water at a temperature below 30°C

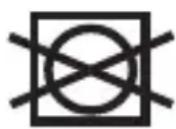
Do not bleach

Dry clean,
any solvent
except
trichloroethylene
Do not
tumble dry

Do not iron
4.3 Removing and replacing the fabric lining
Take off the protective crotch padding and the car seat buckle (see page 12, point 2.7), and then remove the straps and the headrest reducer.
- Remove the fabric lining from the car seat. To replace the fabric lining, repeat the above steps in reverse order.
The contents of this document as stated below will come into effect as from 01.01.2005 and replace, on every account and in full, any previous message referring to the guarantee provided by Foppa Pedretti S.p.A. FORMAL GUARANTEE
Foppa Pedretti S.p.A. the head office of which is located at n. 11 Via Volta, Grumello del Monte (Italy), guarantees directly to the Consumer that this brand new product is free of faults with regard to the materials, design and manufacture and that it complies with the characteristics as declared by the manufacturer.
This formal guarantee is valid in all Member Countries of the European Union and it neither excludes nor limits the Consumer's rights in accordance with mandatory measures provided for by the law with regard to the Retailer of the Product.
To take advantage of this formal guarantee, the Consumer must return the faulty product to the Retailer, presenting to the same the proof of purchase of the Product which must clearly show the Retailer's address, the date of purchase of the Product with the Retailer's stamp and signature and an indication of the Product itself or, alternatively, the receipt which must not have been altered and which must clearly show the same information as that referred to above.
The formal guarantee is valid for twelve (12) months from the date of purchase of the Product.
During this period, Foppa Pedretti S.p.A. will repair or replace the faulty product, at its own discretion. The formal guarantee is granted to the end buyer of the Product (Consumer) and it neither excludes nor limits the mandatory rights of the Consumer as provided for by the law and/or the rights that the Consumer may have with regard to the Dealer/Retailer of the Product.
EXCLUSIONS TO THE FORMAL GUARANTEE.
The formal guarantee is excluded in the case of damage caused to the Product for the following reasons: if the product is used in a way that does not comply with the information contained in the use and assembly instruction sheet, if the product is knocked or dropped, if the Product is exposed to humidity or extreme heat or environmental conditions, or to sudden changes in the same, corrosion, oxidization, unauthorized alterations or repairs to the Product, repairs using unauthorised spare parts, improper use, improper maintenance or failure to carry out the same, improper maintenance compared to the information given on the use and assembly instruction sheet, incorrect assembly, accidents, damage caused by food or drink, damage caused by chemical products, cases of force majeure.
In any case, Foppa Pedretti S.p.A. declines all responsibility for damage caused to persons or to property, other than the Product, when such damage is caused by a failure to comply with the instructions/advice/warnings cont a ined in the manua l or, alternatively, in the use and assembly instruction sheet provided with each Product for the owner/user. (Purely as an example, in the case of a cot : "Check your baby constantly. Make sure that the sheets and blankets do not cover the baby's head...").
to property when the breakage of its products is due to a deterioration in the components of the Product that are subject to wear. All the components of the Product made of plastic are considered to be components subject to wear.
TABLE DES MATIÈRES
AVERTISSEMENTS PAG 34
natural_image
Illustration of a car comfort seat with red measurement lines indicating measurement points (no text or symbols present)Dossier
Boucle
natural_image
Illustration of a hand holding a gray object with a red ribbon, enclosed in a red circle (no text or symbols)natural_image
Technical line drawing of a mechanical device with internal components and mounting holes (no text or symbols)text_image
Diagram showing car seatbelt with red X and ✓ symbols indicating absence or check, likely for safety or inspection purposes.text_image
Diagram of a car with multiple vehicle compartments and checkmarks indicating status or failure, possibly for inspection or verification.
Montage autorisé

natural_image
Illustration of hands adjusting a belt buckle with red arrows indicating motion (no text or symbols)Fig. 1
text_image
CLICKFig. 2

natural_image
Diagram of a car seatbelt buckle with a red arrow indicating the grip point (no text or symbols present)Fig. 3
text_image
Illustration showing a child in a safety harness being lifted, with a magnified inset highlighting the seatbelt mechanism.Desserrer le harnais
natural_image
Illustration of a baby wearing a full-body safety harness, holding a medical device with a red arrow indicating force (no text or symbols)2.5 RÉGLAGE DE L'INCLINAISON DU SIÈGE-AUTO

text_image
Technical diagram of a car seatbelt device with three labeled parts and a highlighted section showing internal structure.
natural_image
Diagram of a mechanical or anatomical structure with no visible text, numbers, or symbolstext_image
Diagram illustrating a mechanical or electrical setup with labeled components O and E, showing two configurations marked by a red X symbol.natural_image
Technical illustration of a mechanical device with internal components and a highlighted section (no text or symbols)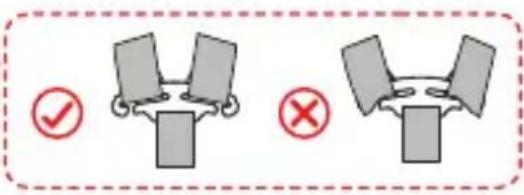
text_image
Diagram showing two identical configurations with check and cross icons, likely for a test or approval process.2.7 RETRAIT DU REMBOURRAGE DE PROTECTION DE L'ENTREJAMBE ET DE LA BOUCLE
natural_image
Illustration of a red fire extinguisher inside a vehicle, with a magnified inset showing the device being inserted (no text or symbols present)2.8 UTILISATION DU DISPOSITIF DE BLOCAGE
natural_image
Illustration of a car seat with highlighted red section (no text or symbols)
text_image
OPEN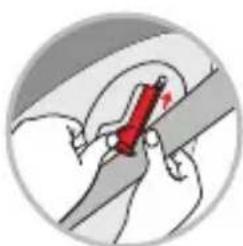
natural_image
Illustration of a hand holding a red object over a curved surface, possibly a tool or device (no text or symbols visible)
text_image
OFFFig.1 Fig.2 Fig.3
INSTALLATION DU SIÈGE-AUTO
text_image
Diagram of car seatbelting mechanism with labeled parts and directional arrows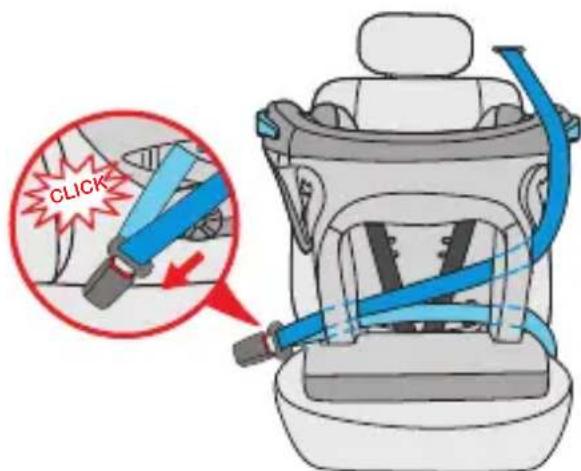
text_image
CLICKtext_image
Diagram illustrating car seatbelt usage with blue belt and red belt, showing three states of seatbelting.INSTALLATION DU SIÈGE-AUTO
text_image
Diagram illustrating car seatbelt usage with blue belt and red valve, showing a highlighted section of the seatbelt mechanism.
natural_image
Diagram of a car seatbelt with blue arrows indicating force or movement, showing internal components and motion direction (no text or symbols)text_image
Diagram showing car seatbelt usage with numbered instructions and directional arrows indicating movementnatural_image
Illustration of a car seat with red belt and two magnified views showing side details (no text or symbols)
text_image
Diagram illustrating car seatbelt usage with red arrows indicating force or movement, showing a highlighted section and magnified detail.natural_image
Illustration of a child in a car seat with red safety belt, no text or symbols present4. ENTRETIEN ET NETTOYAGE
4.1 Entretien quotidien
EXCLUSIONS DE LA GARANTIE CONVENTIONNELLE.
natural_image
Technical line drawing of a mechanical device with internal components and mounting holes (no text or symbols)text_image
Diagram showing car seatbelt with red X and ✓ symbols indicating absence or check, likely for safety or inspection instructions.text_image
Diagram of a car with multiple vehicle compartments and checkmarks indicating failure or rejection statusMontaje permitido
natural_image
Illustration of hands adjusting a belt buckle with red arrows indicating motion (no text or symbols)Fig. 1
text_image
CLICKFig. 2
natural_image
Diagram of a car seatbelt buckle with a red arrow indicating the grip point (no text or symbols present)Fig. 3
natural_image
Illustration of a child in a safety harness being lifted, with a magnified inset showing the cable being inserted (no text or symbols present)Aflojar el arnés
natural_image
Illustration of a baby wearing a full-body safety harness, holding a medical device with a red arrow indicating force (no text or symbols)natural_image
Diagram of a mechanical or structural assembly with no visible text, numbers, or symbols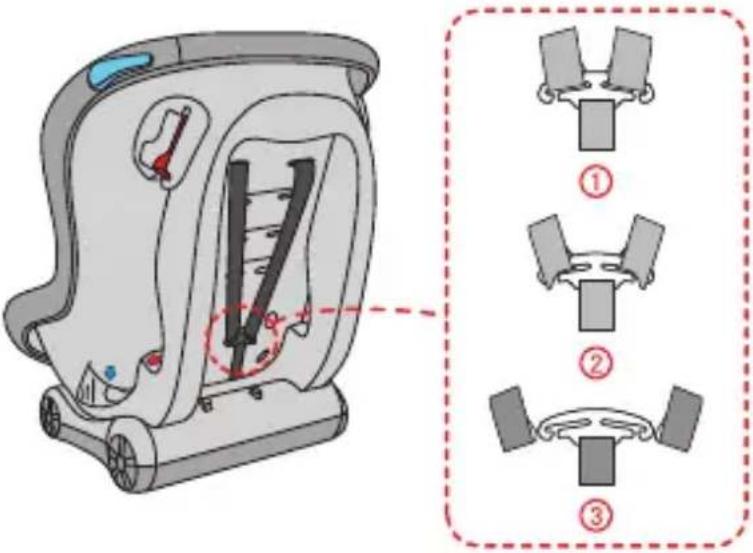
text_image
Technical diagram of a vehicle seatbelt device with three labeled parts and a highlighted section showing internal structure.text_image
Diagram of a mechanical component with labeled parts A, B, and CCHE
text_image
Diagram of a mechanical or structural assembly with labeled components D and E, likely illustrating a system or component layout.natural_image
Technical illustration of a mechanical device with no visible text or symbols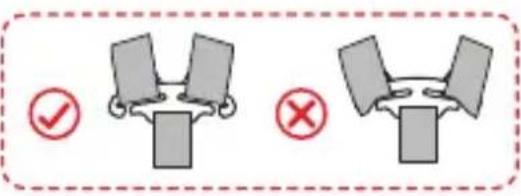
text_image
Diagram showing two identical mechanical or electrical component configurations with check and cross symbols indicating selection or failure.natural_image
Illustration of a red fire extinguisher inside a vehicle, with a magnified inset showing the device's tip (no text or symbols present)natural_image
Illustration of a car seat with a red indicator light and dashed outline (no text or symbols)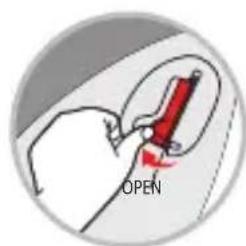
text_image
OPEN
natural_image
Illustration of a hand holding a red object over a gray surface, possibly a tool or device (no text or symbols visible)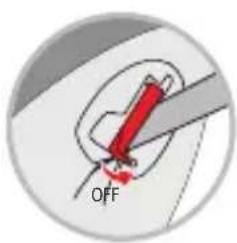
text_image
OFFFig.1 Fig.2 Fig.3
text_image
Diagram of car seat assembly with labeled parts and directional arrows, including a warning sign and numbered indicators.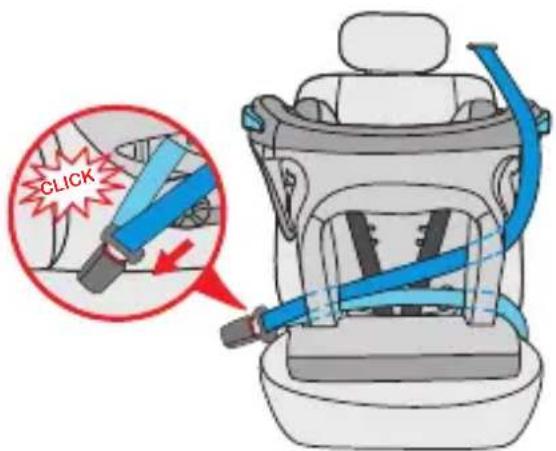
text_image
CLICKtext_image
Diagram showing car seatbelt usage with blue bands and red belt, highlighting seatbelt connection points.text_image
Diagram illustrating car seatbelt usage with magnified detail showing blue belt and red cable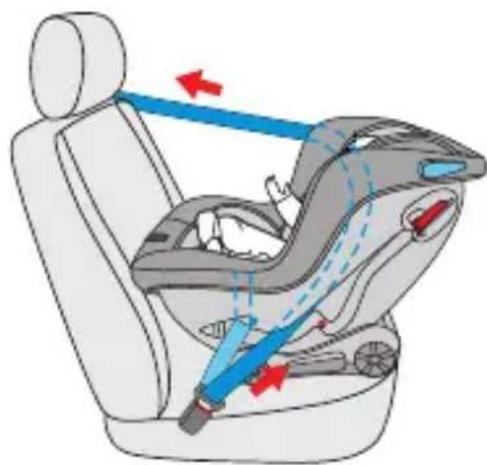
natural_image
Diagram of a car seatbelt with blue belt and red arrows indicating direction (no text or symbols)text_image
Diagram showing car seat assembly with numbered instructions and directional arrows indicating movementnatural_image
Illustration of a car seatbelt with red arrows indicating force or movement, showing two views of the seat (no text or symbols present)
natural_image
Illustration of a car seat with red belt and arrow indicating movement, showing seat structure and seatbelt mechanism (no text or symbols)natural_image
Illustration of a child in a car seat with red safety stripes, no text or symbols present4. MANTENIMIENTO Y LIMPIEZA
text_image
Diagram showing car seatbelt with red X and ✓ symbols indicating absence or compliance statustext_image
Diagram of a car with multiple vehicle compartments and checkmarks indicating failure or rejection statusMontagem permitida
natural_image
Three-panel cartoon showing a person with a sad expression, wearing a backpack, standing in different poses (no text or symbols)natural_image
Illustration of hands adjusting a seatbelt with red arrows indicating motion (no text or symbols)Fig. 1
text_image
CLICKFig. 2
natural_image
Diagram of a car seatbelt with a red arrow indicating the grip point (no text or symbols present)Fig. 3
natural_image
Illustration of a child in a safety harness being lifted, with a magnified inset showing the hand holding a device (no text or symbols present)Soltar o arnês
natural_image
Illustration of a baby wearing a full-body safety harness, holding a medical device with a red arrow indicating force (no text or symbols)text_image
Technical diagram of a car seatbelt device with three labeled parts and a highlighted section showing internal structure.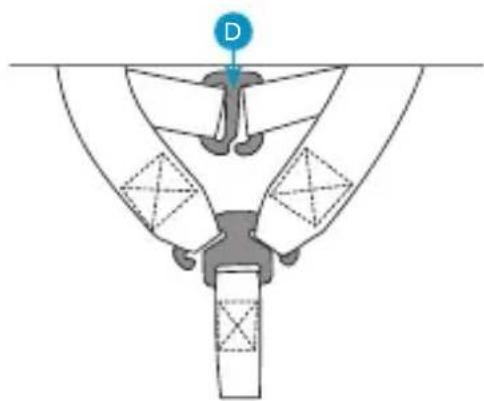
natural_image
Diagram of a mechanical or anatomical structure with no visible text, numbers, or symbolstext_image
Diagram of a mechanical component with labeled parts A, B, and Ctext_image
Diagram of a mechanical or structural assembly with labeled components D and E, likely illustrating a gear or linkage mechanism.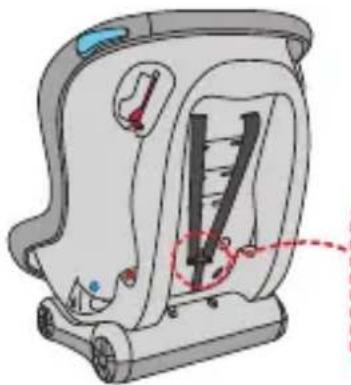
natural_image
Technical illustration of a mechanical device with no visible text or symbols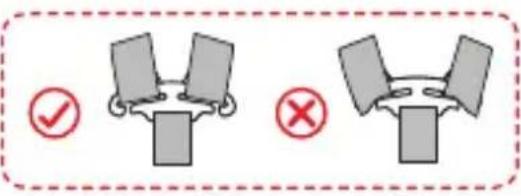
text_image
Diagram showing two identical configurations of a table with check and cross icons, likely indicating correct or incorrect states.natural_image
Illustration of a red fire extinguisher inside a vehicle, with a magnified inset showing the device's handle (no text or symbols present)2.8 UTILIZAÇÃO DO DISPOSITIVO DE BLOQUEIO
natural_image
Illustration of a car seat with a red circular indicator on the seat (no text or symbols)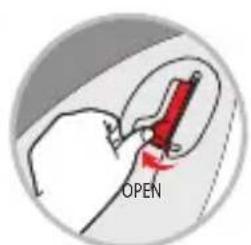
text_image
OPEN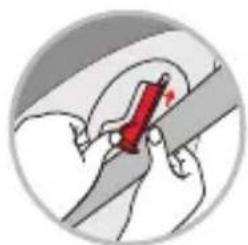
natural_image
Illustration of a hand holding a red object with a circular background (no text or symbols)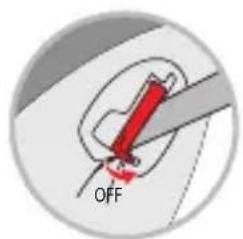
text_image
OFFFig.1 Fig.2 Fig.3
text_image
Diagram of car seat assembly with directional arrows and a warning sign showing '4 NO' in a circular inset.
text_image
CLICKtext_image
Diagram illustrating car seatbelt usage with a magnified inset showing the cable being inserted into a seatbelt.
natural_image
Diagram of a car seatbelt with blue belt and red arrows indicating force or movement (no text or symbols)text_image
Diagram showing car seatbelt usage with numbered instructions and directional arrows indicating movementnatural_image
Illustration of a car seat with red belt and arrows indicating force or movement (no text or symbols)
natural_image
Illustration of a car seat with red belt and seatbelt, showing mechanical adjustment (no text or symbols)natural_image
Illustration of a child seated in a car seat with red safety stripes, no text or symbols presenttext_image
Diagram showing car seatbelt with red X and ✓ symbols indicating absence or check, likely for safety instructions.text_image
Diagram of a car with multiple vehicle compartments and checkmarks indicating unknown status, possibly for inspection or verification.
natural_image
Illustration of hands adjusting a seatbelt with red arrows indicating force or movement (no text or symbols)Fig. 1

text_image
CLICKFig. 2
natural_image
Diagram of a car seatbelt with a red arrow indicating the seatbelt point (no text or symbols present)Fig. 3
natural_image
Illustration of a child in a safety harness being lifted, with a magnified inset showing the hand holding a device (no text or symbols present)natural_image
Illustration of a baby wearing a full-body safety harness, with a hand holding a device and a red arrow indicating downward motion (no text or symbols)text_image
Technical diagram of a vehicle seatbelt device with three labeled parts and a highlighted section showing internal structure.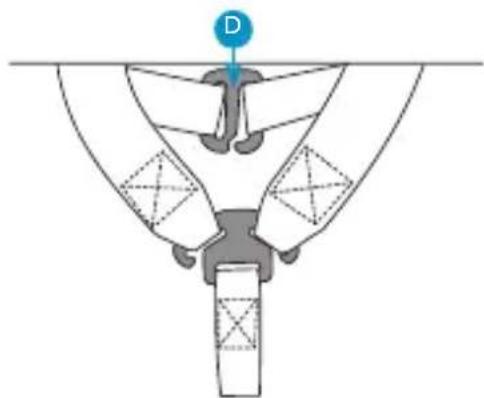
natural_image
Diagram of a mechanical or structural assembly with no visible text, numbers, or symbols.text_image
Diagram of a mechanical component with labeled parts A, B, and CA AYTOKINHTOY
natural_image
Diagram of a mechanical device with internal components and a red annotation arrow (no text or symbols)
text_image
Diagram showing two identical configurations with check and cross icons, likely for a task or process comparison.natural_image
Illustration of a red fire extinguisher inside a vehicle, with a magnified inset showing the tool interacting with it (no text or symbols present)natural_image
Illustration of a car seat with a highlighted seat and red dashed line indicating rotation (no text or symbols)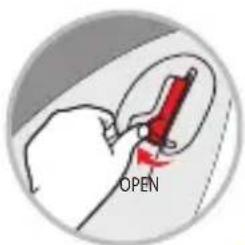
text_image
OPEN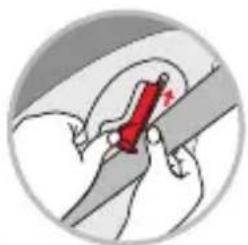
natural_image
Illustration of a hand holding a red object with a starburst symbol, partially enclosed in a circular frame (no text or symbols)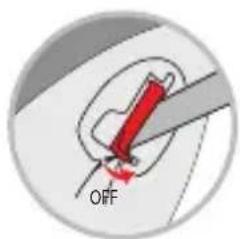
text_image
OFFFig.1 Fig.2 Fig.3
text_image
Diagram showing car seatbelt usage with directional arrows and a warning label '4 NO'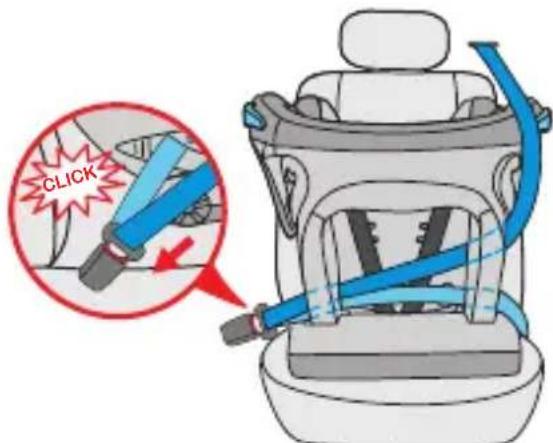
text_image
CLICKΒήμα 2:
text_image
Diagram illustrating car seatbelt usage with blue arrows indicating force application on seats and seatbelt.text_image
Diagram illustrating car seatbelt usage with magnified detail showing blue belt and red cable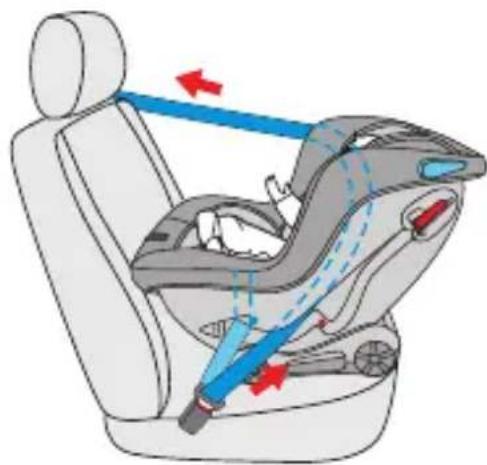
natural_image
Diagram of a car seatbelt with blue and red arrows indicating force or movement directions (no text or symbols)text_image
Diagram showing car seatbelt usage with numbered instructions and directional arrows indicating movementnatural_image
Illustration of a car seat assembly with red belt and arrows indicating force or movement (no text or symbols)