Isoplus - Car seat Foppapedretti - Free user manual and instructions
Find the device manual for free Isoplus Foppapedretti in PDF.
| Product type | Child car seat |
| Brand | Foppapedretti |
| Model | Isoplus |
| Safety standard | ECE R44/04 Regulation |
| Weight groups | Group 1 (9-18 kg) and Groups 2/3 (15-36 kg) |
| Installation type | Universal ISOFIX (group 1) and semi-universal/universal (groups 2/3) |
| Harness | Integrated 5-point harness (group 1), use of vehicle seat belt (groups 2/3) |
| Headrest adjustment | Yes, height adjustable |
| Shoulder strap adjustment | Yes, height adjustable with headrest |
| Seat inclination | 4 positions for group 1, 1 position (vertical) for groups 2/3 |
| Side protection | Yes, integrated side protection system |
| Top Tether strap | Yes, provided for group 1 |
| ISOFIX connectors | 2 ISOFIX connectors with green locking indicator |
| Storage compartment | Yes, for manual and Top Tether strap |
| Cover cleaning | Machine washable at 30°C, do not use tumble dryer |
| Plastic parts cleaning | Damp cloth and mild detergent |
| Warranty | 12 months from date of purchase |
| Country of origin | Italy (Foppa Pedretti S.p.A.) |
| Usage | On front or rear passenger seat, forward-facing |
| Vehicle compatibility | Consult vehicle manual for ISOFIX anchor points |
Frequently Asked Questions - Isoplus Foppapedretti
User questions about Isoplus Foppapedretti
0 question about this device. Answer the ones you know or ask your own.
Ask a new question about this device
Download the instructions for your Car seat in PDF format for free! Find your manual Isoplus - Foppapedretti and take your electronic device back in hand. On this page are published all the documents necessary for the use of your device. Isoplus by Foppapedretti.
USER MANUAL Isoplus Foppapedretti
natural_image
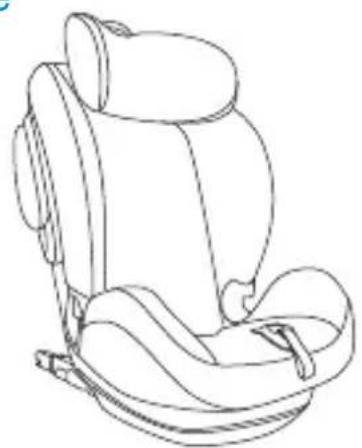
Blue and gray baby car seat with black trim, no visible text or symbolsUNIVERSAL
EN CAR SEAT - Assembly instructions
EN. IMPORTANT! READ THE INSTRUCTIONS CAREFULLY AND KEEP FOR FUTURE REFERENCE
FR. IMPORTANT! LIRE ATTENTIVEMENT ET CONSERVER SOIGNEUSEMENT A PORTEE DE MAIN POUR UNE UTILISATION ULTERIEURE
ES. IMPORTANTE! LEER ATENTAMENTE Y CONSERVAR PARA FUTURAS REFERENCIAS
PT. IMPORTANTE! LER ATENTAMENTE E GUARDAR PARA FUTURA CONSULTA
text_image
Diagram of car seat assembly with labeled parts A and B, showing directional arrows and a close-up of the component.1b
text_image
ID CLICK!1c
natural_image
Line drawing of a car seat assembly with a close-up inset showing the connector detail (no text or symbols)2

text_image
G1: 9-18kg3
text_image
G2 / G3: 15-36kg2a

text_image
Zu A B2b
text_image
Illustration showing a child in a seatbelt seat with a magnified inset highlighting the measurement of 1cm width.3a
natural_image
Diagram of a car seat with blue motion indicators indicating changes (no text or symbols present)3b
natural_image
Illustration of a car seat assembly with a magnified inset showing the internal structure (no text or symbols)3c
natural_image
Line drawing of a baby car seat with a highlighted interior space (no text or symbols)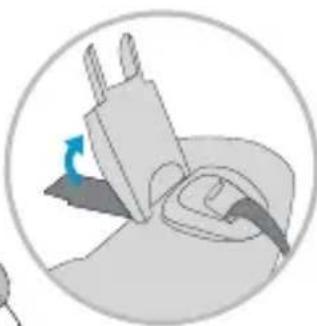
natural_image
Illustration of a plug inserted into a socket, with a blue arrow indicating direction (no text or symbols)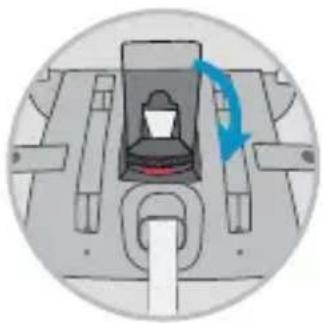
natural_image
Mechanical component diagram showing a piston and shaft assembly with a blue directional arrow indicating motion (no text or symbols)3d 3e
natural_image
Line drawing of a car comfort seat with seatbelt and seat rack (no text or symbols)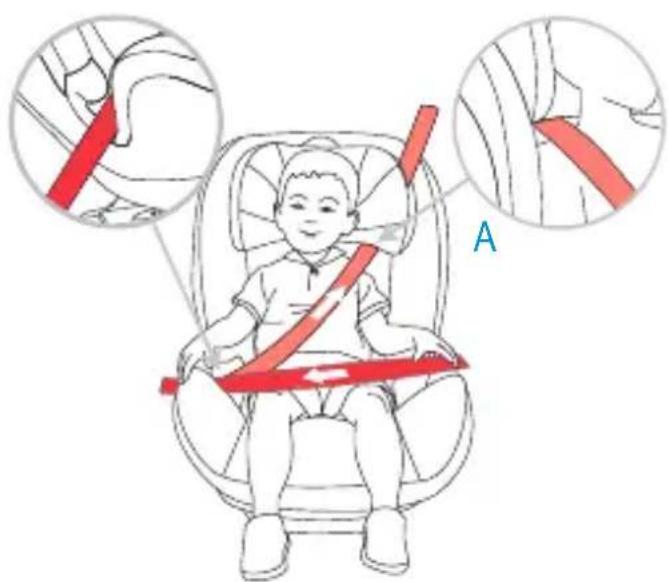
text_image
Diagram illustrating car seatbelt usage with magnified views of the child's seatbelt and seatbelt connection details.4
text_image
Illustration showing a child in a car seatbelt with red belt and blue arrows indicating force directions, accompanied by magnified views of the seatbelt.5
natural_image
Line drawing of a car seat assembly with an inset showing the internal structure (no text or symbols)
text_image
1 2 3 4GR. 1

natural_image
Line drawing of a car seat with a red arrow indicating upward motion (no text or symbols)GR. 2 GR. 3
natural_image
Line drawing of a car seat with a red arrow indicating upward motion (no text or symbols)INDICE
text_image
Diagram of a car seat with numbered labels pointing to different compartments
text_image
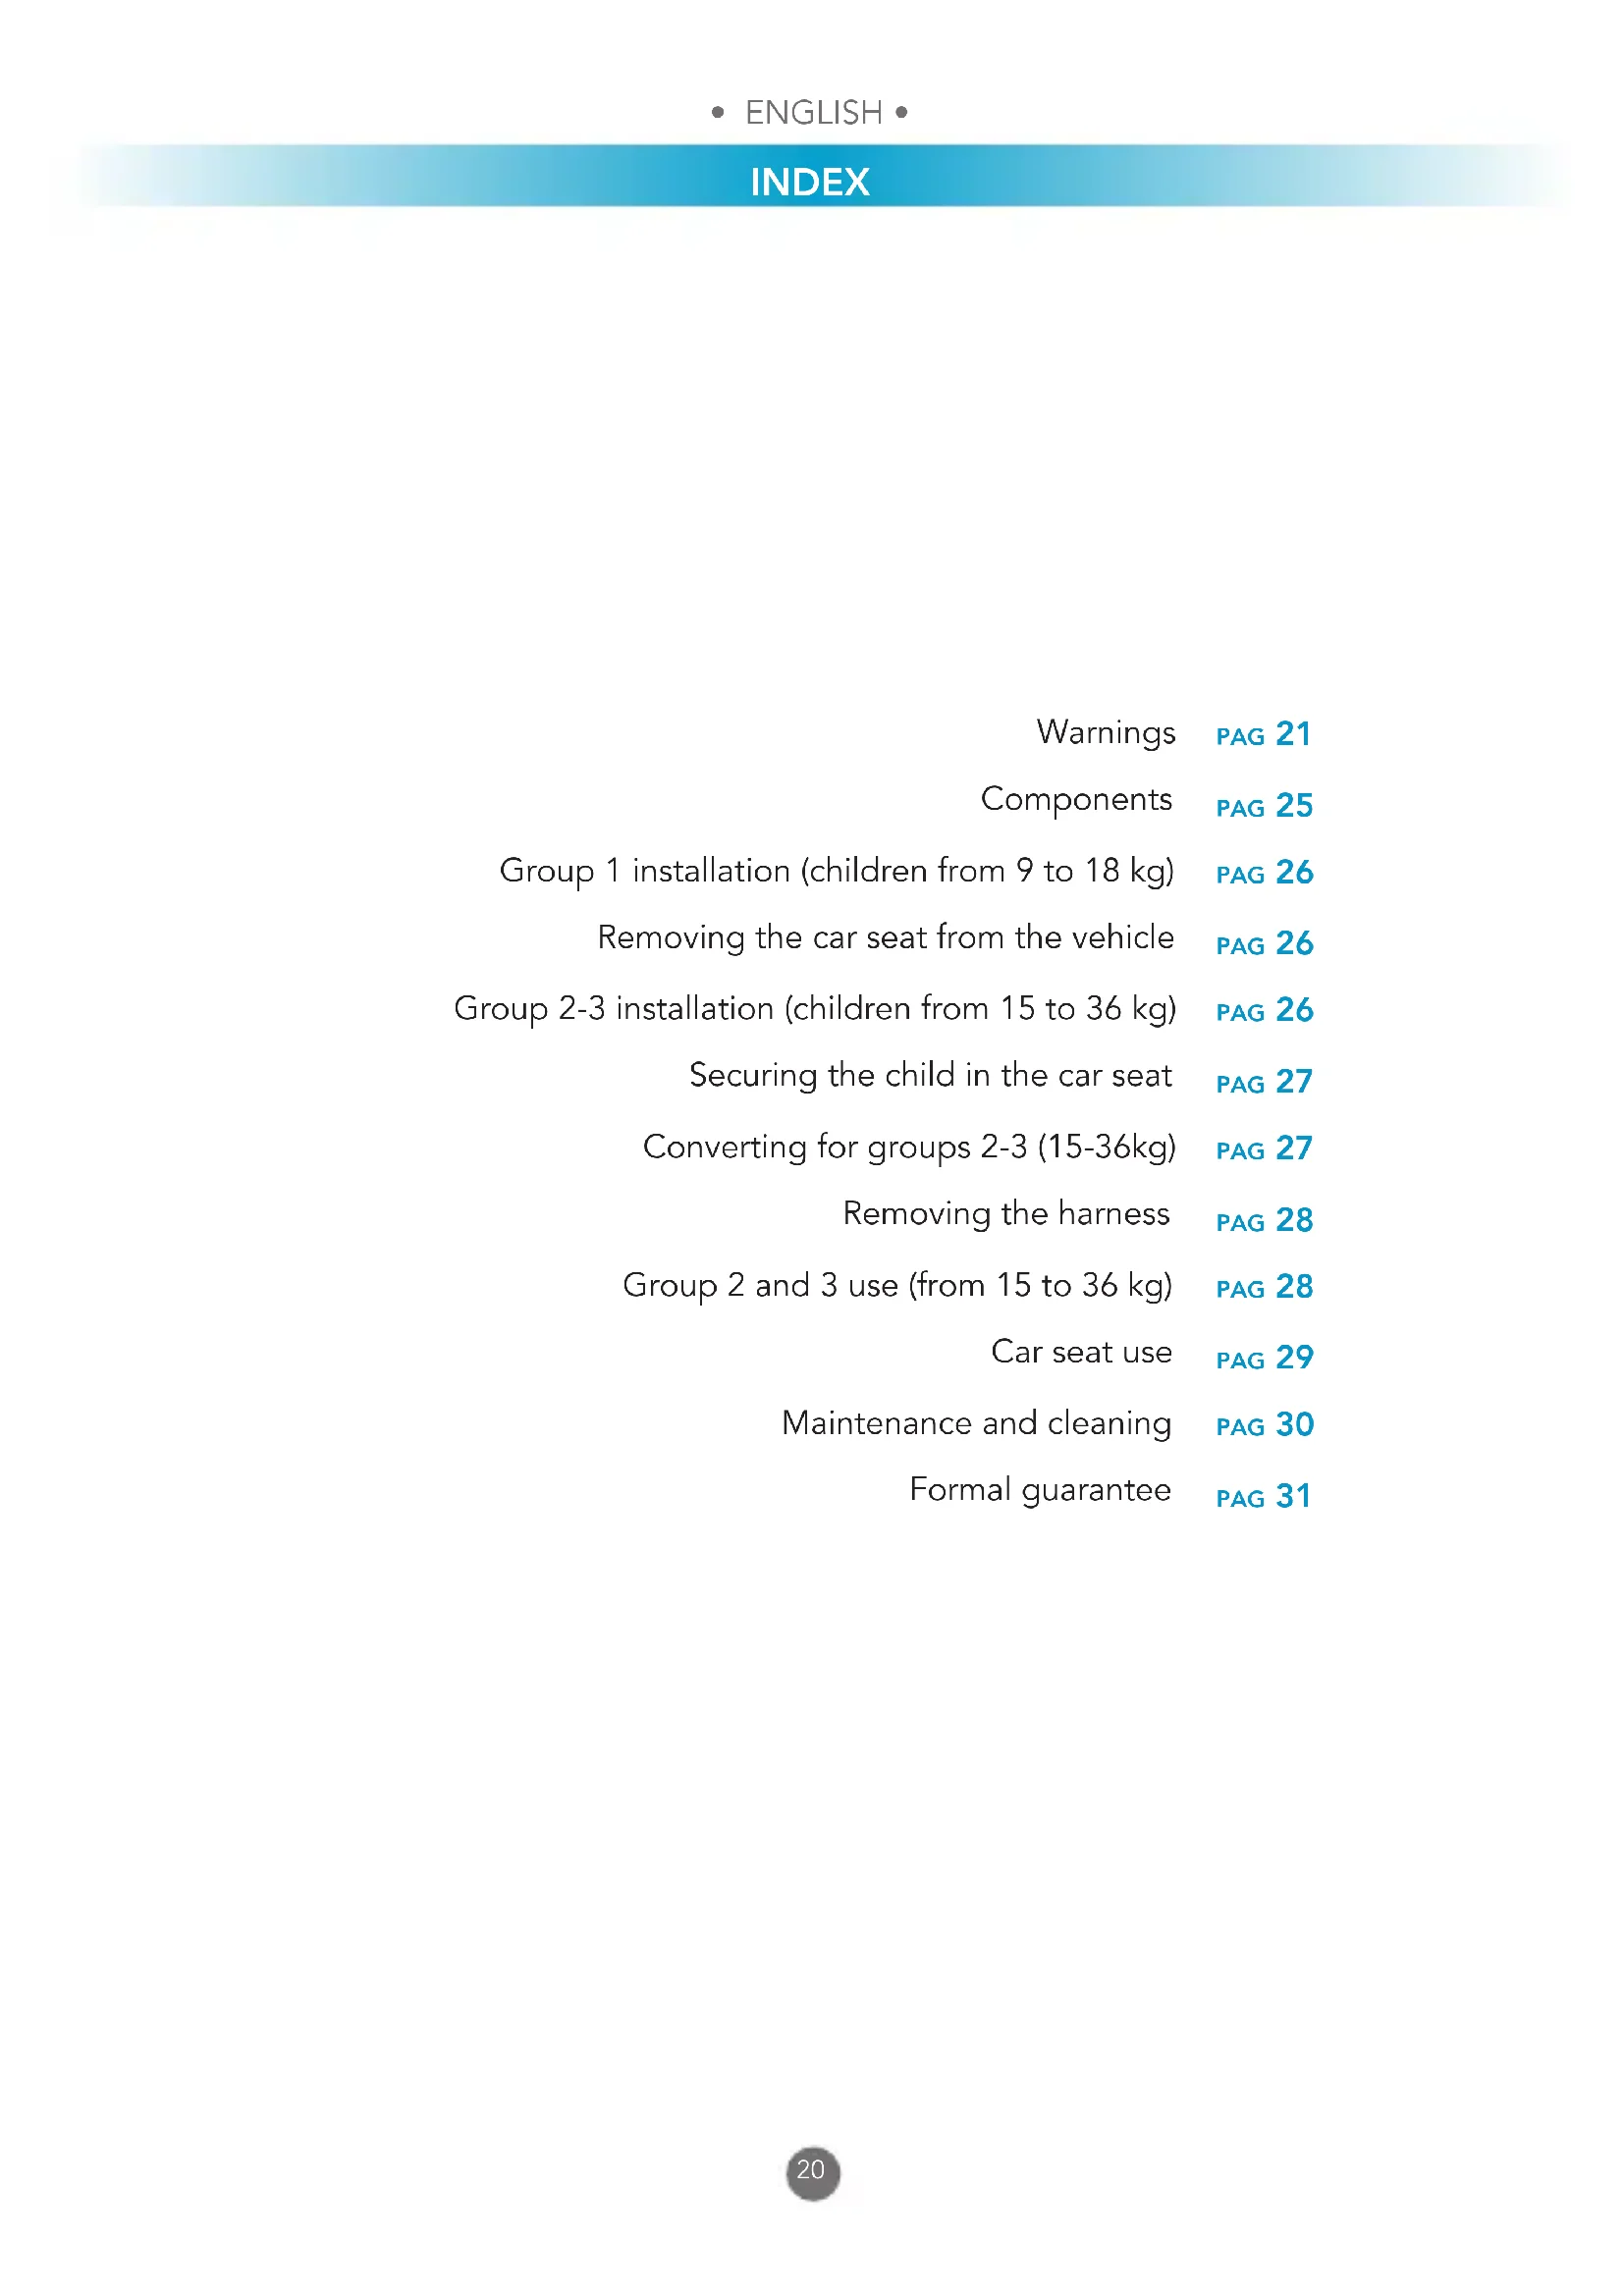
Technical diagram of a car seat with numbered labels pointing to different seat positions.Group 1 installation (children from 9 to 18 kg) PAG 26
Removing the car seat from the vehicle PAG 26
Group 2-3 installation (children from 15 to 36 kg) PAG 26
Securing the child in the car seat PAG 27
Converting for groups 2-3 (15-36kg) PAG 27
Removing the harness PAG 28
Group 2 and 3 use (from 15 to 36 kg) PAG 28
Car seat use PAG 29
Maintenance and cleaning PAG 30
Formal guarantee PAG 31
WARNINGS
WARNINGS
- This restraint device complies with ECE Regulation R44/04 for use with children weighing between 9 and 36 kg.
- WARNING: NEVER leave your child unattended – your child's safety is your responsibility.
• WARNING: Adult assembly required. - Read the instructions carefully before use and store them in the special compartment for reuse in future.
- Failure to follow the car seat installation instructions carefully could pose a risk to your baby.
- WARNING: The child car seat must be fitted in accordance with the manufacturer's instructions. Incorrect installation could be dangerous.
- WARNING: Always ensure that new or occasional users [e.g. grandparents] have read the instructions or been taught the correct installation by someone who has read and understood the instructions.
- WARNING: Always keep this instruction manual with the child car seat, or in the vehicle in which you are carrying the child car seat. Some models of child car seat have a pocket to store the instructions.
BEFORE STARTING
- WARNING: Do not fit the child car seat in a rearward facing position
- WARNING: Before installing the child car seat ensure that the passenger seat you are using is locked in the upright position.
- WARNING: Do not use the child car seat in the home - it has only been designed to be used in the car.
- WARNING: Do not leave loose/unsecured objects on the back seat of your car or the parcel shelf. They may be dangerous to your child if you are forced to brake suddenly.
WHEN USING THE CHILD CAR SEAT
- WARNING: Make sure that the child car seat is placed somewhere so that rigid items and plastic parts do not become trapped in doors or movable seat units when the seat is in everyday use.
- WARNING: Always use the vehicle's door child safety lock system, if one is available, to make it impossible for the child to open the car doors from inside.
• WARNING: Allow the child a break during long car journeys and make sure they
WARNINGS
don't get out of the car seat unaided and without supervision.
- WARNING: The child car seat must be fitted securely to the passenger seat. Ensure that it is not loose or wobbly after you have fitted it. If it is loose, refit it.
- WARNING: Ensure that the child car seat is secured to the car seat at all times even when not in use.
- WARNING: The seat cover should not be replaced with any other than the one recommended by the manufacturer, because the cover constitutes an integral part of the restraint performance.
- WARNING: Stop the car at regular intervals to check that the child car seat is in the correct position and that both the car seatbelt AND the child car seat harness (if required) are still fastened and latched.
- WARNING: In the event of an emergency it is important to be able to release the child quickly (as defined by British Standards). This means that seat buckle cannot be fully tamper proof and you should actively discourage your child from playing with or using the buckle.
- WARNING: Do not place anything under the child car seat (e.g. a towel or cushion) as this could affect the performance of the seat in an accident.
- WARNING: Avoid winter clothing bundling Bulky clothing can lead to incorrect harness tightening. In an accident, the child can slip right out of the extra padding - and thus out of the seat. Let the car warm up or cool down prior to placing your child in there if possible. If your child is cold, place a blanket over the top of the harness.
- WARNING: Make sure to properly secure any loose objects, such as luggage or books, in your car as they may cause injuries in the event of an accident.
SEAT BELT
- WARNING: NEVER use any load bearing contact points other than those described in these instructions or marked on the child car seat.
- WARNING: Ensure that the lap section of the seatbelt or harness is worn low down, so that pelvis is firmly engaged.
- WARNING: Make sure that ALL the passengers in your vehicle have their seatbelts fastened, as unrestrained people can be very dangerous to the child in an accident.
- WARNING: NEVER use a seatbelt routing scheme that differs from these instructions.
- WARNING: The lap and diagonal seatbelt must be used at all times when your child is in the child car seat.
- WARNING: Make sure that there are no twists in the seatbelt.
- WARNING: Do not place luggage on the parcel shelf without securing it: in the event of an accident it could cause serious damage to passengers.
WARNINGS
SUNLIGHT/HOT DAYS
- WARNING: Do not leave your child in the child car seat while parked in direct sunlight or on a hot day.
- WARNING: Do not subject the child car seat to prolonged direct sunlight as this may be dangerous for your child (the metal and plastic fittings could become hot) and may cause the fabric to fade. You can reduce this problem by covering the child car seat with a sheet when not in use.
SECOND HAND OR DAMAGED CHILD CAR SEATS AND SEATBELTS
- WARNING: Never buy a second hand child car seat. It may have unseen damage.
- WARNING: The manufacturer only guarantees this product when the original owner uses it.
- WARNING: You MUST replace the child car seat and your vehicles seatbelts if they become badly worn or amazed.
- WARNING: You MUST replace the child car seat if it is involved in an accident it may have unseen damage and may not protect your child as well as it should. At the very least send the child car seat to your retailer for inspection, together with the accident report.
Group 1 (UNIVERSAL ISOFIX).
IMPORTANT NOTICE:
- This is a “UNIVERSAL ISOFIX” child restraint device for group 1 (9-18 kg) for use in vehicles with an ISOFIX anchoring system, and a “Universal/Semi-Universal” device for group 2 and 3 (15-36 kg). Approved in compliance with Regulation No. 44/04, it is suitable for general use in vehicles and is compatible with most, but not all, passenger seats.
- To use a UNIVERSAL ISOFIX system, it is necessary to read the vehicle manual before proceeding with the installation. The vehicle manual will indicate which passenger seats are compatible with the size class of the UNIVERSAL ISOFIX-approved car seat.
- This restraint device has been classified as "Universal" according to stricter approval criteria than previous models that do not have this notice.
- The mass group and the ISOFIX size class for which the device can be used are: GROUP 1, class B1 for 9-18 kg.
- If in doubt, contact the manufacturer of the child restraint device, or the retailer.
WARNING! In group 1 the car seat must be fixed to the passenger seat only using the ISOFIX lower attachments and the Top Tether belt, fixed to the anchoring point provided by the manufacturer.
WARNINGS
Consult the vehicle manual to check that the ISOFIX category B1 car seats are suitable for your car.
Group 2-3 (SEMI-UNIVERSAL).
IMPORTANT NOTICE: Installation with the ISOFIX connectors and vehicle 3-point seat belt;
- This is a SEMI-UNIVERSAL approved child restraint device according to ECE Regulation R44/04, and is only compatible with vehicles included in the "vehicle list".
- Only suitable for use in vehicles equipped with 3-point static or retractor seat belts, approved according to regulation UN/ ECE no.16 or other equivalent standards.
- If in doubt, contact the manufacturer of the child restraint device, or the retailer.
Group 2-3 (UNIVERSAL).
IMPORTANT NOTICE: Installation with the vehicle 3-point seat belt.
- This is a "Universal" child restraint device, approved according to Regulation No. 44/04.
- Perfect compatibility is more easily achieved in cases where the vehicle manufacturer states in the instruction manual that the vehicle allows a “Universal” child restraint device to be installed for the age group in question.
- This restraint device has been classified as "Universal" according to stricter approval criteria than previous models that do not have this notice.
- Only suitable for use in vehicles equipped with 3-point static or retractor seat belts, approved according to regulation UN/ ECE no.16 or other equivalent standards.
- If in doubt, contact the manufacturer of the child restraint device, or the retailer.
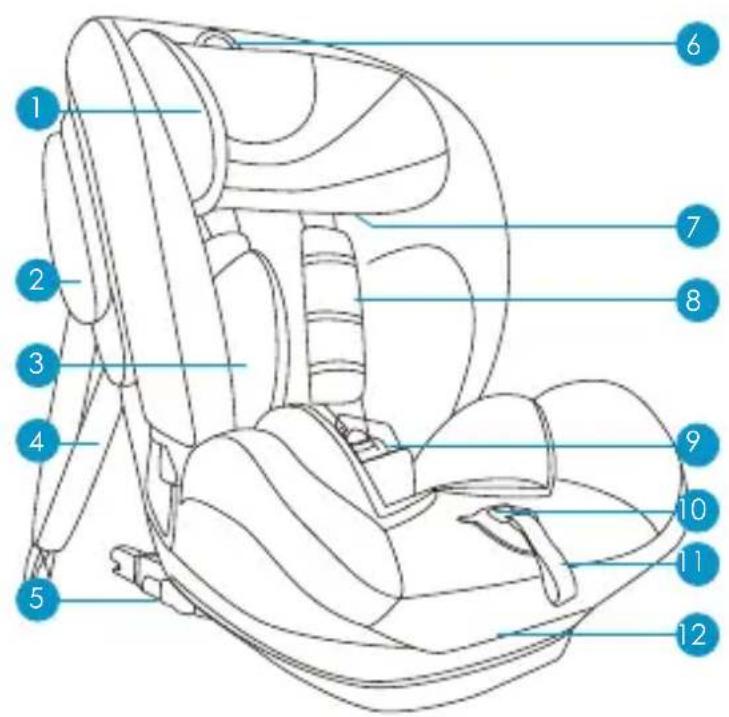
COMPONENTS
text_image
Diagram of a car seat with numbered labels pointing to different compartments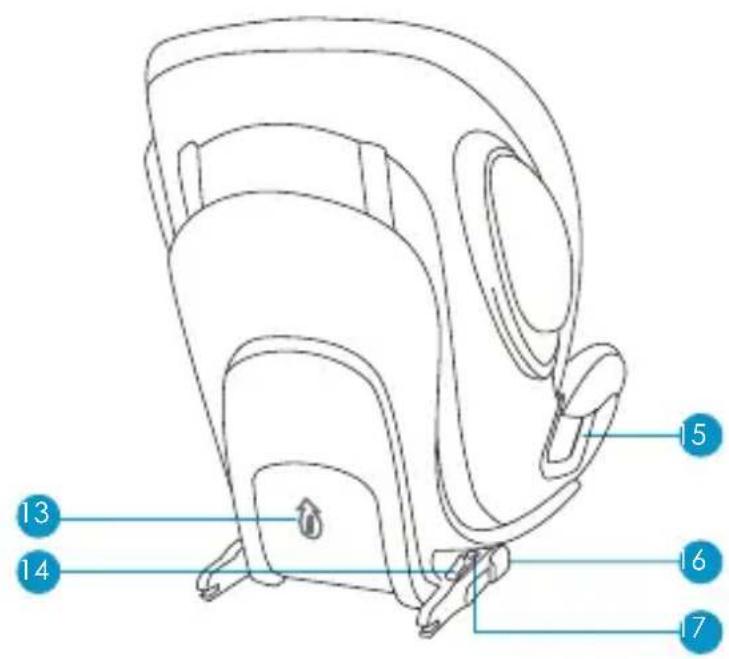
text_image
Technical diagram of a car seat with numbered labels pointing to different seat positions.- Headrest
- Side protection system
- Reducer
- Top Tether
5.ISOFIX connectors - Headrest adjustment handle
- Diagonal belt guide
- 5-point seat belt
- Buckle
- Shoulder strap adjustment button
- Shoulder strap adjustment belt
- Lever to recline the seat
- Compartment for manual / Top Tether Compartment
- ISOFIX indicator
- Lap belt guide
- ISOFIX adjustment lever
- ISOFIX release button
INSTALLING THE CAR SEAT
INSTALLING THE CAR SEAT IN THE VEHICLE
Group 1 installation (children from 9 to 18 kg) - See figure "1a, 1b, 1c"
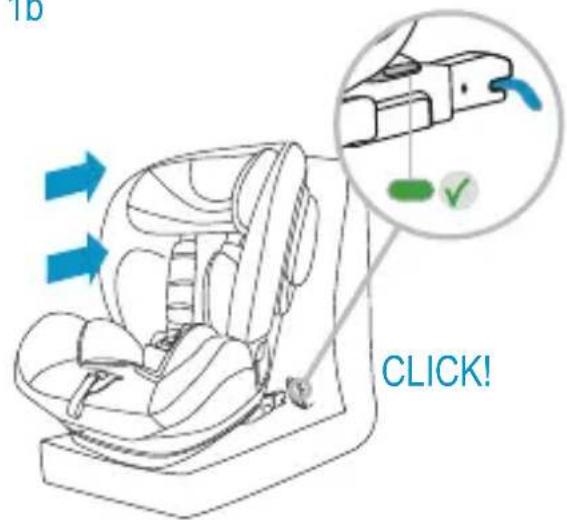
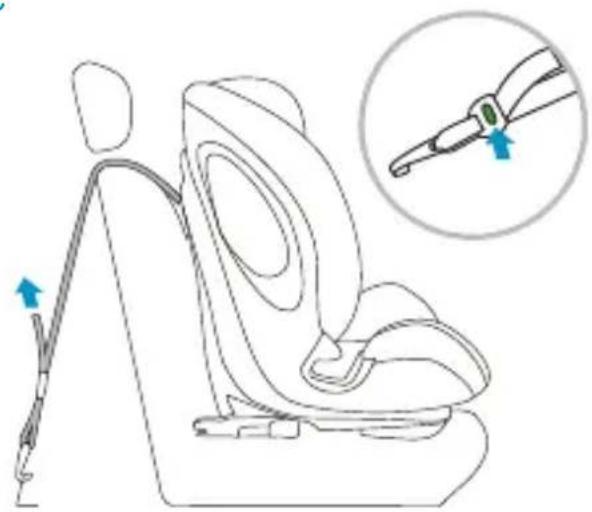
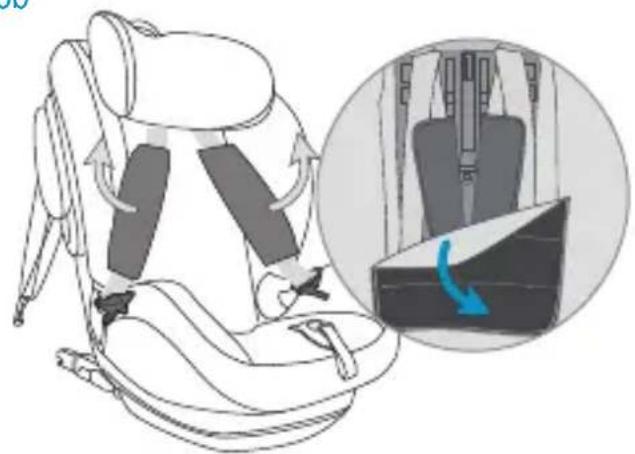
a. Pull lever "A" (16) outwards and, keeping it pulled, fully extend the ISOFIX connector "B" (5), until it stops. Release the lever and make sure that the ISOFIX connector is locked in the extended position. Repeat this process on both connectors of the car seat. Open up the container compartment door (13) on the rear side and pull out the Top Tether belt (4) completely, unhooking the carabiner. Close the container compartment door again.
b. Align the ISOFIX connectors with the anchoring points fixed to the vehicle passenger seat and press until you hear a "click". The indicator (14) on both brackets will turn green, confirming that they have attached. Check that both brackets are attached correctly. Push the car seat towards the passenger seat, making sure that both ISOFIX connectors are extended in the same position.
c. Attach the Top Tether to the appropriate anchoring point indicated by the symbol: Tighten the Top Tether belt until the indicator turns green. The Top Tether belt must pass over the backrest of the vehicle passenger seat, it must never pass over the headrest. If necessary, lift up or remove the headrest from the passenger seat.
Note: before use, check that the ISOFIX connectors are correctly attached on both sides, when pulling the car seat, they must not detach.
REMOVING THE CAR SEAT FROM THE VEHICLE
Loosen the Top Tether belt to reduce the fixing tension. Unhook the belt anchoring carabiner.
Slide button (15) to release the connectors from the vehicle's ISOFIX anchoring device. Remove the car seat from the vehicle.
INSTALLING THE CAR SEAT IN THE CAR
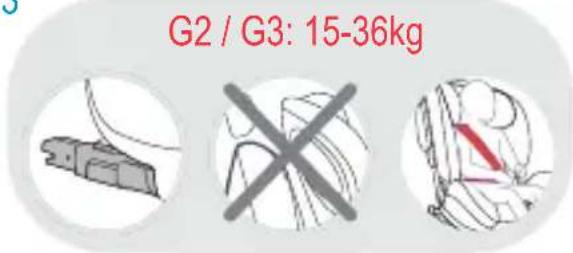
Group 2-3 installation (children from 15 to 36 kg)
- Group 2-3 (SEMI-UNIVERSAL). Follow the installation for the group 1 ISOFIX anchoring system, WITHOUT using the Top Tether belt.
- Group 2-3 (UNIVERSAL). It is possible to install the car seat with the vehicle's 3-point seat belt only, WITHOUT using the ISOFIX connectors and WITHOUT the Top Tether belt. Follow just the installation steps with the vehicle's 3-point seat belt, see "Group 2 and 3 use (from 15 to 36 kg)".
INSTALLING THE CAR SEAT
SECURING THE CHILD IN THE CAR SEAT
The ISOPLUS car seat can be used with the following weight groups:
group 1 (from 9 to 18 kg) - the 5-point harness supplied with the car seat is used.
group 2-3 (from 15 to 36 kg) - the harness supplied with the car seat is removed and the vehicle's 3-point seat belt is used.
Group 1 (from 9 to 18 kg) - HARNESS - See figure "2a, 2b"
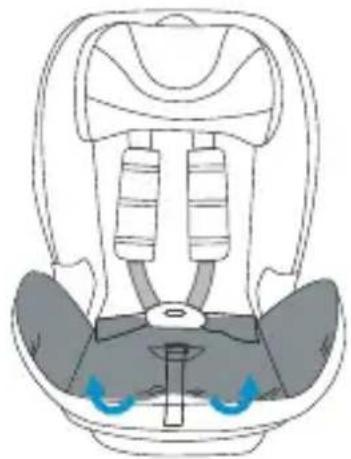
Loosening the harness: press the adjustment button A and at the same time grasp the straps (chest belts) in the lower part, below the chest protector padding, and pull them forwards to loosen them.
IMPORTANT: Do not pull on the straps by gripping the chest protector padding.
Press the red button on the central buckle to unclip the straps and place them to the side of the car seat; you can secure the ends of the buckle with the elastic loops located on the sides of the seat.
Place the child in the car seat. Slide the straps over the child's shoulders and bring together the two ends/tabs of the straps to make a single connector.
Insert the connector into the central buckle until you hear a "click".
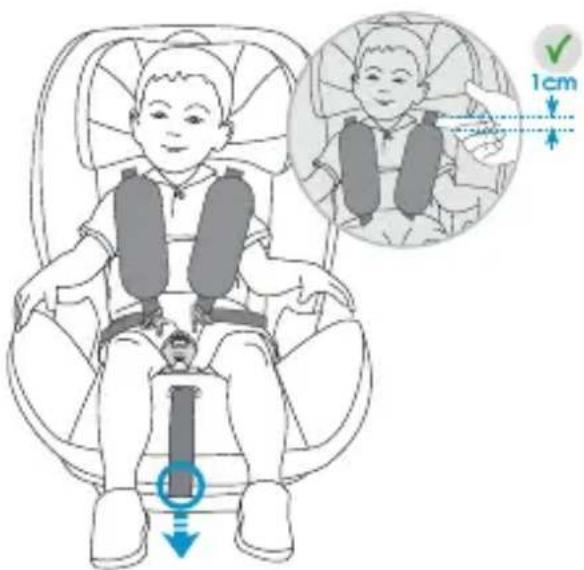
Tightening the harness: Pull the harness adjustment strap so as to tighten it properly against the body of the child. The harness is correctly tightened when the gap between the harness and the child is no greater than the thickness of your finger (1 cm).
NOTE: check that the buckle is secured by tugging the shoulder and waist straps.
CONVERTING FOR GROUPS 2-3 (15-36kg)
It is recommended that you use the 5-point harness for as long as possible.
If you remove the booster cushion this could allow you to use the seat in group I configuration for longer.
When your child has outgrown the group 1 (9-18kg) configuration and you wish to use the seat for a child in either group 2 (15 - 25kg) or group 3 (22-36kg) then you will need to remove the child car seats integral 5-point harness.
INSTALLING THE CAR SEAT
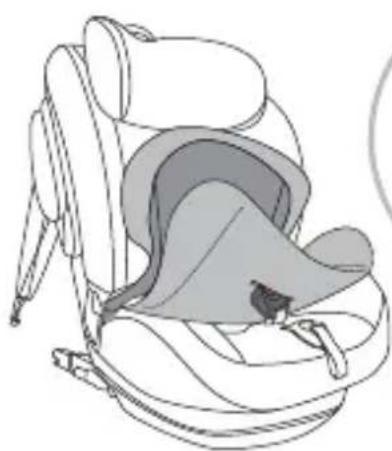
REMOVING THE HARNESS - See figure "3a, 3b, 3c, 3d"
Completely loosen the shoulder straps, see paragraph "loosening the harness" (Group 1). Pull the handle on the headrest and, keeping it pulled, raise or lower the headrest, adjusting it according to the child's height.
Press the red button on the central buckle to release the shoulder straps.
Unhook the press studs on the sides of the backrest fabric, place the shoulder straps on the back of the fabric. Place the buckle tips on the seat sides, in the lower part (fig 3b). Position the backrest fabric correctly and attach the press studs.
Remove the buckle protection padding and store it in a safe place or place it behind the backrest fabric, with the chest straps.
Lift up the seat cover fabric, pulling it out of the harness adjustment device and lift up the inner padding, pulling it out of the harness adjustment device, pulling carefully and gently.
Unthread the buckle inwards from the slots in the fabric and padding, open up the container compartment door and put the buckle back inside. Close the compartment.
Reposition the internal padding correctly on the seat.
Reposition the seat lining correctly, fitting the fabric around the harness adjustment device.
Reposition the lining correctly along the outer edge of the car seat.
Group 2 and 3 use (from 15 to 36 kg)
Place the car seat on the vehicle's passenger seat in a forward-facing position.
Pass the diagonal part of the 3-point seat belt behind the headrest of the car seat and through the red diagonal belt guide (A) 3e located on the lower part of the headrest, on the retractor side.
Place your child in the car seat.
Attach the 3-point belt to the vehicle's buckle and pass the lap belt through the red "lap belt guides" (15), making sure that the lower end of the diagonal belt also passes through the lap belt guide on the buckle side.
Pull the diagonal part of the belt towards the retractor so that the belt is taut and adheres to the chest and legs of the child. See figure "3e".
Make sure that it is installed correctly.
USING THE CAR SEAT
Adjusting the headrest and harness heigh
Group 1 (9-18 kg)
To adjust the chest straps and the headrest into the correct position, pull out the handle (6) on the headrest and, keeping it pulled, raise or lower the headrest (1) adjusting it according to the child's height.
Ensure that the straps are positioned just above the child's shoulders and that there is a space of about 1 cm ", See figure "2b"
CAUTION: Loosen the harness before you adjust the headrest (for more details see "Loosening the harness".
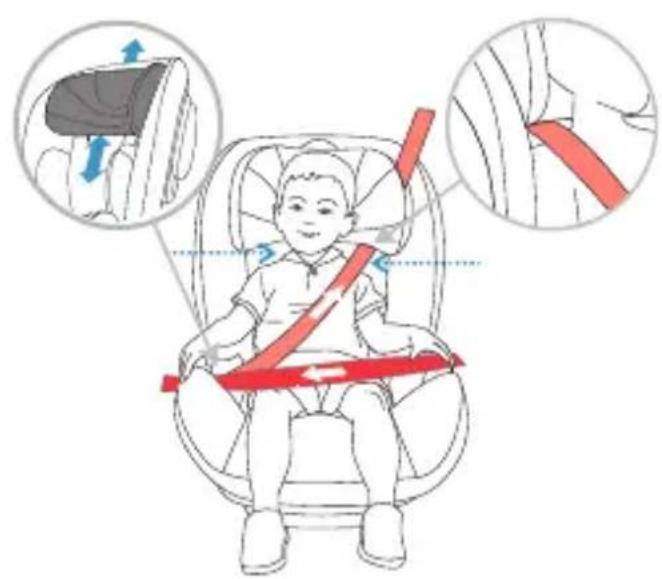
Group 2/3 (15-36 kg) - See figure "4"
To adjust the headrest into the correct position, pull out the handle (6) on the headrest and, keeping it pulled, raise or lower the headrest (1) adjusting it according to the child's height.
The headrest must be adjusted so that there is a space two fingers wide between the headrest and your child's shoulders.
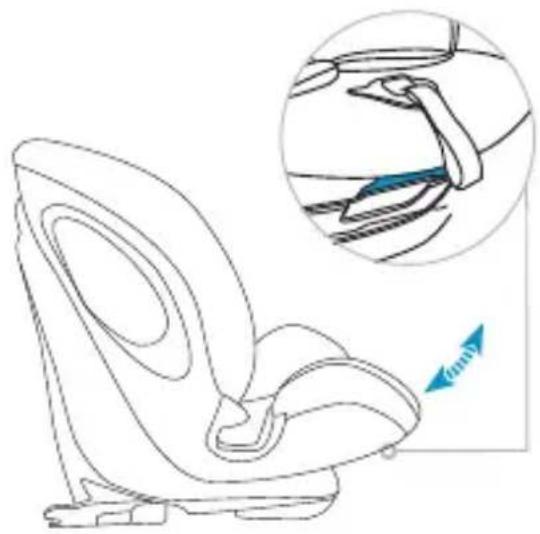
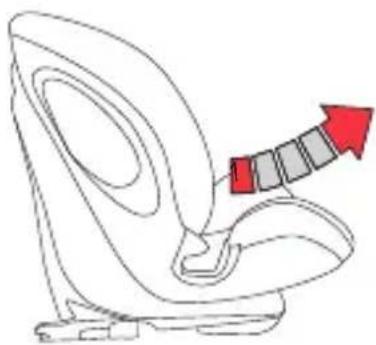
Reclining the seat - See figure "5"
In Group 1 (9-18 kg) the seat of the car seat can be reclined in 4 different positions, from the vertical position to the most reclined one.
WARNING: In the Group 2 (15-25 kg) and in the Group 3 (22-36 kg) the seat of the car seat can be reclined only in 1 position, Vertical position (1). Others positions are not allowed.
Press the adjustment handle located under the front of the car seat and, holding it down, pull or push the seat forwards or backwards. Release the handle when the seat is in the desired position and make sure that it is locked correctly; you will hear a "click" when the seat has attached.
MAINTENANCE AND CLEANING
Remove the car seat lining
Remove the lining fabric of the seat by sliding it along the outer edge of the seat, pulling gently. Remove the fabric from the harness adjustment device, from the diagonal belt guide.
To replace the lining, follow the reverse procedure. Make sure you have inserted the fabric correctly along the outer edge of the seat.
Cleaning
The lining can be machine washed at a temperature not exceeding 30^ C, using a mild detergent. Follow the washing instructions on the label.
Do not tumble dry, as the padding may come off the fabric.
Do not expose the lining to sunlight for prolonged periods; when the car seat is not in use, cover it or place it in the boot.
The plastic parts can be washed with a damp cloth and mild soap.
The contents of this document as stated below will come into effect as from 01.01.2005 and replace, on every account and in full, any previous message referring to the guarantee provided by Foppa Pedretti S.p.A.
FORMAL GUARANTEE
Foppa Pedretti S.p.A. the head office of which is located at n. 11 Via Volta, Grumello del Monte (Italy), guarantees directly to the Consumer that this brand new product is free of faults with regard to the materials, design and manufacture and that it complies with the characteristics as declared by the manufacturer.
This formal guarantee is valid in all Member Countries of the European Union and it neither excludes nor limits the Consumer's rights in accordance with mandatory measures provided for by the law with regard to the Retailer of the Product.
To take advantage of this formal guarantee, the Consumer must return the faulty product to the Retailer, presenting to the same the proof of purchase of the Product which must clearly show the Retailer's address, the date of purchase of the Product with the Retailer's stamp and signature and an indication of the Product itself or, alternatively, the receipt which must not have been altered and which must clearly show the same information as that referred to above.
The manufacturer's formal guarantee is valid for twelve (12) months from the date of purchase of the Product. During this period, Foppa Pedretti S.p.A. will repair or replace the faulty product, at its own discretion.
The formal guarantee is granted to the end buyer of the Product (Consumer) and it neither excludes nor limits the mandatory rights of the Consumer as provided for by the law and/or the rights that the Consumer may have with regard to the Dealer/Retailer of the Product.
EXCLUSIONS TO THE FORMAL GUARANTEE.
The formal guarantee is excluded in the case of damage caused to the Product for the following reasons: if the product is used in a way that does not comply with the information contained in the use and assembly instruction sheet, if the product is knocked or dropped, if the Product is exposed to humidity or extreme heat or environmental conditions, or to sudden changes in the same, corrosion, oxidization, unauthorized alterations or repairs to the Product, repairs using unauthorised spare parts, improper use, improper maintenance or failure to carry out the same, improper maintenance compared to the information given on the use and assembly instruction sheet, incorrect assembly, accidents, damage caused by food or drink, damage caused by chemical products, cases of force majeure.
In any case, Foppa Pedretti S.p.A. declines all responsibility for damage caused to persons or to property, other than the Product, when such damage is caused by a failure to comply with the instructions/advice/warnings cont a ined in the manua l or, alternatively, in the use and assembly instruction sheet provided with each Product for the owner/user. (Purely as an example, in the case of a cot : "Check your baby constantly. Make sure that the sheets and blankets do not cover the baby's head...").
Furthermore, Foppa Pedretti S.p.A. declines all responsibility for damage to persons and to property when the breakage of its products is due to a deterioration in the components of the Product that are subject to wear. All the components of the Product made of plastic are considered to be components subject to wear.
TABLE DES MATIÈRES
Avertissements PAG 33
Composants PAG 38
text_image
Diagram of a car seat with numbered labels pointing to different compartments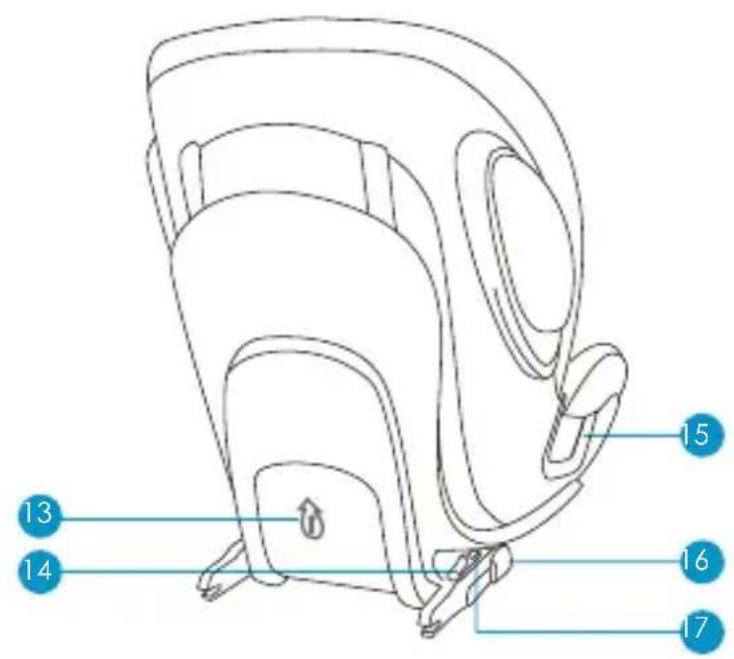
text_image
Technical diagram of a car seat assembly with numbered labels pointing to different components.Groupes 2/3 (15-36 kg) - Voir figure "4"
EXCLUSIONS DE LA GARANTIE CONVENTIONNELLE.
text_image
Diagram of a car seat with numbered labels pointing to different compartments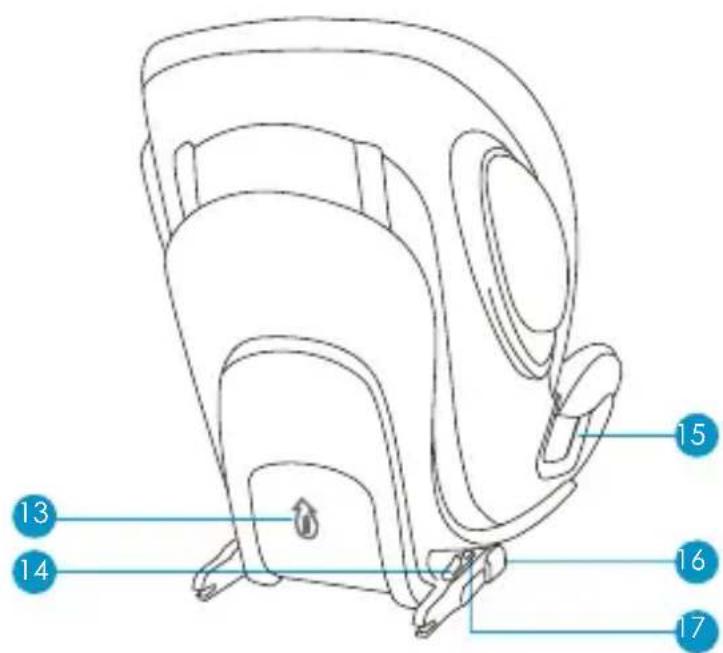
text_image
Technical diagram of a car seat with numbered labels pointing to specific componentstext_image
Diagram of a car seat with numbered labels pointing to different compartments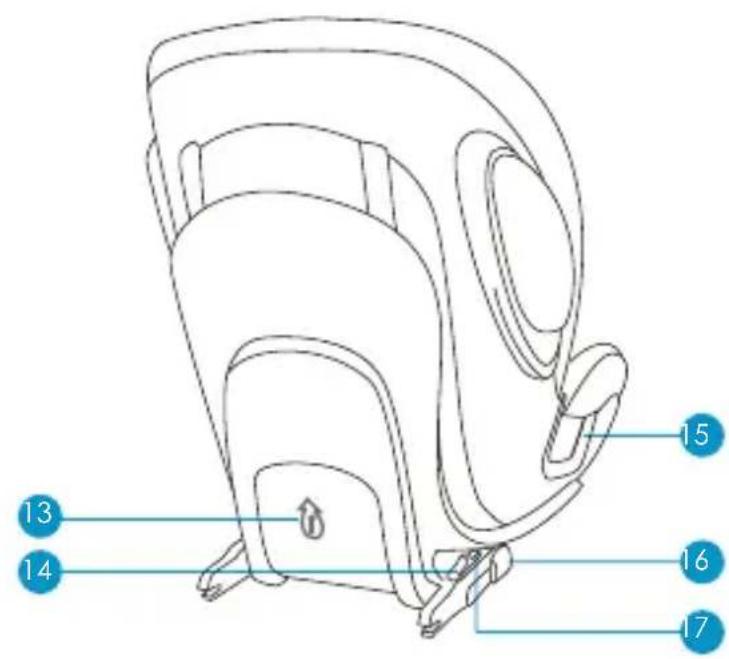
text_image
Technical diagram of a car seat with numbered labels pointing to different seat positions.text_image
Diagram of a car seat with numbered labels pointing to different compartments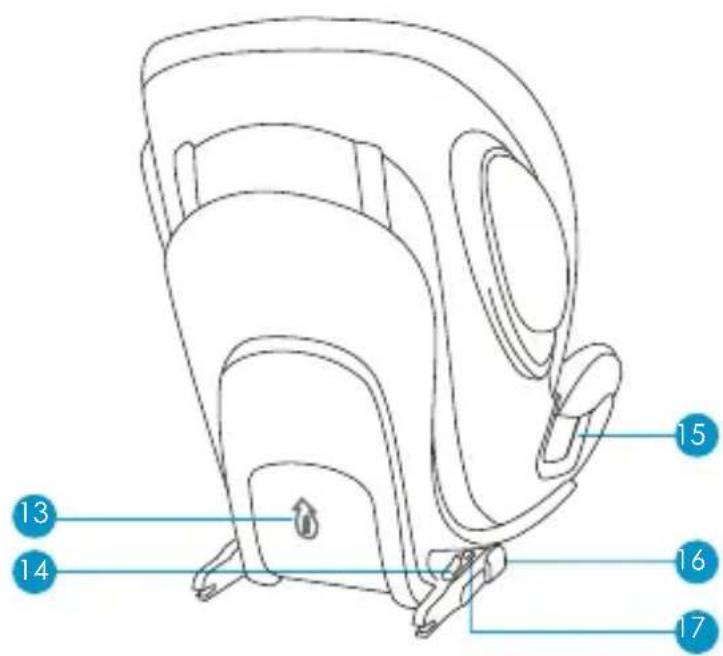
text_image
Technical diagram of a car seat with numbered labels pointing to different seat positions.text_image
Diagram of a car seat with numbered labels pointing to different compartments
text_image
Technical diagram of a car seat with numbered labels pointing to different seat positions.text_image
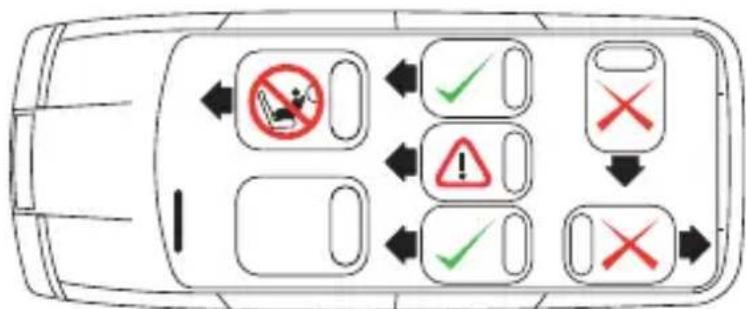
Diagram of a car with multiple directional signs indicating traffic or safety rules, including no stop, check, and warning symbols.VEHICLE APPLICATION LIST
Semi-Universal approved to ECE-R44.04 for use in the vehicles listed in the vehicle application list.
Please note that this list undergoes ongoing revision procedures, with changes and additions of vehicles accordingly.
The up to date list can be consulted on our web site: www. foppapedretti.it
INFORMATION
Please consult with the vehicle manufacturer regarding access to ISOFIX points.

DO NOT USE ON A PASSENGER SEAT WITH A FRONT AIRBAG
CHECK
WARNING: before purchasing, consult the vehicle Use and Maintenance Guide to ensure the ISOFIX anchor is present, as this could be an optional.
text_image
Diagram of a car with multiple directional and safety symbols indicating vehicle use, including no/shock, check, and warning signs.LISTE DES VÉHICULES COMPATIBLES
text_image
Diagram of a car with multiple directional and safety symbols indicating vehicle use or hazard zonestext_image
Diagram of a car with multiple directional and safety symbols indicating vehicle safety or hazard zones.LISTA DE VEÍCULOS AUTOMÓVEIS HOMOLOGADOS
text_image
Diagram of a car with traffic sign icons and directional arrows indicating no or yes actionstext_image
Diagram of a car with traffic sign icons and directional arrows indicating no or yes actionsALFA ROMEO *

| MiTo (Facelift 2013) | 2008 | 24 |
| Giulietta (Facelift 2013) | 2010 | 24 |
AUDI*
| A1 3/5 (Facelift 2015) | 2012 | 24 |
| A3 (8V) | 08/12 | 24 |
| A3 Sportsback (8V) | 2013 | 24 |
| A4 Avant (Facelift 2011) | 2007 | 24 |
| A6 Avant (Facelift) | 2014 | 24 |
| A8 (4H) | 02/10-2013 | 24 |
| SQ5 (8R) | 01/13 | 24 |
| Q3 (Facelift 2014) | 2011 | 24 |
| Q5 (Facelift 09/12) | 2008 | 24 |
| Q7 | 06/15 | 23457 |
BMW*
| 1 (E81) | 5/07-2012 | 24 |
| 1 (E81) 4 | 5/07-2012 | 24 |
| 1 (E82) | 2007 | 24 |
| 1 (E87) | 03/07-2012 | 24 |
| 1 (E88) | 2008 | 124 |
| 1 (F20) | 09/11 | 24 |
| 1 (F21) | 06/12 | 24 |
| 2 (F45) Active Tourer | 03/14 | 24 |
| 2er (F46) Grand Tourer | 03/15 | 24 |
| 3 (E90) | 2005 | 24 |
| 3 (E92) | 2005 | 24 |
| 3 (F30) | 02/12 | 24 |
| 3 (F31) | 09/12 | 24 |
| 3 GT (F34) | 06/13 | 24 |
| 3 Touring (E91) | 09/08-2012 | 24 |
| 4 (F32) | 2013 | 24 |
| 4 (F36) Grand Coupe | 2014 | 24 |
| 5 GranTurismo (F07) | 08/09 | 24 |
| 5 Touring (F11) | 06/10-2013 | 24 |
| 5 Touring (F11) (Facelift) | 07/13 | 24 |
| 5 Touring (E61) | 2003-2010 | 24 |
| 7 (E65) (Facelift 2005) | 2001-2008 | 24 |
| 7 (F01) | 11/08-2012 | 24 |
| 7 (7L) (Facelift) | 07/12 | 24 |
| M5 (F10) | 11/11 | 24 |
| Cruze (EB) | 2012 | 24 |
| HHR (2LT) | 02/08 | 24 |
| Malibu | 2011 | 24 |
| Matiz II (KLAK) | 2005 | 24 |
| Orlando (KL1Y) | 03/11 | 24 |
| Spark (KL1M) | 03/10 | 24 |
| Spark (KL1M) (Facelift) | 01/13 | 24 |
| TRAX (KL1B) | 04/13 | 24 |
| Volt (D1JCI) | 10/11 | 24 |
CITROEN *
| Berlingo Multispace (Facelift 201) | 2) 2008 | 24 |
| Berlingo II (F) (Facelift) | 04/12 | 24 |
| C-Crosser (V) | 06/07-2012 | 24 |
| C1 | 2012 | 24 |
| C3 (F) | 01/10-03/13 | 24 |
| C3 Picasso (SH) | 2009 | 24 |
| C4 (L) | 2004-2010 | 24 |
| C4 (L) 3 | 2004-2010 | 24 |
| C4 II (N) | 10/10 | 24 |
| C4 Aircross (B) | 06/12 | 24 |
| C4 Grand Picasso (U) | 11/06-1010 | 234 |
| C4 Grand Picasso (U)(Facelift) | 11/10-2013 | 234 |
| C4 Grand Picasso | 2013 | 234 |
| C4 Picasso (U) | 10/06-10/10 | 234 |
| C4 Picasso (U) (Facelift) | 10/10 | 234 |
| Mini 2 (R56) (Facelift) | 11/06 | 24 |
| Mini (F55) 5 | 10/14 | 24 |
| Mini (F56) 3 | 03/14 | 24 |
| Mini Clubman (R55)4 | 09/07 | 24 |
| Mini Countryman(UKLX)(R60)4 | 09/10 | 24 |
| Mini Countryman(UKLX)(R60)5 | 09/10 | 24 |
| Mini Countryman(R60)5(Facelift) | 10/12 | 24 |
| X1 (E84) | 10/09-2012 | 24 |
| X1 (E84) (Facelift) | 06/12 | 24 |
| X3 (E83) | 01/04-2010 | 24 |

| X3 (F25) | 11/10 | 24 |
| X5 (E53) | 1999-2006 | 24 |
| X5 (X70_E70) | 03/07-2013 | 24 |
| X5 (F15) | 2013 | 24 |
| X6 (E71) 1,35m | 2008-2012 | 24 |
| X6 (X6-E71) (Facelift) | 06/12 | 24 |
| Z4; | 2002 | ISOFIX 1 |
CHEVROLET*
| Aveo (T250) | 2006 | 24 |
| Aveo (KL1T) | 09/11 | 24 |
| Captiva (KLAC) | 10/06 | 24 |
| Captiva (KLAC)(Facelift) | 2011 | 24 |
| Cruze (KL1J) | 08/11 | 24 |
| Cruze SW (KL1J) | 09/12 | 24 |
| C4 Picasso singleseats (3) | 10/10 | 234 |
| C4 Picasso | 2013 | 234 |
| C5 Tourer (R) | 04/08-2010 | 24 |
| C5 Tourer (R)(Facelift) | 12/10 | 24 |
| DS3 (S) | 03/10 | 24 |
| DS3 (S) | 03/13 | 24 |
| DS4 (N) | 03/11 | 24 |
| DS5 (K) | 03/12 | 24 |
| Jumpy | 2012 | 24 |
| Nemo (A) | 2007 | 24 |
DACIA*
| Dokker (SD) | 02/13 | 234 |
| Lodgy (SD) | 06/13 | 24 |
| Logan MCV (SR) | 06/13 | 24 |
| Sandero (SD) | 06/08-2012 | 24 |
| Sandero II (SR) | 11/12 | 24 |
FIAT *
| 500 (312) | 10/07 | 24 |
| 500L (312) | 10/12 | 24 |
| Bravo (198) | 07/07 | 24 |
| Chroma (194) | 05/05 | 24 |
| Doblo (263) | 02/10 | 24 |
| Freemont (JC) | 09/11 | 24 |
| Grande Punto (199) | 01/06 | 24 |
| Idea (350) | 2003 | 24 |

| Panda (319) | 03/12 | 24 |
| Punto (199) 3(Facelift) | 02/12 | 24 |
| Qubo (255) | 02/08 | 24 |
FORD *
| B-Max | 06/12 | 24 |
| C-Max | 2010 | 24 |
| Fiesta | 2012 | 24 |
| Focus | 2011 | 24 |
| Focus Turnier | 2015 | 24 |
| Galaxy (Facelift 2010) | 2006 | 234 |
| Kuga | 2008-2012 | 24 |
| Kuga | 2013 | 24 |
| Mondeo Estate (Ba7) (Facelift) | 2010 | 24 |
| Mondeo (Facelift 2010) | 2007-2014 | 24 |
| Mondeo ; | 2014 | 24 |
| S-MAX (Facelift 2010) | 2006 | 234 |
| Tourneo Custom | 2012 | 236 |
GEELY EMGRAND *
| EC7 | 2011 | 24 |
| Accord (Facelift 2011) | 2008 | 24 |
| Civic | 2006-2011 | 24 |
| CRV (Facelift 2011) | 2006 | 24 |
| CRV (Facelift 2010) | 2006-2012 | 234 |
| CR-V (Facelift) | 2015-2017 | 234 |
HONDA*
| Genesis (Bk38) | 09/10 | 24 |
| Getz (TB) | 2005-2009 | 24 |
| i10 (PA) (Facelift) | 02/11-2013 | 24 |
| i20 (PBT) 3(Facelift) | 06/12 | 24 |
| i20 (PBT) 5(Facelift) | 06/12 | 24 |
| i30 (FD) | 07/07-2010 | 24 |
| i30 (FDH) | 07/10-2012 | 24 |
| i30 CW (FD) | 2008-2010 | 24 |
| i30 CW (FDH) | 2010-2012 | 24 |
| i40 CW (VF) | 06/11 | 24 |
| ix20 (JC) | 11/10 | 24 |
| ix35 (ELH)(Facelift 2013) | 2009-2015 | 24 |
| Santa Fe (CM) (Facelift) | 01/10-2011 | 24 |
HYUNDAI*

| Santa Fe (DM) | 09/12 | 24 |
| Veloster (FS) | 04/11 | 24 |
JAGUAR*
| XF | 2011 | 24 |
| F-Pace (761) | 2016 | 24 |
| XF (X260) | 2015 | 24 |
KIA*
| Carens (RP) | 03/13 | 24 |
| Cee'd (ED) (Facelift) | 10/10 | 24 |
| Cee'd sw (ED) (Facelift) | 2009 | 24 |
| Cee'd sw (JD) (Facelift) | 09/12 | 24 |
| Picanto (SA) | 04/04 | 24 |
| Pro Cee'd (ED)(Facelift) | 01/11 | 24 |
| Rio | 2011 | 24 |
| Sorento (XM) (Facelift) | 10/12 | 24 |
| Soul (AM) | 2008-2011 | 24 |
| Soul (AM) (Facelift) | 10/11 | 24 |
| Sportage (JES) | 01/08 | 24 |
| Sportage (SL) | 08/10 | 24 |
LAND ROVER *
| Discovery 4 | 2006-2013 | 24 |
| Freelander II | 2006-2013 | 24 |
LEXUS *
| CT 200h (A10(A)) | 03/11 | 24 |
| RX (HAL1) | 04/09 | 24 |
| RX 450h (HAL1(A)) | 07/12 | 24 |
MAZDA*
| 2 (DE) | 09/07 | 24 |
| C(Facelift 2004) | 2000-2007 | 24 |
| C (W204) | 2007 | 24 |
| C (S204) | 2007 | 24 |
| C | 2011 | 24 |
| C (204) | 03/11 | 24 |
| C (S205) | 2014 | 24 |
| E (W212 ; S212) | 2009 | 24 |
| E (C207) | 2009 | 24 |
| GLK | 2008 | 24 |
| G-Klasse (G55 AMG) (Facelift) | 2007 | 24 |
| GLA (X156) | 2014 | 24 |

| GLK (Facelift 2013) | 08/08 | 24 |
| ML (W164) | 07/05 | 24 |
| R (W251/V251) | 12/05 | 2457 |
| Sprinter | 2013 | 23 |
| V-Klasse | 2014 | 24567 |
MG *
NISSAN *
| 6 | 2011 | 24 |
| Juke (F15) | 10/10 | 24 |
| Leaf (ZEO) | 04/12 | 24 |
| Micra (K12) | 2003-2005 | 24 |
| Micra (K13) | 11/10-2013 | 24 |
| Micra C+C (K12) | 09/05-2009 | 24 |
| Murano (Z51) | 09/08-2011 | 24 |
| 2 (DEE) (Facelift) | 10/10 | 24 |
| 3 (BK) | 11/03 | 24 |
| 3 (BL) | 01/09 | 24 |
| 3 (BL) (Facelift) | 09/11 | 24 |
| 3 MPS (BL) | 10/12 | 24 |
| 5 (CR1) | 2008 | 24 |
| 5 (CW) | 10/10 | 24 |
| 5 (CW) (Facelift) | 03/13 | 24 |
| 6 (GG) | 01/02 | 24 |
| 6 (GJ) | 02/13 | 24 |
| 6 (GH) | 02/08 | 24 |
| 6 (GH)(Facelift) | 2010 | 24 |
| 6 Sport (GY) | 01/02 | 24 |
| CX-5 (KE) | 04/12 | 24 |
| CX-7 (ER) | 08/07 | 24 |
| CX-7 (ER) (Facelift) | 10/09 | 24 |
MERCEDES *
| A | 05/05 | 24 |
| B (Facelift 2008) | 06/05 | 24 |
| B | 2011 | 24 |
| Murano (Z51) (Facelift) | 01/12 | 24 |
| Navara(D40)(Facelift)(Crew Cab) | 04/10 | 24 |
| Note (E11) (Facelift) | 2009-2013 | 24 |
| Pixo (HF) | 2009-2013 | 24 |
| Pulsar | 2014 | 24 |
| Qashqai+2 (J10)(Facelift) | 03/10 | 24 |
| Qashqai | 2015 | 24 |
| Qashqai (Facelift 2010) | 12/06-11/13 | 24 |
| X-TRAIL (T31) | 06/07-2010 | 234 |
| X-TRAIL 5 + 7 | 2014 | 24 |
MITSUBISHI*
| ASX (Facelift 2012) | 2010 | 24 |
INFINITI*
| M35h (Y51H) | 09/11 | 24 |
OPEL*
| Adam (S-D) | 01/13 | 24 |
| Agila (H-B) | 04/08-2012 | 24 |
| Ampera (D1JOI) | 11/11 | 24 |
| Astra J (PJ-SW) | 12/09-2012 | 24 |
| Astra J GTC (PJ-SW) | 01/12 | 24 |
| Astra J Sports Tourer(PJ-SW) | 11/10-2012 | 24 |
| Astra Sports Tourer(Facelift 2012) | 2) 2009 | 24 |
| Astra (Facelift 2012) | 2009 | 24 |
| Antara (L-A) (Facelift)5 | 2010 | 24 |
| Corsa D (S-D) 3(Facelift) | 01/11 | 24 |
| Corsa D (S-D) (Facelift) | 01/11 | 24 |
| Insignia (OG-A) 5(Facelift) | 08/11 | 24 |
| InsigniaS Tourer(Facelift 2011) | OG-A) 08/11 | 24 |
| InsigniaS Tourer(Facelift 2013) | 2009 | 24 |
| Meriva B (S-D) | 06/10 | 24 |
| Mokka (E-V) | 10/12 | 24 |
| Zafira B (A-H) | 2005-2008 | 24 |
| Zafira B (A-H) (Facelift) | 2008-2012 | 24 |
| Zafira C Tourer(P-J SW) | 01/12 | 24 |
PEUGEOT*
| 107 | 2012 | 24 |
| 207 (W) | 05/06-2009 | 24 |
| 207 CC (W) | 2007 | 1 |
| 207 SW (W) | 05/06-06/09 | 24 |
| 207 SW (W) (Facelift) | 06/09-2013 | 24 |
| 208 (C) 3 | 04/12 | 24 |
| 208 (C) 5 | 04/12 | 24 |
| 308 (4) | 09/07 | 24 |
| 308 (4) (Facelift) | 05/11 | 24 |

| 308 SW (4) (Facelift) | 05/11 | 234 |
| 308 SW seatbench (4) | 2008 | 24 |
| 508 (8) | 03/11 | 24 |
RENAULT *
| Captur | 2013 | 24 |
| Clio (R) 3 | 05/09-01/12 | 24 |
| Clio (R) 5 | 05/09 | 24 |
| Clio Campus (B) 3 | 2009 | 24 |
| Clio Grandtour (R) | 01/08 | 24 |
| Clio IV (X98) | 10/12 | 24 |
| Clio IV Grandtour(X98) | 10/12 | 24 |
| Espace 4 (K) | 03/06-2010 | 24 |
| Espace 4 (K) (Facelift) | 12/10 | 24 |
| Fluence (Z) (Facelift) | 08/10 | 24 |
| Fluence (ZE) | 2011 | 24 |
| Grand Modus (P) | 2008 | 24 |
| Grand Scénic (JZ)(Facelift) | 01/12 | 24 |
| Kangoo (W) | 01/08-2012 | 24 |
| Koleos (Y) | 09/08-10/11 | 24 |
| Koleos (Y) (Facelift) | 10/11 | 24 |
| Laguna 2 (Y) | 02/01-2005 | 24 |
| Laguna 3 Grandtour(T) | 03/08-2010 | 24 |
| Laguna 3 Grandtour(T) (Facelift) | 11/10 | 24 |
| Megane 2 CC (M) | 01/06-2010 | 24 |
| Mégane 2 Grandtour(M) | 2003-2009 | 24 |
| 508 SW (8) | 03/11 | 24 |
| 508 RXH SW (8) | 02/12 | 24 |
| 1007 (K) | 04/05-2009 | 24 |
| 2008 (C) | 06/13 | 24 |
| 3008 (OU) | 2009 | 24 |
| 4007 (V) | 09/07 | 234 |
| 4008 (B) | 06/12 | 24 |
| 5008 (0) (Facelift 2013) | 2009 | 234 |
| Expert Tepee (B299) | 2007 | 24 |
| Expert Tepee (B229)8 (Facelift) | 2012 | 24 |
| Expert Tepee (B299)9 (Facelift) | 2012 | 24 |
| Partner Tepee (7) | 05/08 | 24 |
| RCZ (4J) | 04/10 | 24 |
RCZ (4J) (Facelift)
②④
PORSCHE *
| Cayenne (Facelift 2007) | 2002-2010 | 124 |
| Panamera | 2009 | 24 |
RANGE ROVER *
| Evoyque | 2011 | 24 |
| 50Mégane 3 (Z) 5 | 11/08-2012 | 24 |
| Mégane 3 (Z) | 2009-2012 | 24 |
| Mégane 3 (Z)(Facelift) | 2012 | 24 |
| Mégane 3 Grandtour(Z) | 06/09 | 24 |
| Modus (P) | 2005 | 24 |
| Scénic 2 (JM) (Facelift) | 01/07-2009 | 24 |
| Scénic 3 (JZ) | 04/09-2012 | 24 |
| Scénic 3 (JZ) (Facelift) | 01/12 | 24 |
| Scénic XMOD (JZ) | 04/13 | 24 |
| Twingo 1 (C06) (Facelift) | 01/02 | 24 |
| Twingo 2 (N) | 09/07-2012 | 124 |
| Twingo 2 (N) (Facelift) | 01/12 | 124 |
SEAT *
| Alhambra | 12/12 | 23457 |
| Exeo (3R) | 2009-2011 | 24 |
| Exeo (3R) (Facelift) | 12/11 | 24 |
| Exeo ST (3R) | 06/09-2011 | 24 |
| Exeo ST (3R)(Facelift) | 12/11 | 24 |
| Leon (5F) | 11/12 | 24 |
| Leon 5 | 2012 | 24 |
| Leon SC (5F) | 06/13 | 24 |
| Leon ST | 2012 | 24 |
| Mii (AA) 3 | 04/12 | 24 |
| Toledo (NH) | 11/12 | 24 |
SKODA*
| Citigo (AA) 3 | 06/12 | 24 |
| Fabia 2 (5J)(Facelift) | 09/10 | 24 |
| Octavia 3 (5E) | 02/13 | 24 |
| Octavia 3 (5E) | 05/13 | 24 |
| Octavia Estate (1Z)(Facelift) | 2009-2013 | 24 |

| Octavia (Facelift) | 2009-201 | 24 |
| Rapid (NH) | 10/12 | 24 |
| Roomster (5J) | 03/07-2010 | 24 |
| Roomster (5J) (Facelift) | 05/10 | 24 |
| Superb(Facelift 2013) | 2008-2015 | 24 |
| Superb(Facelift 2013) | 2008-2015 | 24 |
| Yeti | 2009 | 24 |
SMART\*
SUBARU \*
| FORTWO (Typ 453) | 2014 |
| Forester | 2012 | 24 |
| Forester (Facelift 2010) | 2008-2013 | 24 |
| XV | 2011 | 24 |
SUZUKI \*
| Alto (GF) | 03/08 | 24 |
| Grand Vitara (JT)3 | 09/05 | 234 |
| Avensis (T27) | 2008-2011 | 24 |
| Avensis (T27) (Facelift) | 2012 | 24 |
| Avensis (T27)(Facelift) | 01/12 | 24 |
| Camry (R1) | 06/13 | 24 |
| Corolla Verso (R1) | 2004-2009 | 24 |
| GT86 (ZN) | 09/12 | 24 |
| iQ (Aj1) | 06/10-2014 | 24 |
| Land Cruiser (J15)(Facelift) | 04/12 | 234 |
| Prius 2 (NHW20) | 2003-2009 | 24 |
| Prius 3 (Vw3) | 01/02-2012 | 24 |
| Prius + (XW4) | 06/12 | 24 |
| RAV4 (Xa3) | 03/06-02/09 | 24 |
| RAV4 (XA3) (Facelift) | 05/10-03/13 | 24 |
| RAV4 | 2013 | 24 |
| Urban Cruiser (XP11) | 04/09 | 24 |
| Verso S (XP12) | 03/11 | 24 |
| Yaris 2 (XP9) (Facelift) | 2009-2011 | 24 |
| Yaris 3 (XP13) 3 | 10/11 | 24 |
| Yaris 3 (XP13) 5 | 10/11 | 24 |
VOLVO \*
| C30 1) 3 | 1,35m | 2006 | 24 |
| S60 (F) | 03/10 | 24 |

| Grand Vitara (JT)5 | 09/05 | 234 |
| Jimny (FJ) (Facelift) | 12/12 | 24 |
| Splash (EX) | 04/08 | 24 |
| Splash (EX) (Facelift) | 05/12 | 24 |
| Swift (MZEZ) | 01/05 | 24 |
| Swift (NZ) | 09/10 | 24 |
| SX4 (EY and GY) | 12/10 | 24 |
TOYOTA*
| Auris (E150) 5 | 03/07-02/10 | 24 |
| Auris (E150) 3(Facelift) | 03/10-08/12 | 24 |
| Auris (E150) 5(Facelift) | 03/10-2012 | 24 |
| Auris (E180) 5 | 01/13 | 24 |
| Auris Hybrid (HE15U) | 09/10-2012 | 24 |
| Auris Touring Sports(HE180) | 07/13 | 24 |
| Avensis (T25) | 01/03-2008 | 24 |
| S80 (A) | 05/07-2009 | 24 |
| V40 (M) | 09/12 | 24 |
| V40 Cross Country (M) | 01/13 | 24 |
| V60 (F) 1,35m | 2010-2013 | 24 |
| V60 (F) (Facelift) | 06/13 | 24 |
| V70 1) | 2000-2007 | 24 |
| V70 (B) | 06/07-2011 | 24 |
| V70 (B) (Facelift) | 08/11-2013 | 24 |
| XC60 (D) | 01/08-2013 | 24 |
| XC60 (Facelift 2013) | 2008 | 24 |
| XC70 (P24) | 06/07-2011 | 24 |
| XC70 (B) (Facelift) | 08/11-2013 | 24 |
| XC90 1) 5+7 | 2002 | 24 |
| XC90 (C) | 05/06-2010 | 24 |
| XC90 (C) (Facelift) | 12/11 | 24 |
VW*
| Amarok (2H) | 09/10 | 24 |
| Amarok | 2010 | 24 |
| Beetle (16) | 11/11 | 24 |
| Beetle (16) | 11/12 | 24 |
| Caddy (Facelift 2010) | 2003 | 24 |
| Caddy | 03/15 | 24 |
| Caddy Alltrack | 02/16 | 24 |
| Golf II | 2013 | 24 |
| Golf 5 (1K) | 2004-2008 | 24 |
| Golf 5 GTI (1K) | 2004-2008 | 24 |
| Golf 5 Variant (1KM) | 06/07-2009 | 24 |
| Golf 6 (1K) | 10/08 | 24 |
| Golf 6 R (1K) | 11/09 | 24 |
| Golf 6 (1K) | 06/11 | 24 |
| Golf 6 Plus (1KP) | 2009 | 24 |
| Golf 6 Variant (1KM) | 05/09 | 24 |
| Golf 7 | 08/12 | 24 |
| Golf 7 GTI | 03/13 | 24 |
| Golf Sportsvan | 02/14 | 24 |
| Jetta | 2011 | 24 |
| Passat B6 (3C) | 2005-2010 | 24 |
| Passat B7 (32) | 10/10 | 24 |
| Passat B7 Alltrack (3C) | 02/12 | 24 |
| Passat B7 Variant (32) | 11/10 | 24 |
| Passat B8 | 2014 | 24 |
| Passat CC (3CC) 1,35m | 2008 | 24 |
| Polo 4 (9N) | 11/01-2005 | 24 |
| Polo 4 (9N3) 5(Facelift) | 2005-2009 | 24 |
| Polo 5 (R) | 03/09 | 24 |
| Polo 5 Crosspolo (6R) | 04/10 | 24 |
| Scirocco (13) | 07/08 | 24 |
| Sharan 2 (7N) | 09/10 | 23457 |
| T5 Multivan(Facelift 2009) | 2003 | 2457 |
| T5 Multivan(Facelift 2013) | 2013 | 2457 |
| T6 Multivan | 2015 | 2457 |
| Tiguan (5N) | 2007-2011 | 24 |
| Tiguan (5N) (Facelift) | 07/11 | 24 |
| Tiguan II | 2016 | 24 |
| Touareg (7L)(Facelift 2006) | 10/02-04/10 | 124 |
| Touareg C2 (7P) | 04/10 | 24 |
| Touran | 2003 | 24 |
| Touran GP2 | 2010 | 24 |
| Touran II | 05/15 | 23457 |
| Up (AA) 3 | 12/11 | 24 |
| Up (AA) 5 | 05/12 | 24 |