
HBA81762BX - Blender BEKO - Free user manual and instructions
Find the device manual for free HBA81762BX BEKO in PDF.
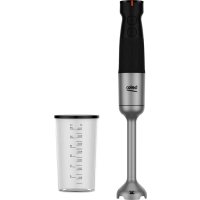



| Product type | Hand blender |
| Brand | Beko |
| Model | HBA81762BX |
| Rated power | 750 W |
| Voltage / Frequency | 220-240 V ~ 50/60 Hz |
| Speed setting | Continuous speed control with Turbo button |
| Included accessories | Blending foot, whisk, mini chopper (200 ml), measuring cup (600 ml) |
| Bowl material | Measuring cup, plastic container for chopper |
| Blades | Stainless steel (blending foot and chopper) |
| Maximum capacity (chopper) | 200 g of meat |
| Maximum capacity (blending) | 150 g carrots + 300 ml water |
| Maximum continuous running time | 10 seconds |
| Safety | Chopper lid lock, automatic overload shut-off, splash protection |
| Cleaning | Motor unit wipe with damp cloth; accessories washable in warm soapy water (except motor unit, cable) |
| Dishwasher | Not recommended for blades and whisk support; other accessories possible but hand washing preferred |
| Storage | Unplugged, in a cool dry place, out of reach of children |
| Weight (approximate) | Approximately 1.5 kg |
| Warranty | 2 years (according to local legislation) |
| Intended use | Household use only, for small quantities of food |
| Country of manufacture | Not specified (manufactured in China or Turkey depending on brand) |
Frequently Asked Questions - HBA81762BX BEKO
User questions about HBA81762BX BEKO
0 question about this device. Answer the ones you know or ask your own.
Ask a new question about this device
Download the instructions for your Blender in PDF format for free! Find your manual HBA81762BX - BEKO and take your electronic device back in hand. On this page are published all the documents necessary for the use of your device. HBA81762BX by BEKO.
USER MANUAL HBA81762BX BEKO
Please read this guide first!
Dear Customer,
Thank you for choosing a BEKO product. We would like you to achieve the optimal efficiency from this high quality product which has been manufactured with state of the art technology. Please make sure you read and understand this guide and supplementary documentation fully before use and keep it as a reference. Include this guide with the unit if you hand it over to someone else. Observe all warnings and information herein and follow the instructions.
Symbols and their meanings
These symbols are used throughout this guide:

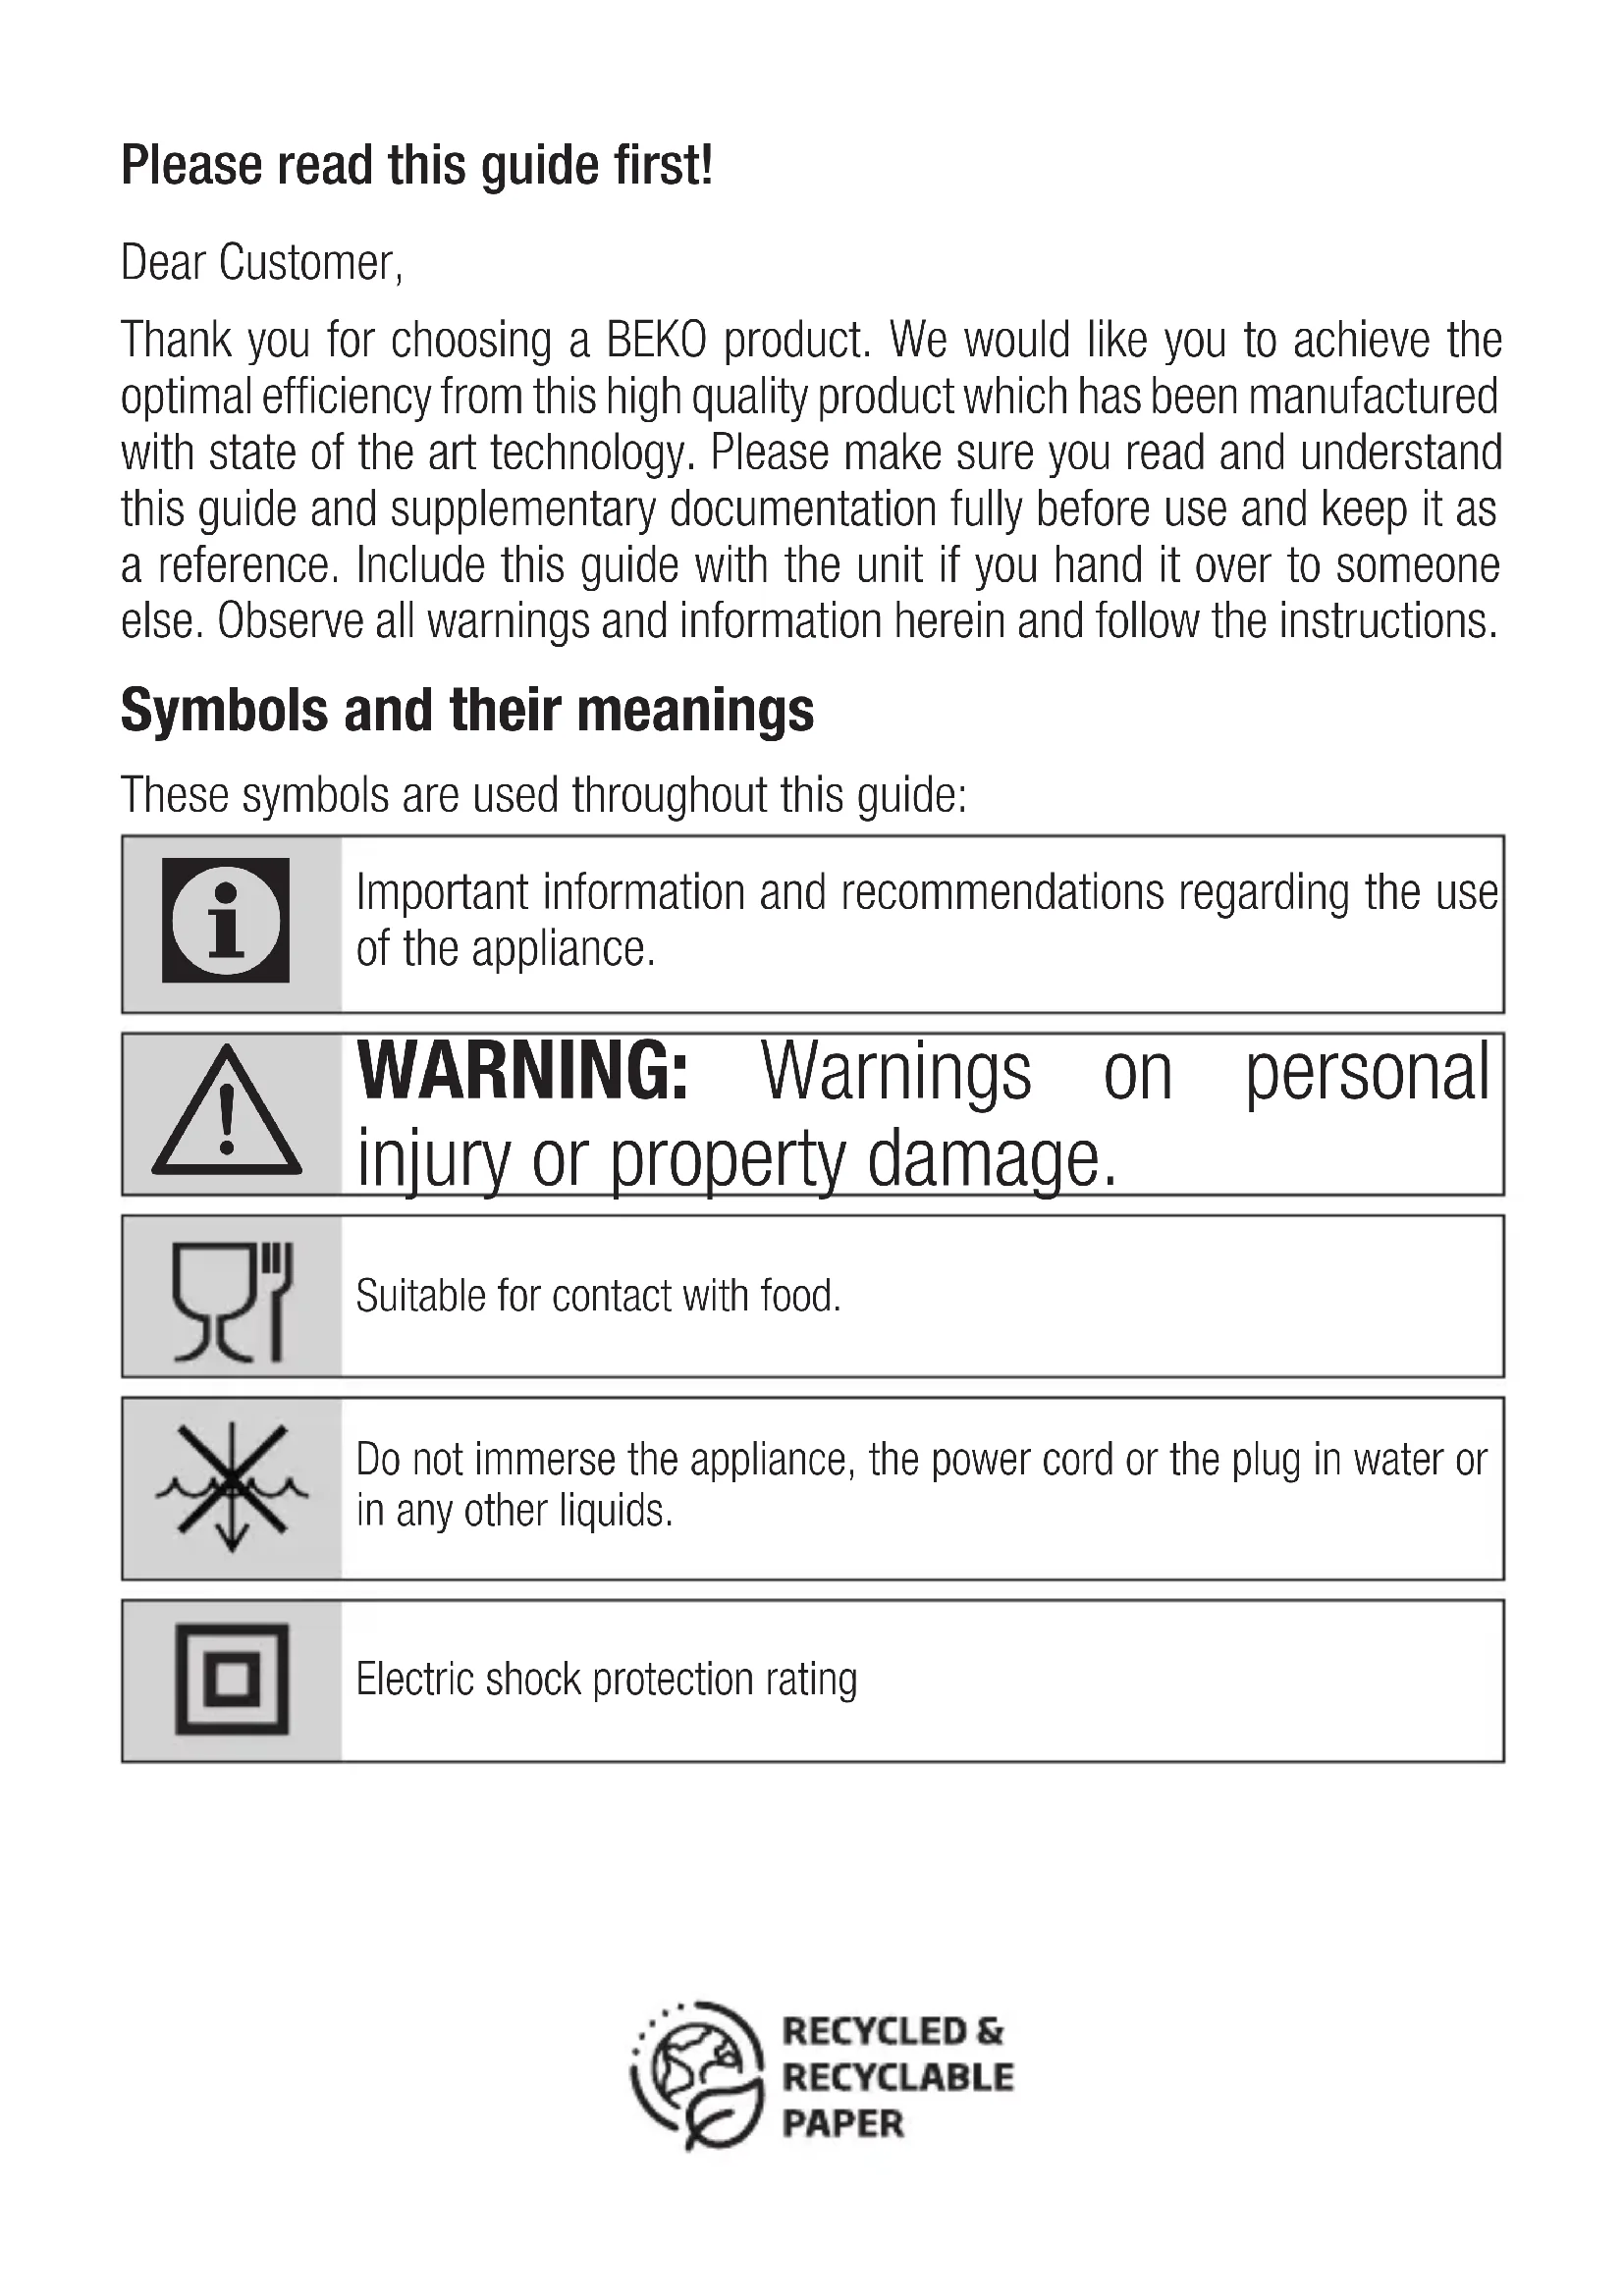
Important information and recommendations regarding the use of the appliance.

WARNING: Warnings on personal injury or property damage.

Suitable for contact with food.

Do not immerse the appliance, the power cord or the plug in water or in any other liquids.

Electric shock protection rating
1 Important safety and environmental instructions
This section contains safety instructions to prevent hazards that can result in injury or property damage.
Any warranty is void if these instructions are not followed.
1.1 General safety
- This appliance complies with international safety standards.
- This appliance may be used by persons with reduced physical, sensory, or mental capabilities, or those lacking experience and knowledge, provided they are supervised or have been given instructions on how to use the appliance safely and understand the potential risks. Children should not play with the appliance.
- This appliance is not intended for use by children.
- Keep the appliance and its power cord out of the reach of children.
- Do not use the appliance if the power cord, the appliance, or the blade is damaged. Contact an authorized service center. Use only original parts or parts recommended by
1 Important safety and environmental instructions
the manufacturer.
- Do not disassemble the appliance.
- Your mains power supply must match the specifications indicated on the rating label.
- Do not use the appliance with an extension cord.
- Do not unplug the appliance by pulling on the cord.
- When the appliance is left unattended, before attaching or detaching accessories, or before cleaning, wait for the moving parts to stop and then unplug the power cord.
- Do not touch the plug with wet or damp hands.
- Do not use the appliance for hot food.
- Use the appliance only with the provided rubber pad and glass bowl.
- Do not operate the appliance when the bowl is empty.
- To avoid damaging the blades and the appliance, remove bones and seeds from foods.
- The appliance is not suitable for dry or hard foods that can cause the blades to become blunt in a short time.
1 Important safety and environmental instructions
- Follow all warnings to avoid injuries due to misuse.
- Serious injury may result from misuse when emptying the bowl, during cleaning and when touching the chopping blade with bare hands. Handle the chopping blade carefully, trying to hold it only by its plastic part.
- After cleaning, dry the appliance and all its components before connecting it to power and installing the components.
- Do not immerse the appliance, the power cord or the plug in water or in any other liquids.
- Do not operate the appliance or its components over or near hot surfaces or do not put on such surfaces.
- If you keep the packaging materials, keep them out of the reach of children.
1.2 Compliance with the WEEE Regulations and Waste Disposal
This product complies with EU WEEE Directive (2012/19/EU). This product bears a classification symbol for waste electrical and electronic equipment (WEEE).
1 Important safety and environmental instructions

This symbol indicates that this product shall not be disposed with other household wastes at the end of its service life. Used device must be returned to official collection point for recycling of electrical and electronic devices. To find these collection systems please contact to your local authorities or retailer
where the product was purchased. Each household performs important role in recovering and recycling of old appliance. Appropriate disposal of used appliance helps prevent potential negative consequences for the environment and human health.
1.3 Compliance with RoHS Directive
The product you have purchased complies with EU RoHS Directive (2011/65/EU). It does not contain harmful and prohibited materials specified in the Directive.
1.4 Package information

Packaging materials of the product are manufactured from recyclable materials in accordance with our National Environment Regulations. Do not dispose of the packaging materials together with the domestic or other wastes. Take
them to the packaging material collection points designated by the local authorities.
1.5 What to do for energy saving
Follow the times recommended in the manual during use. Unplug the cord of appliance after use.
2 Your Hand Blender
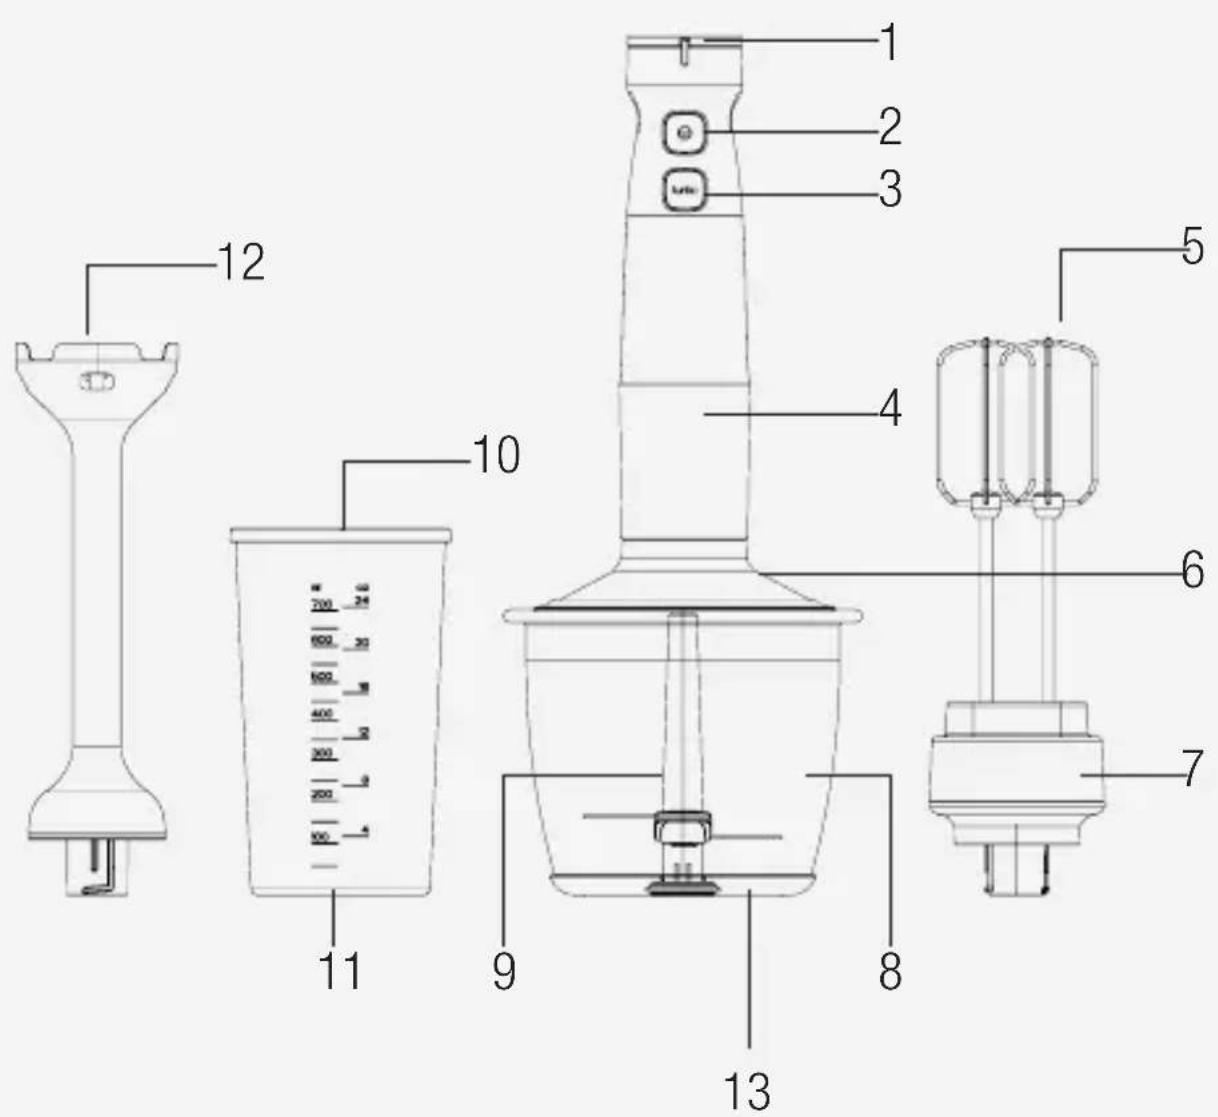
2.1 Overview
- Speed adjustment button
- ON/OFF button
- Turbo button
- Motor unit
- Beater
- Chopping cover
- Beater holder
- Chopping bowl
- Chopping blade
- Scaled beaker
- Scaled beaker non-slip base
- Blending shaft
- Bowl non-slip base
Technical data
Voltage: 220 - 240V 50 - 60Hz
Power: 750 W
The rights to make technical and design changes are reserved.
3 Operation
3.1 Intended use
The appliance is intended for home use only, it is not suitable for professional use.
The appliance is designed for crushing and beater small amounts of solid food only.
3.2 Maximum amounts and processing time
Refer to the table for process times and maximum amounts
| Annexes Ingredients Operation time | ||
| Blender accessory | 150 g carrots (chopped as cubes of 1.5 cm) and 300 ml water | 20 second |
| Mini chopper 200 | g meat 5 second | |
| Beater accessory | 4 eggs white 180 s. | |
3.3 First operation
- Clean the parts of the appliance before the first use (see 3.1).
- Use the appliance in an upright position on a stable, flat, clean, dry and non-slip surface.

- You can use it until the process is completed by waiting a few seconds for continuous uses shorter than 10 seconds.
3 Operation
3.3 Mixing and chopping with blending shaft
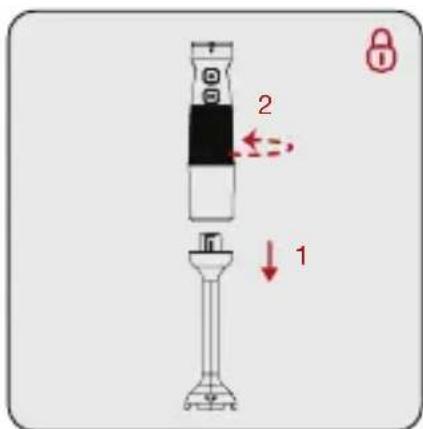
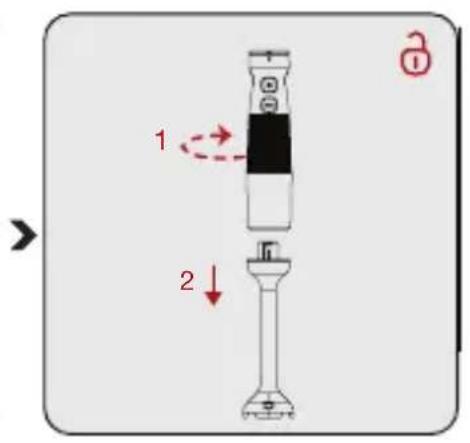
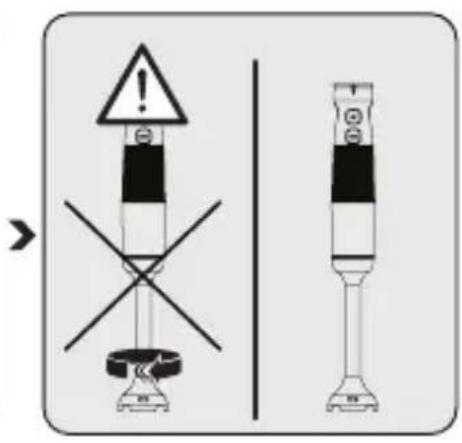
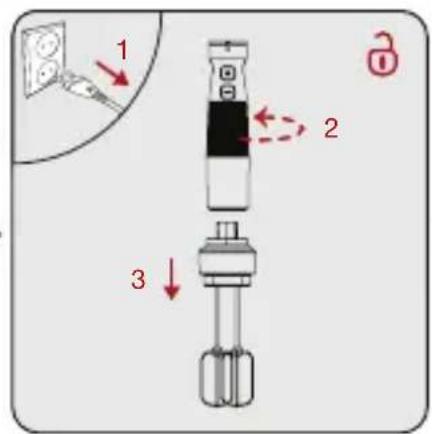
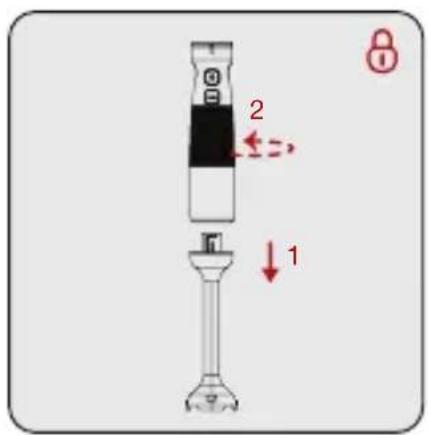
Attach the blending shaft (12) to the motor unit (4) by turning the end of the motor unit (4) counterclockwise.
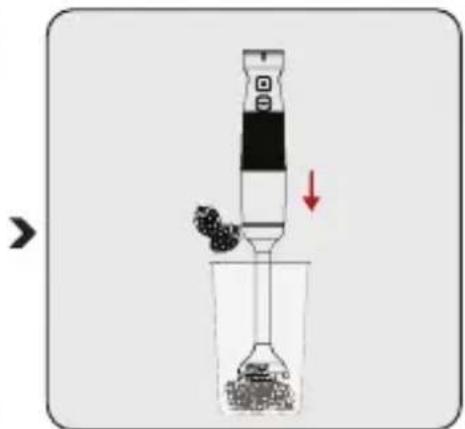
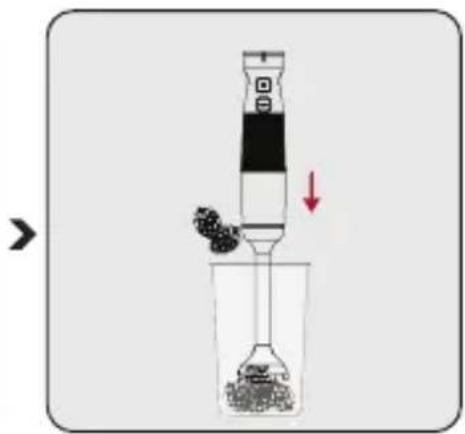
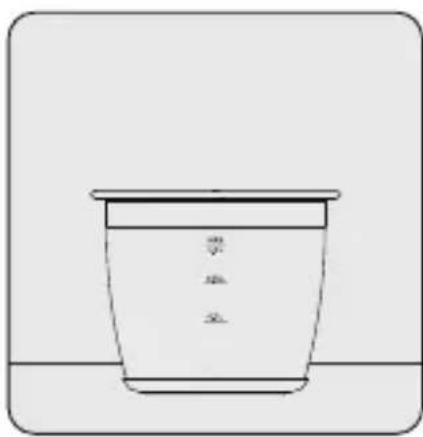
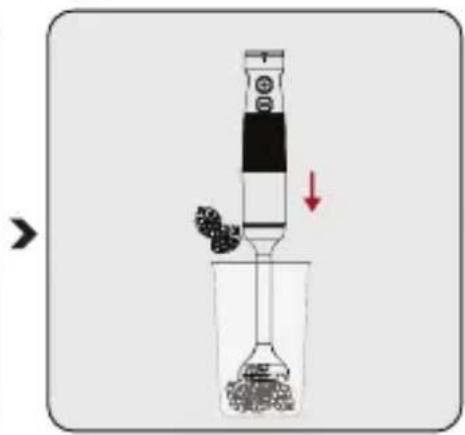
Put the ingredients (in small pieces) to be processed into the scale bowl (10) or the bowl that you will use and immerse the blending shaft (12) into the bowl.
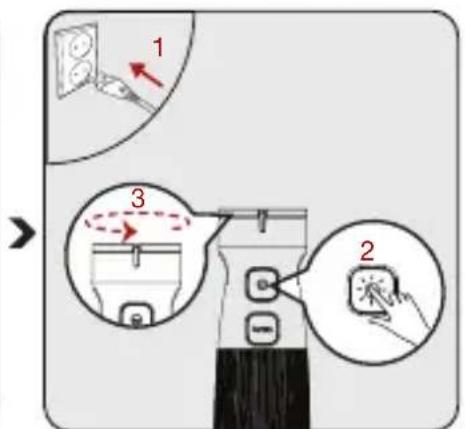
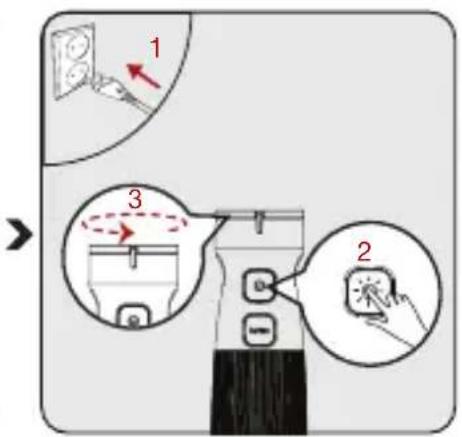
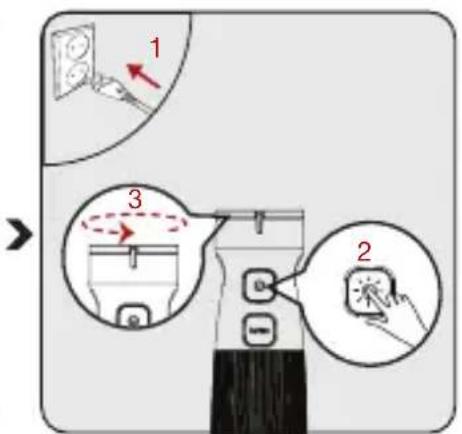
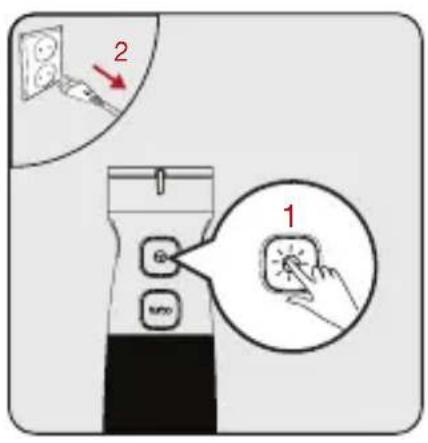
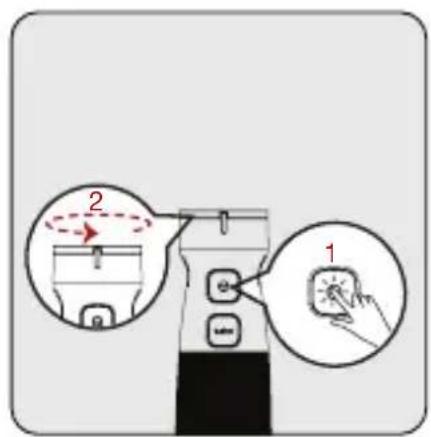
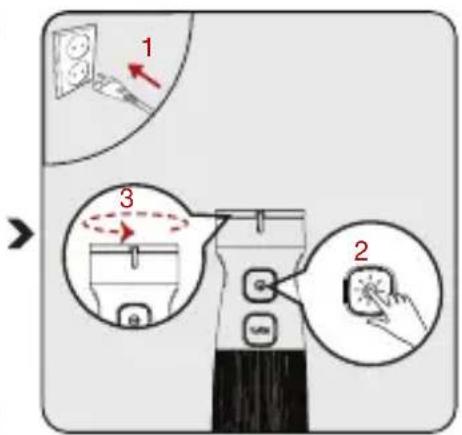
Plug in the appliance. Press the power button (2) and operate. Then adjust the speed by turning the speed adjustment button (1).
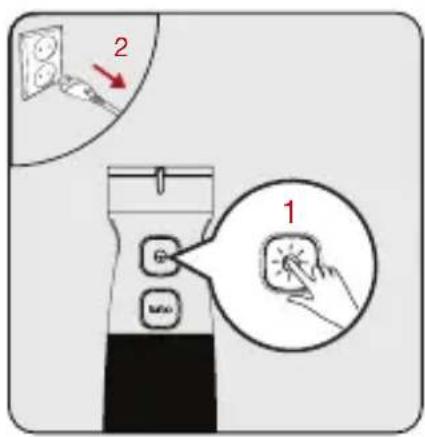
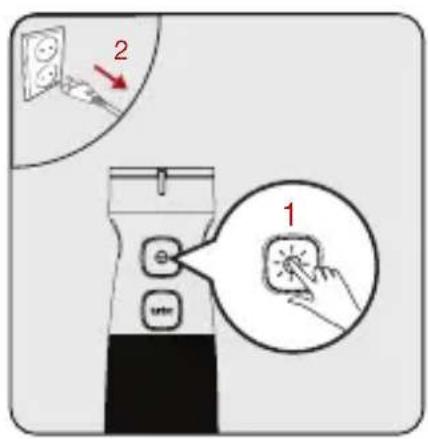
When process is complete, release the power button (2). Unplug the appliance.

Wait for it to stop completely. Turn the blending shaft (12) clockwise to detach it from the motor unit (4).
3 Operation

- You may increase the speed by turning the speed adjustment button (1) step by step.
- Start to mix ingredients with a lower speed at first. When you start with higher speed, foods may splatter.
- Making light circular movements with the device during the procedure will provide a better result.

Do not touch the blades with bare hands.
3.4 Chopping
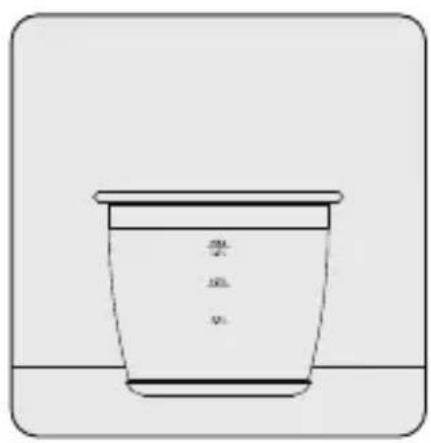
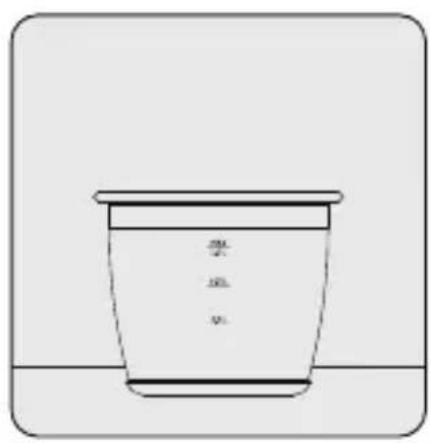
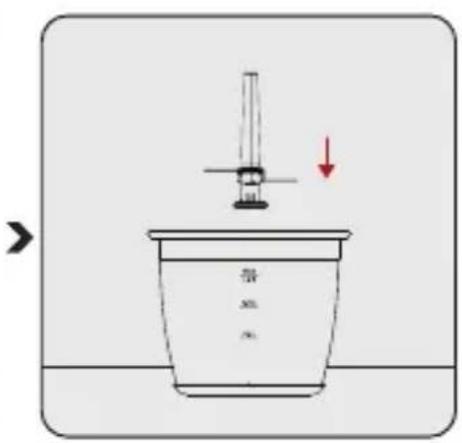
Put the chopping bowl (8) and non-slip base (11) onto a flat surface.
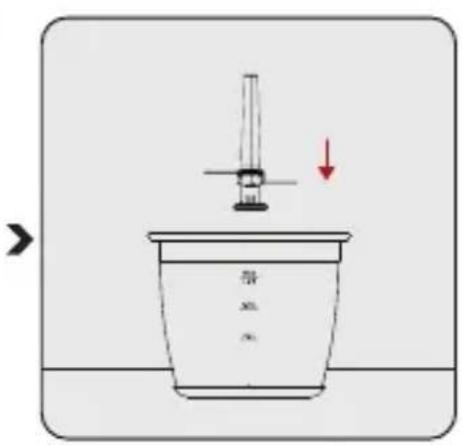
Place the chopping blade (9) onto the fixed shaft in the chopping bowl.
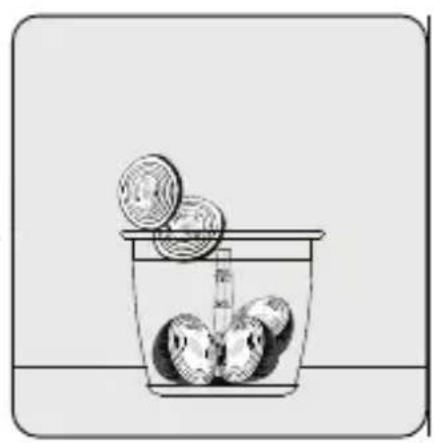
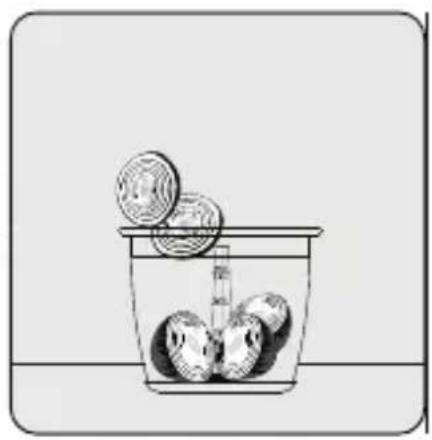
Put the ingredients into the chopping bowl (8).

Do not operate the appliance unless the chopping cover (6) is fully engaged.
3 Operation

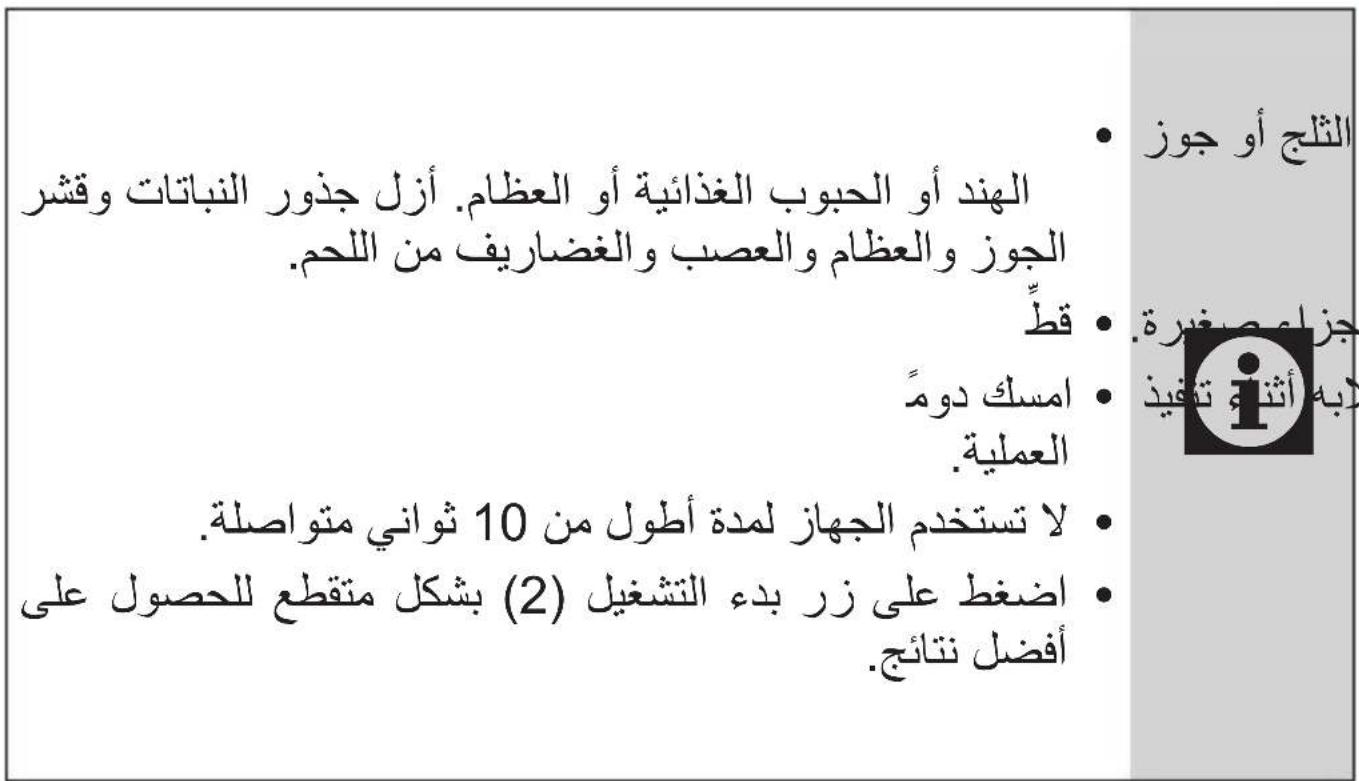
- Do not crush extremely hard ingredients such as coffee beans, ice, coconut, cereals, or bones. Remove the stems of plants, the shells of walnuts, and the bones, nerves, and cartilage of meat.
- Cut the food into small parts.
- Always hold the chopping bowl with one hand to prevent it from tipping over during the process.
- Do not use the appliance for more than 10 seconds continuously.
- Press the start button (2) intermittently for best results.
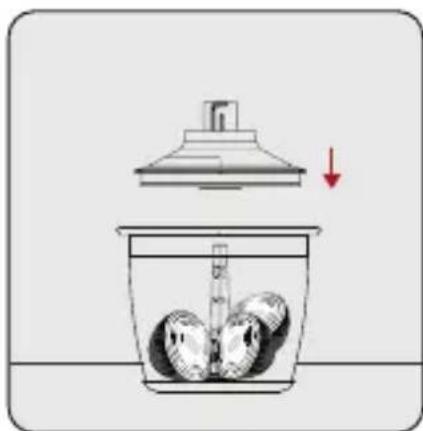
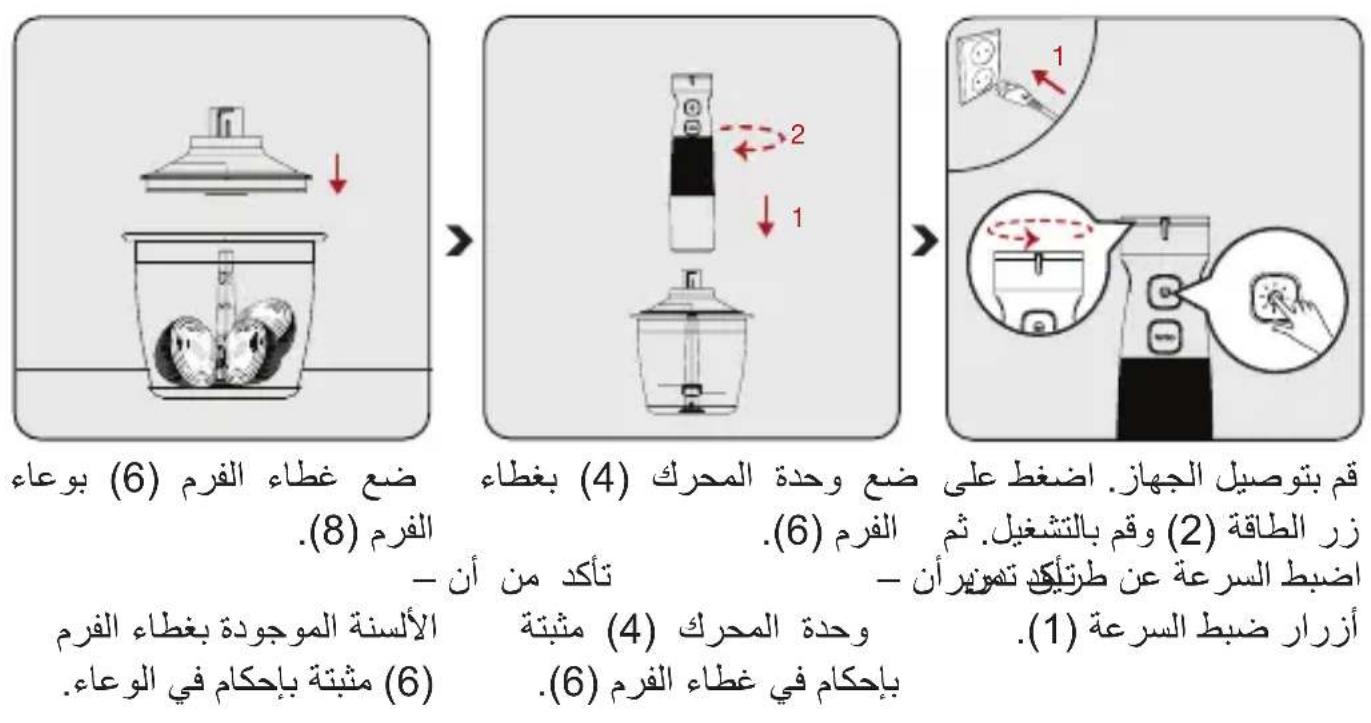
Place the chopping cover (6) onto the chopping bowl (8).
- Make sure that the tabs on the chopping cover (6) are securely locked onto the bowl.
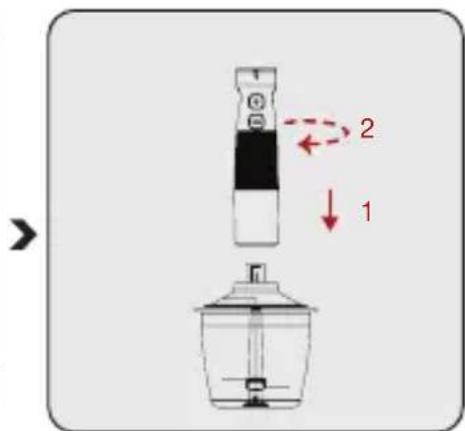
Place the motor unit (4) onto the chopping cover (6).
- Make sure that the motor unit (4) is firmly locked onto the chopping cover.
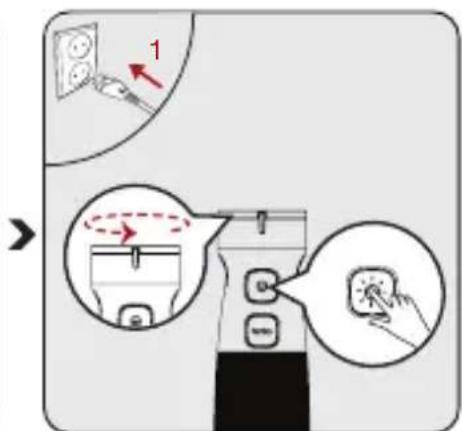
Plug in the appliance. Press the power button (2) and operate. Then adjust the speed by turning the speed adjustment buttons (1).
3 Operation

WARNING:
- Be careful when attaching the chopping blade (9) since it is very sharp.
- Do not touch the chopping blade (9) with bare hands.
3.5 Beater

You may use beater accessory (5) for beater cream and eggs.
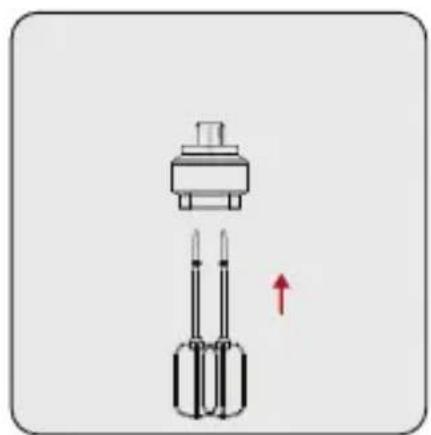
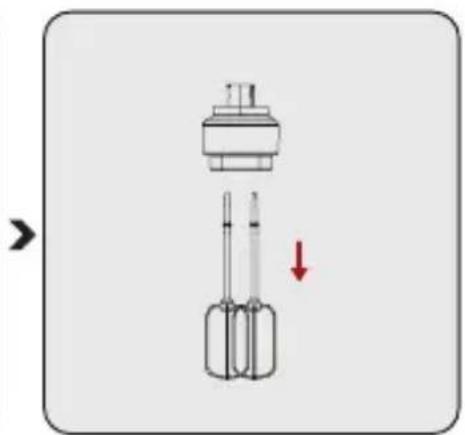
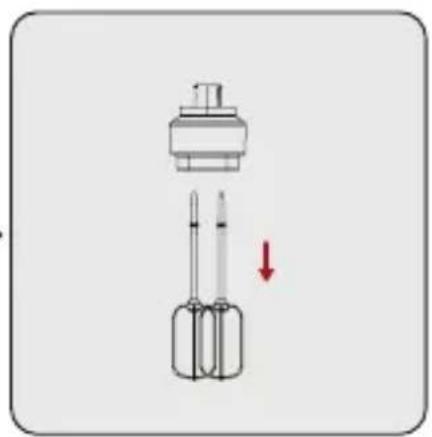
Gently push the beater accessory tips (5) into the beater holder (7).
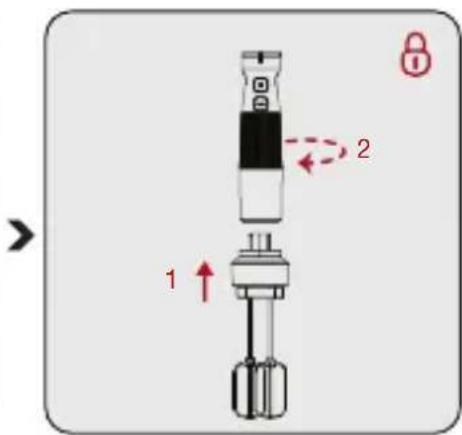
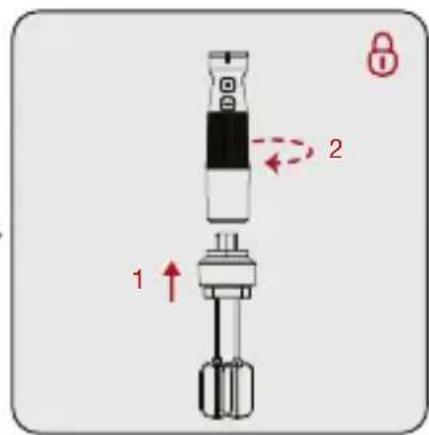
Attach the beater holder (7) into the motor unit (4) by turning counter clockwise " 8".
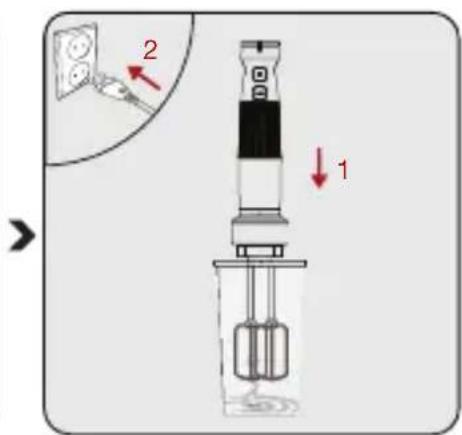
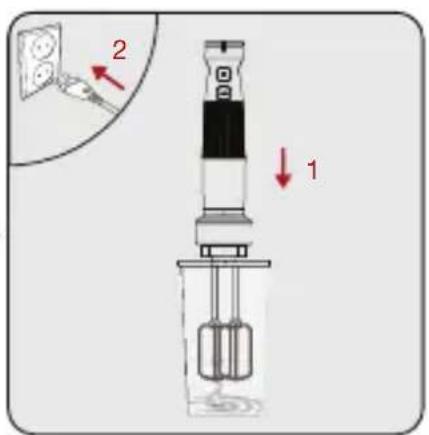
Put the ingredients you want to process into the scaling cup (10) or similar bowl and plug the socket.
3 Operation
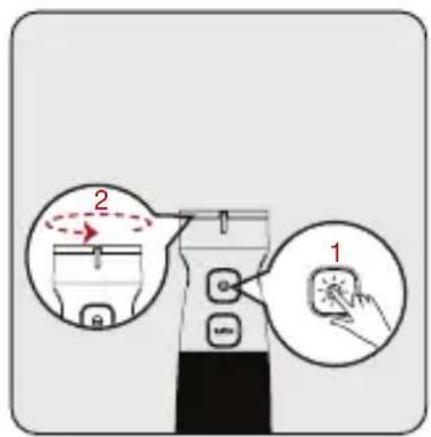
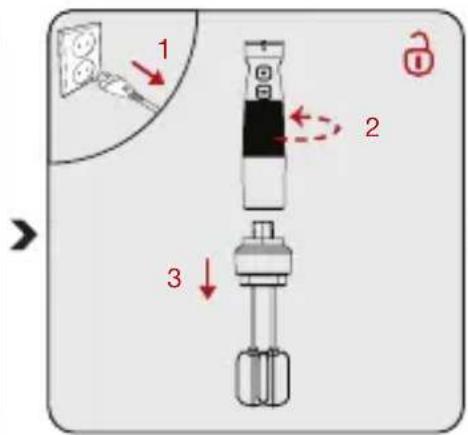
Press the power button (2) and operate. Then adjust the speed by turning the speed adjustment button (1). Start beater.
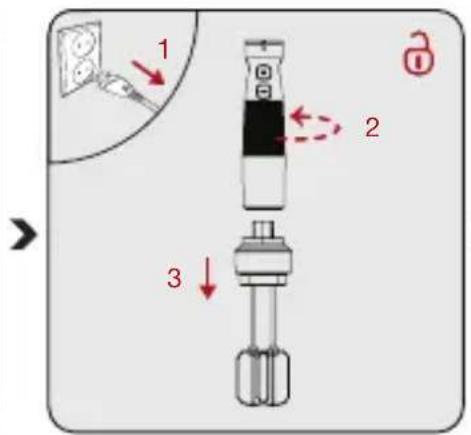
When completed, unplug it. Detach the motor unit, From beater holder (7) by turning it clockwise
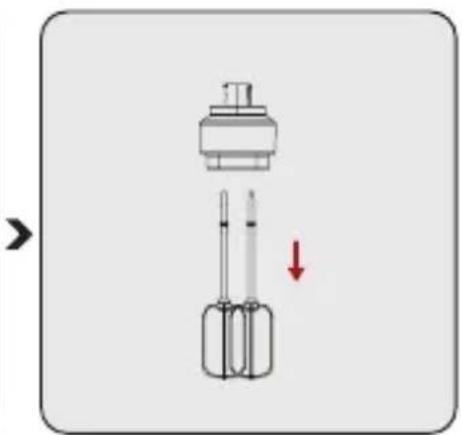
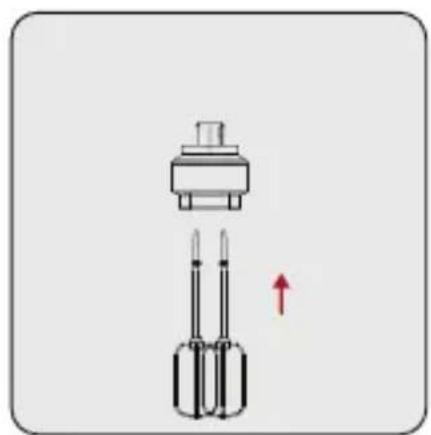
Gently pull out the beater accessory tips (5) from the beater holder (7).
4 Cleaning and maintenance
4.1 Cleaning

WARNING:
- Do not use benzene, solvents, abrasive cleaners, metal objects or hard brushes to clean the appliance.
- Do not touch the chopping blades (9) with bare hands. The blades are very sharp. Use a brush!
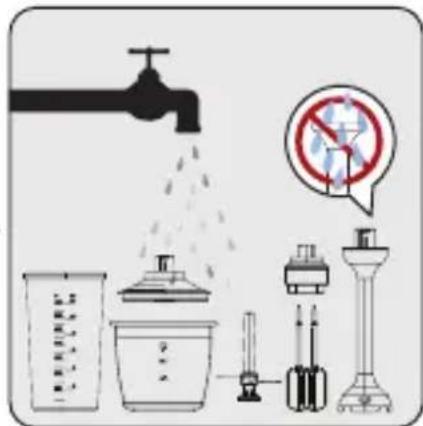
- Do not immerse the motor unit (4) or electrical cord into water or other liquids and never hold under the running water.
- Do not wash chopping blade and beater holder in the dishwasher.
- Do not immerse the inner part of chopping blade, motor unit (4) or electrical cord into water or other liquids.
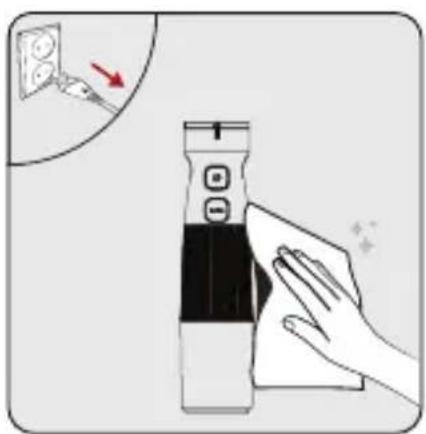
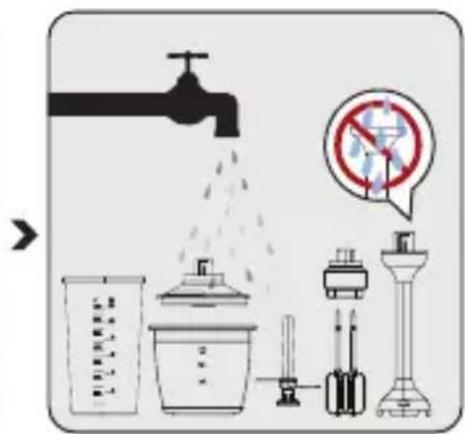
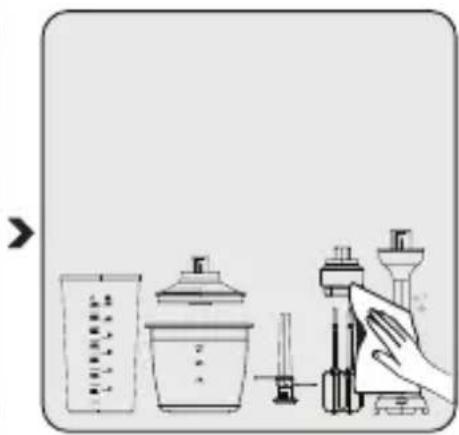
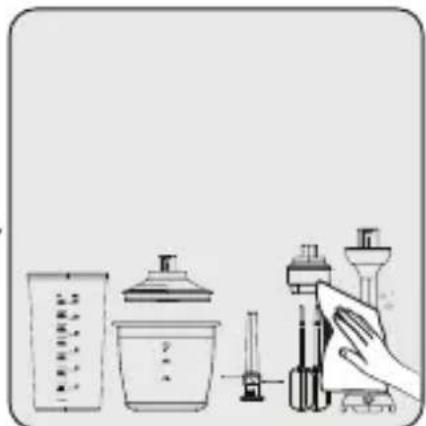
Unplug the appliance before cleaning. Make sure that all appliance components has stopped completely. Wipe the motor unit (4) of the appliance with a damp cloth.
Immediately after using the appliance, clean the scale bowl (10), chopping cover (6), chopping bowl (8), beater (5), beater holder (7) with warm, soapy water.
Dry accessories thoroughly.
4 Cleaning and maintenance
4.2 Storage
- If you do not intend to use the appliance for a long time, store it carefully.
- Unplug the appliance before storing.
- Store the appliance in a cool dry place.
- Store the appliance and its cord out of the reach of children.
4.3 Transport and shipping
- During transport and shipping, carry the appliance with its original packaging. The packaging of the appliance will protect the appliance against physical damage.
- Do not put heavy objects on the appliance or its packaging. Otherwise the appliance may be damaged.
- If the appliance is dropped, the appliance may not operate or permanent damage may occur.
3.3 First operation
4.3 Transport and shipping
- During transport and shipment, carry the device in its original packaging. The device's packaging protects it from physical damage.
- Do not place heavy objects on the device or its packaging. Otherwise, the device may be damaged.
- If the appliance is dropped, it may not work or may suffer permanent damage.
Please read this guide carefully at the beginning!
Dear customer,
3 Operating the appliance

- You can use it until the process is complete by pressing a few seconds before each blending, briefly about 10 seconds.
3.3 Changing and testing with the test light
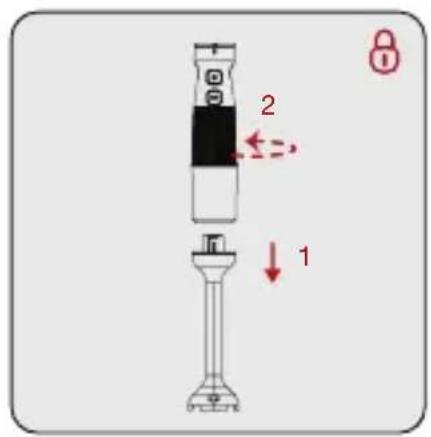
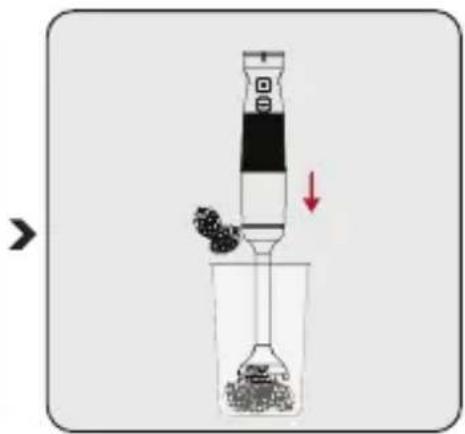
Turn the test light (12) on the motor unit (4) in this way you will complete the end of the unit (4) " 8" against the direction of the clock hands.
Place the ingredients (right side) that need to be blended in the measuring cup (10) or in the container you will use and place the light (12) in the container.
Plug the appliance into the socket. Press the switch (2) and work with the blender. Adjust the speed in this way by pressing the speed switch (1).
3 Operating the appliance
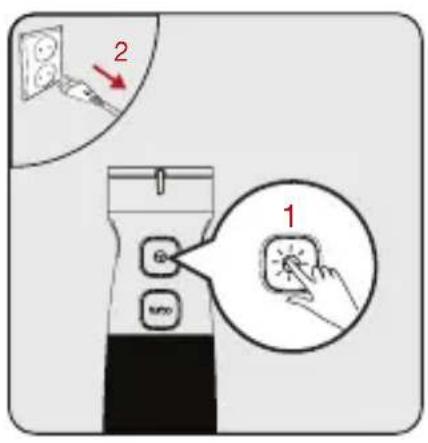
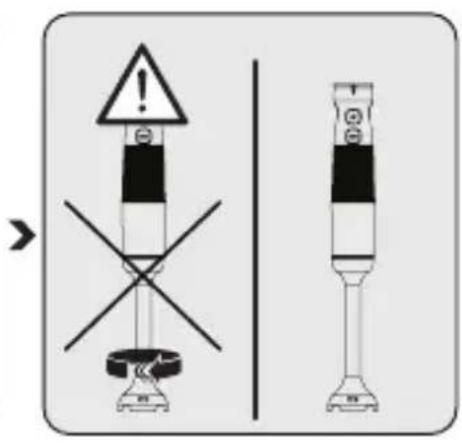
When you finish blending, release the switch (2). Remove the plug from the socket.
Wait for the blender to completely stop working.
Turn the test light (12) in the direction of the clock hands to detach it from the unit (4).

- You can increase the speed by turning the switch (1) gradually.
- Start mixing the ingredients with low speed. If you start with high speed, the food may splatter. The food will blend better if you make slow circular movements with the appliance while working with it.

Do not immerse the appliance in water.
3 Operating the appliance
3.4 Blending
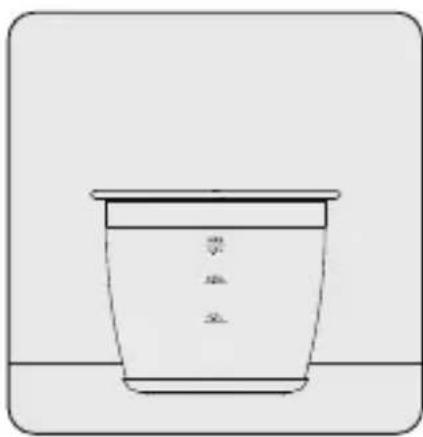
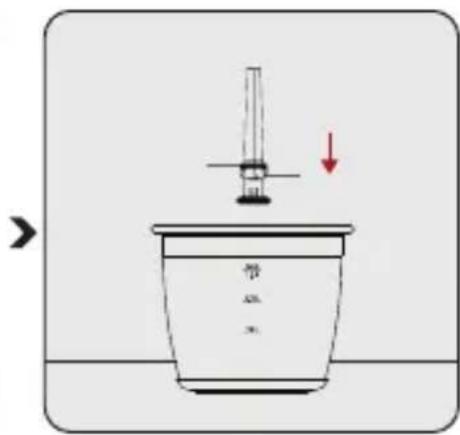
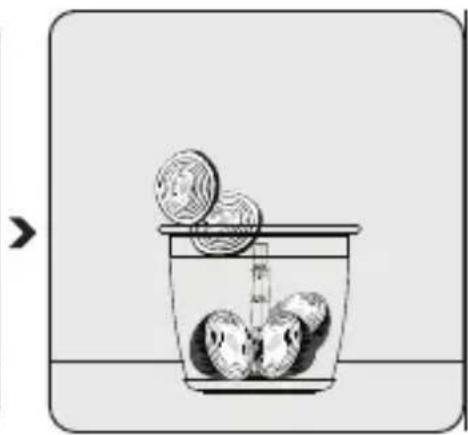
Place the blending base (11) on the blender jug (8).
For blending (9), place it on the lid opening.
Place the ingredients in the blender jug (8).

Do not operate the appliance if the lid (6) is not properly placed.
3 Operating the appliance

- Do not blend very hard ingredients such as ice, coffee, nuts, coconut, or bones. Remove bones from meat, fish, and poultry before blending.
- Cut the food into small pieces.
- Now you can start the blender with one hand, without having to hold the lid. Do not use the appliance for more than 10 seconds at a time.
- Press the on/off button (2) in intervals of 10 seconds for best results.
3 Operating the appliance
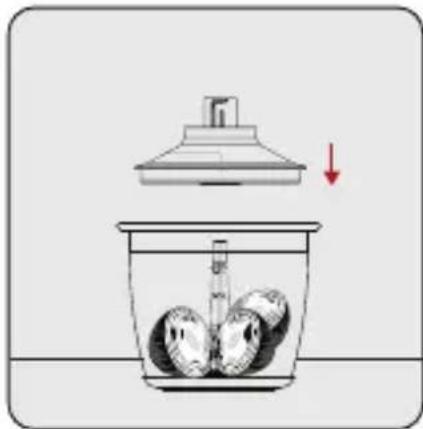
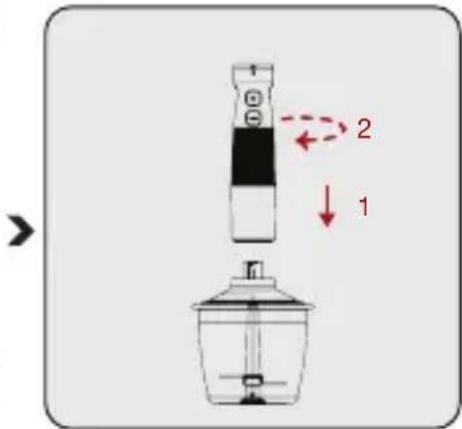
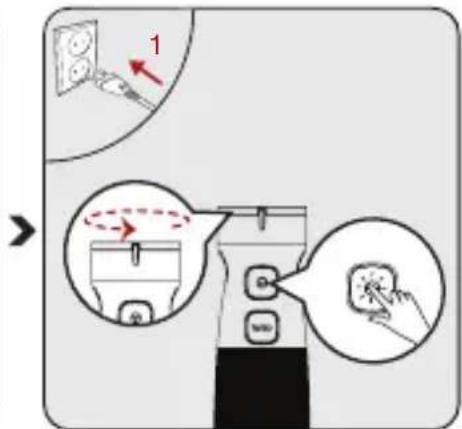
Place the lid (6) on the blender jug (8).
Check that the lid (6) is properly attached to the jug.
Place the measuring cup (4) on the lid (6).
- Check that the measuring cup (4) is properly fitted on the lid.
Connect the power cord to the socket. Connect the cord to the socket for switching on (2) and work with the blender. Then attach the speed knob to the base for speed (1).

WARNING:
- Be careful when you place the blade for chopping (9) — it is very sharp. Do not touch the blade for chopping (9) with your hands.
3. Operating the appliance
3.5 Whisking

The whisking attachment (5) can be used for whisking creams and sauces.
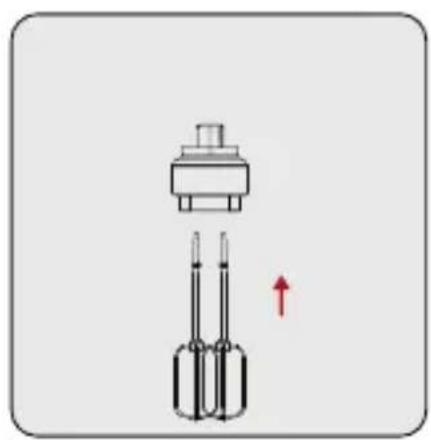
Insert the whisking attachment (5) into the whisking container (7).
>
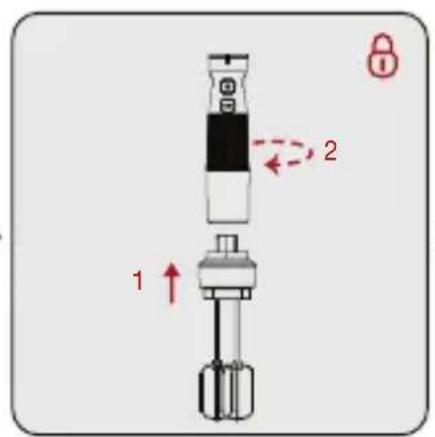
Connect the appliance to the power supply. Turn the whisking container (7) counterclockwise to the arrow on the base.
>
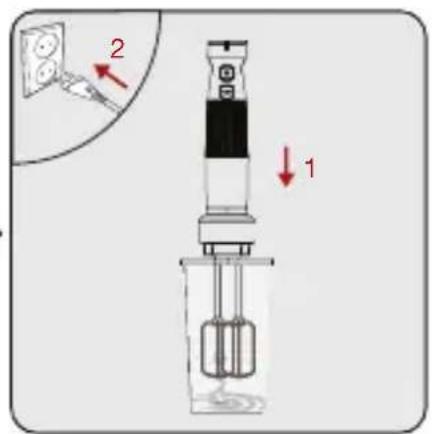
Place the ingredients you want to whisk into the measuring cup (10) or into the container and connect to the power supply.
3. Operating the appliance
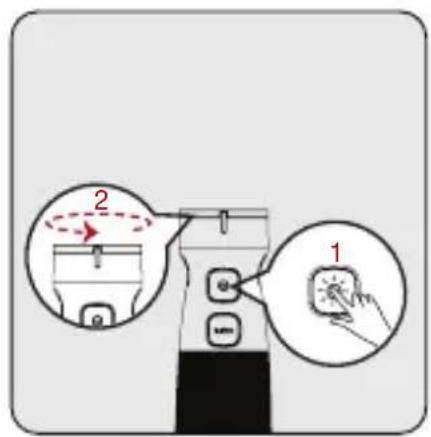
Connect the cord to the socket for switching on (2) and work with the blender. Then attach the speed knob to the base for speed (1). Start whisking.
When you are finished, switch off the appliance. Remove the whisking container (7) from the base by turning it counterclockwise to the arrow on the base.
Remove the whisking attachment (5) from the whisking container (7).
4 Cleaning and maintenance
4.1 Cleaning

WARNING:
Do not use petrol, solvents, abrasive cleaning agents, metal sponges or hard brushes when cleaning the appliance. Do not immerse the probe (9) in water. The probe is very sharp – be careful when using it! Do not immerse the kettle (4) or the power cord in water or any other liquid, and never place them under running water. Do not immerse the probe in water or hold it under running water. Do not immerse the inner part of the probe, the kettle (4) or the power cord in water or any other liquid.
4 Cleaning and maintenance
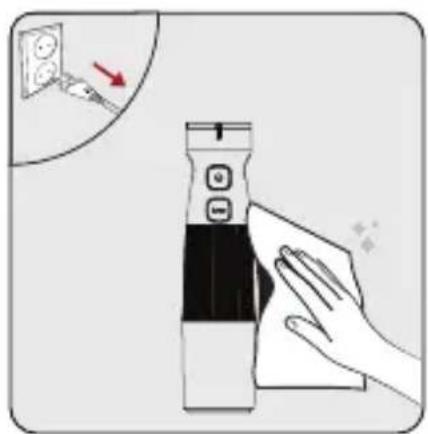
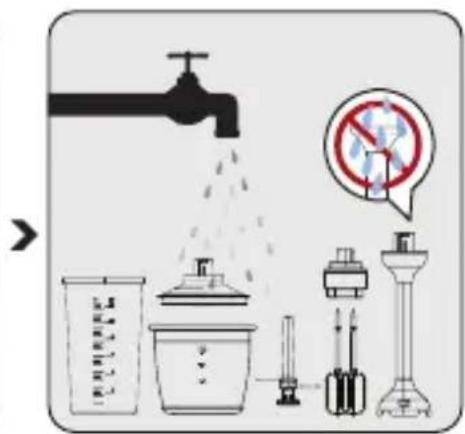
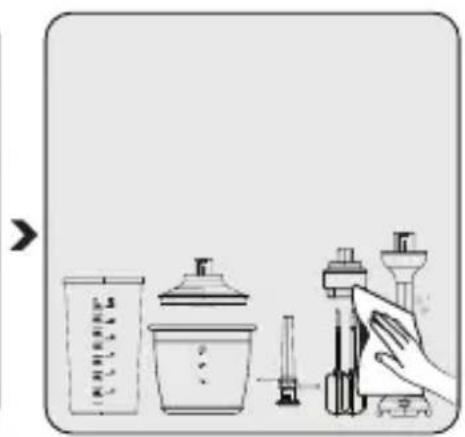
Before cleaning the appliance, unplug it from the outlet. Check that all components of the appliance have completely stopped working. Wipe the kettle (4) of the appliance with a damp cloth.
After each use of the appliance, clean the measuring cup (10), the probe cap (6), the probe (8), the spatula (5) and the spatula holder (7) with warm, soapy water.
Dry them thoroughly.
4.2 Storage
- If you do not intend to use the appliance for a long time, store it carefully.
- Before storing the appliance, unplug it from the outlet. Store the appliance and its cable in a dry place.
4 Cleaning and maintenance
4.3 Transport and shipping
During transport and shipping, carry the appliance in its original packaging. The packaging protects the appliance from physical damage.
Do not place heavy objects on the appliance or on the packaging in which it is stored. This may damage the appliance.
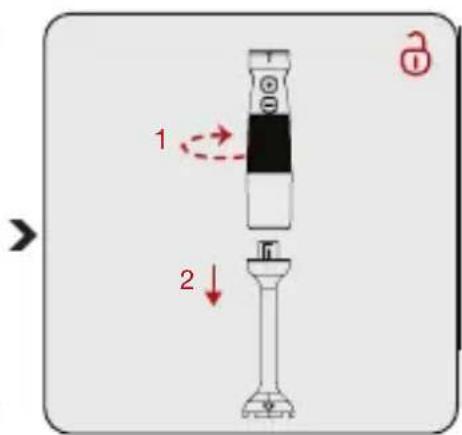
Rotate the grinding knob (12) clockwise to detach it from the motorized unit (4).
3 Operation

- You can increase the speed by turning the speed adjustment knob (1) step by step.
- First start mixing ingredients at a low speed. If you start at a high speed, food will splatter.
- If during use you make slight circular movements with the appliance, you will get better results.

User Manual

HBA81762BX
RU
Symbols used
These symbols are used in this manual:

Important information and recommendations on using the appliance.

Warning of injury or damage to property.

Risk of contact with food products.

Do not immerse the device, power cord, or plug in water or any other liquid.

Protection rating against electric shock
1 Important safety and environmental instructions
This section contains safety instructions to prevent hazards that could lead to injury or property damage.
If the instructions are not followed, the warranty is void.
1.1 General safety
-This device complies with international safety standards.
-This device can be used by persons with reduced physical, sensory, or mental capabilities or lack of experience and knowledge, only if they are under supervision or have been given instructions concerning use of the appliance in a safe way and understand the hazards involved. Children
1 Important safety and environmental instructions
must not play with the appliance.
-This device must not be used by children. Keep the device and its cord out of reach of children. Do not operate the device if the cord, plug, or device is damaged. Contact an authorized service center. -Use only original parts or parts recommended by the manufacturer. -Do not disassemble the device. -The power source must match the type indicated on the rating label. Do not use the device with a damaged cord. -Do not pull the plug out of the socket by the cord.
1 Important safety and environmental instructions
When the device is left unattended, before assembly/disassembly or cleaning, turn off the device and disconnect the plug from the outlet. Do not touch the device plug with wet or damp hands. Do not use the device for hot liquids. -Use the device only with the provided glass jug and lid. Do not use the device without the lid. -To avoid damaging the blade and the device, remove pits and seeds from products. -The device is not intended for processing dry or hard products, the processing of which
1 Important safety and environmental instructions
may quickly dull the blade.
Important: To prevent injuries from incorrect use, read all instructions before using the appliance.
- Incorrect use during operation, cleaning, and contact with the rotating blade with bare hands can lead to serious injuries. Handle the blade with care, and only hold it by the plastic part.
Assemble all parts after cleaning before connecting it to the power supply and before installing the parts.
Do not immerse the appliance, plug, or power cord in water or any other liquid.
Do not use the appliance or its parts on hot surfaces or near them, and do not place them on
1 Important safety and environmental instructions
such surfaces.
Keep the packaging materials out of reach of children.
1.2 Compliance with WEEE Directive (EU Directive on waste electrical and electronic equipment) and waste disposal
This product complies with the EU Directive on waste electrical and electronic equipment (2012/19/EU). This appliance bears the classification symbol for waste electrical and electronic equipment (WEEE).
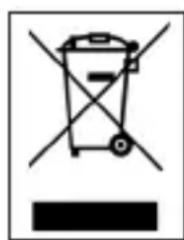
This symbol indicates that the appliance must not be disposed of with other household waste at the end of its service life. The used device must be returned to an official collection point.
You can use it until the end of the process, waiting a few seconds for continuous use for less than 10 seconds.
3.3 Mixing and chopping with the blender
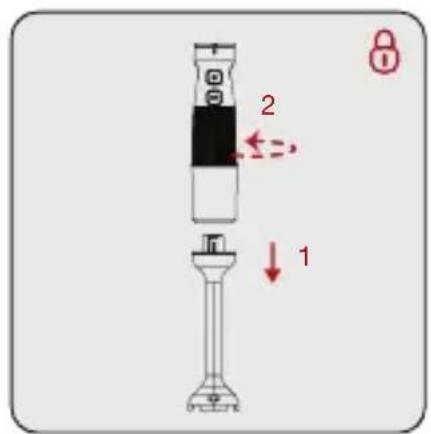
Place the blender shaft (12) onto the motor block (4), turning the end of the block (4) counterclockwise.
Place the ingredients (in small pieces) for processing into the bowl with the scale (10) or the bowl you will use, and immerse the blender shaft (12) into the bowl.
Plug the device into the outlet. Press the power button (2) and work with the device. Then adjust the speed by turning the speed regulator (1).
3 Operation
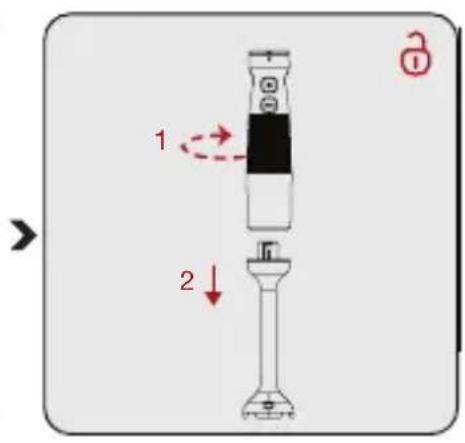
When the process is complete, release the power button (2). Unplug the device from the outlet.
Wait until the device comes to a complete stop.
Turn the mixing valve (12) clockwise to disconnect it from the motor block (4).

Then increase the speed by turning the speed regulator (1) step by step. - Start mixing ingredients at a lower speed. When you start at a higher speed, the products may splash. - Light circular movements during the procedure ensure better results.

Do not touch the blades with bare hands.
3 Operation
3.4 Chopping.
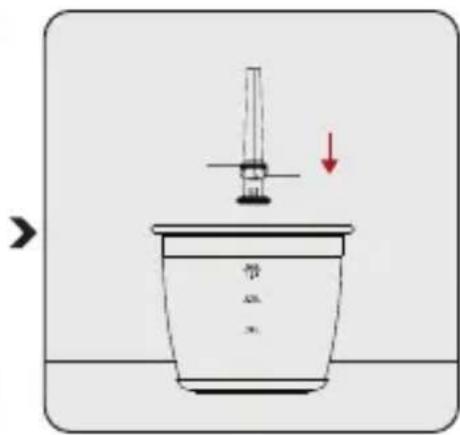
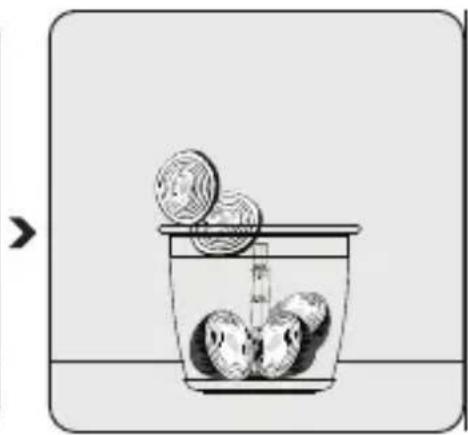
Place the chopping bowl (11) on a flat surface.
Install the chopping blade (9) onto the drive shaft in the chopping bowl.
Place the ingredients to be chopped (8).

Do not turn on the device if the chopper lid (6) is not completely closed.

Do not chop very hard ingredients such as root grains, pepper, coconut, or large bones. Remove stems, nutshells, and also bones, cartilage, and meat gristle. Cut the food into small pieces.
Always hold the chopping bowl with one hand so that it does not tip over during the chopping process. Do not use the device for more than 10 seconds continuously. - To achieve the best results
Press the button (2).
3 Operation
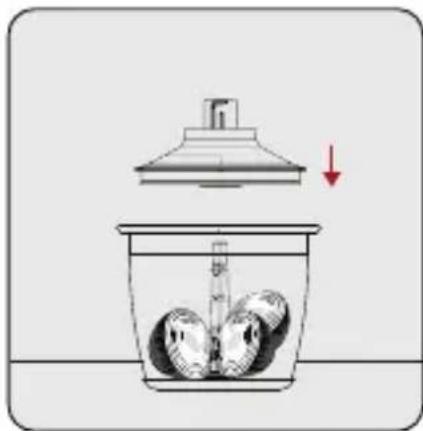
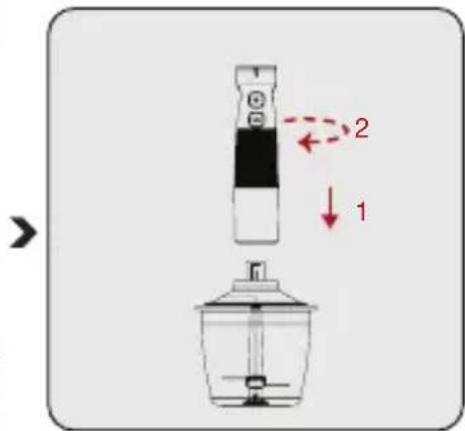
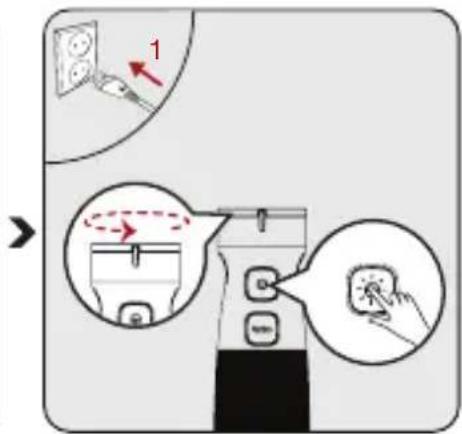
Place the lid (6) on the chopper bowl (8).
- Make sure that the protrusions on the chopper lid (6) are securely locked onto the bowl.
Place the motor block (4) on the chopper lid (6).
- Make sure that the motor block (4) is securely attached to the chopper lid.
Connect the device to a power outlet. Press the power button (2) and work with the appliance. Then adjust the speed by turning the speed control (1).

WARNING:
- Be careful when cleaning the chopper blades (9); they are sharp. Do not touch the blades (9) with bare hands.

Operation
3.5 Mixer

You can use the mixer attachment (5) for whipping cream and eggs.
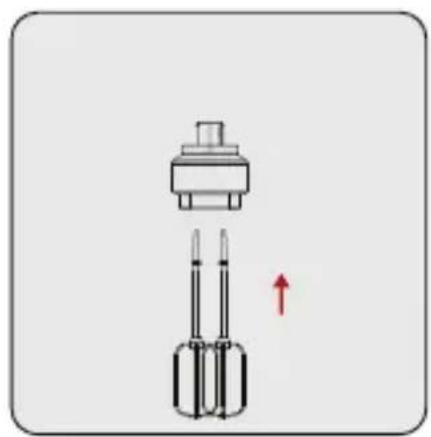
Carefully insert the whipping attachment (5) into the whisk holder (7).

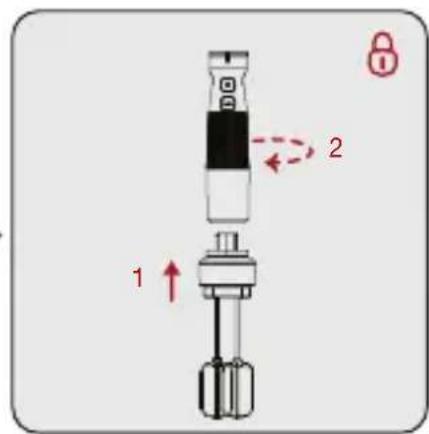
Place the whisk holder (7) onto the motor block (4), turning it clockwise.

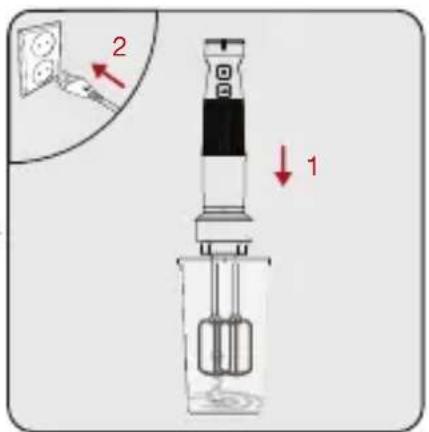
Place the ingredients you want to process into the bowl with the lid (10) or a similar bowl and plug in the appliance.
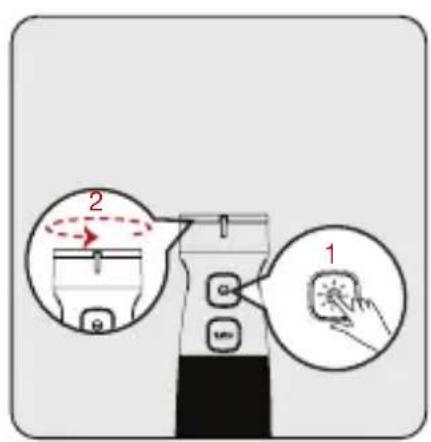

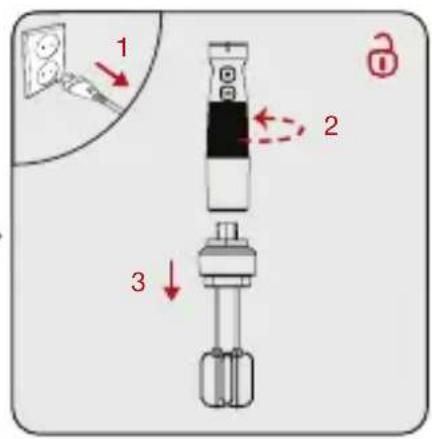

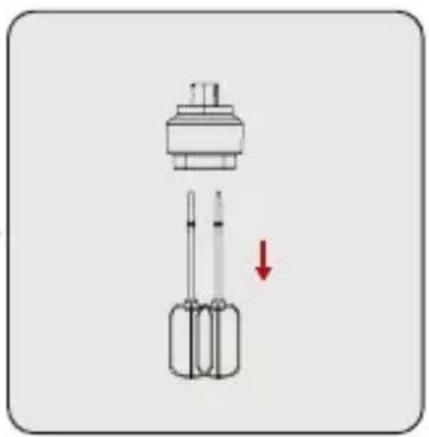
Plug the power cord into the appliance. Then adjust the speed using the speed regulator (1). Turn on the mixer.
After finishing the work, remove the plug from the socket. Disconnect the motor unit from the whisk holder (7) by turning it counterclockwise.
Carefully insert the whisk (5) into the whisk holder (7).
4 Cleaning and maintenance
4.1 Cleaning

WARNING:
Never use gasoline, solvents, abrasive cleaners, metal scrapers or stiff brushes to clean the appliance. Do not touch the blades (9) with bare hands. The blades are very sharp. Use a brush! Do not immerse the motor unit (4) or the power cord in water or other liquids. Never hold them under running water. Do not put the blade of the chopper or the whisk holder in the dishwasher. Do not immerse the inner part of the chopper blade, the motor unit (4) or the power cord in water or other liquids.
4 Cleaning and maintenance
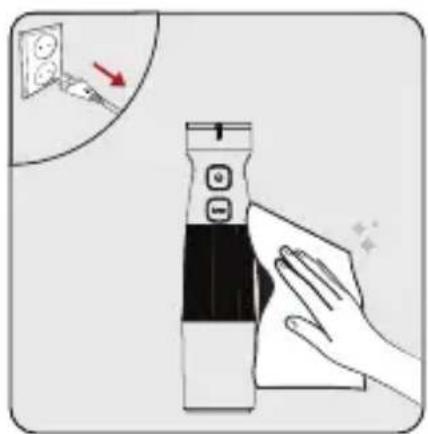
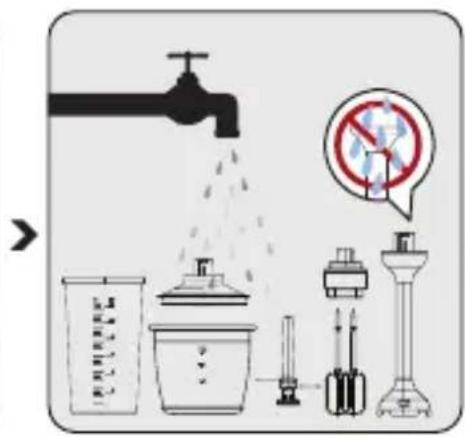
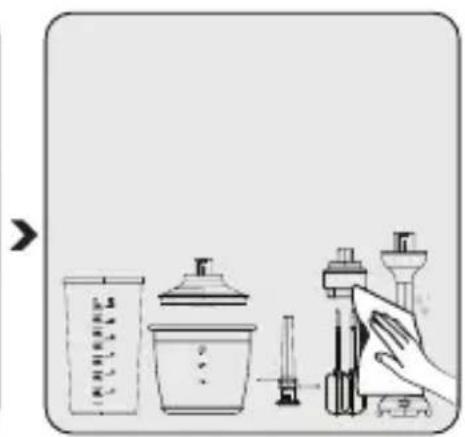
Before cleaning, always unplug the appliance. Make sure the components have completely stopped. Wipe the motor unit (4) with a damp cloth.
Immediately after using the appliance, rinse the bowl (10), the chopper lid (6), the chopper bowl (8), the mixer (5), and the whisk holder (7) with warm soapy water.
Dry all accessories thoroughly.
4 Cleaning and maintenance
4.2 Storage
- If you do not plan to use the appliance for an extended period, store it carefully.
Before storing, always unplug the device. Store the device in a dry and cool place. Keep the device and power supply out of reach of children.
4.3 Transportation
During transportation, carry the device in its original packaging. The packaging protects the device from physical damage.
Do not place heavy objects on the device or its packaging. Otherwise, the product may be constantly subjected to damage.
- If the device is dropped, it may stop working or suffer irreversible damage.
Manufacturer: "Arcelik A.S."
Karağaç Caddesi No: 2-6 Sütlüce, 34445, Istanbul
Made in China
Valid only in the Russian Federation

WARRANTY 2 YEARS
Address: Russia, 125040, Moscow, Vn. Ter. G. Municipal District Begovoy,
Leningradsky Prospekt, 15, Building 10, Floor 4.
Hotline: 8-800-200-23-56 (toll-free throughout Russia)
Working hours: Mon-Fri 07:00-21:00, Sat-Sun 08:00-21:00 (Moscow time)
Warranty card series RUS No
Model
Serial number
Date of sale
Date of installation
Company
Company
Signature
Seal of the seller
SEAL
SEAL
Buyer
Telephone
The product's warranty is verified in the presence of the buyer;
Purchase with warranty conditions acknowledged
Buyer's signature

The coupon is removed from the warranty card after your claims are satisfied.

Series RUS No

Date of sale
Stamp
Store

Warranty

Series RUS No

Date of sale

Series RUS No

Date of sale
Stamp
Store

Warranty
Stamp
Store

Dear Customer!
You have purchased a product manufactured by a company that is part of the Arcelik group of companies. The product is certified for compliance with international standards, technical regulations, and other norms established by the current legislation of the Russian Federation and the Eurasian Economic Union.
- On the territory of the Russian Federation, the manufacturer establishes the following warranty periods for products:
For large and small household appliances, including air conditioners, the warranty period is 10 years from the date of transfer of the product (goods) to the consumer (first buyer).
In the absence of documents confirming the fact of sale, these periods are calculated from the date of manufacture of the product, which can be determined from the serial number. Information on how to read the serial number is contained in the operating instructions.
- The warranty conditions apply to the product used only for personal, family, home purposes, not related to entrepreneurial activity.
- When purchasing and installing, please fill out the warranty card, indicating in it: the date of sale, the seal and signature of the seller, the model and serial number of the product, the date of installation, the name and seal of the installation company.
- Keep the warranty document, the receipt for the sold product, and the receipt for its installation (delivery), modification of water and electrical in-house communications, as well as any other documents related to warranty or other technical maintenance of the product.
- If defects are found in the product during the warranty period, the organization performing repairs (authorized service center) proceeds to eliminate them as soon as possible without unjustified delays. The warranty period for replaced components and parts during the warranty period expires at the end of the warranty period for the product as a whole.
- For air conditioners and split systems, varnished surfaces, and built-in equipment, warranty obligations are fulfilled after installation of the product by the consumer or a specialized organization.
- If it is necessary to diagnose and repair the product in the premises of the organization performing repairs (authorized service center), the transportation of the product
is carried out in accordance with the Law of the Russian Federation "On Protection of Consumer Rights". In case of a call of a specialist to check the quality of the product, as a result of which the absence of defects is revealed or it is established that the defects arose due to violation of the rules of transportation, installation, operation of the product, actions of third parties or force majeure circumstances, diagnostics of the product is carried out for a fee, and transport costs are paid by the consumer according to the price list of the authorized service center. In case of absence of the consumer at home at the time of arrival of the specialist of the authorized service center at the appointed time, a fee is charged for the repeated call of the specialist according to the price list of the authorized service center.
To call a specialist of an authorized service center, carefully read the instructions for use of the product.
- Claims regarding quality are considered according to the standard quality check by a representative of an authorized service center. 9. THE MANUFACTURER SHALL NOT BE LIABLE FOR ANY POSSIBLE DAMAGE CAUSED TO THE CONSUMER, WHETHER PHYSICAL, LEGAL, OR OTHERWISE, IN CASE OF THE CONSUMER'S FAILURE TO COMPLY WITH THE MANUFACTURER'S REQUIREMENTS SPECIFIED IN THESE WARRANTY TERMS AND THE OPERATING INSTRUCTIONS.
Installation and connection:
1. THE MANUFACTURER STRONGLY RECOMMENDS THAT YOU ENTRUST THE INSTALLATION AND CONNECTION OF THE PRODUCT TO SPECIALISTS OF AUTHORIZED SERVICE CENTERS.
To clarify the phone number of the actual authorized service center, you need to contact the hotline at 8-800-200-23-56.
You can also contact any specialized organization that has the appropriate certificate for providing such services.
- Payment for installation and connection work is made according to the price list of the authorized service center / specialized organization. The terms of payment for installation and connection work are regulated by current legislation. The manufacturer shall not be liable for any damage caused to the property of citizens as a result of installation and connection that does not meet the requirements specified in the operating instructions, and/or performed by persons not authorized to do so.
- In case of violation of the manufacturer's requirements for installation and connection, the responsibility for the resulting damage is borne by the person performing this work.
The following cases are not recognized as warranty cases where product defects arose as a result of:
- Failure to comply with the manufacturer's requirements specified in these warranty terms;
- Failure by the consumer to comply with the rules of installation, connection, operation, storage, or transportation of the product, as specified in the operating instructions;
- Repairs performed by unauthorized persons, if such repair caused a malfunction in the product;
- Disassembly of the product, modification of the design, and other interventions not provided for in the operating instructions;
- Malfunctions or damage caused by extreme conditions and/or force majeure (fire, natural disasters, etc.), as well as operation of the product in rooms with high humidity, temperature, etc.;
- Damage to the product or disruption of its normal operation caused by animals or insects, as well as traces of their vital activity.
- Damage caused by deviations of electrical, gas, or water supply parameters from nominal values, as well as unstable operation of the above-mentioned utilities; 8. Use of the product for entrepreneurial activity and/or for purposes not intended.
- Damage or deterioration of the functional characteristics of the product caused by the use of non-standard and/or low-quality consumable materials, accessories, household chemicals, including acid-containing and abrasive cleaning agents or detergents, formation of excessive scale on heating elements (if water hardness is high, treatment with appropriate compounds is necessary), as well as ingress of food residues, dirt, and mechanical impurities inside the product.
- External and internal mechanical damage to the product (scratches, cracks, chips, abrasions, and other mechanical damage) that occurred during installation, operation, or transportation of the product.
- Thermal and other similar damage that occurred during operation. 12. The manufacturer's warranty does not apply to products with altered or damaged
labels containing the identification and serial number of the product.
- The warranty does not cover cosmetic defects that do not affect the consumer properties of the product, as well as consumable materials subject to natural wear (filters, gaskets, seals, oil seals, rubber hoses, decorative overlays, electric lamps, sprayers, power elements, etc., including movable plastic, glass, and metal parts). 14. The manufacturer shall not be liable for any possible damage caused to the consumer, physical or legal, in case of contact of the rear wall of the device with heating risers, gas pipes, metal elements, etc., non-compliance by the consumer with the manufacturer's requirements specified in these warranty terms and in the operating instructions.
- After the warranty period expires, it is recommended to contact an authorized service center at least once a year to check the quality of your product. Diagnostics are paid for by the owner according to the price list of the authorized service center. 16. The manufacturer does not recommend using the product beyond the established service life. By ensuring proper disposal of this product, you will help prevent potential negative consequences for the environment and human health that could otherwise occur.
Arçelik A.Ş.
Karaagaç Cad. No: 2-6, 34445


(2) 1j j b. j c a wll bu wai. a wll bu wu wiyw y. (1)
J 10
golal jol (5) jol. (7)
jbi (9) jai jai jai jai jai jai
1 (9)
3-5
(5)zj(s)

(7)zjla(5)

7 7 7 7 7 7 7 7 7 7 7 7 7 7 7 7 7 7 7 7 7 7 7 7 7 7 7 7 7 7 7 7 7 7

y jll lglall g jlll y g jlln g jlln 10)
J
1 1 1 1 1 1 1 1 1 1 1 1 1 1
(1) a < 1/a +2/a + 11/b· 1/c +3/a + 1 = 1/a + 1. · ∴ a 1 = 2/3,a 5 = 1/9
y

3-4
8 8 8 8 8 8 8 8 8 8 8 8 8 8 8 8 8 8 8 8 8 8 8 8 8 8 8 8 8
g 9) j 8
pJ 10 8. (8)
Jls Jki 6) jie 1e jie jie

3-3
(12) (4) (4) (4)
() (10) (12)
1c b. jgall Js yj p 2 (2) aIbll j Jy j 1 (1) aJlbl j
sllg aalbail albll y! jglal paii
.
J
Jz



- PLEASE READ THIS GUIDE FIRST
- SYMBOLS AND THEIR MEANINGS
- IMPORTANT SAFETY AND ENVIRONMENTAL INSTRUCTIONS
- GENERAL SAFETY
- COMPLIANCE WITH THE WEEE REGULATIONS AND WASTE DISPOSAL
- COMPLIANCE WITH ROHS DIRECTIVE
- PACKAGE INFORMATION
- WHAT TO DO FOR ENERGY SAVING
- YOUR HAND BLENDER
- OVERVIEW
- TECHNICAL DATA
- OPERATION
- INTENDED USE
- MAXIMUM AMOUNTS AND PROCESSING TIME
- FIRST OPERATION
- MIXING AND CHOPPING WITH BLENDING SHAFT
- CHOPPING
- WARNING
- BEATER
- CLEANING AND MAINTENANCE
- CLEANING
- STORAGE
- TRANSPORT AND SHIPPING
- PLEASE READ THIS GUIDE CAREFULLY AT THE BEGINNING
- DEAR CUSTOMER
- OPERATING THE APPLIANCE
- CHANGING AND TESTING WITH THE TEST LIGHT
- BLENDING
- WHISKING
- SYMBOLS USED
- COMPLIANCE WITH WEEE DIRECTIVE (EU DIRECTIVE ON WASTE ELECTRICAL AND ELECTRONIC EQUIPMENT) AND WASTE DISPOSAL
- MIXING AND CHOPPING WITH THE BLENDER
- MIXER
- TRANSPORTATION
- WARRANTY 2 YEARS
- WARRANTY CARD SERIES RUS NO
- INSTALLATION AND CONNECTION
Brand : BEKO
Model : HBA81762BX
Category : Blender