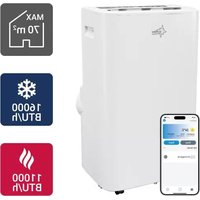
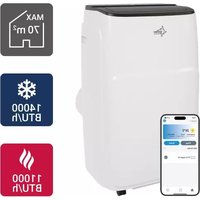
Office 2.8 Kw - Air Conditioning SUNTEC - Free user manual and instructions
Find the device manual for free Office 2.8 Kw SUNTEC in PDF.
User questions about Office 2.8 Kw SUNTEC
0 question about this device. Answer the ones you know or ask your own.
Ask a new question about this device
Download the instructions for your Air Conditioning in PDF format for free! Find your manual Office 2.8 Kw - SUNTEC and take your electronic device back in hand. On this page are published all the documents necessary for the use of your device. Office 2.8 Kw by SUNTEC.
USER MANUAL Office 2.8 Kw SUNTEC
Please do not install or use your mobile local air conditioner before you have carefully read this manual. Please keep this instruction manual for an eventual product warranty and for future reference.
Thank you for purchasing this product of the brand Suntec Wellness. Please read the instructions carefully before using the appliance. Keep this manual for future reference.
Safety instruction
This appliance can be used by children aged from 8 years and above and persons with reduced physical, sensory and mental capabilities or lack of experience and knowledge if they have been given supervision or instruction concerning use of the appliance in a safe way and understand the hazards involved. Cleaning and user maintenance shall not be made by children without supervision. Children of less than 3 years should be kept away unless continuously supervised.
Children aged from 3 years and less than 8 years shall only switch on/off the appliance provided that it has been placed or installed in its intended normal operating position and they have been given supervision or instruction concerning use of the appliance in a safe way and understand the hazards involved. Children aged from 3 years and less than 8 years shall not plug in, regulate and clean the appliance or perform user maintenance.
. Do not use the unit outdoor.
. Do not use the unit if the power cord was damaged, if it seems to be defective.
- The unit may not be connected to a defective outlet. Please make sure before using that the unit has been properly installed.
. Do not use the unit near open fire sources.
. Do not expose the unit to direct sunlight.
. Please turn off the power before you unplug the power cord.
- Before cleaning the unit, turn it off and unplug the power cord.
Before replacing the unit please make sure that the power cord is not plugged in and move it slowly.
. Please clean the unit only on the way as described in this manual.
- Connect the unit to a properly grounded electrical outlet (220-240 V~, 50 Hz).
. Do not let your children play with the unit.
- The unit should not be used without supervision. Please turn off the unit even if you leave the room for only a short time.
Unplug the unit from the socket when you do not use it. Please do not pull on the cord.
. Do not use the unit on a place where it could be splashed with an oil or water.
- Do not use the unit near bath, shower or swimming pool.
- Never insert fingers, pencils or other objects into the unit if the power cord is plugged, and especially not during operation.
- This local air conditioner must be stored and transported upright, otherwise you may cause irreparable compressor damage. In case of doubt let the unit rest for at least 24 hours before you start it.
. Do not cover the unit and make sure that the air inlet and outlet are not blocked.
. Please make sure that the unit stands upright.
- Please use only the spare parts and accessories offered by the manufacturer to avoid damage to the device.
- You should never repair your local air conditioner by yourself. Please contact your dealer if the unit needs to be repaired.
- In case of breakdown turn off the unit (only by the Power button located on the control panel) and contact your dealer.
- In case of power cord damage please turn off the unit and unplug it to avoid fire hazard.
. Do not use multiple sockets or extension cords.
Important. This portable local air conditioner must always be stored and transported in an upright position. In case of doubt, let the unit rest for at least 24 hours before starting it.
Designation of the spare parts/components
| Components | Description | Amount |
| Main component Portable local air-conditioning unit | 1 | |
| Outlet hose adapter for the portable local air-conditioning unit | 1 | |
| Outlet hose adapter for the window (taper) | 1 | |
| Outlet hose | 1 | |
| Window sliding bar with opening | 1 | |
| Drainage hose | 1 | |
| Remote control | 1 |

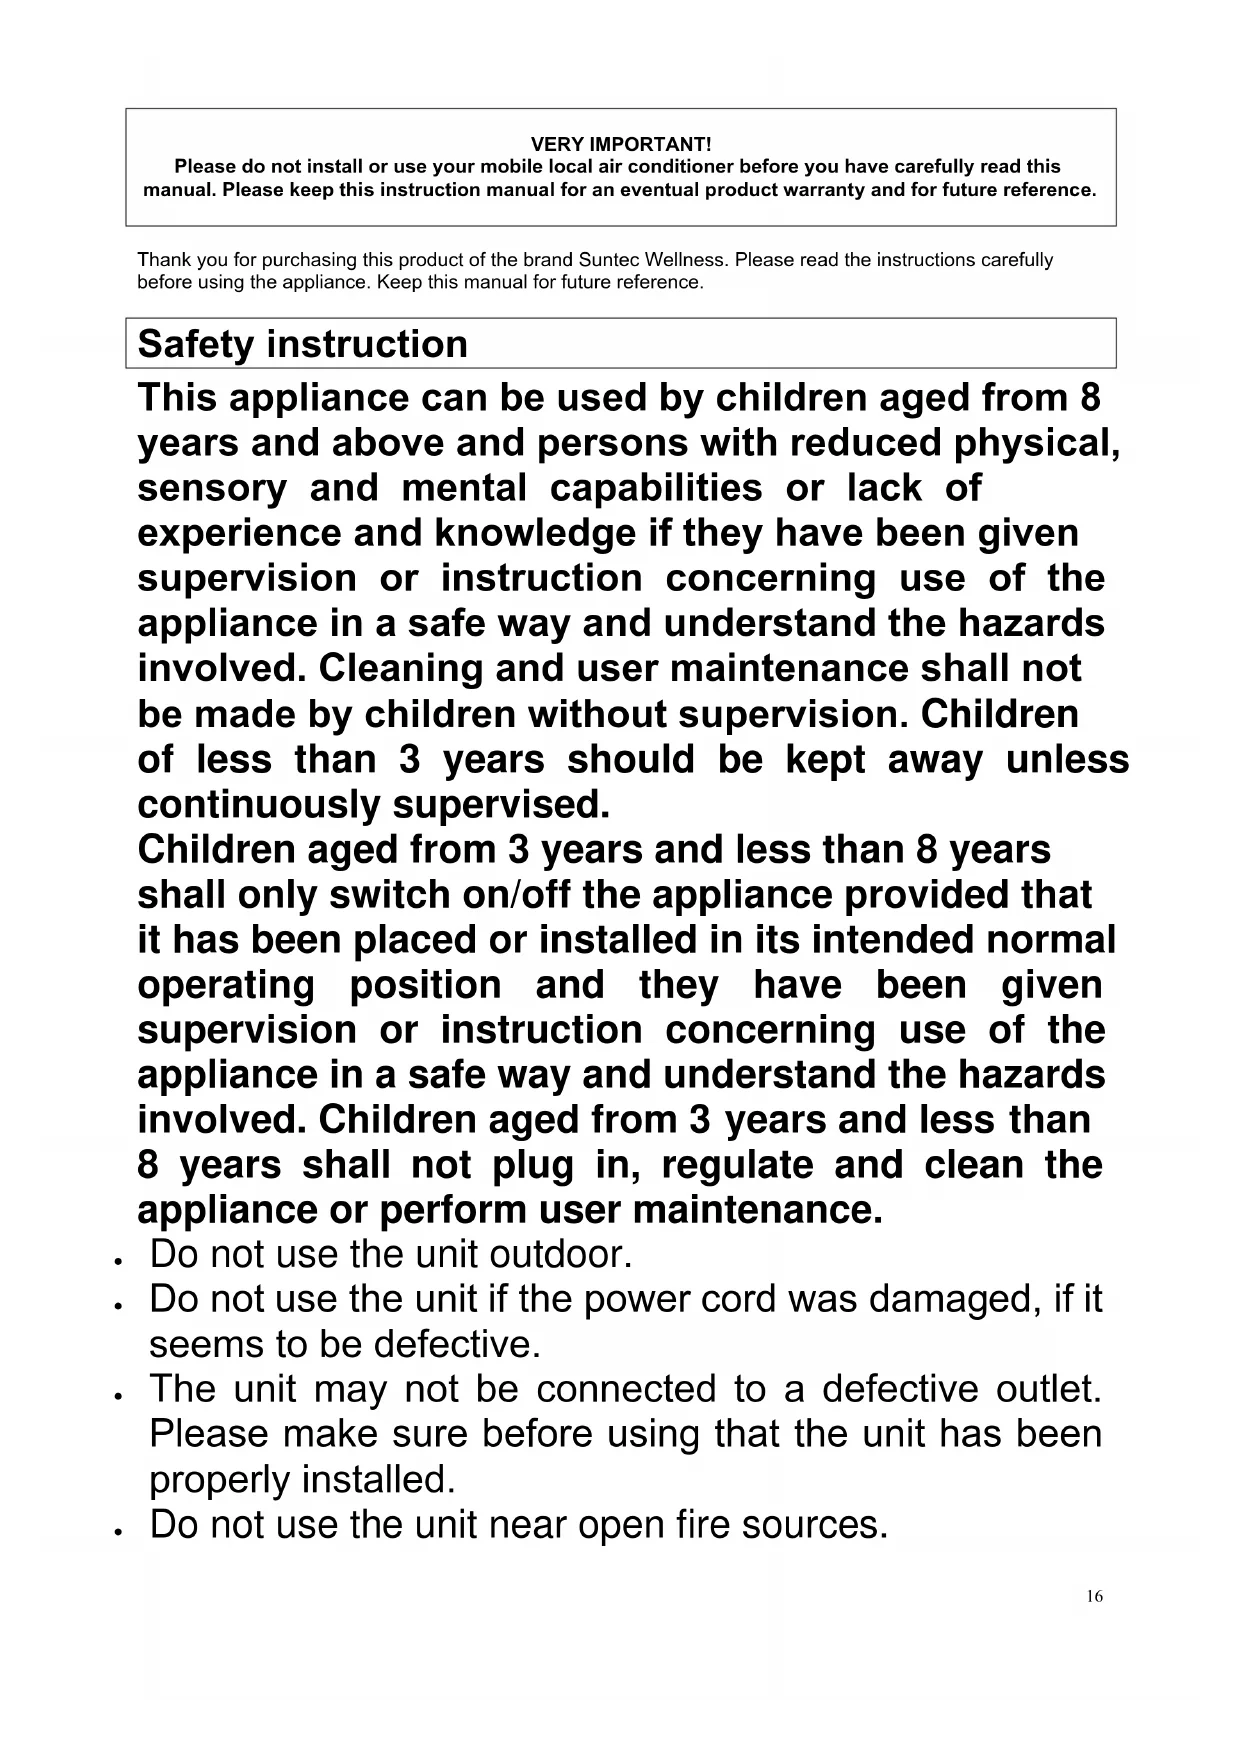
1 Control panel
6 Air inlet / filter grille
2 Carrying handle
7 Outlet hose connection
3 Castors
8 Air inlet / filter grille
4 Air outlet
9 Power cable
5 Housing
10 Drainage hose connection
Installation
The unit should be positioned on the floor, 45cm away from other objects, as these can strongly affect the capacity of the unit (Fig. 1).
Warning: Before using this unit, it should be positioned upright for at least 24 hours.
The unit can be moved without difficulty between rooms, however, please observe the following instructions:
Installation of the outlet hose, Fig. 2, 3 and 4
- Please set up the unit in the vicinity of a wall socket.
- Please secure the adapter to the ends of the outlet hose.
- Please secure the angular end of the outlet hose to the corresponding opening on the back of the unit. (Fig. 5)
- Please attach the sliding bar to the window and insert the oval adapter in the opening on the sliding bar.
- Please connect the power plug to the wall socket (220-240 V~, 50 Hz).
For casement windows, we recommend the Air-Block Klima-Sail EAN 4250058312099 (see chapter "Obtaining spare parts and accessories")
Possible errors during the installation
- Please pay attention that the air outlet is not blocked in order to avoid damaging the unit.
- Do not kink the outlet hose (Fig. 4).
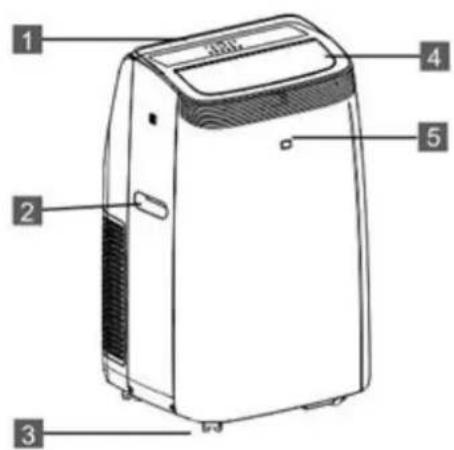
Control panel
1 Mode Timer
2 Fan Speed
3 DOWN(-)
4 Display
5 UP (+)
6 Mode
7 On/Off
A Timer indicator
B Fan speed indicator
C Mode indicator
D UV light indicator
E Sleep mode indicator
- ON/OFF: Please press the button to switch the unit on or off. When switched on, the unit automatically starts with the previous settings.
- MODE: After activation, please press the unit's mode button to select between cooling, heating, dehumidification or fan mode.
- FAN SPEED: After switching on the unit, press this button to set the fan speed (high, medium, low or automatic). With automatic speed, the speed is adjusted to the ambient temperature.
- UP/DOWN buttons (+/ -:): Please set the unit to the cooling mode and adjust the desired room temperature (18-32°C cooling or 13-27°C heating). with the use of these buttons. Please press both buttons simultaneously for at least 3 seconds to switch the temperature display between Celsius and Fahrenheit.
- TIMER: Please press this button and set the desired activation/deactivation time.
Description of the functions
Switching on / off
- Please plug the unit into the mains socket. The unit starts in standby mode. Please press the On/Off button to switch the unit on. The last used mode is automatically activated. Press the On/Off key again to switch the unit off.
Cooling mode
- Please press the mode button until the cooling mode indicator lights up.
- Please press the UP/DOWN buttons to set the desired temperature (18-32 °C or 64-90 °F). The target temperature is shown on the display.
- Please press the fan button to set the speed of the fan (high, medium, low or automatic). The corresponding speed indicator lights up.
Heating mode
- Please press the mode button until the heating mode indicator lights up.
- Please press the UP/DOWN buttons to set the desired temperature (13-27 °C or 55-81 °F). The target temperature is shown on the display.
- Please press the fan button to set the speed of the fan (high, medium, low or automatic). The corresponding speed indicator lights up.
Fan mode
- Please press the mode button until the fan mode indicator lights up.
- Please press the fan button to set the speed of the fan (high, medium or low).
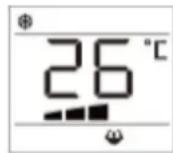
- The corresponding speed indicator lights up, additionally, the set speed is indicated on the display using the symbols (for high speed), (for medium speed) and (for low speed).
Dehumidification mode
- Please press the mode button until the dehumidification mode indicator lights up.
The symbol appears on the display
The fan speed is automatically set by the unit and cannot be adjusted.
Timer
- Please switch the unit on and set the desired room temperature and fan speed. Please switch the unit off now.
- Please press the timer button to activate the function. The display indicates a flashing symbol and an amount of hours.
- Please set the desired switch-on time (0-24h) with the up/down keys on the remote control or press the TIMER button on the unit directly.
- Please wait 5 seconds until the timer function is activated, the corresponding indicator light will light up and the unit will be switched to the standby mode.
- Please press the timer button or the On/Off button once again to clear the timer setting. The indicator light will switch off and the timer symbol will disappear from the display.
- Please press the timer button in the activated state of the unit to set the deactivation time as described above.
Automatic mode
After activation of this function, depending on the ambient temperature, the unit will automatically determine which mode (cooling, heating or fan mode) is activated.
- Please press the mode button on the remote control several times. While the automatic mode is active, the display will indicate spinning bars:

- Please set the desired fan speed (high, medium, low or automatic) with the fan button.
- When your unit is only equipped with the cooling function, it will automatically switch to the fan mode as soon as the ambient temperature is lower than 23^ (73°F) and return to the cooling mode as soon as the ambient temperature is higher than 23^ (73°F).
- When your unit is equipped with both the cooling as well as the heating function, the unit will automatically switch to the heating mode as soon as the ambient temperature drops below 20^ ( 68^ ). When the ambient temperature is between 20^ ( 68^ ) and 23^ ( 73^ ), the unit will switch to the fan mode. From 23^ ( 73^ ), the unit will operate in cooling mode.
UV light:
- This function is used to purify the air.
- When the unit is in operation, press and hold the fan speed button " " for 3 seconds to activate the UV light function. The "UV light indicator" appears on the display.
- Press and hold the fan speed button " " for 3 seconds to deactivate this function.
Note: The UV function is not available when the air conditioner is switched off.
| UV-C Lamp |
| Voltage: 12VDC |
| Wattage: 2W |
| WARNING - This unit contains a UV lamp. Do not look into the light source. |
Remote control:
The same settings can be performed using the remote control as with the control panel.
Powered by 2 x AAA batteries (not included)
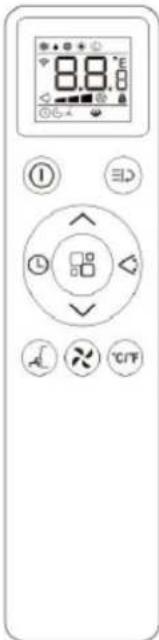
| 1 | On/off button | × | Fan speed |
| 2 | Mode button | L | Timer |
| 3 | Sleep mode (can only be set via the remote control) | °C/°F | Temperature setting Celsius/Fahrenheit |
| 4 | UP button | Δ | Swing (can only be set via the remote control) |
| 5 | DOWN button | ≡∅ | Function key |
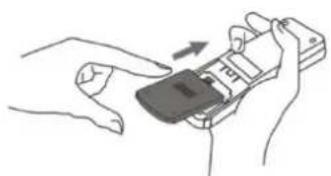
Please insert 2 "AAA" 1.5V batteries into the remote control to operate it.
Description of the functions
Swing
- Please press the swing button in order to activate or deactivate the automatic vertical movements of the louvers.
Turbo function
This function is only available in cooling, dehumidification and fan mode.
- If you activate this function, the selected mode is operated with maximum power.
- Press the function button on the remote control "三口", the turbo symbol "山" will flash 10 times. If you press the function key again during this time, the turbo function is activated.
Child lock (remote control only)
- Please press the up and down buttons together for 3 seconds. This activates and deactivates the child lock. When the child lock is activated, no other key can be activated. The child lock can be deactivated by pressing the up and down buttons again for 3 seconds.
Sleep mode
- Please set the desired room temperature in the cooling mode.
- Please press the sleep mode button on the remote control.
The display will be dimmed and the unit will automatically operate with a low fan speed. - When in COOL mode, the selected temperature will increase by 1^(1^) per hour in a 2 hour period. This new temperature will be maintained for the next 6 hours. Then the appliance turn it off.
- When in HEAT mode, the selected temperature will decrease by 1^(1^) per hour in a 3 hour period. This new temperature will be maintained for the next 5 hours. Then the appliance turn it off.
Draining the water tank
The unit is equipped with an automatic water evaporation system. Condensate is used for the cooling of the condenser, which not only increases the cooling capacity, but also saves energy.
- As soon as the water tank is full, the indication of FE will appear on the display and the standby mode will activate automatically.
- Please switch off the unit and disconnect the power plug.
- To empty the water tank, remove the water drain plug on the bottom of the unit and allow the water to drain into a suitable container. Alternatively, you can drain the water using the supplied drainage hose.
- As soon as you restart the unit, it will function completely normally.
Maintenance
To avoid any injuries, please switch off the unit and disconnect the power plug before beginning the maintenance or cleaning.
Cleaning
- Please disconnect the power plug.
- Please clean the unit with a moistened cloth and then wipe it off with a dry cloth. Please do not use chemical solvents (such as petrol or alcohol). The surface as well as the entire housing could be damaged.
- Please never clean the appliance with water.
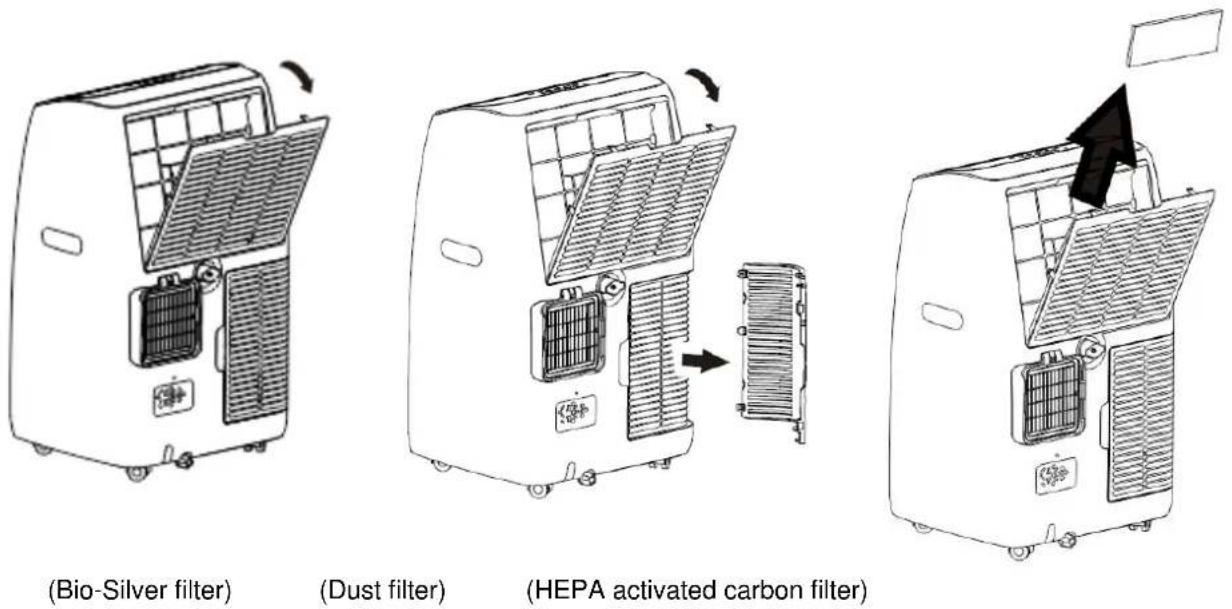
Air filter
- Please clean the air filter regularly. When the air filter has become blocked with dust, its efficiency will be reduced.
- Please wash the air filter by immersing it in warm water (approx. 40^ ) using a neutral cleaning agent, rinse it under running water and subsequently dry it with a soft cloth.
- Please do not operate the unit without an air filter.
Storage
- Please disconnect the power plug and empty the water tank.
- Please allow the appliance to operate in fan mode for approx. 2 hours so the interior assembly can dry.
- Please switch off the unit and disconnect the power plug.
- Please clean and dry the air filter, then reinstall it in the unit.
- Please disconnect the outlet hose from the unit and store it safely.
- Please place the unit in a box and store it in a dry place.
- Remove the batteries from the remote control and store these safely.
Faults
Do not try to install/disassemble/repair the unit yourself. Incorrectly performed work can cause electric shock, water leakage, fire and similar.
| Fault | Reason | Solution |
| 1. The unit will not start | No power | Please provide the unit with power and turn it on. |
| FE - Display lights up | Please empty the water tank. | |
| Internal safety function was activated | Please switch the unit off, wait 30 minutes and switch it on again. Should the problem persist, please contact your point of sale. | |
| 2. The unit does not cool correctly. | Windows and doors are open, other heat sources are present in the room (causing a fluctuation in temperature) | Please close all windows and doors and remove the heat source. |
| Direct sunlight | Please position the unit in the shade or close the curtains. | |
| Outlet hose not connected or blocked | Please connect the outlet hose or clean it, if necessary. | |
| Air inlet is blocked | Please clean the blocked point | |
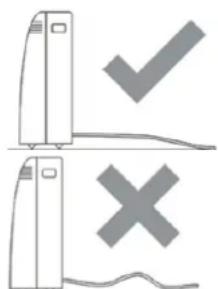
| 3. The unit switches off after a short period of time | Outlet hose is kinked | Please position the outlet hose straight and keep it as short as possible to increase the unit's efficiency. |
| Air outlet is blocked | Please check the air outlet and clean it, if necessary. | |
| 4. Noise | The unit has not been placed on a level surface | Position the unit on a hard, level surface (this reduces the noise) |
| 5. Compressor is not running | Thermal protection has been activated. | Please switch the unit off and restart it after 3 minutes. |
| 6. Unpleasant smell during operation | Air filter is dirty | Please clean the air filter as described in the chapter "Maintenance/cleaning". |
| 7. The Fysbom is shown on the display | The internal sensor is damaged | Please contact your point of sale. |
| 8. The Fysbom is shown on the display | Water tank is full | Please empty the water tank. |
Spare parts and accessories supply (fast convenient supply)
You can obtain spare parts and accessories for your OFFICE unit from your local dealer. And at our website
www.suntec-wellness.de
you will find further information on individual accessory products as well as information on obtaining our spare parts quickly and conveniently. You will also find other information (e.g. FAQ, lists of spare parts, document download, etc) about your OFFICE unit.
| Name EAN | Description | Drawing |
| Air-Block Klima-Sail 4250058312099 | Sail which can be used for all types of windows and doors. As for an external fly screen, it is fixed with Velcro and operated via a zip. The window or door can be closed at any time. | |
| Air-Extension-Kit 4250058312105 | A World First with which you can air-condition almost every corner of your house, and it doesn't matter where the local air conditioner is located. You can extend the extract air hose by 5 meters via a special propeller. For OFFICE this also applies for the air supply and extraction. | |
| OFFICE 2.8 KW supersilent A+ Eco R290 Filter Set 4250058316325 | Bio-Silver-Filter Dust filter HEPA activated carbon filter |
In the case of complaints
Would you like to complain about the device, you can do it within 24 months from the date of purchase (receipt).
- A free replacement or repair will be excluded from the prior improper product manipulation.
Defects on parts and consumables, as well as cleaning, maintenance or replacement of said parts are therefore chargeable.
If you want to make a claim, so please bring the whole unit in its original packaging and with proof of purchase to your dealer. For a timely and convenient service register, visit our website also www.suntec-wellness.de and learn more.
- No proof of purchase will generally not free repair or replacement.
In the event that the complaint case is analogous to our terms of service, all defects of the device or its accessories due to material or manufacturing faults by repair or, at our option, by replacement of the device.
The damage of accessories does not automatically lead to a free replacement of the entire unit. In these cases, please contact your dealer. Glass breakage, or breakage of plastic parts is always a charge.
- The dealer or repair after the warranty service can carry out repairs with costs.
EC-Declaration of Conformity
The unit complies with the essential health and safety requirements of the European Union. The EC declaration of conformity is the basis for the CE marking of this unit. With the publication of this manual, all previous are not valid. SUNTEC, SUNTEC Wellness, KLIMATRONIC and the Sun logo are registered trademarks. © 2021 SUNTEC WELLNESS GMBH
ERP Regulation
This high-quality single-channel portable air conditioning unit is in accordance with the rules and regulations of the European Union, in particular the new ERP Regulation 626/2011 to a "local air conditioner."
Refrigerant
(CE) N 842/2006: This local air conditioner contains the refrigerant R290. The amount of refrigerant is less than 1kg, and is in a closed cooling circuit. The coolant does have zero ozone depletion potential, but is a so-called greenhouse gases under the Kyoto Protocol and may thus contribute to global warming, if it is released to the atmosphere. Therefore only trained technicians with refrigerant certificate make a filling or emptying. Your Suntec local air conditioner does not have to use if used properly and undamaged coolant circuit can be refilled with refrigerant.
OFFICE 2.8 KW SUPERSILENT A+ A++ ECO: R290, GWP: 3, 260g = 0,00078t CO2e
Note concerning protection of environment

This product must not be disposed of via normal household waste after its service life, but must be taken to a collection station for the recycling of electrical and electronic devices. The symbol on the product, the operating instructions or the packaging indicate such disposal procedures. The materials are recyclable in accordance with their respective symbols. By means of re-use, material recycling or any other form of recycling old appliances you are making an important contribution to the protection of our environment. Please ask your local council where your nearest disposal station is located.
Liability is excluded for all printing errors and omissions.
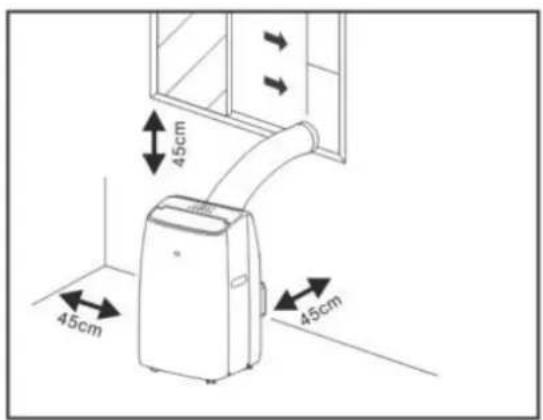
Fig. 1
Fig.2
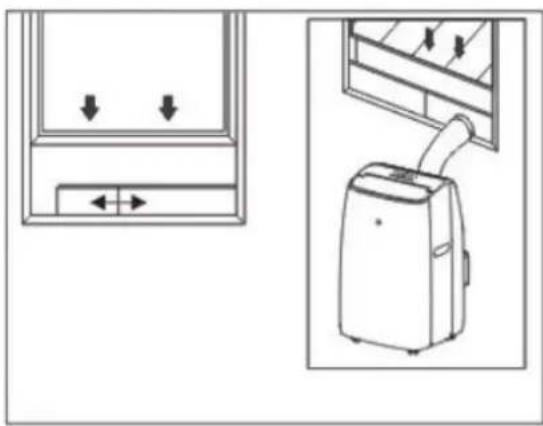
Fig. 4
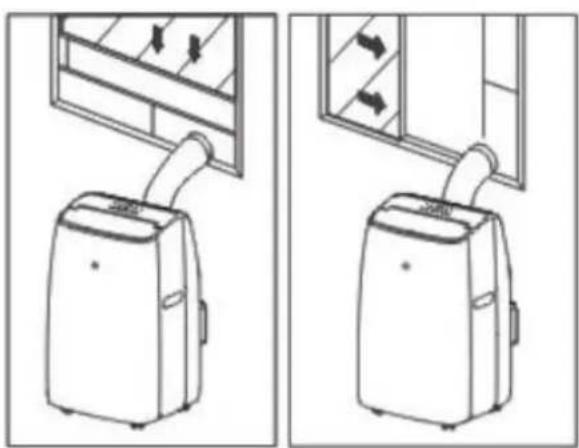
Fig. 3
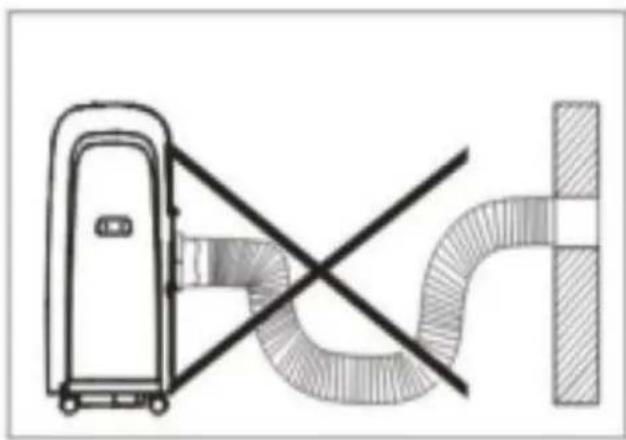
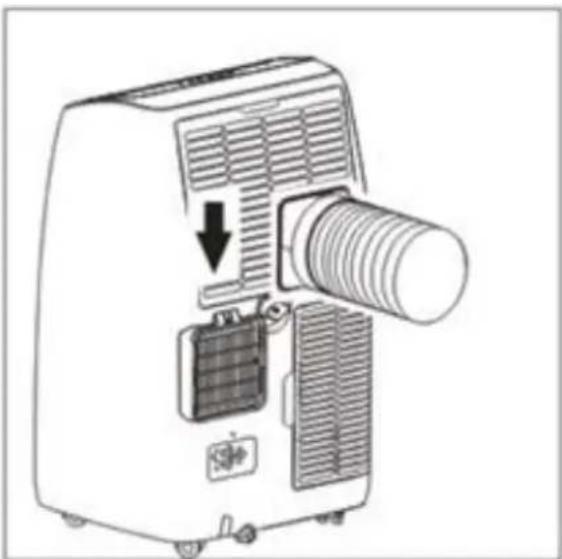
Fig. 5
Muy importante!
EC-Declaration of Conformity
The unit complies with the essential health and safety requirements of the European Union. The EC declaration of conformity is the basis for the CE marking of this unit.
With the publication of this manual, all previous are not valid. SUNTEC, SUNTEC Wellness, KLIMATRONIC and the Sun logo are registered trademarks. © 2021 SUNTEC WELLNESS GMBH
ERP Regulation
This high-quality single-channel portable air conditioning unit is in accordance with the rules and regulations of the European Union, in particular the new ERP Regulation 626/2011 to a "local air conditioner."
Refrigerant
(CE) N 842/2006: This air conditioner contains the refrigerant R290. The amount of refrigerant is less than 1kg , and is in a closed cooling circuit. The coolant does have zero ozone depletion potential, but is a so-called greenhouse gases under the Kyoto Protocol and may thus contribute to global warming, if it is released to the atmosphere. Therefore only trained technicians with refrigerant certificate make a filling or emptying. Suntec your air conditioner does not have to use if used properly and undamaged coolant circuit can be refilled with refrigerant.
OFFICE 2.8 KW SUPERSILENT A+ A++ ECO: R290, GWP: 3, 260g = 0,00078t CO2e
© 2021 SUNTEC WELLNESS GMBH
ERP-besluit
EC-Declaration of Conformity
The unit complies with the essential health and safety requirements of the European Union. The EC declaration of conformity is the basis for the CE marking of this unit.
With the publication of this manual, all previous are not valid. SUNTEC, SUNTEC Wellness, KLIMATRONIC and the Sun logo are registered trademarks. © 2021 SUNTEC WELLNESS GMBH
ERP Regulation
This high-quality single-channel portable air conditioning unit is in accordance with the rules and regulations of the European Union, in particular the new ERP Regulation 626/2011 to a "local air conditioner."
Hütokozeg
For this appliance we assure 24 months warranty.
During the 24 months warranty we guarantee to repair your appliance free of charge or to provide your seller the spare parts free of charge if the appliance fails to work due to production failure.
Other claims are excluded from this warranty. We will not be liable for any defects caused by acts of nature, improper use, negligence of the instruction manual, damage from continuous use and damages during transportation.
This warranty card is only applicable with the according invoice.
In case of service please bring your purchased product to your seller.
Product name:
Serial number:
Name of buyer:
Date of purchase:
Stamp and signature of seller:
Manufacturer:
Suntec Wellness GmbH
Holzstraße 2
40221 Dusseldorf
Germany
SUNTEC WELLNESS GMBH
HOLZSTRAße 2
40221 DUSSELDORF
NÉMETORSZÁG
www.suntec-wellness.de
Garanciajegy
vasarlas helye
vasarlas datuma
cikkszám/EAN
Kedves Vásárló,