
ISLK 96 LS X - Air conditioner INDESIT - Free user manual and instructions
Find the device manual for free ISLK 96 LS X INDESIT in PDF.



| Product type | Range hood |
| Brand | Indesit |
| Model | ISLK 96 LS X |
| Height (cm) | 13.3 |
| Width (cm) | 49.9 / 54.9 / 59.9 / 89.9 |
| Depth (cm) | 51.0 |
| Exhaust duct diameter (cm) | 12.5 |
| Power supply | 220-240 V ~ 50/60 Hz |
| Lighting | LED 2.5 W - E14 |
| Number of suction speeds | 3 (min, med, max) |
| Grease filter type | Metal or paper (depending on model) |
| Active carbon filter | Optional (recirculating version) |
| Cleaning frequency of grease filters | At least once a month |
| Carbon filter replacement | Every 4 months maximum |
| Minimum distance above an electric cooker | 60 cm |
| Minimum distance above a gas cooker | 75 cm |
| Safety | Automatic shut-off in case of overheating (not specified) |
| Recommended use | Indoor, domestic use |
| Country of manufacture | Not specified |
Frequently Asked Questions - ISLK 96 LS X INDESIT
User questions about ISLK 96 LS X INDESIT
0 question about this device. Answer the ones you know or ask your own.
Ask a new question about this device
Download the instructions for your Air conditioner in PDF format for free! Find your manual ISLK 96 LS X - INDESIT and take your electronic device back in hand. On this page are published all the documents necessary for the use of your device. ISLK 96 LS X by INDESIT.
USER MANUAL ISLK 96 LS X INDESIT
EN Instructions for use
- Before any cleaning or maintenance operation, disconnect the hood from the mains by removing the plug or disconnecting the mains electrical supply.
- Always wear work gloves for all installation and maintenance operations.
- This appliance can be used by children aged from 8 years and above and persons with reduced physical, sensory or mental capabilities or lack of experience and knowledge if they have been given supervision or instruction concerning use of the appliance in a safe way and understand the hazards involved.
- Children shall not be allowed to tamper with the controls or play with the appliance.
- Cleaning and user maintenance shall not be made by children without supervision.
- The premises where the appliance is installed must be sufficiently ventilated, when the kitchen hood is used together with other gas combustion devices or other fuels.
- The hood must be regularly cleaned on both the inside and outside (AT LEAST ONCE A MONTH).
- This must be completed in accordance with the maintenance instructions provided. Failure to follow the instructions provided regarding the cleaning of the hood and filters will lead to the risk of fires.
- Do not flambe under the range hood.
- Do not remove filters during cooking.
- For lamp replacement use only lamp type indicated in the Maintenance/Replacing lamps section of this manual.
The use of exposed flames is detrimental to the filters and may cause a fire risk, and must therefore be avoided in all circumstances.
Any frying must be done with care in order to make sure that the oil does not overheat and ignite.
CAUTION: Accessible parts of the hood may become hot when used with cooking appliances.
- Do not connect the appliance to the mains until the installation is fully complete.
- With regards to the technical and safety measures to be adopted for fume discharging it is important to closely follow the regulations provided by the local authorities. The air must not be discharged into a flue that is used for exhausting fumes from appliance burning gas or other fuels.
- Do not use or leave the hood without the lamp correctly mounted due to the possible risk of electric shocks.
- Never use the hood without effectively mounted grids.
- The hood must NEVER be used as a support surface unless specifically indicated.
- Use only the fixing screws supplied with the product for installation or, if not supplied, purchase the correct screws type.
- Use the correct length for the screws which are identified in the Installation Guide.
- In case of doubt, consult an authorized service assistance center or similar qualified person.
WARNING!
- Failure to install the screws or fixing device in accordance with these instructions may result in electrical hazards.
- Do not use with a programmer, timer, separate remote control system or any other device that switches on automatically.
Very young children (0-3 years) should be kept away from the appliance. Young children (3-8 years) should be kept away from the appliance unless continuously supervised.
CAUTION: The appliance is not intended to be operated by means of an external switching device, such as a timer, or separate remote controlled system.
This appliance is not for professional use. Do not use the appliance outdoors. The appliance must be handled and installed by two or more persons - risk of injury. Installation, including water supply (if any), electrical connections and repairs must be carried out by a qualified technician.
Once installed, packaging waste (plastic, styrofoam parts etc.) must be stored out of reach of children - risk of suffocation.
Do not use the appliance when you are wet or barefoot.
Never use steam cleaning equipment - risk of electric shock.
The packaging material is 100% recyclable and is marked with the recycle symbol.

The hood can look different to that illustrated in the drawings in this booklet. The instructions for use, maintenance and installation, however, remain the same.
Closely follow the instructions set out in this manual. All responsibility, for any eventual inconveniences, damages or fires caused by not complying with the instructions in this manual, is declined. This appliance is intended to be used in household and similar applications such as: - staff kitchen areas in shops, offices and other working environments; - farm houses; - by clients in hotels, motels and other residential type environments; - bed and breakfast type environments.
It is important to conserve this booklet for consultation at any moment. In the case of sale, cession or move, make sure it is together with the product. - Read the instructions carefully: there is important information about installation, use and safety. - Do not carry out electrical or mechanical variations on the product or on the discharge conduits. - Before proceeding with the installation of the appliance verify that there are no damaged components. Otherwise contact your dealer and do not proceed with the installation.
The minimum distance between the supporting surface for the cooking equipment on the hob and the lowest part of the range hood must be not less than 60 cm from electric cookers and 75 cm from gas or mixed cookers.
If the instructions for installation for the gas hob specify a greater distance, this must be adhered to.
ELECTRICAL CONNECTION
The mains power supply must correspond to the rating indicated on the plate situated inside the hood. If provided with a plug, connect the hood to a socket in compliance with current regulations and positioned in an accessible area, after installation. If it is not fitted with a plug (direct mains connection) or if the plug is not located in an accessible area, after installation, apply a double pole switch in accordance with standards which assures the complete disconnection of the mains under conditions relating to over-current category III, in accordance with installation instructions.
WARNING!
Before re-connecting the hood circuit to the mains supply and checking the efficient function, always check that the mains cable is correctly assembled.
If the cable is not fitted with a plug, connect the wires according to the following table:
Mains voltage and frequency
Refer to the rating indicated on the plate inside of the hood
Wire connection

N: blue
L: brown
Replacing the power cable
The hood is provided with a special power cable; if the cable is damaged, request a new one from Technical Service.
AIR VENT
(for the suction versions)
Connect the hood and discharge holes on the walls with a diameter equivalent to the air outlet (connection flange).
Using the tubes and discharge holes on walls with smaller dimensions will cause a diminution of the suction performance and a drastic increase in noise.
Any responsibility in the matter is therefore declined.
! Use a duct of the minimum indispensable length. ! Use a duct with as few elbows as possible (maximum elbow angle: 90°). ! Avoid drastic changes in the duct cross-section. ! The company declines any responsibility whenever these regulations are not respected.
FILTERING OR DUCTING?
! Your cooker hood is ready to be used in suction version.
To use the hood in filtering version, the special ACCESSORY KIT must be installed.
Check the first pages of this manual to see if the ACCESSORY KIT is furnished or must be bought separately.
Note: If furnished, in certain cases, the additional activated carbon filtering system may be installed on the hood.
Information about the conversion of the hood from suction version to filtering version is present in this manual.
Ducting version
In this case, the fumes are conveyed outside of the building by means of a special pipe connected with the connection ring located on top of the hood.

CAUTION!
The exhausting pipe is not supplied and must be purchased separately.
The diameter of the exhausting pipe must be equal to that of the connection ring.

CAUTION!
If the hood is supplied with active charcoal filter, then it must be removed.
Filter version
The aspirated air will be degreased and deodorised before being fed back into the room.
In order to use the hood in this version, you have to install a system of additional filtering based on activated charcoal.
CONTROLS
The hood is fitted with a control panel with aspiration speed selection control and a light switch to control cooking area lights.
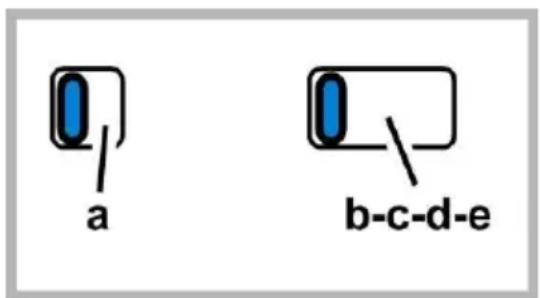
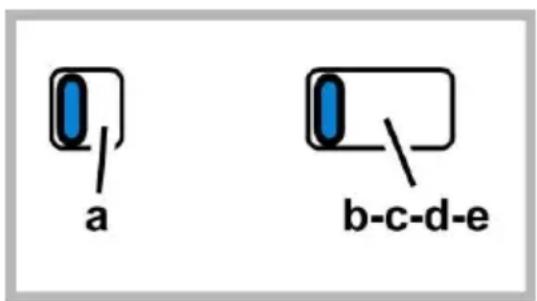
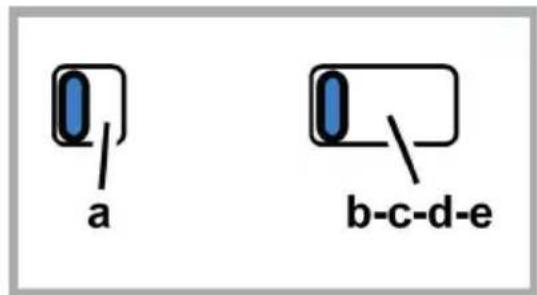
a. ON/OFF lighting b. OFF motors c.-d.-e. Minimum suction power (c.), medium (d.), maximum (e.).
MAINTENANCE
Cleaning
Clean using ONLY a cloth dampened with neutral liquid detergent. DO NOT CLEAN WITH TOOLS OR INSTRUMENTS. Do not use abrasive products. DO NOT USE ALCOHOL!
Maintenance of the anti-grease filters
Traps cooking grease particles.
If situated inside the support grill, it may be one of the following types:
Paper filter must be replaced once a month or if colouring appears on upper side, in such cases the colouring is evident through the grill openings.
Metallic filter must be cleaned once a month, with non abrasive detergents, by hand or in dishwasher on low temperature and short cycle.
When washed in a dishwasher, the grease filter may discolour slightly, but this does not affect its filtering capacity.
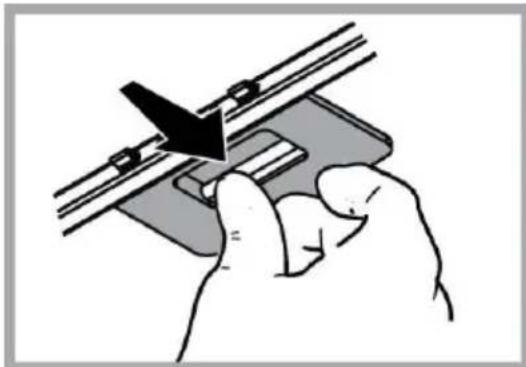
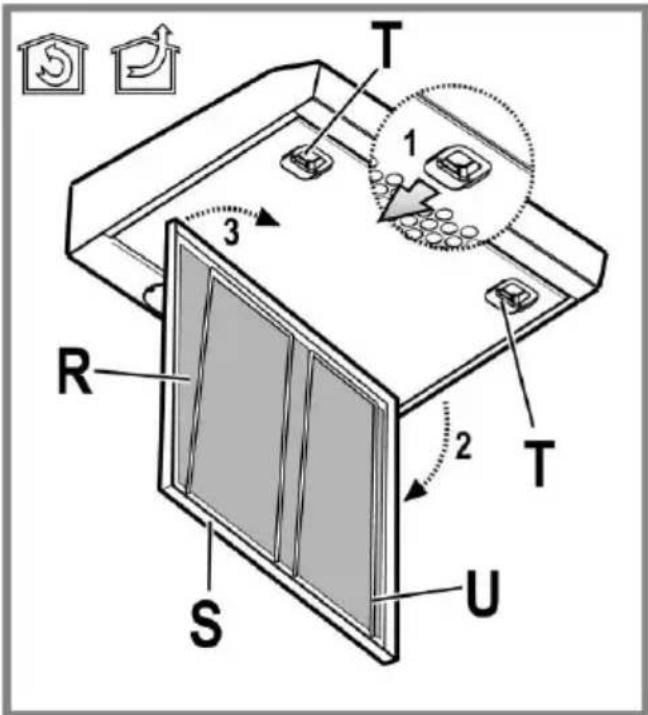
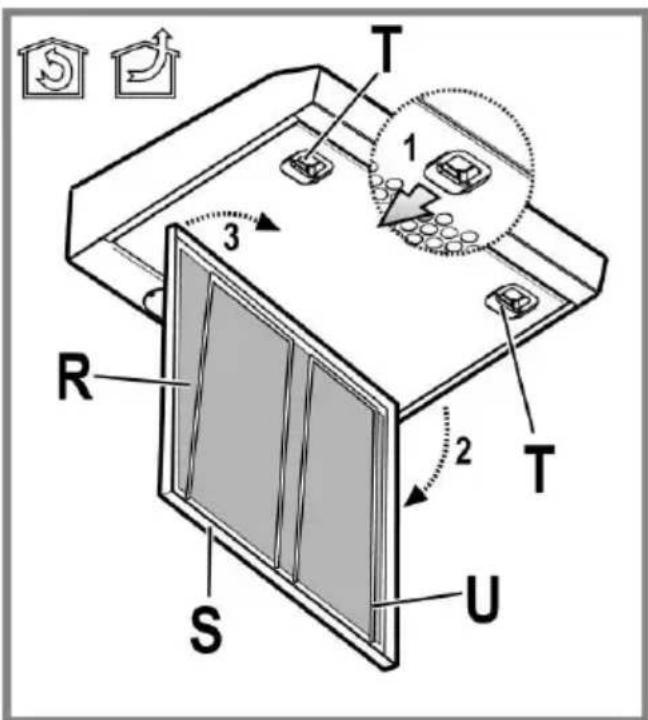
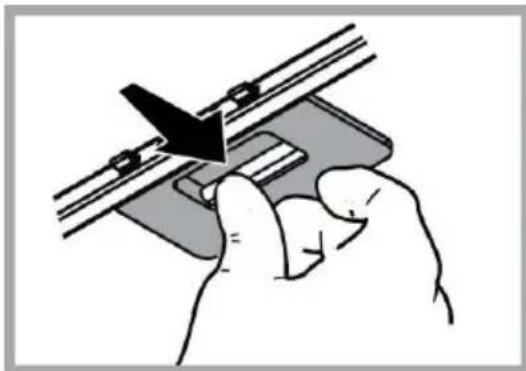
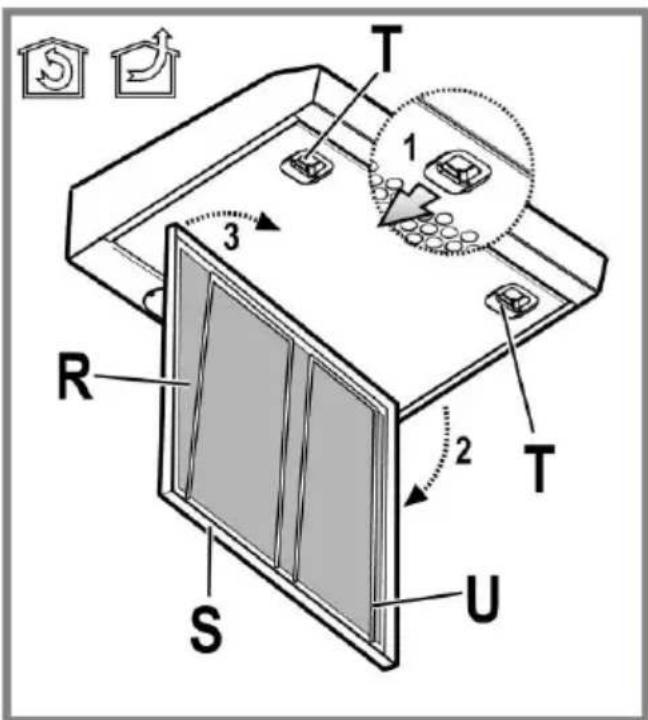
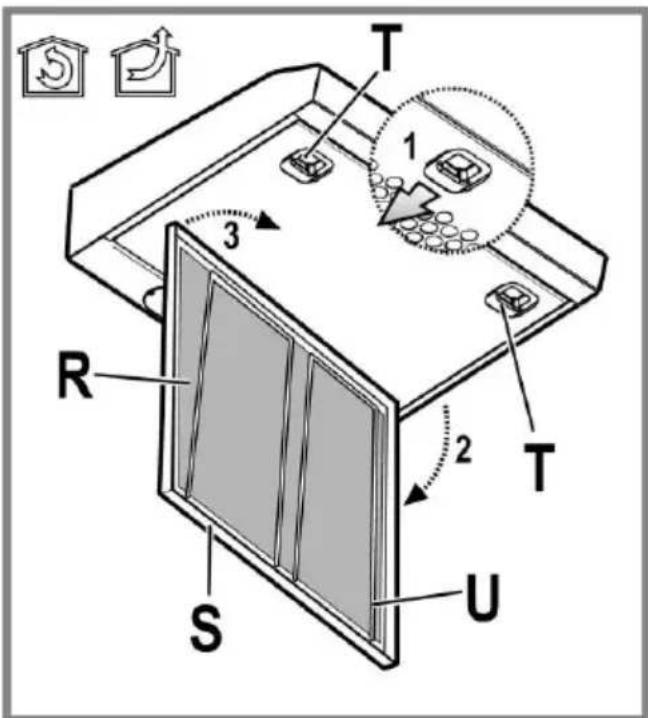
To access the grease filter R open the suction grill S via the release hooks T and free from the supports U.
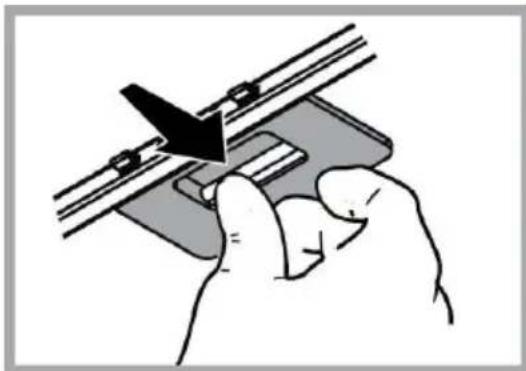
The self-supporting metal filter does not include a support grill, in order to remove the filter - pull the release springs backwards and slide the filter downwards.
Maintenance of the charcoal filter
It absorbs unpleasant odors caused by cooking.
The saturation of the charcoal filter occurs after more or less prolonged use, depending on the type of cooking and the regularity of cleaning of the grease filter.
In any case it is necessary to replace the cartridge at least every four months.
The charcoal filter may NOT be washed or regenerated.
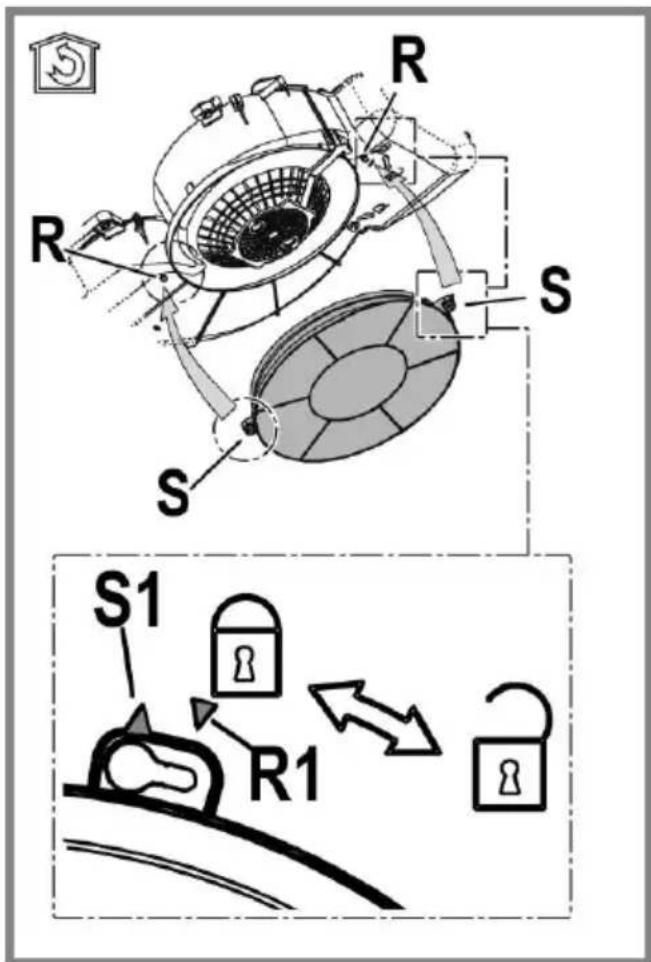
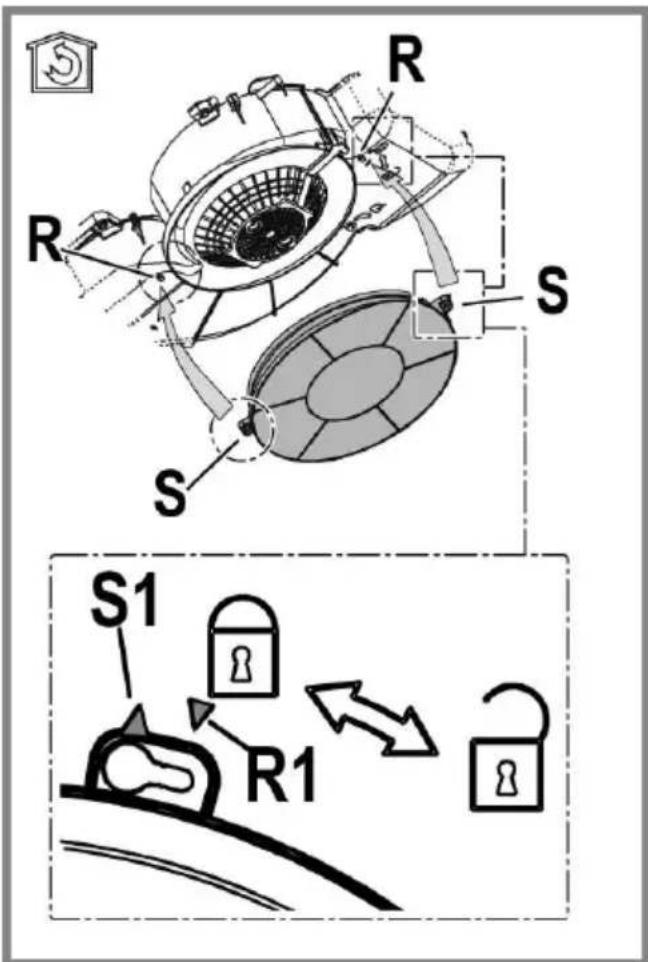
Remove the grease filters.
Fit the charcoal filters over the motor.
Align the pins R on the cowl with the slots S, then turn the filter clockwise until it locks in place.
Reverse the above procedure to remove the charcoal filters.
Refit the grease filters.
Replacing lamps
Disconnect the appliance from the electricity.
Warning! Prior to touching the light bulbs ensure they are cooled down.
Put the grill back.
Replace the damaged lamp.
Use E14 2,5W max LED lamps only. For more details, check enclosed leaflet "ILCOSD" (alphanumeric position "1e").
Put the grill back.
DISPOSAL
This appliance is marked according to the European directive 2012/19/EC on Waste Electrical and Electronic Equipment (WEEE). By ensuring this product is disposed of correctly, you will help prevent potential negative consequences for the environment and human health, which could otherwise be caused by inappropriate waste handling of this product.

- The symbol on the product, or on the documents accompanying the product, indicates that this appliance may not be treated as household waste. Instead it should be taken to the appropriate collection point for the recycling of electrical and electronic equipment. Disposal must be carried out in accordance with local environmental regulations for waste disposal.
- For further detailed information regarding the process, collection and recycling of this product, please contact the appropriate department of your local authorities or the local department for household waste or the shop where you purchased this product.
Appliance designed, tested and manufactured according to:
- Safety: EN/IEC 60335-1; EN/IEC 60335-2-31, EN/IEC 62233. Performance: EN/IEC 61591; ISO 5167-1; ISO 5167-3; ISO 5168; EN/IEC 60704-1; EN/IEC 60704-2-13; EN/IEC 60704-3; ISO 3741; EN 50564; IEC 62301.
- EMC: EN 55014-1; CISPR 14-1; EN 55014-2; CISPR 14-2; EN/IEC 61000-3-2; EN/IEC 61000-3-3. Suggestions for a correct use in order to reduce the environmental impact. Switch ON the hood at minimum speed when you start cooking and keep it running for a few minutes after cooking is finished. Increase the speed only in case of large amount of smoke and vapor and use boost speed(s) only in extreme situations. Replace the charcoal filter(s) when necessary to maintain a good odor reduction efficiency. Clean the grease filter(s) when necessary to maintain a good grease filter efficiency. Use the maximum diameter of the ducting system indicated in this manual to optimize efficiency and minimize noise.
MALFUNCTIONS
If something appears not to be working properly, do the following simple checks before calling Technical Service:
If the hood is not working:
Check that:
- The power has not been disconnected.
- A speed has been selected.
- If the hood performs inefficiently:
Check that:
- The motor speed selected is sufficient for the amount of smoke and vapours released.
- The kitchen is sufficiently ventilated to allow air intake.
- The charcoal filter is not worn (hood in filtering version).
- If the hood has turned off during normal functioning:
Check that:
- The power has not been disconnected.
- The omnipolar disconnection device has not tripped.
If the hood fails to operate correctly, briefly disconnect it from the mains power supply for almost 5 sec. Then connect it in again and try once more before contacting the Technical Assistance Service.
TECHNICAL DATA
| Height (cm) | Width (cm) | Depth (cm) | Ø of the exhaust tube (cm) |
| 13,3 | 49,9 | 51 | 12,5 |
| 13,3 | 54,9 | 51 | 12,5 |
| 13,3 | 59,9 | 51 | 12,5 |
| 13,3 | 89,9 | 51 | 12,5 |


Components not provided with the product

You can download the Safety Instructions, User Manual, Product Fiche and Energy data by:
- Visiting our website docs.indesit.eu Using QR Code
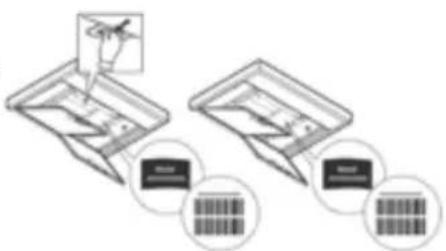
- Alternatively, contact our After-sales Service (See phone number in the warranty booklet). When contacting our After-sales Service, please state the codes provided on your product's identification plate.
IT
GENERAL SAFETY
Controller of: Controller dat:
Controller of: Controller dat:
Before installing the appliance, check that the necessary accessories are included.
Check the first pages of this manual to see if the accessories are included in the supply or if they need to be purchased separately.
Note: Depending on the model, some accessories may already be installed on the appliance.
Information on how to dispose of the appliance in accordance with the regulations is included in this manual.
Exhaust connection
The exhaust pipe must be routed outside through a wall or window opening.
WARNING!
The exhaust pipe is not supplied, so it must be purchased separately.
The diameter of the exhaust pipe must match the diameter of the existing outlet.
The oil filter must be replaced, so it needs to be known.
Perform the replacement procedure.
The filter is inserted, rotated, and then turned back into the housing. To use the filter in this mode, it is necessary to install the initial system with the filter being activated.
COMMANDS
The control panel allows you to give commands from the control and display the temperature and control the light of the working surface.
a. ON/OFF light b. OFF button c.-d.-e. Suction power minimum (c.), medium (d), maximum (e).
MAINTENANCE
UH
For cleaning, use a special service brush, moistened with a neutral cleaning agent. Do not use abrasive agents or instruments for cleaning!
Do not use agents with abrasive materials. Do not use alcohol!
Maintenance of oil filters
Grease filters trap grease that falls during cooking.
If you are inside the protective grid, you can access the following three types:
Remove the filter by pulling it down or if it is attached to the upper side, when the filter is turned through the openings in the grid.
The metal mesh filter can be cleaned with a mild detergent and a soft brush, either by hand or in the dishwasher. At low temperatures and short cycles, the filter will not be damaged.
During washing, the metal mesh filter may lose its color, but its filtering characteristics will not change at all. To access the mesh filter, open the loading door and pull the filter towards you.
The metal mesh filter has no support grid, so to remove it, press the two side clips backwards and pull the filter out.
Maintenance of the charcoal filter
Removes unpleasant kitchen odors.
The charcoal filter should be checked for saturation after a longer period of use, depending on the type of kitchen and the frequency of filter cleaning. In any case, the cartridge must be replaced at least every four months.
Do not wash or regenerate.
Remove the grease filter.
Install the filters, covering the mesh.
Check that the rods on the conveyor are correct.
Open the openings; then turn in the direction of the arrow until
it is locked or
for disassembly, turn in the opposite direction.
Install the grease filters again.
Replacing the lamps
BidiknouHTnpaad BiEeKtpomepekei.
Ybara! Nepu HIX TOPKATN JAMN Heo6xIDHO BnEBHNTNCA OBOHN OXOJIOJIN.
BctahOBHTpeWitKy
3amHnTn nozkOJKeHy lamny.
Bukopucstobuyte cbitiojodhi lamnn BnKIOHMoMkC.2,5W-E14.
Дябиьдетаьhoi iHΦopmaцii nB.Доадотok "ILCOS D" (no3niz "1e").
BctahOBHTpuewitky
YTNJI3AUJI
DAnHn Bnpi6 npomapKobAHn BiDnOBiDn Do CbponeNcBKOi DnpeKTbN 2012/19/EC, yTnI3aJg eNeKtpuHoro i eNeKtpoHoro o6NaHaHH (WEEE). 3a6e3neuyIOuH BpHy ytiniauio zboR OBNpo6y, Bn Donomoxete nonepdntn Notehui HeraTbHi HacnIKn dny OTOUYOHO cepeoBua i 3doop'JIouHN, KOTpi MOrnn 6 Matn Micce B npotnEHXOMy BnnaKy.

CnMBOH Ha cAmOMy Bnpo6i abo Ha cynpoBdoxyuOmy NOro DOKyMeHTI Bk3yE, 10 npn yTuNl3aui CbOro Bnpo6y 3 Hm He MoKHa NOBODNTSCRAK 3i 3BnuAHHMM No6yTOBMM BIXxOAMn. BiH Mae 3daBaTNCraY BIDNOBIDHnn PnyKT PnHOMy eNEKTPnHORo i eNEKTPoHORo 6bnadHn I nnoJbIooI yTuNl3aui. 3DaBAHH Ha 3Iam NobHHBO KIOHYBaTMc 3rHO 3 MlcEBMn npabunamn no yTuNl3aui BIXxOJB. 176 6blwe DetanbHOI IHOpMaui np npabHna NobOdoHeHH 3 TaKMM Bnpo6Am, ix yTuNl3aui i nepepobKn 3BepTaIteCb B Miccebi opraHn BnaH, B cnjXbpy no yTuNl3aui BiXxDIB, a6o B MaraHN, B kOMy Bn npndaHn daHm Bnpi
PnnaCnpoekToBaHO,Bnpo6yBaHOiBnroTOBneHo3rIHO 3:
- Bezneka: EN/IEC 60335-1; EN/IEC 60335-2-31, EN/IEC 62233.
- EKcnpyatauhi jaocti: EN/IEC 61591; ISO 5167-1; ISO 5167-3; ISO 5168; EN/IEC 60704-1; EN/IEC 60704-2-13; EN/IEC 60704-3; ISO 3741; EN 50564; IEC 62301.
- EMC: EN 55014-1; CISPR 14-1; EN 55014-2; CISPR 14-2; EN/IEC 61000-3-2; EN/IEC 61000-3-3. Порадд дра вьною ekслуатцп тдя знжени вллву на сеpe doишe: Викайт eВТУКу Ha MInimalbHy wBnDкгппрд noayakom npirotybaHn iki, i zinwaite II npaIOBATn Ha deKINbKa XBNINH nICrZakHcHn npiroTbyHnR. 36IbUyIte WbNdkCTb TlbKu y pa3i BeNkoi KInbKocTi dmy i napy Ta BIKOPNCTOByTe HADyB TINkY kpaHix Bnadkax. ДЯ пдtrpmaHH BnCOKI eFekTNBHOcti BndaJIeHH 3anaxiB, 3a Heo6xIDHocTi, BIKOHyTe 3amHy ByrInbHoro(-nx) φInbtpy(-IB). ДЯ пдtrpmaHH BnCOKI eFekTNBHOcti φInbtpy JxipB, 3a Heo6xIDHocTi, BIKOHyTe YnCTKY φInbtpy(-IB) xIpB. BIKOPNCTOByTe MAKcIMaJIbHmДiametp cNCTeMH NOBtpoBodIB, 9O Bka3AHn y IHCTpyKuII dny OITMIaui eFekTNBHOCTI ta mihimiaaui shym.
3БОΙ Y ΦУнКЦIOHYBAHHI
If the appliance does not work properly, before contacting technical support, perform the following checks:
- If the appliance does not work: check: - Whether the power supply has not been interrupted. - Whether the fuse has blown. - If the appliance works poorly: check: - Whether the grease filter is clogged. - Whether the charcoal filter is saturated (if the appliance is in recirculation mode). - If the appliance has turned off during normal operation: check: - Whether the power supply has not been interrupted. - Whether the single-phase switch has not tripped.
In case of possible malfunctions, before contacting technical support, turn off the appliance, wait 5 seconds, turn it on again, and then check if the malfunction persists. If the malfunction persists, contact technical support.
TECHNICAL DATA
GENERAL SAFETY RULES
Do not connect the appliance to the electrical power supply until the installation is completely finished.
Regarding technical and safety measures for the discharge of vapors, strictly adhere to what is prescribed by local competent authorities. The extracted air must not be discharged into a chimney used for exhaust fumes from appliances operating on gas or other fuels. - Do not use or leave the hood without correctly installed lamps, with the risk of electric shock. - Never use the hood without the correctly installed grille! - The hood must never be used as a support surface, unless explicitly indicated. - Use only screws for fixing in combination with the accessory for installation, or if not included, purchase screws of the correct type. - Use the correct screw length as indicated in the installation guide. In case of doubt, consult the authorized service center or qualified personnel.
WARNING!
- Failure to install the appropriate screws or fixing devices in accordance with these instructions may result in electrical hazards.
Do not use the appliance with a programmer, timer, separate remote control, or any other device that switches on automatically.
Do not allow children under 8 years of age to approach the appliance. Without constant supervision by adults, children under 8 years of age must not be allowed near the appliance.
WARNING: The appliance is not intended to be switched on by means of external devices or separate remote control. This appliance is not intended for professional use. Do not use the appliance outdoors. To avoid injury, the appliance must be moved and installed by at least two people. Installation, including connection to the water supply (if provided) and electrical connections, as well as repair operations, must be carried out by qualified personnel.
After unpacking, store packaging materials (plastic, polystyrene parts, etc.) in an inaccessible place to prevent children from playing with them.
Do not use the appliance with bare feet or wet hands.
Never use the appliance for cleaning purposes - risk of electric shock.
Packaging material can be 100% reused if marked with the appropriate recycling symbol.

The appliance may have a different appearance from the one shown in the figures of this manual, but the operating instructions, maintenance, and installation remain the same.
The appliance is intended for household use. The manufacturer disclaims all liability for malfunctions, damage, or fires arising from use of the appliance due to failure to follow the instructions in this manual. The appliance is intended for suction of smoke and steam during cooking and is intended only for household use.
It is very important to keep this instruction so that you can refer to it at any time. If the appliance is sold, transferred, or moved, make sure the instruction always accompanies it. Read the instruction carefully. It contains important information on installation, operation, and safety. It is forbidden to make any changes to the electrical or mechanical parts of the appliance or in the exhaust pipes. - Before starting installation of the equipment, check the integrity of all components. If any damage is found, contact the supplier and in no case start installation of the equipment.
The distance between the lower edge of the hood and the support surface above the hob must be at least 60 cm for electric hobs, and at least 75 cm for gas or combined hobs.
If the installation instructions for the gas hob specify a greater distance, take that into account.
Electrical connection
The mains voltage must correspond to the voltage indicated on the data plate located inside the appliance. If the appliance is equipped with a plug, connect the plug to a suitable socket. It must comply with current regulations and be located in an accessible place. The socket can be installed after installation. If the appliance is not equipped with a plug (direct connection to the mains), or if the socket is not located in an accessible place, even after installation, use a two-pole switch that ensures complete disconnection from the mains under overvoltage category III conditions, in accordance with installation instructions.
WARNING!
Before connecting the electrical system of the hood to the mains, check its correct functioning and make sure that the power cable is properly installed.
If the cable is not equipped with a plug, connect it to the mains in accordance with the following steps:
Mains voltage and frequency
Important: The values indicated on the plate with the technical characteristics inside the cap.
Colors

Yellow/Green
N: Blue
L: Brown
Replacing the electrical cable
The hood has a special power cable; in case of damage to the cable, it must be ordered from the after-sales service.
Air outlet
The manufacturer declines all responsibility for the above.
! Use the pipe with the minimum necessary length. ! Use the pipe with the smallest number of bends (maximum bend angle: 90°). ! Avoid sudden changes in the pipe section. The manufacturer declines any responsibility if these rules are not followed.
Recirculation mode with discharge?
Your hood is ready for use in extraction mode.
To use the hood in recirculation mode, it is necessary to install the accessory kit.
Check on the first pages of this manual whether the accessory kit is included in the delivery or if it must be purchased separately.
Note: If the equipment is supplied, in some cases, the accessory kit for charcoal filters
The hood must be installed on the exhaust.
Information about the exhaust air discharge modes is included in this manual.
Recirculation mode
In this mode, the hood operates with the exhaust pipe reduced, connected to the connecting ring.
WARNING!
The exhaust pipe is not included in the kit and must be purchased separately.
The diameter of the exhaust pipe must correspond to the diameter of the connecting ring.
WARNING!
If the hood is equipped with a charcoal filter, make sure it is installed.
Installation with air discharge
A charcoal filter must be used, if available for your cooker hood. The extracted air is purified before being returned to the room through the upper grille.
Controls
The hood is equipped with only the controls for the fan speed and the light switch for the work surface illumination.
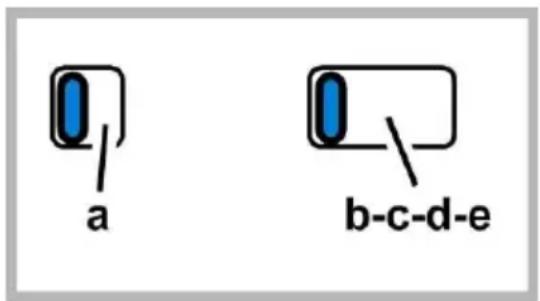
a. Light on/off b. Motor on/off c.-d.-e. Hood speed, minimum (c.), medium (d), maximum (e.)
Technical maintenance
For cleaning, use only a special cloth moistened with a neutral detergent. Do not use any tools for cleaning. Do not apply products that contain abrasive materials. DO NOT USE ALCOHOL!
Maintenance of grease filters
Retains grease particles coming from cooking.
When installing the filter inside the grid, you have two options:
Paper filter: replace it once a month or when the light appears dim through the grid openings. Replacement is recommended when the light becomes visible through the grid openings.
Metal filter: clean it once a month using non-abrasive detergents in dishwashers at low temperatures and short wash cycles.
Washing in a dishwasher may cause some discoloration of the grease filter, but its filtering characteristics remain absolutely unchanged.
To access the grease filter R, you need to open the grid on the intake S using the steps T and move the blocker U to the side.
The metal filter is not load-bearing; to remove it, press the tabs K and pull the filter downward.
Replace the damaged lamp.
Use only LED lamps with a maximum power of 2.5W, with socket E14. For detailed information, see the attached sheet "LEDS D" (alphanumeric code "1e").
Reinstall the grease filters or the pulled-out grid.
DISPOSAL
This device is marked in accordance with European Directive 2012/19/EC on waste electrical and electronic equipment (WEEE).
By correctly using this device, you can help prevent potential negative consequences for the environment and human health.

The symbol on the product or its accompanying documentation indicates that this product must not be treated as household waste. Instead, it should be handed over to the appropriate collection point for the recycling of electrical and electronic equipment.
Disposal must be carried out in accordance with local regulations for waste disposal.
For more detailed information on the treatment, recycling, and disposal of this product, please contact your local authorities, the waste disposal service, or the store where you purchased the product.
The device has been designed, tested, and manufactured in accordance with:
- Safety: EN/IEC 60335-1; EN/IEC 60335-2-31, EN/IEC 62233.
- Performance: EN/IEC 61591; ISO 5167-1; ISO 5167-3; ISO 5168; EN/IEC 60704-1; EN/IEC 60704-2-13; EN/IEC 60704-3; ISO 3741; EN 50564; IEC 62301. EMC: EN 55014-1; CISPR 14-1; EN 55014-2; CISPR 14-2; EN/IEC 61000-3-2; EN/IEC 61000-3-3. Tips for correct use to reduce environmental impact: Turn on the extractor hood at minimum speed when you start cooking and leave it running for a few minutes after you finish cooking. Increase the speed only in case of large amounts of smoke and steam, and use the boost speeds only in extreme situations. Replace the charcoal filter(s) when necessary to maintain good odor reduction efficiency. Clean the grease filter(s) when necessary to maintain good grease filter efficiency. Use the maximum diameter of the ducting system indicated in this manual to optimize efficiency and minimize noise levels.
TROUBLESHOOTING
If something is not working properly, before contacting the technical service, perform the following simple checks:
- If the hood does not work:
Check: - that the power supply is not interrupted. - that a speed has been selected.
- If the hood does not work well:
Check:
- That the selected speed is suitable for the amount of smoke and steam produced.
- That the room is sufficiently ventilated to allow the hood to draw in air.
- The coarse filter is not cleaned (air suction is blocked).
If the suction is normal during operation:
Check:
- That the power supply is not interrupted.
- That the single-phase switch has not tripped.
In case of possible anomalies in operation, before contacting technical service, disconnect the device from the power supply for at least 5 seconds, remove the plug and then reconnect it. If the anomaly persists, contact the technical service.
TECHNICAL DATA
The length of the hose for models with a dust bag is 60 cm, for models with a container for liquid and dust it is 75 cm, no more.
If the hose is longer than specified, it must be shortened.
ELECTRICAL CONNECTION
Before connecting, check the device for visible damage. If the hose is damaged, it must be replaced. If the hose is damaged (visible cracks) or if after replacement the device still does not work, contact the service center for repair. Do not attempt to repair the device yourself.
ATTENTION!
When connecting the device to the electrical network, make sure that the cable is properly installed.
If the cable is damaged, it must be replaced.
Electrical connection and plug
Tighten the cable glands and check the terminal connections.
Smooth surface

: rough surface
N: Cable (flat)
L: Cable (round)
Cable gland installation
The cable gland is pre-assembled with a sealing insert. To install the cable, remove the insert and use the appropriate tools.
CABLE GLAND TIGHTENING TORQUE
(for new installations)
For cable glands with a metric thread, tighten the gland nut to the specified torque.
For cable glands with a NPT thread, tighten the gland nut to the specified torque.
The maximum bending radius of the cable must be observed. The minimum bending radius is 90°. Do not bend the cable beyond this limit. If the cable is bent more, it may be damaged.
LUBRICATION OR CABLE GLAND MAINTENANCE?
! New cable glands are pre-lubricated.
If the cable gland has a lubrication function, it is pre-lubricated at the factory.
This device is intended for use in veterinary medicine for animals, and it is necessary to read the instructions before use.
Caution: If the device is used, it may be necessary to replace the battery with a new one after a certain period of time.
The instructions for use of the device are given in this manual.
Safety instructions
This device is designed for use with the specified type of battery.
WARNING!
The battery parameters must match the parameters specified in the instructions.
WARNING!
The battery must be replaced with a new one after a certain period of time.
Instructions for use
For this, a new battery is required, which can be purchased from authorized dealers.
If you have any questions, please contact the manufacturer or the authorized service center.
CONTROL ELEMENTS
To turn on the device and to set the required parameters, use the control buttons.
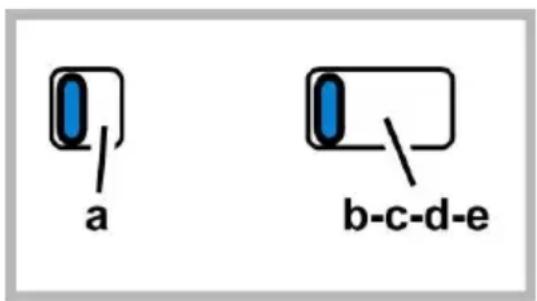
a. Battery insertion/removal b. Motor start c. - d. - e. Minimum speed (c.), medium (d.), maximum (e.).
TECHNICAL SERVICE
Warning
Read this manual carefully before using the device. Failure to follow the instructions may result in damage. Use only original spare parts. We are not responsible for damage caused by misuse!
Maintenance and technical service
Before carrying out any work, disconnect the device from the power supply. If the pressure switch is installed, it is possible to turn it on accidentally: when the water pressure drops or the pressure switch is activated, the device may start automatically. Use only original spare parts, and clean the device with a damp cloth or a soft brush at room temperature and short intervals. When cleaning with a soft brush, be careful not to damage the device. To access the inside of the device, remove the screws using a screwdriver, then remove the cover.
After cleaning, reassemble the device in reverse order, tighten the screws and check the device's operation.
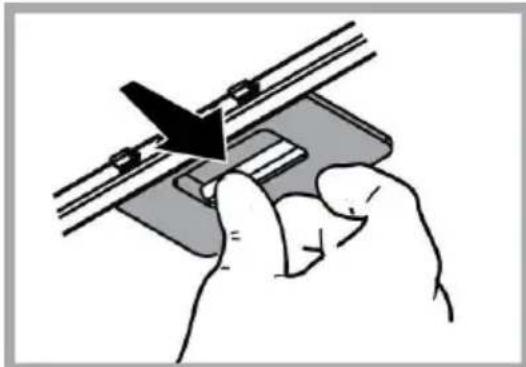
Maintenance of the pump
Before any work, disconnect the device from the power supply.
If the pump's inlet filter is clogged or the pump's performance is reduced due to dirt, clean the filter with a soft brush or rinse it with water. In any case, replace the filter at least once a year.
Do not operate the pump without a filter and do not use it without water.
TECHNICAL SPECIFICATIONS
| Биiktiri (см) | Енi (см) | Тереньдiri (сm) | Тугін šылару кúсырblø (сm) |
| 13,3 | 49,9 | 51 | 12,5 |
| 13,3 | 54,9 | 51 | 12,5 |
| 13,3 | 59,9 | 51 | 12,5 |
| 13,3 | 89,9 | 51 | 12,5 |


Information provided with the device

Safety instructions, operating instructions, technical data, and electrical specifications are provided in the following:
- Visit our website: docs.ingesit.eu or scan the QR code
- If not, contact the after-sales service (see the warranty card). If you contact the after-sales service, provide the device's serial number.
TR
GENERAL SAFETY
(1)
- Given vectors a = (x1, y1) and b = (x2, y2)

()
15 15 15
J 1
90 851 84
y
1
I 1
blc
OFF/ON
OFF.


- WARNING
- ELECTRICAL CONNECTION
- MAINS VOLTAGE AND FREQUENCY
- WIRE CONNECTION
- REPLACING THE POWER CABLE
- AIR VENT
- FILTERING OR DUCTING
- DUCTING VERSION
- CAUTION
- FILTER VERSION
- CONTROLS
- MAINTENANCE
- CLEANING
- MAINTENANCE OF THE ANTI-GREASE FILTERS
- MAINTENANCE OF THE CHARCOAL FILTER
- IT ABSORBS UNPLEASANT ODORS CAUSED BY COOKING
- REPLACING LAMPS
- DISPOSAL
- MALFUNCTIONS
- TECHNICAL DATA
- IT
- GENERAL SAFETY
- EXHAUST CONNECTION
- PERFORM THE REPLACEMENT PROCEDURE
- COMMANDS
- UH
- MAINTENANCE OF OIL FILTERS
- REMOVES UNPLEASANT KITCHEN ODORS
- REPLACING THE LAMPS
- YTNJI3AUJI
- БОΙ Y ΦУНКЦIOHYBAHHI
- GENERAL SAFETY RULES
- COLORS
- REPLACING THE ELECTRICAL CABLE
- AIR OUTLET
- RECIRCULATION MODE WITH DISCHARGE
- RECIRCULATION MODE
- INSTALLATION WITH AIR DISCHARGE
- TECHNICAL MAINTENANCE
- MAINTENANCE OF GREASE FILTERS
- TROUBLESHOOTING
- ATTENTION
- ELECTRICAL CONNECTION AND PLUG
- SMOOTH SURFACE
- CABLE GLAND INSTALLATION
- CABLE GLAND TIGHTENING TORQUE
- LUBRICATION OR CABLE GLAND MAINTENANCE
- SAFETY INSTRUCTIONS
- INSTRUCTIONS FOR USE
- CONTROL ELEMENTS
- TECHNICAL SERVICE
- MAINTENANCE AND TECHNICAL SERVICE
- MAINTENANCE OF THE PUMP
- TECHNICAL SPECIFICATIONS
- TR
Brand : INDESIT
Model : ISLK 96 LS X
Category : Air conditioner