
TMA40A - Anemometer Amprobe - Free user manual and instructions
Find the device manual for free TMA40A Amprobe in PDF.
| Product Type | Digital Anemometer |
| Brand | Amprobe |
| Model | TMA40A |
| Dimensions | 165 × 70 × 53 mm (6.5 × 2.57 × 2.1 in) |
| Weight | Approximately 300 g (with batteries) |
| Power Supply | 4 AAA batteries or 9 V DC power adapter (5.5/2.1 mm connector, center positive) |
| Display | Large dot matrix LCD with backlight |
| Measurement Ranges | Air velocity: 0.4 to 32 m/s; Temperature: -22 to 70 °C; Relative humidity: 0 to 100%; Air volume: 0 to 99999 CFM/CMM |
| Resolution | Velocity: 0.1 m/s; Temperature: 0.1 °C; Humidity: 0.1%; Volume: 0.1 |
| Accuracy | Velocity: ±3%; Temperature: ±1°C (typ.); Humidity: ±3% (10-99%); Volume: ±3% |
| Measurement Modes | Single-point, multi-point (99 manual points), automatic data logging (2400 points) |
| Special Functions | Backlight, tripod mount, programmable auto-off, clock, customizable identifier |
| Connectivity | USB port for data transfer to PC (software provided on CD) |
| Included Accessories | 4 AAA batteries, USB cable, software CD, carrying case |
| Maintenance and Cleaning | Clean with a soft, dry cloth. Do not use solvents. Store in a dry place. |
| Safety | Indoor use only. Do not expose to direct sunlight or excessive humidity. |
| Warranty | 1 year (excluding batteries, fuses, and abnormal use) |
Frequently Asked Questions - TMA40A Amprobe
User questions about TMA40A Amprobe
0 question about this device. Answer the ones you know or ask your own.
Ask a new question about this device
Download the instructions for your Anemometer in PDF format for free! Find your manual TMA40A - Amprobe and take your electronic device back in hand. On this page are published all the documents necessary for the use of your device. TMA40A by Amprobe.
USER MANUAL TMA40A Amprobe
© 2016 Amprobe Test Tools.
All rights reserved.
Limited Warranty and Limitation of Liability
Your Amprobe product will be free from defects in material and workmanship for 1 year from the date of purchase. This warranty does not cover fuses, disposable batteries or damage from accident, neglect, misuse, alteration, contamination, or abnormal conditions of operation or handling. Resellers are not authorized to extend any other warranty on Amprobe's behalf. To obtain service during the warranty period, return the product with proof of purchase to an authorized Amprobe Test Tools Service Center or to an Amprobe dealer or distributor. See Repair Section for details. THIS WARRANTY IS YOUR ONLY REMEDY. ALL OTHER WARRANTYIS - WHERER EXPRESS, IMplied OR STAUTORY - INCLUDING IMPLIED WARRANTYIS OF FITNESS FOR A PARTICULAR PURPOSE OR MERCHANTABILITY, ARE HEREBY DISCLAIMED. MANUFACTURER SHALL NOT BE LIABLE FOR ANY SPECIAL, INDIRECT, INCIDENTAL OR CONSEQUENTIAL DAMAGES OR LOSSES, ARISING FROM ANY CAUSE OR THEORY. Since some states or countries do not allow the exclusion or limitation of an implied warranty or of incidental or consequential damages, this limitation of liability may not apply to you.
Repair
All test tools returned for warranty or non-warranty repair or for calibration should be accompanied by the following: your name, company's name, address, telephone number, and proof of purchase. Additionally, please include a brief description of the problem or the service requested and include the test leads with the meter. Non-warranty repair or replacement charges should be remitted in the form of a check, a money order, credit card with expiration date, or a purchase order made payable to Amprobe® Test Tools.
In-Warranty Repairs and Replacement – All Countries
Please read the warranty statement and check your battery before requesting repair. During the warranty period any defective test tool can be returned to your Amprobe® Test Tools distributor for an exchange for the same or like product. Please check the "Where to Buy" section on www.amprobe.com for a list of distributors near you. Additionally, in the United States and Canada In-Warranty repair and replacement units can also be sent to a Amprobe® Test Tools Service Center (see address below).
Non-Warranty Repairs and Replacement - US and Canada
Non-warranty repairs in the United States and Canada should be sent to a Amprobe® Test Tools Service Center. Call Amprobe® Test Tools or inquire at your point of purchase for current repair and replacement rates.
In USA In Canada
Amprobe Test Tools Amprobe Test Tools
Everett, WA 98203 Mississauga, ON L4Z 1X9
Tel: 877-AMPROBE (267-7623) Tel: 905-890-7600
Non-Warranty Repairs and Replacement - Europe
European non-warranty units can be replaced by your Amprobe® Test Tools distributor for a nominal charge. Please check the "Where to Buy" section on www.amprobe.com for a list of distributors near you.
European Correspondence Address*
Amprobe® Test Tools Europe
Beha-Amprobe GmbH
In den Engematten 14
79286 Glottertal, Germany
Tel.: +49 (0) 7684 8009 - 0
*Correspondence only - no repair or replacement available from this address. European customers please contact your distributor.)
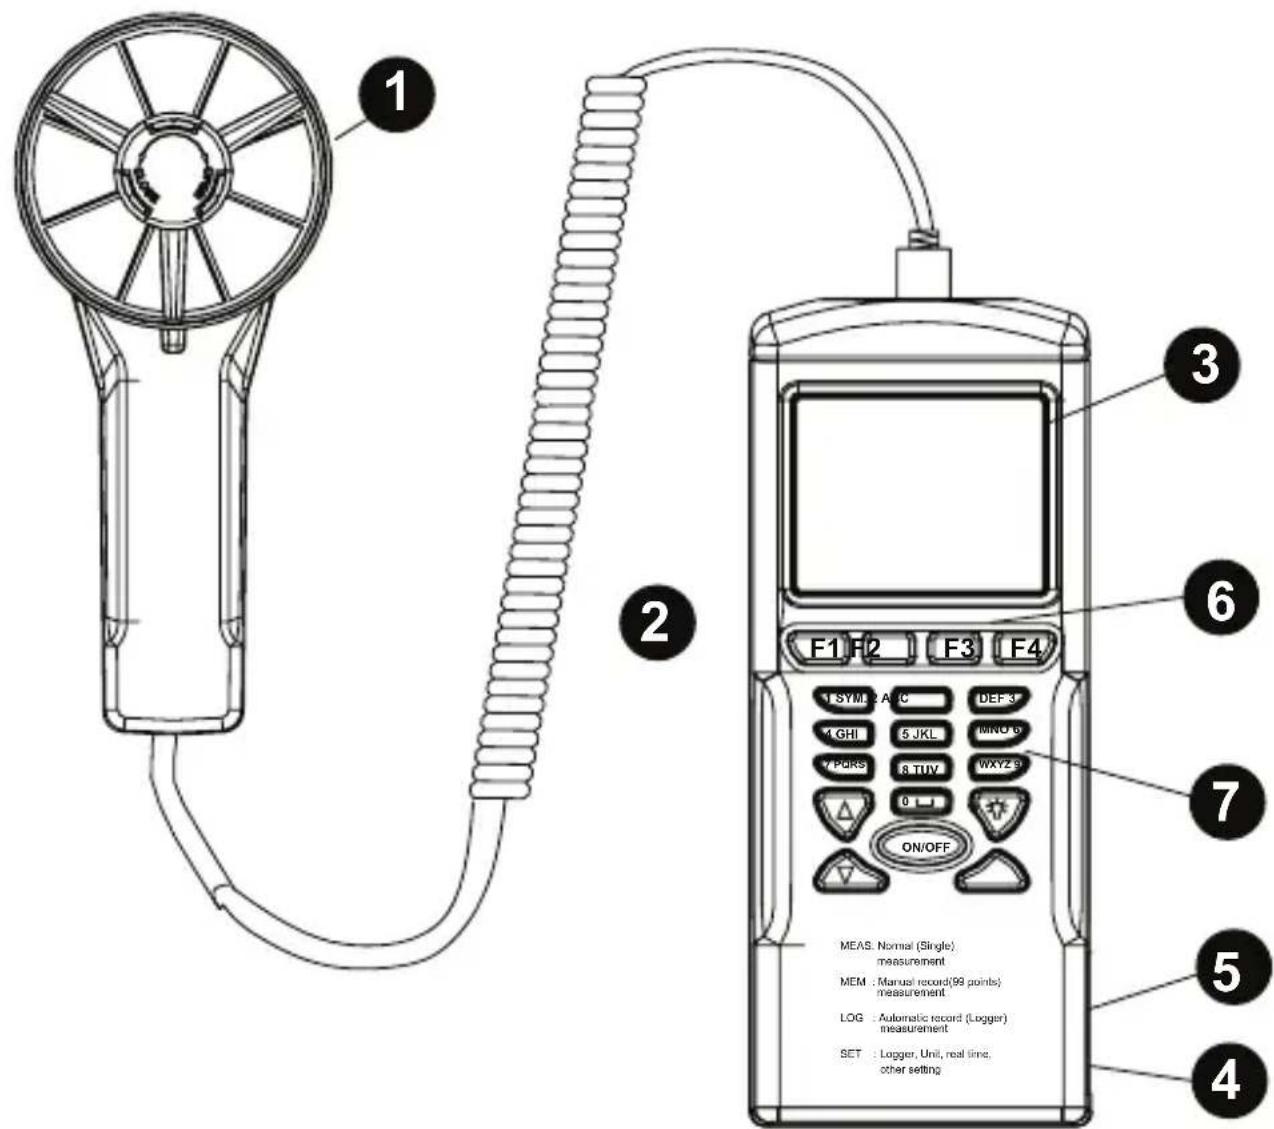
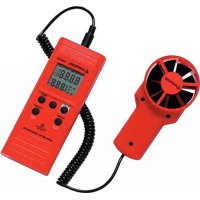
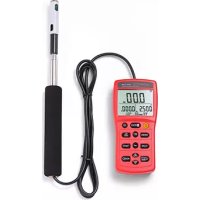
1 Fan probe with built-in temperature and humidity sensors
Tripod mounting screw
LCD display
DC adaptor jack
USB port
Function Keys F1: Press for measurement mode F2: Press to access the memory F3: Press to access the log files F4: Press to enable/disable auto power off, set data and time, and set parameters to record.
7 Keypad 1SYM stands for "1, *, :, $, +, -, =" 2ABC stands for "2, a, b, c, A, B, C" 3DEF stands for "3, d, e, f, D, E, F" 4GHI stands for "4, g, h, i, G, H, I" 5JKL stands for "5, j, k, l, J, K, L" 6MNO stands for "6, m, n, o, M, N, O" 7PQRS stands for "7, p, q, r, s, P, Q, R, S" 8TUV stands for "8, t, u, v, T, U, V" 9WXYZ stands for "9, w, x, y, z, W, X, Y, Z" 0 |_1 stands for "0 and space" :: Press to turn on and off the backlight △: Press to shift the cursor to previous ∇: Press to shift the cursor to next ON/OFF: Press to turn the unit on and off
CONTENTS
Introduction. 5
Unpacking and inspection 5
Operation 5
Meter setting: SET (See Fig.2) 5
Meter Screen Description (See Figs 2&3) 5
Single Measurement: MEAS (See Fig. 3) 6
Multiple Measurement: MEM (See Fig. 4) 6
Automatic Logging: LOG (See Fig. 5) 6
Comparison Table. 7
Technical Specifications 8
Software Operation 8
Troubleshooting 9
INTRODUCTION
This meter is designed with three measurement modes:
Single point measurement1.
Multiple points measurement (Manual record)2.
Automatic Logging 3.
Measuring/programming anywhere at any time
User friendly interface
USB cable and software enable to link with PC for downloading and uploading
Backlight function
Tripod mountable for long time use
Power off time selectable
Big Dot matrix LCD
Powered by 4-pcs AAA batteries or 9V adaptor (not included) (Plug: outer:5.5mm; Inner:2.1mm; Center positive) 0.05mA minimum
UNPACKING AND INSPECTION
Your shipping carton should include:
1 x TMA40-A Airflow Anemometer
4 x AAA Battery
1 x USB Cable
1 x CD Download Suite
1 x Carrying case
OPERATION
Caution
For indoor use only. Do not use under the sunlight.
Meter setting: SET (See Fig.2)
Press F4 to enter the meter setting
Press or key to shift the cursor
Press EDIT to enter modification mode
- Press NEXT/BACK to enter the next or previous page.
- Press EXIT to return to main menu.
Meter Screen Description (See Figs 2&3)
- LCD Cont.(1-5): LCD brightness. From darkest 1 to brightest 5.
- Auto Off: Selectable 1 to 20 minutes.
- Set clock: Choose date and time. Press EDIT to enter the month. Press NEXT to accept or ABORT to cancel. Repeat for day, year, hour, minute and second.
- Set ID: Press EDIT to enable or disable ID.
ID: Press EDIT to enter the user id. Use the keypad to enter the information.5.
Note: To calculate air volume, first enter the value of the air source area. Three choices are available: length X width (rectangle); Diameter(Circle); and Area.
Range from 0~300cm (Rectangle and Circle and 0~90000sq.cm for area.
Single Measurement: MEAS (See Fig. 3)
Press F1 to enter the single measurement mode.
Press F2 to select the type of input
Press ESC to return to previous menu
Multiple Measurement: MEM (See Fig. 4)
In this mode, you can manually record what you measure in real time and attach a file name with the recording. There is a total of 99 memory locations in this mode.
Press F2 to enter the multiple measurement mode.
Press F2(MEAS) to start a measurement.
Press ABORT(F1) to cancel the measurement.
Press SAVE(F4) to save the recording.
Press F3(EDIT) to edit the file name of the recorded value. Use the keys to enter the name. Press and hold to move from one character to another. Release the key to select the desired character.
Press CLR(F2) to delete a selected character.
Press and hold CLR(F2) for over 2 seconds to delete the whole memory.
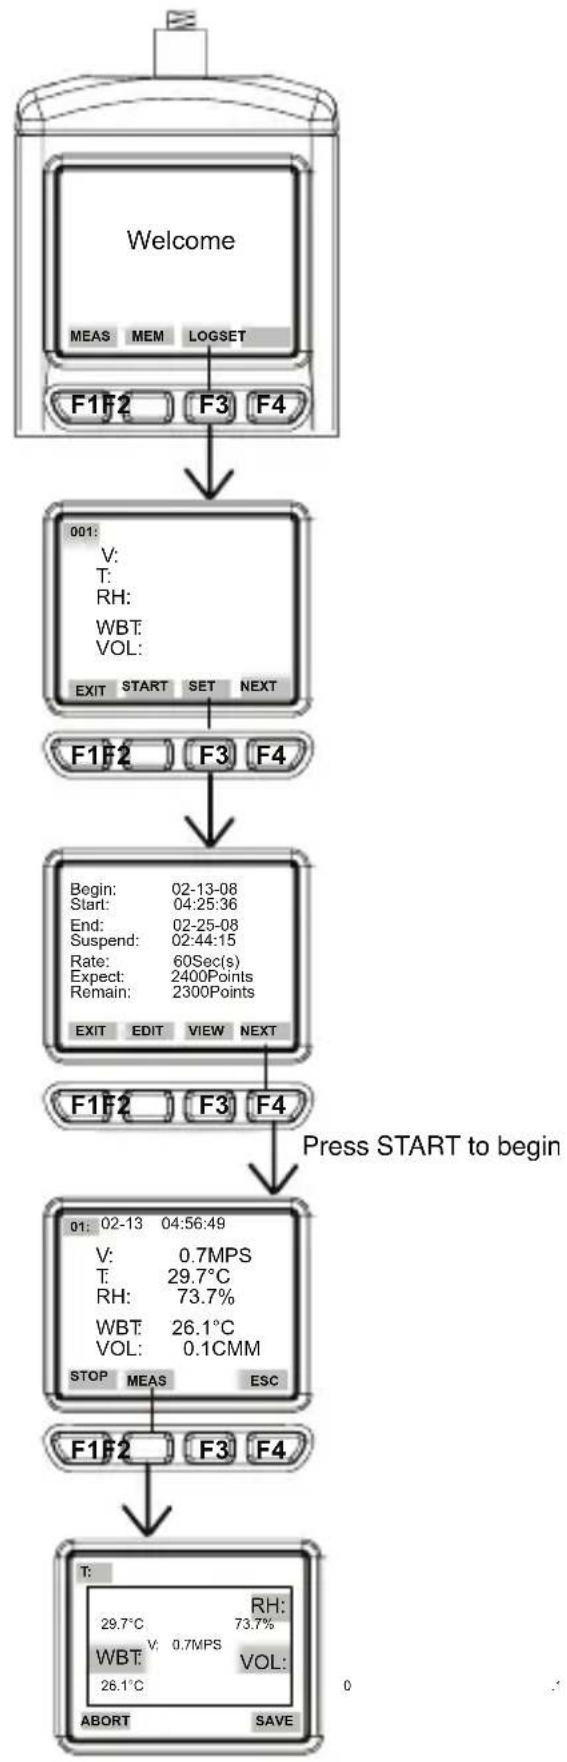
Automatic Logging: LOG (See Fig. 5)
In this mode, you can automatically record what you have set up before a real time measurement.
Press F3(LOG) to enter the LOG mode.
Press SET(F3) to set up the parameters for the recording.
Press keys to select a parameter.
- Press EDIT to modify begin date, start time, End date, suspend time, and the rate ( 1 to 200 seconds).
- Expect is 2400 points(total memory) and remain (remaining memory) will be calculated according to your setting.
Press NEXT - Press START to begin the logging session
Press VIEW to see the recording data - Press MEAS to see the real time data measurement.
- Press ESC to return to previous screen.
- Press STOP to suspend the logging session.
Press NEXT
Press P-PG previous page) or N-PG next page) to see the previous or the next 100 points.
Press BACK
Press EXIT to return to the main screen
COMPARISON TABLE
| Measurement Description | Memory Point | |
| Single point Single point | measurement No Memory | |
| Multi-Point | File name editable Multi-point measurement | 99 points |
| Automatic Logging | Programmable Data logging function | 2400 points |
| Multi-point measurement Data | Logging | |
| Record 99 points 2400 points | ||
| File Name | Editable or Default with date and time (Note 1) | Default (Note 2) |
| Measuring/Sampling | Press MEAS Key to measure and store | Automatically measure and store according to preset parameters (Note 3) |
Note 1: The recording file name will show current date and time as file name if the user doesn't edit any.
Example: "05-06 09:21:51" means the recording was made on May 6th at 09:21:51 or June 5th at 09:21:51 depending on your date mode setting.
Note 2: Each recording file will take the current date and time as file name.
Note 3: The meter will start and stop recording at the preset dates and times. If the preset time is less than 24-hour and the end date is in the future, the meter will stop at the ending time and restart again the next day until the ending date or until the memory is full.
a) Set the date and start time
b) Set the date and stop time
c) Set the sample rate
d) In order to record 24-hour a day, you must set START for 00:00:00 and SUSPEND for 23:59:59
TECHNICAL SPECIFICATIONS
Temperature resolution 0.1^ (0.1^)
Temperature response 30 seconds
Relative Humidity range 0 to 100%
RH accuracy ± 3% at 10% to 99% ; ± 5% at all others
RH resolution 0.1%
RH response time 15 seconds
Wet Bulb range -22 to 70^ (-7.6^ to 158^)
Wet Bulb resolution 0.1
Air Velocity range 0.4 to 32m / s (1.3 to 105 ft/s)
Air Velocity accuracy ± 3%
Air Velocity Resolution 0.1 m/s (0.1 ft/s)
Air Velocity response time 1 second
Air Volume range 0 to 99999 (CFM or CMM)
Air Volume accuracy ± 3%
Air Volume resolution 0.1
Measurement with memory 99 points
Datalogging measurement 2400 points
Dimensions 165× 70× 53mm (6.5× 2.57× 2.1 in)
SOFTWARE OPERATION
-Insert the software CD into CD-ROM driver
Install the USB driver first
Install the software follow the on-screen instructions
-Open the program
-Click the "Port" from main screen and input the right comm. port.
-Click as follow to download the memory
Click to download manually recorded data.1.
Click to download automatically recorded data2.
Click to download both manually & automatically recorded data3.
TROUBLESHOOTING
Power on but no display
Make sure the time of pressing "ON/OFF" key is more than 0.2 seconds.
Check the batteries are in place and make sure they are at good contact and correct polarity.
Replace the batteries and try again.
Display disappear
- Check whether the low battery indicator is displayed on or before display disappears. If yes, replace the batteries.
Error code:
E2. Problem : Meter value is underflow .
E3. Problem : Meter value is overflow.
E4. Problem: Calculated source value occurs error.
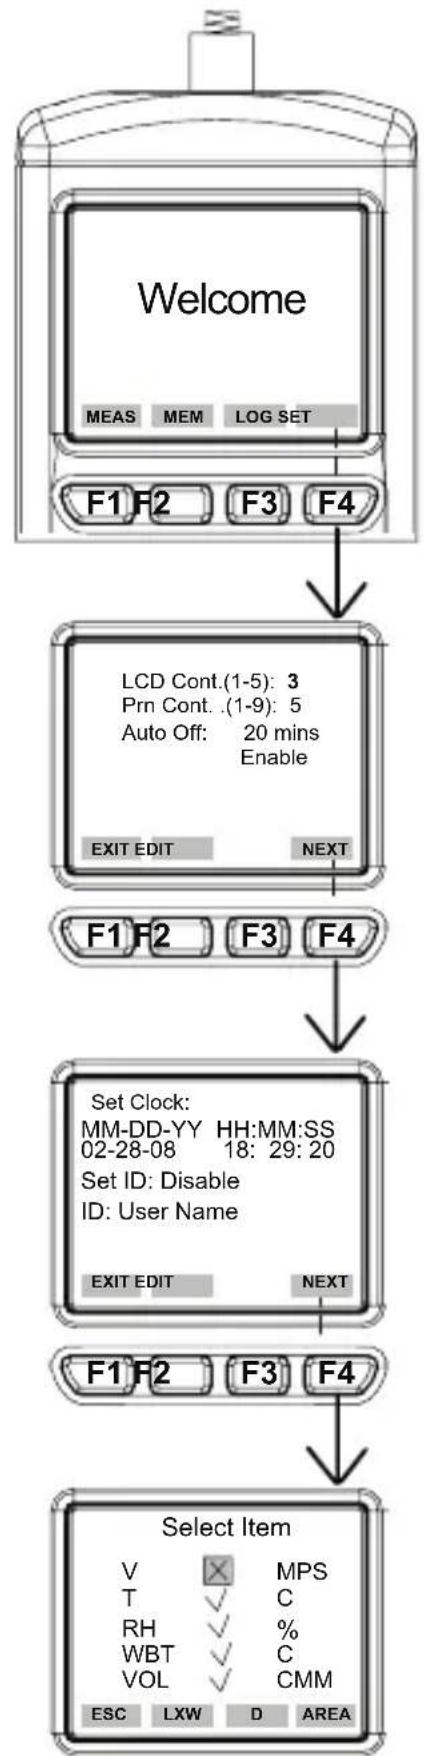
Fig. 2 Fig. 3
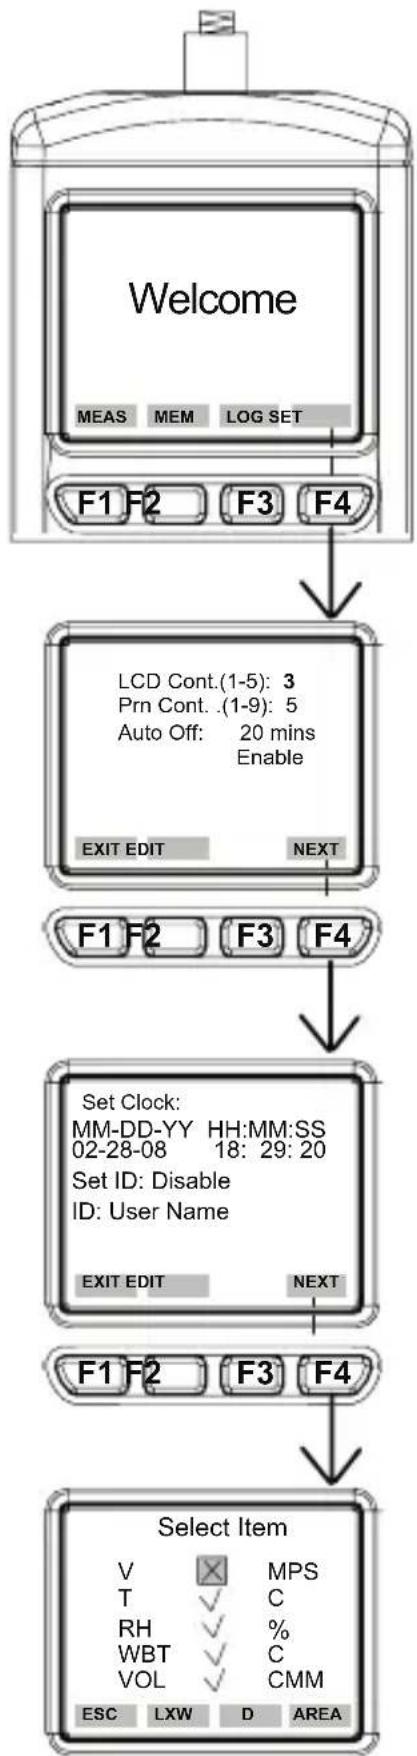

Fig. 4 Fig. 5

AMPROBE
TMA40-A
Anémomètre
Mode d'emploi
TMA40-A_Rev003
© 2016 Amprobe Test Tools.
Amprobe Test Tools Amprobe Test Tools
Everett, WA 98203 E-U Mississauga, Ontario L4Z 1X9 Canada
Tél.: 877-993-5853 Tél.: 905-890-7600
Fax:425-446-6390 Fax:905-890-6866
Amprobe Test Tools Europe
Beha-Amprobe GmbH
In den Engematten 14
© 2016 Amprobe Test Tools.
Amprobe Test Tools Amprobe Test Tools
Everett, WA 98203 Mississauga, ON L4Z 1X9
Tel.: 877-993-5853 Tel.: 905-890-7600
Fax: 425-446-6390 Fax: 905-890-6866
Amprobe Test Tools Europe
Beha-Amprobe GmbH
In den Engematten 14
© 2016 Amprobe Test Tools.
© 2016 Amprobe Test Tools.
Amprobe Test Tools Amprobe Test Tools
Everett, WA 98203 Mississauga, Ontario L4Z 1X9
Tel.: 877-993-5853 Tel.: 905-890-7600
Fax: 425-446-6390 Fax: 905-890-6866
Amprobe Test Tools Europe
Beha-Amprobe GmbH
In den Engematten 14
79286 Glottertal, Germany
Tel.: +49 (0) 7684 8009 - 0
© 2016 Amprobe Test Tools.
Med ensamratt.
Matarinstalling: SET (se figur 2)
Visit www.Amprobe.com for
Catalog
Application notes
Product specifications
User manuals
- Limited Warranty and Limitation of Liability
- Repair
- In-Warranty Repairs and Replacement – All Countries
- Non-Warranty Repairs and Replacement - US and Canada
- In USA In Canada
- Non-Warranty Repairs and Replacement - Europe
- CONTENTS
- INTRODUCTION
- UNPACKING AND INSPECTION
- OPERATION
- Meter Screen Description (See Figs 2&3)
- Single Measurement: MEAS (See Fig. 3)
- Multiple Measurement: MEM (See Fig. 4)
- Automatic Logging: LOG (See Fig. 5)
- TECHNICAL SPECIFICATIONS
- SOFTWARE OPERATION
- TROUBLESHOOTING
- Power on but no display
- Display disappear
- Error code:
- AMPROBE
- TMA40-A
- Anémomètre
Brand : Amprobe
Model : TMA40A
Category : Anemometer