Red Force 2754 - Vacuum Cleaner ARIETE - Free user manual and instructions
Find the device manual for free Red Force 2754 ARIETE in PDF.



| Product type | Bagless vacuum cleaner |
| Brand | Ariete |
| Model | Red Force 2754 |
| Power supply | 220-240 V ~ 50/60 Hz |
| Suction power | Variable with regulator |
| Tank capacity | Approximately 1.5 L (estimated) |
| Filter type | Permanent washable filter (tank), motor protection filter, exhaust air filter |
| Included accessories | Telescopic tube, floor brush, parquet brush, crevice tool with brush, small tool |
| Main functions | Hard floors, carpets, parquet, crevices, furniture; power adjustment; automatic cable rewind |
| Maintenance | Empty and wash the tank, clean filters with clear water (no soap) every 6 months or if suction is reduced |
| Brush cleaning | Pass your hand between the bristles while operating to release dust |
| Safety | Automatic stop if obstructed; do not vacuum liquids, hot ashes, sharp objects |
| Cable rewinding | By pedal (C); guide the cable by hand to avoid injury |
| Transport | Handle located on top of the tank |
| Storage | Floor brush can clip onto the back of the unit |
| After-sales service | Contact an authorized Ariete service center for repair or replacement of parts |
| Repairability | Spare parts available via after-sales service; power cable replaceable by a professional |
Frequently Asked Questions - Red Force 2754 ARIETE
User questions about Red Force 2754 ARIETE
0 question about this device. Answer the ones you know or ask your own.
Ask a new question about this device
Download the instructions for your Vacuum Cleaner in PDF format for free! Find your manual Red Force 2754 - ARIETE and take your electronic device back in hand. On this page are published all the documents necessary for the use of your device. Red Force 2754 by ARIETE.
USER MANUAL Red Force 2754 ARIETE
De' Longh Appianoes St
Divine Commerce And
vivienQuinco 300
001000000000000000000000000000000000000
e
INHRE:
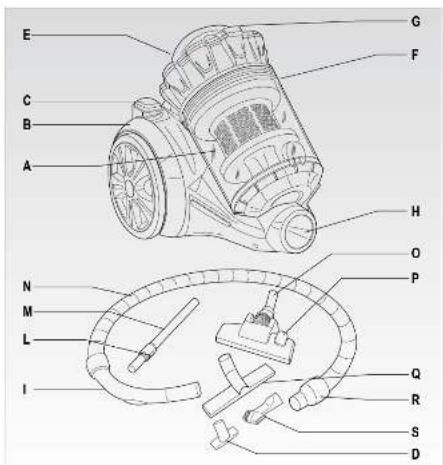
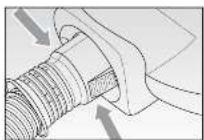
Fig.1
Fig.2
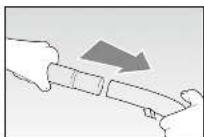
Fig. 3
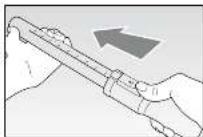
Fig. 4
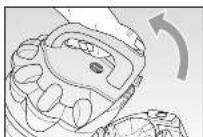
Fig.6
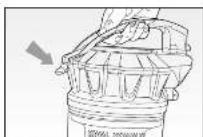
Fig. 8
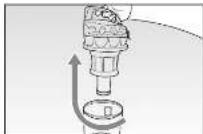
Fig. 10 Fig. 11
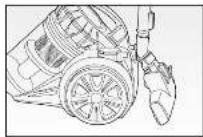
Fig.5
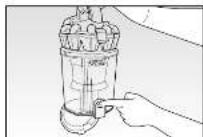
Fig.7
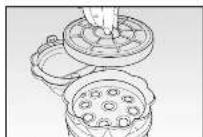
Fig. 3
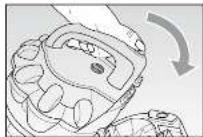
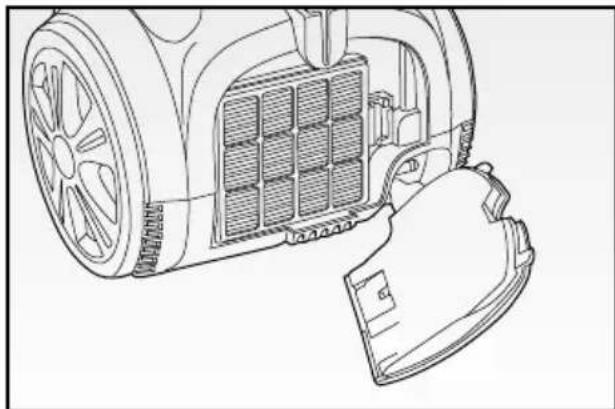
Fig. 12
AVVERTENZE IMPORTANTI
LEGGERE QUESTE ISTRUZIONI PRIMA DI USARE L'APPARECCHIO:
READ THESE INSTRUCTIONS BEFORE USING THE APPLIANCE:
When using the appliance, it is necessary to follow some basic precautions:
1 Always make sure that the voltage of the mains electricity supply is the same as that indicated on the rating plate of the appliance and that the system is compatible with the appliance power.
2 This appliance conforms to the 2014/35/EU and EMC 2014/30/EU directives.
3 The appliance may only be used for its intended purpose, which is for vacuuming dust from surfaces within the home. Any other use is to be considered improper and therefore, dangerous. The manufacturer may not be held liable for any damages caused by improper, incorrect or unreasonable use.
4 Do not use to vacuum hot ash, large pieces of glass, rubble, sharp or pointed items or liquids.
5 To prevent dangerous overheating, always unwind the power cord fully and unplug the appliance from the mains when the appliance is not in use.
6 Only plug the appliance into an AC socket.
7 Never use the appliance without a bag or motor filter or if the bag or filter are broken or damaged.
8 Never use the appliance on wet surfaces.
9 Never suck up liquids.
10 NEVER PLACE THE APPLIANCE IN WATER OR OTHER LIQUIDS.
11 Do not touch the appliance when hands or feet are wet or moist.
12 Never use the appliance with bare feet.
13 Do not leave the appliance exposed to the elements (rain, sun, etc.).
14 Do not store the appliance in proximity to sources of heat (e.g. radiators).
15 Always unplug the appliance before cleaning it or changing the filters.
16 This appliance is not intended for use by persons (including children) with reduced physical, sensory or mental capabilities, or lack of experience and knowledge, unless they have been given supervision or instruction concerning use of the appliance by a person responsible for their safety.
17 Children should be supervised to ensure that they do not play with the appliance.
18 Never unplug the appliance by pulling on the power cord.
19 Make sure that the power cord does not come into contact with sharp or hot surfaces.
20 Never use the appliance if the power cord is damaged.
21 If the cord is damaged, it must be replaced by the Manufacturer, by an Authorised Technical Assistance Centre or in any case, by a similarly qualified person, in order to prevent any risks.
22 Always switch on the appliance with the power regulator set to minimum.
23 Unplug the appliance from the mains electricity after each use.
24 In the event that you decide to dispose of the appliance, we advise you to make it inoperative by cutting off the power cord. We also recommend that any parts that could be dangerous be rendered harmless, especially for children, who may play with the appliance or its parts.
25 Packaging must never be left within the reach of children since it is potentially dangerous.
- To dispose of product correctly according to European Directive 2012/19/EU, please refer to and read the provided leaflet enclosed with the product.
DO NOT THROW AWAY THESE INSTRUCTIONS
DESCRIPTION OF THE APPLIANCE (Fig. 1)
A Dust container
B Appliance body
C Foot-operated cord rewind button
D Small vacuum cleaner
E Dust container lock/release button
F Foot-operated on/off switch
G Dust container handle
H Suction device coupling
I Handle
L Slider device
M Telescopic tube
N Suction device
O Floor brush
P Hard floor / carpet selector switch
Q Parquet brush
R Release buttons
S Narrow suction nozzle with brush
ATTACHMENTS
Telescopic tube (M)
Insert the extension tube onto the handle and then fit the required attachment.
Once the attachment has been fitted, it is possible to extend the telescopic tube using the lever (FIG.
4) to move it to the required length. Release the lever to stop the tube in the required position.
Floor brush (O)
- Ideal for cleaning large areas as well as corners that are difficult to reach.
- We advise against using the brush to clean carpets and resistant floors. The brush has wheels to allow it to glide over all surfaces. Select the required projection for the bristles by pressing the lever at the end of the brush. To retract the bristles, press the lever marked with the carpet symbol.
- For better preservation and protection of smooth flooring such as PVC, parquet or tiles, it is better
to use the brush. To lower the bristles, press the lever marked with the smooth flooring symbol.
Parquet brush (Q)
This can be used to clean delicate surfaces.
Narrow suction nozzle with brush (S)
This suction device is ideal for cleaning between the folds on fabrics, joints, corners or niches that are impossible to reach using the floor cleaning device. This attachment can also be fitted directly to the handle (I).
Small vacuum cleaner (D)
Useful to remove the dust from books or delicate objects, as picture frames, etc.
Suitable for cleaning upholstered furniture, mattresses, pillows, curtains, etc.
This attachment may be applied directly to the handle (I).
VACUMM CLEANER ASSEMBLY
IMPORTANT: Before fitting or removing attachments, always make sure that the vacuum cleaner has been unplugged from the power mains.
- Insert the suction device coupling (N) into the air inlet opening (H) and press until it clicks into place. To remove it, it is necessary to press the two release buttons (R) at the same time and to pull it out (Fig. 2).
- Insert the telescopic tube (M) into the handle (Fig. 3).
- Push the slider device (L) forwards and pull the bottom section of the tube out to the required length (Fig. 4). To shorten the tube, push it back in the opposite direction.
- Fit the required attachment to the telescopic tube.
USING THE APPLIANCE
CAUTION: Before using the vacuum cleaner, remove all large or sharp objects from the floor to avoid any possible damage to the cleaner itself.
First of all, before using this appliance, unwind the power cord completely and plug the appliance into the mains socket.
To switch on, press the foot switch (F) on the appliance. The cleaner is equipped with wheels to move it easily during use.
IMPORTANT: The appliance might make a whistling sound that will stop after a few seconds.
WARNING: Switch off the vacuum cleaner immediately if the air inlets, brushes or telescopic tube become blocked. Remove the cause of the blockage before switching the vacuum cleaner on again.
After using the cleaner
Switch off the appliance using the foot switch (F).
Then unplug the appliance from the mains power and hold down the foot pedal (C) on the appliance until the power cord is fully rewound.
WARNING: While rewinding the power cord, guide it in the right direction by hand to prevent any risk of injury to yourself.
Put away the appliance, placing the floor brush (O) on the special hook in the back (Fig. 5).
Carrying the vacuum cleaner
Only carry the appliance using the special handle on the top part (G).
CLEANING AND MAINTENANCE
WARNING: Before carrying out any cleaning or maintenance operation, switch off the appliance and unplug it from the mains power.
The dirt vacuumed up will enter the dust container (A). The air is cleaned by a permanent washable filter that is located inside the dust container, by a motor protection filter and an air outlet filter located under the appliance.
WARNING: Never use the vacuum cleaner if any filter is missing or damaged. Any dust cleaned up will enter the appliance and damage the motor.
WARNING: Clean the filters regularly or in any case, whenever the suction power seems to be reduced.
How to empty the dust container (A)
- Press the release button (E) and at the same time take out the dust container (A) using the handle (G) (Fig. 6).
- Empty the dust container (A), opening the lid with the release button (Fig. 7).
IMPORTANT: To empty the container and prevent any dirt from leaking out, we recommend first placing it inside a plastic bag and emptying it there.
- To clean the container (A) fully, it is necessary to disassemble it completely, as described here below:
- press the appropriate button and open the lid of the container (A) (Fig. 8); extract the filter beneath (Fig. 9);
- remove the complete filter by rotating it clockwise (Fig. 10).
IMPORTANT: Wash the filter in clean water without soap or detergents. It is advisable to clean the filter at least every 6 months or in any case, when suction is visibly reduced.
- Before using the appliance again, reassemble the container (A).
- Place the filter inside the container (A) and lock it into place by turning it anticlockwise.
- Now refit the whole dust container (A) onto the appliance body, pressing gently until it clicks into place (Fig. 11).
Cleaning the air outlet filter
This filter cleans the air one last time before it leaves the vacuum cleaner. To clean the filter proceed as follows:
- Use the lever to remove the small hatch on the back of the appliance (Fig. 12).
- Clean the filter in cold water and leave it to dry.
- Refit the clean (or new) air outlet filter into the grid and return this to the appliance, pressing it down until it clicks into place.
WARNING: Only wash the filter in clean water, without using soap or detergents.
Cleaning the vacuum cleaner
The casing, dust container and filter seats can be wiped with a damp cloth if necessary. No liquid must enter the vacuum cleaner in the process. Never use heavy-duty cleaning substances (stain removers, thinners) because they can corrode the plastic surfaces. Only put the plug back into the mains socket when you are sure that all parts are thoroughly dry.
IMPORTANT: Do not lubricate or oil any rotating parts, since this could cause dirt and fluff to stick even further
WARNING: It is advisable to clean the filter at least every 6 months or in any case, when suction is visibly reduced.
Cleaning the brushes
While the appliance is switched on, move your hand between the bristles on the brush to free them of any trapped dust, which will then be sucked into the cleaner.
SERVICE AND CUSTOMER ASSISTANCE
In case of damage to the power cord of other parts of the appliance, please contact an ARIETE authorised assistance service.
For assistance and repairs (under or post guarantee), please contact your local authorised ARIETE assistance centre.
IMPORTANT: The serial number of the appliance can be found on its rating plate.
NOTES IMPORTANTES
LIRE ATTENTIVEMENT CES INSTRUCTIONS AVANT D'UTILISER L'APPAREIL:
TEXNIKH EeynHPETHsH NEATQN
CoOTBeTCTByeT Tpe6ObaHnA m
TP TC 004/2011 «O 6e3oNaChocTn Hn3KOBbTHOrO o6OpyIOBaHn, yTBepXdEn PeSeHnEm Komccnn TaMoxeHHoro co768 ot 16 abrycTa 2011 roda
Tobap noctabnayetcB co6paHHOM Bnde, CneuNbHbIX Tpe6oBaHn K nepeBO3Ke I xpaHeHIO He yCTaHOBNeHO.
YTNIN3nOBAbB COOTBEcTBUN C 3aKOHoDaTeJIbCTBOM MeCTa peaJIn3aUIN.
TapaHTnHbI cpoK 2 roJa. Cpok cnJxkbI n3dJIyra 2 roJa.
Hopmaqna O ceptnkaun B npnoxeHn K rapaHTnHomy TaHOHy n/nn Ha ynaKOBKe n3dEINr.
IHCTPyKci3 EKcPlyatai
IPEД NOYATKOM POBJTN 3 ПИСТРОЕМ YBAЖHO O3HAJOMNTUCR 3 IHCTPYUJIAMN 3 EKCПЛYATAUII:
IiD qac po6oTn 3 npncTrooem cnid doTpmyBaTnscr pydy 3araIbHnx npaBnI:
1 3aBxdi nepeBiprtn, 06 Hanpyra B Mepej eEeKtpoeHeprii BiDnOBiDaIa 3a3NaueHi Ha 3aBOcBki Ta6nuci nIIOcoca, a TaKoX 06 eEeKtpopBoOka BiDnOBiDaIa NotyxHocTi npncTpoI.
2 Βeɪ npɪcɪptɪŋ Bɪdɪnəbɪdaɪe Bɪmʊrʌm ἀnpεκτɪbɪn 2014/35/EU ḁ ἀnpεκτɪbɪn EMC 2014/30/EU.
3 LcH npicptiCnID BnKOpncTOBbATN TiIbKn 3a npn3NaueHHaM, dIyAKoRbB6yB CTBOpeHn, a came: BCMOKTyBaHHa NIIy 3 pI3Hnx NOBepxOHb B no6yTOBHX npimiiEHHax. Byd-kaKe iHwe BnKOpncTahHra BBaXaCTbcra HeHaJIeXHM, a 3HaHTb - He6e3neuHm. Bnpo6Hnk He Hece BiINOBiJaIbHicTb 3a MoJINBy ShKOdy, HadaHy B pe3yIbTaTi HeHaJIeXHoro, HeBipHOrTa HeIopeUHO r BOKOpNCtAHn.
4 3abopohjctbca BcMOKtBuAtn rapnyn noni, BeNki yIamKn cKna, mMatkn 6yDBeHoro cmTTra, roCTpi a6o pixyu npedMeTu paipkeOBHH.
5 Μιοδ 3aπo6iRTn He6e3neuHomy neperpiBaHHIO, peKOMeHdyεTbCS πID yac po6OTn PO3MOTyBaTnCS ΦHyp XnBJIeHHa HbCIO DOBXmHy Ta BNTaYBaTN BnKy 3 MepeXi eNeKTpUHOrO XnBJIeHHa, kIso npncTpiH He BnKOpNCTOByεTbCS.
6 Ппсстри можна вимкати Лше в eлектчну розетку мереши 3MiHHoro CTpyMy.
7 3a6bopohrctbca BnKOpncTOBvBaTn npncptpi 6e3 fIbTpiv, a6o JkUO fIbTpni nookjxehi a6o nopbahi.
8 He BCMOKTyBaTn nJ3 BOJOnx NOBepXohb.
9 3a6opohrctbcr BcMOKtByBaTn piHny.
10 3ABOPOHЯETbCRA 3AHUPOBATN INPNCPTIY BODY T A B IHSSI PIDINH.
11 3a6bopohrctbcr TOpKaTnCra npnctroo MOKpMn abo BOJOrmny pykamn Ta Horamn.
12 3a6oHЯETbCЯ KOpNCTyBaTnCЯ NINOCOCOM 6OcKOM.
13 He 3aIIuataI npIcTpiiPi dIeIO atmocepnHex yBnU (doU, coHuce i T.d.).
14 He 3aIIuataI nnococ no6n3y BiI dJkepeI TeIIa (HaNP., 6aTapeI onaJIeHЯ).
15 3aBxDn BnMaTn BnIky 3 pO3eTKn Ipeed OuNueHnM Iprntpoo a6o 3amHoIO iNbTpiv.
16 He cnid donyckatn do po60t n 3 npnctroeM oc6 3 obmxeHIMN o3nHIMN, ceHcOpHIMn a6o nCnxiHIMN cnpomoxHOCTaMn, a TaKoX oc6 3 HeOCTaTHim 3HaHHM npnctroo Ta He3NaHIM docBIDOM po60t n HIM. Taki oc6b IOBHHI KOpNCtYBaTnca npnctroeM IInse niD hargJdOM oc6b, BiINObIaJIbHoI 3a ix 6e3neky.
17 Κeɪ npɪnʌd He moʊke BnKOpNCTOByBaTɪcər ἀɪtɒmɪ. Tpɪmaɪte npɪnʌd ta ŽɔrO χHyp B Mɪcɪx, Hεdɑctyɪnɪx dɪŋ ἀɪteɪ.
18 CπiδκyBaTn 3a Tm, οo6 πιν He 6abnncs 3 nllococom.
19 He Taryntn 3a npoBid, uOb BIMKHyTn BNkky 3 po3eTKn MepeXi eJeKtpuHoro cTpymy.
20 CπiδκyBaTn 3a Tm, ζοδ προBιD He TopKaBcR rapaunx Ta rOCTpnx NOBepxohb.
21 He kopncTyBaTnca npncTroeM, kso npoBid nookdKeHn.
22 RaKIO npOBiD JxNBLeHnI NOxKOJKeHn, Ioro 3aMIny IOBnHeH 3diIChHTn Bnpo6HnK YI npEicTAbHnK TexHiuHOcLyXb, a6o ocO6a 3 BiINObIDHOU KBaJIiΦiKaciEIO, Uo6 3aNo6irTu 6yDb-IAkOMy pU3NKy.
23 Пи вимканни пистою ретуларовпOTуЖнocTi 3aBXДи NOВиен 6уТи B noJIO-жehи Ha mIHIMyMi.
24ПсЯКоЖHOrOBuKOpNCTaHHBnTayBaTN BnIky 3po3eTKJxNBJIeHHa.
25 Y BnnaKy 3aBepWeHHa TepmiHy BnKOpNCtAHHЯ NINOCocY cIiD BiDi pO-BiD JxNBJIeHHa, 06 Hm He MoXHa 6yNo 6IbWe CkOpNCTyBaTnc. Kpim Toro, peKomeHdyETbcra 3HeWKoJNTn Ti YaactHn PnCtpoH, 0o MoXytb 6yTu He6e3- neuHmN, OcO6JIuBO dIaTei, kI MoXytb BnKOpNCtAtn Ioro dIra rpn.
26 Cknaobi ynaOBKn He cnid 3aIIuwaTn y DoCJHX iITm MiCuX, OCKJIbKn BOHMOxTyb 6yTu NToEHcIINHM dKepeIOM He6e3neKn.
27 - Правида посяпстоюуВдноьдноctido ВIMOR ebронькоДиpeктИВn 2012/19/EU 3a3нayehiуВдноьднomy iHфорmaцйнOMy JINCTI, loHaadaeTbCSdo zuBOro Bnpo6y.
3EPIATN IHCTPYK2I 3 EKCJIYATAI
ONCAHHI INCTPOIO (Ma1.1)
A KoHTeHep dny nIy
B Kopnyc npuctpoio
C PndaJIb-BMnKau HAMOTyBaHHn npOBdy
D MiHi-niNooc
E Khonka 6nOKyBaHHra/po36nOKyBaHHra KOHTeHepa dIra nIy
F PndaJIb-BMnKaay BMnKaHHaBmNkaHHa
G Pyuka KOHTeHepa dIy nIy
H Micce kpinneHHaHaHy BCMOKTyBaHHa
I Pyka
L Pnpctpii noobxehnra Tpy6n
M TeneckoniuHa trpy6a
N UHaHRCMOKTyBaHH
O 乌itka nna niDnorn
P IepemnkaTbepda niIgora/KnIIMN
Q LItka dny napKeTy
R KhoNk po36JokyBaHHa
S Pnnooc dna uinn 3i iitkoio
HACADKN
TeleckoniuHa Tpy6a (M)
BCTaBnTu Tpy6y Ha pyuKy, NOTIM BCTaHOBnTu Heo6xIDHy HacaIky. Pic7aHOBJIeHNHa HacaIK MoJHa NIOOBXHTu TeJeCKOJIChy Tpy6y Do Notpi6Hoi DOBXHH, HATNCyBShn Ha BiINOBiDn BaxJIb (MAJ. 4). BiNpyCTnTu BaxIb npi DoC8rHeHHi Notpi6Hoi DOBXHH.
Uitka nna nidaorn (O))
- BnKOpncToBcyTbcra KdI npnbpaHna BeNknx NOBepxOHb, Ta i IJBaKo DoCzHHx KyTkIB.
- He pekomehdyecBnKOpncTOByBaTn 10 11TKy IJRA YIeHnKINIMIB Ta TBepdoi NiIIOrN. 11TKa obnaHaHa KOIiAtamn, 106 3a6e3neuHTn II JERKe npocyBaHHn NO BCix BnDax nobepxohb. Bn6paTn nOTpi6Hy DOBXInHy BnCyBaHHn 10ETnHK, HATNCyBUnn Ha BiNDOBiHN peryJrTop no Kpao 10 11TKN. 106 nIDHn Tn 10TKy, CIId HATNCHTn Ha BaxkB-BmNKaU, N03NaueHn CNMBOLOM KINIMMa.
- Κόb ποκραψιτη πριδυρανήτa 3axnct rnaikoi πidnoi, λκ ΠΒΧ, napket a6o ππιΤΚa, κραupe cκοριστataɪncsə μιτkoio. Κόb BucyHytn ΚιTKy, cπiδ haTnchTy nHa BaχiNb-BmMnKaU, πο3haueHm CImBOLOM mπaɪkπiπIŋora.
YbIMKHyTN NINOCOC, NOHCTNTN UeTINKN UITKN BiD HAKONUHeHOrO Ha HNX NnIy Ta 6pydy, kI npi Cbomy 6byTB BCMOKTyBaTnCRA BCEpeDInHy.
OBCJNYROBYAHH KJIICHTIB
Y BnnaKy noIkoJKeHn npObOy a6o iHnx cKnadOBnx qactnH npNCTpoI npoxaHn 3BepTaTncsdo ynoBHOaKeHOro cepBicHoro ueHTpy ARIET.
3 nntanb texhiuoi niTpumkn ta peMOHTy (Ha npotrai TepmiHy dii rapaHtii Ta nicna Ioro 3aikHeHn): 3Beptatncs6e3nocepedhbo do periohaBHorO ynoBHOaxeHoro cepbichoro ceHTpy ARIETE.
BAXJIINBA IHΦOPMALI: Homep MoJeni Bnpo6y 3a3HaueHn Ha 3aBOcBki TbNIuCi TeXHiUHX daHx, IIO BCTaHOBNeHa Ha npICtpoi.
WAZNE OSTRZEZENIA
a a a a a a a a a a a a a a a a a a a a a a a a a a
Jgll gdd
45 1
y
jglal
1
.
i
Jilgll bai jie jie 9
1
1 1
y 1
()-
()
10
17
aagaa aaii iiaaii aaii. (Jabla slls lo) dss
a a a a a a a a a a a a a a a a a a a a a a a
J
jgllypepepepepepepepepepepepepepepepepepepepepepepepepepepepepepepepepepepepepepepepepepepepepepepepepepepepepepepepepepepepepepepepepepepepepepepepepepepepepepepepepepepepepepepepepepepepepe pe
1
19
g dai aai j 1 1 g i aai
j 1
aaii aie 100
g jao gai jn no jie gl aaijall jol gai jgl j
1
A
1
a + b = 5
aJl la. gI y J (H) 1g (N)
()4cjjg(R)
()(M)
J 1111 1111 1111 1111 1111
a a a a a a a a a a a a a a a a a a a a a a a a a a