USER MANUAL Evolution 2.0 2712 ARIETE
natural_image
3D rendering of a robotic vacuum cleaner with circular head and mounting base (no text or symbols visible)
EVOLUTION 2.0
ROBOT
CE 2712
Gentile cliente,
natural_image
3D rendering of a robotic vacuum cleaner on tiled floor connected to a wall-mounted electrical outlet (no text or symbols visible)

Attenzione!
natural_image
3D rendering of a robotic vacuum cleaner on tiled floor with wall-mounted electrical outlet (no text or symbols)
c) Auto-ricarica:

Attenzione!

Attenzione!
natural_image
Illustration showing a hand using a tool to adjust or install a mechanical component, with no visible text or symbols.
PULIZIA DEL CONTENITORE DELLA POLVERE PREFERIBILMENTE DOPO OGNI UTILIZZO
natural_image
Hand pressing down on a robotic vacuum cleaner's lid (no text or symbols visible)
natural_image
Hand placing a component into a vacuum cleaner's air gap (no text or symbols visible)
natural_image
Illustration of a hand opening a small cylindrical device with an upward arrow indicating motion (no text or symbols)
IT
natural_image
Illustration of a hand holding a mechanical component with a grid-like structure inside (no text or symbols)

Attenzione!
Thank you for choosing to purchase the Robot the new intelligent robot floor cleaner that works independently to clean your floors.
The Robot is able to vacuum the dirt from floors with its suction motor and rotating side brushes that mean it can get into the corners as well as around and under furniture and along skirting.
The Robot is able to completely cover the area you need to clean, with circular, perimeter and linear movements and it can be used on any type of flooring: parquet, tiles, vinyl, linoleum, rugs and carpets.
Thanks to its special sensors, the Robot
- avoids or passes over obstacles
- will not collide with furniture
- will not fall down stairs
- recognises the amount of dirt on the floor and automatically adjusts suction accordingly
Dirt is collected inside a container which is easily removable for emptying and fitted with a Hepa filter to trap fine dust, pollen, animal hairs and micro particles.
Silent and eco-friendly, the Robot is also able to recharge itself, using its auto charge station and it can also be programmed to clean at set times during the day.
Complete with touchscreen display for easy setting from the product itself.
In no time at all, the Robot will become an essential part of the family – one that leaves you free to do other things.
IMPORTANT SAFEGUARDS
READ THESE INSTRUCTIONS BEFORE USE.
DO NOT THROW AWAY THESE INSTRUCTIONS.
This appliance conforms to the 2006/95/EC and EMC 2004/108/EC directives.
To dispose of product correctly according to European Directive 2009/96/
CE, please refer to and read the provided leaflet enclosed with the product.
CHILD HAZARD

- This appliance can be used by children over the age of 8 and by people with reduced physical, sensory or mental capabilities, or lack of experience and knowledge, if they are supervised while using it or have been shown how to use it in a safe way and understand the hazards involved. This appliance may not be used as a plaything. Cleaning and maintenance can be performed by children only if properly supervised.
- Never allow the cord to dangle in places where it may be grabbed by a child.
- Inform everyone in the house that the Robot is cleaning. Caution should be used if small children and animals are in the house.
- In the event that you decide to dispose of the appliance, we advise you to make it inoperative by cutting off the power cord. We also recommend that any parts that could be dangerous be rendered harmless, especially for children, who may play with the appliance or its parts.
- Packaging must never be left within the reach of children since it is potentially dangerous.
DANGER FROM ELECTRICITY AND BATTERIES
-
Make sure that the voltage on the appliance rating plate corresponds to that of the mains electricity.
-
Only use the charging station and battery charger provided when charging the Robot.
-
Always make sure that your hands are thoroughly dry before using or adjusting the switches on the appliance, or before touching the power plug or power connections.
- Should acid leak from the batteries, avoid all contact with skin, eyes and mucous. Rinse any affected area with plenty of water and seek medical attention immediately.
- Improper replacement of batteries may lead to a risk of explosion. Only replace the battery with batteries of the same type or equivalent.
- Before disposing of the appliance, remove all of the batteries.
OTHER HAZARDS
- Never leave the appliance exposed to the elements (rain, sun, etc....).
- Never place the appliance on or close to sources of heat.
- Never place the appliance unit, charging station, plug or power cord in water or other liquids; wipe them clean with a damp cloth.
- If the appliance is not operating, remove it from the charging base, switch off the power, and unplug the appliance from the mains socket before inserting or removing any parts or cleaning the appliance.
- Never use the appliance or charging station if the power cord or plug are damaged or if the appliance is faulty; all repairs, including the replacement of the power cord, must be carried out by an assistance service or by a service engineer approved, so as to eliminate any risks.
- If the power feeder or cable needs to be replaced and/or serviced, always contact an assistance service or a service engineer approved, so as to eliminate any risks.
- If any fluid should leak from the batteries, do not use the appliance: take it to the nearest assistance service for battery replacement.
- This appliance operated using rechargeable batteries and therefore, at the end of its useful life, it must not be disposed of with other household waste. It can be taken to a council recycling centre or to stores or retailers offering this type of service. Separate disposal of electric appliances means it is possible to avoid some of the negative effects on health and the environment caused by incorrect disposal and it also makes it possible to
EN
recover the materials from which it is made and this helps to save energy and resources. To point out the requirement to dispose of electrical appliances properly and separately, this product is marked with the crossed out wheelie bin symbol. Never throw batteries into fire.
- This appliance is designed for HOME USE ONLY and may not be used for commercial or industrial purposes.
- Only charge and use the appliance in closed environments.
- Always abide by any further warnings in the CLEANING AND MAINTENANCE chapter.
CAUTION: POSSIBLE MATERIAL DAMAGE
- Never clean up hot ash, large pieces of glass, plaster debris, sharp or pointed objects, or liquids.
- Do not allow clothes or body parts to become caught up in the Robot's wheels or rotary brushes.
- The appliance must not come into contact with cigarettes, lighters, matches or other flammable items.
- Never place items on top of the Robot, never sit on the appliance.
- Before use, pick up items from the floor (remove fragile objects and wires, clothing, paper, curtains and any fringes on rugs, as these may become caught up in the appliance and cause items to fall from tables and/or shelves).
- The Robot must not be used without its filters, or if the filters are broken or damaged in any way.
- Never use to clean on wet surfaces.
- Never clean up liquids or residues of bleach, paint or other chemicals or wet substances.
- Always disconnect the Robot or the charging station from the mains power if it is not to be used for any length of time or when transporting it.
- Do not threaten the safety of the appliance by using parts that are not original or which have not been approved by the manufacturer.
-
To unplug the appliance, grip the plug and remove it directly from the power socket. Never pull the power cord to unplug the appliance.
-
In case of using extension leads, these must be suitable for the appliance power to avoid danger to the operator and for the safety of the environment in which the appliance is being used. Extension leads, if not suitable, can cause operating anomalies.
- Any changes to this product that have not been expressly authorised by the manufacturer may lead to the user's guarantee being rendered null and void.
DISPOSAL
Important!
Used batteries cannot be thrown away with normal household waste. Dispose of batteries at recycling points or return them to the retailer where you purchased the appliance or an authorised after-sales service centre.
DESCRIPTION OF ROBOT AND PARTS
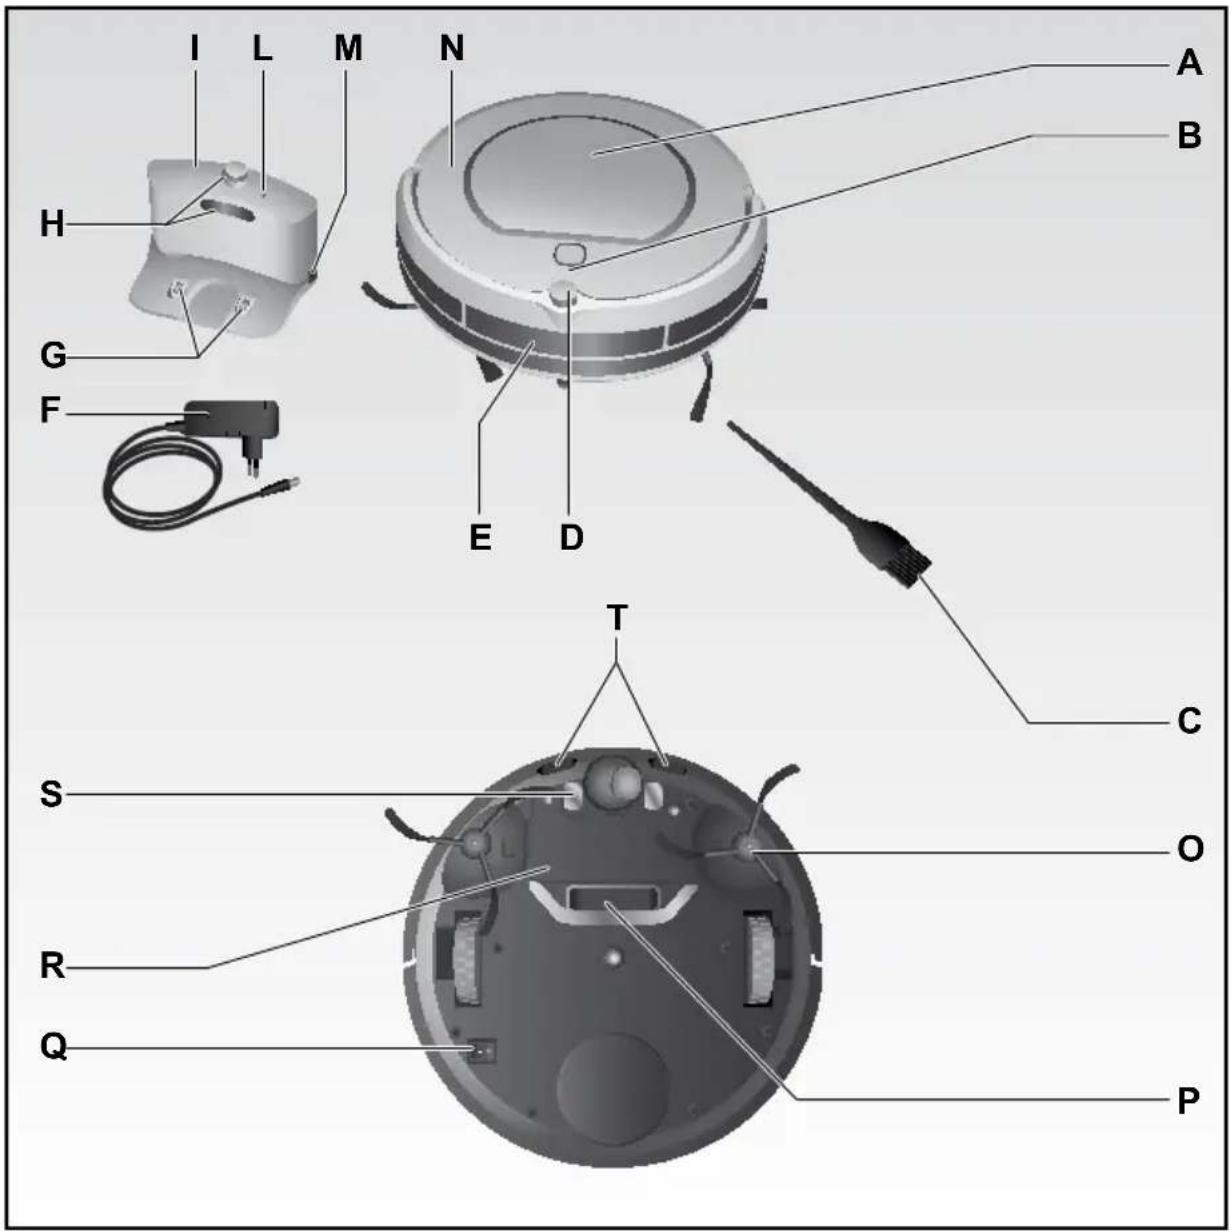
A Dust container lid
B Display and control panel (touch screen)
C Cleaning brush
D Infrared signal receiver
E Crashproof sensor beam for tall obstacles
F Charger
G Contact points for charging
H IR signal transmitters
I Charging station ("HOME BASE")
L Power light
M Socket for power cord
N Appliance body
O Rotary brushes
P Suction opening
Q ON/OFF switch
R Battery cover
S Contact points for charging station
T Crashproof sensor beam for low obstacles and to prevent falling
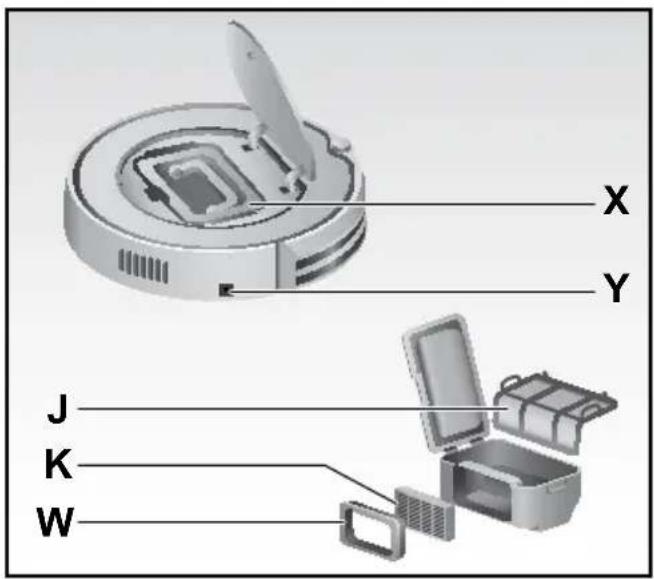
Z Dirt container
X Socket for power cord
Y Hepa filter support
W Hepa filter
K Main filter
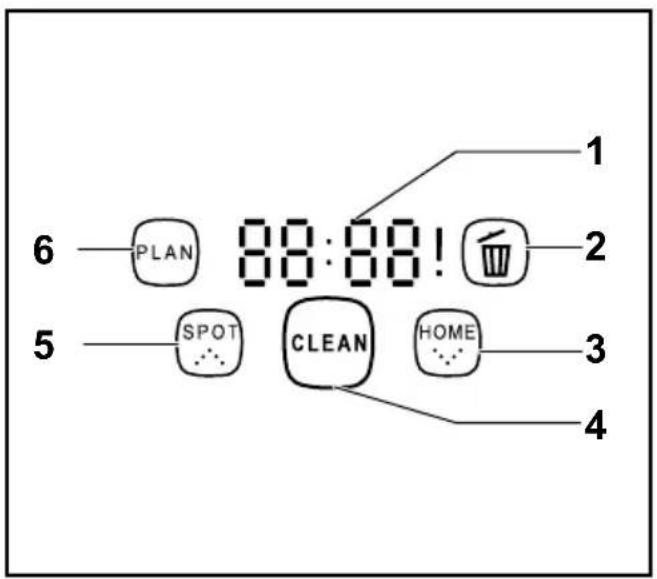
1 Time and information display
2 Icon to signal that the dirt container is full
3 Touch screen HOME button to return to the charging station
4 "CLEAN" touch screen on button with light
5 "SPOT cleaning" touch screen button
6 "PLAN" touch screen button
INSTRUCTIONS FOR USE
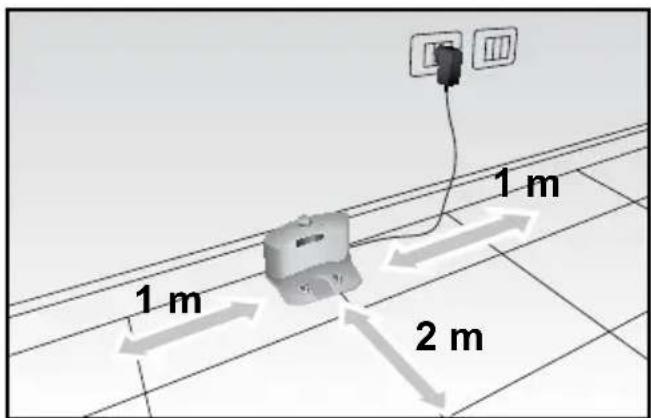
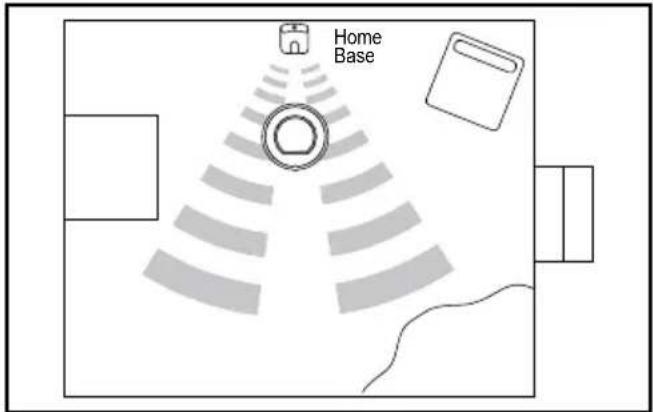
- PLACE THE CHARGING STATION (I) on a hard surface and against a wall with no obstacles within one metre on each side and for about two metres to the front.
Plug the power cord (F) into the socket (M) in the charging station and then connect the battery charger to the main power.
The power light (L) in the charging station will switch on to show that it is correctly connected.
- TURN THE SWITCH (Q) on the base of the appliance to ON, to charge up the appliance for operation. If the appliance has switched on correctly, the icons (2-3-5-6) will start to flash.

Important!
If the Robot is connected to the mains power without first switching it on at the ON button, the display will show the "E10" error code, the icons 2-3-5-6 will start to flash and an intermittent acoustic signal will be sounded to warn that no charging has taken place.
- CHARGE THE BATTERY:
the Robot is powered by a rechargeable Ni-Mh battery.
The charge modes are:
a) Directly via adaptor (F)
Plug the charger (F) directly into the socket (Y) in the appliance body (Q).

natural_image
3D wireframe diagram of a vacuum cleaner placed on tiled floor next to an electrical outlet (no text or symbols)

Important!
Never use this charging methods when the Robot has been set to switch on later for cleaning (see the “Programming” chapter), as this could cause damage to the power cord and to the appliance at the start of the cleaning cycle.
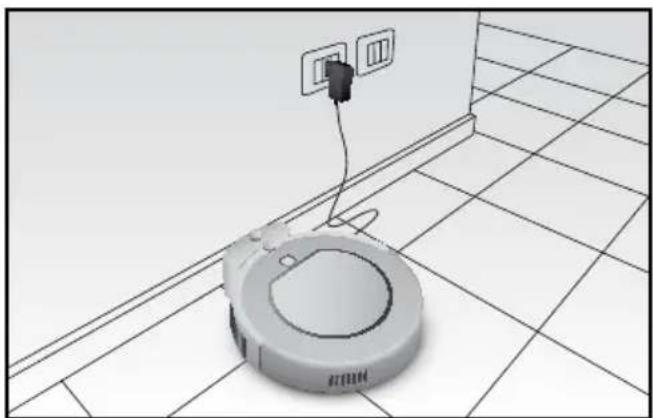
b) Via charging station (I)
After installing the "Home Base" correctly, place the Robot on this charging station, making sure that the charge poles (S) meet with the charge contacts (G) in the base.
The "Home Base" charge contacts are low voltage and do not constitute any type of hazard.
natural_image
3D rendering of a robotic vacuum cleaner on tiled floor with wall-mounted electrical outlets (no text or symbols)
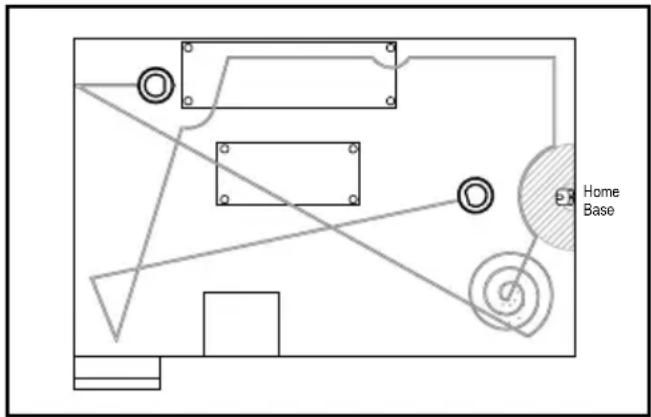
c) Auto-charge:
the Robot will automatically return to the "Home Base" when the battery charge is low.
To do this, it is necessary for the IR signal to reach it from the "Home Base" which means that the base must be in the same room as the one being cleaned.
If the Robot is unable to return to the charging station at its first attempt, it will continue to try to do so until it is correctly positioned.

Important!
The Robot cannot return to the charging station if the station is not connected to the mains power; in this case, the suction function will be reduced until it runs out and the Robot will switch off.

Important!
If the Robot is in a different room to the charging station, it will not be able to pick up the recall signal.

Important!
Make sure that the power cord does not get in the way of the Robot, as there is a risk of blocking the rotary brushes.
NOTES ABOUT CHARGING AND AUTONOMY

Important!
Before using for the first time, you need to charge the appliance for at least 12 hours. Anything less than this could affect the life of the batteries.
Subsequent charges need a maximum time of 3.5 hours to guarantee a full 1.5 hour cleaning cycle.
| First charge time 12 h | |
| Subsequent charge times 3,5 h | |
| Autonomous operating time 90 min (including return to charging station) |
| Robot status Display status (1) | |
| While charging The display will read “1111”, repeating from right to left. |
| Low battery The display will read “Lo” | |
| Charge complete The display will read “FULL” | |
If used correctly, the battery has a useful lifetime of hundreds of cleaning cycles.
To extend battery life as much as possible, keeping operating autonomy at the same level, you should follow some important rules:
- use the Robot frequently;
- recharge the battery completely before every cleaning cycle;
- always keep the Robot connected to the power supply;
- if you do not intend to use the Robot for a certain length of time, charge the batteries completely, switch off the appliance at the switch (Q), remove the batteries and store them in a cool, dry place;
- after a long period of disuse, charge the batteries fully before use.

Important!
Do not leave the batteries flat for a long period of time, since they could become damaged.

Important!
Do not charge batteries at temperatures below 4°C or above 40°C.
If the battery should become flat, replace it with a new one, removing the battery cover (R) and taking out the screws.
Ni-MH 14V 2000 mAH batteries are available from Authorised Assistance Centres.
OPERATION IN START MODE
Once the charge cycle has been completed, the appliance display will read "FULL" and it will be possible to start the Robot and the cleaning cycle. To start the Robot, first check its status
| Lights Robot status | |
| “Pause” “CLEAN” button on and 2-3-5-6 icons flashing | In pause mode, waiting for commands. | |
| “Stand-by” “CLEAN” button and 2-3-5-6 icons off | ON (switch (Q) set to ON) but it needs to be activated before it can accept commands. | |
a) If the Robot is in “pause” (it does not move and the icons 2-3-5-6 are flashing), this means that it is waiting for commands:
- to start the cleaning cycle, press the "CLEAN" button once or if necessary, press one of the buttons on the control panel (B) on the appliance body:
- to set the Robot from "pause" to "stand-by" hold down the "CLEAN" button for 3 seconds or wait 20 seconds until the flashing icons switch off.
b) If the Robot is on “stand-by” (it does not move and the icons and “CLEAN” button are off), this means it is on but that it needs to be activated before it can receive commands. To start the cleaning cycle, press the “CLEAN” button twice:
- once to activate it and set it in "pause" mode: the icons 2-3-5-6 will start to flash;
- a second time to activate cleaning setting it to "cleaning": the "CLEAN" button will switch on.
CLEANING
Once the cleaning cycle has been activated, to stop it, press the "CLEAN" button once< the icons will begin to flash again.
- press it once to set the appliance to "pause", waiting 20 seconds for it to enter "stand-by" mode automatically;
- hold down for 3 seconds to set the Robot directly in "stand-by" mode.
The different cleaning modes can be set from the touch screen:
1) AUTOMATIC cleaning:
Pressing the "CLEAN" button will start the Robot cleaning the room automatically and changing its route according to the obstructions on the floor, applying alternately:
- spiral movements
- linear perimeter movements
- linear diagonal movements
- automatic "SPOT cleaning": faster spiral movements with greater suction when the dust detection sensors find a particularly dirty area. This function is interrupted automatically when the area has been cleaned or it can be stopped by pressing the "CLEAN" button.

Important!
For the best cleaning results and to make sure that the Robot can cover the entire surface of the room without leaving any area uncovered and in the shortest possible amount of time, it is necessary to remove as many obstructions from the floor as possible.

Important!
To prevent the Robot from getting stuck, remove or lift any wires and power cords that could become wrapped around the rotary brushes and cause items to fall from furniture or break or damage the Robot.
2) SPOT cleaning:
To focus cleaning on a smaller area, it is possible to use the "SPOT" button on the Robot to use the Spot cleaning function (for the operation mode, see the instructions above).
3) Return to the charging station:
Using the "HOME" button on the Robot, it is possible to make it return to the base when necessary.
- the Robot must be able to intercept the IR signal from the charging station which must therefore be in the same room as is being cleaned;
- if the Robot is not able to return to the base at the first attempt, it will continue to try until it is correctly positioned.

Important!
If the Robot is unable to return to the charging station at its first attempt, it will continue to try to do so until it is correctly positioned.

Important!
The Robot cannot return to the charging station if the station is not connected to the mains power; in this case, the suction function will be reduced until it runs out and the Robot will switch off.

Important!
During the return to the charging station, the suction function is suspended and therefore, the noise level will be lower.
DURING THE CLEANING CYCLE
The coverage time for a room may vary according to floor type and to the number of obstructions the Robot encounters as well as the possible differences in height on the floor.
Thanks to its front anti-collision sensors, the Robot is able to intercept surfaces (walls, furniture...) avoiding collisions with them. However, if the obstruction consists of corners or tubular parts of furnishings, then a gentle impact may be possible. Special anti-fall sensors on its base mean that the Robot is able to recognise differences in height and therefore, to avoid falling from tops or stairs.
The Robot is also able to overcome differences in level such as thresholds or rugs and to move away from obstacles (pipes, floor lamps, etc.) of no higher than 1 cm.

Important!
When cleaning carpets or rugs, do not allow the Robot to come into contact with fringes and do not clean shag pile carpets, as the fibres and fringes may become caught up around the rotary brushes.
USING THE ROBOT WHERE THERE IS A GOOD DEAL OF EXPOSURE TO SUNLIGHT
When using the robot in rooms with a great deal of exposure to sunlight, we recommend closing blinds or curtains to reduce this and to remove the problems that could incorrectly change the direction and route of the appliance.
SETTING THE DATE AND TIME
- Hold down the "PLAN" button for 3 seconds to enter the clock setting mode.
- Press the "SPOT" and "HOME" buttons together to set the hours: then press "PLAN" to confirm and pass on to the minutes.
- Press the "SPOT" and "HOME" buttons together to set the minutes, then press "CLEAN" to confirm and pass onto setting the day.
- Press the "SPOT" and "HOME" buttons together to set the day, from the number "1" which represents Monday, through to "7", which is Sunday.
- Press "CLEAN" to exit and quit.
- To delete the time, set it to 00:00 and save.
SETTING THE CLEANING PROGRAMME
- Press the "CLEAN" button to set the Robot to "pause".
- Press the "PLAN" button to enter the programming mode.
- Press the "SPOT" and "HOME" buttons together to set the day, from the number "1" which represents Monday, through to "7", which is Sunday.
- Press "CLEAN" to confirm and quit or "PLAN" to set the time for daily cleaning.
- Press the "SPOT" and "HOME" buttons together to set the hours: then press "PLAN" to confirm and pass on to the minutes or press "CLEAN" to confirm and return to the days setting.
- Press the "SPOT" and "HOME" buttons together to set the minutes, then press "CLEAN" to confirm and quit, returning to days, or press "PLAN" to confirm and return to the hours.

Important!
A sound signal will be emitted to show that the time has been saved. If no sound is heard, re-enter the settings and save again.
At the selected time, the Robot will move from its charging station to start the cleaning cycle and then return to the station when the cleaning is complete or if the batteries are almost flat. Once it has begun to return to the station, the Robot may take up to 30 minutes to intercept the signal and reposition itself on the "Home Base".
CLEANING AND MAINTENANCE
For the correct maintenance of the Robot, follow the rules below:
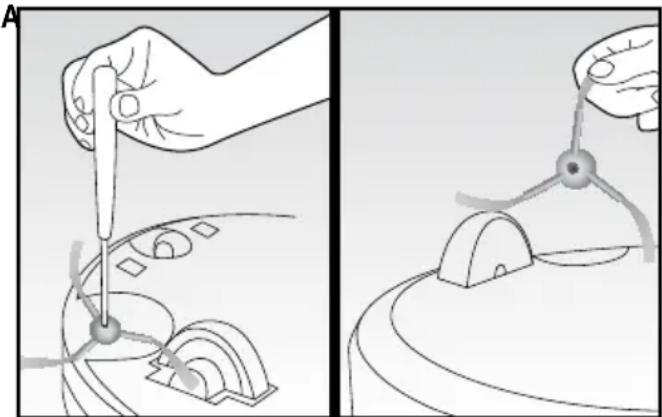
CLEAN THE SIDE BRUSHES ON REGULAR BASIS AND REPLACE THEM IF DAMAGED.
- Remove the screw in the centre of each brush support.
- Remove the brushes and replace them, making sure that the marks "L" (left) and "R" (right) meet with the same marks on the appliance base.
natural_image
Two-step diagram showing hands using a tool to adjust a mechanical component, with no visible text or symbols.
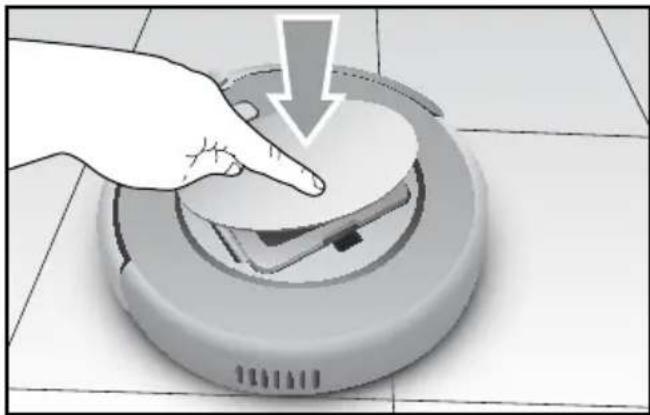
CLEAN THE DUST CONTAINER AFTER EACH USE:
As soon as the icon (2) on the control panel (B) switches on, the Robot will stop cleaning to return to the charging station and it will be necessary to proceed with cleaning the dust container and the dirt suction opening (P).
The Robot will only resume cleaning once the container has been emptied.
- Lift the lid (A) by pressing gently yet firmly on the logo "push": the lid will open slowly.
natural_image
Hand placing a white circular object onto a robotic vacuum cleaner on tiled floor (no text or symbols visible)
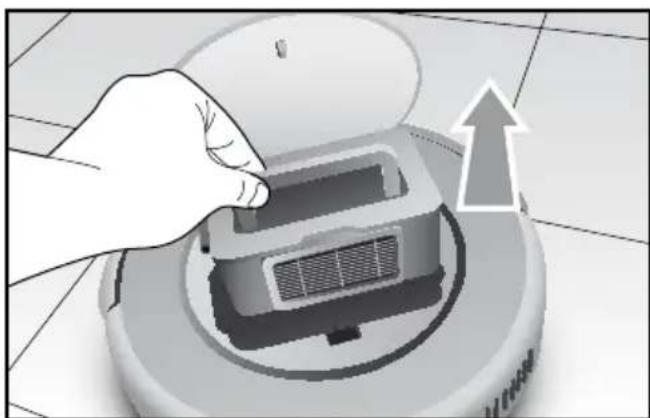
- Take out the container by its handle.
natural_image
Illustration of a hand opening a portable air conditioner unit with an upward arrow indicating airflow (no text or symbols)
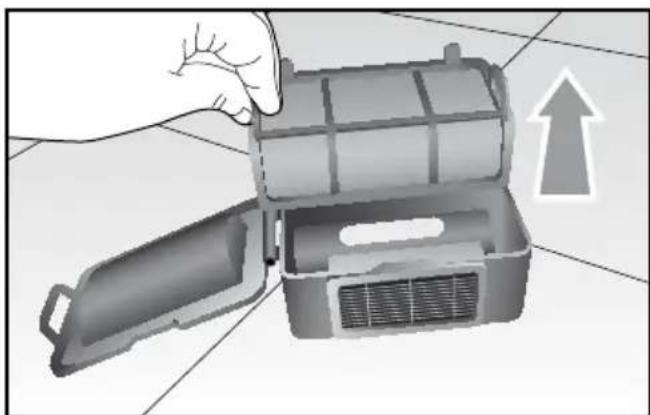
- Open the container using the special tab on the side and remove the main filter (J); clean it with the special brush (C) provided and if necessary, wash it.
natural_image
Hand placing a component into a vacuum cleaner's air gap (no text or symbols visible)
EN
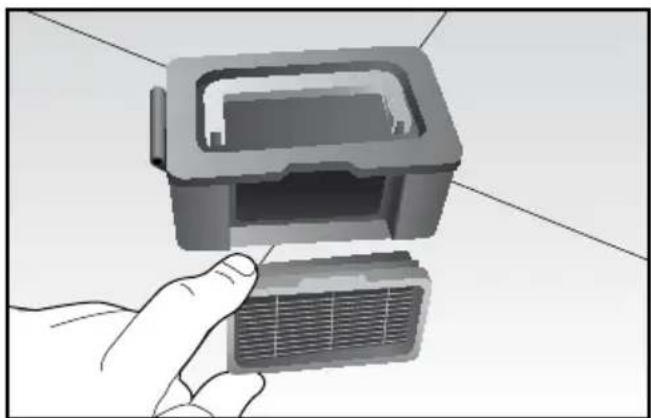
- Remove the HEPA filter using the special tab and clean it with the brush.
natural_image
Illustration of a hand holding a rectangular electronic component with a grid-like base (no text or symbols visible)

Important!
Wash the HEPA filter every 15-30 days and replace it every 6 months.
- Empty the container and clean it with the brush and/or wash it.
- Dry all the parts and then re-fit them, taking care to insert the Hepa filter in its special housing.

Important!
Always make sure that items or dirt build-up has not blocked the suction openings and remove gently, if necessary, using a soft, dry cloth to prevent the SPOT function from being activated continually.
SENSOR CLEANING
- Clean the Robot with a soft dry cloth, being particularly gentle over the sensor beam (E) and contact points for the charging base.
- Make sure that the wheels or their housing are not blocked by dirt.
TROUBLESHOOTING
| Code on display (1) | Cause Solution | |
| E01 Left wheel not working. Check the left wheel. | |
| E02 Right wheel not working. Check the right wheel. | |
| E04 The appliance body is raised. Reposition the Robot on the floor. | |
| E05 | Defect in sensor beam for low obstacles (T). | Clean the sensors and if the problem persists, send for repairs. |
| E06 | Defect in sensor beam for high obstacles (E). | Check the sensitivity of the sensor beam and that there are no foreign objects. |
| E07 Left brush not working. Check the left brush. | |
| E08 Right brush not working. Right the left brush. | |
| E09 Appliance body blocked. Move the Robot and restart. | |
| E10 The appliance body is set to charge with the switch (Q) on OFF. | Move the switch (Q) to ON. |
| E11 Product malfunction. Switch off the appliance and contact an authorised assistance centre. | |
| E12 Product malfunction. Switch off the appliance and contact an authorised assistance centre. | |
| E13 Product malfunction. Switch off the appliance and contact an authorised assistance centre. | |
| E14 No battery or Robot off. Make sure the batteries have been inserted or that the on button is set to ON. | |
| Icon (2) and dust container full or suction opening blocked. | Clean the dust container and suction opening. |
Note: if errors persist, reset the Robot from the switch (Q) in the bottom. If this does not work, contact an authorised assistance centre.
CHARACTERISTICS
| Classification Item Detail | |
| Mechanical specifications | Diameter 340 mm | |
| Height 90 mm | |
| Weight 3,0 Kg | |
| Electrical specifications | Power voltage 14,4 V | |
| Battery specifications Ni-MH | 2000 mAH |
| Cleaning specifications | Dust container capacity 0,5 l | |
| Charge type Automatic / Manual charge | |
| Cleaning mode Automatic, Turbo, Perimeter, Daily schedule | |
| Charge time About 3,5 hours | |
| Cleaning time 90 min at maximum | |
| Main body button type Touch screen | |
Cher Client,
natural_image
3D rendering of a circular robotic device connected to a wall-mounted electrical outlet (no text or symbols visible)

Attention!
natural_image
3D rendering of a robotic vacuum cleaner on tiled floor with wall-mounted electrical outlet (no text or symbols)
c) Auto-recharge:

Attention!

Attention!
natural_image
Two-step diagram showing hands using a tool to adjust or install a component, with no visible text or symbols.
NETTOYAGE DU RECIPIENT A POUSSIERE DE PREFERENCE APRES CHAQUE UTILISATION
natural_image
Hand pressing a button on a robotic vacuum cleaner's surface, with a downward arrow indicating action (no text or symbols present)
natural_image
Illustration of a hand pressing down on a robotic vacuum cleaner's base, with an upward arrow indicating motion (no text or symbols present)
natural_image
Illustration of a hand opening a small internal air conditioner unit with an upward arrow indicating motion (no text or symbols)
FR
natural_image
Illustration of a hand holding a device with a rectangular component inserted (no text or symbols visible)

Attention!
GEFAHR DURCH ANDERE URSACHEN
natural_image
3D rendering of a circular robotic device connected to a wall-mounted electrical outlet (no text or symbols visible)

Achtung!
natural_image
3D rendering of a robotic vacuum cleaner on tiled floor with wall-mounted electrical outlet (no text or symbols)

Achtung!

Achtung!
natural_image
Illustration showing two-step robotic manipulation process: hand tool pressing into gear, then presser holding a device (no text or symbols)
ENTLEEREN DES STAUBBEHÄLTERS MÖGLICHST NACH JEDEM GEBRAUCH
natural_image
Hand pressing down on a robotic vacuum cleaner's surface, no text or symbols visible
natural_image
Hand placing a component into a vacuum cleaner's air gap (no text or symbols visible)
DE
natural_image
Illustration of a hand opening a portable electronic device with an upward arrow indicating action (no text or symbols present)
natural_image
Illustration of a hand holding a small mechanical component with a grid-like structure inside (no text or symbols)

Achtung!