
Cordless 2 in 1 2770 - Vacuum Cleaner ARIETE - Free user manual and instructions
Find the device manual for free Cordless 2 in 1 2770 ARIETE in PDF.


| Product type | Cordless stick vacuum 2 in 1 |
| Brand | Ariete |
| Model | Cordless 2 in 1 2770 |
| Dimensions (H x W x D) | 110 x 25 x 15 cm |
| Weight | 2.5 kg |
| Power supply | Rechargeable lithium-ion battery 22.2 V, 2200 mAh |
| Battery life | Approximately 30 minutes |
| Charging time | Approximately 4 to 5 hours |
| Battery type | Removable lithium-ion |
| Dust container capacity | 0.5 L |
| Filtration | Washable HEPA filter |
| Main features | Powerful suction, motorized brush, 2-in-1 converter (stick and handheld vacuum), LED battery indicator, automatic shut-off |
| Noise level | Approximately 75 dB (A) |
| Maintenance and cleaning | Water-washable filter, removable and cleanable container, detachable brush |
| Safety | Double insulation, automatic shut-off in case of overheating, battery lock |
| Spare parts and repairability | Battery, filter, brush, container available as spare parts |
| Included accessories | Crevice tool, wide brush, wall mount |
| Warranty | 2 years |
Frequently Asked Questions - Cordless 2 in 1 2770 ARIETE
Make sure to use an original battery.
User questions about Cordless 2 in 1 2770 ARIETE
0 question about this device. Answer the ones you know or ask your own.
Ask a new question about this device
Download the instructions for your Vacuum Cleaner in PDF format for free! Find your manual Cordless 2 in 1 2770 - ARIETE and take your electronic device back in hand. On this page are published all the documents necessary for the use of your device. Cordless 2 in 1 2770 by ARIETE.
USER MANUAL Cordless 2 in 1 2770 ARIETE
Fig. 1
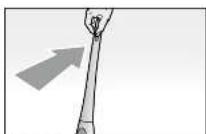
Fig. 6 Fig. 7


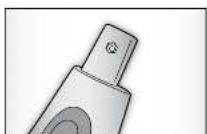
Fig. 2 Fig. 3
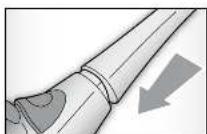


Fig. 10 Fig. 11
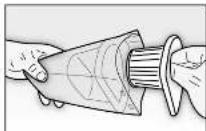


Fig. 4 Fig. 5 Fig. 12 Fig. 13

The Ground Truth image displays a single, solid horizontal line. According to Rule 2 (UNDERSCORE & LINE RULES), this is a stylistic or background line, not a placeholder underscore. Therefore, the OCR result must ignore it and output nothing or only meaningful text. The provided OCR content is "____", which consists of four underscores. This is an incorrect interpretation of the line as a placeholder, violating the rule that stylistic lines must be ignored. The OCR has hallucinated underscores where none should exist based on the GT's visual context. Hence, the OCR result is inconsistent with the Ground Truth.
(No text)


natural_image
Illustration of a hand pressing down on a mechanical device (no text or symbols visible)
natural_image
Technical illustration of a mechanical device with no visible text or symbolsFig. 14 Fig. 15

natural_image
Illustration of a hand using a screwdriver to press down an electronic device (no text or symbols visible)
natural_image
Illustration of a hand using a handheld device to press or install a component, with an upward arrow indicating action (no text or symbols present)Fig. 16
AVVERTENZE IMPORTANTI
LEGGERE QUESTE ISTRUZIONI PRIMA DELL'USO.
The necessary precautions must be taken when using electrical appliances, and these include the following:
1 Never place the appliance on or close to sources of heat.
2 Never use the appliance in proximity to people or lift to eye level, ear level, etc... as there is a serious risk of accident.
3 Never leave the appliance exposed to the elements (rain, sun, etc....).
4 Make sure that the power cord does not come into contact with hot surfaces.
5 This appliance is not intended for use by persons (including children) with reduced physical, sensory or mental capabilities, or lack of experience and knowledge, unless they have been given supervision or instruction concerning use of the appliance by a person responsible for their safety.
6 Children should be supervised to ensure that they do not play with the appliance.
7 Never insert any items in the openings of the appliance and do not allow items to obstruct air flow.
8 Keep openings free from dust, fluff, hair, etc.
9 Never use the appliance without the filter.
10 Do not use to clean up hot items or any items that are giving off smoke or which are burning, such as cigarettes, matches or hot ash.
11 Never pick up flammable or combustible materials (volatile fluids, petrol, kerosene, etc.) or use where there are large amounts of water.
12 Never use the appliance in closed environments or where there might be fumes from oil-based paints and varnishes or solvents, waterproofing treatments, flammable powders or other toxic or explosive fumes.
13 Never pick up toxic materials (bleach, ammonia, drain cleaners, petrol, etc.).
14 NEVER PLACE THE APPLIANCE BODY, PLUG OR POWER CORD IN WATER OR OTHER LIQUIDS; ALWAYS WIPE CLEAN WITH A DAMP CLOTH.
15 SWITCH OFF THE APPLIANCE AFTER USE AND BEFORE FITTING OR REMOVING SINGLE PARTS AND BEFORE CLEANING.
16 Before plugging the charger into the mains power, make sure that the voltage on the rating plate corresponds to the voltage of the mains system.
17 UNPLUG THE CHARGER WHILE THE APPLIANCE IS IN USE.
18 This appliance operates using NiMH rechargeable batteries and therefore, at the end of its useful life, do not dispose of it in general household waste. Take it to a special municipal recycling facility or to retailers offering this type of service. Separate disposal of a household appliance makes it possible to prevent potentially negative effects on health and the environment as well as to recover the material of which the appliance is made in order to achieve significant savings in terms of energy and resources. The product is marked with a crossed out wheeled bin symbol to show that it needs to be disposed of separately. Never throw batteries into fire..
19 For the best performance, never charge a battery if its temperature or the environment temperature is below 5irc C ( 40irc F) or above 40irc C ( 105irc F).
20 If any fluid should leak from the battery, do not use the appliance; take it to your nearest Assistance Centre to have the battery replaced.
21 Always make sure that your hands are thoroughly dry before using or adjusting the switches on the appliance, or before touching the power plug or power connections.
22 To unplug the appliance, grip the plug and remove it directly from the power socket. Never pull the power cord to unplug the appliance.
23 Never use the appliance if the power cord or plug are damaged or if the appliance itself is faulty; in this case, take it to your nearest Authorised Assistance Centre.
24 To prevent any risks, if the power cord is damaged, it must be replaced by the manufacturer, its Technical Assistance Service or a similarly qualified person.
25 This appliance is designed for HOME USE ONLY and may not be used for commercial or industrial purposes.
26 This appliance conforms to the 2006/95/EC and EMC 2004/108/EC directives.
27 Any changes to this product that have not been expressly authorised by the manufacturer may lead to the user's guarantee being rendered null and void.
28 In the event that you decide to dispose of the appliance, we advise you to make it inoperative by cutting off the power cord. We also recommend that any parts that could be dangerous be rendered harmless, especially for children, who may play with the appliance or its parts.
29 Packaging must never be left within the reach of children since it is potentially dangerous.
DO NOT THROW AWAY THESE INSTRUCTIONS
DESCRIPTION OF THE APPLIANCE (Fig. 1)
| A Dust container | N Screw |
| B Filter support | O Release button |
| C Filter | P Recharge indicator light |
| D Release button | Q Charger power socket |
| E Flat battery indicator light | R Battery charger |
| F ON/OFF button | S Appliance body |
| G Handgrip | T Floor brush |
| H Power base | U Vacuum cleaner for dirt and small amounts of water |
| I Nut | |
| L ON/OFF button | V Round brush |
| M Upper handle | Z Crevice nozzle |
The characteristic of this Stick Cleaner is that it can be used in standard mode, just with the floor brush (T), angling the body of the appliance back into the typical user position or by removing the handheld section, which can be used with the cleaner for small amounts of water (U), the round brush (V) or the crevice nozzle (Z) for easier use in restricted spaces.
ASSEMBLY OF THE APPLIANCE
Before using the appliance it is necessary to assemble the upper handle (M) to the body of the appliance (S) by operating as follows:
- Insert the nut supplied (1) into the appropriate housing at the top of the appliance's body (S) (Fig. 2).
- Assemble the upper handle (M) to the appliance's body (S) pressing it home until it stops (Fig. 3).
- Insert the screw supplied (N) into the appropriate hole in the handle (M) and solidly block the handle by using a screwdriver (Fig. 4).
ATTENTION: Be careful when using the screwdriver so as not injure yourself.
ATTENTION: Before utilising the appliance, make sure that the appliance has been correctly assembled.
BATTERY CHARGING
IMPORTANT: Always charge the battery fully before using the Stick Cleaner.
IMPORTANT: Charge the battery for at least 24 hours to activate it before using the appliance for the first time; after this time, a full charge will take 16 hours.
IMPORTANT: It is normal for the appliance to become hot while charging.
IMPORTANT: Never use the appliance while it is charging.
- Once the appliance is assembled, plug the charger (R) into the power mains and insert the lead into the relevant socket (Q) on the appliance body (S).
The warning light (P) lights up to indicate that the appliance is recharging. After 16 hours the recharge will be complete and the broom is then ready for use.
IMPORTANT: We recommend using up all of the battery power before charging again.
ATTACHMENTS
Floor brush (T)
Ideal for cleaning any type of surface.
Fit the brush into the appliance body (S), pressing it gently until it clicks into place. To remove the brush, just press the release button on the back of the brush itself and pull the brush outwards (Fig. 5).
Vacuum Cleaner (U) (For Handheld Cleaner only)
This is used to clean up large-sized pieces of dirt and small amounts of water.
Round brush (V) (For Handheld Cleaner only)
Suitable for cleaning sofas and fabrics.
Crevice nozzle (Z) (For Handheld Cleaner only)
Ideal for cleaning in corners, crevices and areas that are hard to reach.
INSTRUCTIONS FOR USE
IMPORTANT: SWITCH OFF THE APPLIANCE AFTER USE AND BEFORE FITTING OR REMOVING SINGLE PARTS AND BEFORE CLEANING.
IMPORTANT: UNPLUG THE CHARGER WHILE THE APPLIANCE IS IN USE.
- Once the battery has been recharged, make sure that the handheld cleaner is correctly fitted into the appliance body (S), press the ON/OFF button (L) and move the handle back (M) into the typical position for use (Fig. 6).
- Clean large surfaces by pushing the brush (T) forwards.
This allows the vacuum cleaner to pick up fragments and dirt from the floor. - To clean small surfaces and in corners, turn the stick cleaner in the opposite direction to move the dirt and fragments so that they can be picked up.
IMPORTANT: switch off the stick cleaner immediately should anything become entangled inside the brush, such as a piece of fabric, the fringe on a rug, etc. - After cleaning, switch off the stick cleaner by pressing the ON/OFF button (L) again.
Handheld Cleaner
IMPORTANT: SWITCH OFF THE APPLIANCE AFTER USE AND BEFORE FITTING OR REMOVING SINGLE PARTS AND BEFORE CLEANING.
- Holding the handle (M) of the appliance body (S) firmly, press the release button (O) and remove the handheld cleaner (Fig. 7).
- Fit the required attachment to the end of the dust container (A), press the ON/OFF button (F) to start the handheld cleaner, holding it by the special handgrip (G) (Fig. 8).
The relevant indicator (E) switches on when the battery is running down and it stays lit until the battery is completely flat.
Refit the handheld cleaner into the appliance body (S) and recharge the appliance as described previously.
- To refit the handheld cleaner into the appliance body (S), first remove the attachment fitted to the cleaner by pulling it outwards, then place the end of the dust container (A) in the bottom of the special housing in the appliance body (S) carefully pushing the handheld cleaner back until you hear it click into place (Fig. 9).
IMPORTANT: Make sure that the handheld cleaner has been correctly fitted before using the appliance in the standard way or recharging the battery.
CLEANING
IMPORTANT: NEVER PLACE THE APPLIANCE BODY, PLUG OR POWER CORD IN WATER OR OTHER LIQUIDS; ALWAYS WIPE CLEAN WITH A DAMP CLOTH.
IMPORTANT: SWITCH OFF THE APPLIANCE AFTER USE AND BEFORE FITTING OR REMOVING SINGLE PARTS AND BEFORE CLEANING.
- Only clean the power base (H) and appliance (S) with a damp cloth and some mild detergent, if needed. When cleaning the appliance, make sure that no type of liquid enters the cleaner.
Never use heavy-duty cleaning agents (stain removers or solvents) as they could corrode the plastic.
How to empty the dust container (A)
IMPORTANT: Clean the dust container (A) and filter (C) in good time; suction power will be reduced if the container is full or the filter is clogged.
- Remove the handheld cleaner, as described previously.
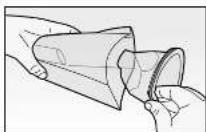
- Press the release button (D) and pull out the whole container (Fig. 10).
- Pull out the filter (C) (Fig. 11) and the relevant filter support (B) (Fig. 12) and clean them.
IMPORTANT: Only wash the filter (C) in clean water, without using soap or detergent.
- Empty the dust out from the container (A) and into a plastic bag; if necessary, rinse out the container.
- Dry all parts and then refit them.
IMPORTANT: Correctly fit the support (B), filter (C), and dust container (A) before switching on the appliance.
- Fit the whole container to the power base (H), pushing it down until it clicks into place (Fig. 13).
How to clean the floor brush (T)
IMPORTANT: Only clean the floor brush (T) after removing it from the appliance.
- Push the release lever forwards and remove the plastic cover (Fig. 14).
- Take out the rotating brush (Fig. 15) and then clean it and refit it correctly.
- Fit the plastic cover in place, pushing back the special lever (Fig. 16).
TROUBLESHOOTING
| Problem Possible reason | Solution | |
| The motor is not working Flat | battery Recharge the battery | |
| Suction power becomes weak | The dust container is full or the filter is blocked | Empty the dust container and clean the filter |
| The charge indicator light doesn’t work | Power supply disconnected | Plug back in firmly |
| Charger plug not firmly inserted | ||
| There is dust between the motor electrode and the base | Clean off the dust | |
| The battery use time is shorter and shorter | If the battery is fully charged within 16 hours | If the battery can only work for 1-2 minutes after a full 16-hour charge, it may be flat and simply needs replacing with a new one. |
INSTRUCTIONS IMPORTANTES
LIRE CES INSTRUCTIONS AVANT L'EMPLOI
PROBLEMAS E SOLUÇÕES
BESCHRIJVING VAN HET APPARAAT (Fig. 1)

- AVVERTENZE IMPORTANTI
- LEGGERE QUESTE ISTRUZIONI PRIMA DELL'USO.
- DO NOT THROW AWAY THESE INSTRUCTIONS
- ASSEMBLY OF THE APPLIANCE
- BATTERY CHARGING
- ATTACHMENTS
- Floor brush (T)
- Vacuum Cleaner (U) (For Handheld Cleaner only)
- Round brush (V) (For Handheld Cleaner only)
- Crevice nozzle (Z) (For Handheld Cleaner only)
- INSTRUCTIONS FOR USE
- Handheld Cleaner
- CLEANING
- How to empty the dust container (A)
- How to clean the floor brush (T)
- INSTRUCTIONS IMPORTANTES
- LIRE CES INSTRUCTIONS AVANT L'EMPLOI
Brand : ARIETE
Model : Cordless 2 in 1 2770
Category : Vacuum Cleaner