
FCWR - Wireless remote OLYMPUS - Free user manual and instructions
Find the device manual for free FCWR OLYMPUS in PDF.
| Product type | Wireless radio trigger |
| Brand | Olympus |
| Model | FC-WR |
| Maximum communication distance | Approx. 30 m |
| Frequency | 2.4 GHz band |
| Number of channels | 15 (with automatic setting) |
| Number of groups | 3 |
| Flash control modes | TTL, Manual, FP TTL, FP Manual, Off |
| Flash compensation | ±5 EV (1/3 or 1/2 EV increments) |
| Manual intensity adjustment | 1/1 to 1/128 (1/3 or 1/2 EV increments) |
| Power supply | 2 AAA batteries (alkaline or NiMH) |
| Estimated battery life | Approx. 6.4 h (alkaline batteries) |
| Dimensions (L x H x D) | 59.5 x 51.0 x 67.4 mm |
| Weight (without batteries) | 73 g |
| Splash-proof protection | IPX1 |
| Operating temperature | -10 to 40 °C |
| Operating humidity | 30 to 90% |
| Mounting | Accessory shoe |
| Display | Backlit control screen |
| Sleep function | Automatic after 60 min |
| Included accessories | Pouch, instructions, warranty card |
| Care and cleaning | Wipe contacts, avoid humidity |
| Safety | Do not use near flammable gases, avoid disassembly |
Frequently Asked Questions - FCWR OLYMPUS
User questions about FCWR OLYMPUS
0 question about this device. Answer the ones you know or ask your own.
Ask a new question about this device
Download the instructions for your Wireless remote in PDF format for free! Find your manual FCWR - OLYMPUS and take your electronic device back in hand. On this page are published all the documents necessary for the use of your device. FCWR by OLYMPUS.
USER MANUAL FCWR OLYMPUS
Thank you for purchasing this Olympus product.
To ensure your safety, please read this instruction manual carefully before use.
In addition, please keep the manual handy for future reference.
Be sure to read the instruction manuals for the flash and the wireless receiver as well.
If you use the product outside the country or region of purchase, you may violate local regulations. Olympus accepts no liability in this case.
Checking the Contents of the Package
- Wireless radiowave commander: FC-WR
- Pouch
- Instructions (This manual)
Warranty card
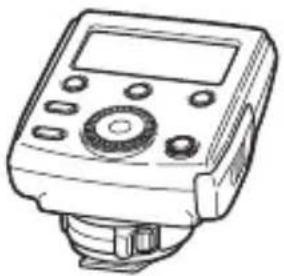
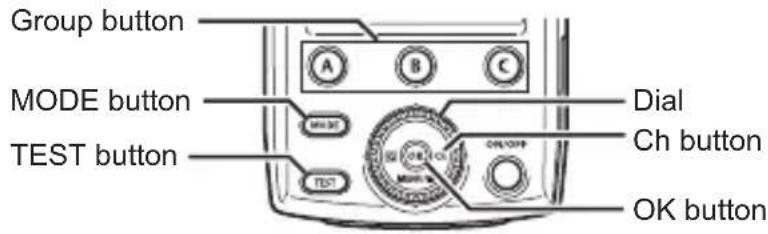
Names of Parts
① Group buttons (A/B/C) P. 24
② MODE button P. 25
③ TEST button P.24
④ Control panel .P.19
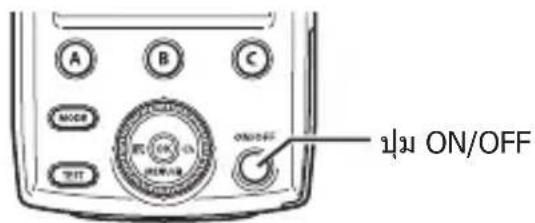
⑤ ON/OFF button P. 22
⑥ Battery compartment cover .P. 20
⑦ OK button .P.24
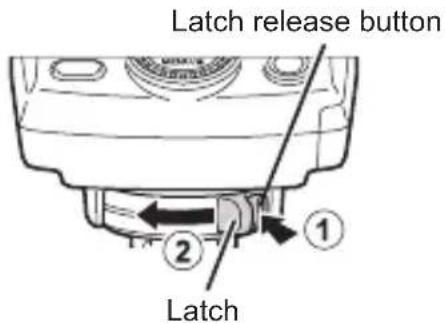
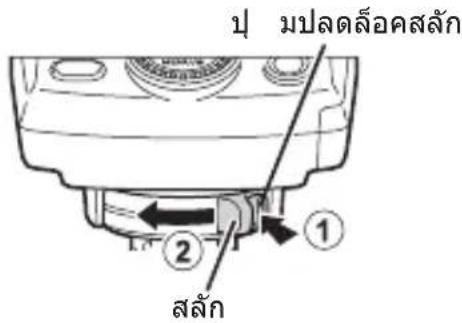
⑧ Latch release button P. 21
⑨ Latch P.21
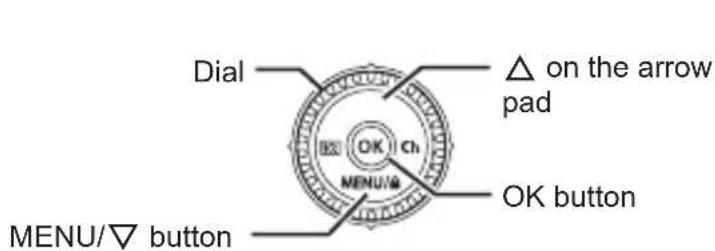
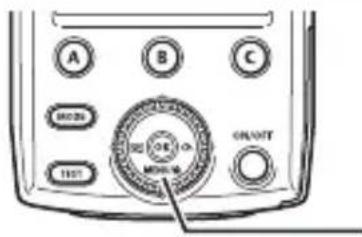
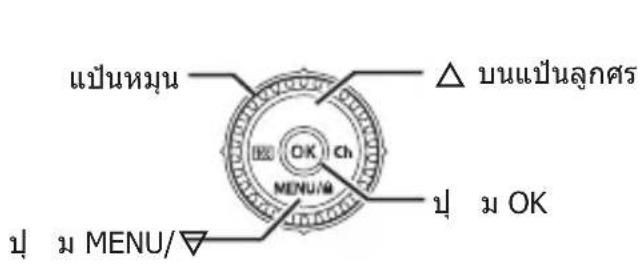
Dial/Arrow pad
⑩ Dial P.24,27
⑪ (flash compensation/flash intensity)/ button P.25,26
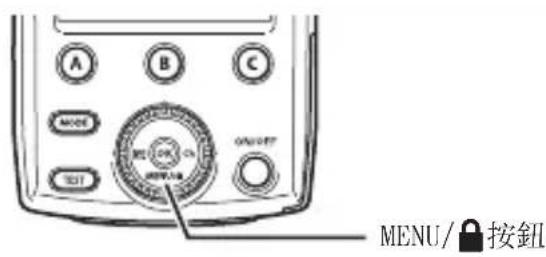
12 MENU/ (key locking)/ button
13 button
14 Ch (communication channel)/ button P.24
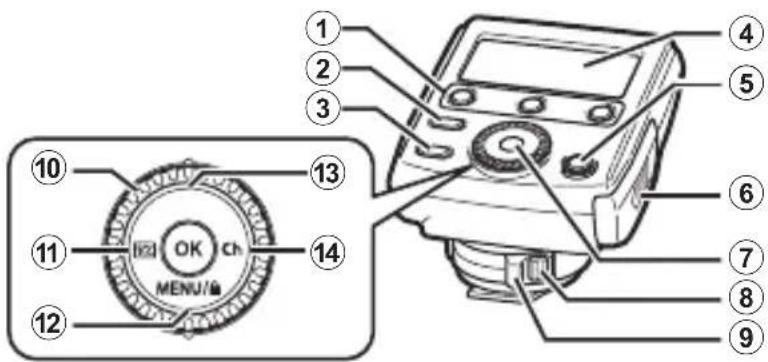
Display (control panel)
① MODE (flash control mode)
2+/- (fl ash compensation)/ RATIO (fl ash intensity)
③ FP (Super FP) flash
CH (communication channel)
⑤ RATIO (flash intensity)
⑥ Group A setting
⑦ Group B setting
⑧ Group C setting
(9) A (key lock mode)
Preparing the Commander
Inserting the batteries (solo
Batteries to use
Choose from the following batteries.
- AAA NiMH batteries (x 2)
- AAA alkaline dry-cell batteries (x 2)
A manganese batteries are not usable.
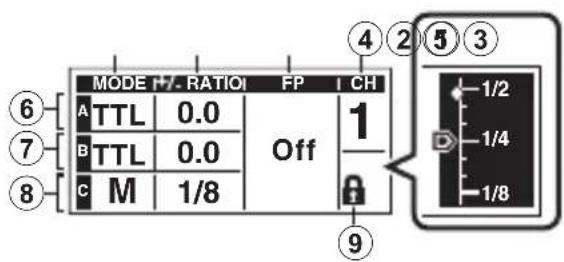
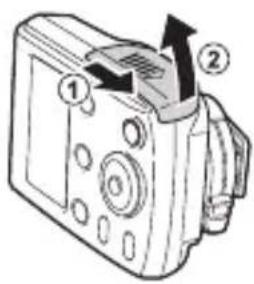
Inserting the batteries
1 Open the battery compartment cover.

2 Insert the batteries. -Make sure that the polarity ( /) is correct.
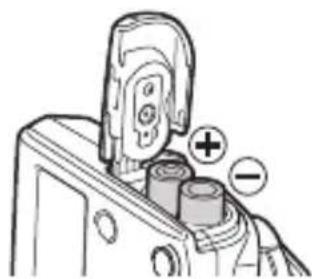
3 Close the battery compartment cover.
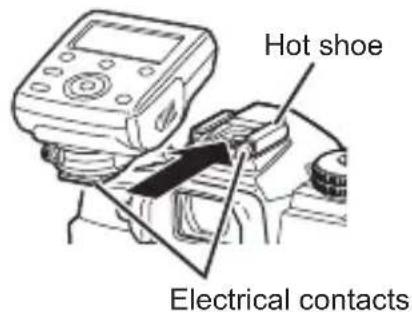
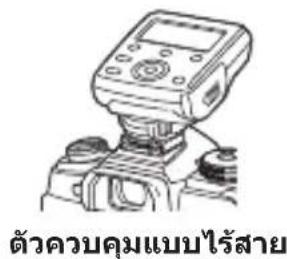
take sure that both the commander and the camera are turned off.
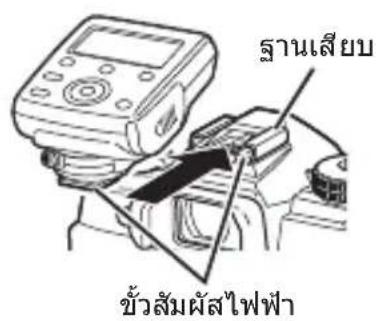
Or moisture on the electrical contacts may cause a malfunction. Wipe off any dirt or moisture before you attach the commander to the camera.
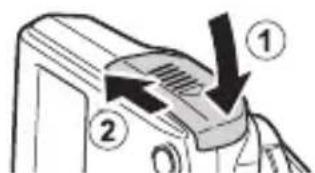
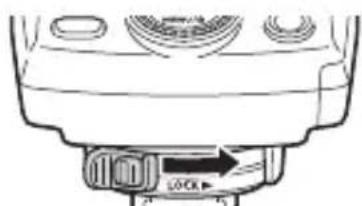
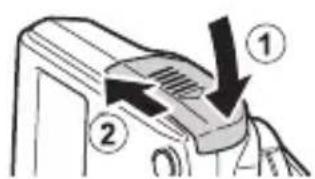
1 Hold down the latch release button (1), and slide the latch in the direction of the arrow (2).
2 Insert the commander all the way into the hot shoe.
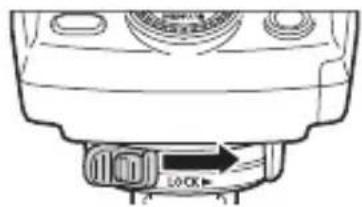
3 Slide the latch in the direction of the arrow.
Removing the commander
Perform Step 1 of the above procedure and remove the commander from the hot shoe.
Turning on the Power
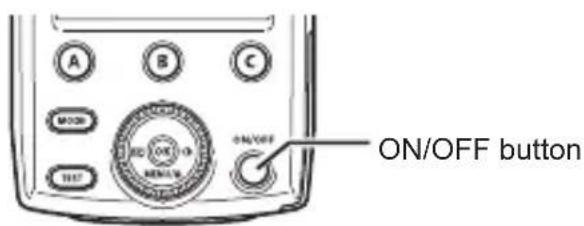
1 Press the ON/OFF button.
The mark appears in the center of the control panel, the batteries are running very low. Replace the batteries as soon as possible.
Turning off the power
Press the ON/OFF button.
Sleep mode/Automatic power off
- With some cameras, the commander will automatically enter the sleep mode when the camera enters the sleep mode.
- If approximately 60 minutes elapse with no operations, the power will turn off automatically. Press the ON/OFF button when you want to use the commander again.
Radio Wireless Shooting
You can use this wireless commander to control multiple receivers through radio communications. This function only works with Olympus products that support the radio wireless function.
Refer to the Olympus website for information on products that support the radio wireless function.
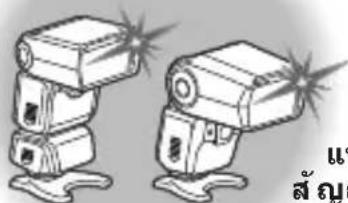
Group control
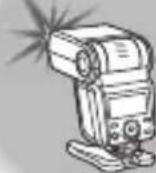
You can control up to three groups of receivers. Within each group, the flashes will fire with the same settings. This function allows you to shoot with a variety of lighting effects.
Group B
(sold separately)
Wireless receiver (sold separately)
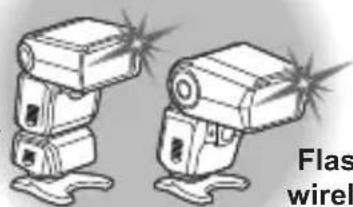
Flash with radio wireless function (sold separately)
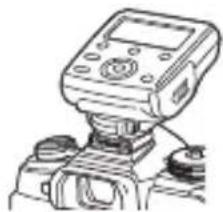
Wireless commander
Group A
Flash with radio wireless function sold separately
Group C
Flash with radio wireless function sold separately)
Communication distance
The maximum distance for radio wireless communications with this wireless commander is approx. 30 meters (98.4 ft.) (under Olympus measurement conditions).
- This distance assumes that there are no obstacles, shielding materials, or radio interference from other devices.
- The communication distance may be shorter depending on the positions of the devices, the surrounding environment, weather conditions, and other factors.
Frequency
This product uses the 2.4 GHz band for wireless communications. However, other wireless devices may use the same frequency.
Setup
1 Set a flash mode on the camera.
Refer to the camera manual for details.
2 Press the group button to select a communication group.
3 Select a flash control mode and adjust the settings.
- For details, refer to the explanations of the flash control modes (P. 25 to 26).
you do not want to use this communication group, select "Off."
4 Press the Ch button to highlight CH. Then, turn the dial to select a communication channel. Press the OK button to confirm.
- You can select SCAN* or a channel from 1 to 15.
- Select this setting when the communication conditions are poor due to interference from other devices. When an unused channel appears automatically, press the OK button again to confirm.
5 Match the receiver channel to the commander channel.
6 Set the group on the receiver.
7 Press the TEST button to check the flash.
Shooting with Automatic Flash Control (TTL Mode)
The TTL mode adjusts the flash level according to the brightness through the camera lens. You can use this mode with cameras that support the Olympus TTL mode. Refer to the Olympus website for a list of compatible cameras.
1 Press the MODE button. Then, turn the dial to select TTL. Press the OK button to confirm.
2 Set the flash compensation (+ / - )
Press the button to highlight +/- RATIO. Then, turn the dial to adjust the setting.
- You can set a flash compensation from -5 to +5.
Press the OK button.
Manually Setting the Flash Intensity (M Mode)
The flash will fire at the selected intensity. You can use this mode with cameras that do not support the Olympus communication feature.
1 Press the MODE button. Then, turn the dial to select M. Press the OK button to confirm.
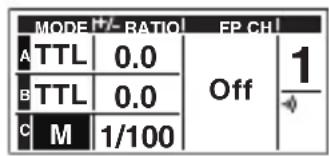
2 Set the flash intensity (RATIO).
Press the button to highlight RATIO. Then, turn the dial to adjust the setting.
- You can set a flash ratio from 1/1 to 1/128.*
1 You can select 1/2 EV or 1/3 EV for the adjustment increment. (P. 28)
2 On the scale display, is the current selection. is the previous setting.
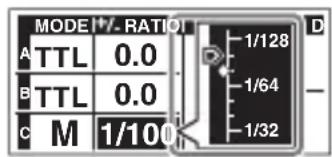
Scale display*2
Press the OK button.
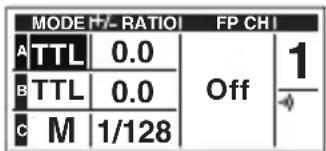
Firing the Flash at a High Shutter Speed (FP TTL Mode / FP M Mode)
You can shoot with the flash at shutter speeds faster than the flash sync speed. These modes are useful when you want to shoot a portrait with a blurry background by widening the aperture, or when you want to use a high shutter speed to reduce blown-out highlights in the background. The guide number is lower than in the regular TTL mode or M mode.
1 Press the MODE button. Then, turn the dial to select TTL or M. Press the OK button to confirm.
2 Press on the arrow pad to highlight FP. Then, turn the dial to select "On."
3 Adjust the settings.
| MODE/+/- RATIO! FP CH! | ||
| A FP TTL | 0.0 | 1 |
| B FP TTL | 0.0 | |
| C FP M | 1/128 | |
Setting the flash compensation (+/-) in the FP TTL mode
Press the button to highlight +/- RATIO. Then, turn the dial to adjust the setting.
- You can set a flash compensation from -5 to +5.
Press the OK button.
Setting the flash intensity (RATIO) in the FP M mode
Press the 52 button to highlight + / - RATIO. Then, turn the dial to adjust the setting.
- You can set a flash ratio from 1/1 to 1/128.*
1 You can select 1/2 EV or 1/3 EV for the adjustment increment. (P. 28)
2 On the scale display, is the current selection. is the previous setting.
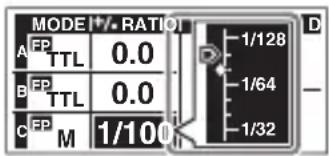
Scale display*2
Press the OK button.

MENU/ button
Preventing accidental operation (key lock mode)
You can prevent accidental operation of the buttons and dial during shooting.
1 Hold down the MENU/ button until appears on the control panel.
- To cancel the mode, hold down the MENU/ button until disappears from the control panel.
| MODEH/-RATIO1 | FP CH1 | ||
| A | TTL | 0.0 | Off |
| B | TTL | 0.0 | |
| C | M | 1/8 | |
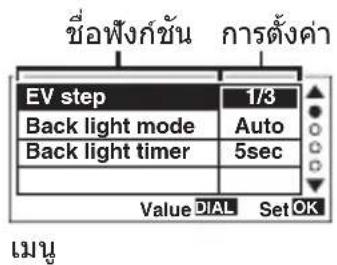
Settings on the MENU Screen
You can configure various functions to make the wireless commander easier to use.
Setup procedure
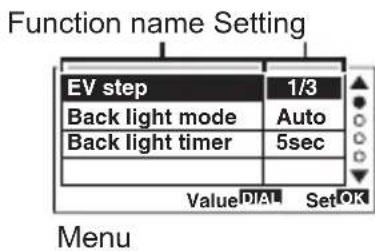
1 Press the MENU button.
2 Press the on the arrow pad and select a function name.
3 Turn the dial to select a setting, and press the OK button to confirm.
indicates the default setting.
EV step: You can change the adjustment increment for 23 + 14 (flash compensation/fl ash intensity).
1/3 / 1/2
Back light mode: You can set the back light of the control panel.
Auto (The back light turns on during operation.) /
On (The back light is always on.) / Off (The back light is always off.)
Back light timer: You can set when to turn off the back light of the control panel.
You can select the time (in seconds) until the back light turns off automatically when there is no operation.
From 1sec to 5sec to 15sec
Safety Precautions
Read WARNINGS and CAUTIONS thoroughly to ensure safe usage. These safety precautions protect the users and others and prevent property damage.

WARNING
Failure to observe the precautions indicated by this symbol may result in injury or death.
- Do not use flash in places where it may be exposed to flammable or explosive gas. Otherwise, fire ignition or explosion may result.
- Do not directly solder the product or modify, remodel, or disassemble.
- Do not cover the light emitting area of the flash with your hand, and do not touch the light emitting area after continuous firing. It may burn your skin.
- Water and foreign matter inside of the device may cause fire or electric shock. If the device is immersed in or exposed to water or foreign matter is found inside of the device, turn off the power immediately and remove batteries with care. Contact your dealer or consult an Olympus Authorized Service Station.
- To prevent a traffic accident, do not direct the flash at a person operating a motor vehicle.
- Do not use the flash or AF illuminator in close proximity to others (especially infants). Keep the flash out of reach of children. Light from the flash can cause visual impairment.
-
To prevent a short circuit, do not use batteries with a damaged external seal (insulation coating).
-
Do not mix old and new batteries, or batteries made by different manufacturers.
- Do not connect substances such as metal to the (+) or (-) of batteries.

CAUTION
Failure to observe the precautions indicated by this symbol may result in injury or property damage.
- If you notice any abnormalities such as odor, noise, or smoke, stop using this device. Otherwise a fire or burn may result. Remove the batteries carefully to avoid burning yourself, and contact your dealer or consult an Olympus Authorized Service Station.
- There is a risk of explosion if the battery is replaced with the incorrect battery type.
- Do not operate with wet hands. This may cause malfunction or electric shock.
- Do not use or store batteries in areas exposed to extremely high temperatures, such as in direct sunlight, in an enclosed vehicle on a sunny day, or near a heater.
- Continuous repeated firing could lead to adverse health effects.
- Dirt or water on the contacts can cause malfunction. Remove dirt, water, and other foreign matter before attaching the unit to the camera.
Using the radio wireless function
- When you use the radio wireless communication function, comply with all local laws and regulations.
- If you use the product outside the region of purchase, you may violate local regulations for radio waves. Olympus accepts no liability in this case.
- Turn off the product in hospitals and other locations where medical equipment is present.
The radio waves from the product may adversely affect medical equipment, causing a malfunction that results in an accident.
- Turn off the product when onboard aircraft.
Using wireless devices onboard may hinder safe operation of the aircraft.
FCC Caution
Changes or modifications not expressly approved by the party responsible for compliance could void the user's authority to operate the equipment.
This equipment must not be co-located or operated in conjunction with any other antenna or equipment except Olympus wireless equipment whose RF exposure was evaluated for this equipment. For the latest information, please visit the Olympus website.
Website: https://cs.olympus-imaging.jp/en/support/imsg/digicamera/download/ notice/rfsimullist.cfm
FCC Notice
This equipment has been tested and found to comply with the limits for a Class B digital device, pursuant to part 15 of the FCC Rules. These limits are designed to provide reasonable protection against harmful interference in a residential installation. This equipment generates, uses and can radiate radio frequency energy and, if not installed and used in accordance with the instructions, may cause harmful interference to radio communications. However, there is no guarantee that interference will not occur in a particular installation. If this equipment does cause harmful interference to radio or television reception, which can be determined by turning the equipment off and on, the user is encouraged to try to correct the interference by one or more of the following measures:
- Reorient or relocate the receiving antenna.
- Increase the separation between the equipment and receiver.
- Connect the equipment into an outlet on a circuit different from that to which the receiver is connected.
- Consult the dealer or an experienced radio/TV technician for help.
Declaration of Conformity
Model Number : IM012
Trade Name : OLYMPUS
Responsible Party : OLYMPUS AMERICA INC.
Address
3500 Corporate Parkway, P. O. Box 610, Cent
PA 18034-0610, USA
Telephone Number : 484-896-5000
Tested To Comply With FCC Standards
FOR HOME OR OFFICE USE
This device complies with part 15 of FCC Rules and Innovation, Science and Economic Development Canada's licence-exempt RSS(s). Operation is subject to the following two conditions: (1) this device may not cause harmful interference, and (2) this device must accept any interference received, including interference that may cause undesired operation.
This equipment complies with FCC/ISED radiation exposure limits set forth for an uncontrolled environment and meets the FCC radio frequency (RF) Exposure Guidelines and RSS-102 of the ISED radio frequency (RF) Exposure rules as this equipment has very low levels of RF energy.
Simple Declaration of Conformity
Hereby, OLYMPUS CORPORATION declares that the radio equipment type IM012 is in compliance with Directive 2014/53/EU.
The full text of the EU declaration of conformity is available at the following internet address:
http://www.olympus-europa.com/

This symbol [crossed-out wheeled bin WEEE Annex IV] indicates separate collection of waste electrical and electronic equipment in the EU countries.
Please do not throw the equipment into the domestic refuse.
Please use the return and collection systems available in your country for the disposal of this product.
| Radio wireless communication function | |
| Compatible standard | IEEE 802.15.4 2405 - 2480 MHz 3 mW or less |
| Firmware Version 1.0 or later | |
| Complies with IMDA Standards DB104634 |
Specifications
| Product type Wireless radiowave commander | |
| Maximum communication distance*1 | Approx. 30 m (98.4 ft.) |
| Frequency 2.4 GHz band | |
| Number of channels 15 | (in the commander mode; with automatic channel setting function) |
| Number of groups 3; maximum number of units: unlimited | |
| Flash control modes TTL / MANUAL / FP TTL / FP MANUAL / Off | |
| Flash compensation ±5 | EV (Increment: 1/3 EV or 1/2 EV) |
| Manual flash intensity adjustment | From 1/1 to 1/128 (Increment: 1/3 EV or 1/2 EV) |
| Operable duration*1 | Approx. 6.4 hours (when using AAA alkaline dry-cell batteries) |
| Power supply AAA alkaline dry-cell batteries x 2 / AAA NiMH batteries x 2 | |
| Splash-proof function (Type) | Class 1 (IPX1) |
| Operable temperature/humidity*2 | From -10 to 40°C (14 to 104°F) / From 30 to 90% |
| Storage warranty temperature/humidity | From -20 to 60°C (-4 to 140°F) / From 10 to 90% |
| Dimensions Approx. 59.5 (W) x 51.0 (H) x 67.4 (D) mm (2.3 x 2.0 x 2.7 in.) [excluding the projecting parts] | |
| Weight 73 g (2.6 oz.) [excluding the batteries] | |
Specific cations are subject to change without notice.
1 Values are based on Olympus testing conditions and may vary according to the shooting conditions. The values assume the use of new batteries or fully charged rechargeable batteries.
2 At low temperatures, warm the batteries before use. For example, place the batteries in your pocket.
Technical Support (U.S.A. / Canada)
24/7 online automated help: http://www.olympusamerica.com/support
Phone customer support: Tel.1-800-260-1625 (Toll-free)
Our phone customer support is available from 9 am to 9 pm (Monday to Friday) ET
E-Mail: distec@olympus.com
European Technical Customer Support
Please visit our homepage
http://www.olympus-europa.com
or call: Tel. 00800 - 67 10 83 00 (Toll-free)
+49 40 - 237 73 899 (Charged)
m = 311 ;
| MODE | RATIO |
| FP | 0.0 |
| TTL | |
| FP | 0.0 |
| TTL | |
| FP | 1/100 |
訛國 微斯普羅耶|*2
OK burtno nui.
MENU/ 账
写
| MODE +/- RATIOI | FP CHI | ||
| A FP TTL | 0.0 | On | 1 |
| B FP TTL | 0.0 | ||
| C FP M | 1/128 | ||
| MODEM +/- RATIO | |
| A FP TTL | 0.0 |
| B FP TTL | 0.0 |
| C FP M | 1/100 |
比例尺顯示*2
防止意外的操作(按鍵鎖定模式)
您可以防止拍攝時意外的操作按鈕和旋鈕。
- NiMH AAA (x 2)
AA (x 2)
AAA
nlaa
1
2
-

3 1
n
aannnnn nnnnnnnnnnnnnnnnnnnnnnnnnnnnnnnnnnnnnnnnnnnnnnnnnnnnnnnnnnnnnnnnn
nunnnnnaaennnnnnnnnnnnnnnnnnnnnnnnnnnnnnnnnnnnnnnnnnnnnnnnnnnnnnnnnnnnnnnnnnnnnnnnnnnnnnnnnnnnnnnnnnnnnnnnnnnnnnnnnnnn
1 nau uuaananaan ()n“y"uayaa
2
3
nnaa
vuaaunau 1 uavanrnnnnaaannnnaananaanana
n
1 nON/OFF
Onnauuunu 15nnnnaaannnnaaennn nnnnnae nnne uuuu
aunnsnntu
ON/OFF
nua/na
·lunna 1
- nunnnnnsnuuauanrnu 60 u anananaaannnnae
nnaanannnnnnaaennnnnne annnnnnnnnnnnnn
nunnnnnae nnnnnnne 15 nnnnnnne nnnnnnne nnnnnnne nnnnnnne nnnnnnne nnnnnnne nnnnnnne nnnnnnne nnnnnnne nnnnnnne nnnnnnne nnnnnnne nnnnnnne nnnnnnne nnnnnnne nnnnnnne nnnnnnne nnnnnnne nnnnnnne nnnnnnne nnnnnnnee nannnne nannnne nannnne nannnne nannnne nannnne nannnne nannnne nannnne nannnne nannnne nannnne nannnne nannnne nannnne nannnne nannnne nannnne nannnne nannnne nannnne nannnne nannnne nannnne nannnne nannnnee
Olympus 7777777777777777777777777777777
nnaaann
nannnnnnae nnnnnae nnnnnae nnnnnae nnnnnae nnnnnae nnnnnae nnnnnae nnnnnae nnnnnae nnnnnae nnnnnae nnnnnae nnnnnae nnnnnae nnnnnae nnnnnae nnnnnae nnnnnae nnnnnae nnnnnae
nauB
wau (uunnuu) +
Wauwnwnu u yunnunnnnnnnnnnnnnnnnnnnnnnnnnnnnnnnnnnnnnnnnnnnnnnnnnnnnnnnnnnnnnnnnnnnnnnnnnnnnnnnnnnnnnnnnnnnnnnnnnnnnnnnnnnnnnnnnnnnnnnnnnnnnnnnnnnnnnnnnnnn
A
wauu wun u uununununu uunun (ununun)
nuc
Onnulna "onrsuynuyau in "sAn"Off
4 nuiu Ch waian CH anunnuuuiuunuuaanauyuyuou OK wuu
- nuaanranan SCAN* naaannnnae 1 15
* 1nannnnnnaanennnnnnaaannnnnnaanannnnnnaananaananaananaananaananaananaananaananaananaananaananaananaananaananaananaananaananaananaananaananaananaananaananaananaananaananaananaananaananaananaananaananaananaananaananaananaananaananaananaananaananaananaananaananaananaananaananaananaananaananaanara an
5 1
6
7 TEST Waaanwaa
nnaananaananaananaanwaaanuun (nnn TtL)
1 mode 7nunuunwaaan TTL m nui OK wau
2 nD △ uuuuunwaaan FP anu nnnnn nn "On"
3
| MODE (+)/- RATIO | FP CH | ||
| A F P TTL | 0.0 | On | 1 |
| B F P TTL | 0.0 | ||
| C F P M | 1/128 | ||
nVnnaaunw(+/-)uFPTL
NNTNNNNNNNNNNNNNNNNNNNNNNNNNNNNNNNNNNNNNNNNNNNNNNNNNNNNNNNNNNNNNNNNNNNNNNNNNNNNNNNNNNNNNNNNNNNNNNNNNNNNNNNNNNNNNNNNNNNNNN
nannnnnnnnnnnnnnnnnnnnnnnnnnnnnnnnnnnnnnnnnnnnnnnnnnnnnnnnnnnnnnnnnnnnnnnnnnnnnnnnnnnnnnnnnnnnnnnnnnnnnnnnnnnnnnnnnnnnnn
1 naiu u MENU
2n△Vuuunnnnaaannwn
3 uuuuunuuaanannnnnauoONU OK wauu
nunnnnnnnnnnnnnnnnnnn
Back light mode: nnnnnae neaee nne aee
Auto (uawwnnnaeunnu) /
On (uwwwnnnnnaa) / Off (uwwwnnnnnaa)
Chup bang song radio khong day
Bàn có the sù dung bó dièu khìén khòngday nay de kiém soat nhieu dαu thu thong qua két néi vô tuyén. Chuc näng nay chi hoat dong vovi cac san pham Olympus có hó tro chuc nang radio khòngday.
| MODE | -RATIO | FP CH | | ||
| A TTL | 0.0 | 1 |
| B TTL | 0.0 | |
| C M | 1/100 | |
2 Thiét lâp cuòng dô dén flash (RATIO).
Tat san pham khi dang tren may bay.
Su dung cac thiet bi khong day tren may bay co the can tro hoat dong an toan cua may bay.
Thòng sǒ kǔ thai
The following importer description applies to products imported into the EU directly by OLYMPUS EUROPA SE & Co. KG only.
OLYMPUS EUROPA SE & Co. KG
Wendenstrasse 14-18, 20097 Hamburg, Germany
Manufactured by OLYMPUS CORPORATION
2951 Ishikawa-machi, Hachioji-shi, Tokyo 192-8507, Japan

- Checking the Contents of the Package
- Names of Parts
- Dial/Arrow pad
- Display (control panel)
- Preparing the Commander
- Batteries to use
- Inserting the batteries
- Removing the commander
- Turning on the Power
- Turning off the power
- Sleep mode/Automatic power off
- Radio Wireless Shooting
- Group control
- Group B
- Group A
- Group C
- Communication distance
- Frequency
- Setup
- Shooting with Automatic Flash Control (TTL Mode)
- Manually Setting the Flash Intensity (M Mode)
- Firing the Flash at a High Shutter Speed (FP TTL Mode / FP M Mode)
- Preventing accidental operation (key lock mode)
- Settings on the MENU Screen
- Setup procedure
- Safety Precautions
- WARNING
- CAUTION
- Using the radio wireless function
- FCC Caution
- FCC Notice
- Simple Declaration of Conformity
- Specifications
- Technical Support (U.S.A. / Canada)
- European Technical Customer Support
- 写
- 防止意外的操作(按鍵鎖定模式)
- nlaa
- n
- nnaa
- nON/OFF
- aunnsnntu
- nua/na
- nnaanannnnnnaaennnnnne annnnnnnnnnnnnn
- nnaaann
- nnaananaananaananaanwaaanuun (nnn TtL)
- NNTNNNNNNNNNNNNNNNNNNNNNNNNNNNNNNNNNNNNNNNNNNNNNNNNNNNNNNNNNNNNNNNNNNNNNNNNNNNNNNNNNNNNNNNNNNNNNNNNNNNNNNNNNNNNNNNNNNNNNN
- Chup bang song radio khong day
- Thòng sǒ kǔ thai
Brand : OLYMPUS
Model : FCWR
Category : Wireless remote