Best duoFIX - Car seat Foppapedretti - Free user manual and instructions
Find the device manual for free Best duoFIX Foppapedretti in PDF.
| Product Type | Universal car seat |
| Brand | Foppapedretti |
| Model | Best duoFIX |
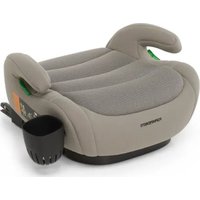
| Category | Car seat group 1/2/3 (9-36 kg) |
| Homologation | ECE R44-04 |
| Weight | Approximately 7 kg |
| Dimensions (L x W x H) | 44 x 52 x 65 cm (approx.) |
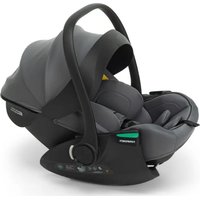
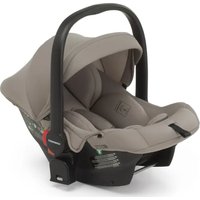
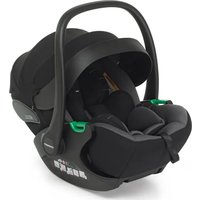
| Installation | 3-point seat belt or with Smart Fix connectors (ISOFIX) |
| Orientation | Forward-facing only |
| Harness | 5-point, height adjustable with headrest |
| Adjustments | Adjustable headrest, seat recline (multiple positions) |
| Material | Plastic and metal |
| Cover | Fabric cover, removable and washable |
| Cleaning | Cover machine washable at 30°C, delicate cycle |
| Accessories | Cup holder, ISOFIX insertion guides |
| Warranty | 12 months |
| Anchorage points | Lower ISOFIX (Smart Fix) + 3-point belt |
| Vehicle compatibility | Seats with ECE R16 approved 3-point belt |
Frequently Asked Questions - Best duoFIX Foppapedretti
User questions about Best duoFIX Foppapedretti
0 question about this device. Answer the ones you know or ask your own.
Ask a new question about this device
Download the instructions for your Car seat in PDF format for free! Find your manual Best duoFIX - Foppapedretti and take your electronic device back in hand. On this page are published all the documents necessary for the use of your device. Best duoFIX by Foppapedretti.
USER MANUAL Best duoFIX Foppapedretti
GB CAR SEAT - Assembly instructions
Complies with ECE R44-04
F SIÈGE-AUTO - Instructions de montage
READ THE INSTRUCTIONS CAREFULLY AND KEEP FOR FUTURE REFERENCE
F. IMPORTANT! LIRE ATTENTIVEMENT
ET CONSERVER SOIGNEUSEMENT
A PORTEE DE MAIN POUR UNE
-
Know your child seat PAG 19
-
Adjusting your child seat PAG 20
4.1 Adjusting the seating position of the child seat PAG 20
4.2 Adjusting the headrest PAG 20
-
Installation with 3-point safety belt PAG 21
-
Installation with 3-point safety belt in combination PAG 21
with Smart fix connectors
-
Securing your child PAG 22
-
Remove and refitting of seat covers PAG 24
-
Cleaning PAG 24
-
Warranty PAG 25
NOTICE
- This is a Universal child restraint. It is approved to Regulation No. 44.04 series of amendments, for genera use in vehicles and it will fit most, but not all, car seats.
- A correct fits is likely if the vehicle manufacturer has declared in the vehicle handbook that the vehicle is capable of accepting a Universal child restraint for this age group.
- This child restraint has been classified as Universal under mor stringent conditionsthan those which applied to earlier designs which do not carry this notice.
- Only suitable if the approved vehicles are fitted with 3 point static or retractor safety belts approved to UN/ECE Regulation No. 16 or other equivalent standards.
- If in doubt, consult either the child restraint manufacturer or the retailer.
WARNING
1. IMPORTANT
Before use our product, please read the instruction manual carefully, the product is a safety product and is only safe when used in accordance with the instruction manual.
- For the future use of the seat, it is important that you keep the instruction manual carefully.
- Never leave your child unattended in the car.
- The child seat should be changed when has been subject to violent stressed in an accident.
- We advise you strongly that not to use a second-hand product, beacuse you are not sure what has happened to it.
- Ensure that all luggage and objects likely to cause injury in the event of an accident are properly secured.
- The moving parts of the child seat should not be lubricated in any way.
- The child seat shall not be used without the cover; the seat cover should not be replaced with any other than the one recommended by the manufacturer.
- The seat must be secured with a seat belt, even who it is not on use. An unsecured seat may injure other passengers in the car in an urgent stop.
- It is danger to make any alterations or additions to the device without the approval of the Type Approval Authority, and is also danger not following closely the installation instructions.
- The rigid items and palstic parts of a child restraint shall be so located and installed that they are not liable, during everyday use of the vehicle, to become trapped by a movable seat or in a door of the vehicle.
- In hot weather, the plastic and metal parts of the product will be hot. You should cover the seat when the car parked under the sun.
- Any straps holding the restraint to the vehicle should be tight; restraining the child should be adjusted to the child's body, and should not be twisted.
- It is important to ensure that any lap strap is worn low down, so that the pelvis is firmly engaged, shall be stressed.
- It is extremely danger to use any load bearing contact points other than those described in the instructions and marked in the child seat.
- Use the seat even in a short journey, as this is when most accidents occur.
- Take a short break in long journey. So that your child has some time for the relaxation.
- Set a good example yuorself and always wear your seat belt.
- Tell your child that he/she should be never play with the belt buckle.
WARNING
2. USE IN THE VEHICLE
The child seat is approved for 2 different methods of installations:
A. With vehicle's 3-point safety belt
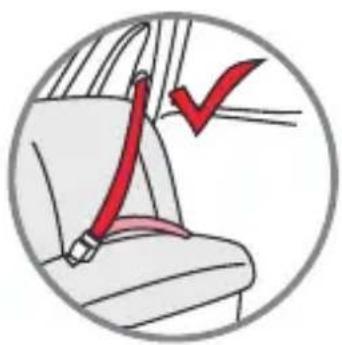
B. With vehicle's 3-point safety belt in combination with smart fix connectors locking into vehicle's ISOFIX lower anchorages
IMPORTANT:
- Always used in forward facing passenger seat. We do not recommend to use the child seat in the front passenger seat.
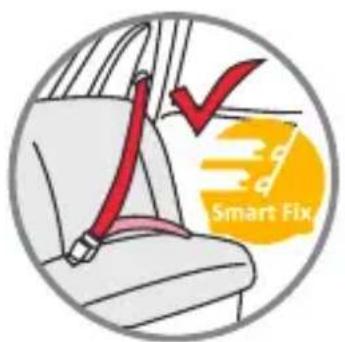
- The safety belt must be approved to ECE R16 or a comparable standard.
- Never use the child seat in the passenger seat equipped with 2-point belt seat.
Use with the vehicle's 3-point seat belt
Use with 3-point safety belt in combination with Smart Fix
DO NOT use with 2 point belt
- Check that you have secured your baby child seat with the seat belt.
- Check that both Smart Fix connectors are properly attached to the anchorage points. Both Smart Fix indicators are green
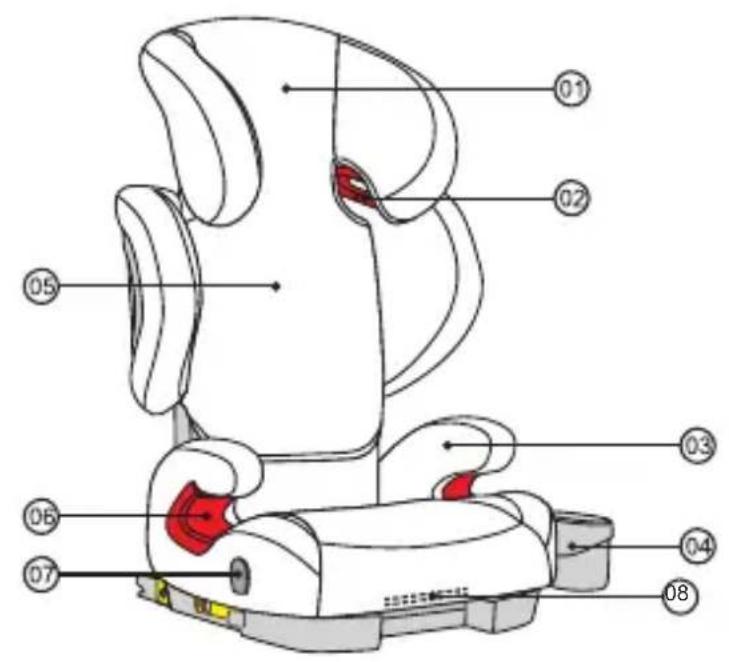
01 Headrest
02 Diagonal belt guides and locks
03 Armrests
04 Cup holder
05 Backrest
06 Lap belt guides
07 Cup holder retainer
08 Recline handle
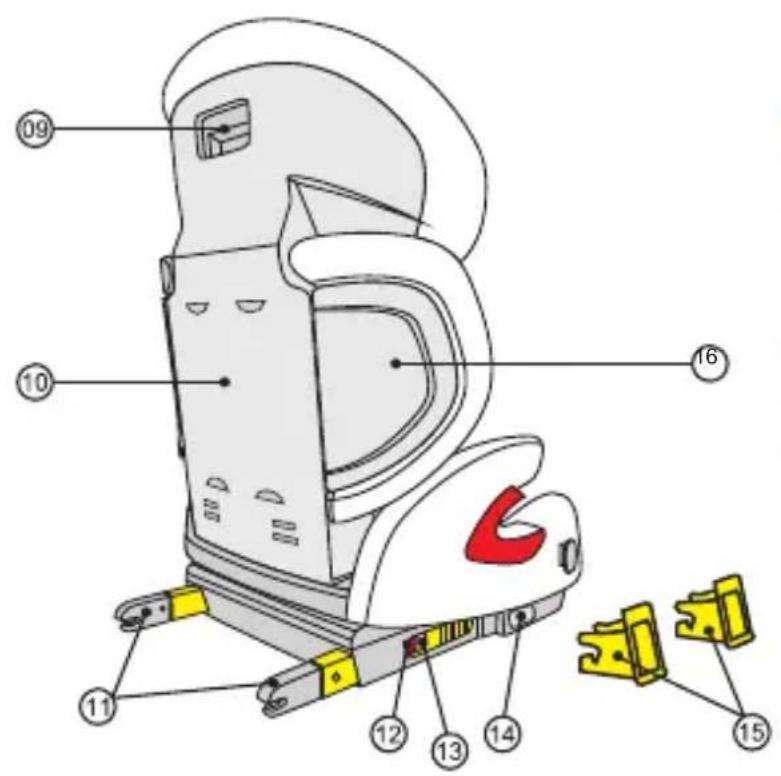
09 Headrest adjustment handle
10 Seat back
11 Smart fix connectors
12 Smart fix indicators(gree/red)
13 Smart fix release button
14 Smart fix adjustment button
15 Smart fix insertion guides
16 Side wings
CHECKS BEFORE USE
4. ADJUSTING YOUR CHILD SEAT
4.1 Adjusting the seating position of the child seat
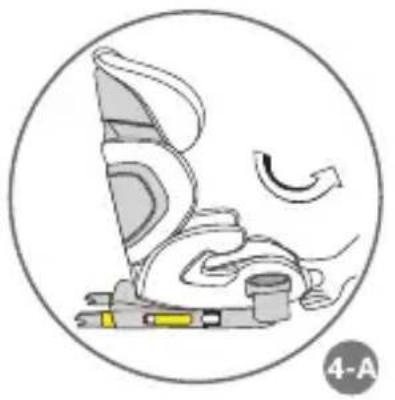
The child seat can be used in multi seating positions for use of all groups. Pull the recline handle, adjust the seat shell forwards or backwards. Release the handle in the required position and push until you hear a distinct "click" (4-A).
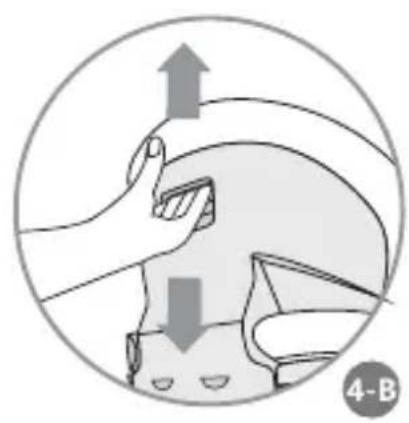
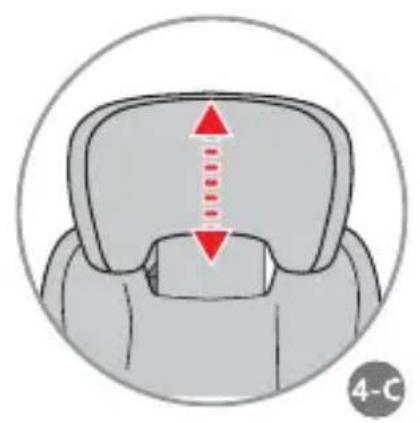
4.2 Adjusting the headrest
A correctly adjusted headrest ensures that the diagonal seat belt section is optimally positioned, and gives your child the optimal protection.
The headrest must be adjusted so that there is a space two fingers wide between the headrest and your child's shoulders.
To adjust the height of the headrest to fit your child:
- Reach into the adjustment handle on the back of the headrest and pull it upwards. This unlocks the headrest (4-B)
- You can now move the unlocked headrest to the desired height. As soon as you release the adjustment handle, the headrest will lock into place (4-C)
- Place the child seat on the vehicle seat. Have your child sit down in the child seat and check the height. Repeat this process until the headrest is at the optimal height (4-D).
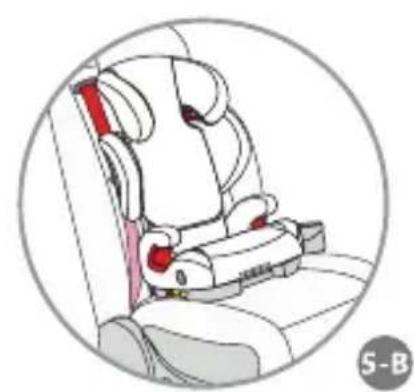
5. INSTALLATION WITH 3-POINT SAFETY BELT
-
Please make sure that the both smart fix connectors are stowed in its original position (the most inside position). If not, please pull&hold the smart fix adjustment button, meantime push back the smart fix arms back into the seat base. Repeat the above, to pull back the arm in the other side.(5-A)
-
Place the child seat on the vehicle seat, make sure the backrest of child seat is flush with 2. Place the child seat on the vehicle seat, make sure the backrest of child seat is flush with backrest of the vehicle seat. Tips: if the headrest of the vehicle seat gets in the way, please remove it or turn it in other way.(5-B).
-
SFollow the steps in section 7 "Securing your child" to finish the installation.

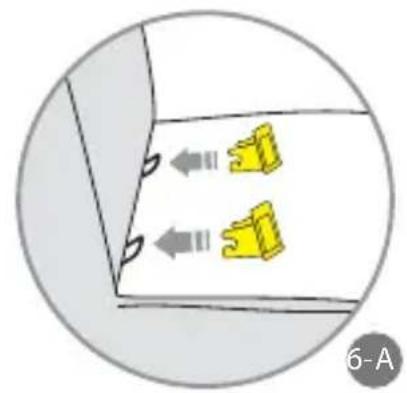
6. INSTALLATION WITH 3-POINT SAFETY BELT IN COMBINATION WITH SMART FIX CONNECTORS
Please read the instructions on the use of child restraint systems described in your vehicle owner's manual. Find the ISOFIX anchorage points in the vehicle seat.
Tips: the ISOFIX anchorage points are located between the surface and the backrest of the vehicle seat.
- Insert two Smart Fix guides to the ISOFIX lower anchorages respectively (6-A) Smart Fix guides make it easier to install using the Smart Fix connectors and prevent damage to the upholstery.
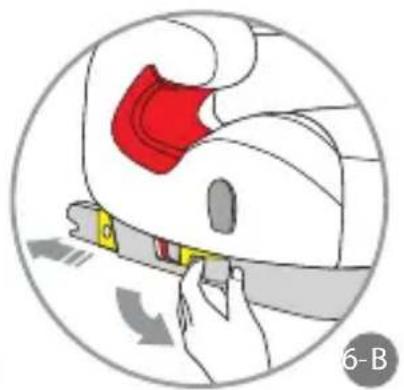
- Pull the Smart Fix extend levers on the both sides of seat base to stretch the two arms of Smart Fix connectors respectively (6-B)
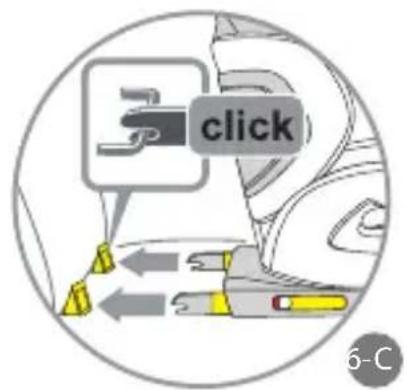
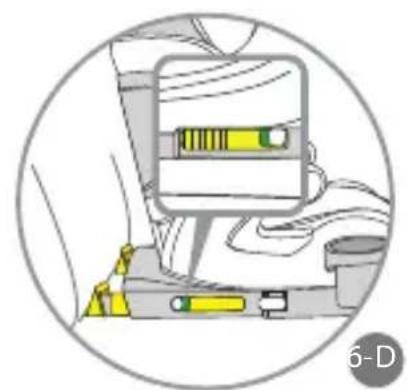
- Line up the Smart Fix connectors with the Smart Fix guides. Attach the two Smart Fix connectors to the two anchorages points on the vehicle seat respectively. You will hear two sounds of " clicks". And check the Smart Fix indicator on each side turns to green (6-C/6-D)
INSTALLATION IN THE VEHICLE
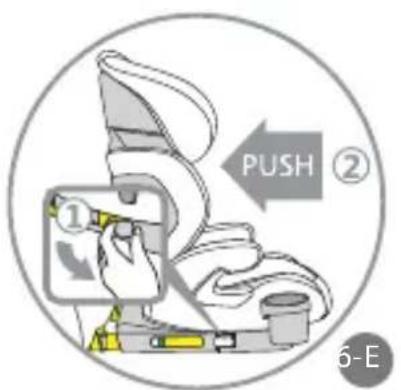
- Pull the Smart Fix extedn levers at same time to push the child seat as far back as it will go. Make sure the back of child seat is against the backrest of vehicle seat firmly. (6-E)
- Follow the steps in section 7 'Securing your child' to finish the installation.
Unfastening your child seat
To unfastening your child seat, please pull the Smart fix release buttons on both sides.
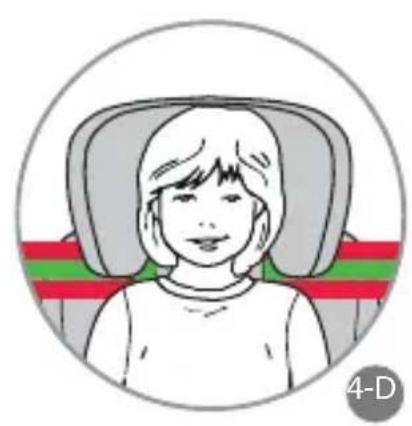
7. SECURING YOUR CHILD
IMPORTANT:
- Before securing your child in the child seat, please make sure the headrest is adjusted to the correct position (see section 4.2).
-
Check your vehicle's manual to see if your vehicle is equipped with ISOFIX lower anchorages; choose one method of installation in the vehicle, either section 5 or 6 was followed correctly.
-
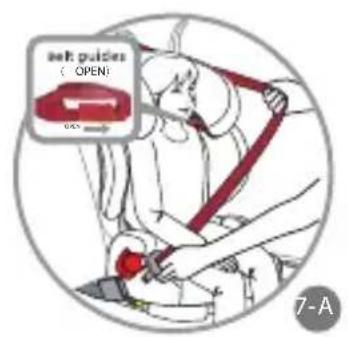
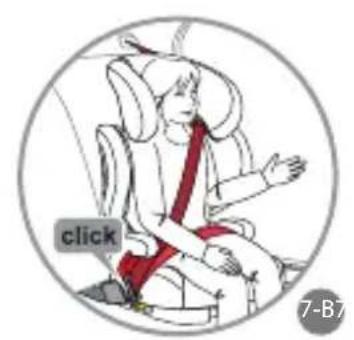
Have your child sit down in the child seat, and slide the diagonal belt guide locking piece to open it. Pull out the safety belt and guide it to in front of your child to the seat buckle. (7-A)
SECURING YOUR CHILD
- Buckle it up with an audible 'Chick'.(7-B)
- Guide the lap belt and one end of diagonal belt to the belt guides under the both armrests (7-C)
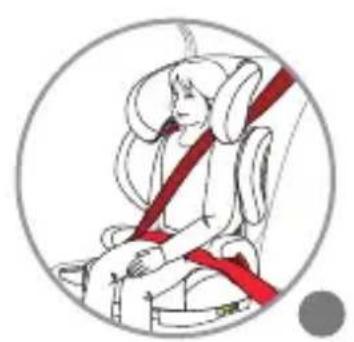
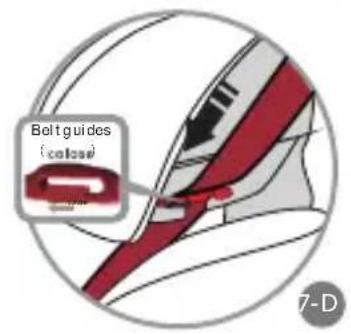
- Insert the other end of the diagonal belt into the belt guide under headrest, that slide the locking piece to close it (7-D).
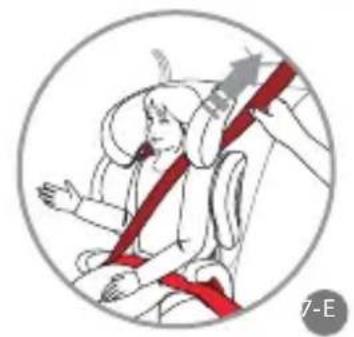
- Remove all the slackness of safety belts to the retractor.(7-E)
Checklist before you go:
- the diagonal belt must run over in the middle of your child's shoulder, not in his or her neck (7-F);
- the lap belt must lie as low as possible on your child's pelvis on both sides;
- no parts of belt should be twisted;
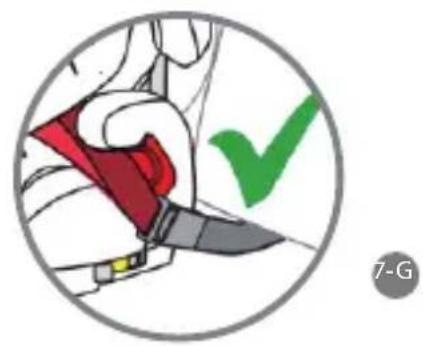
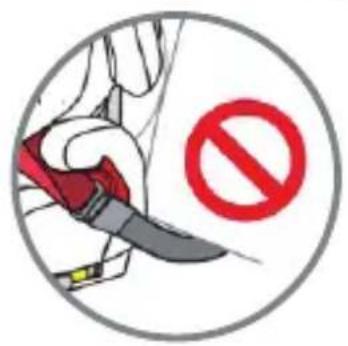
- make sure the safety buckle is not rested on the lap belt guide (7-G).

CLEANING AND MAINTENANCE
8. REMOVE AND REFITTING OF SEAT COVERS
- Unhook the elastic loops on the back of the headrest and backrest to remove covers from the headrest and side wings.
- Unhook the cover loops at the bottom of seat base to pull off the cover from it.
Re-fitting the cover
Proceed in reverse order to put on te cover.
9. CLEANING
The child seat must not be used without the seat cover.
The cover can be washed with a mild detergent using the washing machine's cycle for delicate items (30^) .
The colors of the cover may fade if it is washed at more than 30^ .
Do not spin, and never tumble dry in an electric clothes dryer (the fabric may be separated from the padding).
The plastic parts can be cleaned using soap warer.
Do not use harsh cleaning agents (such as solvents).

The contents of this document as stated below will come into effect as from 01.01.2005 and replace, on every account and in full, any previous message referring to the guarantee provided by Foppa Pedretti S.p.A.
FORMAL GUARANTEE
Foppa Pedretti S.p.A. the head office of which is located at n. 11 Via Volta, Grumello del Monte (Italy), guarantees directly to the Consumer that this brand new product is free of faults with regard to the materials, design and manufacture and that it complies with the characteristics as declared by the manufacturer.
This formal guarantee is valid in all Member Countries of the European Union and it neither excludes nor limits the Consumer's rights in accordance with mandatory measures provided for by the law with regard to the Retailer of the Product.
To take advantage of this formal guarantee, the Consumer must return the faulty product to the Retailer, presenting to the same the proof of purchase of the Product which must clearly show the Retailer's address, the date of purchase of the Product with the Retailer's stamp and signature and an indication of the Product itself or, alternatively, the receipt which must not have been altered and which must clearly show the same information as that referred to above.
The manufacturer's formal guarantee is valid for twelve (12) months from the date of purchase of the Product. During this period, Foppa Pedretti S.p.A. will repair or replace the faulty product, at its own discretion.
The formal guarantee is granted to the end buyer of the Product (Consumer) and it neither excludes nor limits the mandatory rights of the Consumer as provided for by the law and/or the rights that the Consumer may have with regard to the Dealer/Retailer of the Product.
EXCLUSIONS TO THE FORMAL GUARANTEE.
The formal guarantee is excluded in the case of damage caused to the Product for the following reasons: if the product is used in a way that does not comply with the information contained in the use and assembly instruction sheet, if the product is knocked or dropped, if the Product is exposed to humidity or extreme heat or environmental conditions, or to sudden changes in the same, corrosion, oxidization, unauthorized alterations or repairs to the Product, repairs using unauthorised spare parts, improper use, improper maintenance or failure to carry out the same, improper maintenance compared to the information given on the use and assembly instruction sheet, incorrect assembly, accidents, damage caused by food or drink, damage caused by chemical products, cases of force majeure.
In any case, Foppa Pedretti S.p.A. declines all responsibility for damage caused to persons or to property, other than the Product, when such damage is caused by a failure to comply with the instructions/advice/warnings cont a ined in the manua I or, alternatively, in the use and assembly instruction sheet provided with each Product for the owner/user. (Purely as an example, in the case of a cot : "Check your baby constantly. Make sure that the sheets and blankets do not cover the baby's head...").
Furthermore, Foppa Pedretti S.p.A. declines all responsibility for damage to persons and to property when the breakage of its products is due to a deterioration in the components of the Product that are subject to wear. All the components of the Product made of plastic are considered to be components subject to wear.
INDICE
EXCLUSIONS DE LA GARANTIE CONVENTIONNELLE.