
HHOB 500 H634DB3TPG3 - Cooker HOOVER - Free user manual and instructions
Find the device manual for free HHOB 500 H634DB3TPG3 HOOVER in PDF.
| Product type | Built-in induction hob |
| Number of cooking zones | 4 cooking zones (including a flexible zone and a dual zone) |
| Control type | Touch controls |
| Power supply | 220-240 V~ or 380-415 V 3N~ (depending on model) |
| Maximum power | 7.0 kW (adjustable from P1 to P5) |
| Boost function | Yes, temporary maximum power |
| Pause function | Yes, pauses cooking without turning off |
| Timer | Yes, programmable from 1 to 99 minutes |
| Child safety | Yes, control lock (displays "Lo") |
| Automatic shut-off | Yes, according to power level (up to 8 hours) |
| Residual heat indicator | Yes, displays "H" |
| Pan detection | Yes, beep if incompatible or too small |
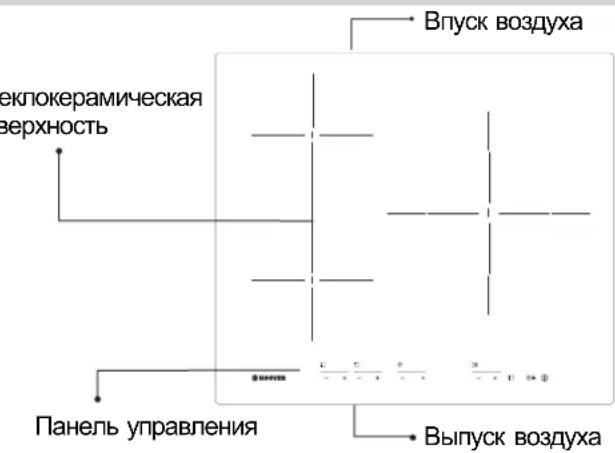
| Surface material | Ceramic glass |
| Flexible zone | Yes, can operate as one large zone or two separate zones |
| Dual zone | Yes, pan diameter from 160 to 290 mm |
| Cleaning | Hot water, specific sponge for ceramic glass, scraper for stubborn residues |
| Color | Black (typical) |
Frequently Asked Questions - HHOB 500 H634DB3TPG3 HOOVER
User questions about HHOB 500 H634DB3TPG3 HOOVER
0 question about this device. Answer the ones you know or ask your own.
Ask a new question about this device
Download the instructions for your Cooker in PDF format for free! Find your manual HHOB 500 H634DB3TPG3 - HOOVER and take your electronic device back in hand. On this page are published all the documents necessary for the use of your device. HHOB 500 H634DB3TPG3 by HOOVER.
USER MANUAL HHOB 500 H634DB3TPG3 HOOVER
Thank you for purchasing the HOwVER induction hob. Please read this instruction manual carefully before using the hob and keep it in a safe place for future reference.
By placing the CE C E marking on this product, we declare, on our own responsibility, compliance to all the European safety, health and environmental requirements stated in the legislation for this product. Asapplicable, the parts of this appliance are compliant to:
REGULATION (EC) No 1935/2004 on materials and articles intended to come into contact with food.
Safety Reminding and Maintenance:
- WARNING: The appliance and its accessible parts become hot during use. Care should be taken to avoid touching heating elements.
Children under 8 Year of age must be kept away from the appliance unless they are continuously supervised. - This appliance can be used by children aged from 8 years and above and persons with reduced physical, sensory or mental capabilities or lack of experience and knowledge if they have been given supervision or instruction concerning use of the
- appliance in a safe way and understand the hazards involved. Children must not play with the appliance.
- Cleaning and user maintenance shall not be made by children without supervision
- WARNING: Unattended cooking on a hob with fat or oil can be dangerous and may result in fire.
- NEVER try to extinguish a fire with water, but switch off the appliance and then cover flame e.g. with a lid or a fire blanket.
-
WARNING: Danger of fire: do not store items on the cooking surfaces.
-
WARNING: If the surface is cracked, switch off the appliance to avoid the possibility of electric shock.
- Do not use a steam cleaner for cleaning operations
- Metallic objects such as knives, forks, spoons and sauce pan lids must not be placed on the hob surface as they can get hot. Any spillage should be removed from the lid before opening.
- The hob surface must be allowed to cool down before closing the lid.
- After use, switch off the hob element by its control. Do not rely on the pan detector.
- This appliance is not intended to be operated by means of an external timer or separate remote - control system.
- The means for disconnection must be incorporated in the fixed wiring in accordance with the wiring rules.
- The instructions state the type of cord to be used, taking into account the temperature of the rear surface of the appliance.
- If the supply cord is damaged, it must be replaced by the manufacturer, its service agent or similarly qualified persons in order to avoid a hazard.
- CAUTION: In order to avoid a hazard due to inadvertent resetting of the thermal cutout, this appliance must not be supplied through an external switching device, such as a timer, or connected to a circuit that is regularly switched on and off by the utility.
WARNING: Use oly hob guards designed by manufacturer of the cooking appliance or indicated by the manufacturer of the appliance in the instructions for use as suitable or hob guards incorporated in the appliance. The use of inappropriate guards can cause accidents.
- Always use the appropriate cookware.
-
Always place the pan in the center of the unit that you are cooking on.
-
Do not place anything on control panel.
-
Do not use the surface as a cutting board.
-
The hob surface must be allowed to cool down before closing the lid.- CAUTION: the cooking process must be supervised. A short term cooking process has to be supervised continuously
Dear Customer:
Thank you for purchasing the CANDY induction hob. We hope it will give many year service.
Please read this instruction manual carefully before using the hob and keep it in a for future reference.
Product Introduction
The induction hob caters for all kind of cooking electromagnetic cookingzones, and its micro-computerised controls and multi-functions, making ideal choce todays family.
Manufactured with specially imported materials, the CANDY induction hob is extremely fit friendly, durable and safe.
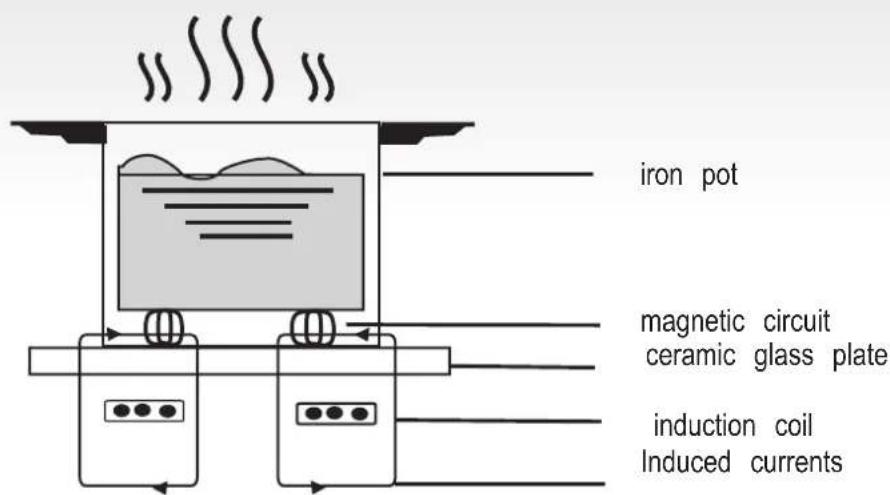
Working Principle
The induction hob comprises a coil, a hotplate made of ferromagnetic material and a system. Electrical current generates a powerful magnetic field through the coil. This produces a large number of vortices which in turn generate heat which is then transmitted through the cookingzone to the cooking vessel.
Safety
Installation
This hob was specially designed for domestic use. In its constant search to improve its product CANDY reserves the right to modify any technical, programme or aesthetic aspects of the appliance at any time.
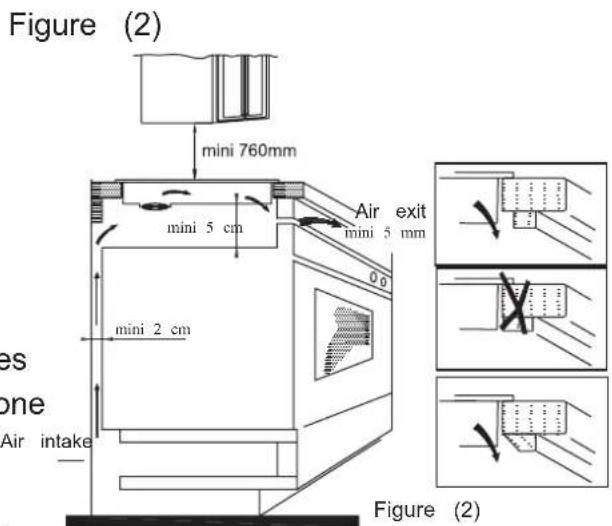
Cut a hole in the worktop of the dimensionshown in the diagram below. A minimum of50 mm space should be left around the hoThe worktop should be at least 30 mm thand made of heat-resistant material. As shown in Figure (1)
Protection from over-heating
A sensor monitors the temperature in the cooking zones. When the temperature exceeds a safe level, the cooking zone is automatically switched off.
Detection of small or non-magnetic items
When a pan with a diameter of less than 80 mm or some other small item (e.g. knife, fork, key) a non-magnetic pan (e.g. aluminium) has been left on the hob, a buzzer sounds for approximately one minute, after which the hob goes automatically on to standby.
Residual heat warning
When the hob has been operating for some time, there will be some residual heat. The letter "H" appears to warn you to keep away from Flush

n Flush installation: Feasible only if the oven is not installed under the counter
Auto shutdown
Another safety feature of the induction hob is shutdown. This occurs whenever you forget to switch off a cooking zone. The default shutdown times are shown in the table below:
| Power level | The heating zone shut down automatically after |
| 1~3 | 8 hours |
| 4~6 | 4 hours |
| 7~9 | 2 hours |
When the pan is removed from the cooking zone, it stops heating immediately and switches itself off after the buzzer has sounded for one minute. Air i
- It is essential that the induction hob is w
s ventilated and that the air intake and exit
to not blocked.
dowMake sure the hob is correctly installed as
shown in Figure 2.
Warning: Anyone who has been fitted with a heart pacemaker should consult a doctor before using the induction hotplate.
B: For safety, the gap between the hob any cupboard above it should be at least 7 mm.
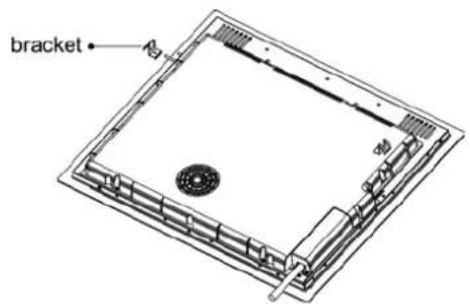
- Fix the hob to the worktop using the Ifothe appliance is being connected directly brackets on the base of the hob. The positinains supply, an omnipolar circuit bred of the brackets can be adjusted accordingsto be installed with a minimum gap of the thickness of the top. between the contacts.
The installer must ensure that the correct electrical connection has been made and that it complies with safety regulations.
The cable must not be bent or compressed. The cable must be checked regularly and only replaced by a properly qualified person.
Warnings:
Diagram of induction hob:
(1) The induction hob must be installed by a properly qualified person. We have our own qualified installers. Never try to install the appliance yourself.
(2) The induction hob must not be installed above refrigerators, freezers, dishwashers or tumble dryers.
(3) The induction hob should be installed so that optimum radiation of heat is possible.
(4) The wall and the area above the hob should be able to withstand heat.
(5) To avoid any damage, the sandwich layer and adhesive should be heat-resistant.
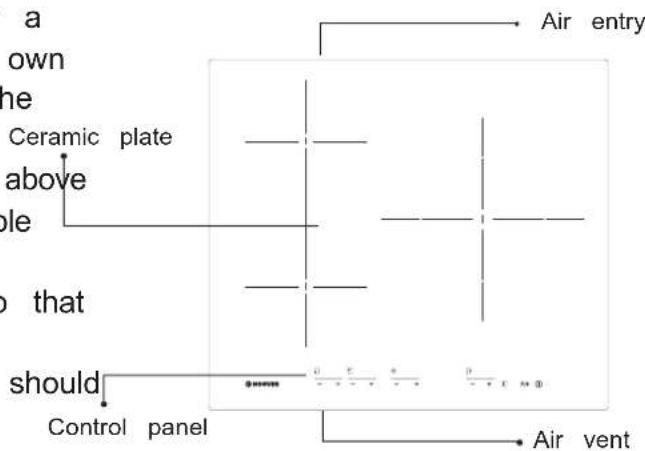
Schematic diagram of the control panel
4. Connection to power supply
The socket should be connected in compliance with the relevant standard, to a single-pole circuit breaker. The method of connection is shown in Figure 3.
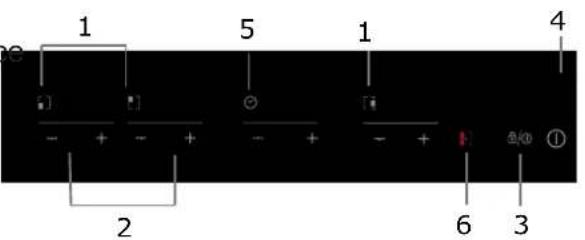
Figure (3)
| Voltage | Wire connection | ||
| 380-415V 3N~ | 1 2 L1 L2 Black Brown | 3 4 N Blue | 5 1 Yellow/Green |
| 220-240V~ | 1 2 L Black& Brown | 3 4 N Blue | 5 1 Yellow/Green |
- Heating zone selection controls 2. Power / Timer regulating key
3.Keylock/Pause control 4.ON/OFF control - Timer control
- Flexible Area control( Some models are without it)
If the cable is damaged or needs replacing, this should be done by an after-sales technician using the proper tools, so as to avoid any accidents.
Instructions for Use
Preparation before using:
When the power is switched on, the buzz sound once and all the indicators will com for one second and then go out. The hob in standby mode.
Place the pan in the centre of the cooking zone.

decreases the time by one minute. When the
er will
set time exceeds 99 minutes, it will automatica
the on
return to0" minutes. If the" and "+" keys are
is now
pressed simultaneously, the indicator will display

Operating instructions
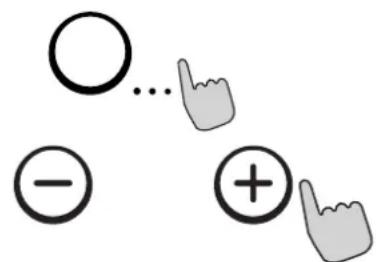
When the ON/OFF key is pressed, all the indicators show-. Select the power level by pressing the"or"-key for the relevant hotplate. To begin with the indicator "Shows Adjust up or down by pressing"dhe"key. If you press and-"keys simultaneously, the power setting return0'tand the cooking zone switches off.
See the table on Page for the power speciected zone.
to each cooking zone.
NB: When the ON/OFF key is pressed, the induction hob returns to standby mode if no other operation is carried out within one m
- Select the power level of the cooking zone and then press "thimer"key. The timer can now be set.
By. When the timing indicator has been flashing for 5 seconds, the settime will be automatically confirmed.
3. After selecting a set time, confirm by press the "Timer" key.
4. Once the "Timer" is confirmed, a dot appears on the bottom right of the power level of the
Timer cancellation
After setting the time again, hold down the "hhimer" key for 5 seconds. This will cancel the timer and the indicator will reveal to
Timing function
Press the timing key and the indicator will flashing. Then set the time for between 1 99 minutes, by pressing "t" and "-" keys.
Pressing the + " key once increases the time by one minute; pressing " -thkey once
Safety mode
To ensure the safety of children, the induction hob is fitted with an interlock device.
To lock: hold down "litterlock"; the hob then goes infanterlock" mode, the timer shows "Lo and the rest of the keysated except the " ON/OFF " key.
Unlicking
ABD down t'nterlock" key for 2 seconds and the hob will return to normal working.

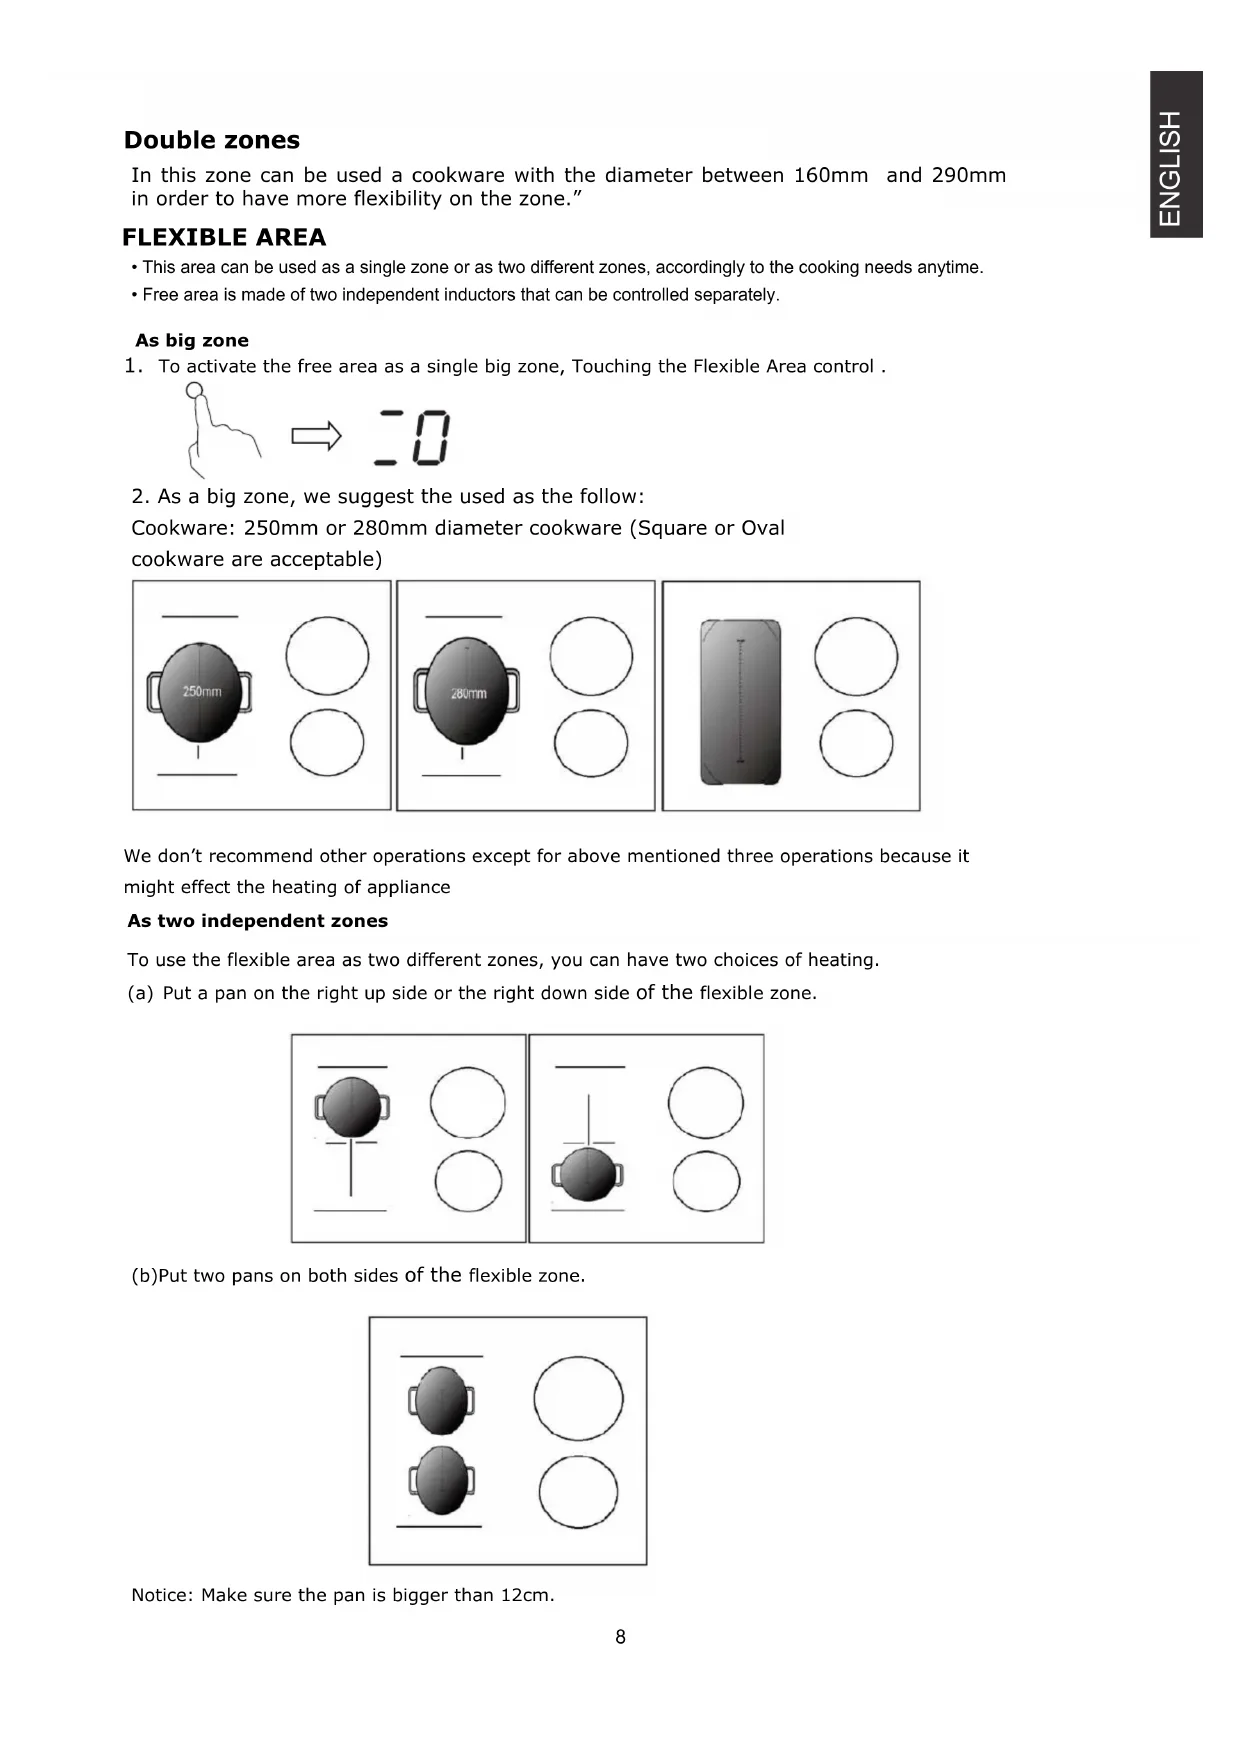
Double zones
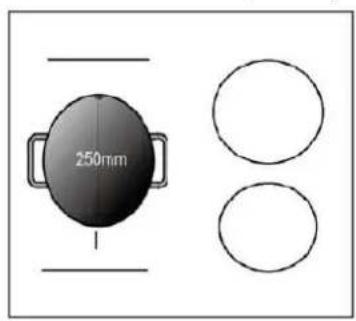
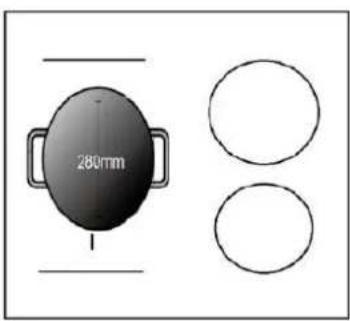
In this zone can be used a cookware with the diameter between 160mm and 290mm in order to have more flexibility on the zone."
FLEXIBLE AREA
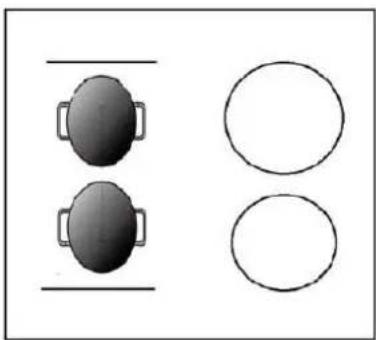
This area can be used as a single zone or as two different zones, accordingly to the cooking needs anytime.
- Free area is made of two independent inductors that can be controlled separately.
As big zone
- To activate the free area as a single big zone, Touching the Flexible Area control.

- As a big zone, we suggest the used as the follow:
Cookware: 250mm or 280mm diameter cookware (Square or Oval cookware are acceptable)
We don't recommend other operations except for above mentioned three operations because it might effect the heating of appliance
As two independent zones
To use the flexible area as two different zones, you can have two choices of heating.
(a) Put a pan on the right up side or the right down side of the flexible zone.
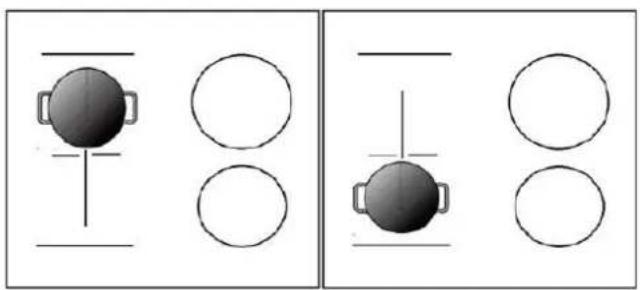
(b)Put two pans on both sides of the flexible zone.
Notice: Make sure the pan is bigger than 12cm.
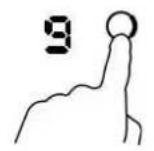
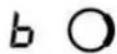
@oostmode
Touching the heating zone selection control, then touching "+" . Make sure the display shows "9". Touching the "+" button again, the zone indicator show "b" and the power reach Max
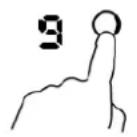

Cancel the Boost mode
Touching the "-" button to cancel the Boost function, then the cooking zone will revert to its original setting.
Touching “-” and “+” control together, the cooking zone switch off and the boost function cancel automatically


- The cooking zone returns to its original setting after 5 minutes
Note: It is recommended that the cooker hood suction is switched on few minutes prior to cooking and switched off few minutes after terminating cooking.
Pause Mode
- You can pause the heating instead of shutting the hob off.
- When entering the Pause mode, all the controls except the ON/OFF control are disabled.
| To enter pause mode | |
| Touch the lock/pause control. | All the indicator will show " 11" |
| To unlock the controls | |
| Touch the lock/pause control. | |

When the hob is in the pause mode, all the controls are disable except the ON/OFF the induction hob off with the ON/OFF control in an emergency.

Power Management Function
- it is possible to set a maximum power absorption level for the induction hob, choosing up to different power ranges.
- induction hobs are able to limit themselves automatically in order to work at lower power level, to avoid the risk of overloading.
To enter Power Management Function
Turn on the hob, then Press at the same time the "+" (timer) and key lock.
The timer indicator will show " P5" which means power level 5. The default mode is on 7.0kW/ 7.1kW.

To switch to another level
press + / - from the timer There are 5 power levels, from "P1" to "p5". The timer indicator will show one of them.
"P1": the maximum power is 2.5kW.
"P2": the maximum power is 3.5kW.
"P3": the maximum power is 4.5kW .
"P4": the maximum power is 5.5kW .
"P5": the maximum power is 7.0kW/ 7.1kW.

Confirmation and Exit Power Management Function
Press at the same time + (timer) and key lock for Then the hob will be turned off. confirmation.

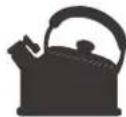
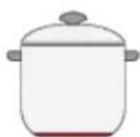
Selection of cooking vessels
Iron oil frying

Stainless steel
Iron pan Iron kettle
Enamel
stainless steel kettle

Enamel cooking utesil
Iron plate
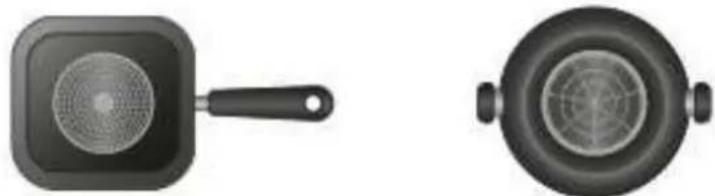
You may have a number of different cooking vessels
- This induction hob can identify a variety of cooking vessels, which you can test by one of the following methods:
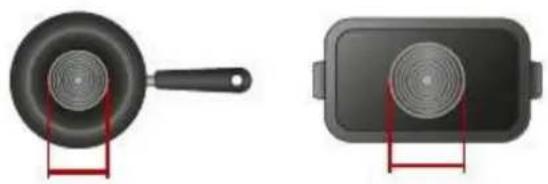
Place the vessel on the cooking zone. If the corresponding cooking zone displays a power level, then the vessel is suitable. If "U" flashes, then the vessel is not suitable for use with the induction hob.
- Hold a magnet to the vessel. If the magnet is attracted to the vessel is suitable for use with the induction hob.
NB: The base of the vessel must contain magnetic material.
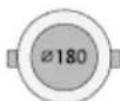
It must have flat bottom with a diameter according to the table 1 below.
- Use only ferromagnetic cookwares made from enameled steel, cast iron or stainless steel but compatible with induction
-
Use pans whose diameter of the ferromagnetic area (base of the pan) is in the range of dimensions in the table below. (Table 1)
-
If you use smaller pots, performance could be affected
- If you use pot with a diameter smaller than the one indicated in the table 1, pots may not be detected
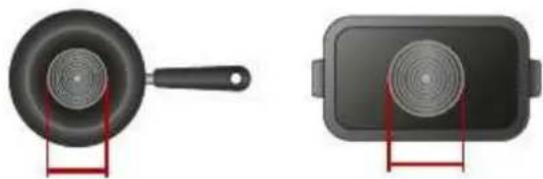
According to the dimension of the zone you can use pots of different diameters as picture below:


-
If the ferromagnetic part covers only partially the base of the pan, only the ferromagnetic area will heat up, the rest of the base may not heat up a sufficient temperature for cooking.
-
If the ferromagnetic area is not homogeneous, but presents others material such as aluminum this may affect the heating up and the pan detection.
If the base of the pan is similar to the pictures below the pan could be not detected.
| The base diameter of induction cookware | ||
| Cooking zone | Minimum Maximum | |
| 1 & 2 140 | 180 | |
| 3 | 180 | 290 |
The above may vary according to the size of the pan and the material it is made from.
Cleanness and Maintenance
The surface of the induction hob may be easily cleaned in the following way:
| Type of contamination | Method of cleaning | Cleaning materials |
| Light Immersion | in hot water and wipe dry Cleaning | sponge |
| Rings and lime scale | Apply white vinegar to the area, wipe a soft cloth or use a commercially available product | Speltial adhesive for ceramic glass |
| Sweetmeat, melted aluminium or plastics | Use a special scraper for ceramic glass to remove residue (a silicon product best) | lassical adhesive for ceramic glass |
NB: Disconnect the power supply before cleaning.
Failure Display and Inspection
If any abnormality occurs, the induction hob will automatically go into protective mode and one of the following codes:
| Fault Possible cause Solutions | ||
| F0/F1/F2 | Fan failure | Contact the supplier |
| F3-F8 | Temperature sensor failure | Contact the supplier |
| E1/E2 | Abnormal voltage in power supply | Check if power supply is normal. Power on after power sup returns to normal. |
| E3/E4 | Abnormal temperature | Check the pan |
| E5/E6 | Poor heat radiation in cooking zone | Restart when cooking zone cools down |
The above table shows how to assess and check common faults.
Do not dismantle the appliance yourself, otherwise you may damage the induction hob.
Customer Care Service
If a fault should occur, before calling After Sales Service, please do the following:
-Check that the appliance is correctly plugged in
-Read the failure and display table above
If you are still unable to resolve the problem, switch off the appliance, do not try to and call
After Sales Service.
Special Declaration
The contents of this manual have been carefully checked. However, the company cannot be held responsible for any misprints or omissions. Also, any technical modifications may be included in a revised version of the manual without notice. The appearance and colour of the appliance in this manual may differ from the actual one.

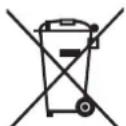
DISPOSAL: Do not dispose this product as unsorted municipal waste. Collection of such waste separately for special treatment is necessary.
For more detailed information about treatment, recovery and recycling of this product, please contact your local city office, your household waste disposal service or the shop where you purchased the product.
This appliance is labelled in compliance with European directive 2012/ IBC for Waste Electrical and Electronic Equipment (WEEE).
By ensuring that this appliance is disposed of correctly, you will help prevent any possible damage to the environment and to human health, which might otherwise be caused if it were disposed of in the wrong way.
The symbol on the product indicates that it may not be treated as normal household waste. It should be taken to a collection point for the recycling of electrical and electronic goods.
This appliance requires specialist waste disposal. For further information regarding the treatment, recovery and recycling of this product please contact your local council, your household waste disposal service, or the shop where you purchased it.
Protection anti-surchauffe
| The base diameter of induction cookware | ||
| Cooking zone | Minimum Maximum | |
| 1 & 2 140 | 180 | |
| 3 | 180 | 290 |
The above may vary according to the size of the pan and the material it is made from.
| The base diameter of induction cookware | ||
| Cooking zone | Minimum Maximum | |
| 1 & 2 140 | 180 | |
| 3 | 180 | 290 |
The above may vary according to the size of the pan and the material it is made from.
Čistění s udržba
| The base diameter of induction cookware | ||
| Cooking zone | Minimum Maximum | |
| 1 & 2 140 | 180 | |
| 3 | 180 | 290 |
The above may vary according to the size of the pan and the material it is made from.
| The base diameter of induction cookware | ||
| Cooking zone | Minimum Maximum | |
| 1 & 2 140 | 180 | |
| 3 | 180 | 290 |
The above may vary according to the size of the pan and the material it is made from.
Alarma calor residual
The base diameter of induction cookware
Cooking zone
1&2140
3
Minimum Maximum
180
180
290
The above may vary according to the size of the pan and the material it is made from.
| The base diameter of induction cookware | ||
| Cooking zone | Minimum Maximum | |
| 1 & 2 140 | 180 | |
| 3 | 180 | 290 |
The above may vary according to the size of the pan and the material it is made from.
Puhdistus ja huolto
| The base diameter of induction cookware | ||
| Cooking zone | Minimum Maximum | |
| 1 & 2 140 | 180 | |
| 3 | 180 | 290 |
The above may vary according to the size of the pan and the material it is made from.
| The base diameter of induction cookware | ||
| Cooking zone | Minimum Maximum | |
| 1 & 2 140 | 180 | |
| 3 | 180 | 290 |
The above may vary according to the size of the pan and the material it is made from.
| The base diameter of induction cookware | ||
| Cooking zone | Minimum Maximum | |
| 1 & 2 140 | 180 | |
| 3 | 180 | 290 |
The above may vary according to the size of the pan and the material it is made from.
IIO6bIe IepeKbI n3JeNnB, Bbl3BaHbIe He6peKHO TpaHCnOpTnpOBKO n XpaHeHem n3JeNnA, He noJnxKAT 6ecnNaTHOMy rapaHTnHOMy peMOHTy.
3.YctaHOBka n 3KcnplyaTaunia
BecnIaTHbI rapaHTnHbI peMOHT He npOn3BOIDTCra, ecJI NdepeKT n3dEJIINy Bbl3BaH: HnPaBnIbHbIM NOKIOUeHNEM 3DeJIIN K CTeTAM 3NEKTPO, BOIO Ira3OChA6KeHHN, a TAKKe HECoOTBeTCTBnEM npaMeTpOB BblIeYka3aHHbIX CeTeI npaMeTpAM, IpeDbYBIAEmbIM 06a3aTeNbHbIMn FocydapCTBeHHbIMn CtaHdaptAmn INHCTpyKuNeI NO 3KcPnyatau; INCNoJIb3OBaHHeM 3DeJIINr HE B COOTBeTCTBnC INHCTpyKuNeI NO 3KcPnyatau, a TAKKe He6pexHOJ 3KcPIyatauJe, NOBNEKlIMN BO3HNIKHOBEHne MExAHuecknx INI INpyrNX TINOB DepekTOB;
IcNoJIb3OBAHnEM N3eJIy He B COOTBETCTBn C ero npraMbIM Ha3HaueHnEm IJIH He B DOMaUHnx HxKdax.
4. PemOH
BecnIaTHbI rapaHTHbI pEmOHr He npOn3BOIDTcR, ecNI n3deJIne:
IMeET CJIeIbI NOCTOpOHHeRo BMeUaTeJIbCTBa IIN PemaHTa He yNOnHOMOueHHbIMn fIpMOi
JIuCaM;
IMeET HecAHKcIOHOpOBaHHbIe cInpMoN u3MeHEnra KOHCTpyKcIMN IIN HeNpNeMJIeMbIe
KOMJIeKTyUoUe;
IMeET NOBpeJxHnRA, Bbl3BaHHbIe HENpeDcKa3yEmbIMn RAJIeHnAIMN I DeIcTBnAIMN CTUXN;
IMeET NOBpeJxHnRA, Bbl3BaHHbIe NCIOJIb3OBAHnEM HeCTaHdApTHbIX IN HeNpNeMJIeMbIX
pacXODHbIX MaTePnaIOB IN PrnHaIaNEXHOCTe;
IMeET NOBpeJxHnRA, Bbl3BaHHbIe NOnaDaHNEM BHUTpb I3DeJIINr NOCTOPOHHX IpEIMTOB,
arpeCCNBbIX BeIeCTB, XIBOTbIX INI HaceKOMbIX;
HE IMeET cepInHoro Homepa IIN erO HEBO3MOXHO UCTaHOBtB.
Gamma He pacnpocTppaHareTcRa Ha pacxoIDhie MaTePnaJIbI n akceccyapbl.
5. OTBETCTBEHHOCTb
ΦnnpMa He HecET OTBcTCTBeHHocTH 3a IIO60I npuHHeHHbI Bam n OkpykaIoUm yuep6 r npuHHe HapuWeHn npabIn NcHcTpKznn NO 3KnPyatauNN, B OcObeHHocTN Bb3BaHHbI HnPaBnBnIM NODKNIOeHNEM N3DeJIIN K CetAM 3NeKTPO, BOo N ra3OCHa6KeHn, IN HeDOnyCTnMbIM OTKIOHeHnA MnpaMeTPOB B BblwepeucNCHeHHbx CTeX, HnPaBnBHOJ 3KnPnyatauNE, HecAHKUnOHnPOBAHHbIM pEmoHTOM, NCNOb3OBaHnEM N3DeJIIN He No IprMOMy Ha3NaueHnIO.
BBoD N3deJIIN B 3KnPnyatauN IO dopa6OTKa CeTe 3NeKTPO, BOo N ra3OCHa6KeHn DnI COBMeCTnMOCTn C N3DeJIINEM He YBIAOTc8OHOJ OTBeTCTBEHHOCTHn QnPMBI N QnPMoH He ONlauVBaOTcY.
B clyuae Bo3NHKnHOBeHn KaNX-ri60 IpO6Lnem C BaUM N3DeJIINEM, nepei Tem kak BblBaTb MacTepa, npOBepbTe npabNJbHOCTb yCTaHOBkN i QyHKUnOHnPOBAHn B COOTBeTCTBn C NcHTpyKzne no 3KnPnyatauNN. Onnaty Bbl3OBA Bbl 6yTe nPoN3BOdntb 3a CBOI chET, ecNI N3DeJIe 6blno B pa6OeM CoCTOARNN IIN 6blIO He npaBnJIbHO yCTaHOBJeHO IIN IcNoIb3OBAHO.
YBaXaEmbl KIneHT,
XOTIM no6laorodapntb Bac 3a TO, yTO Bbl octaHOBNi CBOB BBIOp Ha INdyKUHOHOB BapouHoi naneHN CANDY - np6ope, KOtOpB, 6e3 COMHeHn, Ha npOTxKeHm MHOrnx JET ydoBnetbopNT Baun notpe6hOCTn.
BHHMaTeIbHO npOHTaIe DaHHOe pyKOBOcTBo npeEd TeM, KaK npNCTyIuNTb K 3KcNJIyaTaUIN npIbopa, H 6epexKHO xpaHnte erO, YTObbl B 6dyuem Bbl MOrJIn O6paTnTbcR K Hemy B MOMENT Heo6xOdIMOCtN.
BVeDeHne
Hndykuohna Bapouhna naneoc6ha yobTbOpntb MHOQNCHeHHbI Hxkb, CB3aHHbI c npiroTOBHeHem NnCnOC6om 3JekTpOMarHHTHO HarpeBa 6Naoradap MHorOyHKcNoHaNbHO CnCTeMe ynpabHeHnBtpoEHbIM Mkponpoceccopom, YTo DeJaTe ee NdealbHbIM peWeHnEM dIra COBpeMbo
3TOT 3NeKtpo6bITOBO np6op, BblnoJIHeHHbI N3 CneUaJIbHbIX MaTePnaIOB, OTNIuHaETcN pOCTOTOn B INCNoJIb3OBAHnI, PPOUHOCTbIO n HaDeJXHOCTbIO.
PpHcnp pa60tbI
He donyckaTb nepereN6a nn cKaTna Ka6eJia.
OncanHe HndyKmoHnBapouHoi NaHeJI
Cxema naneyn ynpableneia
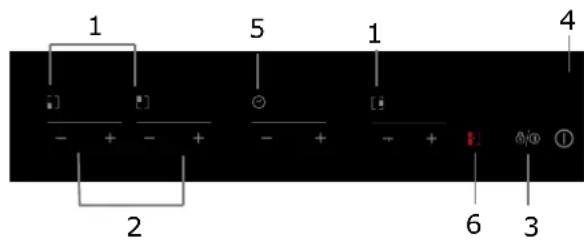
- KhoNk Bb6opa 30hI HarpeBa 2. PeryIaTOp MOUHocTN/TaIMepa
3.Блорва/Пay3a 4.Khonnka BkN/BblKJI - TaMep
- N6kə o6nactb (HMeEeTcH e BO BcEx MoDenax)
HctpyKu no 3KcnJyaTaun
IoproTOBka nepei nCnoJIb3OBAHHeM:
qgl tih 3yphi mghg 3aimha
iuhhhtce uaytg3xiy g3hau,3f
tigcge h3-04 3 yfhg1 hghte,
ieighmav, mti 3aimha u3iuhhhtce hauiiggtu
3 igghidggah.
jH3-3GCTe xHphi u33eia-hh|p
ha-3J3aYucel|p gihl.

3KcnnyataLna
jhy hagatu yua-3gng "A/64A." 3+
targicie uya-ga3afgh3iy "-. gE1Ae
ha-3yaucehlophi gih, 3vHixi hy wiaegttu
ya-Hidmu; targicie li3hu hinhittG
3eiahh iy gihe ha-mht hgo3ace. e-gaTce
xua-3gnl "+" gug -," h aoglu tio8ggtu
eagbit ghamhg 5, hHaigctae ha-gyayhey
li3hct uhincofya-3gn +" gug -.
fehihhih hi hgaohy yua-3gnl +" G yua-3gnl
-, ghamhg uyeelngw ha-hiix iehIupdtu
g haaeyucaea gih- 3aimhy taHug
3exyphmaytu.
c ta-yuguy Ha Hi. 89Xagah haxtgaucehey
li3hce hinhittG gui a-ggeiy hao3aayuceh iy
ghe lahyg.
PnmeaHne: stg uity hagatgu yae3ng "A/6tA." hauhug 3ymhg 1ghhty uiieGHT xrgu-ugei iuywgy, gheuugihna 3amhauhueyuiigot 3 iggh igoeahgu.


Функця TAIMEP
jig hagatgg yua-3gng RABESq, tniigic g h
egttt ha-mghoyt hgs-tce, g higt ga-ga-3a4ce
3hu ugu3iuyhgu. q uihincdyua-3gn "+" G
"3hu ha-tia-G3aytu 3 ggayggtt 1 0i 99
hght jig hagatgg yua-3gng "+ ghamhg
haHixxg [yugmg3aytu + na-sin 3 1 hght;
ug hagatgg yua-3gng "ghamhg hHaHixy
[hycenayhu t na3ih 31 hghl jy3etg3 99
hght, ghamhg haHcyxg taYhna
a3iHaGmhyg HhaHa-3ug3aHTu Ha0. jig
ichjzhihhih hagatgg yua-3gn " + " G "
"ghamhg haoogtu sigia nauyuxo.

IoTBePxJdeHne yHKmTN TAIMEP
- 0e1a4e li3hce hnhihg hghiy h3y3a4yauehiy gihe, hga4ce yua-3gnl "ayh" G gaa4ce 3hu.
- jiy fisi, yx tayhj hgsy 3ymhg ugeugguyaehi 5 tyhe, gaoehhj 3fhu aitha gmyghu liqgyaht.
- 7a-3 ght3auy 3hng, haoece yae3gnl "RABEsQ"euuiyrggeahhiigha-mhg.
- Пи Нжати Na «ТаIMep» BHN3y cnpaBa NOЯВЯETcT OTOka O6O3HaueHne ypoBnA MOUHOCr N BbI6paHHoN 3OHbI.
OTmeHaФyHKUIN TAIMEP
gagatce g lgtgg3a tce hagatiy yua3gnl "yhj" 3 ymhjt 5 tylhe euyithhe gahh iy ugh blyuGG. aogtluit iieia-gg0 0.
Бezonachoe coCToHne
Дябсоченя 6e3oNaChocTn DeTei HdukOnHna NaHeIbObOpyDoBaHa 6NOKIpOBKoJ DЯ 6NOKIpOBKn: HaxMITE KHOKNY "Interlock", NaHeIb NepeIeT B COCTOHNHe 6NOKIpOBKn "Interlock", Ha TaIMepe NOBNTcR HaIINcB "Lo". Bce KHOKN, 3a NCKJIIOUeHneM ON/OFF pa6oTaTb He 6yDyT.
Pa36JIOKINPOBka
HaxmTe n ydepxnBaIte KhoNky 2 ceKyHdbI KhoNky "Interlock", naHeJIb BepHeTcB pa6ooye coCTOHNHe

ДВОИнBsI3OHbI
B daHHo 3OHe MOxHO nCnObl3OBaTb NocUy dIaMeTpOM OT 160 Do 290 MM, TTo6bl noJTyHb 6OJIbwe BO3MOxHcOCTeI.
ГИБКАЙОБЛACTь
- Ho Heo6xOaHMoCTn 3Ta 0bactb MoKET NCIOB3OBaTbCg KaK eINHa 3OHa INI KAK DBe 3OHbl PpNTOBHeHn
Cbo6oHnaObnaCTb COCTOnT n3 DByX He3aBnCmblx INHyKTophix 3NeMeHTOB, KaKdbI N3 KOTOpbIX IMeET CBOH CNTcEMY ynpabJIeHH.
IcnoB3OBAHne eDINHO6Jbwo30hbl
1.ДяВкJOUeHЯ CBO6OJHOI OBJaCTN BpeKIMe eINHOI 60JIbWOn 3OHbI HeOBxOJIMO HaxaTb Ha KHOJky «「n6KaJ OBJaCTb»

NcnoB3OBaHne DByx 3OH
PpmeuHHe: Nocya He donjHa 6bItb Mehee 12 cm.
Pexim 6bictporo HarpeBa
IotpohntecbdoKHOKNBbIbopa3oHbHarpeBa,3aTeMaXMnTe «+».HaDinCJIeepoJxHO OTo6pa3ntbcra «9».
BHOBb DoTpoHbTeCb Do KhoNk N «+», INHdNkaTop 3oHbI NOKaXeT «b» I MOUHOCTb DOCTURHET MaKcMmaNbHorO npedeJa.

OTmeHa peXnMa 6bIcTporo HarpeBa
IyHkun 6bictporo HarpeBa dOtpohbTecb Do KhONK «-», 30Ha npiroTOBHeHn IuU BepHETcB H3HaayJIbHbIM HAcTPOkAM.
OndHOBpeMeHHo HaxMnte KhoNkN «+» N «-». 30Ha npriroTOBneHn BbIKIOHTcA, npOn3OJDeT abTomatuecka OTMeHa cyHKuN 6bICTpOHarpeBa.


Yepe3 5 MmHyT 3OHa nprirotOBJeHnI NIIu BepHeTc K n3HaaybHbIM HAcToPouKaM.
Приимechан: Изrogenытbel pekomendуet BKliouaTb Bblry 3a HeCKoJIbKO MnHyTdo Haayana npiroTOBJeHnA Пиu, a BblKlIOyatb Yepe3 HeCKOJIbKO MmHyT NocIe OKOHuaHnRA TOTOBKn.
Nay3a
BmeTo BbIKIOueHnBaOpOH naHeIN MoXHO NOCTaBtB HArpeB Ha nay3y.
Bo Bpem deiCtBnpeKMa nay3bpa6oTaET OJbKO KOnKa BKJI/BblKJI, ocTaIbHbIe - HeT.
- EcIn ΦeppomarHHTHa 3OHa He NOJIHOCTbIO NOKpbIbAet OCHOBaHne KAcTpHOn, To 6yJeT HArpeBaTcra TOLbKO 3Ta 3OHa, a OCTaJIbHaa ChAcTb OCHOBaHnma MoXeT He HarpeTbcrdo HyxHoi dI npriROToBLeHnna 6JIoDa TemNepaTypbl.
- EcIn φeppomarHHTha 30Ha YBJIeTc HEOdHOpOHO IN CODepKNT dpyrHe MaTePnAblb, NaIpIMep aIHomHH, 3TO MOKeT HeraTINBHO OTPaXaTbcra Ha 3ΦΦeKTINBHOCTN HarpeBa n paCNo3HaBaHm NocyDbI.
Ecn OCHOBAHne nocybl aHaIoruHNo 3o6paXeHHo Ha pncyHke Hxke, NOBepxHOCTb MOxET He paCnO3HaTb ee.

| The base diameter of induction cookware | ||
| Cooking zone | Minimum Maximum | |
| 1 & 2 140 | 180 | |
| 3 | 180 | 290 |
The above may vary according to the size of the pan and the material it is made from.
Ynctka n texo6cnyxnbHne
IobepxHocTb BapouHoi NaHeJIIMoXHO YnCTHTb CneDyUOUM o6pa3OM:
CJYKBA CEPBnCHO OBCJyKBAHN KJIeHTOB
IpeTeM, KaK 3BOHnTb B Cnyx6y cepBnCHoro 06CnyxuBaHHa
B cnyae BO3HKnHOBeHHn HEnoJaOK B pa6Ote np60pa peKOMeHdyTe:
-
y6eHtbc8, YTO wTeNceJIb npaBnIbHO NOcOeINHeH K 3JeKtpUeCKoP03ETke;
-
npoHTaTb npBBeHHyIO BblSe Ta6NcUy C NO BblBJeHNo HeNCnpaBHOCTeN.
Ecni npuHnHa HncnpaBHOCTn He yctaHOJIeHa:
BbIKIIOHTb np6Op, He pa36npaTb erO I NO3BOHITb B cIyK6y cepBnCHOrO 6cIyXnBaHn KJIeHTOB.
CneuaJIbHaJeKnapaun
Bcra HnΦopMaζη, npuBeHHe B DaHHom pyKOBoDCTBe, 6bIa TuaTeJbHO npOBepHa. TeM He MeHee, npOn3BOIDTeJIb He He CeT OTBETCTBeHHOCTN 3a OUn6Kn, DOnyUeHHbIe npi NeaTn. Kpome Toro, B cIyae BbIXOda HOBo PeDAKzIMpyKOBoDCTBa NO 3KcPlyatauIN, B Hero MOryt 6bITb BHOCeHbI TexHueckne N3MeHHeN 6e3 PpeBapNTeJbHoro yBeOMJeHn. N3o6paXeHne N3DeJIIn COOTBeTCTByeT DeIcTBtJIbHOCTN.

BHIMAHNE: He BbI6paCbIBaTb DaHHbI npH6Op, KaO obHyBle 6bITOBbl OTxOdbI. OH NpDnEKNr pa3dJIbHOyTuIN3aUIN.
Iyohn 60nee noDpO6Hoi HOpMaunno nepepaotke yTnH3aun 3TOO n3deJna obaNTbcB MeHTbI cHTpyTNn3aun OTXoDB Nm B Mara3NH, rne 6blIO npno6peTeHO n3dJIe.
Hactoian 3neKtpueckn np6op BbINOHNB COOTBeCTBUN C eBponeckO dupeKTHBOI 2012/19/CE no yTnIN3aunn 3neKtpueckoro n 3neKtpOHHO 6OpdyOBAHNA.
CoIIOeHne dupeKTHB, kacaIoUxCra yTnIN3aunn DaHHORo np6opa, nomoraet npedotBpaNTb uyep6, KOTOpBIM MOKeT 6bITb HaHeceH OKpykaIOSe cpeDe N 3DOpOBbIO B pe3yIbTaTe 0bUHNOy TnIN3aU 3TOT CmBON O3Haayet, YTO IN3dEInne He NOJNeKHT yTnIN3aUnn B KaueCTBE 6bITOBbIX OTXIOB, a DOJXHO 6bITb HAnpaBNeHO B OprAHIN3aUIO, 3aHImaIOUyIOc c6opom 3neKtpuecknx i 3neKTPoHHbIX KOMNHOHTOB.
CepBnC npOdykun Bcex Mapok rpynnbI Candy, opnHnaHbHbIe 3aNaChbIe qactN, paCXoDhble MaTePnAbIb, akCEccyapbl
| The base diameter of induction cookware | ||
| Cooking zone | Minimum Maximum | |
| 1 & 2 140 | 180 | |
| 3 | 180 | 290 |
The above may vary according to the size of the pan and the material it is made from.
| The base diameter of induction cookware | ||
| Cooking zone | Minimum Maximum | |
| 1 & 2 140 | 180 | |
| 3 | 180 | 290 |
The above may vary according to the size of the pan and the material it is made from.
| The base diameter of induction cookware | ||
| Cooking zone | Minimum Maximum | |
| 1 & 2 140 | 180 | |
| 3 | 180 | 290 |
The above may vary according to the size of the pan and the material it is made from.
| The base diameter of induction cookware | ||
| Cooking zone | Minimum Maximum | |
| 1 & 2 140 | 180 | |
| 3 | 180 | 290 |
The above may vary according to the size of the pan and the material it is made from.