HC506 - Heating Bimar - Free user manual and instructions
Find the device manual for free HC506 Bimar in PDF.
User questions about HC506 Bimar
0 question about this device. Answer the ones you know or ask your own.
Ask a new question about this device
Download the instructions for your Heating in PDF format for free! Find your manual HC506 - Bimar and take your electronic device back in hand. On this page are published all the documents necessary for the use of your device. HC506 by Bimar.
USER MANUAL HC506 Bimar
This symbol tells you to read these instructions carefully before using the appliance, and to inform any third parties if necessary. Keep the instruction booklet for further reference throughout the lifetime of the appliance. If when reading these instructions you find any parts difficult to understand or have any doubts, contact the manufacturer at the address provided on the back page before using the product.
WARNING! This symbol highlights instructions and precautions for safe use.
IP24
This symbol indicate IP24 protection rating: the appliance is protected from water spray from any direction.

This symbol indicate: CAUTION: do not cover the appliance to an overheating.
SAFETYNOTICES
- This appliance is only intended for heating domestic and similar interiors in accordance with these instructions; moreover, it should be considered as a supplement heating appliance and not as a main/central heating system.
This heater is a radio device which intentionally emit and/or receives radio waves for radiocommunication and/or radiodetermination purposes.
Examples of household appliances are appliances for the household functions, those used in the home, or the which may be used for typical household functions even untrained persons:
- in shops, offices and other similar workplaces;
- on farms and in similar locations;
-
by the customers of hotels, motels and other resident environments;
-
in bed and breakfast establishments.
-
The appliance must not be used in dusty environments, those containing particularly volatile materials (they may obstruct the grilles), in very damp locations, in the presence of flammable products, or outdoors. Any other use constitutes misuse and is hazardous. The manufacturer cannot be held liable for any damage arising from misuse, incorrect or irresponsible use, and/or from repairs carried out by unqualified persons.
- The appliance becomes hot when in operation, so only control panel buttons must be touched. Do not touch surface as it is very hot. The appliance's heat output variable and the temperature may become so high that exposed skin is scorched. This appliance should not be by persons with reduced sensitivity to heat, or who are unable to act quickly to prevent scorching.
- The grille and the body do not provide complete prote for children or those with impaired physical, sensory mental capacities.
- Check that the convection heater does not come in contact with water or other liquids. If it is accidentally immersed in a liquid, first disconnect the power supply turning off the control panel switch, and only then rem the plug from the power socket. Dry both the plug and power socket carefully before reactivating the power socket. Reconnect the plug to the power socket and the use the appliance. If in doubt, call in qualified staff.
Warning:
-
Parts of this product may become very hot and cause burns. Special care must be taken in the presence children or vulnerable individuals.
-
When using electrical appliances, always comply with basic safety precautions to avoid the risks of fire, electric shock and physical injury.
-
Do not use the appliance in small rooms containin persons who are unable to leave the room unaide unless they are constantly supervised.
-
Never use this appliance in a room with floor area of less than 4m^2
-
This appliance can be used by children aged from 8 year and above and persons with reduced physical, sensory mental capabilities or lack of experience or the necessary knowledge providing they are supervised or have been instructed on the safe use of the appliance and unders the hazards involved. Children must not play with appliance. Cleaning and maintenance intended to be carried out by the user should not be done by children unless they are supervised.
-
Children of less than 3 years of age must be kept at a distance unless continually supervised. Children between and 8 years of age must only switch the appliance on/off it has been placed or installed in its normal operating position and they are supervised or instructed regarding safe use of the appliance and understand its dang. Children between 3 and 8 years of age must not connect the plug, adjust or clean the appliance, or maintain or set it.
Danger:
- The appliance must not be placed just below a power socket.
- The power socket must be easily accessible so that the plug can be removed easily in an emergency.
- Do not use this appliance in the immediate vicinity of a bathtub, a shower, a swimming-pool, washbasins, etc.
- If the power cord is damaged, it must be replaced by a manufacturer or its aftersales service, or by a person with similar qualifications, to prevent all risks.
- Do not use this heating appliance with programmed timers or any other device which switches the appliance automatically, since there is a fire hazard if the appliance covered or incorrectly positioned.
- To avoid all risk of electric shock, never immerse the p the power cord or the appliance in water or any other I
- Unplug the appliance from the socket when not in use
- Do not touch the appliance with wet hands or feet.
- Never move the appliance when in operation.
- Never leave the device exposed to the weather (sun, rain, etc.).
- If the appliance is dropped or malfunctions, disconnect power cord at once. Check all parts for damage and dc switch it on unless certain it is intact: if in doubt, call ir qualified staff.
- Do not pull on the power cable or the appliance itself to remove the plug from the power socket.
-
Do not move the appliance by pulling the cable.
-
Do not use the appliance if it is not functioning correctly. It appears damaged: if in doubt, call in qualified staff.
- Do not allow the appliance to overheat: check that the inlets and outlets are unobstructed and do not hang anything above or below the appliance. In case of overheating, the integral safety device will cut out ope of the convection heater. To restart the appliance, rem the plug from the power socket and wait for it to cool ( 20/30 minutes) and reconnect the plug.
INSTALLATION
- After removing the packaging, check that the appliance is intact; if in doubt, do not use it and call in qualified staff. Packaging components (plastic bags, expanded polystyrene, nails, etc.) must not be left within reach of children since they are potentially hazardous. Any stickers or advertising leaflets affixed to the appliance must be removed prior to use.
- Before connecting the appliance, check that the voltage values marked on the nameplate are the same as those of the electrical mains, and that the power socket is properly earthed. If the appliance's plug is not compatible with the socket, have the socket replaced with another of suitable type by qualified staff, who must ensure that the socket's wire gauge is suitable for the appliance's power draw. In general, the use of adapters and/or extension leads is not recommended; if their use is unavoidable, they must comply with current safety regulations and their current rating (amps) must be no lower than the maximum current draw of the appliance.
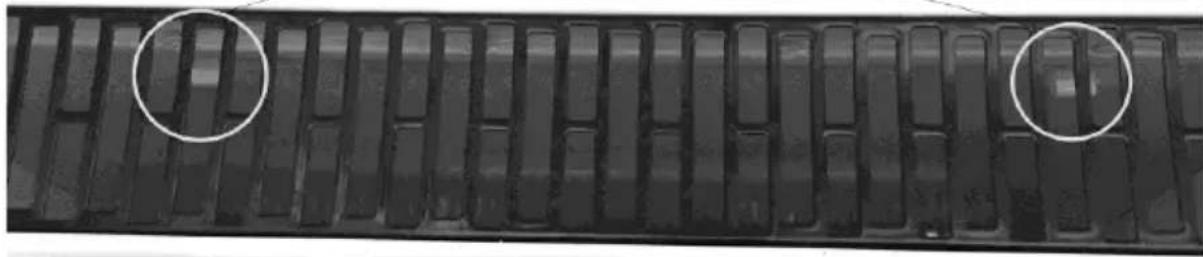
- Take care to ensure that the air inlet and outlet grilles cannot become obstructed, to avoid the risk of fire or overheating of the appliance (inspect regularly); do not cover the appliance, or use it for drying laundry.
- The appliance can be used on the floor by means of the feet provided, or wall-mounted with the aid of the expansion plugs: the wall must have a flat, even surface and must be solid and heat-resistant.
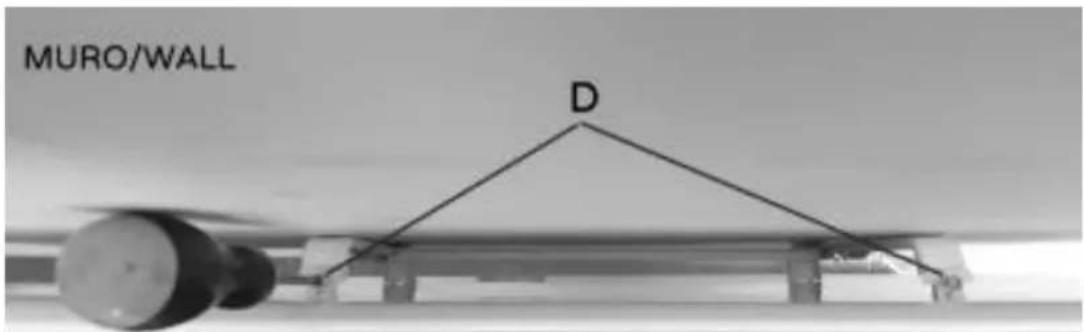
Wall-mounting (see relevant images)
For this type of installation, use the wall mounting bracket and expansion plugs provided (not the feet) and proceed as follows:
- Place the convection heater well away from other heat sources, flammable materials (curtains, upholstery, etc.), flammable gases or explosive materials (spray cans) and materials which may warp in heat. Ensure that gaps of at least 100cm in front of the convection heater, 25cm between the heater and the floor, 100cm between the heater and the ceiling, and 50cm at the sides, are left.
-
The power socket must be easily accessible so that the plug can be removed easily in an emergency; the appliance must not be placed under or near windows.
-
Make sure that there are no internal pipes or wiring (electricity, water or gas, etc.) in the appliance's mounting points.
-
Slightly unscrew 2 fixing screws "D" (4x12mm).
-
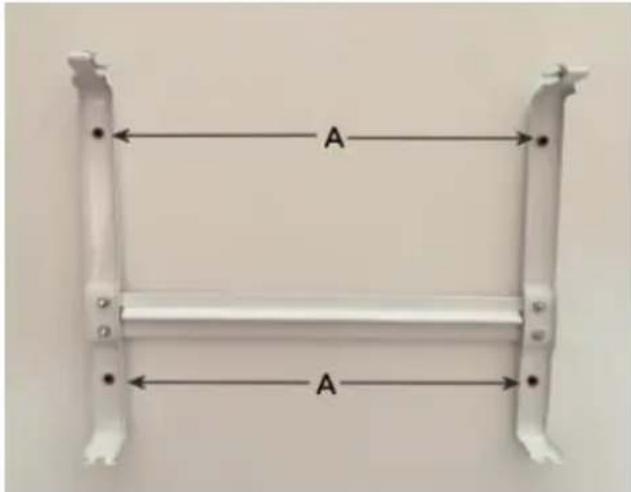
Mark the 4 mounting holes 280 × 158 ~mm (WxH) apart: before making these holes, it is best to check these measurements on the wall mounting bracket itself.
-
Drill the holes in the wall with a bit 0.8mm ; fit the plastic expansion plugs fully into the holes, then fix the mounting bracket with the 4 screws provided "A" (4x35mm).
-
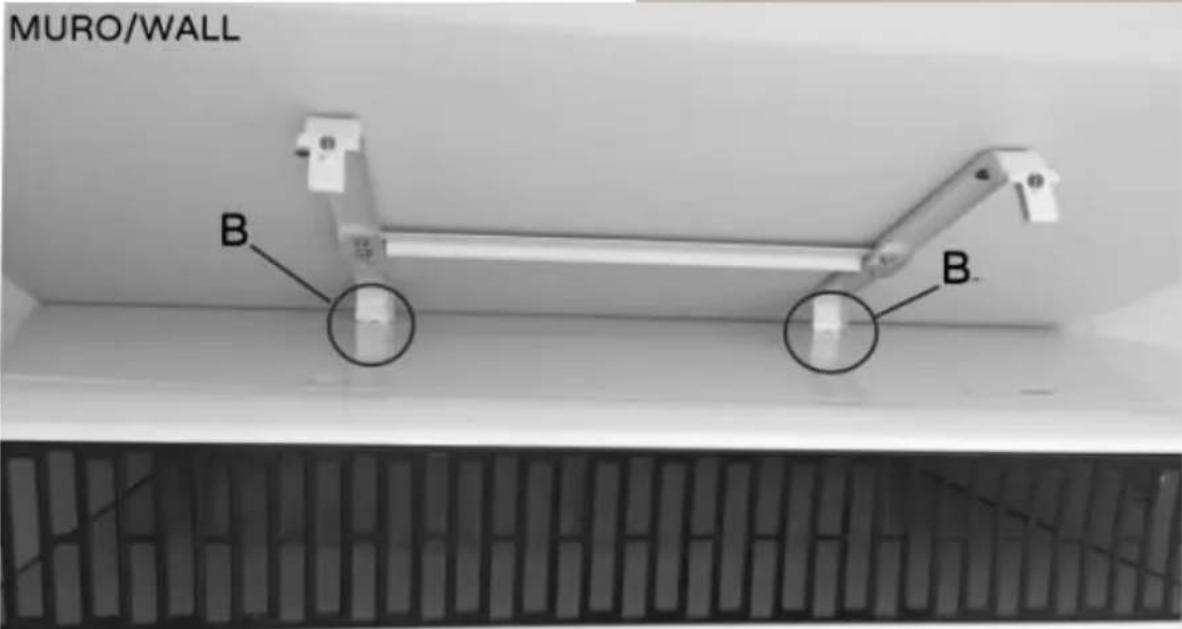
Fit the convection heater on the wall mounting bracket and proceed as follows: - Tilt the bottom of the convection heater to about 45^ so that the bottom slots " JL" fit onto the bottom pegs of the mounting bracket "B".
-
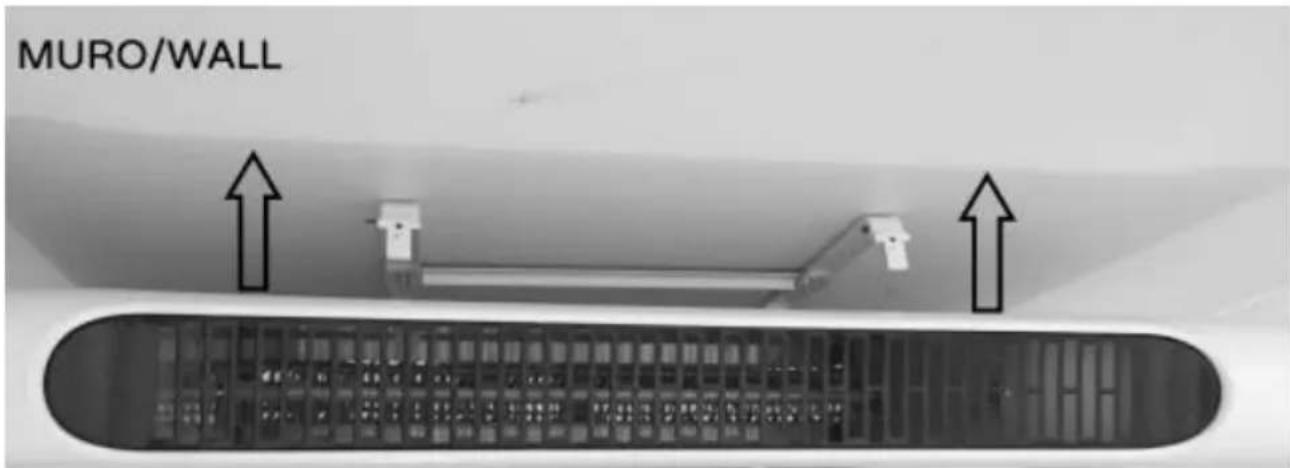
Lift the heater slightly so that the bottom pegs lock, then push it in so that its top slots fit onto the top pegs of the mounting bracket "C".
-
Press the appliance in with a moderate pressure until it click into place, then lock by tightening the screws "D".
-
When done, check that the wall mounting bracket and convector heater are securely fixed together.
+
+
CONVETTORE/CONVECTOR

CONVETTORE/CONVECTOR

CONVETTORE/CONVECTOR

CONVETTORE/CONVECTOR
Portable installation (see relevant image)
If possible, work with the appliance on a flat, smooth, horizontal surface and proceed as follows: fit the bases on the feet and fix them with the four screws provided "1" (3x6mm).
Fit the set of feet on the bottom of the convection heater, and fix them by screwing in four screws "2" for each foot (total 8 screws: 4 × 12 ~mm ); take care to ensure that the feet are perfectly horizontal.
When done, check that the foot mounting bracket and convector heater are securely fixed together.

Make sure that the power cable is correctly positioned and not in contact with hot parts or sharp edges, or wound around the appliance or twisted.
In case of a fault or malfunction, switch the appliance off and have it checked by qualified staff; repairs by unqualified staff may be dangerous and lead to the loss of warranty cover.
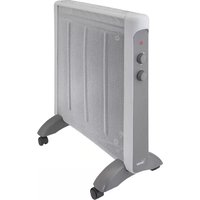
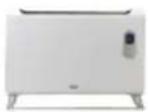
DESCRIPTION
Wifi convection heater, usable via Smartphone using an app with Android or iOS operating systems.
- Electronics with integral wi-fi allowing Smartphone-convection heater communication via an App.
- All functions are adjustable via APP: mode (stand-by/Low/High); Temperature setting 15-35°C; Timer 0-24h and Weekly programming.
- Check that the router is for domestic use, that there are no access restrictions except the password, that the Wi-Fi network is 2.4 GHz, and that there is a strong, uniform Wi-Fi signal in the room where the device is to be installed.
- During initial installation and configuration, make sure that the smartphone is connected to the wi-fi network to be used for the appliance.
First Installation/Setup
1.1 Install the "BIMAR life Smart" App via Google Play (Android) or AppStore (iOS), or scan the QR code provided here.

For Android

For iOS
1.7 Once installed, the app icon appears. Click the "Bimar Live Smart" icon to run the app.

1.8 The first time the app is started, register and enter your credentials:
- click "Register" and confirm the "Privacy Policy Statement" with "I agree" to continue
- enter your phone number or email address (select the mode in the top right-hand corner)
- click "Get check code", wait a few moments and then enter the code received in the registration email or text message in the "Check code" field (also check in the Spam folder if you cannot find the email in your "Incoming Mail" folder).
1.9 Enter the password required and click "Done".
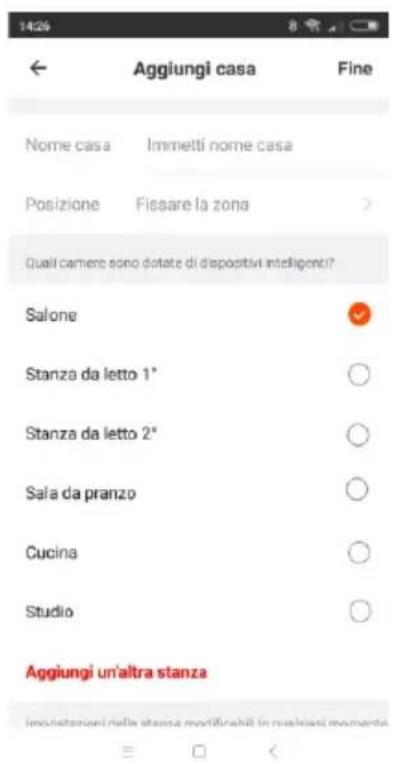
1.10 A screen will open: click "Create Family".
1.11 A screen (as shown on the right) appears where you can customise the home (name, position and name of room). Confirm when done.
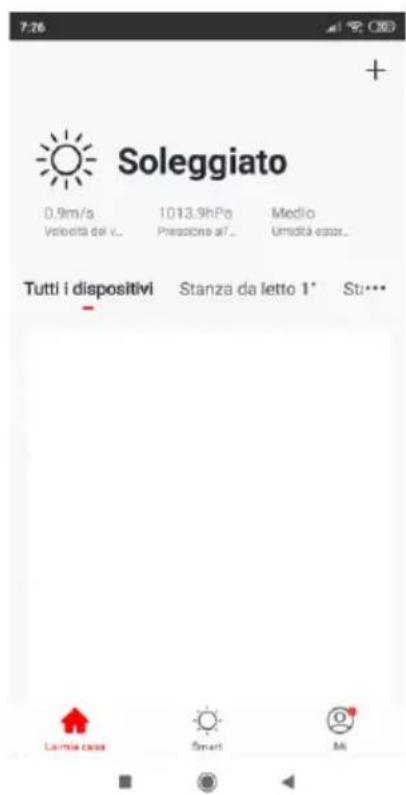
1.7 Once you have customised the app
correctly, the main screen appears. It
contains the following functions:
- List and control of devices, subdivided
room "
- List and control of scenarios
User profile management
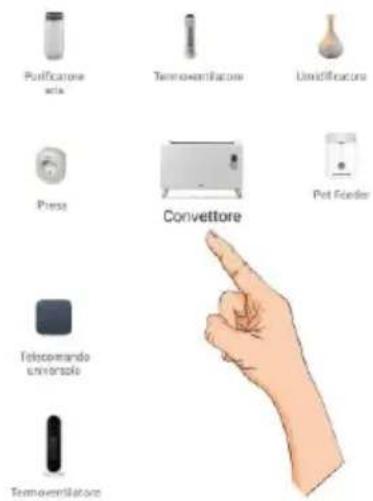
- Pairing of new devices
- To pair new devices with the smartphone
2.7 Connect the plug to the power socket and press the 0/1 switch (on the side; a "beep" will be heard and the symbol will appear. If the light does not flash quickly, press the "
” button for about five seconds: a "beep" will be heard and light “ ” flashes quickly; release the “ ” button.
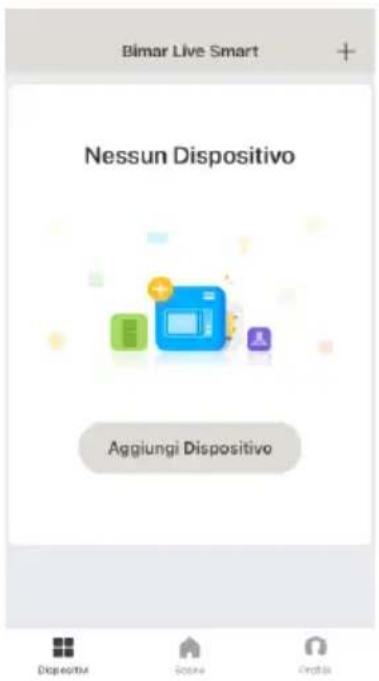
2.8 Open APP on the smartphone: in the first screen, click "ADD DEVICE" or click "+" in the top right corner.
2.10In the next screen, click" quickly.
/Check that the LED flashes
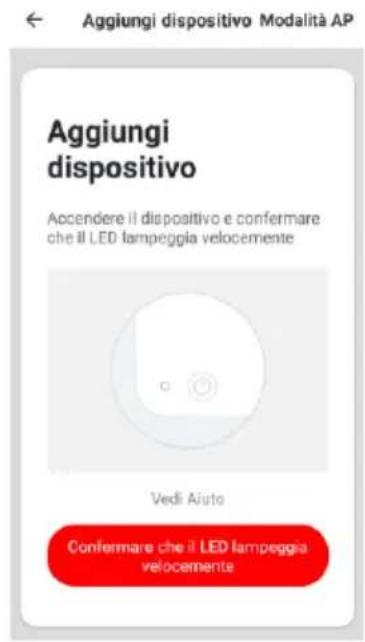
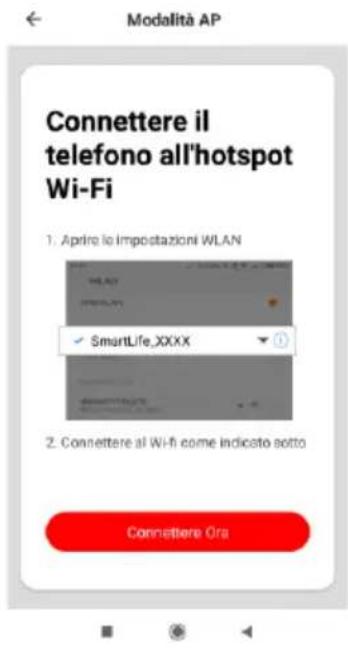
The device can also be paired using the "AP Mode". Press the top right button, hold down the ON-OFF button on the control panel
until the light " " flashes quickly, access the smart phone WI-Fl settings and connect to the "Bimar Live Smart xxx" or "Smart Life xxx" network, then press "connect now".
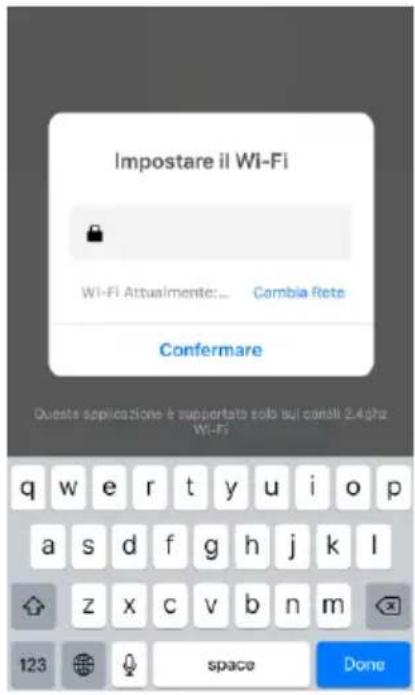
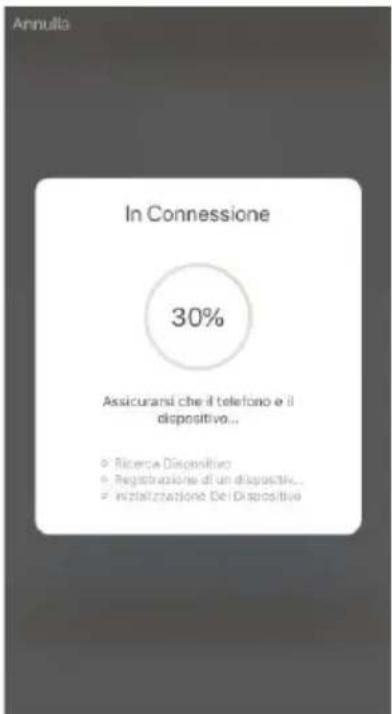
2.11 In the next screen, "Set Wi-Fi" (see below), type the PASSWORD of your Wi-Fi network and click the "confirm" symbol to activate the connection. The countdown (see below) starts and will be interrupted as soon as the smartphone has connected to the device.
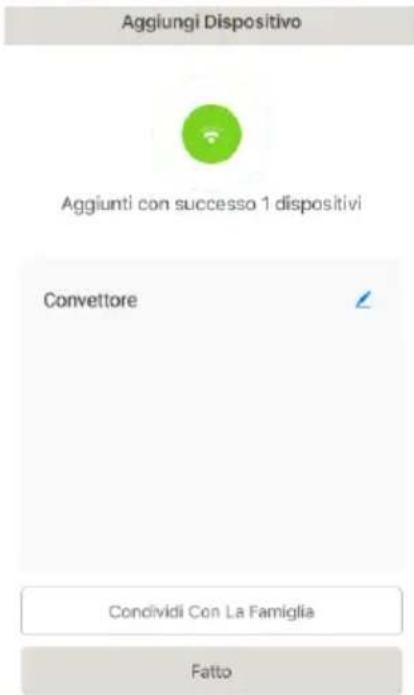
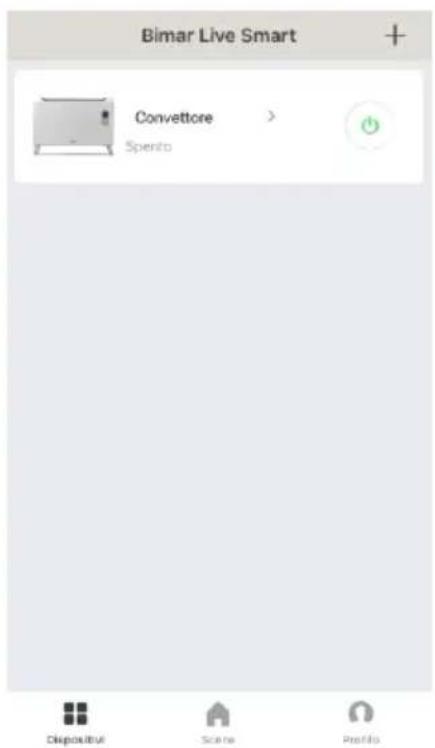
2.12 The first screen reappears with the added option "CONVECTION HEATER" (see right); click "DONE" to activate the heater.
The device can also be shared with other users. (See next section: Description of convection heater control panel or Use via smartphone)
If the above operations do not proceed correctly, the appliance must be reset by disconnecting the plug from the power socket and leaving the appliance disconnected for
30 seconds. Re-connect the plug to the appliance power socket and press the switch (on the side) into the I position. Press the " " button for about five seconds; a "beep" will be heard and the corresponding light will flash quickly. Release the button.
Settings and customisations.
Open the smartphone screen and press in the bottom right corner to customise the following functions:
Home management
- Message centre
- Assistance centre
- Configure (audio, alerts, info, cache memory clear)
Press in the bottom centre to customise operation of the fan heater to suit the various scenarios or operating situations provided by the APP (for example: Back home, Leaving home, Dawn, Goodnight, Temperature, Humidity, Weather, Air quality, Dawn/dusk) or in combination with other devices.
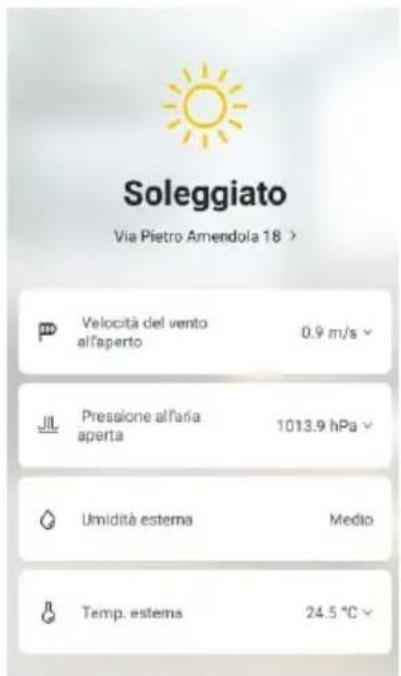
Press in the bottom left corner and then in the top of the screen, for example:
to customise (update and/or change where permitted) the appliance's position or the outdoor wind speed, air pressure, humidity and temperature (see right).
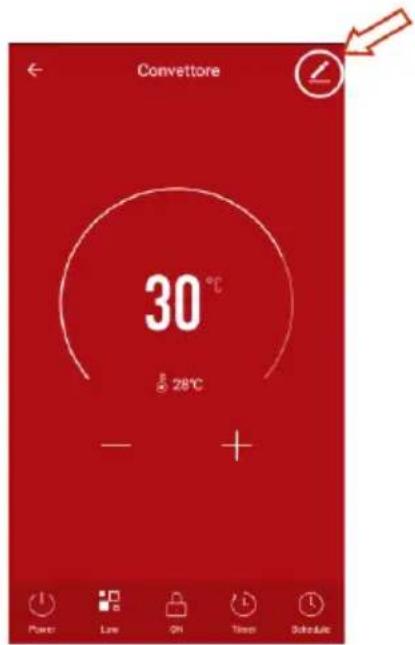
Press top right to customise the following:
- Change Device name
Device position - Check Network
- Third-party devices supported: Amazon Alexa, Google Assistant, IFTTT
Device sharing
-Create a Comment group
Device Info - Feedback
- Update Firmware
- Remove device
-RestoreFactorySettings
The smartphone must be connected to Wi-Fi or cellular data network for remote control. Voice control and IFTTT
The device is compatible with Amazon Alexa and Google Assistant voice controls and supports IFTTT. Open the corresponding App (make sure that the account and password used are the same as those of the "Bimar Live Smart" app) and follow the settings.
Google Home: some basic vocal commands are:
"OK Google" or "Hey Google", turn on XX (name of the device)
"OK Google" or "Hey Google", turn off XX (name of the device)
-etc.
Amazon Alexa:some basic vocal commands are:
Alexa", turn on XX (name of the device)
"Alexa", turn off XX (name of the device)
-etc.
IFTTT is able to generate small "programs", known as "Applets" in the APP. The following application must be installed in order to use IFTTT: "Smart Life".
Example of an Applet: switch on the fan heater automatically when you are near your home.
Description of convection heater control panel or Use via smartphone (Follow the procedure in point 1.1)
Control panel
Smartphone Screen
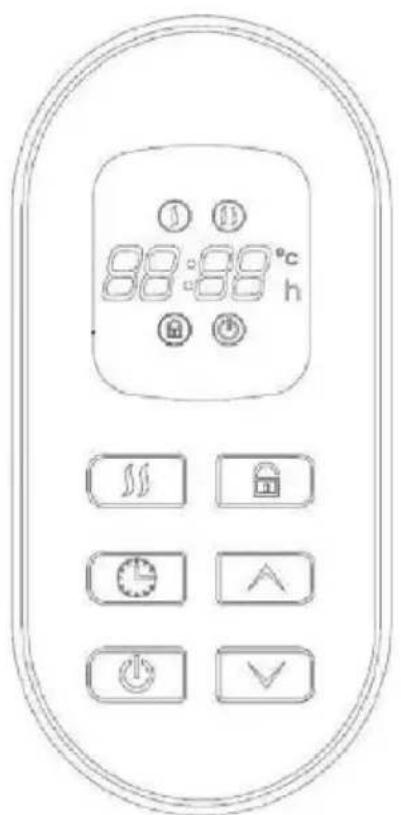
The device has the following adjustment and control functions and accessories:
- Main switch (1/0), on rear: when on "I" the appliance is in standby (light ); when on "O" the appliance is off.
- " " button: activates the functions and the room temperature appears on the display and is selected, or switches the appliance to standby.
- “” and “” buttons: set the room temperature (15-35°C); press the buttons to increase “” or decrease “”.
- " ” button: selects:
- Eco (750W), comfortable warmth: the display shows ;
-
Rapid (150W), immediate warmth: the display shows ;
-
“ button: the operating time after which the appliance stops. Press the button and the time “(0 0)h” flashes; press “ ” to increase or “ ” to decrease. Each pressure on the button modifies the time (from 1 h up to 24h with intervals of 1 h), and the time selected lights up on the control panel. To deactivate the timer, press the button until all the times go out (0 Oh).
-
Weekly programming (only activate via Smartphone): sets: the on/off periods for each day of the week and the temperature.
For on-off periods, select the time (hours and minutes) and confirm the function (on or off), and then the next ones (off or on) - periods may be repeated during the week; the temperature setting (15 - 35)^ and Eco or Rapid mode.

- " child safety button: press for about five seconds to lock the control panel; the corresponding symbol appears. Reverse the operation to unlock.
- Safety device to stop operation if case of overheating: to return the device to operation, remove the plug from the power socket and wait for it to cool (about 10/20 minutes), connect the plug and switch it back on.
Use
First use: to eliminate the "new smell" operate the device for 10/15 minutes at maximum power (Rapid): the room should be ventilated during this procedure
- Connect the plug to the power socket: a "beep" will be heard. The appliance will switch
to standby mode and light " will appear.
- Press the “ ” button to activate the appliance and select the function required.
- To stop the appliance, press the " " button then set the 0/1 switch on. 0 and remove the plug from the socket.
During long periods of inactivity, remove the plug from the electric socket.
CLEANING AND MAINTENANCE
Warning:: before cleaning the appliance, remove the plug from the power socket and wait for it to cool.
- Check regularly that the air inlet and outlet grilles are not obstructed by fluff or threads; clean with a vacuum cleaner if necessary, taking care not to damage the heating element.
- Clean the body of the device with a soft, damp cloth: do not use metal scouring pads or abrasive products.
- If the convection heater is to be out of use for a long period of time, cover it and store it in a dry place. It is best to return it to its original packaging to protect it from dust and damp.
- If you decide not to use the appliance any more, it must be rendered unusable by cutting off the power supply cord (first making sure that the plug has been removed from the power socket), and any parts which are hazardous if used as children's playthings must be rendered harmless.
Information for correct disposal of the product under the European Directive directive 2011/65/EU.
At the end of its lifetime, the product must not be disposed of with ordinary urban waste. It can be consigned to the special waste recycling centres provided by local government, or by the retailers who provide this service.
Proper disposal of a household appliance prevents possible detrimental effects on the environment or health arising from its incorrect disposal and allows the recovery of its constituent materials, generating major savings of energy and resources. The product bears the crossed-out symbol of a wheeled rubbish bin to indicate that it must be disposed of separately. Illegal dumping of the product by the user will be subject to prosecution under the relevant law.
- Gestion maison
- Centre messages
- Centre assistance
- Configurer (audio, notifications, infos, effacer)