
PFRS 1 5 B3 - Tile repair kit PARKSIDE - Free user manual and instructions
Find the device manual for free PFRS 1 5 B3 PARKSIDE in PDF.

| Product type | Tile repair kit |
| Brand | Parkside |
| Model | PFRS 1 5 B3 |
| Dimensions (L x W x H) | Approx. 14.7 x 3.5 x 2.2 cm |
| Weight (with batteries) | Approx. 90 g |
| Power supply | 2 batteries 1.5 V type AA/LR6/Mignon |
| Main functions | Melting and filling chips and cracks in tiles, stone and ceramics using hard wax sticks |
| Included accessories | Wax melting device, cleaning scraper, spatula with planing function, rounded spatula, 11 hard wax sticks, sanding sponge, cleaning cloth, 2 AA batteries, storage case |
| Operating temperature | Reached in approx. 15 seconds |
| Intended use | Private use only, indoors dry |
| Maintenance and cleaning | Clean after cooling with a dry cloth; scrape off wax residues with the rounded spatula; do not use chemical products |
| Safety | Do not use near open flames or flammable liquids; avoid contact with the hot tip; do not use on surfaces in contact with food; keep out of reach of children under 8 years |
| Warranty | 3 years from date of purchase |
| Spare parts | Available during the warranty period; contact customer service |
| Disposal | Do not dispose of in household waste; recycle according to local regulations |
Frequently Asked Questions - PFRS 1 5 B3 PARKSIDE
User questions about PFRS 1 5 B3 PARKSIDE
0 question about this device. Answer the ones you know or ask your own.
Ask a new question about this device
Download the instructions for your Tile repair kit in PDF format for free! Find your manual PFRS 1 5 B3 - PARKSIDE and take your electronic device back in hand. On this page are published all the documents necessary for the use of your device. PFRS 1 5 B3 by PARKSIDE.
USER MANUAL PFRS 1 5 B3 PARKSIDE
text_image
PDF ONLINE www.lidl-service.comTILE REPAIR KIT / FLIESEN-REPARATURSET/ SET DE RÉPARATION POUR CARRELAGE PFRS 1,5 B3
GB IE
TILE REPAIR KIT
Operating instructions
DE AT CH
FLIESEN-REPARATURSET
Bedienungsanleitung
FR BE
SET DE RÉPARATION POUR CARRELAGE
Mode d'emploi
NL BE
TEGEL REPARATIESET
Gebruiksaanwijzing
CZ
SADA NA OPRAVU DLAŽDIC
Návod k obsluze
PL
ZESTAW NAPRAWCZY DO PŁYTEK
Instrukcja obstugi
SK
SÚPRAVA NA OPRAVU OBKLADAČIEK
Návod na obsluhu
ES
Before reading, unfold both pages containing illustrations and familiarise yourself with all functions of the device.
DE AT CH
GB/IE Operating instructions Page 1
| DE/AT/CH Bedienungsanleitung Seite 13 | |||
| FR/BE Mode d'emploi Page 27 | |||
| NL/BE Gebruiksaanwijzing Pagina 43 | |||
| CZ Návod k obsluze Strana 55 | |||
| PL Instrukcja obstugi Strona 67 | |||
| SK Návod na obsluhu Strana 81 | |||
| ES | Instrucciones de uso | Página | 93 |
| DK | Betjeningsvejledning | Side | 105 |
text_image
Labeled diagram of a battery with numbered parts and a battery cell showing charge distribution.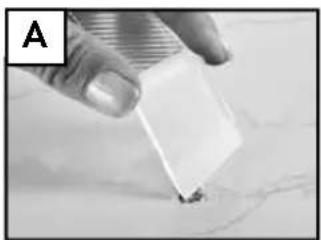
natural_image
Close-up of a hand holding a white rectangular object with a small dark spot, against a faint background (no text or symbols visible)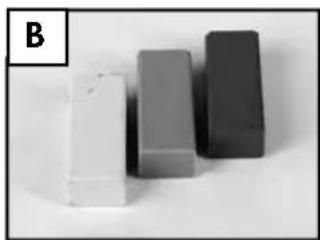
natural_image
Three rectangular blocks of varying shades of gray and black, arranged on a plain surface (no text or symbols visible)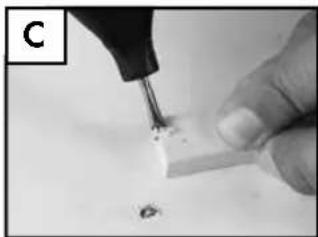
natural_image
Close-up of a hand using a tool to apply material to a small white object (no visible text or symbols)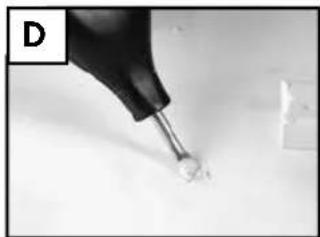
natural_image
Close-up of a pipette tip dispensing liquid onto a surface, with no visible text or symbols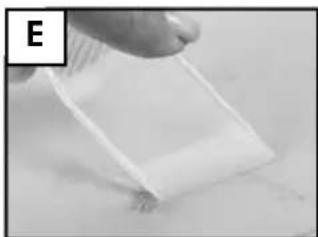
natural_image
Close-up of a hand holding a white rectangular object, possibly a medical or laboratory device (no visible text or symbols)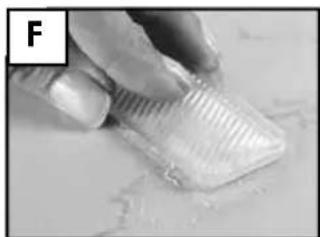
natural_image
Close-up of a hand using a plastic eraser to apply material (no visible text or symbols)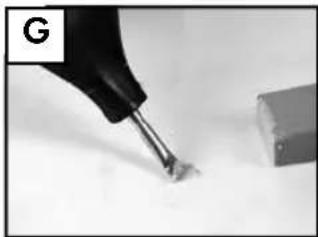
natural_image
Close-up of a hand holding a small tool tip, with a small object nearby (no visible text or symbols)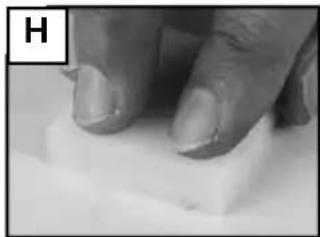
natural_image
Close-up of a finger pressing a white object on a flat surface (no text or symbols visible)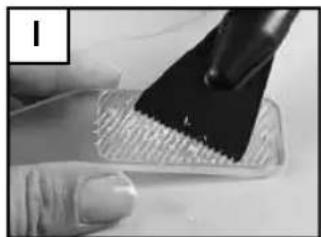
natural_image
Close-up of a gloved hand holding a small transparent container with a black tool, no visible text or symbolsTable of contents
Introduction 2
Limited liability 2
Intended use 2
Warnings used 3
Safety 3
Safety instructions for handling batteries .... 4
Basic safety instructions 5
First use....6
Items supplied and transport inspection ..... 6
Disposal of the packaging 6
Battery insertion/exchange 7
Operating elements....7
Handling and operation .....7
Heat up the wax melter tip ..... 7
Application example. 8
Troubleshooting....9
Malfunction causes and remedies .....9
Cleaning 9
Storage when not in use ..... 9
Disposal 10
Disposal of the appliance....10
Disposing of the batteries ..... 10
Appendix 10
Technical data....10
KompernassHandelsGmbHwarranty.....10
Service 12
Importer 12
Introduction
Congratulations on the purchase of your new appliance.
You have clearly decided in favour of a high-quality product. These operating instructions are a part of this product. They contain important information in regard to safety, use and disposal. Before using the product, familiarise yourself with all operating and safety instructions. Use this appliance only as described and only for the specified areas of application. Retain these instructions for future reference. In addition, pass these operating instructions on to whoever might acquire the appliance at a future date.
Limited liability
All technical information, data and information for installation, connection and operation contained in these operating instructions correspond to the latest at time of printing and, to the best of our knowledge, take into account our previous experience and know-how. No claims can be derived from the details, illustrations and descriptions in these instructions. The manufacturer assumes no responsibility for damage caused by failure to observe these instructions, improper use, incompetent repairs, making unauthorised modifications or for using unapproved replacement parts.
Intended use
This tile repair kit is intended for the repair of tiles, stoneware and ceramics. Do not use it on surfaces that come into contact with food. The supplied wax melter is intended exclusively for the melting of hard wax suitable for these applications. The appliance is intended exclusively for domestic use. Do not use the appliance for commercial or industrial applications. Use the appliance only in a dry environment resp. in indoor areas. This appliance is not intended for any other use or for uses beyond those detailed. Claims of any kind for damage resulting from unintended use will not be accepted. The user alone bears the risk.
Warnings used
In these extant operating instructions the following warnings are used:
DANGER
A warning at this risk level indicates a threateningly dangerous situation.
If the dangerous situation is not avoided, it could lead to death or serious physical injury.
▶ Follow the instructions in this warning to avoid the death of or serious physical injury to people.
WARNING
A warning at this risk level indicates a potentially dangerous situation.
If the dangerous situation is not avoided, it could lead to physical injuries.
▶ Follow the instructions in this warning to avoid personal injuries.
CAUTION
A warning at this risk level indicates potential property damage.
If the situation is not avoided it could lead to property damage.
▶ Follow the directives in this warning to avoid property damage.
NOTICE
▶ A notice indicates additional information that could assist you in the handling of the appliance.
Safety
In this chapter you will receive important safety information regarding the handling of the appliance. This appliance complies with the statutory safety regulations. Incorrect usage can lead to personal injury and property damage.
DANGER
▶ Do not use the appliance in locations where there is a risk of fire or explosion, e.g. in the vicinity of inflammable liquids or gases.
Safety instructions for handling batteries
WARNING
Mishandling batteries can cause fires, explosions, leakages of dangerous chemicals or other hazards!
- Keep batteries out of the reach of children.
■ Make sure that no one can swallow the batteries.
■ If a battery is swallowed, seek medical assistance immediately.
■ Always use the stated battery type.
■ Never try to recharge non-rechargeable batteries.
■ Remove the batteries from the appliance before recharging them.
■ Do not throw batteries into a fire or water.
■ Never expose batteries to high temperatures or direct sunlight.
■ Never open or deform batteries.
■ Do not short-circuit the terminals.
■ Remove depleted batteries from the appliance and dispose of them safely.
■ Do not use different types of batteries together or mix new batteries with used batteries.
■ Always ensure that the batteries are installed in the appliance with the correctly aligned polarity.
■ If you do not intend to use the appliance for an extended period, remove the batteries.
■ Check the condition of the batteries at regular intervals. Leaking batteries can cause injuries as well as damage to the appliance.
■ Always use protective gloves when handling leaking batteries! Clean the battery and appliance contacts with a dry cloth. Do not let the chemicals get into contact with your skin and mucous membranes, especially your eyes. In the event of exposure to the chemicals, wash the affected area with plenty of water and seek medical advice immediately.
Basic safety instructions
For safe handling of the appliance, follow the safety information below:
■ Before use, check the appliance for visible external damage. Do not take into use a damaged appliance or one that has been dropped.
■ Do not make any unauthorised modifications or alterations to the appliance.
■ This appliance may be used by children aged 8 over and by persons with reduced physical, sensory or mental capabilities or lack of experience and knowledge, provided that they are under supervision or have been told how to use of the appliance safely and are aware of the potential risks. Children must not play with the appliance. Cleaning and user maintenance tasks must not be carried out by children unless they are supervised.
■ Protect the appliance against moisture and liquid penetration.
■ Do not operate the appliance close to open flames (e.g. candles).
■ Avoid direct sunlight.
■ Avoid unintentional operation of the wax melter.
■ Avoid skin contact with the wax melter tip and protect yourself against dripping wax. There is a risk of burns!
First use
DANGER
During the commissioning of the appliance personal injury and property damage could occur!
▶ Packaging material should not be used as a play thing. There is a risk of suffocation.
Items supplied and transport inspection
The tile repair set is supplied with the following components as standard:
- Wax melter
- Cleaning scraper
- Scraper with planer function
- Scraper with curvature
- 11 x Hard wax sticks
- Sanding sponge
- Cleaning cloth
- 2 x Batteries 1.5 V Type AA/LR6/Mignon
- Storage case
• This operating manual
NOTICE
▶ Check the contents to ensure that everything is available and for signs of visible damage.
▶ If the contents are not complete, or are damaged due to defective packaging or through transportation, contact the Service Hotline (see chapter Service).
Disposal of the packaging
The packaging materials have been selected for their environmental friendliness and ease of disposal and are therefore recyclable.
Dispose of packaging materials that are no longer needed in accordance with applicable local regulations.
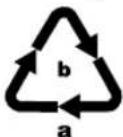
Dispose of the packaging in an environmentally friendly manner. Note the labelling on the packaging and separate the packaging material components for disposal if necessary. The packaging material is labelled with abbreviations (a) and numbers (b) with the following meanings: 1-7: Plastics, 20-22: Paper and cardboard, 80-98: Composites.
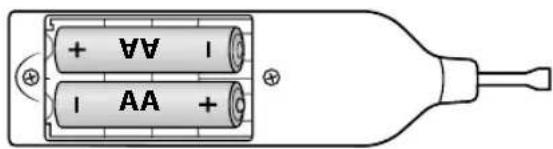
Battery insertion/ exchange
This wax melter requires 2 x 1.5 V batteries, type AA/LR6/Mignon, for operation.
◆ Open the battery compartment④ on the back of the wax melter ①.
Insert the batteries into the wax melte 1 as indicated in the battery compartment 4 (see fig. 1).
◆ Close the battery compartment④.
text_image
+ AV I AA +fig. 1
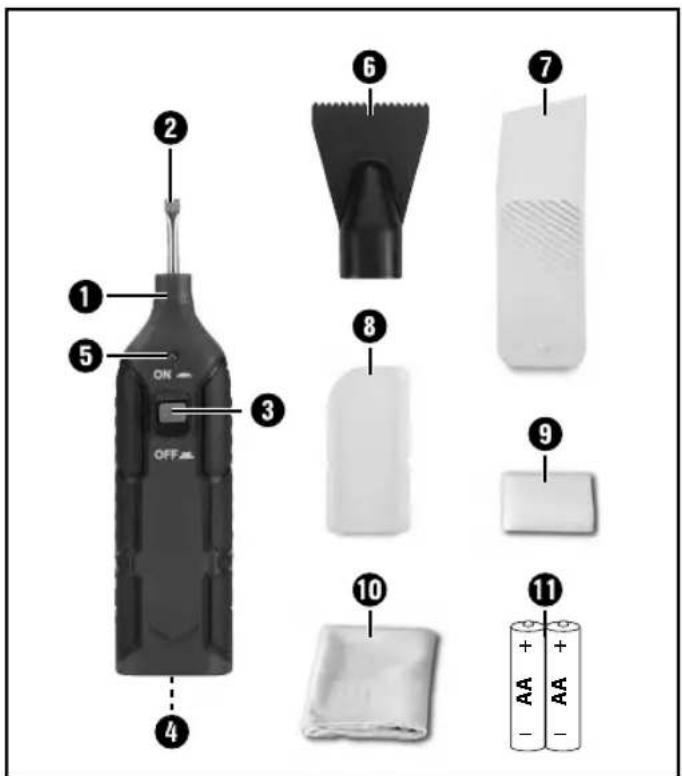
Operating elements
1 Wax melter
② Wax melter tip
③ Activation button ON /OFF
4 Battery compartment
5 Red LED
6 Cleaning scraper
7 Scraper with planer function
8 Scraper with curvature
9 Sanding sponge
⑩ Cleaning cloth
⑪ Battery type AA/LR6/Mignon
Handling and operation
In this chapter you will receive important information for the handling and operation of the appliance.
Heat up the wax melter tip
◆ Press and hold the activation button ON/
OFF ■ 3 heat up the wax melter tip . 2 The red LED 5 will remain lit as long as you hold down the activation button ON √
OFF 3.
Application example
Preparation (Fig. A)
- Clean the damaged area with the scrape and remove all loose parts.
Colour selection (Fig. B)
Select the matching colour tone. Ensure that several colour tones, from light to dark, are always used.
Melting and filling (Figs. C + D)
Press and hold the activation button ON/OFF heat up the wax melter tip. The appliance reaches operating temperature after about 15 seconds.
Now melt small portions of the hard wax and place them into the damaged area, until it is slightly overfilled. Start with the light colour tones and progress step by step to the dark colour tones.
Filling (Fig. E)
For vertical surfaces it is recommended to mix the colour tone beforehand, collect it on the scraper ⑦ and then fill the damaged area. When working on curved areas the scraper with curvature ⑧ should be used to fill hard wax into the damaged area.
CAUTION
The wax melter tip gets very hot! When mixing the colour, use a work surface made of a suitable heat-resistant material, such as ceramic.
Smoothing (Fig. F)
◆ Allow the hard wax to cool for a few seconds (about 10 seconds).
After cooling, smooth any protrusion with the planing grooves of the scraper ⑦. Use only light pressure to smooth the protrusion.
Fine matching (Fig. G)
◆ For fine matching, now imitate any marbling with a darker colour tone.
Subsequently, again smooth any protrusion with the planing grooves of the scraper ⑦.
Degreasing (Fig. H)
To finish, remove the last hard wax residues with the sanding sponge 9. Thereby the gloss level of the surface will also be simultaneously matched. Job done!
Cleaning the planer grooves (Fig. I)
Place the cleaning scrape on the plane grooves of the scraper and scrape the wax residues from the plane grooves.
Troubleshooting
In this chapter you will receive important information for malfunction localisation and malfunction remedies.
Malfunction causes and remedies
The following table will help with localising and remedying minor malfunctions:
| Defect | Possible cause | Solution |
| The wax melter tip 2 does not get hot. | Thebatteries have been inserted incorrectly. | Insert the batteries into the wax melter 1 as indicated in the battery compartment 4 |
| Thebatteries are discharged. | Insert two new batteries. |
NOTICE
▶ If you cannot solve the problem with the aforementioned solutions, please contact the Service Hotline (see chapter Service).
Cleaning
CAUTION
Damage to the appliance!
▶ Ensure that, when cleaning it, no moisture can penetrate into the appliance, so as to avoid irreparable damage to it.
▶ Do not use chemical or abrasive cleaning agents. These could damage the housing.
Clean the wax melte ① and the wax melter tip ② with the cleaning cloth ③ only when they have cooled down.
♦ Scrape the wax residue off the wax melter tip 2 using the scraper with curvature 8.
Storage when not in use
If you do not intend to use the appliance for an extended period of time, remove the batteries. Store all parts of the tile repair kit in the storage case and in a clean, dry location out of direct sunlight.
Disposal
Disposal of the appliance

Do not dispose of the appliance in your normal domestic waste. This product is subject to the provisions of European Directive 2012/19/EU WEEE (Waste Electrical and Electronic Equipment).
Dispose of the appliance through an approved disposal centre or at your community waste facility. Please pay heed to the currently applicable regulations. In case of doubt, please contact your waste disposal centre.

Your local community or municipal authorities can provide information on how to dispose of the worn-out product.

The product is recyclable, subject to extended producer responsibility and is collected separately.
Disposing of the batteries

Do not dispose of the batteries with domestic waste. Every consumer is statutorily obliged to dispose of batteries/rechargeable batteries at a collection point in their community/district or to a dealer.
This obligation is intended to ensure that batteries are disposed of in an environmentally responsible manner. Dispose of batteries only when they are fully discharged.
Appendix
Technical data
| Voltage supply batteries | 2 x 1.5 V === (direct current) type AA/LR6/Mignon |
| Dimensions approx. | 14.7 x 3.5 x 2.2 cm |
| Weight (including batteries) approx. | 90 g |
KompernassHandelsGmbH warranty
Dear Customer,
This appliance has a 3-year warranty valid from the date of purchase. If this product has any faults, you, the buyer, have certain statutory rights. Your statutory rights are not restricted in any way by the warranty described below.
Warranty conditions
The warranty period starts on the date of purchase. Please keep your receipt in a safe place. This will be required as proof of purchase. If any material or manufacturing fault occurs within three years of the date of purchase of the product, we will either repair or replace the product for you or refund the purchase price (at our discretion). This warranty service requires that you present the defective appliance and the proof of purchase (receipt) within the three-year warranty period, along with a brief written description of the fault and of when it occurred. If the defect is covered by the warranty, your product will either be repaired or replaced by us. The repair or replacement of a product does not signify the beginning of a new warranty period.
Warranty period and statutory claims for defects
The warranty period is not prolonged by repairs effected under the warranty. This also applies to replaced and repaired components. Any damage and defects present at the time of purchase must be reported immediately after unpacking. Repairs carried out after expiry of the warranty period shall be subject to a fee.
Scope of the warranty
This appliance has been manufactured in accordance with strict quality guidelines and inspected meticulously prior to delivery.
The warranty covers material faults or production faults. The warranty does not extend to product parts subject to normal wear and tear or to fragile parts which could be considered as consumable parts such as switches, batteries or parts made of glass.
The warranty does not apply if the product has been damaged, improperly used or improperly maintained. The directions in the operating instructions for the product regarding proper use of the product are to be strictly followed. Uses and actions that are discouraged in the operating instructions or which are warned against must be avoided.
This product is intended solely for private use and not for commercial purposes. The warranty shall be deemed void in cases of misuse or improper handling, use of force and modifications / repairs which have not been carried out by one of our authorised Service centres.
Warranty claim procedure
To ensure quick processing of your case, please observe the following instructions:
Please have the till receipt and the item number (IAN) 373883_2104 available as proof of purchase.
■ You will find the item number on the type plate on the product, an engraving on the product, on the front page of the operating instructions (below left) or on the sticker on the rear or bottom of the product.
If functional or other defects occur, please contact the service department listed either by telephone or by e-mail.
■ You can return a defective product to us free of charge to the service address that will be provided to you. Ensure that you enclose the proof of purchase (till receipt) and information about what the defect is and when it occurred.

You can download these instructions along with many other manuals, product videos and installation software at www.lidl-service.com.
This QR code will take you directly to the Lidl service page (www.lidl-service.com) where you can open your operating instructions by entering the item number (IAN) 373883_2104.
Service
GB Service Great Britain
Tel.: 0800 404 7657
E-Mail: kompernass@lidl.co.uk
IE Servicelreland
Tel.: 1890 930 034
(0,08 EUR/Min., (peak))
(0,06 EUR / Min., (off peak))
E-Mail: kompernass@lidl.ie
IAN 373883_2104
Importer
Please note that the following address is not the service address. Please use the service address provided in the operating instructions.
KOMPERNASS HANDELS GMBH
BURGSTRASSE 21
44867 BOCHUM
GERMANY
www.kompernass.com
Inhaltsverzeichnis
Einleitung 14
text_image
+ A V - I AA + +Abb. 1
Bedienelemente
KOMPERNASS HANDELS GMBH
BURGSTRASSE 21
44867 BOCHUM
DEUTSCHLAND
www.kompernass.com
Sommaire
Introduction 28
text_image
+ A V I I AA + +Fig. 1
KOMPERNASS HANDELS GMBH
BURGSTRASSE 21
44867 BOCHUM
ALLEMAGNE
www.kompernass.com
Inhoud
Inleiding 44
text_image
+ ∀ I I AA + ⊕Afb. 1
Bedieningselementen
KOMPERNASS HANDELS GMBH
BURGSTRASSE 21
44867 BOCHUM
DUITSLAND
www.kompernass.com
Obsah
Úvod....56
Omezení ručení 56
text_image
+ ∀ 1 - AA + ⊕Obr. 1
Ovládací prvky
KOMPERNASS HANDELS GMBH
BURGSTRASSE 21
44867 BOCHUM
NĚMECKO
www.kompernass.com
Spis treści
Wstep 68
text_image
+ ∀V I AA + +Rys. 1
Elementy obstugowe
KOMPERNASS HANDELS GMBH
BURGSTRASSE 21
44867 BOCHUM
NIEMCY
www.kompernass.com
Obsah
Úvod....82
KOMPERNASS HANDELS GMBH
BURGSTRASSE 21
44867 BOCHUM
NEMECKO
www.kompernass.com
Índice
Introducción....94
text_image
+ ∀ 1 - AA + ⊕Fig. 1
Elementos de control
KOMPERNASS HANDELS GMBH
BURGSTRASSE 21
44867 BOCHUM
ALEMANIA
www.kompernass.com
Indholdsfortegnelse
Indledning 106
text_image
+ ∀ I I AA +Fig. 1
Betjeningselementer
① Vokssmelter
② Vokssmelterens spids
3 Aktiveringsknap ON /OFF
4 Batterirum
5 Rød LED
6 Rengøringsskraber
⑦ Spartel med høvlefunktion
8 Spartel med afrunding
9 Slibesvamp
10 Rengøringsklud
⑪ Batterier af typen AA/LR6/Mignon
KOMPERNASS HANDELS GMBH
BURGSTRASSE 21
44867 BOCHUM
TYSKLAND
www.kompernass.com

KOMPERNASS HANDELS GMBH
BURGSTRASSE 21
44867 BOCHUM
GERMANY
www.kompernass.com
Last Information Update · Stand der Informationen · Version des informations
