
PKH 2500 A1 - Heating PARKSIDE - Free user manual and instructions
Find the device manual for free PKH 2500 A1 PARKSIDE in PDF.

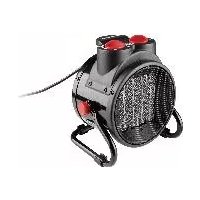
| Product type | Ceramic fan heater |
| Brand | Parkside |
| Model | PKH 2500 A1 |
| Power supply | 220-240 V~, 50 Hz |
| Power level 1 | 1500 W |
| Power level 2 | 3000 W |
| Fan-only function | 25 W |
| Dimensions (L × W × H) | Approx. 265 × 210 × 290 mm |
| Weight | Approx. 2.85 kg |
| Protection class | I |
| Thermostat temperature range | 0 to +85°C |
| Heating element type | Ceramic |
| Overheat protection | Yes |
| Angle adjustment | Yes, via lateral rotary knobs |
| Usage | Indoor only, well-insulated rooms |
| Heating levels | 3 (off, fan, level 1, level 2) |
| Delivery contents | 1 fan heater, 1 instruction manual |
| Warranty | 3 years |
| Maintenance and cleaning | Unplug, clean housing with damp cloth and mild detergent, vacuum grille |
| Safety instructions | Do not cover, maintain minimum distances, do not use outdoors |
Frequently Asked Questions - PKH 2500 A1 PARKSIDE
User questions about PKH 2500 A1 PARKSIDE
0 question about this device. Answer the ones you know or ask your own.
Ask a new question about this device
Download the instructions for your Heating in PDF format for free! Find your manual PKH 2500 A1 - PARKSIDE and take your electronic device back in hand. On this page are published all the documents necessary for the use of your device. PKH 2500 A1 by PARKSIDE.
USER MANUAL PKH 2500 A1 PARKSIDE
KERAMIK-HEIZGEBLASE PKH 3000 A1 CERAMIC FAN HEATER PKH 3000 A1 CHAUFFAGE SOUFFLANT EN CÉRAMIQUE PKH 3000 A1
ATDECH
KERAMIK-HEIZGEBLASE
Operation and Safety Instructions
This product is only suitable for well insulated spaces or occasional use.
NL BE
KERAMISCHE VERWARMINGSVENTILATOR
KERAMICKY TOPNY VENTILATOR
Before reading, unfold the page containing the illustrations and familiarise yourself with all functions of the device.
FR BE
GB/IE Operation and Safety Instructions Page 15
Key to the pictograms
Introduction
Intended Use 16
Equipment 16
Scope of Delivery 16
Technical Data 17
Safety Instructions
General Safety Instructions
Before the Start of Operation
Setting up the Fan Heater 20
Commissioning
Switching Heat Settings and Fan on/off 20
Setting the Temperature 20
Switching off the Fan Heater. 21
Overheating Protection 21
Troubleshooting
Maintenance, Cleaning and Storage
ROWI Germany GmbH warranty
Service
Disposal
| Key to the pictograms: | |||
| Read the operating instructions! | Warning - Danger from hot surfaces! | ||
| Pay attention to warning and safety information! | Dispose of packaging and device environmentally friendly! | ||
| Warning! Risk of electric shock! | The packaging is made of environ-ronmentally friendly materials! | ||
| Warning! Fire hazard! | Observe the marking of the packag-ing materials for waste separation! | ||
| Warning! To prevent the fan heater from overheating, the fan heater should never be covered! | Indoor use only! | ||
CERAMIC FAN HEATER PKH 3000 A1
Introduction
Congratulations on the purchase of your new fan heater. You have opted for a high quality product. The operating instructions are part of this product. They contain important information on safety, usage and disposal. Familiarise yourself with all operating and safety instructions before you use the product. Use the product only as described and only for the specified areas of use. When passing on the product, please do not forget to hand over all the necessary documents to the new user.
Intended Use
This fan heater is intended for heating of enclosed spaces only. The fan heater is not suitable for use in rooms where special conditions exist, such as a corrosive or potentially explosive atmosphere (dust, vapour or gas). Do not use the appliance outdoors. Any other use or modification of the device shall be
deemed to be improper and entails a considerable risk of accidents. We assume no liability for damage resulting from improper use. The fan heater is intended for private use only.
Equipment
1 Stand with carrying handle
Heating level switch
Control light
4 temperature control
Air outlet
6 Rotary knobs
Mains cable
Scope of Delivery
1 Ceramic fan heater PKH 3000 A1
1 Operating manual
Technical Data
Input voltage: 220-240 V , 50Hz
Nominal power consumption: 3000 W
Safety class: I
Heat control setting 1: 1500 W
Heat control setting 2:3000 W
Fan operation: 25 W
Thermostat: 0 to +85 °C
Dimensions: 265 × 210 × 290 ~mm
Weight: approx. 2.85kg
Information requirements for electric local space heaters
Model identifier(s): PKH 3000 A1
Item Symbol Value Unit
Heat output
Nominal heat output P 3.0 kW nom
Minimum heat P 1.5 kW min
output (indicative)
Maximum continuous P_ c 3.0 kW
heat output
Auxiliary electricity consumption
At nominal heat e max na kW
output
At minimum heat el_ na kW
output
In standby mode el_SB na kW
Item Unit
Type of heat input, for electric storage local space heaters only (select one)
manual heat charge control, with [no]
integrated thermostat
manual heat charge control with room [no]
and/or outdoor temperature feedback
electronic heat charge control with room [no]
and/or outdoor temperature feedback
fan assisted heat output [no]
Type of heat output/room temperature control (select one)
single stage heat output and no room [no]
temperature control
Two or more manual stages, [no]
no room temperature control
with mechanic thermostat room [yes]
temperature control
with electronic room temperature control [no]
electronic room temperature [no]
control plus day timer
electronic room temperature [no]
control plus week timer
Other control options (multiple selections possible)
room temperature control, [no]
with presence detection
room temperature control, [no]
with open window detection
with distance control option [no]
with adaptive start control [no]
with working time limitation [no]
with black bulb sensor [no]
ROWI Germany GmbH
- Safety Instructions
Read all safety information and instructions.
Failure to observe the safety information and instructions may result in serious injury or damage to property.
FOR FUTURE REFERENCE, KEEP ALL SAFETY INSTRUCTIONS AND PRECAUTIONS IN A SAFE PLACE!
WARNING! Danger of lifethreatening electric shock! Mortal danger: high contact with ducts or onents under voltage!
- Do not use the fan heater if the power cord or plug is damaged. Have an authorised electrician install a new power cord before any further use of the fan heater.
- Never open the fan heater housing. There is a danger of electric shock if the live connections are touched and/or the electrical and mechanical installation is changed!
Before connecting the fan heater, compare the connection data on the rating plate (voltage and frequency) with the data of your electricity supply. Make sure the data matches,
so that no damage to the fan heater occurs.
Make sure the mains cable is undamaged and is not laid over hot surfaces and/or sharp edges.
- Ensure the power cable does not kink or become trapped.
Repairs to electrical appliances should only be performed by professionals who have been trained by the manufacturer. Unauthorised repairs may result in considerable dangers for the user.
WARNING!
FIRE HAZARD! For
that reason, never use the fan heater in the vicinity of or below curtains and other combustible material.
Avoid contact between the fan heater and combustible material (e.g. textiles).
To prevent the fan heater overheating, the heater must not be covered.
General Safety Instructions
Check the fan heater for external visible damage before use. Do not operate a damaged or dropped fan heater.
If the power cable of this fan heater is damaged, to avoid hazards, it must be replaced
by the manufacturer or its after-sales service, or a similarly qualified person.
- This fan heater can be used by children over the age of 8 and by persons with reduced physical, sensory or mental capabilities, or people who are lacking in experience and knowledge, if they are supervised or have been instructed in the safe use of the unit and understand the hazards involved. Children should not play with the appliance. Cleaning and user maintenance must not be undertaken by children without supervision.
Children under 3 must be kept away from the fan, unless they are monitored constantly.
Children between the ages of 3 and 8 may only switch the fan heater on and off when they are supervised or have been instructed in the safe use of the fan heater and understand the resulting risks, provided that the fan heater is placed or installed in its normal operating position. Children between the ages of 3 and 8 may not plug the fan into the wall socket, regulate the fan heater, clean the fan heater and/or perform user maintenance.
WARNING OF H
OF HOT SURFACES!
Some parts of this product can become very hot and cause burns. Special care is required when children and vulnerable persons are present.
Only have the fan heater repaired by authorised specialist companies or by customer service. Unauthorized repairs may result in considerable danger to the user. In addition, the warranty claim expires.
Defective components must be replaced only by original spare parts. Only these parts will ensure that the safety requirements are met.
Protect the fan heater against moisture and the ingress of liquids.
Disconnect from the power supply connection only by removing the plug from the socket.
Do not operate the fan heater in the vicinity of open flame.
Do not place the fan heater directly below or above a wall socket.
Pull the plug out of the socket in the event of malfunctions and during thunderstorms.
Never use the fan heater in the immediate vicinity of a bath, shower or swimming pool.
Before the Start of Operation
- Setting up the Fan Heater
- Remove all packaging material and all transport securing devices from the fan heater.
For safe and error-free operation of the fan heater, the installation site must meet the following requirements:
- The ground must be firm, flat and level.
- A minimum distance of 30~cm must be kept to the side, 30~cm to the top, 30 to the rear and 100~cm to the front.
- Do not place the fan heater in a hot, wet or very humid environment or near flammable material.
- The socket must be easily accessible so that the mains cable can be easily removed in case of emergency.
Please note: When used for the first time, it may briefly cause a slight odour.
Commissioning
- Switching Heat Settings and Fan on/off
Make sure the heating level switch 2 is set to 0. Then connect the heater to a earthed and fused plug socket protected by a GFCI. Free rotation of the fan must be ensured.
Now switch on the fan heater by turning the heating level switch 2 to the desired position. For this:
| 0 | Off Position If the heating level switch 2 is in this position, the fan heater is switched off. |
| + | Fan position If the heating level switch 2 is in this position, only the fan operates. Move the switch to this position when you want to use the heater as a fan. |
| Heat control setting 1 If the heating level switch 2 is in this position, the fan heater produces a heat output of 1500 W. | |
| Heat control setting 2 If the heating level switch 2 is in this position, the fan heater produces a heat output of 3000 W. |
| MIN position of the temperature control |
| MAX position of the temperature control |
- Setting the Temperature
Start the heater by using the heating level switch 2 to set the desired heat level.
Turn the temperature control 4 clockwise until it stops. The control light 3 begins to illuminate.
- When the desired temperature is reached, turn the temperature control 4 counter-clockwise until you hear an audible click, the control light 3 will then go out. An integrated thermostat will now automatically switch the heating function on and off.
Regardless of the actual room temperature, the symbols shown only represent a guide value for the temperature range you require.
lowest temperature range
low temperature range

medium-high temperature range

highest temperature range
Please note: The fan heater temporarily remains very hot during the heating intervals. Please take care when operating the fan heater.

The fan heater has angle adjustment. Turn the rotary knobs 6 at the side to adjust the tilt.

Switching off the Fan Heater
To avoid heat build-up in the fan heater, allow the fan to run for approximately 30 seconds afterwards.
Turn the heating level switch 2 to position O.
Pull out the mains plug to disconnect the heater from the mains supply, thus switching it off completely.

Overheating Protection
This fan heater is equipped with overheating protection. If the fan heater overheats, it will switch off automatically. The fan continues to run so that rapid cooling is achieved. The fan heater will switch on again automatically once it has cooled down properly.

PLEASE NOTE: There is usually a reason for overheating! It can indicate a fire hazard!
Check whether the fan heater is giving off sufficient heat: Is the fan heater covered or is it too close to a wall or other obstruction? Is the grid blocked in the front or at the back? Is the fan blocked?
- Rectify the problem if possible, or contact the service hotline (see the section "Service").
Even if you were unable to identify the cause, if the overheating protection is triggered a second time, you must switch off the fan heater and contact the service hotline (see "Service" Section).

Troubleshooting
| Fault | Possible cause | Solution |
| The fan heater will not switch on. | The mains plug is not plugged in. | Insert the mains plug in the socket. |
| Socket delivering no voltage. | Check the house fuses. | |
| The fan heater does not heat up. | Heating level switch 2 is not switched on. | Set the heating level switch 2 to the desired operating mode. |
| Temperature control 4 is in the MIN position. | Set temperature control 4 to the MAX position. | |
| Faulty heating element. | Notify customer services. |

Maintenance, Cleaning and Storage
Always disconnect the mains plug when the fan heater is not in use, before cleaning or in the event of operating faults!
Clean the fan heater only when switched off and cold.
Make sure when cleaning that no moisture penetrates into the fan heater, to avoid irreparable damage to the fan heater.
Clean the housing with a slightly damp cloth and a mild detergent.
Use a vacuum cleaner to remove dust from the safety guard.
Store the heater in a dry environment.
ROWI Germany GmbH warranty
Dear Customer,
This appliance has a 3-year warranty valid from the date of purchase. If this product has any faults, you, the buyer, have certain statutory rights. Your statutory rights are not restricted in any way by the warranty described below.
Warranty conditions
The validity period of the warranty starts from the date of purchase. Please keep your original receipt in a safe place. This document will be required as proof of purchase.
If any material or production fault occurs within three years of the date of purchase of the product, we will either repair or replace the product for you at our discretion. This warranty service is dependent on you presenting the defective appliance and the proof of purchase (receipt) and a short written description of the fault and its time of occurrence.
If the defect is covered by the warranty, your product will either be repaired or replaced by us. The repair or replacement of a product does not signify the beginning of a new warranty period.
Warranty period and statutory claims for defects
The warranty period is not prolonged by repairs effected under the warranty. This also applies to replaced and repaired components. Any damage and defects present at the time of purchase must be reported immediately after unpacking. Repairs carried out after expiry of the warranty period shall be subject to a fee.
Scope of the warranty
This appliance has been manufactured in accordance with strict quality guidelines and inspected meticulously prior to delivery.
The warranty covers material faults or production faults. The warranty does not extend to product parts subject to normal wear and tear or fragile parts such as switches, batteries, baking moulds or parts made of glass.
The warranty does not apply if the product has been damaged, improperly used or improperly maintained. The directions in the operating instructions for the product regarding proper use of the product are to be strictly followed. Uses and actions that are discouraged in the operating instructions or which are warned against must be avoided.
This product is intended solely for private use and not for commercial purposes. The warranty shall be deemed void in cases of misuse or improper handling, use of force and modifications/repairs which have not been carried out by one of our authorised Service centres.
Warranty claim procedure
To ensure quick processing of your case, please observe the following instructions:
Please have the till receipt and the item number (IAN 329052_2001) available as proof of purchase.
You will find the item number on the type plate, an engraving on the front page of the instructions (bottom left), or as a sticker on the rear or bottom of the appliance.
If functional or other defects occur, please contact the service department listed either by telephone or by e-mail.
You can return a defective product to us free of charge to the service address that will be provided to you. Ensure that you enclose the proof of purchase (till receipt) and information about what the defect is and when it occurred.
NOTICE: At www.lidl-service.com you can download this manual as well as many other manuals, product videos and software. This QR code will take you directly to the Lidl service page (www.lidl-service.com) and allow you to open your operating instructions simply by entering the article number (IAN 329052_2001).

Service
If any problems arise while using your ROWI
Germany product, please proceed as follows:
Contact
You can contact the ROWI Germany Service Team at:
ROWI Germany GmbH
(free of charge from a German landline)
IAN 329052_2001
Most problems can be fixed with competent technical advice from our service team.

Disposal
The packaging is made of environmentally friendly materials that can be disposed of at local recycling facilities.


Do not dispose of the product with the normal household waste, but via municipal recycling points! Please contact your municipal or city administration to find out options for the disposal of the used product.
Observe the marking of the packaging materials for waste separation, which are marked with abbreviations and numbers with following meaning: 1-7: plastics/20-22: paper and fibreboard/80-98: composite materials.

PARKSIDE
Puisance absorbee:3000W
Protection anti-surchauffe
Chere cliente, cher client,
Tryb wentylatora: 25 W
Termosta: 0 do + 85^ C
Wymiary: ok. 265 × 210 × 290 ~mm
Masa: ok. 2,85kg
s cernym kulovymCIDlem [ne]
ROWI Germany GmbH
Tepelny istic Strana 71
Odastranovanie poruch Strana 72
Udrzba, cistenie a skladovanie Strana 72
Zaruka spolocnosti ROWI Germany GmbH Strana 72
Servis Strana 73
Likvidácia Strana 73

- KERAMIK-HEIZGEBLASE PKH 3000 A1 CERAMIC FAN HEATER PKH 3000 A1 CHAUFFAGE SOUFFLANT EN CÉRAMIQUE PKH 3000 A1
- KERAMIK-HEIZGEBLASE
- KERAMISCHE VERWARMINGSVENTILATOR
- KERAMICKY TOPNY VENTILATOR
- FR BE
- Key to the pictograms
- Introduction
- Safety Instructions
- Before the Start of Operation
- Commissioning
- Troubleshooting
- Maintenance, Cleaning and Storage
- ROWI Germany GmbH warranty
- Service
- Disposal
- CERAMIC FAN HEATER PKH 3000 A1
- Intended Use
- Equipment
- Scope of Delivery
- Technical Data
- Information requirements for electric local space heaters
- Heat output
- Auxiliary electricity consumption
- Type of heat input, for electric storage local space heaters only (select one)
- Type of heat output/room temperature control (select one)
- Other control options (multiple selections possible)
- - Safety Instructions
- Read all safety information and instructions.
- WARNING!
- FIRE HAZARD! For
- General Safety Instructions
- WARNING OF H
- OF HOT SURFACES!
- - Setting up the Fan Heater
- - Switching Heat Settings and Fan on/off
- - Setting the Temperature
- Switching off the Fan Heater
- Overheating Protection
- PLEASE NOTE: There is usually a reason for overheating! It can indicate a fire hazard!
- Warranty conditions
- Warranty period and statutory claims for defects
- Scope of the warranty
- Warranty claim procedure
- Contact
- ROWI Germany GmbH
- IAN 329052_2001
- PARKSIDE
- Protection anti-surchauffe
- Odastranovanie poruch Strana 72
- Udrzba, cistenie a skladovanie Strana 72
- Zaruka spolocnosti ROWI Germany GmbH Strana 72
- Servis Strana 73
- Likvidácia Strana 73
Brand : PARKSIDE
Model : PKH 2500 A1
Category : Heating