USER MANUAL T6 Lamax
Dashcam with Wi-Fi, GPS and Magnetic Holder LAMAX T6
EN - USER MANUAL
DE - BENUTZERHANDBUCH
PL - INSTRUKCJA OBSŁUGI
CZ - UŽIvATELSKÁ PŘÍRUČKA
SK - UžívATELŠKÁ PRÍRUČKA
HU - FELHASZNÁLÓI KÉZIKÖNYv
FR - MANUEL DE L'UTILISATEUR
LT - vARTOTOJO vADOvAS
HR - PRIRUČNIK ZA KORISNIKA
SLO - PRIROČNIK ZA UPORABNIKA
Dashcam with Wi-Fi, GPS and Magnetic Holder LAMAX T6
natural_image
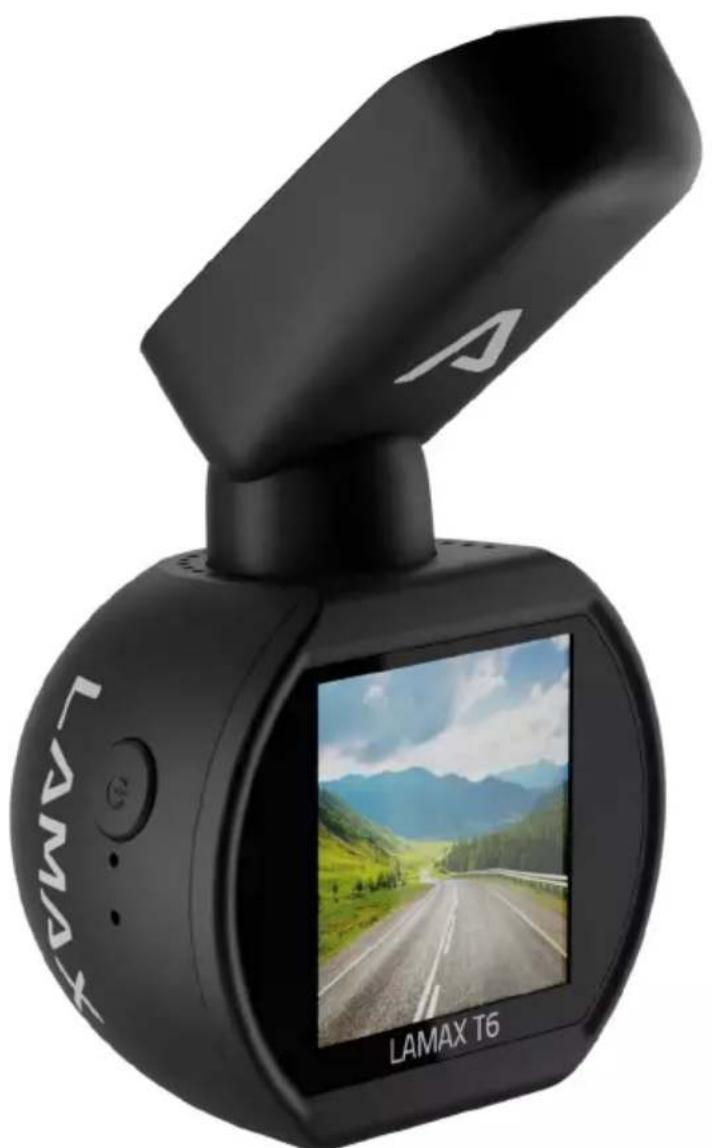
LAMAX T6 digital camera with a screen displaying a scenic mountain road (no text or symbols on the device body)
EN - USER MANUAL
1. PACK CONTENTS
- LAMAX T6 dashcam
– GPS holder with 3M adhesive pad
- 2× spare 3M adhesive pad
- Car charger
- Mini USB cable 0,7 m and Mini USB cable 3 m
- Manual and Safety Instructions
- Cloth carry bag
- Microfibre cloth
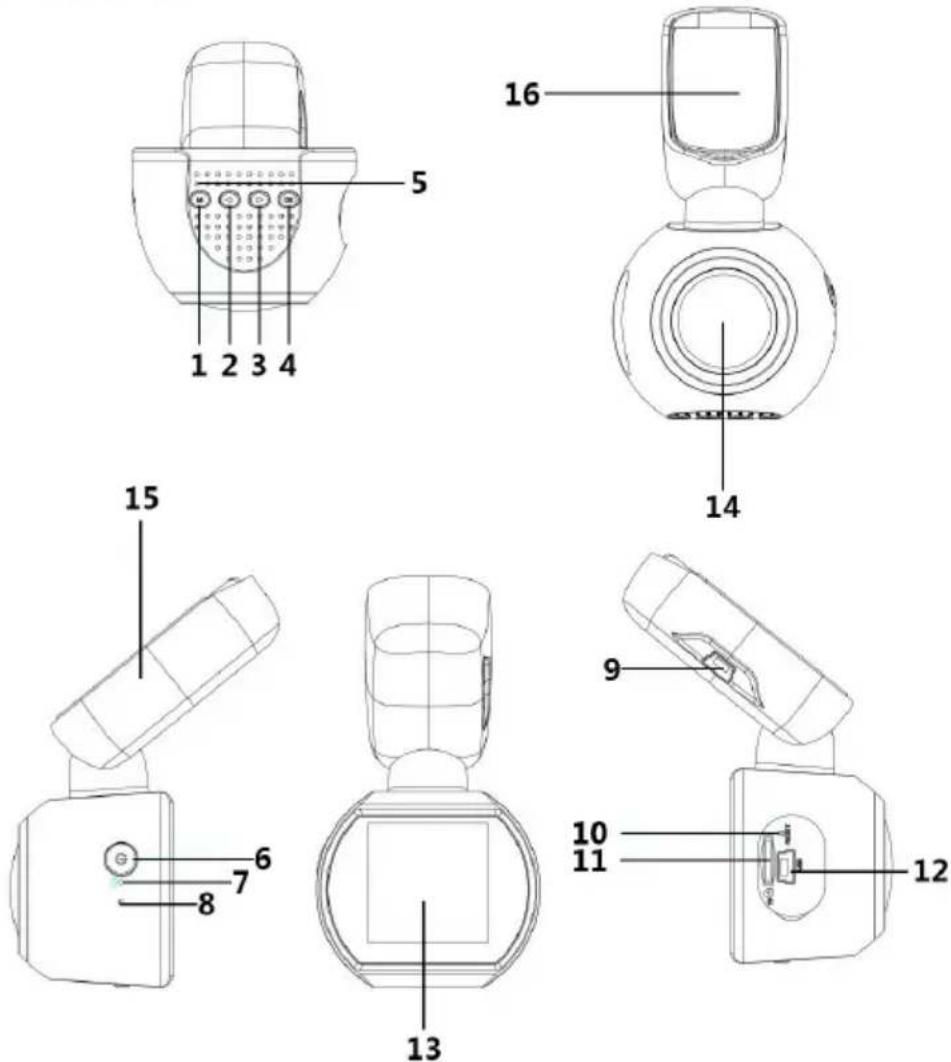
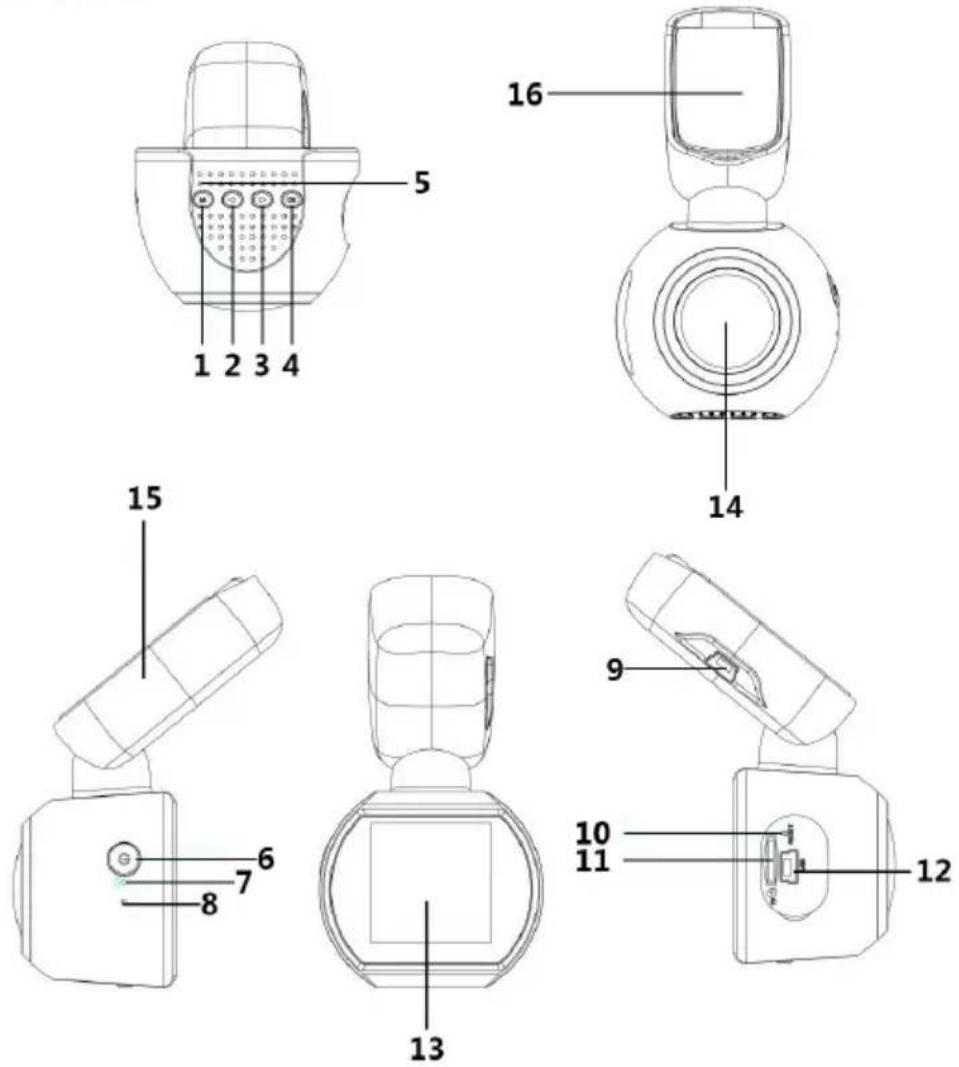
2. PRODUCT LAYOUT
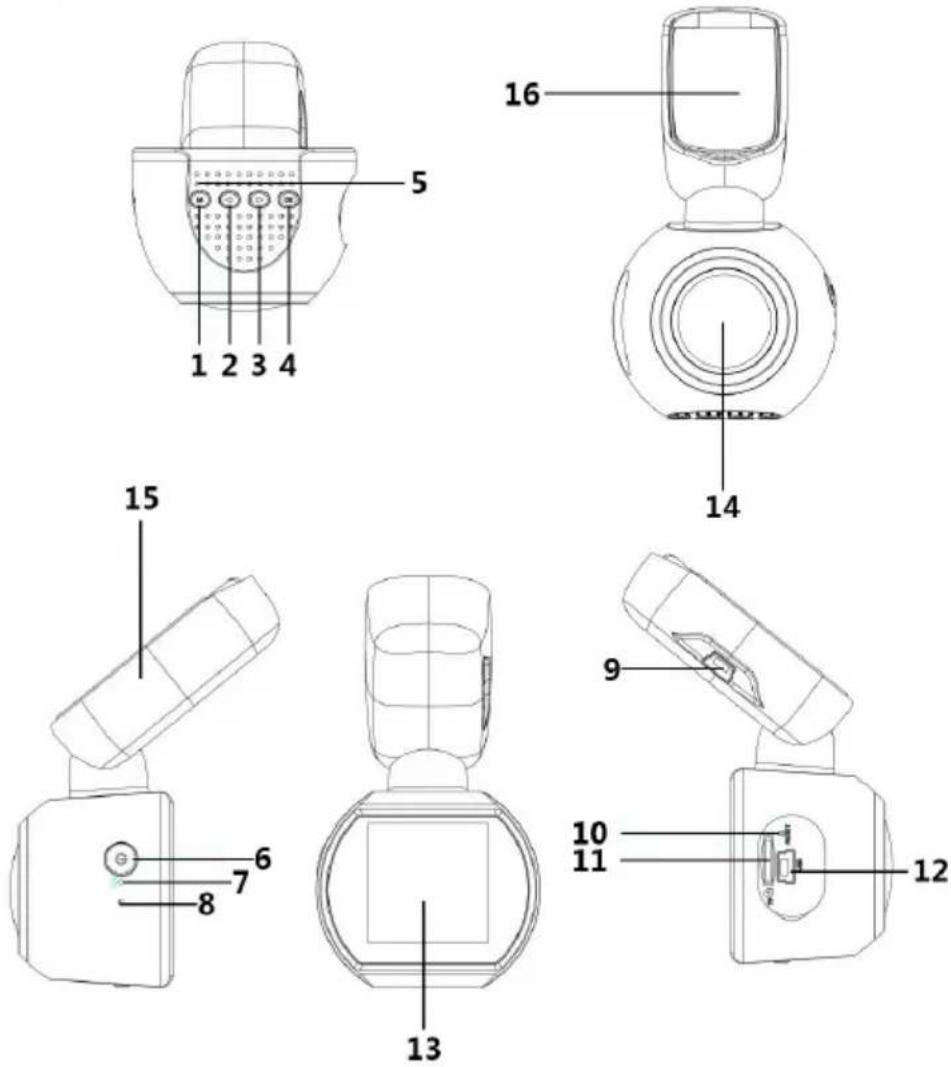
- MENU/MODE button
- UP button
- DOWN button
- OK button
- Speaker
- ON/OFF button (power)
- Microphone
-
LED
-
USB charging port
- RESET
- MicroSD card slot
- Mini USB interface
- Display
- Lens
- GPS holder
- 3M adhesive pad
3. DEVICE INSTALLATION
1) Route the car cigarette lighter power cable around the windscreen so that it does not obstruct the driver's view and fasten it securely. Attach the device ideally between the glass and the rear-view mirror.
2) Do not install the device in a position that would obstruct or distract the driver.
3) When using the device for the first time, the battery may be low on charge. If the device cannot turn on due to low power, connect the external power cable manually and charge the battery.
4) The device uses microSDHC memory cards up to 128 GB. Use branded cards of class 10 or higher. The memory card needs to be formatted directly in the camera before use (see Camera Settings). Insert and remove the card only when the camera is off.
Attention:
For proper functioning of the LAMAX T6 and GPS module, it is necessary for the power cable to lead to the mini USB port of the GPS holder (not directly into the mini USB port of the camera).
4. USING THE LAMAX T6 DASHCAM
1) Charging
a) The camera can be powered by a USB cable from a PC, an AC adapter or a car cigarette lighter charger (included).
b) The camera is designed for a permanent power supply. The integrated battery cannot be removed or replaced.
2) Turning the Camera On/Off
a) The camera will turn on automatically when connected to the power supply.
b) Hold the "ON/OFF" button for 3-5 seconds to turn the camera on/off.
c) The camera will turn off automatically when disconnected from the power supply.
3) Switching Modes and Navigating Menus
a) Hold down the "MENU/MODE" button to switch between: video mode (live view) » photo mode » gallery mode.
b) Press the "MENU/MODE" button in the respective mode to enter the menu. The camera menu consists of two separate sections: video/photo settings » camera settings. Use the „UP“ and „DOWN“ arrows to navigate between the sections. Use the „OK“ button to enter the menu. Then move vertically using the „UP“ and „DOWN“ arrows under each menu section and press „OK“ to confirm.
c) Only the respective mode can be accessed in the video settings / photo settings menu. Thus, video settings can only be accessed from video mode and photo settings from photo mode.
d) Use the „MENU/MODE“ button to go back one level.
4) Video / Photo / Gallery
a) Start a recording or take a photo by pressing the "OK" button in the respective mode.
b) Auto recording – the auto recording feature is permanently on. Automatic recording starts when the camera is plugged in. If the vehicle's cigarette lighter is ignition dependent, the camera turns on and starts recording after starting the engine.
c) Auto-stop recording and shutdown – the camera automatically stops recording and shuts down after a power is stopped, i.e. when the engine is turned off. Some cars have a continuous lighter power supply. In this case, be sure to remove the power cord from the cigarette lighter.
d) Gallery mode displays a list of recorded videos and captured photos. Use the "UP" and "DOWN" arrows to navigate between the recordings and images. Press the "OK" button to start and stop a recording.
5) Deleting and Protecting Files
The device divides the videos into individual loops. If the memory card becomes full, it will automatically start overwriting the oldest recorded videos with new ones. If you want to protect videos against being overwritten, you need to lock them:
a) Select a file in gallery mode.
b) Press the "MENU/MODE" button.
c) Choose whether to delete or protect (lock / unlock).
d) Choose whether you want to perform the selected operation only for the selected entry or for all entries.
6) Connecting to a PC
a) The camera can be connected to a PC with the mini USB cable included. In this case, the cable must be connected directly to the mini USB port of the camera.
b) Confirm mass storage with OK.
c) The camera will connect to the PC and be displayed as a disk drive from which you can play/copy recordings.
7) Reset
If the camera stops responding, insert a paper clip (or another similar tool) into the RESET socket and gently press the button inside. The camera turns off.
8) Mobile Application
a) Turn on Wi-Fi and install HQBKiNG
- First install the HQBKiNG application available on your device, available for both Android and iOS. Please scan the following QR code to download the 'HQBKiNG' application.

- Turn on Wi-Fi on the LAMAX T6 – go to Camera Settings → Wi-Fi → Press "OK" button to turn Wi-Fi on/off.
- When Wi-Fi is turned on, the Wi-Fi icon will appear on the display.
- On your device, select the LAMAX T6 Wi-Fi Network and enter the password: 12345678, then connect to the camera.
- After connecting the device to the camera's Wi-Fi network, a yellow exclamation mark appears on the camera next to the Wi-Fi icon.
- The distance between the LAMAX T6 and the device should not exceed 10 m.
b) Starting the HQBKiNG application
- When your device is successfully connected to the LAMAX T6 Wi-Fi network, open the HQBKiNG application.
- When the HQBKiNG application is opened, the application will automatically link to the LAMAX T6, the camera will start recording and a live video preview will appear on your device.
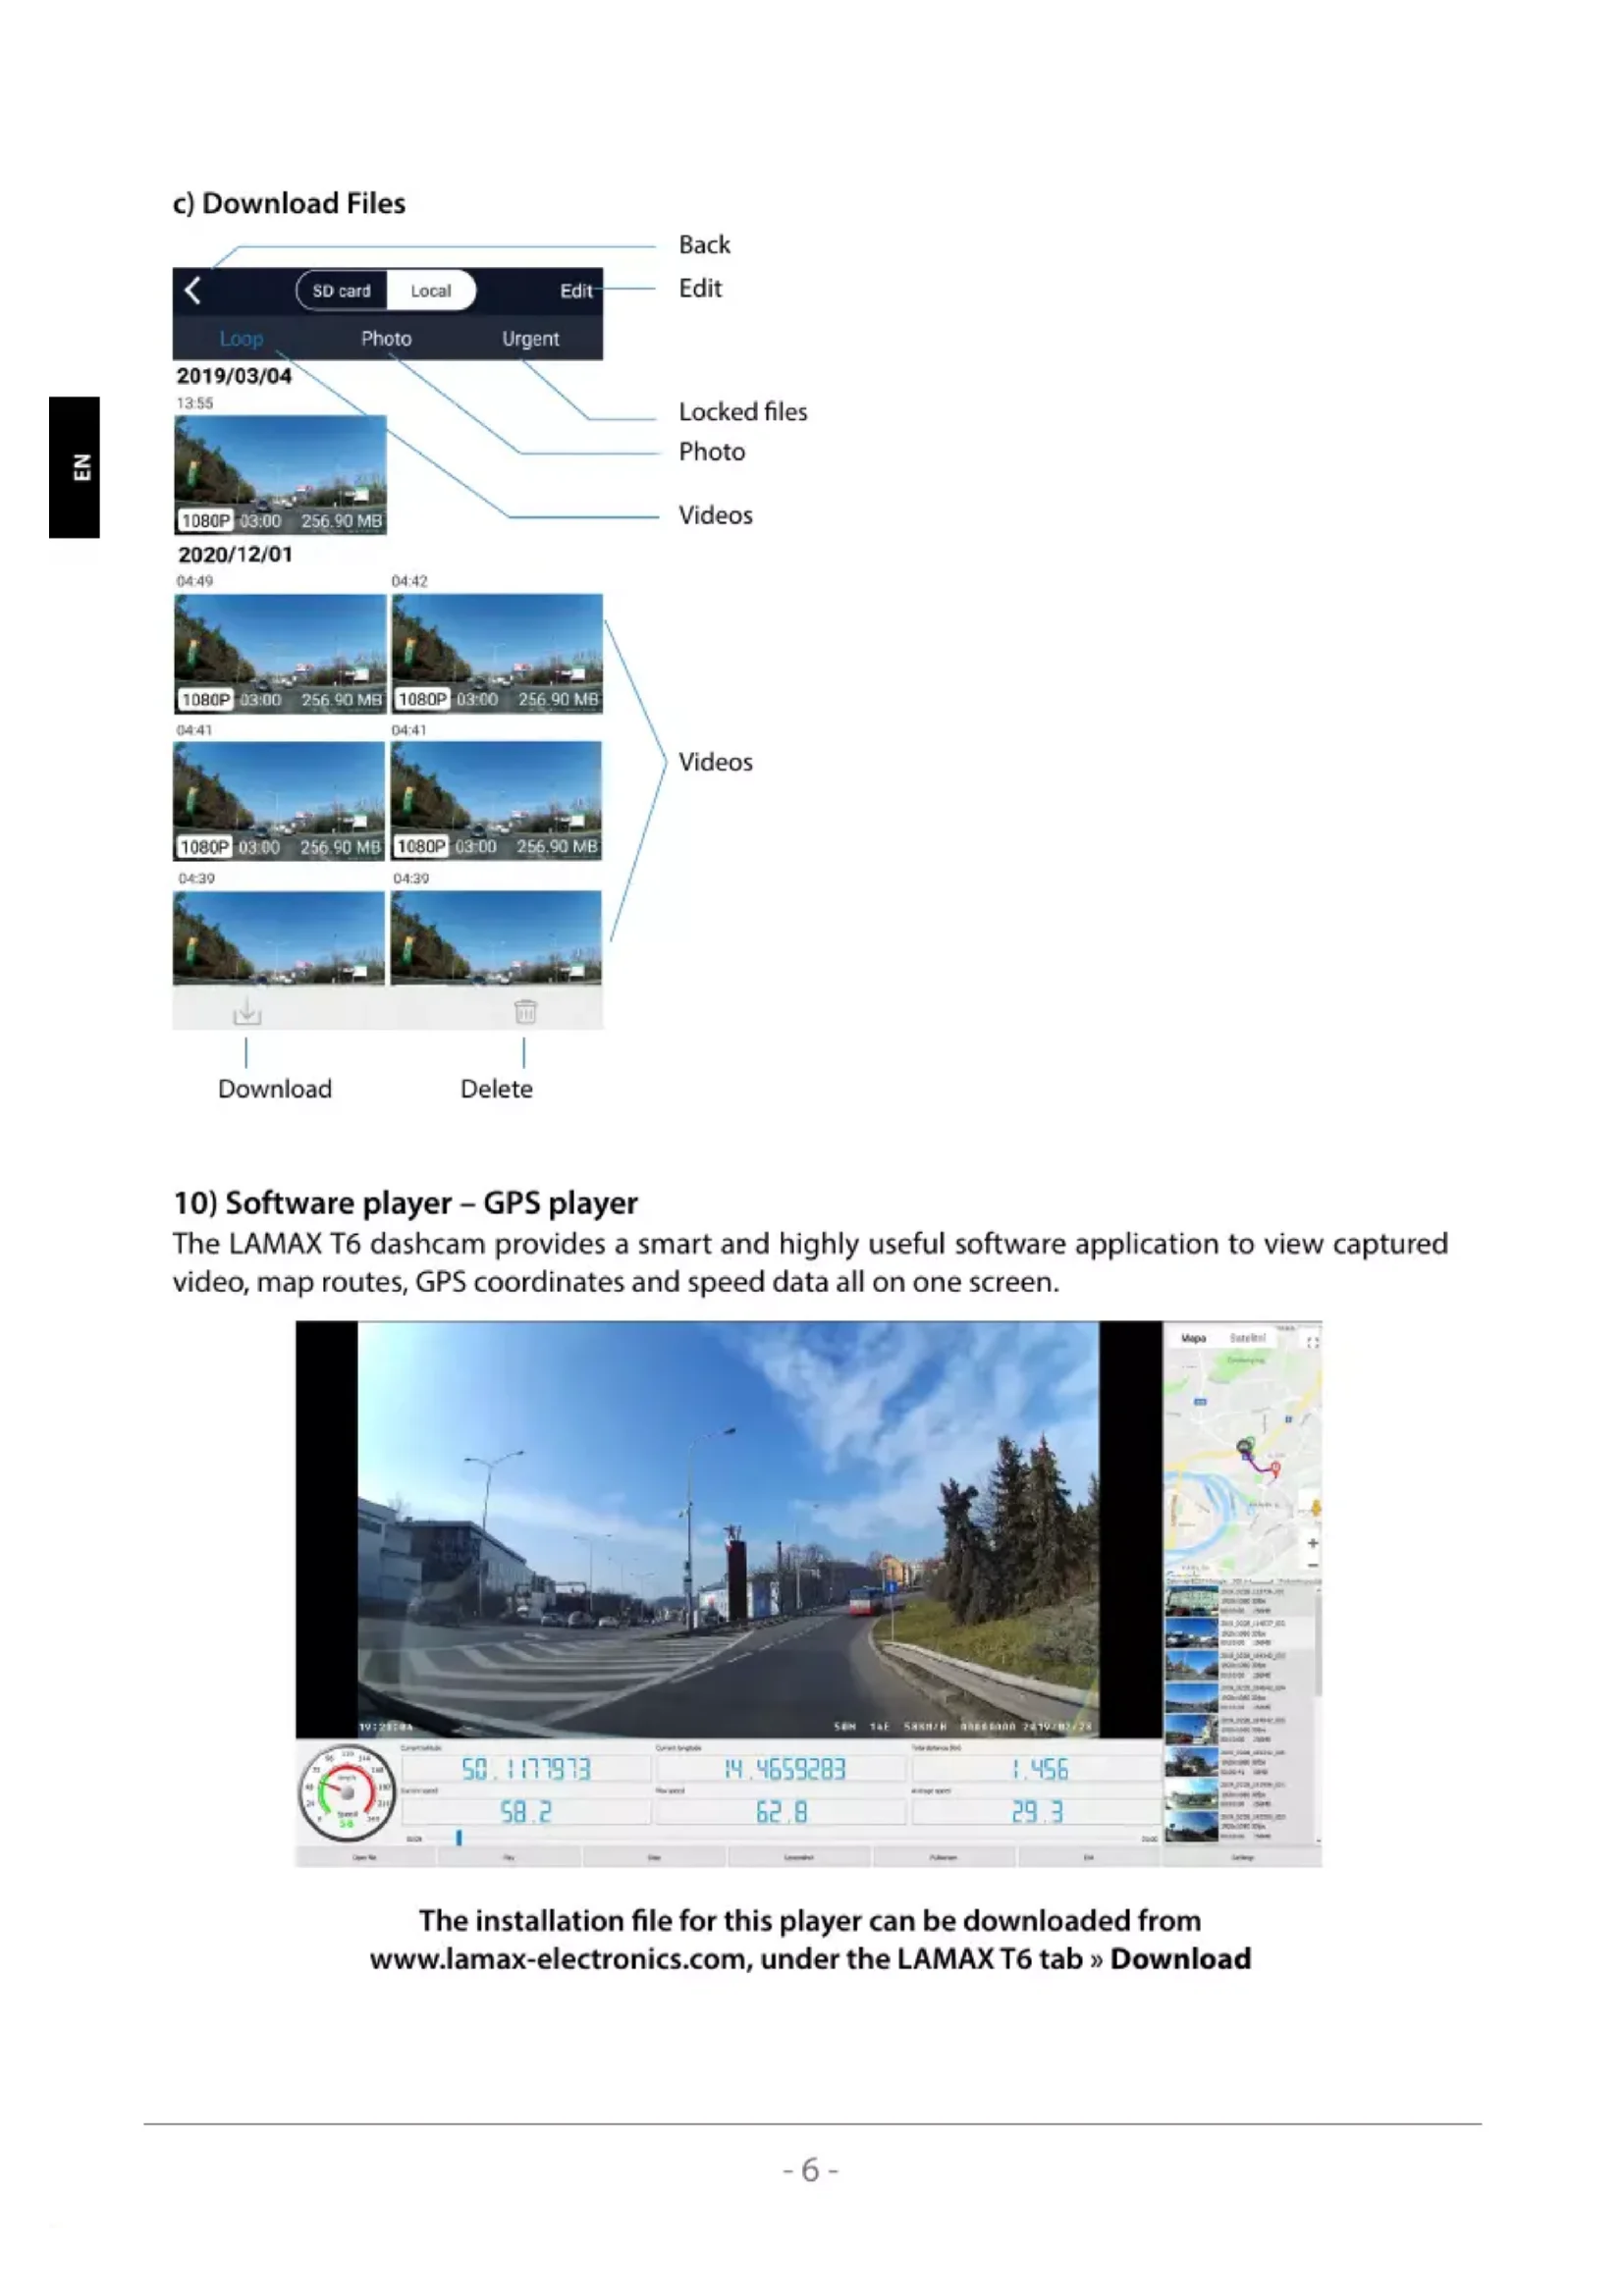
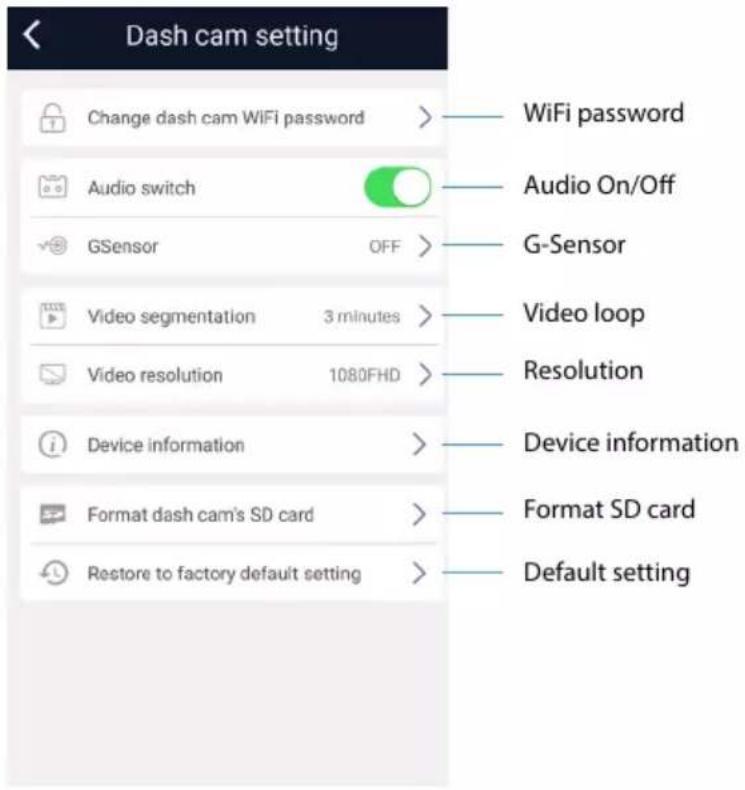
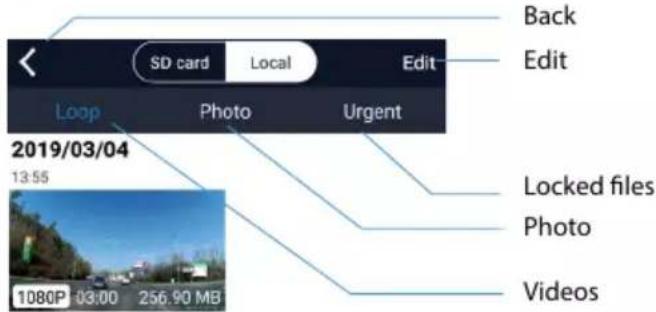
9) Application Controls
a) Live Video View
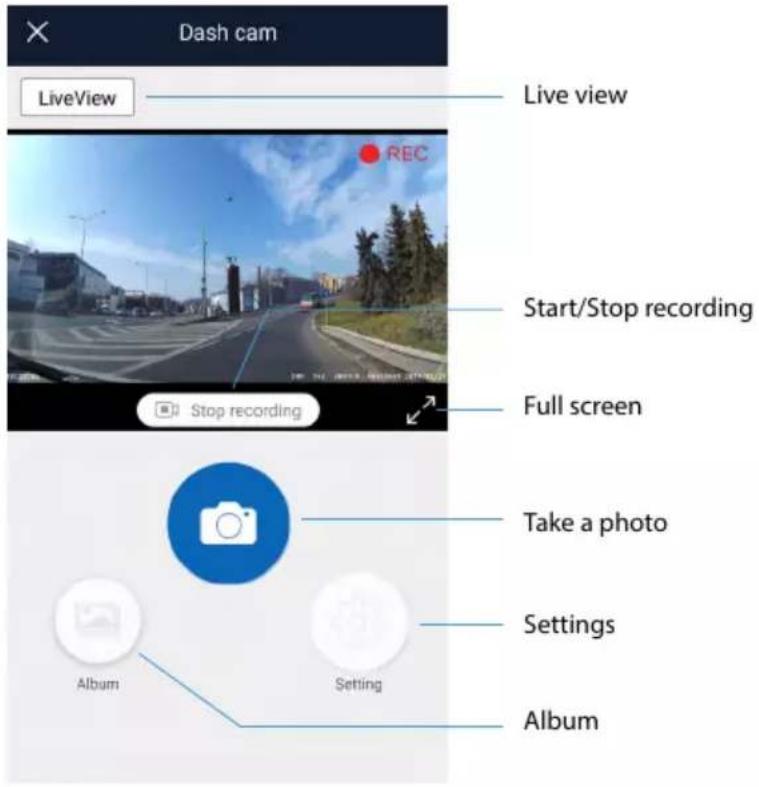
b) Settings
c) Download Files
2020/12/01

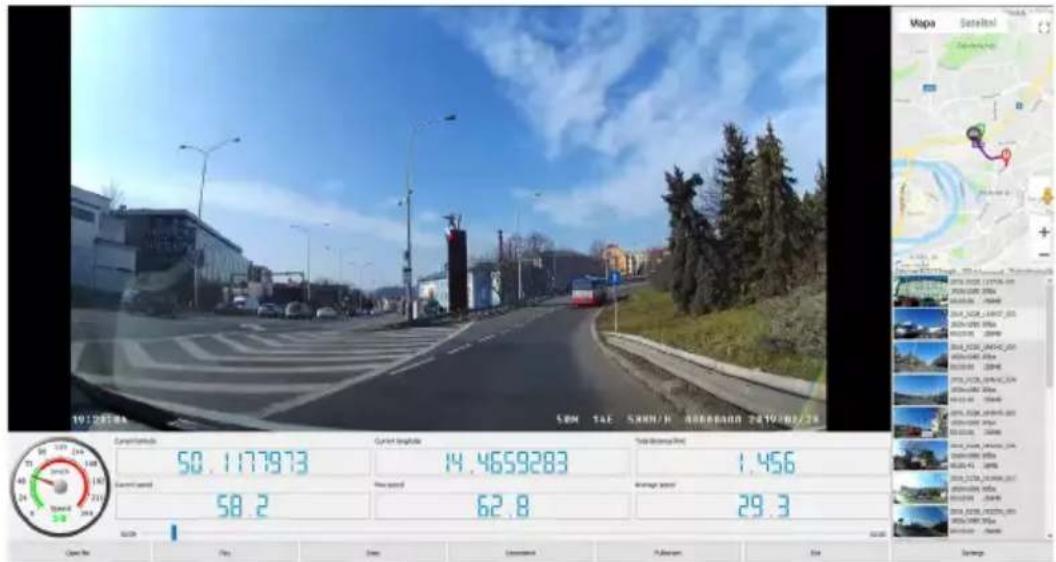
10) Software player – GPS player
The LAMAX T6 dashcam provides a smart and highly useful software application to view captured video, map routes, GPS coordinates and speed data all on one screen.
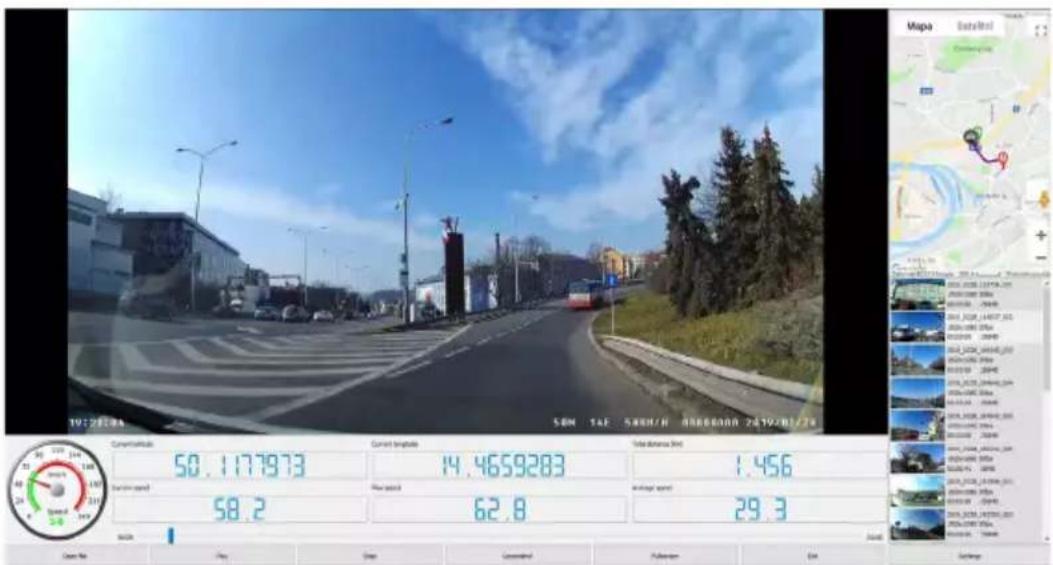
The installation file for this player can be downloaded from www.lamax-electronics.com, under the LAMAX T6 tab » Download
*If the car's windscreen is tinted with a reflective layer or heated, it can limit the recording quality and especially the GPS signal. In this case, the camera may not receive the GPS signal at all. GPS positioning data and speed are indicative.
- BUTTON FUNCTIONS
| Button | Mode | Note |
| ON/OFF | All modes | Press and hold to turn the camera on/off. |
| MENU/MODE | Video/Photo Mode | Press to enter the MENU. |
| All modes | Hold down to change camera modes – video mode (liveview) » photo mode » gallery. |
| Video mode | Whilst recording, press to take a photo. Long press to manually lock the recording. |
| Menu | In the camera menu the button functions as a back button. |
| OK | Video mode | In video mode, press to record. |
| Photo mode | In photo mode, press to take a photo. |
| Gallery mode | Starts/stops playback. |
| Menu | In the menu, press to enter the selection/ confirm. |
| UP | Video/photo mode | Zoom in up to 4x. |
| Gallery mode | Tap to slow down previously sped up playback 2x, 4x, 8x. |
| Menu | Tap to move up/left. |
| DOWN | Video/photo mode | Zoom out of the zoomed image. |
| Menu | Tap to move down/right. |
| Gallery mode | Tap to speed up playback 2x, 4x, 8x. |
| RESET | All modes | Tap to reset the camera. |
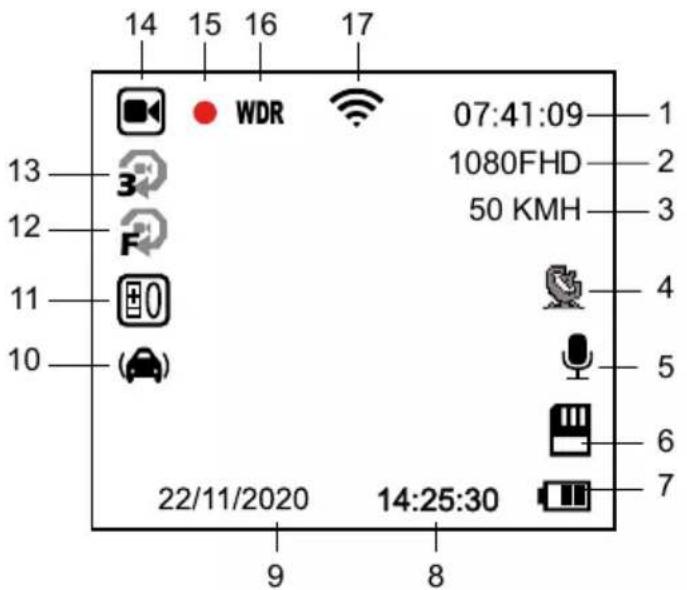
6. ICON KEY

| 1 | 07:41:09 | Remaining recording time (depending on memory card space) |
| 2 | 1080FHD | Camera resolution |
| 3 | 50 KMH | Current speed |
| 4 |  | GPS icon (when blue, camera is connected to GPS satellite) |
| 5 |  | Microphone on / off |
| 6 |  | Memory card inserted |
| 7 |  | Battery power / status indicator (if not powered) |
| 8 | 14:25:30 | Time |
| 9 | 22/11/2020 | Date |
| 10 |  | G-Sensor |
| 11 | [DW7S] | Exposure value |
| 12 |  | Motion detection |
| 13 | [KBKK] | Loop recording length setting |
| 14 | [GS8C] | Recording mode |
| 15 | [O###] | A blinking red dot indicates that the device is currently recording |
| 16 | [O###] | WDR function turned on |
| 17 | [O###] | Wi-Fi on |
- MENU
| Menu Item | Setting Options | Description |
| Basic Settings | Video Resolution | FHD 1080p / HD 720p | Sets the video resolution. |
| Loop Recording | Off / 1 min / 3 min / 5 min / 10 min | Sets the loop length of the video. |
| WDR | Off / On | Wide dynamic range finds the ideal compromise between the lightest and darkest parts in the video. |
| Brightness | +2.0; +5/3; +4/3; +1.0; +2/3; +1/3; 0; -1/3; -2/3; -1.0; -4/3; -5/3; -2.0 | The „+“ value increases the brightness of the recording. The “-” value lowers the brightness so the recording becomes darker. |
| Motion Detection | Off / On | Sets the motion detection function. |
| Audio Recording | Off / On | Sets audio recording. |
| Timestamp | Off / On | Sets the timestamp on the video/photo. |
| G-Sensor | Off / Low / Medium / High | Sets the G-Sensor sensitivity. |
| Settings in Photo Mode | Image Mode | Instant shot / 2s / 5s / 10s timer | Sets the image mode. Allows you to delay taking a photo by up to 10 seconds. |
| Image Size | 12MP / 8MP / 3MP | Sets the photo resolution. |
| White Balance | Auto / Daylight / Cloudy / Bulb / Fluorescent | Set to “Auto” by default. If the camera does not capture natural colours, select the setting manually according to the lighting conditions. |
| ISO | AUTO / 100 / 200 / 400 | Specifies the sensitivity when taking a picture. |
| Colour | Colour / Black and White / Sepia | Selects the colour mode of the image. |
| Quick Preview | Off / 2s / 5s | Allows 2s / 5s to preview after image creation. |
| Stabilization | Off / On | Enables/disables image stabilization. |
| Quality | Fine / Normal / Low | Sets the photo quality. |
| Sharpness | High / Normal / Low | Adjusts the sharpness of the photo. |
| Settings in Playback Mode | Delete | Delete Current / Delete All | Deletes files. |
| Protect | Lock Current / Unlock Current / Lock All / Unlock All | Locks/unlocks the file. |
| Slideshow | 2 sec / 5 sec / 8 sec | Sets the slideshow speed. |
| Advanced settings | Wi-Fi | | Press OK to turn Wi-Fi on/off. |
| Date/Time | YY/MM/DD | Sets the date and time. |
| Driver Name | - - - - - - | Use the arrow keys to select A-Z, 0-9. Press OK to confirm the selected character and press OK to confirm. |
| Auto-off Delay | Off / 10s / 20s / 30s | Allows you to delay immediate shutdown after the camera is disconnected from the power supply. This feature is useful, for example, for cars with start/stop systems. |
| Operating Sounds | Off / On | Set to turn off/on camera sounds. |
| Screensaver | Off / 1 min / 2 min / 3 min | Sets the screensaver. |
| Speedometer | Off / 1 min / 2 min / 3 min | Sets the speedometer function as a screensaver. |
| Time Zone | UTC+12 – UTC-12 | Sets the time zone. |
| Speed Units | KMH / MPH | Sets the unit of speed. |
| Frequency | 50Hz / 60Hz | Sets the video frequency. |
| Language | English / French / German / Russian / Polish / Czech / Slovak / Hungarian / Lithuanian | Sets the device language. |
| Format | Cancel / OK | Formats the data on the memory card. |
| Factory Settings | Cancel / OK | Restores the camera factory settings |
| Version | xxxx | Displays the installed FW settings. |
8. TECHNICAL PARAMETERS
| Video resolution | 1920×1080 30FPS, 1280×720 30FPS |
| Shot angle | 140° |
| Screen size | 1,5" |
| Memory type | Micro SD Class 10, max 128 GB |
| Video format | MP4 |
| Time stamp | Yes |
| GPS | Yes |
| G-Sensor | Yes |
| Connectivity | Wi-Fi / mini USB |
| System | MS Windows / MAC OS |
| Input voltage | 5 V |
| Night mode | Yes |
| Battery capacity | 180 mAh |
| Operating temperature | -5°C ~ 40°C |
Note: Specifications may change by replacing any part of the device or updating the software. Please note that some European Union countries have specific laws regarding dashcam recording. Therefore, we recommend that you inform yourself about the local legal regulations, ideally at local car clubs, before travelling abroad. The camera can be used as evidence, even when dealing with a police officer. Again, we recommend studying the legislation in each country. Please note that such material may also be used against the author of such a record. LAMAX Electronics is not responsible for the illegal use of cameras or material recorded by these cameras.
Manufacturer
elem6, s.r.o., Braškovská 308/15, 16100 Prague 6 www.lamax-electronics.com
Printing errors and changes in the manual reserved.

natural_image
LAMAX T6 digital camera with a remote screen displaying a scenic mountain road (no text or symbols on the device body)
10) Softwareplayer - GPS player
natural_image
LAMAX T6 digital camera with a remote display showing mountain scenery (no text or symbols on device body)
1. ZAWARTOŚĆ ZESTAWU
natural_image
Black LAMAX T6 digital camera with a flat-screen display showing mountain scenery (no text or symbols on device body)
1. OBSAH BALENÍ
3. INSTALACE PRODUKTU
natural_image
LAMAX T6 digital camera with a remote display showing mountain scenery (no text or symbols on device body)
1. OBSAH BALENIA
natural_image
LAMAX T6 digital camera with a remote screen displaying a scenic mountain road (no text or symbols on the device body)
1. CSOMAG TARTALMA
natural_image
Technical line drawing of a mechanical component with no visible text or symbols

natural_image
LAMAX T6 digital camera with a remote screen displaying a scenic mountain road (no text or symbols on the device body)
1. CONTENU DE L'EMBALLAGE
3. INSTALLATION DU PRODUIT
natural_image
LAMAX T6 digital camera with a remote screen displaying a scenic mountain road (no text or symbols on the device body)
1. PAKUOTÈS SUDÈTIS
2. PRODUKTO BRĚŽINYS
10) Software grotuvas – GPS player
natural_image
Black LAMAX T6 camera with a digital display showing a scenic mountain road (no text or symbols on the device body)
1. SADRŽAJ PAKIRANJA
- Autokamera LAMAX T6
- GPS držač s 3M naljepnicom
- 2× rezervna 3M naljepnica
- Punjač preko upaljača u vozilu
- Mini USB kabel 0,7 m i Mini USB kabel 3 m
- Priručnik i sigurnosne upute
- Futrola od tkanine za prenošenje kamere
- Krpa od mikrovlakna
2. NACRT PRODUKTA
- Gumb, MENU'/'REŽIM'
- Gumb GORE
- Gumb DOLE
- Gumb, OK'
- Zvučnik
- Gumb UKLJ/ISKLJ (Power)
- Mikrofon
-
LED
-
USB ulaz za punjenje
-
RESET
-
Utor za Micro SD karticu
-
Sučelje mini USB
-
Zaslon
-
Leća
-
GPS držač
-
3M naljepnica
3. NAMJEŠTANJE PROIZVODA
10) Softverski player – GPS player
Autokamera LAMAX T6 nudi mogućnost uporabe pametne i korisne softverske aplikacije zahvalju- jući kojoj imate mogućnost gledati na jednom zaslonu video koji snimate, prikaz putanje na kartama, GPS koordinate i podatak o brzini.
Instalacijsku datoteku za ovaj player možete preuzeti s web mjesta www.lamax-electronics.com, na kartici LAMAX T6 » Za preuzimanje
*Ako je vjetrobransko staklo automobila obojeno refleksivnim slojem ili sa spiralom za grijanje, to može ograničiti snimanje, a prije svega signal GPS. U tom slučaju kamera ne mora uopće primati signal GPS. Podaci mjerenja pozicije GPS i brzine služe samo za informativne svrhe.
- FUNKCIJE GUMBA
| Gumb | Režim | Napomena |
| UKLJ./ISKLJ. | Svi režimi | Pritisnite i držite pritisnutim zaključavanje/isključenje kamere. |
| MENU/REŽIM | Režim video/slike | Pritiskanjem ulazite u ponudu MENU. |
| Svi režimi | Držanjem mijenjate režime kamere – režim video (pregledanje video sadržaja) » režim slike » galerija. |
| Način rada „video“ | U toku snimanja pritiskanjem slikate sliku.Dugim držanjem ručno zaključavate snimak. |
| Meni | U meniju kamere postoji i gumb za funkciju 'Natrag'. |
| OK | Način rada „video“ | U režimu video pritisnite za snimanje. |
| Režim slike | U režimu slikanja pritisnite za slikanje. |
| Režim galerija | Uključuje/isključuje snimanje. |
| Meni | U izborniku pritisnite za pristup unutrašnjoj opciji / potvrdi. |
| GORE | Režim video/slike | Približava sliku do 4x. |
| Režim galerija | S kratkim pritiskanjem se vraćate u video koji snimate po 2x, 4x, 8x. |
| Meni | Kratkim pritiskanjem se krećete u smjeru prema gore/lijevo. |
| DOLE | Režim video/slike | Kratkim pritiskanjem udaljite približenu sliku. |
| Meni | Kratkim pritiskanjem se krećete u smjeru prema dole/desno. |
| Režim galerija | Kratkim pritiskanjem ubrzate gledanje 2x, 4x, 8x. |
| RESET | Svi režimi | Kratkim pritiskanjem resetirate autokameru. |
6. OBJAŠNJENJA ZNAČENJA IKONA
| 1 | 07:41:09 | Preostalo vrijeme snimanja (prema slobodnom mjestu na memorijskoj kartici) |
| 2 | 1080FHD | Rezolucija kamere |
| 3 | 50 KMH | Aktualna brzina |
| 4 |  | Ikona GPS (ako svijetli plavo, kamera je priključena na GPS satelit) |
| 5 |  | Mikrofon uključiti/isključiti |
| 6 |  | Memorijska kartica je umetnuta |
| 7 |  | Indikator punjenja / stanja baterije (ako uređaj nije priključen) |
| 8 | 14:25:30 | Vrijeme |
| 9 | 22/11/2020 | Datum |
| 10 |  | G-senzor |
| 11 |  | Vrijednost ekspozicije |
| 12 |  | Detekcija kretanja |
| 13 |  | Podešavanje duljine snimanja u petlje (loop) |
| 14 |  | Režim snimanja |
| 15 | [0473] | Crvena točka koja treperi indicira da uređaj upravo snima |
| 16 | [A12K] | WDR funkcija je uključena |
| 17 | [7784] | WiFi je uključen |
- MENI
| Pozicija u meniju | Mogućnosti postavki | Opis |
| Osnovno podešavanje | Rezolucija video | FHD 1080p / HD 720p | Postavlja rezoluciju video sadržaja. |
| Snimanje u 'petlju' (loop). | Isključeno / 1 minuta / 3 minute / 5 minuta / 10 minuta | Postavi duljinu petlje video sadržaja (loop) |
| WDR | Isključeno / Uključeno | Dinamički raspon pokušava postići idealan kompromis između najsvjetlijeg i najtamnijeg mjesta u video sadržaju. |
| Jasnoća | +2.0; +5/3; +4/3; +1.0; +2/3; +1/3; 0; -1/3; -2/3; -1.0; -4/3; -5/3; -2.0 | Vrijednost „+“ postavlja veće osvjetljenje snimanja. Vrijednost „-“ postavlja manje osvjetljenje snimanja gdje dolazi do zatamnjenja prizora. |
| Detekcija kretanja | Isključeno / Uključeno | Postavlja funkciju detekcije kretanja. |
| Zvučni zapis | Isključeno / Uključeno | Postavlja snimanje zvuka. |
| Vremenski znak | Isključeno / Uključeno | Postavi prikaz vremenske oznake u videu / na slici. |
| G-Senzor | Ugašeno / Niska / Srednja / Visoka | Podešava jačinu G-osjetila. |
| Podešavanje u režimu slikanja | Režim snimka | Trenutni snimak / 2s / 5s / 10s podešavanje vremena | Postavlja režim snimka. Omogućuje odgoditi slikanje za 10 sekundi. |
| Veličina slike | 12M / 8M / 3M | Postavlja rezoluciju fotografije. |
| Uravnoteženje bijele boje | Auto / Dnevno svijetlo / Oblacno / Žarulja / Fluorescentna cijev | U normalnim uvjetima izaberite mogućnost "Auto". Ako kamera ne prikazuje prirodne boje, izaberite opciju za ručno određivanje prema svjetlosnoj situaciji. |
| ISO | AUTO / 100 / 200 / 400 | Određuje osjetljivost prilikom slikanja snimka. |
| Boja | Boja /Crna i bijela / Sepija | Izabere režim snimka u boji. |
| Brzi pogled | Isključeno / 2s / 5s | Nakon slikanja omogućuje pregled 2s / 5s. |
| Stabilizacija | Isključeno / Uključeno | Uključuje/Isključuje stabilizaciju slike. |
| Kvaliteta | Dobra / Normalna / Ekonomična | Postavlja kvalitetu fotografije. |
| Oštrina | Visoka / Normalna / Niska | Postavlja oštrinu fotografije. |
| Postavljanje u režimu snimanja | Izbriši | Obriši aktualno / Obriši sve | Obriše datoteku. |
| Zaštititi | Zaključati aktualno / Otključati aktualno / Zaključati sve / Otključati sve | Zaključa / Otključa datoteku. |
| Prezentacija | 2 sekunde / 5 sekundi / 8 sekundi | Podešava brzinu prezentacije. |
| Napredna postavljanja | Wi-Fi | | Gumbom 'OK' Uključuje/Isključuje WiFi. |
| Datum/vrijeme | LL/MM/DD | Podešavanje datuma i vremena. |
| Ime vozača | - - - - - - | Pomoću strelica izaberite znak A-Z, 0-9. Izabrani znak potvrdite gumbom 'OK', cijelo ime potvrdite gumbom 'OK'. |
| Odgođeno isključivanje. | Isključeno / 10s / 20s / 30s | Omogućuje vremensko kašnjenje gašenja nakon prekida napajanja kamere. Ova funkcija je prikladna na primjer kod vozila s funkcijom start/stop. |
| Radni zvuk | Isključeno / Uključeno | Podešavanje uključivanja/isključivanja zvukova kamere. |
| Čuvar zaslona | Isključeno / 1 min / 2 min / 3 min | Postavlja čuvara zaslona. |
| Brzinomjer | Isključeno / 1 min / 2 min / 3 min | Postavlja funkciju mjerača brzine kao čuvara zaslona. |
| Biranje vremenske zone | UTC+12 - UTC-12 | Postavljanje vremenske zone. |
| Jedinica brzine | KMH / MPH | Postavljanje jedinica brzine. |
| Frekvencija | 50Hz/60Hz | Postavljanje frekvencije video. |
| Jezik | Engleski / Francuski / Njemački / Ruski / Poljski / Češki / Slovački / Mađarski / Litvanski | Podešavanje jezika. |
| Oblikovati | Odustani / U redu | Formatira podatke na memorijskoj kartici. |
| Tvornička podešenost | Odustani / U redu | Postavlja kameru na tvornička podešavanja. |
| Verzija | xxxx | Prikazuje namještenu (instaliranu) verziju FW. |
8. TEHNIČKI PARAMETRI
| Rezolucija video | 1920×1080 30FPS, 1280×720 30FPS |
| Kut snimanja | 140° |
| Veličina displeja | 1,5" |
| Tip memorije | Micro SD Class 10, maks. 128 GB |
| Oblik video | MP4 |
| Vremenski znak | Da |
| GPS | Da |
| G-osjetilo | Da |
| Konektivitet | WiFi / mini USB |
| Sistem | MS Windows / MAC OS |
| Uzlazni napon | 5 V |
| Noćni režim | Da |
| Kapacitet akumulatora | 180 mAh |
| Radna temperatura | -5 °C ~ 40°C |
Napomena: Specifikacije se mogu promijeniti zamjenom nekih dijelova uređaja ili aktualizacijom softvera. Pozor – u nekim država Europske unije važe specifični zakoni kojima je regulirano snimanje pomoću auto-kamere. Zbog toga je preporučljivo prije svakog putovanja u inozemstvo provjeriti lokalnu legislativu, preporučljivo je kontaktirati lokalne autoklubove. Kamera se može koristiti kao dokazni materijal, i to čak i pred policijom. Ponovno preporučujemo proučiti važeće lokalne zakone i propise koji su na snazi u pojedinim državama. Upozoravamo da se ovaj materijal može iskoristiti i protiv autora zapisa. Društvo ne odgovara za protuzakonitu primjenu kamera i zapisa snimljenih pomoću ovih kamera.
Proizvođač
The Ground Truth image displays a single, continuous horizontal line, which is a stylistic or background element (like a ruled paper line). According to Rule 2, such lines must be ignored by the OCR result. The provided OCR content is "____", which consists of underscores. Underscores are not equivalent to a solid line and are not permitted under the “Stylistic/Background Lines (Ignore)” rule. Outputting underscores for a stylistic line is incorrect because it misinterprets the line as a fill-in-the-blank placeholder. Therefore, the OCR result is inconsistent with the Ground Truth.
[Non-Text]
[Non-Text]
[Non-Text]
[Non-Text]
The Ground Truth image displays a single, solid horizontal line. According to Rule 2 (UNDERSCORE & LINE RULES), this is a stylistic or background line, not a placeholder underscore. Therefore, the OCR result must ignore it and output nothing or only meaningful text. The provided OCR content is "____", which consists of four underscores. This is an incorrect interpretation of the line as a placeholder, violating the rule that stylistic lines must be ignored. The OCR has hallucinated placeholder underscores where none should exist in the GT. Hence, the OCR result is inconsistent with the Ground Truth.
[Non-Text]
[Non-Text]
Avtomobilska kamera z WiFi, GPS in magnetnim držalom LAMAX T6
natural_image
LAMAX T6 digital camera with a remote screen displaying a scenic mountain road (no text or symbols on the device body)
1. VSEBINA EMBALAŽE