ULGD 10 A1 - Battery charger ULTIMATE SPEED - Free user manual and instructions
Find the device manual for free ULGD 10 A1 ULTIMATE SPEED in PDF.
| Brand | Ultimate Speed |
| Model | ULGD 10 A1 |
| Product type | Intelligent car battery charger |
| Input voltage | 220-240 V~, 50-60 Hz |
| Max input current | 2.0 A |
| Output voltage | 12 V / 24 V (selectable) |
| Output current (12 V) | 10.0 A or 5.0 A depending on program |
| Output current (24 V) | 5.0 A or 2.5 A depending on program |
| Compatible battery types | Lead-acid 12 V (20-300 Ah) and 24 V (20-150 Ah): WET, AGM, GEL, Calcium |
| Protection rating | IP54 (dust and splash resistant) |
| Protection class | II (double insulation) |
| Charging programs | 10 programs: normal, winter, AGM, power supply (maintenance) |
| Special functions | Recovery (desulfation), automatic maintenance charge, protection against reverse polarity, short circuit, overheating |
| Included cables | Cable with clamps and cable with ring terminals |
| Warranty | 3 years |
| Operating temperature | -20 °C to 50 °C |
| Usage | Indoor use only, in well-ventilated rooms |
| Maintenance | Clean with a dry cloth, do not use solvents |
| Disposal | Do not dispose of with household waste, mandatory recycling |
| Certifications | CE, compliance with directives 2014/35/EU, 2014/30/EU, 2011/65/EU |
Frequently Asked Questions - ULGD 10 A1 ULTIMATE SPEED
User questions about ULGD 10 A1 ULTIMATE SPEED
0 question about this device. Answer the ones you know or ask your own.
Ask a new question about this device
Download the instructions for your Battery charger in PDF format for free! Find your manual ULGD 10 A1 - ULTIMATE SPEED and take your electronic device back in hand. On this page are published all the documents necessary for the use of your device. ULGD 10 A1 by ULTIMATE SPEED.
USER MANUAL ULGD 10 A1 ULTIMATE SPEED
Translation of the original instructions
NL BE
AUTO-ACCULADER
Before reading, unfold the page containing the illustrations and familiarise yourself with all functions of the device.
FR BE
GB/IE Translation of the original instructions Page 29
Dr. Christian Weyler
Katharina-Loth-Str. 15
DE-66386 St. Ingbert
service.at@cmc-creative.de
service.ch@cmc-creative.de
Telefon: +49 (0) 6894/ 9989750
Technical specifications 33
Charging characteristics.. 34
Safety instructions.. 34
Specific safety instructions.. 39
Before use 39
Using the device. 40
Connection 40
Disconnecting 41
Standby / Measuring battery voltage.. 41
Battery recognition.. 41
Revival. Page 41
Selecting programs.. 42
Maintenance and care 46
Information about recycling and disposal 47
EU Declaration of Conformity 47
Warranty and service information 48
Warranty conditions 48
Warranty period and statutory claims for defects.. 48
Extent of warranty.. 49
Processing of warranty claims 49
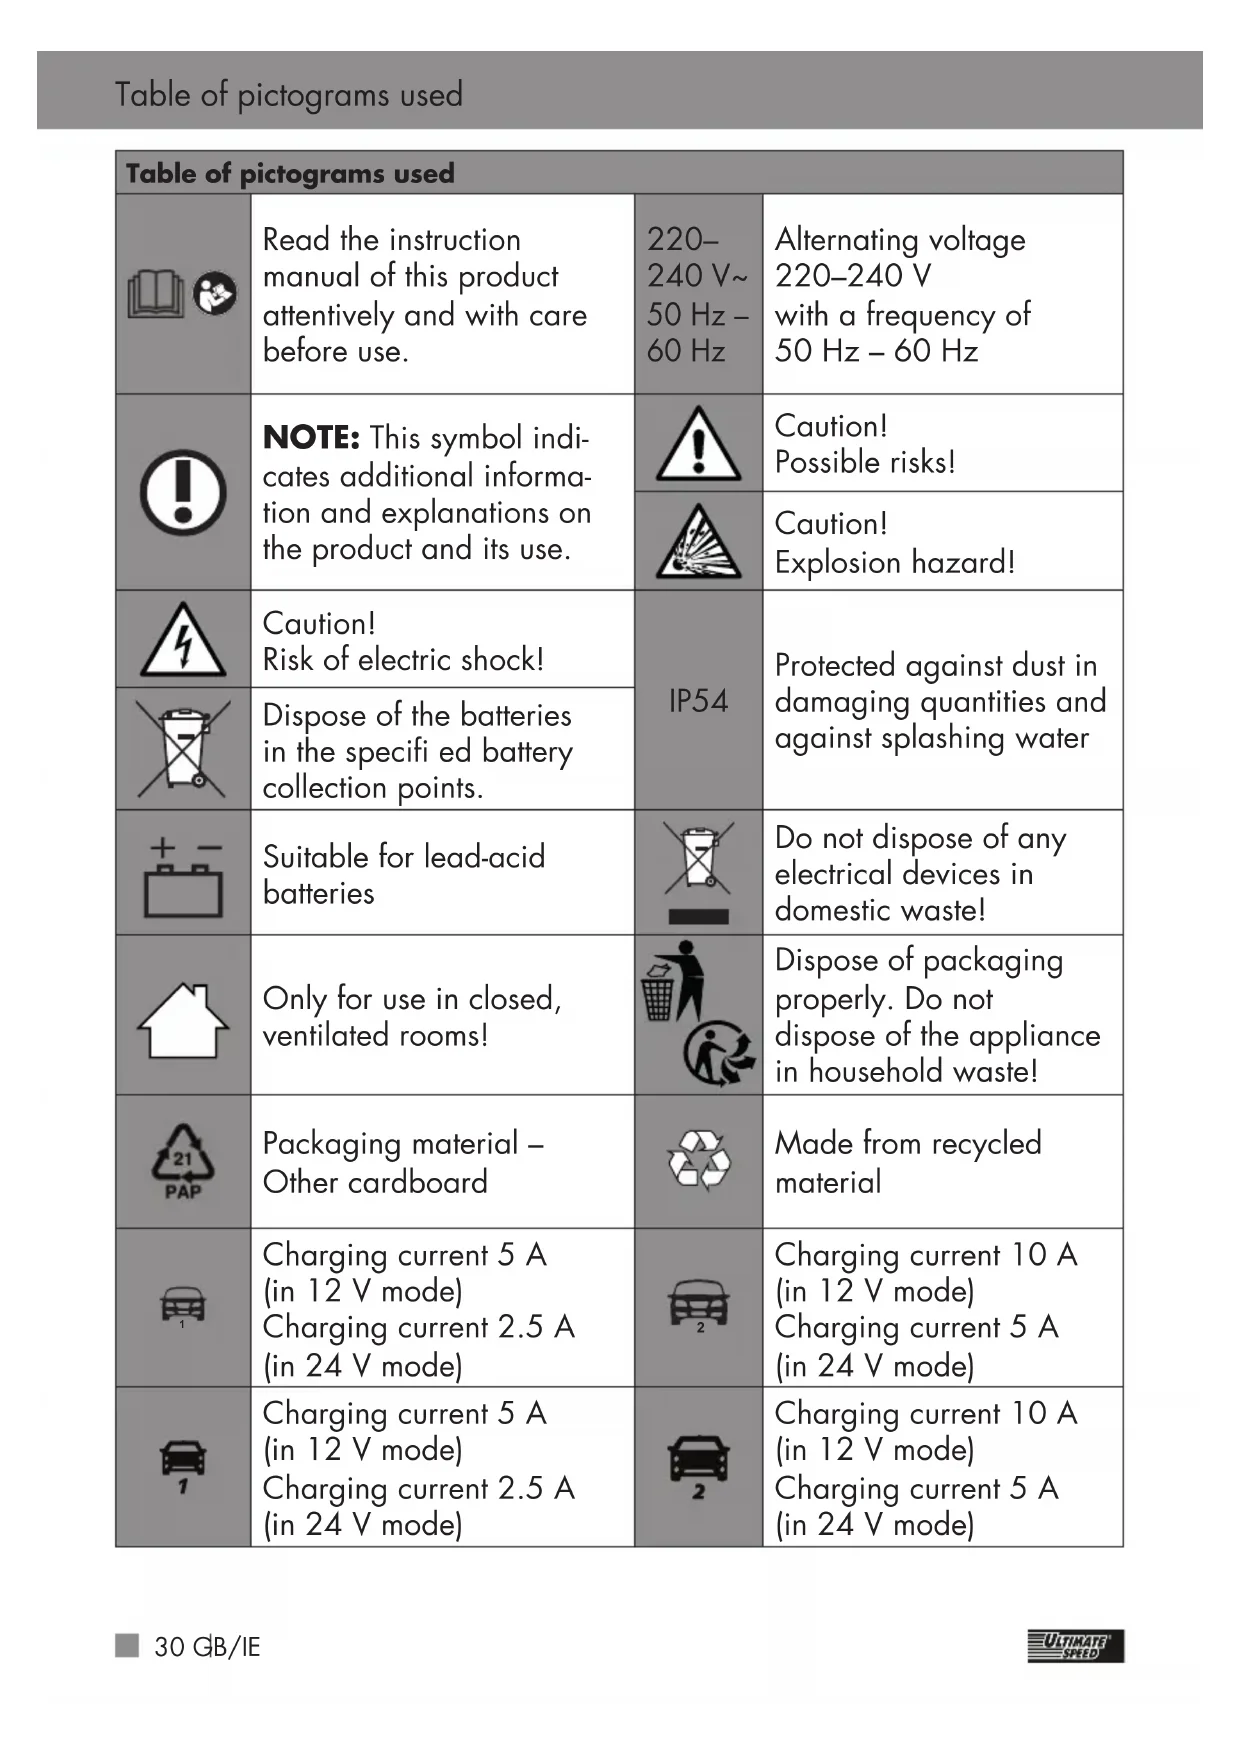
| Table of pictograms used | |||
| Read the instruction manual of this product attentively and with care before use. | 220-240 V~50 Hz - 60 Hz | Alternating voltage220-240 Vwith a frequency of50 Hz - 60 Hz | |
| NOTE: This symbol indicates additional information and explanations on the product and its use. | Caution!Possible risks! | ||
| Caution!Explosion hazard! | |||
| Caution!Risk of electric shock! | IP54 | Protected against dust in damaging quantities and against splashing water | |
| Dispose of the batteries in the specified battery collection points. | |||
| Suitable for lead-acid batteries | Do not dispose of any electrical devices in domestic waste! | ||
| Only for use in closed, ventilated rooms! | Disposition of packaging properly. Do not dispose of the appliance in household waste! | ||
| Packaging material - Other cardboard | Made from recycled material | ||
| Charging current 5 A(in 12 V mode)Charging current 2.5 A(in 24 V mode) | Charging current 10 A(in 12 V mode)Charging current 5 A(in 24 V mode) | ||
| Charging current 5 A(in 12 V mode)Charging current 2.5 A(in 24 V mode) | Charging current 10 A(in 12 V mode)Charging current 5 A(in 24 V mode) | ||
| 12 V | Suitable for the charging of 12-V batteries | 24 V | Suitable for the charging of 24-V batteries |
| = = = | Direct current Protection class | 2 | |
| 12V | 12 V mode (Program 1, 2, 3, 4 and 9) | 24V | 24 V mode (Program 5, 6, 7, 8 and 10) |
| 24V | Disconnect from the mains before closing or opening any of the connections to the battery. | Ensure sufficient ventilation when charging! | |
| 1 | Connect the battery first, then establish the connection with the mains! | J | Protect electrical connections from rain! |
| × | Avoid flames and sparks! Do not smoke! | ||
| Winter - AGM - Mode (Program 2, 4, 6 and 8) | + + | Supply program (Program 9 and 10) | |
VEHICLE BATTERY CHARGER ULGD 10 A1
Introduction
Congratulations! You have purchased one of our high-quality products. Please familiarise yourself with the product before using it for the first time. To do so, please read through the following operating and safety instructions carefully.
KEEP OUT OF THE REACH OF CHILDREN!
- Intended use
The Ultimate Speed ULGD 10 A1 is a multi-level vehicle battery charger, which is suitable for charging and trickle charging 12 V- (6 cells) or 24 V (2x6 cells) lead acid batteries with electrolyte solution (WET), with electrolyte absorbing mats (AGM), with gel gel-type electrolyte (GEL) or calcium batteries. The device is not suitable for charging lithium-ion batteries!
You can also regenerate discharged batteries (depending on the battery
type). The vehicle battery charger has a safety circuit against sparking and overheating. Keep these instructions in a safe place.
The supply program enables you to change a vehicle battery without interrupting the voltage supply.
Ensure you hand over all documentation when passing the product on to anyone else. Any use that differs to the intended use as stated above is prohibited and potentially dangerous. Damage or injury caused by misuse or disregarding the above warning is not covered by the warranty or any liability on the part of the manufacturer. The device is not intended for commercial use and should only be used indoors. Commercial use will void the guarantee. The product must only be started up initially by people who have been trained to do so.
! Note:
The vehicle battery charger cannot charge any electrical vehicles with integrated rechargeable battery.
! Note:
No jumpstart of 12V or 24V batteries possible.
Package contents
1 Vehicle battery charger
1 Operating instructions
1 Connecting cable with clamps
1 Connecting cable with loops
Equipment
To do this see Fig. A, B: After unpacking the product, please check that all of the package contents are present and that the battery charger is in perfect condition. Do not use the device if it is defective.
| 1 | Vehicle battery charger |
| 2 | 24V 24 V mode (Program 5, 6, 7, 8 and 10) |
| 3 | 12V, 12V mode (Program 1, 2, 3, 4 and 9) |
| 4 | Charging current 5 A (in 12 V mode) Charging current 2.5 A (in 24 V mode) |
| 5 | 2, Charging current 10 A (in 12 V mode) Charging current 5 A (in 24 V mode) |
| 6 | Winter - AGM - Mode (Program 2, 4, 6 and 8) |
| 7 | Supply program (Program 9 and 10) |
| 8 | Program selector button |
| 9 | Charging display |
| 10 | Status display |
| 11 | Voltage display |
| 12 | Mains cable |
| 13 | Red loop (positive pole) |
| 14 | Black loop (negative pole) |
| 15 | Output cable with plug |
| 16 | Cover cap connecting cable with loops |
| 17 | Connecting cable with loops |
| 18 | Connecting cable with clamps |
| 19 | Positive pole connection terminal (red) |
| 20 | Cover cap for connecting cable with clamps |
| 21 | Negative pole connection terminal (black) |
- Technical specifications
| Model: ULGD 10 | A1 |
| Rated voltage: | 220–240 V~50 Hz – 60 Hz |
| Rated intake current: | 2.0 A |
| Rated output DC voltage: | 12 V——/24 V—— |
| Rated output direct current at 12 V: | 10.0 A / 5.0 A |
| Rated output direct current at 24 V: | 5.0 A / 2.5 A |
| Ambient temperature: | -20 °C to 50 °C |
| Housing protection type: | IP 54 |
| Appliance class: | II(dual insulation) |
| Battery types: | 12 V lead acid battery20 Ah -300 Ah24 V lead acid battery20 Ah -150 Ah |
! Note:
The use of the term 'product' or device' in the following text refers to the vehicle battery charger named in these operating instructions.
- Charging characteristicsPRODUCT AND MUST BE AVAILABLE AT ALL TIMES!
To do this see Fig. C:
| 1 | Polarity reversal protection / Battery diagnosis |
| 2 | Pulse charging / Revival (Desulphation) |
| 3 | Main charge |
| 4 | Preservation charging up to 80% |
| 5 | Recharging up to 100% (Absorption) |
| 6 | Battery monitoring |
| 7 | Charge maintenance |
Changes to technical and visual aspects of the product may be made as part of future developments without notice. Accordingly, no warranty is offered for the physical dimensions, information and specifications in these operating instructions.
The operating instructions cannot therefore be used as the basis for asserting a legal claim.
- Safety instructions
PLEASE READ THROUGH THE INSTRUCTION MANUAL CAREFULLY BEFORE USE. THESE FORM PART OF THE
KEEP OUT OF THE REACH OF CHILDREN!
The charger is only suitable for indoor operation!
DANGER!
Avoid danger to life and danger of injury from improper use!
CAUTION!
Do not operate the device with a damaged cable, mains cable or mains plug. Damaged mains cables pose danger to life from electric shock.
In case of damage, the mains cable must only be repaired by authorized and trained specialists! Contact the service point of your country if you need any repair!
DANGER OF ELECTRIC SHOCK!
Ensure that the vehicle is not in operation if the battery is installed firmly in the vehicle! Switch off the ignition and put the vehicle into the parking position, with the parking brake engaged (e.g. car) or the rope attached (e.g. boat)!
DANGER OF ELECTRIC SHOCK!
Disconnect the vehicle battery charger from the mains before
removing the connection terminals.
- Connect the connection terminal that is not connected to the car body first.
- Connect the other connection terminal to the car body away from the battery and the gasoline line.
- Connect the vehicle battery charger to the supply grid only after doing this.
- Disconnect the vehicle battery charger from the supply grid after charging.
- Only then disconnect the connection terminal from the car body. Then disconnect the connection terminal from the battery.

ANGER OF ELECTRIC SHOCK!
Only touch the pole connection terminals (^ - ^ and ^ + ^ ) in the insulated area!

ANGER OF ELECTRIC SHOCK!
Conduct the connection to the battery and the socket of the mains grid completely protected from moisture!

ANGER OF ELECTRIC SHOCK!
Perform installation, servicing and maintenance of the vehicle battery charger only when
the mains current is not connected!

ANGER OF ELECTRIC SHOCK!
First disconnect the negative pole connection cable (black) of the vehicle battery charger from the negative pole of the battery upon completing the charging and trickle charging process, if the battery is continually connected in the vehicle.
- Do not leave any toddlers or children unsupervised around the vehicle battery charger!
Children cannot assess possible dangers in use of electrical devices. Children must be supervised to ensure that they do not play with the device.

XPOSION HAZARD!
Protect yourself from highly explosive oxyhydrogen reactions! Gaseous hydrogen can escape during charging or maintenance charging of the battery. Oxyhydrogen is a potentially explosive mix of gaseous hydrogen and oxygen. The oxyhydrogen reaction occurs at contact with open fire (flames, smouldering or sparks)! Perform charging and maintenance charging in a weather-protected space that is
ventilated well. Ensure that there are no naked flames (flames, smouldering or sparks) during charging or maintenance charging!
EXPLOSION AND FIRE HAZARDS!
Ensure that explosive or flammable substances, such as gasoline or solvents cannot be ignited when you are using the vehicle battery charger!
EXPLOSIVE GASES!
Avoid flames and sparks!
- Ensure sufficient ventilation when charging.
Put the battery onto a well-ventilated surface when charging. Otherwise, the device can be damaged.

XPOSION HAZARD!
Ensure that the positive pole connection cable has no contact with a fuel line (e.g. petrol line)!
DANGER OF CAUSTIC BURNS!
Protect your eyes and skin from caustic burns from the acid (sulphuric acid) when it comes into contact with the battery!
Use: acid-resistant safety goggles, clothing and gloves! If your eyes or skin have come into contract with the sulphuric acid, flush the affected body
region with plenty of clear, running water and seek medical advice at once!
- Avoid electrical short circuits when connecting the vehicle battery charger to the battery. Connect the negative pole connection cable only to the negative pole of the battery or the car body. Connect the plus pole connection cable only to the plus pole of the battery!
Before connecting to the mains, verify the mains power has the required 230V 50Hz a 16 A fuse and an ELCB switch (earth leakage circuit breaker)! Otherwise, the device can be damaged. - Do not use the vehicle battery charger near any fires, heat and long-term temperatures above 50^ ! For higher temperatures, the output power of the vehicle battery charger will drop automatically.
Only use the vehicle battery charger with the original parts it was delivered with! - Do not cover the vehicle battery charger with any objects! Otherwise, the device can be damaged.
- Protect the electrical contact surfaces of the battery from short circuit!
Only use the vehicle battery charger for the charging and maintenance charging of undamaged 12 V-/24 V-lead batteries (with electrolyte solution or gel)! Otherwise, property damage may be the consequence.
- Do not use the vehicle battery charger for the charging and maintenance charging of non-rechargeable batteries. Otherwise, property damage may be the consequence.
- Do not use the vehicle battery charger for the charging and maintenance charging of damaged or frozen batteries! Otherwise, property damage may be the consequence.
Please refer to the original operating instructions about the maintenance of your battery prior to connecting the vehicle battery charger! Otherwise, there is a danger of injury and/or the risk of damage to the device.
Before connecting the vehicle battery charger to a battery that is continually connected to the vehicle, learn about compliance with the electrical safety and maintenance in the original operating instructions of the vehicle! Otherwise, there is
a danger of injury and/or the risk of property damage.
- Disconnect the vehicle battery charger from the mains current when it is not is use to protect the environment as well! Note that power is consumed in standby operation as well.
Always pay attention and be aware of what you are doing. Proceed reasonably and do not put the vehicle battery charger into operation when you are not focused or not feeling well.
Personal safety:
This device may be used by children aged 8 years and older, and by persons with reduced physical, sensory or mental capacities, or a lack of experience and knowledge, if they are supervised or have been instructed in how to use the device safely and understand the dangers that may arise when using it. Do not allow children to play with the device. Cleaning and day-to-day maintenance must not be performed by children without supervision.
Children must be supervised to ensure that they do not play with the device.
- Keep the device away from people - especially children - and household pets.
Within the working area, the user is responsible for any damage or injury to third parties that was caused by the use of the device.
Do not leave the device charging unattended. - Keep the device in a dry location and out of the reach of children.

This helps prevent device damage and possible personal injuries that could result from it:
Working with the device:
Before setup or first use, check the device for any damage and do not use unless in perfect working order.
Make sure that the mains plug and connection terminals do not get wet. Do not expose the device to rain or wet weather. Do not let the device come into contact with water. Do not immerse the device in water. There is a risk of electric shock!
In hot weather, do not leave the device in a car. This could permanently damage the device.
Do not operate the device near to flammable liquids or gases. Failure to do so risks causing a fire or explosion!
- Switch the device off and remove the mains plug from the socket in the following cases:
- When you are not using the device;
If you are leaving the device unsupervised; - If you are doing cleaning work;
- If the connection cable is damaged;
Only use the accessories supplied and recommended by the manufacturer.
- Do not disassemble or modify the vehicle battery charger. This device must only be repaired by a maintenance technician.
Do not use the device in areas with a risk of explosion, e.g. near flammable liquids, gases or powders.
- Do not expose the device to any source of heat.
When the charger is not being used, always put the
cover caps 20 and 16 onto the connecting cable 18 and 17. This prevents any possible short circuit through contact with rain or splashed water.

CAUTION: How to avoid accidents and injuries resulting from electric shock:
Electrical safety:
- Do not carry the device by the cable. Do not unplug the plug from the socket by pulling on the cable. Protect the cable from heat, oil and sharp edges.
If the cable is damaged, unplug the plug immediately from the socket.
- Specific safety instructions
A slightly higher temperature during charging is absolutely normal and not a malfunction.
- Protect the vehicle battery charger from moisture and high temperatures, including fires.
Store the vehicle battery charger in a dry place
and protect the device from moisture and corrosion.
- Do not drop the vehicle battery charger while it is being used.
- Before use
Take all parts from the packaging and check whether the device or parts show any damage. If this is the case, do not use the device. Contact the manufacturer via the indicated service address. Remove all transport packaging. Check that the delivery is complete.
Always pull the mains plug from the socket before you perform any work at the vehicle battery charger.
Before connecting the charger please read the user instructions for the battery.
In addition, you must adhere to the instructions from the vehicle manufacturer where a battery is continuously connected in the vehicle. Secure the vehicle, switch the ignition off.
Clean the battery poles. Make sure that the dirt does not come into contact with your eyes.
Make sure that there is sufficient ventilation.
Note: The ambient temperature is measured in the charger. Hence, for optimum function, make sure the
battery exhibits the same temperature as the environment.
Using the device
- Connection
! Note:
Always observe the instructions from the vehicle manufacturer or the battery manufacturer.
Charging using the battery clamps:
- Disconnect the minus pole connection cable (black) of the vehicle from the minus pole of the battery first before charging and maintenance charging if the battery is continually connected in the vehicle. The negative pole of your battery is usually connected to the car body of the vehicle.
- Then disconnect the plus pole connection cable (red) of the vehicle from the plus pole of the battery.
- Connect the output cable with the plug 15 o the connecting cable with clamps 18.
- Only then connect the "+" pole quick-contact connection terminal (red) of the vehicle battery charger to the "+" pole of the battery.
-
Connect the "−" pole quick-contact connection terminal (black) to the "−" pole of the battery.
-
Connect the mains cable of the vehicle battery charger to the socket.
Charging using loops:
The connecting cable with loops must be permanently connected to the battery.
- Disconnect the battery from the vehicle. Loosen the nut on the battery's positive terminal (red). Now insert the red loop 13 under the nut connected to the battery's positive terminal, and then retighten the nut. Make sure that the loop 13 does not slip when tightening the nut.
Repeat with the black loop on the battery's negative terminal.
- Afterwards, reconnect the battery to the vehicle.
Plug the cover cap of the connecting cable with loops 16 over the contacts of the connecting cable with loops 17. When the charger is not being used, this must always be carried out, in order to prevent a short circuit.
Remove the cover cap of the connecting cable with loops 17, before you start charging.
- Connect the output cable with the plug 15 with the connecting cable with loops 17.
- Connect the mains cable of the vehicle battery charger to the socket.
- Disconnecting
Stop charging using the battery clamps:
- Disconnect the device from the mains current.
- Disconnect the "−" pole quick-contact connection terminal (black) 21 from the "−" pole of the battery.
- Disconnect the "+"-pole quick contact-connection terminal (red) 19 rom the "+"-pole of the battery.
- Reconnect the plus pole connection cable of the battery to the plus pole of the battery.
- Reconnect the minus pole connection cable of the battery to the minus pole of the battery.
Stop charging using loops:
- Disconnect the device from the mains current.
Pull out the plug, which connects the output with the plug 15 with the connecting cable with loops 17. - Cover the contacts of the connecting cable with loops 17 with the attached cover cap of the connecting cable with loops 16.
- Standby / Measuring battery voltage
After connecting the mains supply, the device is in standby mode. The display is in use. When the connection terminals are connected, the battery voltage is displayed on the LC display (voltage display 11). The segments of the status display 10 are empty. If the measured voltage is below 2V , then this means the battery is not charging.
- Battery recognition
If a battery with a voltage over 2V is connected, the charging process will start once the charging program is selected. Deeply discharged batteries can also be charged, as long as they are not defective.
If a battery with a voltage of over 15.6V is connected, in 12V mode, "Err" will be shown in the voltage display [1]. The charging process in 24V mode.
If the charger is connected to a battery with the poles reversed, "POL" will be shown on the display. The charging process will not be activated.
Revival
After battery recognition, depending on the battery status, the revival process will be activated. Pulsating
current ensures that a battery which is not used for a long period of time will still be able to be charged.
If the revival is not successful after 10 minutes, then "Err" will be shown on the display.
If a 24 V charging program is selected accidentally and a 12 V battery is connected, then after 10 mins, "Err" will appear on the display.
- Selecting programs
! Note:
Before a charging program is carried out, the battery must be connected to the charger as described in the "Connection" section. The charging process continues automatically. Depending on the program selected, the charging characteristics for voltage, time and temperature are
monitored. The charging process contains a diagnosis program, a revival mode and a trickle charge function.
| Program | max. (V) | max. (A) | |
| 1 | 12V 1 | 14.4 V | 5.0 A |
| 2 | 12V 2 | 14.7 V | 5.0 A |
| 3 | 12V 2 | 14.4 V | 0.0 A |
| 4 | 24V 2 | 14.7 V | 0.0 A |
| 5 | 24V 1 | 28.8 V | 2.5 A |
| 6 | 24V 1 | 29.4 V | 2.5 A |
| 7 | 24V 2 | 28.8 V | 5.0 A |
| 8 | 24V 2 | 29.4 V | 5.0 A |
| 9 | 12V ± | 13.6 V | 3.0 A |
| 10 | 24V ± | 27.2 V | .5 A |
Program 1
12v
(14.4 V / 5.0 A)
To charge 12V batteries with a capacity of 20 Ah to 100 Ah.
Press the program selector button 8 once to select Program 1.
The 3 and 4 symbols are shown on the LC display. During the charging process, the charging display 9 flashes. The progress of the charging process (1-4 bars) will be shown on the status display 10. When the battery is fully charged, the status display shows 10 4 bars. The flashing stops and the device switches to trickle charging automatically. The display will show "FUL".
Program 2
12V再
(14.7 V / 5.0 A)
To charge 12V batteries with a capacity of 20 Ah to 100 Ah under cold conditions or to charge AGM batteries.
Press the program selector button 8 twice to select Program 2.
The 3 and symbols are shown on the LC display. During the charging process, the charging display flashes. The progress of the charging process (1-4 bars) will be on the status display . When battery is fully charged, the sto display shows 4 bars. The f ing stops and the device switch trickle charging automatically. The display will show "FUL".
Program 3

(14.4 V / 10.0 A)
To charge 12V batteries with a capacity of 60 Ah to 200 Ah. To maintain the charge of 12V batteries up to 300 Ah.
Press the program selector button 8 three times to select Program 3.
The 3 and 5 symbols are shown on the LC display. During the charging process, the charging display 9 flashes. The progress of the charging process (1-4 bars) will be shown on the status display 10. When the battery is fully charged, the status display shows 10 4 bars. The flashing stops and the device switches to trickle charging automatically. The display will show "FUL".
Program 4
2
(14.7 V / 10.0 A)
To charge 12 V batteries with a capacity of 60 Ah to 200 Ah under cold conditions or to charge AGM batteries. To maintain the charge of 12 V batteries up to 300 Ah.
Press the program selector button 8 four times to select Program 4.
The 12V 3, 5 and 6 symbols are shown on the LC display. During the charging process, the charging display 9 flashes. The progress of the charging process (1-4 bars) will be shown on the status display 10 . When the battery is fully charged, the status display shows 10 4 bars. The flashing stops and the device switches to trickle charging automatically. The display will show "FUL".
Program 5
24V
(28.8 V / 2.5 A)
To charge 24V batteries with a capacity of 20 Ah to 50 Ah.
Press the program selector button 8 once to select Program 5. If the 24V battery is deeply discharger (below 15.6 Volt), then the charger recognises the battery as a 12V battery. In this case, the program selector button 8 must be pressed five times, to select program 5.
The 2 and 4 symbols are shown on the LC display. During the charging process, the charging display flashes. The progress of the charging process (1-4 bars) will be shown on the status display . When the battery is fully charged, the status display shows 4 bars. The flashing stops and the device switches to trickle charging automatically. The display will show "FUL".
Program 6
24V
(29.4 V / 2.5 A)
To charge 24V batteries with a capacity of 20 Ah to 50 Ah under
cold conditions or to charge AGM batteries.
Press the program selector button 8 twice to select Program 6.
If the 24V battery is deeply discharger (below 15.6 Volt), then the charger recognises the battery as a 12V battery. In this case, the program selector button must be pressed six times, to select program 6.
The 24V 2, 4 and 6
symbols are shown on the LC display. During the charging process, the charging display 9 flashes. The progress of the charging process (1-4 bars) will be shown on the status display 10 . When the battery is fully charged, the status display shows 10 4 bars. The flashing stops and the device switches to trickle charging automatically. The display will show "FUL".
Program 7
24V 1
(28.8 V / 5.0 A)
To charge 24V batteries with a capacity of 40 Ah to 100 Ah.
To maintain the charge of 24V batteries up to 150 Ah.
Press the program selector button 8 three times to select Program 7.
If the 24V battery is deeply discharger (below 15.6 Volt), then the charger recognises the battery as a 12V battery. In this case, the program selector button must be pressed seven times, to select program 7.
The 24 and symbols are shown on the LC display. During the charging process, the charging display flashes. The progress of the charging process (1-4 bars) will be shown on the status display. When the battery is fully charged, the status display shows 4 bars. The flashing stops and the device switches to trickle charging automatically. The display will show "FUL".
Program 8

(29.4 V / 5.0 A)
To charge 24V batteries with a capacity of 40 Ah to 100 Ah under cold conditions or to charge AGM batteries.
To maintain the charge of 24V batteries up to 150 Ah.
Press the program selector button 8 four times to select Program 8. If the 24V battery is deeply discharger (below 15.6 Volt), then the charger recognises the battery as a 12V battery. In this case, the
program selector button 8 must be pressed eight times, to select program 8.
The 24 symbols are shown on the LC display. During the charging process, the charging display flashes. The progress of the charging process (1-4 bars) will be shown on the status display. When the battery is fully charged, the status display shows 4 bars. The flashing stops and the device switches to trickle charging automatically. The display will show "FUL".
Program 9
(13.6 V / 3.0 A)
Supply program 13.6V / 3A max.
Press the program selector button 8 nine times to select Program 9.
The 3 and 7 symbols are shown on the LC display.
For use as a 12 V voltage supply or for buffer maintenance charging, where 100% battery power is necessary. Das supply program will work without a time limit.
Please contact the vehicle manufacturer and read the operating
instructions for your vehicle, if you want to use this program to buffer your vehicle when changing a battery.
Program 10
24 (27.2V/1.5A)
Supply program 27.2 V / 1.5 A max.
Press the program selector button 8 ten times to select Program 10.
The 2 and 7 symbols are shown on the LC display.
For use as a 24 V voltage supply or for buffer maintenance charging, where 100% battery power is necessary. Das supply program will work without a time limit.
Please contact the vehicle manufacturer and read the operating instructions for your vehicle, if you want to use this program to buffer your vehicle when changing a battery.
Trickle charging
In programs 1 to 8, the device has an automatic trickle charging procedure. Depending on the drop in voltage in the battery - through self-discharge - the charger reacts
with different levels of charging current. The battery can remain connected to the charger over a longer period of time.
Device protection function
As soon as a different situation occurs, such as a short circuit, critical drop in voltage during the charging process, open circuit or reversed connection of the output terminals, the battery charger switches off automatically. The electronic system resets the system immediately to its home position, in order to avoid damage. If the device should become too hot during charging, the output power is automatically reduced. This protects the device from damage.
- Maintenance and care
Always pull the mains cable 12 from the socket before you perform any work on the vehicle 1 battery charger.
The device is maintenance-free. Deactivate the device. Clean the metal and plastic surfaces of the device with a dry cloth.
- Never use any solvents or other aggressive cleaning agents.
Information about recycling and disposal

Do not dispose of electrical tools in household waste!

Please return this device, accessories and packaging to your local recycling depot.
Do not dispose of the vehicle battery charger in household waste, in fire or in water. Devices that are no longer functional should be recycled wherever possible. Ask your local stockist for advice.

As the consumer you are legally obliged (by the Ger
man Battery Ordinance) to return any and all used batteries. Batteries containing harmful substances are labelled with the adjacent symbol, which indicates the prohibition on disposal in household waste. The abbreviations for the relevant heavy metals are:
Cd = cadmium, Hg = mercury, Pb = lead.
Take used batteries to a waste management company in your city or community or return them to your dealer. This satisfies your legal obligations while also making an important contribution to protecting the environment.
EU Declaration of Conformity
We,
C. M. C. GmbH
Responsible for documentation: Dr Christian Weyler Katharina-Loth-Str. 15 66386 St. Ingbert
hereby take sole responsibility for declaring that the product
Vehicle battery charger
Year of manufacture: 2020/40
IAN:329536_2001
Model:ULGD10A1
Model number: 2312
meets the basic safety requirements as specified in the European Directives.
Low Voltage Directive
2014/35/EU
Electromagnetic Compatibility
2014/30/EU
RoHS Directive
2011/65/EU + 2015/863/EU
and the amendments to these Directives.
The object of the declaration described above meets the requirements of Directive 2011/65/EU of the European Parliament and of the Council of 8 June 2011 on the
restriction of the use of certain hazardous substances in electrical and electronic equipment.
This conformity assessment is based on the following harmonised standards:
EN 60335-2-29:2004/A2:2010
EN 60335-1:2012/A13:2017
EN 62233:2008
EN 55014-1:2017
EN 55014-2:2015
EN 61000-3-2:2019
EN 61000-3-3:2013+A1:2019
St. Ingbert, 01/07/2020
C.M.C.GmbH
Katharina Loth-Str.15 1.A.66386 Str.hgBent
Telephone: +49 6894 9989750
Telefax: +49 6894 9989729
pp Dr Christian Weyler
- Quality Assurance -
Warranty and service information
Warranty from Creative Marketing & Consulting GmbH
Dear Customer,
The warranty for this equipment is 3 years from the date of purchase. In the event of product defects, you have legal rights against the retailer of this product. Your statutory rights
are not affected in any way by our warranty conditions, which are described below.
Warranty conditions
The warranty period begins on the date of purchase. Please retain the original sales receipt. This document is required as your proof of purchase.
Should this product show any defect in materials or manufacture within 3 years from the date of purchase, we will repair or replace it - at our discretion - free of charge.
This warranty service requires that you retain proof of purchase (sales receipt) for the defective device for the three year period and that you briefly explain in writing what the fault entails and when it occurred. If the defect is covered by our warranty, we will repair and return your product or send you a replacement. The original warranty period is not extended when a device is repair or replaced.
Warranty period and statutory claims for defects
The warranty period is not extended by the guarantee. This also applies to replaced and repaired parts. Any damages or defects detected at the time of purchase must be reported
immediately after unpacking. Any incidental repairs after the warranty period are subject to a fee.
- Extent of warranty
This device has been manufactured according to strict quality guidelines and carefully inspected before delivery.
The warranty applies to material and manufacturing defects only. This warranty does not extend to product parts, which are subject to normal wear and tear and can thus be regarded as consumable parts, or for damages to fragile parts, e.g. switches, rechargeable batteries or parts made from glass.
This warranty is voided if the product becomes damaged or is improperly used or maintained. For proper use of the product, all of the instructions given in the operating instructions must be followed precisely. If the operating instructions advise you or warn you against certain uses or actions, these must be avoided in all circumstances.
The product is for consumer use only and is not intended for commercial or trade use. The warranty becomes void in the event of misuse and improper use, use of force, and any work on the device that has not been
carried out by our authorised service branch.
- Processing of warranty claims
To ensure prompt processing of your claim, please follow the instructions given below.
Please retain proof of purchase and the article number (e.g. IAN) for all inquiries.
The product number can be found on the type plate, an engraving, the cover page of your instructions (bottom left), or the sticker on the back or underside of the device. In the event of malfunctions or other defects, please first contact our service department below by phone or email. If your product is found to be defective, you can then send your product with proof of purchase (till receipt) and a statement describing what the fault involves and when it occurred free of charge to the service address given.
! Note:
You can download this handbook and many more, as well as product videos and software at www.lidl-service.com.
With this QR code you can gain immediate access to the Lidl Service page (www.lidl-service.com) and
you can open your operating instructions by entering the article number (IAN) 329536.

How to contact us:
GB,IE
Name: C. M. C. GmbH
Website: www.cmc-creative.de
E-mail: service.gb@cmc-creative.de
Phone: 0-808-189-0652
Registered office: Germany
IAN 329536_2001
Please note that the following address is not a service address.
Please first contact the service point given above.
Address:
C. M. C. GmbH
Katharina-Loth-Str. 15
66386 St. Ingbert
GERMANY
Ordering spare parts:
Dr. Christian Weyler
Katharina-Loth-Str. 15
DE-66386 St. Ingbert
Site web: www.cmc-creative.de
E-mail: service.fr@cmc-creative.de
Telephone: 0033 (0) 387 84 72 34
Siège: Allemagne
IAN 329536_2001
Cd = cadmium, Hg = kwik, Pb = lood.
Dr. Christian Weyler
Katharina-Loth-Str. 15
DE-66386 St. Ingbert
z up. dr. Christiana Weylera
-Zapewnieniejakosci
Dr. Christian Weyler
Katharina-Loth-Str. 15
DE-66386 St. Ingbert
Dr. Christian Weyler
Katharina-Loth-Str. 15
DE-66386 St. Ingbert