
Tartàr 2in1 G20037 - Juicer G3 Ferrari - Free user manual and instructions
Find the device manual for free Tartàr 2in1 G20037 G3 Ferrari in PDF.

| Brand | G3 Ferrari |
| Model | Tartar 2in1 G20037 |
| Product type | Juicer / Meat grinder / Tomato press |
| Power supply | AC 220-240 V ~ 50/60 Hz |
| Rated power | 300 W |
| Maximum power | 800 W |
| Continuous operation time | 10 minutes maximum |
| Recommended break time | 10 minutes |
| Main functions | Meat grinder, sausage making, kibbeh, tomato press (model G20037) |
| Included accessories | Motor unit, feed tube, tray, food pusher, conical helix, star blade, 3 dies (small, medium, large), locking ring, sausage cone, kibbeh accessories, tomato press kit (G20037) |
| Reverse function | Yes, to unblock the screw |
| Non-slip feet | Yes |
| Maintenance and cleaning | Motor body: damp cloth. Removable parts: warm water and mild soap. Do not immerse motor. Do not wash in dishwasher. |
| Safety | Keep out of reach of children under 8 years. Unplug before cleaning. Do not use with wet hands. Do not insert metal objects. |
| Country of origin | Not specified |
Frequently Asked Questions - Tartàr 2in1 G20037 G3 Ferrari
User questions about Tartàr 2in1 G20037 G3 Ferrari
0 question about this device. Answer the ones you know or ask your own.
Ask a new question about this device
Download the instructions for your Juicer in PDF format for free! Find your manual Tartàr 2in1 G20037 - G3 Ferrari and take your electronic device back in hand. On this page are published all the documents necessary for the use of your device. Tartàr 2in1 G20037 by G3 Ferrari.
USER MANUAL Tartàr 2in1 G20037 G3 Ferrari
Technical model: AMG25-060

natural_image
Exterior view of a Ferrari Fast food grater with white and black casing (no visible text or symbols)Tritacarne e Passapomodoro
Meat grinder & tomato juicer
TARTÀR 2IN1
ITA: INDICE
Simbologia.... p. 2
Safety instructions p. 9
General information p. 11
G20036-G20037 p. 12
Preparation for use.... p. 12
Operating.... p. 12
Cleaning.... p. 14
Technical features.... p. 14
Waste of electric and electronic equipment (WEEE Directive)...... p. 40
PORTUGUES:....p. 15
ESPAÑOL ...... p. 21
DEUTSCH....p. 27
DEUTSCH....p. 33
CLASSI DI PROTEZIONE / PROTECTION CLASSES

ATTENZIONE RISCHIO DI SCOSSE ELETTRICHE NON ESPORRE A PIOGGIA E UMIDITA'


WARNING ELECTRIC SHOCK RISK DO NOT EXPOSE TO RAIN OR MOISTURE

ATTENZIONE: NON APRITE L'APPARECCHIO. ALL'INTERNO NON VI SONO COMANDI MANIPOLABILI DALL'UTENTE NE' PARTI DI RICAMBIO. PER TUTTE LE OPERAZIONI DI SERVIZIO RIVOLGERSI AD UN CENTRO DI ASSISTENZA AUTORIZZATO.
This symbol warns the user that un-insulated dangerous voltage inside the system may cause an electrical shock. Do not open the case.

Class II Appliance symbol. The double insulated electrical appliance is one which has been designed in such a way that it does not require a safety connection to electrical earth/ground.

Caution: this symbol reminds the user to read carefully the important operations and maintenance instructions in this owner's guide.
AVVERTENZE DI SICUREZZA
natural_image
Technical line drawings of a manual tool and a hand operating a manual mixer (no text or symbols present)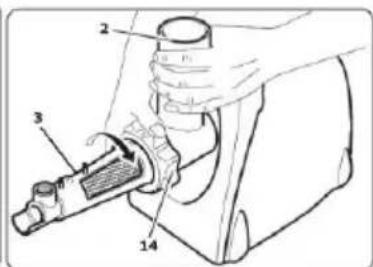
ENGLISH: SAFETY INSTRUCTIONS
The following are important notes on the installation, use and maintenance; save this instruction manual for future reference; use the equipment only as specified in this guide; any other use is considered improper and dangerous; therefore, the manufacturer cannot be held responsible in the event of damages caused by improper, incorrect or unreasonable use.
Before use, ensure the equipment is undamaged; if in doubt, do not attempt to use it and contact the authorized service center; do not leave packing materials (i.e. plastic bags, polystyrene foam, nails, staples, etc.) within the reach of children as they are potential sources of danger; always remember that they must be separately collected. Make sure that the rating information given on the technical label are compatible with those of the electricity grid; the installation must be performed according to the manufacturer's instructions considering the maximum power of the appliance as shown on the label; an incorrect installation may cause damage to people, animals or things, for which the manufacturer cannot be considered responsible thereof.
If it is necessary to use adapters, multiple sockets or
electrical extensions, use only those that comply with current safety standards; in any case do not exceed the power consumption limits indicated on the electrical adapter and / or extensions, as well as the maximum power shown on multiple adaptor.
Do not leave the unit plugged; better to remove the plug from the mains when the device is not in use. Always disconnect from power supply if you leave it unattended.
Cleaning operations should be carried out after unplugging the unit.
If the unit is out of order and you do not want to fix it, it must be made inoperable by cutting power cord.
- Do not allow the power cord to get closer to sharp objects or in contact with hot surfaces; do not pull it to disconnect the plug.
- Do not use the appliance in the event of damage to the power cord, plug, or in case of short circuits; to repair the product only address an authorized service center.
- Do not handle or touch the appliance with wet hands or bare feet. Do not expose the appliance to harmful weather conditions such as rain, moisture, frost, etc.. Always store it in a dry place.
- This appliance cannot be used by children, even if they're more than 8 years old.
- This appliance can be used by persons with reduced physical, sensory or mental capabilities or lack of experience and knowledge if they received supervision or instruction concerning use of appliance in a safe way and understand the hazards involved.
- Children must not play with the appliance.
- Keep the appliance and its cord out of reach of children less than 8 years.
If the power cord is damaged, or in case of failure and / or malfunction do not tamper with the unit. The reparation must be done by manufacturer or by service center
authorized by the manufacturer in order to prevent any risk. Failure to comply with the above may compromise the unit safety and invalidate the warranty.
- This appliance is intended to be used in household and similar applications such as: staff kitchen areas in shops, offices and other working environments; by clients in hotels, motels and other residential type environments; farm houses, bed and breakfast type environments.
- The appliance is not intended to be operated by means of an external timer or separate remote-control system.
- Before every use, unroll the power cord.
- Use original spare parts and accessories only.
- Do not subject the product to strong impacts, serious damages may result.
- Do not use near or under flammable materials (like curtains), heat, cold spots and steam.
GENERAL INFORMATION
Before carrying out any cleaning or maintenance operation, disconnect plug from main power socket.
When you move the machine, grasp the motor body with both hands, not the funnel.
Do not try to remove the accessories when the meat grinder is running.
If the device locks due to the food clogged on the blade, turn off the unit and clean all the parts.
Do not put your hand inside the openings. Do not insert metal objects into the opening of the dish.
If the propeller is clogged, turn off the appliance and then turn it on again. If the problem persists, switch the power off, unplug it from the wall outlet and remove the food from the unit.
Never put the food with your own hands. Always use the food presser. The blade is sharp, handle with care.
Do not use the appliance if the blade is damaged. Do not
use the appliance to grind hard and dry food (such as bones, nuts etc..), otherwise the blade may be damaged.
Do not use your fingers to remove the food from the cutting plates while the unit is operating, in order to avoid serious risks to your safety.
Do not operate the appliance while is empty.
Do not operate for more than 10 minutes continuously.
Take 10 minutes rest after every process.
It is not recommended to use non-original accessories, since they could cause damage to persons or property; the manufacturer cannot be considered responsible thereof.
Do not sharpen the blade, replace it if it does not cut anymore or if it is damaged.
This appliance has been designed and built to create tomato sauces and for chopping meat and make sausages (sausages). It must be used only for these applications.
The manufacturer declines all responsibility for improper use or failure to follow instructions, tampering and improper maintenance of the unit.
DESCRIPTION G20036 - G20037
| 1 Motor unit | 2 Meat funnel | 3 Sieve * |
| 4 Regulation screw * | 5 Food tray | 6 Cover * |
| 7 Food presser | 8 Extension twister * | 9 Conical meat twister |
| 10 Blade | 11 Large cutting plate | 12 Medium cutting plate |
| 13 Small cutting plate | 14 Locking sleeve | 15 Sausages cone |
| 16 Kibbe accessories | 17 Power switch | 18 Unlocking Button |
* Accessories included only with model G3FERRARI G20037.
PREPARATION FOR USE
If you use the appliance for the first time or after a long period of inactivity, it is advisable to clean the motor unit (1) with a damp cloth. Then wash all parts except the motor unit with warm water and mild detergent. Rinse and dry thoroughly before use.

WARNING! Before inserting / removing components, make sure that the appliance is disconnected from the power outlet and the power is turned off.
OPERATING

CAUTION: do not insert your fingers, tools or metal objects in the food funnel. For pressing foods, use only the supplied presser.
REVERSE option
If the cutting plate is locked, you may want to reverse the direction of the blade, place the switch (17) to REVERSE and hold for the time needed to unlock it.
Do not enter anything in the tray (5), and do not press during this operation.
If the appliance does not work even with the REVERSE function, turn off the unit, disconnect the plug from the outlet, remove and clean it thoroughly.

CAUTION: do not operate the unit continuously for more than 10 minutes. After having worked for 10
minutes, take 10 minutes rest.
Meat grinder
-
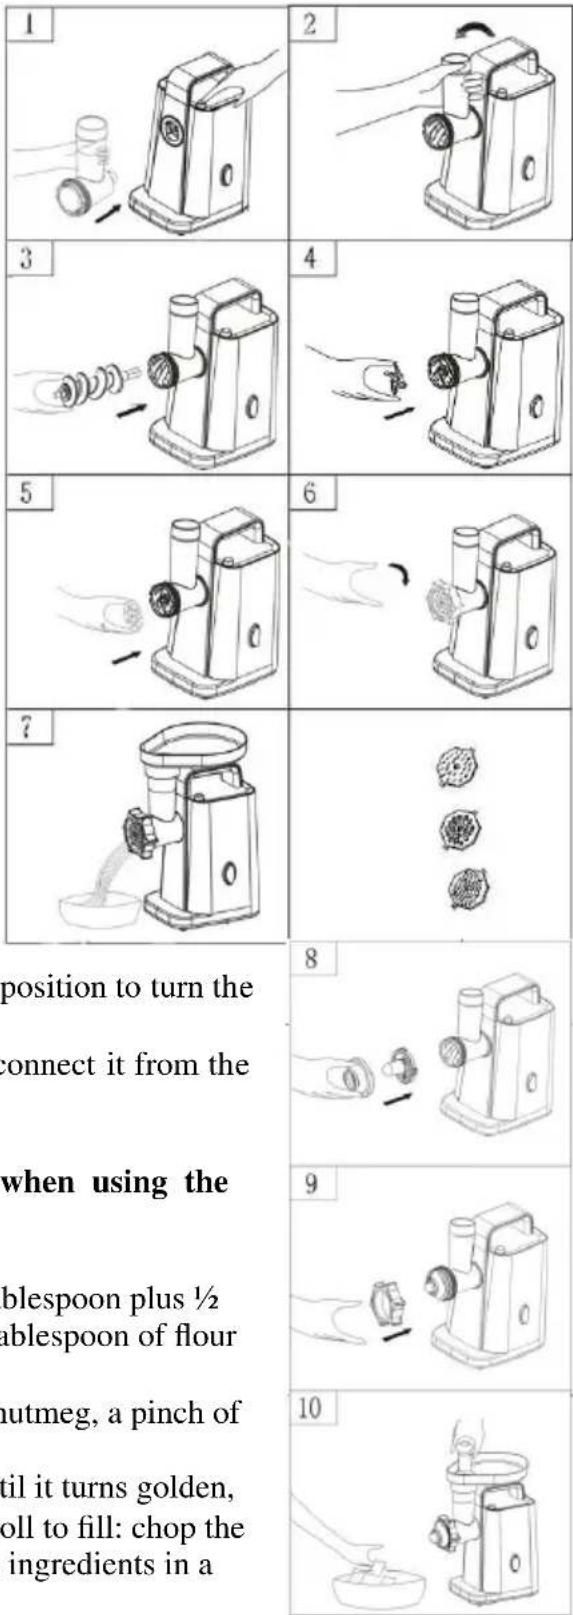
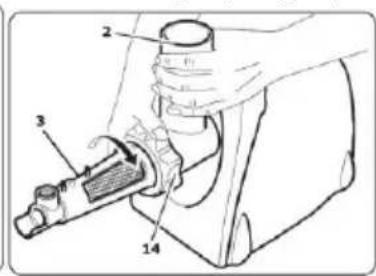
Place unit on a flat and stable surface. Press button (18) and Insert funnel (2) in the housing (Fig. 1).
-
Rotate the funnel anticlockwise until blocking (Fig. 2).
-
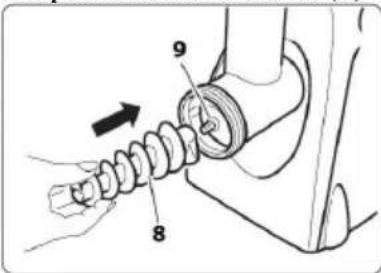
Assemble the twister (9) to the feed funnel (2) by inserting the longer side into the opening, pushing it to the bottom (Fig. 3) and locking on the motor.
-
Insert the blade (10) with the cutting side inwards (Fig. 4). WARNING: the meat is not chopped if the blade is not mounted correctly.
-
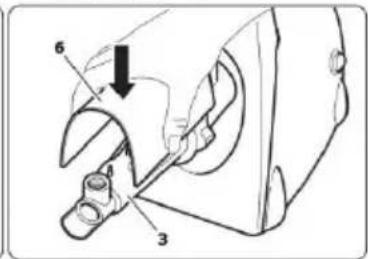
Select the desired cutting plate - small (13), medium (12) or large (11) - and mount it on the twister, framing the projections into the slots provided in the funnel (Fig. 5).
-
Secure the sleeve (14) by turning it clockwise (Fig. 6).
-
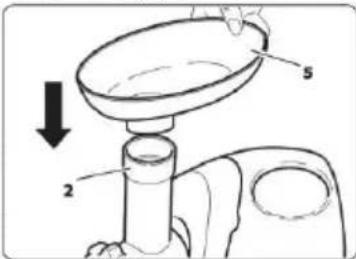
Mount the tray (5) above the feed funnel and put a suitable container below for chopped meat (Fig. 7).
-
Cut raw meat into small pieces after removing the bones or tendons and insert them into the tray. Use only the provided presser to push the meat through the feed conduit (2).
-
Insert the plug into the socket and press the switch (17) to ON position to turn the unit on.
-
Once you have finished working, turn off the machine and disconnect it from the power outlet.
11. Preparing Kibbe

CAUTION: remove the cutting plate and the blade when using the appliance for making Kibbe.
Recipe
Filling: 100g mutton or sheep, 1 and 12 tablespoon of olive oil, 1 tablespoon plus 12 onion (finely chopped), 1/3 teaspoon of spices, 12 teaspoon salt, 1 tablespoon of flour and 12 .
Rolls: 450g of lean meat, 150 - 200g flour, 1 teaspoon of spices, 1 nutmeg, a pinch of red pepper.
Prepare the filling by chopping the meat of sheep. Fry the onion until it turns golden, then add the meat, spices, salt and flour and mix well. Prepare the roll to fill: chop the meat 2-3 times (see "Meat grinder" paragraph) and then mix all the ingredients in a bowl. Grind the mixture 2/3 times.
- Follow the procedure from step 1 to 4 as they are described in the "Meat grinder" section.
- Mount the accessories for Kibbe (16) on the supply pipe as shown in Fig 8.
- Lock the sleeve (14) by tighten it carefully (Fig. 9).
- Lay the prepared roll on the tray (5).
- Connect the food processor into the socket and turn the switch to ON to start the appliance. Use the food presser (7) to push the meat through the funnel.
- Fill the cylinders just formed with the fillings and then seal the edges thus giving an oval shape.
- Fry in hot oil until they take on a golden color.
Preparing sausages
- Follow the procedure from step 1 up to 5 as they are described in the "Meat grinder" section.
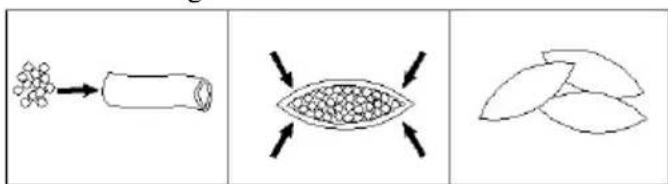
- Place the cone for sausages (15) on the mounted cutting plate, and then secure the sleeve (11) by turning it clockwise.
- Put the whole gut stuffer on the cone (15). Mount the tray (5) above the feeding funnel (2).
- Cut raw meat into small pieces and, after removing the bones or tendons, insert meat in the funnel (2).
- Connect the appliance into the power outlet and switch it to ON.
- Use only the supplied food presser to push the meat through the pipe (2).
- To disassemble the unit, follow the steps in reverse order as for assembling.
Tomato Juicer (only for model G20037)
- Place the unit on a flat and stable surface.

natural_image
Technical line drawing of a manual milling cutter tool and a separate motor, showing exploded view (no text or labels)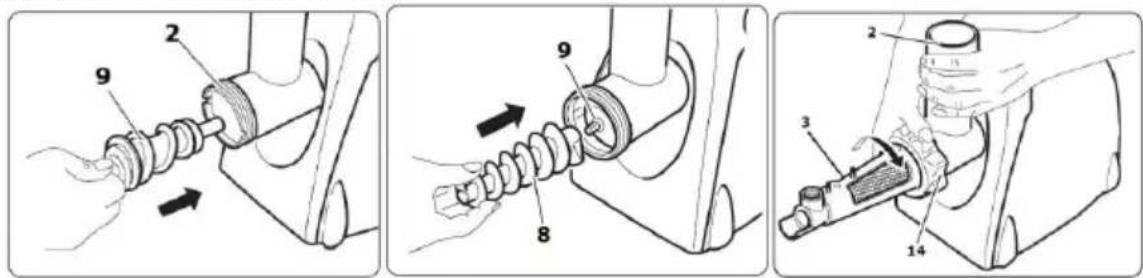
- Press the button (18) and Insert the funnel (2) in its housing.
- Rotate the funnel anticlockwise until blocking (Fig. 2).
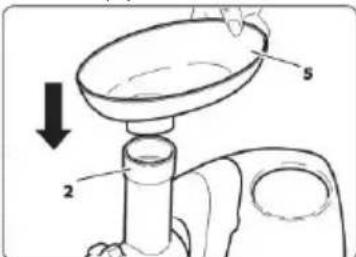
- Insert the outlet of feeding funnel (2) in the bigger hole of the tomato juicer tray.
- Assemble the twister (9) to the feeding funnel (2) by inserting the longer side into the opening and pushing it all the way, blocking it on the motor spindle. Insert the extension twister (8) and fix it to the conical one (9).
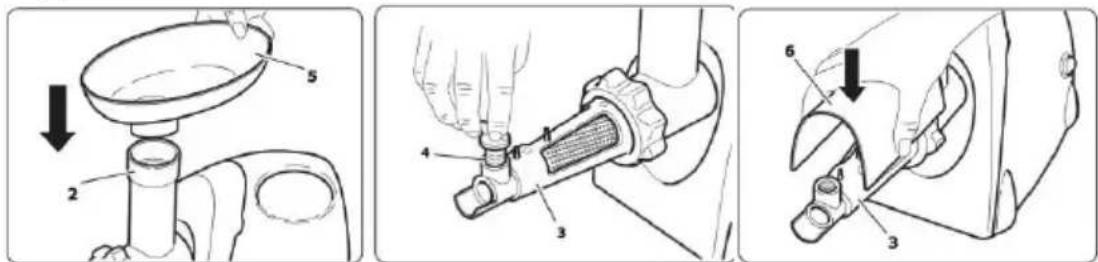
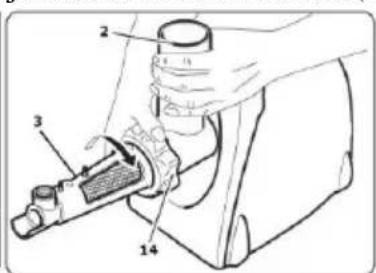
- Insert the sieve (3) in the feeding
funnel (2), as shown in Figure.
- Secure the locking sleeve (14) by tighten it carefully by hand.
- Screw the plastic adjustment (4) in its seat on the sieve (3).
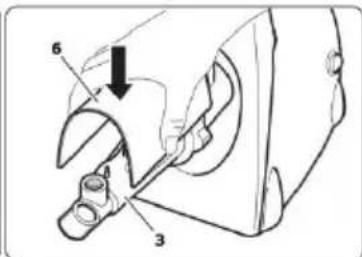
- Place the tray (5) on the funnel (2). Assemble the cover (6) on the sieve (3). Place a container for the collection of waste below the terminal part of the sieve and another container to collect the juice.
- Connect the meat grinder into the power socket and switch it ON to start operations.
- Once you have finished working, turn off the machine and disconnect it from the power outlet.
CLEANING - CAUTION: Before cleaning, make sure that the plug is disconnected from the electrical outlet and that each part has cooled down.
Clean the motor housing by using only a soft cloth dampened with warm water. Do not use abrasive detergents, which can discolor the plastic and ruin the aesthetics of the appliance.

CAUTION: do not immerse the appliance in water or other liquid. Do not spray detergents on the motor unit.
Do not wash in the dishwasher.
All removable parts of the tomato juicer can be cleaned with warm water and mild detergent. The removable accessories of the meat grinder can be washed in hot water with dish detergent.
TECHNICAL FEATURES
• Power supply: AC 220-240V\~50/60Hz, 300W. Power MAX: 800W
- Kb: 10 minutes
- Antislip feet
- Accessories: feeding funnel, tray, food presser, 1 twister for meat grinding, blade, 3 cutting plates, locking sleeve, sausages cone, accessories for Kibbe.
- For G20037, also included the tomato juicing set
PORTUGUES: ADVERTÊNCIAS
natural_image
Three-panel diagram showing a flower growing from a cylindrical object, a cross-section of a seed pod with arrows indicating direction, and a separate leaf-like shape (no text or symbols)Preparar salsichas
natural_image
Technical line drawings of a manual milling machine and a mounted tool (no text or symbols)Passa-tomate (apenas para mod. G20037)
natural_image
Line drawing of a mechanical device with a handle and connector (no text or symbols)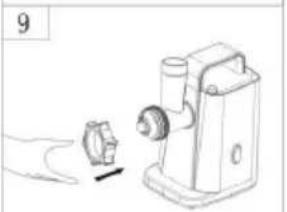
natural_image
Illustration of a hand operating a small mechanical device with a tool, no text or symbols present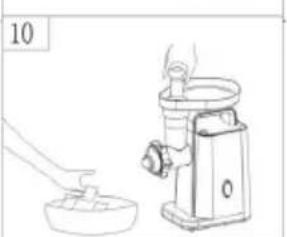
natural_image
Line drawing of a hand pouring liquid into a small bowl next to a machine (no text or symbols)natural_image
Illustration of a manual washing machine with exploded view and side view (no text or symbols)Exprimidor de tomates (solo para mod. G20037)
natural_image
Illustration of a hand holding a small mechanical component next to a motor (no text or symbols)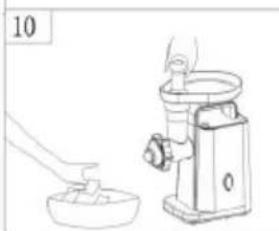
natural_image
Line drawing of a hand pouring liquid into a small container next to a machine (no text or symbols)natural_image
Three-panel diagram showing a plant growing into a cylindrical structure, then feeding into a cross-section with arrows indicating direction (no text or symbols)Wurst-Zubereitung
natural_image
Technical line drawings of a manual tool and a manual mixer (no text or symbols)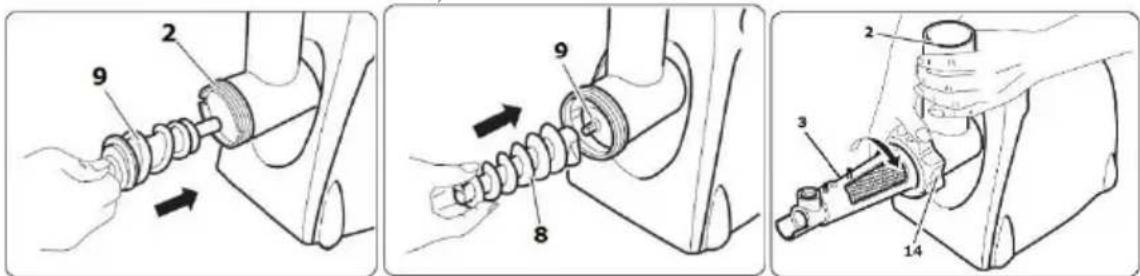
natural_image
Illustration of a hand holding a cylindrical object next to a portable device with a handle (no text or symbols visible)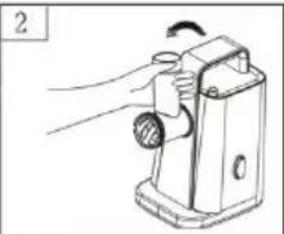
natural_image
Line drawing of a hand operating a mechanical device with a rotating knob (no text or symbols)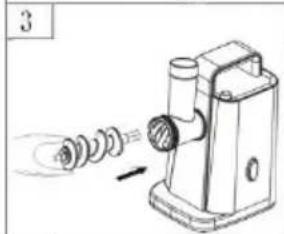
natural_image
Illustration of a mechanical device emitting a spiral coil (no text or symbols)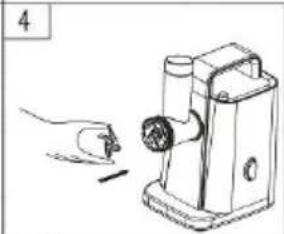
natural_image
Line drawing of a hand using a manual tool to press or install a small mechanical device (no text or symbols present)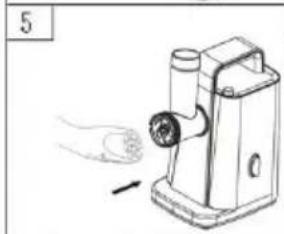
natural_image
Line drawing of a hand holding a small object next to a mechanical device with a circular component (no text or symbols)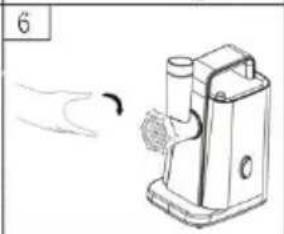
natural_image
Simple line drawing of a mechanical device with a handle and base, no text or symbols present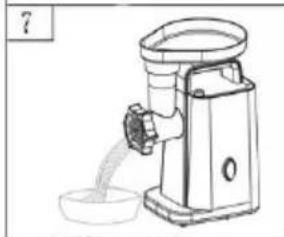
natural_image
Line drawing of a manual hand mixer with a bowl of liquid (no text or symbols)
natural_image
Three abstract, irregularly shaped objects arranged vertically (no text or symbols)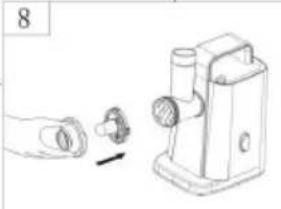
natural_image
Line drawing of a manual hand holding a small mechanical component next to a machine (no text or symbols)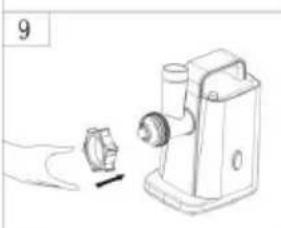
natural_image
Illustration of a hand holding a small mechanical component next to a motor (no text or symbols visible)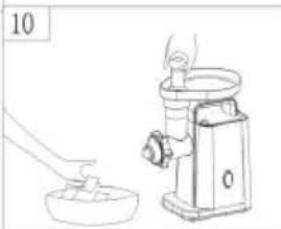
natural_image
Line drawing of a hand pouring liquid into a small container next to a manual grater (no text or symbols)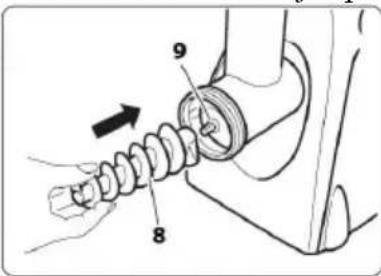
The product is made of non-biodegradable and potentially polluting substances if not properly disposed of; other parts can be recycled. It’s our duty to contribute to the ecological health of the environment following the correct procedures for disposal. The crossed out wheelie bin symbol indicates the product complies with the requirements of the new directives introduced to protect the environment (2002/96/EC, 2003/108/EC, 2002/95/EC, 2012/19/EC) and must be properly disposed at the end of its lifetime. If you need further information, ask for the dedicated waste disposal areas at your place of residence. Who does not dispose of the product as specified in this section shall be liable according to the law.
To find the nearest service center, please call the telephone number 0541 694246, fax number 0541 756430 or contact us at assistenzatecnica@trevideo.it asking for the service centers supervisor.
Appliance is conform to the pertinent European regulation and is therefore marked with the CE mark.

www.g3ferrari.it TREVIDEA S.r.l.
TREVIDEA S.R.L. – Strada Consolare Rimini – San Marino n. 62 – 47924 – RIMINI (RN) - ITALY
MADE IN CHINA


- ITA: INDICE
- CLASSI DI PROTEZIONE / PROTECTION CLASSES
- ATTENZIONE RISCHIO DI SCOSSE ELETTRICHE NON ESPORRE A PIOGGIA E UMIDITA'
- WARNING ELECTRIC SHOCK RISK DO NOT EXPOSE TO RAIN OR MOISTURE
- AVVERTENZE DI SICUREZZA
- ENGLISH: SAFETY INSTRUCTIONS
- GENERAL INFORMATION
- PREPARATION FOR USE
- OPERATING
- REVERSE option
- CAUTION: do not operate the unit continuously for more than 10 minutes. After having worked for 10
- minutes, take 10 minutes rest.
- Meat grinder
- Preparing Kibbe
- CAUTION: remove the cutting plate and the blade when using the appliance for making Kibbe.
- Recipe
- Preparing sausages
- Tomato Juicer (only for model G20037)
- CLEANING - CAUTION: Before cleaning, make sure that the plug is disconnected from the electrical outlet and that each part has cooled down.
- CAUTION: do not immerse the appliance in water or other liquid. Do not spray detergents on the motor unit.
- Do not wash in the dishwasher.
- TECHNICAL FEATURES
- PORTUGUES: ADVERTÊNCIAS
- Preparar salsichas
- Passa-tomate (apenas para mod. G20037)
- Exprimidor de tomates (solo para mod. G20037)
- Wurst-Zubereitung
- TREVIDEA S.R.L. – Strada Consolare Rimini – San Marino n. 62 – 47924 – RIMINI (RN) - ITALY
Brand : G3 Ferrari
Model : Tartàr 2in1 G20037
Category : Juicer