IAN 103909 - Electric scooter CRIVIT - Free user manual and instructions
Find the device manual for free IAN 103909 CRIVIT in PDF.

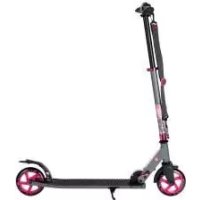
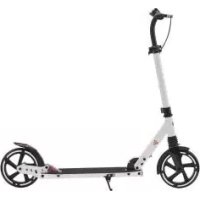
| Product type | Big-wheel scooter |
| Brand | Crivit |
| Model | IAN 103909 |
| Maximum load | 100 kg |
| Dimensions (unfolded) | Approx. 36.5 × 106.5 × 103 cm (L × H × L) |
| Dimensions (folded) | Approx. 12 × 34.5 × 86.5 cm (L × H × L) |
| Handlebar height | Adjustable from approx. 92 to 106.5 cm |
| Weight | Approx. 5.5 kg |
| Wheel diameter | 200 mm |
| Bearing type | ABEC 7 |
| Brake | Sheet metal brake on the deck |
| Kickstand | Integrated, foldable for parking |
| Folding | Yes, with quick-release and lever |
| Handlebar adjustment | 4 heights, locking with button and quick-release |
| Usage | Leisure, private outdoor use (not on public roads) |
| Recommended age | Not specified (requires concentration, not a toy) |
| Frame material | Not specified (estimated: aluminum or lightweight steel) |
| Maintenance | Clean and dry after use, lubricate bearings |
| Warranty | 3 years (defective parts, excluding normal wear) |
| Spare parts | Available at www.delta-sport.com |
Frequently Asked Questions - IAN 103909 CRIVIT
User questions about IAN 103909 CRIVIT
0 question about this device. Answer the ones you know or ask your own.
Ask a new question about this device
Download the instructions for your Electric scooter in PDF format for free! Find your manual IAN 103909 - CRIVIT and take your electronic device back in hand. On this page are published all the documents necessary for the use of your device. IAN 103909 by CRIVIT.
USER MANUAL IAN 103909 CRIVIT
Instructions for use
()
H)(68)

()()
fi#r#e #ndng, k##d out the flluation poge and got to know all of the funclions of your urit.
GB Instructions and Safety Notice 17
IAN103909

IAN 103909
Inhaltswerzachn / Table des monatres / Indice / Contents
With your purchase you have decided on a high-quality product. Get to know the product before you start to use it.
Carefully read the following operating instructions. Use the product only as described and only for the given areas of application.
Keep these instructions safe. When passing the product on to a third party, always make sure that the documentation is included.
Contents
1 x Instructions for use
1 x Big Wheel Scooter
Technical data
Maximum weight capacity: 100kg
Dimensions unfolded:
approx. 36.5 × 106.5 × 103cm (w × h × l)
Dimensions folded:
approx. 12 × 34.5 × 86.5 ~cm (w × h × l)
Handlebar height:
adjustable from approx. 92 - 106.5cm
Weight: approx. 5.5kg
Rollers: 200mm
Bearings: ABEC 7
Intended use
This product is not a toy, but a recreational product.
This product contains small parts which could be swallowed by small children, and as a sporting good requires concentration and good motor skills. This product was designed for private use outdoors with a maximum weight capacity of 100kg . This product is not suitable for jumps. This product is not a vehicle as defined by Highway Code and must not be used on public roads. Please obtain information about legal regulations before use.

Safety notices
WARNING!
Choking hazard for children! Do not let children play with the packaging or product unsupervised.
Risk of injury!
- Due to small parts this product should always be assembled by adults!
- This product may only be used by one person at a time.
- Check the product for damage or wear before every use. Always check all connecting elements and closures such as the folding mechanism and handlebar height adjustment are tight. This product must only be used in good condition!
- Verify screws and nuts maintain their self-locking functionality.
- Do not modify the product so as to potentially jeopardize your safety.
- Do not use the product indoors. The rollers can lose their grip and slip on smooth surfaces such as laminate, parquet, wooden floors, tiles, etc.

Risk of fingers being crushed!
- When folding and unfolding the product be aware of crushing and shearing points.
Always wear suitable protection (helmet, hand-, wrist-, elbow- and knee protectors) as well as shoes!
Always be considerate of others! - Only use the product on suitable surfaces which are even, clean and dry. Ride apart from other road users as possible. Avoid steep terrain, stairs and open waters.
- Never ride in the dark or in poor visibility.
- When applied continuously, the brake will become hot. To avoid burns, allow to cool down before touching it.
- Do not allow your child to use the product unsupervised, as children are unable to recognize potential hazards.
Prevent property damage!
- Avoid water, oil, potholes and very rough surfaces.
Assembly
The product is supplied folded for transport. Proceed as follows to set it up for use:
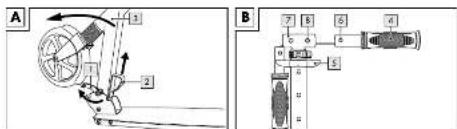
Unfolding (Fig. A)
- Release the lower quick-release connector (1).
- Pull the lever (2) upward and fold the steering post (3) forward until it locks into place.
- Secure the folding mechanism by locking the lower quick-release connector.
Handle assembly (Fig. B)
- Remove the handles (4) from the holders (5).
- Push in the locking buttons (6) on the handles and slide the handles into both sides of the T-tube (7) on the steering post. You must hear the locking buttons lock into the designated holes (8).
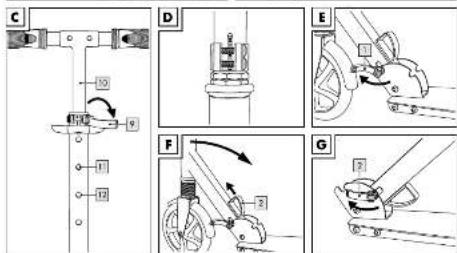
Adjusting the steering post (Fig. C)
The steering post can be adjusted to four different levels. Only use the product with the locking button locked into one of the four designated holes and after securing the steering post with the quick-release connector!
- Release the quick-release connector (9) on the steering post.
- Pull up on the steering post (10) until the locking button (11) latches into one of the four holes (12).
- Secure the steering post by locking the quick-release connector.
Steering head bearing (Fig. D)
On product delivery the steering head bearing is preset. If the handlebar has too much play after some time or becomes too tight, have the steering head bearing adjusted by a speciality retailer or a bicycle shop.
Readying the product for transport
- Release the quick-release connector on the steering post, push in the locking button, push the steering post all the way in, then tighten the quick-release connector.
- Push the locking buttons on the handles, pull the handles out of the T-tube, and secure in the holders.
- Release the lower quick-release connector (Fig. E) and pull the lever (2) up, push the steering post toward the deck until it locks into place (Fig. F). Tighten the lower quick-release connector (Fig. G).
Use
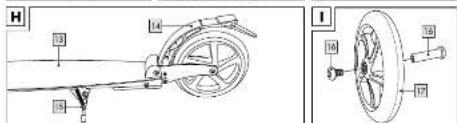
Riding, braking, parking (Fig. H)
- Place one leg on the deck (13) and put into motion by evenly pushing off with the other leg.
- Step on the fender (14) to brake.
- Swing out the stand (15) to park.
Only park the scooter on level surfaces.
Maintenance
Replacing the rollers (Fig. 1) Important!
Please refer to chapter "Technical Data". Rollers with a different diameter can alter the riding properties and possibly endanger the user. Do not use rollers which cannot be easily installed. Never install rollers larger than the original rollers on the scooter.
Rollers wear down. This wear depends on many factors, such as the ground, size and weight of the user, weather conditions, and the material and hardness of the rollers. They therefore occasionally need to be replaced.
- Loosen the axle bolts (16) using two size 5 socket head wrenches.
- Remove the axle bolts and remove the roller.
- Install the new roller (17) and secure with the axle bolts.
After replacing:
Do not use if the roller grinds against the side after replacing!
Verify all screws are still tight after the first few minutes of riding and nothing has detached or loosened.
Retighten the roller to ensure it runs smoothly and the bearings are silent.
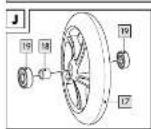
Replacing the ball bearings (Fig. J)
- Replace the roller (17) as described in section "Replacing the rollers".
- Carefully pry out the respective bearing (19) using a socket head wrench.
- Remove the spacer (18) from the roller and turn it over.
- Prey out the other bearing using a socket head wrench.
- Push in a new bearing. Turn the roller over, insert the spacer, then push in a second new bearing.
- Reattach the roller as described in section "Replacing the rollers".
Care and storage
We recommend thoroughly cleaning and drying the product after use.
Remove small stones or other objects which may be stuck to the rollers. Dry wet or damp ball bearings with a clean cloth. Grease the bearings with suitable bearing grease from the outside to prevent rust forming on the outside. Always store the product in a dry location.
Information on disposal
Please dispose of packaging and product in an environmentally friendly way and according to the material type!
Dispos of the product through an authorised waste disposal company or your municipal authorities.
Please observe the currently applicable regulations.
3 Years Warranty
The product was produced with great care and under constant supervision. You receive a three-year warranty for this product from the date of purchase. Please retain your receipt.
The warranty applies only to material and workmanship and does not apply to misuse or improper handling. Your statutory rights, especially the warranty rights, are not affected by this warranty.
With regard to complaints, please contact the following service hotline or contact us by e-mail.
Our service employees will advise as to the subsequent procedure as quickly as possible.
We will be personally available to discuss the situation with you.
Any repairs under the warranty, statutory guarantees or through goodwill do not extend the warranty period. This also applies to replaced and repaired parts. Repairs after the warranty are subject to a charge.
IAN:103909
GB Service Great Britain
Tel.: 0871 5000 720
(£ 0.10/Min.)
E-Mail: deltasport@lidl.co.uk
You can also find spare parts for your product at: www.delta-sport.com, category Service - Lidl Spare Parts Service