
HPURIFIER 500 - Air purifier HOOVER - Free user manual and instructions
Find the device manual for free HPURIFIER 500 HOOVER in PDF.
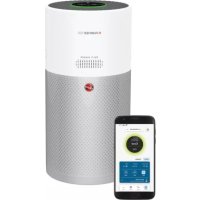


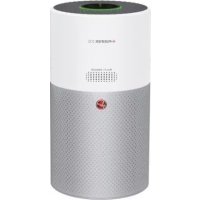
| Product type | Air Purifier |
| Brand | Hoover |
| Model | HPURIFIER 500 |
| Sensors | PM10, PM2.5, carbon monoxide (CO), volatile organic compounds (VOC) |
| Purification modes | Auto, Max, Sleep (silent), Pollen Allergy (via hOn app) |
| CO Monitor | Yes, with audible alarm (85–110 dB) and visual (flashing red LED) |
| Diffuser | Integrated for Essence H essential oils and H-Biotics biotics |
| Connectivity | Wi-Fi (IEEE 802.11 b/g/n, 2.4 GHz) and Bluetooth (v4.2) |
| App | hOn (iOS and Android) |
| Child safety | Child Lock: press and hold the dedicated button for 3 seconds |
| Light control | On, Dim, Off – adjustable via Lighting button |
| Display | Digital screen with LED Ring for air quality (green, yellow, orange, red) |
| Filter | Filter assembly with washable outer mesh and replaceable inner filter |
| Filter maintenance | Cleaning the outer mesh with a vacuum cleaner; replace filter on alert |
| Operating temperature | 0 °C to +40 °C |
| Operating humidity | 15% to 90% RH |
| Radio frequency | 2400 – 2483.5 MHz (Wi-Fi and Bluetooth) |
| Maximum RF power | 18.9 dBm (Wi-Fi), 10 mW (Bluetooth) |
| Warranty | According to the retailer's conditions – purchase receipt required |
Frequently Asked Questions - HPURIFIER 500 HOOVER
User questions about HPURIFIER 500 HOOVER
0 question about this device. Answer the ones you know or ask your own.
Ask a new question about this device
Download the instructions for your Air purifier in PDF format for free! Find your manual HPURIFIER 500 - HOOVER and take your electronic device back in hand. On this page are published all the documents necessary for the use of your device. HPURIFIER 500 by HOOVER.
USER MANUAL HPURIFIER 500 HOOVER
INSTRUCTIONS FOR SAFE USE
This appliance should only be used for private household use, as described in this user guide. Please ensure that this guide is fully understood before operating the appliance and keep it for future reference.
Always switch off and remove the plug from the socket after use, or before cleaning the appliance or any maintenance task.
This appliance can be used by children aged from 8 years and above and persons with reduced physical, sensory or mental capabilities or lack of experience and knowledge if they have been given supervision or instruction concerning use of the appliance in a safe way and understand the hazards involved. Children shall not play with the appliance.
Cleaning and user maintenance shall not be made by children without supervision.
If the power cord is damaged, stop using the appliance immediately. To avoid a safety hazard, an authorised HOOVER service engineer must replace the power cord.
Use only attachments, consumables or spares recommended or supplied by HOOVER.
Do not remove the plug by pulling on the power cord.
Do not continue to use your appliance if it appears faulty.
Place and use the product only on a dry, stable, level horizontal surface, so that tipping over is excluded.
Keep the product dry.
Never tilt or empty the product during operation.
Lay the supply cord so nobody will step on or trip over it.
Do not place the product on hot surfaces, near hot surfaces, near an open fire or in direct sunlight.
Do not let water or any other liquid or flammable detergent enter the appliance to avoid electric shock and/or a fire hazard.
Do not clean the appliance with water, any other liquid, or a (flammable) detergent to avoid electric shock and/or a fire hazard.
Do not spray any flammable materials such as insecticides or fragrance around the appliance.
Check if the voltage and ratings indicated on the label of the appliance correspond to the local power voltage before you connect the appliance.
Do not block the air inlet or air outlet.
This appliance is not a substitute for proper ventilation, regular vacuum cleaning, or use of an extractor hood or fan while cooking.
Do not place anything on top of the appliance.
Do not place the appliance directly below an air conditioner to prevent condensation from dripping onto the appliance.
Make sure all filters are properly installed before you switch on the appliance.
Only use the original HOOVER filters specially intended for this appliance. Do not use any other filters.
Avoid knocking against the appliance (the air inlet and outlet in particular) with hard objects.
Do not insert your fingers or objects into the air outlet or the air inlet to prevent physical injury or malfunctioning of the appliance.
Do not use this appliance when you have used indoor smoke-type insect repellents or in places with oily residues, burning incense, or chemical fumes.
Do not use the appliance near gas appliances, heating devices or fireplaces.
Do not use the appliance in a room with major temperature changes.
To prevent interference, place the appliance at least 2 m away from electrical appliances that use airborne radio waves such as TVs, radios, and radio-controlled clocks.
When the appliance is not used for a long time, bacteria may grow on the filters. Check the filters after a long period of disuse. If the filters are very dirty, replace them.
Do not use the appliance in wet surroundings or in surroundings with high ambient temperatures, such as the bathroom, toilet, or kitchen.
The appliance does not remove carbon monoxide (CO) or radon (Rn). It cannot be used as a safety device in case of accidents with combustion processes and hazardous chemicals.
The CO Monitor function is not to be used as, nor implied to be used as a substitute for an EN 50291-1 UL-2034, CSA-6.19 or any other recognized standard certified carbon monoxide alarm where Local or Regional Codes or legislation mandate their use. The CO Monitor function is a supplemental carbon monoxide monitoring device only. Use of this device is at the user's discretion and implies the understanding and acceptance of its limitations to adhere to codes or legislation where applicable.
Do not place the appliance in any of the following locations:
- In a bathroom or other areas where the Alarm may be exposed to water splashes, dripping or condensation (e.g. above an electric kettle).
- Next to or directly above heaters or air conditioning vents, doors, windows, extractor fans or anywhere that it would be affected by draughts.
- Directly above a sink or cooker.
- In an area where the temperature could drop below -20°C or rise above 50°C.
- In an enclosed space (e.g. in or below a cupboard). In a damp or humid area.
- Where it would be obstructed, e.g. by curtains or furniture.
- Where dirt or dust could block the sensor.
- Near paint, thinners, solvent fumes or air fresheners...
If CO alarm is activated, you should open all windows and doors (if safe to do so). Turn off all fuel burning appliances if possible and then evacuate the property leaving the windows and doors open. Get immediate medical help for anyone suffering the effects of carbon monoxide poisoning. Do not re-enter the property until the alarm stops. The alarm will stop once the CO has cleared. Do not use fuel burning appliances again until the CO source has been located and rectified by a qualified technician.
To activate the CO monitor, connect the plug to a socket outlet. The CO Sensor Condition Lamp will display green. When the CO monitor detects unsafe level of CO, the CO alarm will ring loudly and the CO Alert button and O ring lamp will blink in red colour. The alarm will continue to indicate until the detected CO reduces to a safe level.
Avoid using paint, thinners, solvent fumes, air fresheners, aerosol sprays or chemical cleaners near the appliance. This may affect functioning of CO monitor.
Do not allow small children to press the CO Alert button for 3 seconds as they could be subject to excessive noise when the alarm rings.
Touch [CO Alert] button for 3 seconds to test the CO Alarm function and the alarm will ring loudly for 5 seconds. Test the alarm monthly and after prolonged absence from the building (e.g., holidays). If the alarm fails to ring after touching the [CO Alert] button for 3 seconds, please contact the Hoover customer care centre to arrange a qualified technician to repair the fault.
Do not allow small children to press the CO Alert button for 3 seconds as they could be subject to excessive noise when the alarm rings.
If the display indicates that the CO sensor is faulty or end of life has been reached, please contact the Hoover customer care centre to arrange a qualified technician to replace the CO sensor. The expected lifetime of the CO sensor is 5 years and must be replaced after this time.
Operating Humidity: 15 - 90% RH
Operating Temperature: 0°C to +40°C
When the detected level of CO reaches a high level, the [CO Alert] button and the [Air Quality LED Ring] blink in red color (2Hz), at the same time, alarm rings loudly (85~110dB(A)) and continuously, the alarm will not stop until the intensity of CO falls back from the alarm level.
Carbon Monoxide affects the body by starving (suffocating) critical organs of oxygen.
When CO is inhaled it attaches to the hemoglobin in the blood that normally carries oxygen throughout the body. CO permanently displaces the ability for oxygen molecules to attach to the hemoglobin, thus reducing oxygen to vital organs. The concentration level and time exposed to CO can vary its effects on the body, but experts agree even low levels of carbon
monoxide exposure over prolonged periods can have serious and lasting affects to anyone's overall health.
WARNING: THE CO ALARM IS DESIGNED TO PROTECT INDIVIDUALS FROM THE ACUTE EFFECTS OF CARBON MONOXIDE EXPOSURE OR PREVENT THE CHRONIC EFFECTS OF CARBON MONOXIDE EXPOSURE. IT WILL NOT FULLY SAFEGUARD INDIVIDUALS WITH SPECIFIC MEDICAL CONDITIONS. IF IN DOUBT CONSULT A MEDICAL PRACTITIONER.
This appliance should not be used as a substitute for proper installation, use and maintenance of fuel burning appliances including appropriate ventilation and exhaust systems.
The CO monitor mobile and tablet notifications require a functional Wi-Fi connection to operate. They are not a substitute for a third-party emergency monitoring service.
Only use aroma oil recommended or supplied by HOOVER.
Wipe any spillage of aroma oil immediately.
HOOVER service: To ensure the continued safe and efficient operation of this appliance, we recommend that any servicing or repairs are only carried out by an authorized HOOVER service engineer.
The Environment
This appliance is marked according to the European directive 2011/65/EC on Waste Electrical and Electronic Equipment (WEEE). By ensuring this product is disposed of correctly, you will help prevent potential negative consequences for the environment and human health, which could otherwise be caused by inappropriate waste handling of this product.
The symbol on this appliance indicates that this appliance may not be treated as household waste. Instead, it must be handed over to the applicable collection point for the recycling of electrical and electronic equipment. Disposal must be carried out in accordance with local environmental regulations for waste disposal. For more detailed information about treatment, recovery, and recycling of this appliance, please contact your local city office, your household and waste disposal service, or the shop where you purchased the appliance.
| Frequency bands 2400Mhz ~ 2483.5Mhz | |
| Maximum RF power transmitted in the frequency band 18.9 dBm | |


This appliance complies with the European Directives 2014/53/EU and 2011/65/EU. To receive a copy of the declaration of conformity, please contact the manufacturer at: www.candy-group.com
CANDY HOOVER GROUP S.r.l. Via Privata Eden Fumagalli, 20861 Brugherio (MB) Italy
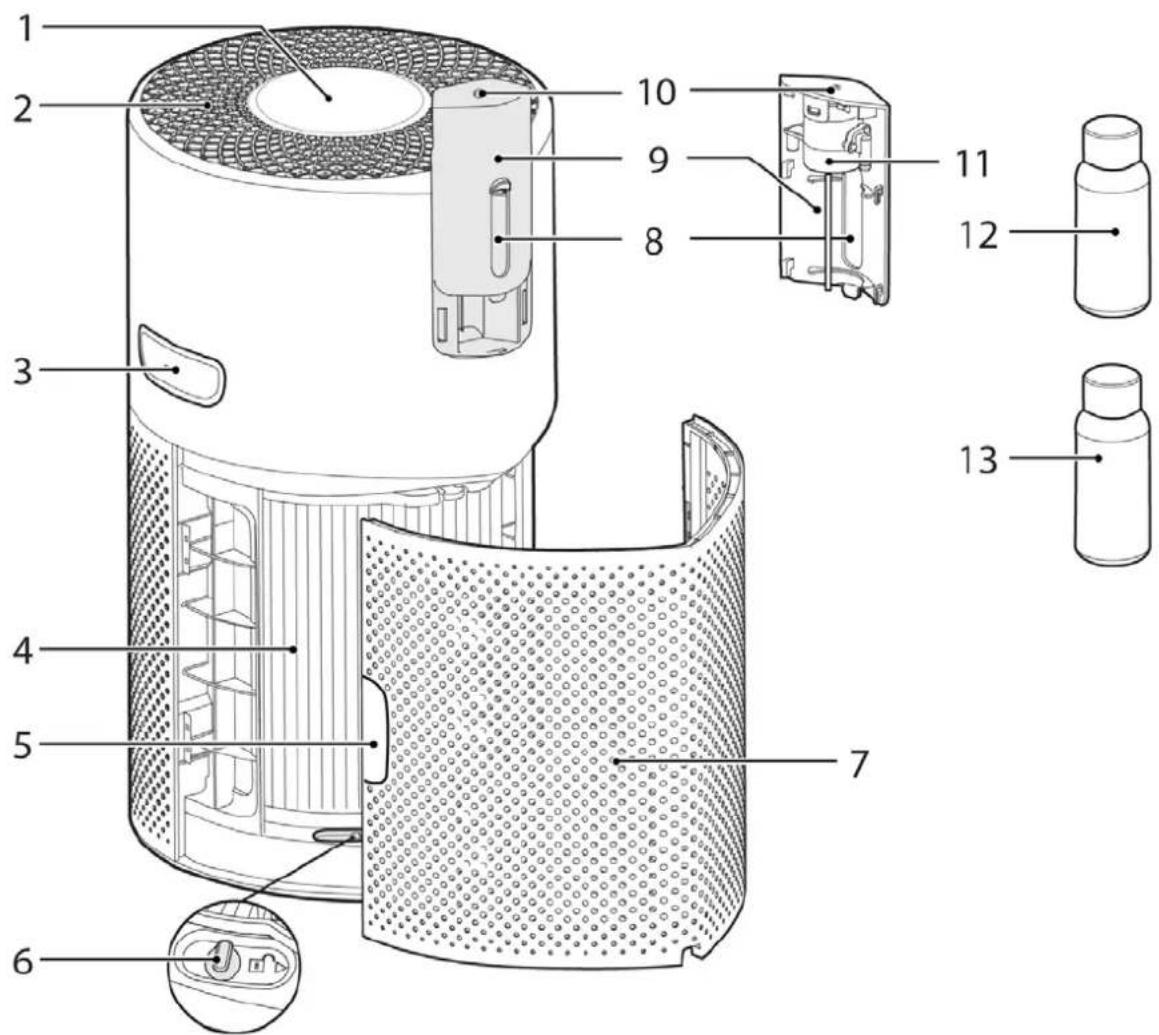
| 1 Control Panel / Display |
| 2 Air Outlet |
| 3 Product Carry Handle |
| 4 Filter Assembly |
| 5 | Air Inlet Cover Handle |
| 6 Filter Release Switch | |
| 7 Air Inlet Cover | |
| 8 Diffuser Window | |
| 9 Diffuser Cover | |
| 10 D | ffuser Outlet |
| 11 D | ffuser Unit |
| 12 H | Essence Bottle (Green) |
| 13 H | Biotics Bottle (Brown) |
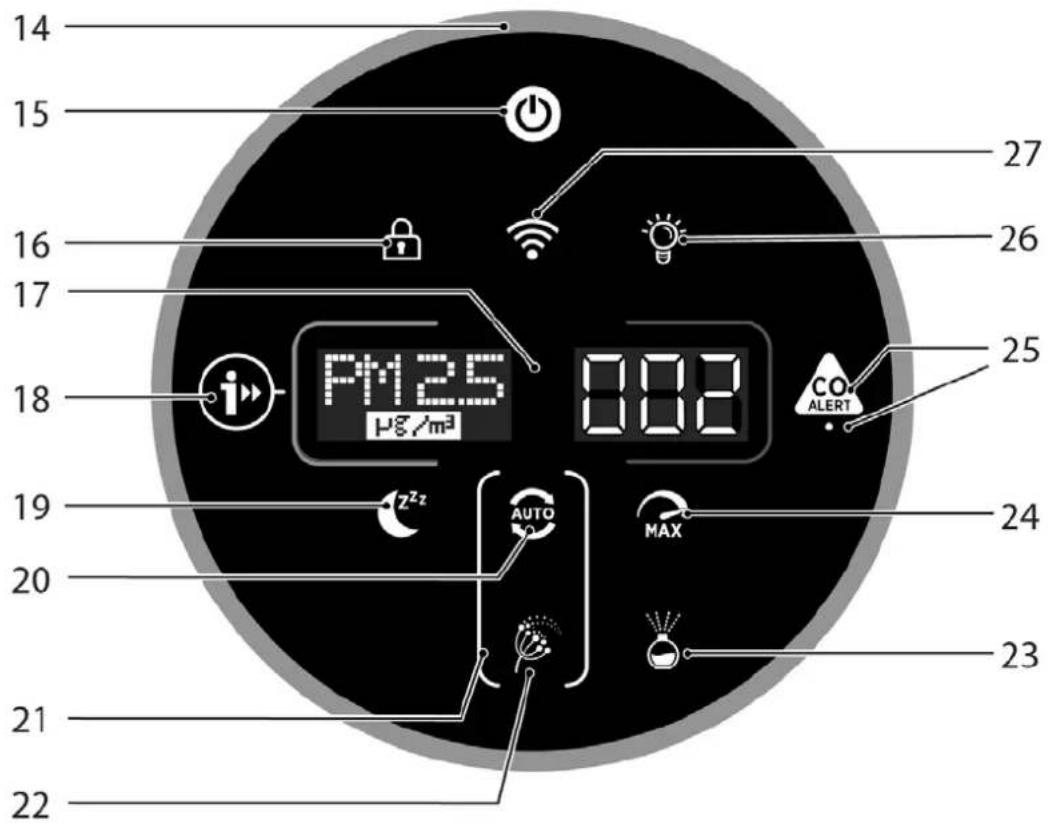
| 14 Air Quality LED Ring |
| 15 Power Button |
| 16 Child Lock Button |
| 17 Digital Display |
| 18 Information Button |
| 19 S | sleep Mode Button |
| 20 A | uto Mode Button |
| 21 P | pollen Allergy Circle Lamp |
| 22 P | pollen Allergy Lamp |
| 23 D | iffuser Button |
| 24 Max Mode Button |
| 25 CD Alert Button & LED |
| 26 Light Control Button |
| 27 Wi-Fi Button |
Multi Sensor Monitoring System
Thanks to the Multi Sensor Monitoring System, your product will continuously monitor the indoor air condition in terms of PM10, PM2.5, Volatile Organic Compounds (GAS), and Carbon Monoxide concentration (CO).
Each time you switch your product on, the Multi Sensor Monitoring system will start analyzing the indoor air and the Air Quality LED Ring will illuminate with different colors representing real-time air quality conditions.
| Air Quality LED Ring Colour | Indoor Air Quality |
| GREEN EXCELLENT | |
| YELLOW SATISFACTORY | |
| ORANGE POOR | |
| RED VERY POOR |
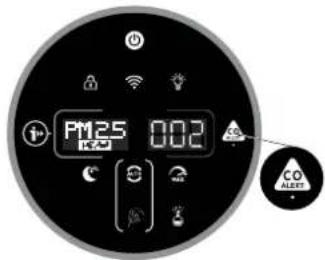
Carbon Monoxide Concentration Monitoring and Alarm
The H-Purifier will constantly monitor the indoor air for Carbon Monoxide (CO). The product is equipped with an alert system.
When the Carbon Monoxide alarm is activated, the Air Quality LED Ring, Information & CO Alert button will flash red simultaneously and an audible alarm will sound. The alarm will remain in operation until the Carbon Monoxide (CO) concentration has reduced to below 50 ppm unless silenced manually by pressing the CO Alert Button for 3 seconds.
This CO Alert LED shows the working condition of the CO sensor. It appears in green color when the CO sensor is in normal condition, in yellow color when the sensor is malfunctioning or exceeds its working life.
PREPARING YOUR H-PURIFIER
1. Filter Assembly [Fig. 1]
Before using your H-Purifier product, you will need to remove the filter from its protective packaging: - Remove the Air Inlet Cover from your product by gripping the two Air Inlet Cover handles and pulling them away from the product. [Fig. 1a] - Remove the plug from the transport location. [Fig. 1b] - Unlock the Filter release switch. [Fig. 1c] - Remove the filter from your product and remove the outer packaging. [Fig. 1d, e] - Refit the filter into your product. [Fig. 1f] - Lock the filter release switch. [Fig. 1g] - Refit the Air Inlet Cover to your product. [Fig. 1h]
Fig. 1![HOOVER HPURIFIER 500 - Filter Assembly [Fig. 1] - 1](/content/2026/03/542263/images/a4a9b07f01a23513ddadcbb61ef07722fdfc71dc4d6119ad0d042082d14f5850.jpg)
![HOOVER HPURIFIER 500 - Filter Assembly [Fig. 1] - 2](/content/2026/03/542263/images/240bb47231253d0a246845669b29f2165aabcb9387f1d4c385ab417bdc8aa790.jpg)
![HOOVER HPURIFIER 500 - Filter Assembly [Fig. 1] - 3](/content/2026/03/542263/images/6009ea8d7d51dc3a1d3456f93dd061b6e012d3d884a596c91e0beac8113458de.jpg)
![HOOVER HPURIFIER 500 - Filter Assembly [Fig. 1] - 4](/content/2026/03/542263/images/4ed1a1c457b43bf2ed3c46bff56ea2fa90bced75bfd5fb08b12a89a61802bbad.jpg)
![HOOVER HPURIFIER 500 - Filter Assembly [Fig. 1] - 5](/content/2026/03/542263/images/3ebf095bf608bf7dad9a44f9ed257a862f6839ac29e452df23700b0fde068eef.jpg)
![HOOVER HPURIFIER 500 - Filter Assembly [Fig. 1] - 6](/content/2026/03/542263/images/275e32d599b37aa88b45b0bd418f183986ce99bc6b9d499f312432463496fa10.jpg)
2. Install the Diffuser Bottle [Fig. 2]
To prepare your H-Purifier product for the Diffuser function:
- Remove the Diffuser Cover from the product. [Fig. 2a]
- Remove the Diffuser Unit from the Diffuser Cover. [Fig. 2b]
- Remove the bottle of H-Essence or H-Biotics from the packaging and remove the cap. [Fig. 2c]
- Tightly screw the bottle onto the Diffuser unit. [Fig. 2d]
- Refit the Diffuser Unit into the Diffuser Cover. [Fig. 2e]
- Refit the Diffuser Cover into the product. [Fig. 2f]
![HOOVER HPURIFIER 500 - Install the Diffuser Bottle [Fig. 2] - 1](/content/2026/03/542263/images/1ce0b4c9661c29acc0e652e61124e811177ba9d5c31c36efb010c954c594c621.jpg)
![HOOVER HPURIFIER 500 - Install the Diffuser Bottle [Fig. 2] - 2](/content/2026/03/542263/images/c00ade84e7d8b35dfc9f8d93a907c8752e4f6dd89f5aed372f33ce974b50b21f.jpg)
![HOOVER HPURIFIER 500 - Install the Diffuser Bottle [Fig. 2] - 3](/content/2026/03/542263/images/3ad4aa0674d16e057e7507fc1a7bee6ff80ee39af3878010e15f8361e7b41863.jpg)
![HOOVER HPURIFIER 500 - Install the Diffuser Bottle [Fig. 2] - 4](/content/2026/03/542263/images/a92031ebd19f65759a60c61d4ca0aaabe1dc4070ffbe7e93aeddf25be4457a6b.jpg)
![HOOVER HPURIFIER 500 - Install the Diffuser Bottle [Fig. 2] - 5](/content/2026/03/542263/images/5031cdda794d600751d2638606eb109a9406ad6f14ab404e4c33f1d1b03a3a26.jpg)
Fig. 2![HOOVER HPURIFIER 500 - Install the Diffuser Bottle [Fig. 2] - 6](/content/2026/03/542263/images/071df70396d090cf3c67fe1d93b52b5136ffe9393c015c76f1d68c185b9e41d2.jpg)
Fig. 3![HOOVER HPURIFIER 500 - Install the Diffuser Bottle [Fig. 2] - 7](/content/2026/03/542263/images/6d516be8f93d623e5430b40eedcb49763963b735a091ea6b8db2a4305633bf5b.jpg)
Fig. 4![HOOVER HPURIFIER 500 - Install the Diffuser Bottle [Fig. 2] - 8](/content/2026/03/542263/images/fe97479e76004da700b8d44bd4dbac3374640cc96d4641405b54cac7ff8a5d95.jpg)
Fig. 5![HOOVER HPURIFIER 500 - Install the Diffuser Bottle [Fig. 2] - 9](/content/2026/03/542263/images/5f9a9881652ccddc8f322fe3562133dc9c75b452e34ff3e235640d3ae35e45cb.jpg)
![HOOVER HPURIFIER 500 - Install the Diffuser Bottle [Fig. 2] - 10](/content/2026/03/542263/images/cc929d0fbe04aa356a4b56fbba00c852ba4cc219c661fc8a1e0a3d864c51d78c.jpg)
Fig. 6 Fig. 7![HOOVER HPURIFIER 500 - Install the Diffuser Bottle [Fig. 2] - 11](/content/2026/03/542263/images/65f8ab9dfb010242afad7dda84f0e0715cfbf5a35e0c478dec9b745f2ca073ec.jpg)
USING YOUR H-PURIFIER
Plug in the Product [Fig. 3]:
Pull out the power cord from the cord reel and plug into a power supply.
All lights on the Control Panel / Display will fully illuminate for approximately 1 second to indicate a successful plug in.
The POWER button will be dimly lit and the CO sensor light will be ON to indicate that the Multi Sensor Monitoring System has started working to monitor the indoor Carbon Monoxide level.
Switching on the Product [Fig. 4]:
To switch on your product, press the POWER button on the display.
The Air Quality LED Ring will illuminate through all colours in sequence whilst the sensors are analysing the realtime air condition. After a few seconds, the Air Quality LED ring will select the appropriate colour for the air quality at that time.
Your H-Purifier product will immediately enter AUTO MODE and begin to purify the indoor air.
The AUTO MODE button, INFORMATION button, LIGHTING button and PM10 information on the
Display will illuminate.
The following functions are available via the Display buttons:
Press the Wi-Fi button to turn on/off remote access.
Press the INFORMATION button to see all monitoring data.
Press the AUTO, MAX or SLEEP buttons to select a purifying mode.
Press the LIGHT CONTROL button to set the brightness of the display lights.
Press the CHILD LOCK button to inactivate all the buttons on the Control Panel / Display.
Press the DIFFUSER button to activate the function.
Press the POWER button to switch off the air purifier.
Pairing to Wi-Fi:
In order to access all the H-Purifiers functions from anywhere, it is suggested to download the hOn App.
You will be able to control your product in the most efficient way.
Instructions:
- Download the hOn application from the App Store or Google Play. [Fig. 5]
- Open the APP, create an account with your e-mail and a password.
- Confirm login.
- Ensure your mobile device is connected to Wi-Fi.
- Log into the hOn app.
- Press and hold the Wi-Fi button on the display for 5 seconds, there will an audible beep and the Wi-Fi button will start flashing to indicate it is waiting for a connection. [Fig. 6]
- Follow the in-app instructions to connect your mobile device to your product.
- When successfully paired, the Wi-Fi button on the product will remain illuminated.
- To reset the Wi-Fi, press and hold the Wi-Fi button for 5 seconds.
Wireless Parameters for Pairing
| Technology Wi-Fi | Bluetooth | |
| Standard IEE 802.11 b/g/n Bluetooth v4.2, BR/EDR, BLE | ||
| Frequency Band(s) (MHz) | 2401 ~ 2483 2402 ~ | 2480 |
| Maximum Power (mW) | 100 10 | |
INFORMATION Function [Fig. 7]:
There are 6 different data sets available to monitor:
PM10, PM2.5, GAS, Temperature, Humidity, and Filter Status.
To monitor each value, simply press the INFORMATION button consecutively.
By default, the display will show the PM10 data. The machine will remember the user's last selection and maintain this selection the next time the product is switched on.
MODE Functions:
There are 3 available air purifying modes via the display: AUTO MODE, MAX MODE, and SLEEP MODE. Auto mode is the default setting for your product when switched on. All modes can be selected manually by pressing the related button on the display.
POLLEN ALLERGY mode can be activated via the hOn APP.
AUTO MODE [Fig. 8]:
This is the default mode of your H-Purifier product when first switched on. In Auto Mode, the H-Purifier automatically adapts its purifying performance to the real-time monitored indoor air quality level.
This is the recommended setting for your product.
In AUTO mode, after 30 minutes of excellent air quality, your product will enter an ECO mode by pausing the purifying function. The Multi Sensor Monitoring System will continue to analyse the indoor air and automatically switch on the purifying function when required.
MAX MODE: [Fig. 9]
Press the MAX mode button on the display to activate air purifying at maximum power setting. To exit MAX mode, simply select AUTO mode or SLEEP mode.
SLEEP MODE: [Fig. 10]
Press the SLEEP mode button to activate air purifying at the lowest silent power setting. The SLEEP mode button will be dimly lit and all other display lights will be off. This can be modified by pressing the LIGHTING button.
POLLEN ALLERGY MODE: [Fig. 11]
The Pollen Allergy mode can only be activated via the hOn APP. You will first be required to activate and register a profile in the app, in order to create your Pollen Allergy Profile.
The Pollen Allergy mode works only when AUTO MODE is selected. [Fig. 11c]
In Pollen Allergy mode, the appliance continuously receives real time data from the APP about the monitored pollen concentration outdoor, and works automatically to maximize pollen capturing performance.
Once pollens are captured, they are inactivated to help alleviate allergic symptoms.
When Pollen Allergy mode is activated in the App, there are 2 possible notification lamps on the product display:
- The Pollen Allergy Lamp is WHITE [Fig. 11a]: The appliance and the App are monitoring the presence of pollens outdoor and there is no risk.
- The Pollen Allergy Lamp turns YELLOW [Fig. 11b] and the Pollen Allergy Circle lamp is WHITE [Fig. 11a]: The appliance and the APP have detected risk.
If the product is manually put into SLEEP mode or MAX mode whilst Pollen Allergy mode is activated, the Pollen Allergy mode will stop.
LIGHT CONTROL Function: [Fig. 12]
There are 3 settings available for the display lighting: On, Dim, and Off.
To adjust the brightness of the display lighting, simply press the LIGHTING button on the display to cycle through the 3 available options. ON is the default setting.
If OFF is selected, any other button will need to be pressed twice to activate. After one press, the lights will become DIM; on the second press, the action will be activated.
CHILD LOCK Function: [Fig. 13]
Press and hold the CHILDLOCK button for 3 seconds to activate. An audible sound will be heard when it has been activated, and the CHILDLOCK button will remain illuminated. No other buttons will work when activated.
To exit, simply press and hold the CHILDLOCK button for 3 seconds. An audible sound will be heard to confirm it is off, and the button will no longer be illuminated.
![HOOVER HPURIFIER 500 - CHILD LOCK Function: [Fig. 13] - 1](/content/2026/03/542263/images/3a790723decb35d7edd091cda5d813b5ac4ac2889040a0b1cebdc10b3dab121b.jpg)
Fig. 14![HOOVER HPURIFIER 500 - CHILD LOCK Function: [Fig. 13] - 2](/content/2026/03/542263/images/7e840e55ab66943155fcd874e2f9e5ba02ec248c1757b3db1376557231646605.jpg)
Diffuser Function: [Fig. 14]
The diffuser spreads H-Essence or H-Biotics into the air of the room. H-Essence is the Hoover collection of essential oils to release enjoyable fragrances into the air.
H-Biotics is a natural blend based on probiotics that keeps the room bio-hygienized by inhibiting the growth of microorganisms such as bacteria or microbes.
There are 4 different settings for the DIFFUSER function: SOFT, MEDIUM, CUSTOM, and H-BIOTICS. To activate this function, simply press the Diffuser button on the display. The default setting for this function is SOFT. To select any of the other settings, simply press the button consecutively to change to the desired selection. The button will illuminate white when switched on.
It is recommended to use SOFT and MEDIUM settings for H-Essence.
Custom settings can be created within the hOn app for your H-Essence.
When Using H-Biotics, the setting MUST be set to H-Biotics. Once user activates H-Biotics using the APP, this will give an alert of "ACTIVATE H-BIOTICS" after 120 hours to ensure the H-biotics usage of every 5 days.
The Diffuser function can only be used in AUTO & MAX modes and cannot be used in SLEEP mode.
| Setting Pump On Pump Off Cycle | |||
| SOFT 10 secs 300 secs Shutdown after 6 Hours | |||
| MEDIUM 90 secs | 120 secs Shutdown after 6 Hours | ||
| CUSTOM User Defined User Defined Shutdown after 6 Hours | |||
| H-BIOTICS 120 secs 120 secs Shutdown after 6 Hours | |||
To switch off the function, press the diffuser button until the button light switches off.
After each use of the Diffuser function, use a dry soft cloth to clean any residue from the product surfaces.
To change the bottle in the diffuser unit, see 'Maintaining your H-Purifier' section.
MAINTAINING YOUR H-PURIFIER
IMPORTANT: ALWAYS UNPLUG YOUR APPLIANCE FROM THE POWER SUPPLY WHEN PERFORMING MAINTENANCE TASKS.
FILTER CLEANING / REPLACEMENT
Your H-Purifier will monitor the condition of your filter. A CLEAN FILTER OR REPLACE FILTER alert will appear on the left side of the display and Flash indicating action is required to clean or change the filter.
Cleaning / Replacing the Filter: [Fig. 15]
- Remove the Air Inlet Cover from your product. [Fig. 15a]
- Unlock the Filter release switch. [Fig. 15b]
- Remove the filter from your product. [Fig. 15c] Use a Vacuum Cleaner to clean the external mesh on the Filter Assembly OR Replace with a NEW filter. [Fig. 15d]
- Re-Fit the Filter assembly into the product. [Fig. 15e]
- Lock the filter release switch. [Fig. 15f]
- Refit the Air Inlet Cover to your product. [Fig. 15g]
- Plug in your appliance to the power supply and switch on. [Fig. 4] Press the INFORMATION button and follow the instructions to reset the Filter Clean function by holding the button for 3 seconds; an audible alert will be heard to indicate a successful reset. [Fig. 7]
Fig. 15![HOOVER HPURIFIER 500 - Cleaning / Replacing the Filter: [Fig. 15] - 1](/content/2026/03/542263/images/a5eea8b54a10eae1bd108b6991545dc62a22d4b62d643fb0981a073acbb0d2bc.jpg)
DIFFUSER MAINTENANCE
After each use of the Diffuser function, use a dry soft cloth to clean any residue from the product surfaces.
Diffuser Bottle Replacement: [Fig. 16]
The volume of liquid remaining in the bottle can be checked through the Diffuser Window; when required, the bottle should be replaced.
- Remove the Diffuser Cover from the product. [Fig. 16a]
- Remove the Diffuser Unit & Bottle from the diffuser cover. [Fig. 16b]
- Unscrew and remove the empty bottle, then discard it. [Fig. 16c]
- Remove the new bottle of H-Essence or H-Biotics from the packaging and remove the cap. [Fig. 16d]
- Tightly screw the new bottle onto the diffuser unit. [Fig. 16e]
- Refit the diffuser unit into the diffuser cover. [Fig. 16f]
- Refit the Diffuser cover into the H-Purifier. [Fig. 16g]
Fig. 16![HOOVER HPURIFIER 500 - Diffuser Bottle Replacement: [Fig. 16] - 1](/content/2026/03/542263/images/726e24c8396b65bce453eb4938eb50743d7d72e6fa5439e74df46110c4ce7263.jpg)
STORAGE OF YOUR H-PURIFIER
- Switch off the Air Purifier and unplug the socket.
- Clean all internal & external surfaces of the Air Purifier and the external mesh of the Filter.
- Remove the bottle from the diffuser. Refit the original cap onto the bottle and store it to protect from direct light. Clean the surfaces of diffuser unit and Diffuser Cover.
- Ensure all components are dry.
- Remove the Air Inlet Cover [Fig. 17a] and Reel in the power cord by pulling on the cord [Fig. 17b] and fit the plug into the transport location. [Fig. 17c,d] Refit the air inlet cover [Fig. 17e]
- Store the Air Purifier in a cool dry place.
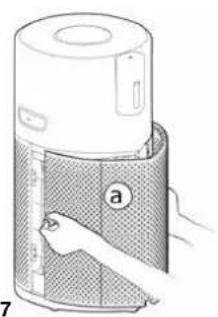
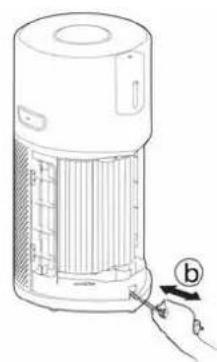
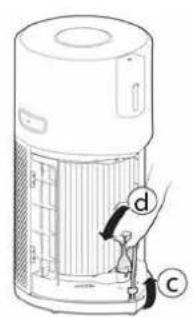
Fig. 17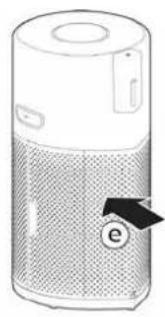
ALERTS & SOLUTIONS
The following codes may appear during use. [Fig. 18]
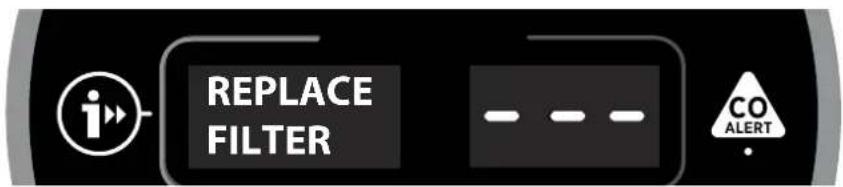
Fig. 18
| Error Description | Error Description | Error Solution | |
| Alert on product Control Panel / Display | Alert on APP | ||
| Outer Layer's Filter cleaning Alert | Alert of "CLEAN FILTER" blinks on display | Filter cleaning Alert | 1.Follow the instructions in I/M to clean the Outer Layer's Filter.2 Reset the alert. |
| Filter replacement Alert | Alert of "REPLACE FILTER" blinks on display | Filter replacement Alert | 1.Follow the guidance in I/M to replace the filter.2 Reset the alert. |
| Filter not present or filter has not been locked | Alert of "FILTER MISSING" blinks on display | Filter not present or filter has not been locked | 1.If filter is not present, put it back.2.If filter is in position, check whether the Filter Tab has been switched to LOCK status. |
| Dust sensor malfunctioning: no signal from sensor or output voltage exceeds the limit value | / | Dust sensor malfunctioning: no signal from sensor or output voltage exceeds the limit value | Dust sensor failure or dust sensor wire has not been connected well, please call service center to fix. |
| Motor no speed | / | Motor no speed feedback | Motor failure or motor wire has not been connected well, please call service center to fix. |
| CO sensor malfunctioning | CO sensor status lamp is on in yellow | CO sensor malfunctioning Alert: | need call service. |
ATTENTION: If any of these failures persist, contact your local Hoover representative. DO NOT try to disassemble the H-Purifier by yourself.
TROUBLESHOOTING
The following is a list of commonly encountered problems and solutions.
If any of these problems persist contact your local Hoover representative.
| The Fan does not work (Control Panel / Display Lights on) | ·Check the alert showing on the display or in the app. ·Check if there are any obstructions in the fan. ·Check if the H-Purifier is switched on. ·Check if the filter is incorrectly installed. ·Check if the H-Purifier is in a completely upright vertical position and not leaning. |
| The Fan does not work (Control Panel / Display Lights off) | ·Check if the H-Purifier is plugged in and switched on. ·Check if there are any obstructions in the fan. |
| No Lights on Control Panel / Display (Fan Working) | ·Check if the lights have not been switched off by pressing the Light Control button on the control Panel / Display. |
| Buttons on the control panel / Display do not operate | ·Check if Child lock has been activated by pressing and holding the Child Lock Button for 3 secs. |
| Air Flow is Weak | ·Check if the protective packaging has been removed from the filter. ·Check if there are any obstructions in the Air Intake Cover or Air outlet. ·Check the Filter staus on the Control Panel / Display or in App for clean or replace warning. ·Check if the H-Purifier is in sleep mode. The fan operates on reduced power in this mode. |
| Air Purifier is operating loudly | ·Check if there are any obstructions in the Air Outlet or the fan. ·Check if the H-Purifier is running in MAX mode, the air flow is at maximum power in this mode. |
IMPORTANT INFORMATION
Hoover Spares and Consumables
Always replace parts with genuine Hoover spares. These are available from your local Hoover dealer or direct from Hoover. When ordering parts always quote your model number.
Quality
Hoover's factories have been independently assessed for quality. Our products are made using a quality system which meets the requirements of ISO 9001.
Your Guarantee
The guarantee conditions for this appliance are as defined by our representative in the country in which it is sold. Details regarding these conditions can be obtained from the dealer from whom the appliance was purchased. The bill of sale or receipt must be produced when making any claim under the terms of this guarantee.
Subject to change without notice.
SAFETY INSTRUCTIONS FOR USE
SLEEP MODE: [Fig. 10]
SLEEP MODE: [Fig. 10]
DIFFUSER MAINTENANCE
Multi Sensor Monitoring System
H-PURIFIER MAINTENANCE
IMPORTANT: THE APPLIANCE MUST ALWAYS BE DISCONNECTED FROM THE POWER SUPPLY WHEN PERFORMING MAINTENANCE.
FILTER CLEANING/REPLACEMENT
The H-Purifier monitors the condition of the filter. A warning message "CLEAN OR REPLACE FILTER" appears on the left side of the display, and a lamp blinks to indicate that the filter needs to be cleaned or replaced.
Cleaning/Replacing the filter: [Fig.15]
MAINTENANCE OF THE DIFFUSER
Cleaning/Replacing the filter: [Fig.15]
![HOOVER HPURIFIER 500 - Cleaning/Replacing the filter: [Fig.15] - 1](/content/2026/03/542263/images/3075f7c244c7f0058a187443311a1654417a50020673cc71e2af85dd2cf70e8e.jpg)
If the device is damaged, do not continue to use it.
Place the device and use it on a dry, stable, horizontal surface to avoid the possibility of tipping over.
The device must be kept dry.
Never tilt or tip the device during operation.
The power cord must be routed in such a way that no one can step on it or trip over it.
Do not place the device on hot surfaces, near hot surfaces, or in the open sun or under direct sunlight.
Do not allow water, other liquids, or flammable substances to enter the device to prevent electric shock and/or fire.
Do not immerse the device in water, other liquids, or flammable substances to prevent electric shock and/or fire.
Do not spray any flammable materials, such as insecticides or deodorants, around the device.
Before connecting the device, check that the values of the nominal parameters indicated on the device's rating plate match the parameters of the local power supply.
Do not block the air intake and exhaust openings.
This device is not intended for ventilation; regular cleaning and maintenance of the ventilator during cooking is required.
Do not place anything on top of the device.
Do not place the device directly under an air conditioner to prevent condensation from dripping onto the device.
Make sure that all filters are correctly installed before turning on the device.
Use only genuine HOOVER filters, designed specifically for this appliance. Do not install any other filters.
Do not hit the appliance (in particular, the air intake and exhaust blocks) with hard objects.
Do not insert fingers or objects into the air intake and exhaust blocks to avoid injury or damage to the appliance.
Do not use this appliance after applying a room fragrance or in places where the air contains residues of oil, paint, or chemical fumes.
Do not use the appliance near gas appliances, heaters, or fireplaces.
Do not use the appliance in rooms with sudden temperature changes.
To avoid interference, place the appliance at a distance of at least 2 m from electrical devices that use radio waves, such as televisions, radios, and radio-controlled clocks.
If the appliance is not used for a long time, bacteria may multiply on the filters. Check the filters after a long period of inactivity. If the filters are too dirty, replace them.
Do not use the appliance in a humid atmosphere or in rooms with high temperature, for example, in bathrooms, toilets, or kitchens.
The appliance does not remove carbon monoxide (CO) or radon (Rn). It must not be used as a safety device in emergency situations related to combustion processes or dangerous chemical substances.
The CO Monitor function should not be used or intended to be used as a replacement for carbon monoxide detection in accordance with standard EN 50291-1, UL-2034, CSA6.19, or any other standard, if required by local or regional regulations. The CO Monitor function can only be used as a supplement to a special carbon monoxide detection device. The owner of the appliance is responsible at their own discretion, which implies understanding and agreement with its limitations and compliance with applicable norms and rules.
Do not place the appliance in any of the following places:
In a bathroom or other place where water splashes, drops, or condensate may fall on the signaling device (for example, above an electric sink).
Near or directly above heaters or air conditioners, doors, windows, exhaust fans, or other places where drafts may occur.
- Directly above a sink or stove.
The temperature may drop below -20°C or rise above 50°C.
In enclosed spaces (e.g., in a cabinet or under a cover).
- In humid places.
In places where the device could be blocked, such as behind curtains or furniture.
In places where dirt or dust could block the vents.
In places where paint, thinners, solvents, or air fresheners may evaporate.
When the alarm sounds, open all windows and doors (if safe to do so). Turn off all fuel-burning appliances if possible, then evacuate the premises, leaving windows and doors open. Seek immediate medical help if any signs of carbon monoxide poisoning are present. Do not re-enter the premises until the alarm has stopped. The alarm will stop as soon as the carbon monoxide has dissipated. Do not turn on fuel-burning appliances until the source of the problem has been identified and corrected by a qualified technician.
To turn on the CO Monitor, plug it into an outlet. The indicator light will turn green. If the CO Monitor detects a dangerous level of CO, an audible alarm will sound, and the CO Alert button and ring indicator light will start flashing red. The alarm will continue until the elevated CO level drops to a safe level.
Try not to use paints, thinners, solvents, air fresheners, aerosol sprays, or chemical cleaners near the device. This may affect the operation of the CO Monitor.
Do not allow small children to press the CO Alert button for 3 seconds, as this will produce a very loud sound.
Press and hold the [CO Alert] button for 3 seconds to test the CO alarm; the alarm should sound for 5 seconds. Test the alarm weekly, and also after prolonged absence from the premises (e.g., during holidays). If the alarm does not sound when the [CO Alert] button is pressed for 3 seconds, contact the Hoover customer service center for advice from a qualified technician regarding repairs.
Do not allow small children to press the CO Alert button for 3 seconds, as this will produce a very loud sound.
If the CO sensor displays an error or its service life has expired, contact the Hoover customer service center for advice from a qualified technician or for sensor replacement. The expected service life of the CO sensor, after which it must be replaced, is 5 years.
Operating humidity: 15-90% RH
Operating temperature: from 0°C to +40°C
The installed level of CO reaches a high level when [CO Alert] and [LED Ring Air Quality] flash red (at a frequency), while a loud and continuous alarm (85~110 d(A)) is activated; the alarm does not turn off until the CO level drops below the alarm level.
Carbon monoxide affects the body, depriving vital organs of oxygen. When breathing in CO, it combines with hemoglobin, instead of oxygen, which it normally carries to the body. CO constantly displaces the ability of oxygen molecules to bind with hemoglobin, thereby reducing its delivery to vital organs. The degree of CO impact on the body depends on the concentration level and duration of exposure, but experts agree that even low-level CO exposure over a long period can have serious long-term effects on overall health.
WARNING: THE CO SENSOR IS INTENDED TO PROTECT PEOPLE FROM ACUTE POISONING BY CARBON MONOXIDE OR TO PREVENT CHRONIC EXPOSURE. IT DOES NOT PROVIDE ABSOLUTE PROTECTION FROM SPECIFIC MEDICAL CONDITIONS. IN CASE OF DOUBT, CONSULT A DOCTOR.
This device should not be considered a substitute for proper installation, use, and technical maintenance of appliances that run on fuel, including necessary ventilation and exhaust systems.
Immediately wipe up any spilled aromatic oil.
HOOVER SERVICE: To guarantee safe and reliable operation of this device, we recommend that you call qualified engineers from the HOOVER service for technical maintenance and repair.
Environment
The device is marked in accordance with European Directive 2011/65/EC on waste electrical and electronic equipment (WEEE). By following the disposal rules for this electronic device, you help prevent possible negative consequences for the environment and human health, which could arise from improper disposal of this device.
The symbol on this device indicates that it cannot be disposed of with household waste. It must be taken to an appropriate collection point for further recycling of electrical and electronic parts. Disposal of the device is carried out
in accordance with current laws and regulations on environmental protection and waste disposal. For more detailed information on handling this device, its disposal, and recycling, contact your local authorities, the waste disposal service, or the store where you purchased this device.
B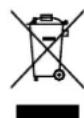
Pull out the power cord and insert the plug into the socket.
On the control panel, all indicators light up / the display lights up for 1 second, indicating successful connection.
The PINTAHN button will glow softly, the CO indicator will be lit, indicating that the multi-sensor monitoring system is activated and tracking the carbon monoxide level.
Turning on the device [Fig.4]:
To turn on the device, press the POWER button.
The LED ring for air quality will light up in all colors sequentially while the sensors analyze the air condition in real time. After a few seconds, the LED ring for air quality will light up with the color corresponding to the air quality at that moment.
Your H-Purifier device immediately switches to automatic mode and starts purifying the air in the room.
The AUTO MODE button, information, and PM10 backlight on the display will light up.
The buttons on the display allow you to control the following functions:
Press the Wi-Fi button to enable/disable remote access.
Press the INFO button to view all tracked data.
Press the AUTO button or SLEEP MODE to select the operating mode.
Press the BACKLIGHT buttons to adjust the display brightness.
Press the CHILD LOCK button to lock all buttons on the control panel/display.
Press the IONIZER button to turn it on.
Press the POWER button to turn on the device.
Connecting to Wi-Fi:
To get access to all H-Purifier functions from any location, it is recommended to download the mobile app.
This way you can control your device in the most effective way.
- Download the app from the App Store or Google Play. [Fig. 5]
- Open the app, create an account with your email address and password. 3. Confirm the login.
- Make sure your mobile device is connected to Wi-Fi. 5. Log into the app.
- Press and hold the Wi-Fi button on the device for 5 seconds, a sound signal will be emitted, and the Wi-Fi button will start blinking, indicating the connection is being established. [Fig. 6] 7. Follow the instructions in the app to connect your mobile device to the device.
- Upon successful connection, the Wi-Fi button on the device will remain lit. 9. To disconnect Wi-Fi, press and hold the Wi-Fi button for 5 seconds.
Wireless connection parameters
| Texhoolorhy Wi-Fi B | Bluetooth | |
| Стондэрэн.IEE 802.1 | 1 b/g/n Bluetooth v4.2, BR/EDR, BLE | |
| Диапазон частот (MHz) | 2401 ~ 2483 2402 ~ 2480 | |
| Марсималовая мошноctь(mW) | 100 | 10 |
Information function [Fig. 7]:
You can view 6 different data sets:
PM10, PM2.5, GAS, Temperature, Humidity, and filter status.
To view each value, simply press the INFORMATION button sequentially.
The display shows PM10 data. The device remembers the last user selection and retains it when the device is turned on again.
Operating modes:
From the display, you can select one of the cleaning modes: AUTOMATIC, MAXIMUM, and SLEEP MODE.
Automatic mode is the default when the device is turned on. All modes can be selected manually by pressing the button on the display.
Pekm AJIIEPTN HAIbIbLY MOXHO BKNIOHType3 npJIOKeHHe hOn.
ABTOMATUHECKN PEXKIM [Pnc.8]:
3To peXIM no yMonuHnIO, KOtOpB 3aNyccaTc npn nepBOM BkIoueHH H-Purifier. B 3ToM peX
H-Purifier abTomatueckn aanTnpyeX npakTepcntkN OvncTK cornaCHO n3MepeHHbIM B peaIbHom BpeMeHH npametpam KaeeCTBA BO3dyxa B nomeuen.
3To peKoMeHdyMaHa NaTpoKa IaI npi6opa.
B abTomatueckom pexime nocle pernctraun otnnuHoro kaeeCTBa BO3dya B teueHne 30 MNHT np6op nepexoNDt B pejIM ECO, ytaHaabInBa jyHKUIO ONUCTKn Ha naay. Cntema MHOraTNUKOBORO MOHTOPINrA npn 3OM IpOdoJkaet aHaJIINpOBaTB BO3dY B NOMEeHN IN BKIOHaET fYHKUIO ONUCTKN npn Heo6xOIMOCTN.
MAKCUMAJbHbIPEXKIM:[Pnc.9]
HaxmTe KhONky MAX Ha dncnnee, YTObbl BKNIOHTb ONUCTKy BO3dyxa Ha MaKcIMaJIbHOH MOUHOCtN. DnBa BixOda n3 MAKCIMAMlbHOTo pexkma npocTo HaxmTe KhONky AUTO nnPEKIMA CHA.
PEXKM CHA:[Pnc.10]
HaKmTe KhONky PEXIMMA CHA, yTo6bl nepeBecTn Ouncntenb Ha camyio Hn3KyIO 6ecwmyHO HAcTpoKMy MoUHcTN. KhoNka PEXIMMA CHA 6yET TycKnIO NOCBeUBAbCra, a BCE octaIbHbe INHdkaTOpbI Ha dncPiee 6dyT OTKIOUeHb. 3Ty HAcTPOkO MOnHO N3MeHInTB, Hxab KhoNky IOCDBTKN.
PEXKIM ANLEPRM HA NblbUy: [Pwc.11]
Pexn annepnHa nblbuy moxho BkIOuHTb uepe3 npINOxHe hOn. Iha Hauana Heo6xIIMO aKTHBnPOBaTb 3apeHCTpnpOBAb npOfnB npINOxKeHH.
Pexim anleprnHa nblbuy paobotaet tokbko,ecnn Bb6paH ABTOMATUeCKN PEXIM. [Puc. 11c]
B 3TOM pexKIMe np6op HnpepbBHO B pealbHOM BpemEH nOyuaet daHHbIe uepe3 npInnoKeHne 06 OTCJEXNBAeMOI KOHcHTpaCm NblbCuI bChApxuN aBtOMaTNUeCKn aKTNBpyET yHKUIO MaKcMmaHoro ynaBnBaHN PbNbCbI.
YnabnBaMaNbIbuaHnAHTBnpyeTc, NOMORa CHMmTa CMMTOnMb aJIpeprn.
The dust indicator lights up in the device display according to the corresponding indicator.
- The dust indicator lights up white [Fig. 11a]: the device is ready to check for dust, and there is no risk.
- The dust indicator lights up yellow [Fig. 11b], and the ring indicator for dust lights up white [Fig. 11a]: the device has detected a risk.
If, when the device is turned on, the dust indicator lights up, then to bring the device into sleep or maximum mode, the dust alarm mode is disabled.
Backlight control function: [Fig. 12]
The display backlight operates in one of three settings: on, dim, and off.
To adjust the display backlight brightness, simply press the backlight button, sequentially cycling through each of the 3 options. By default, the backlight is on.
When the backlight is off, all other buttons will need to be pressed twice to activate: after the first press, the backlight turns on dimly, and on the second press, the desired action is activated.
Child lock function: [Fig. 13]
To activate this function, press and hold the child lock button for 3 seconds; after this, the activation of the function is confirmed by a sound signal, and the child lock button remains lit. All other buttons are blocked.
To deactivate the function, press and hold the child lock button for 3 seconds; after this, the deactivation of the function is confirmed by a sound signal, and the button goes out.
![HOOVER HPURIFIER 500 - Child lock function: [Fig. 13] - 1](/content/2026/03/542263/images/eb12218d7dd3b9a076945dc3330821b7460824529183a0a1ec72b3c7d93e79b3.jpg)
Fig. 14![HOOVER HPURIFIER 500 - Child lock function: [Fig. 13] - 2](/content/2026/03/542263/images/184008f85cfb36a81c2229c1e772fb040057d9c929baff0db2906d9e9ae41954.jpg)
Operation of the device: [Fig. 14]
TROUBLESHOOTING
Below is a list of the most common problems and their solutions.
If you cannot fix the problem, contact your local Hoover company representative.
| Вернеловп не павлоат (Пуньт уралени / Диспей посвец) | • Правлое сгнан на диспee и в риложен. • Правлое boзмене засоренье Фильста. • Убаде ть, чо H-Purifier влочen. • Правлое, правлино и встален Фильст. • Убаде ть, чо H-Purifier размени встору ветокаловом положен, a he поулов. | |
| Вернеловп не павлоат (Пуньт уралени / Диспей посвец) | • Убаде ть, чо влеса H-Purifier встална в розétку и рибор влочen. • Правлое boзмене засоренье Фильста. | |
| Нет посвetedки на павлое уралени / Диспей (Вернелов ларота) | • Убаде ть, чо посвetedка не SFыla bbyклоча нахашием Кногки уралени посвetedки на павлое / Диспей. | |
| Кондки на павлое уралени / Диспей не павота | • Убаде ть, чо не SFын влочуен Замок от deteун Нжатием COOTBEТСВИОЕ Kногки в楼下у ende 3 cekyн. | |
| Слабийnotok bo3dyaха | • Убаде ть, чо Фильстбын SFын вblут ИЗ заштойу ураковки. • Убаде ть, чо крышka SFын SFын SFын вblуck SFвдухуа He SFын SFвдухуа He SFын SFвдухуа SFын SFвдухуа SFын SFвдухуа SFын SFвдухуа SFын SFвдухуа SFын SFвдухуа SFын SFвдухуа SFын SFвдухуа SFын SFвдухуа SFын SFвдухуа SFын SFвдуху� SFын SFвдуху� SFын SFвдуху� SFын SFвдуху� SFын SFвдуху� SFын SFвдуху� SFын SFвдуху� SFын SFвдуху� SFын SFвдуху� SFын SFвдуху� SFын SFвдуху� SFын SFвдуху� SFын SFвдуху� SFын SFвдуху� SFын SFвдуху� SFын SFвдуху� SFын SFвдуху� SFын SFвдуху� SFын SFвдуху� SFын SFвдуху� SFын SFвдухуual SFын SFвдухуual SFын SFвдухуual SFын SFвдухуual SFын SFвдухуual SFын SFвдухуual SFын SFвдухуual SFын SFвдухуual SFын SFвдухуual SFын SFвдухуual SFын SFвдухуUAL SFын SFвдухуUAL SFын SFвдухуUAL SFын SFвдухуUAL SFын SFвдухуUAL SFын SFвдухуUAL SFын SFвдухуUAL SFын SFвдухуUAL SFын SFвдухуUAL SFын SFвдухуUAL SFын SFвдухуual SFын SFвдухуUAL SFын SFвдухуUAL SFын SFвдухуUAL SFын SFвдухуUAL SFын SFвдухуUAL SFын SFвдухуUAL SFын SFвдухуUAL SFын SFвдухуUAL SFын SFвдухуQUAL SFын SFвдухуQUAL SFын SFвдухуQUAL SFын SFвдухуQUAL SFын SFвдухуQUAL SFын SFвдухуQUAL SFын SFвдухуQUAL SFын SFвдухуQUAL SFын SFвдухуQUAL SFын SFвдухуQUAL SFын SFвдухуQual SFын SFвдухуQUAL SFын SFвдухуQUAL SFын SFвдухуQUAL SFын SFвдухуQUAL SFын SFвдухуQUAL SFын SFвдухуQUAL SFын SFвдухуQUAL SFын SFвдухуQUAL SFын SFвдухуQUAL SFын SFвдухуqual SFын SFвдухуqual SFын SFвдухуqual SFын SFвдухуqual SFын SFвдухуqual SFын SFвдухуqual SFын SFвдухуqual SFын SFвдухуqual SFын SFвдухуqual SFын SFвдухуqual SFын SFвдухуquel SFын SFвдухуqual SFын SFвдухуqual SFын SFвдухуqual SFын SFвдухуqual SFын SFвдухуqual SFын SFвдухуqual SFын SFвдухуqual SFын SFвдухуqual SFын SFвдухуqual SFын SFвдухуequal SFын SFвдухуequal SFын SFвдухуequal SFын SFвдухуequal SFын SFвдухуequal SFын SFвдухуequal SFын SFвдухуequal SFын SFвдухуequal SFын SFвдухуequal SFын SFвдухуequal SFын SFвдухуqual SFын SFвдухуqual SFын SFвдухуqual SFын SFвдухуqual SFын SFвдухуqual SFын SFвдухуqual SFын SFвдухуqual SFын SFвдухуqual SFын SFвдухуqual SFын SFвдуху equal SFын SFвдухуqual SFын SFвдухуqual SFын SFвдухуqual SFын SFвдухуqual SFын SFвдухуqual SFын SFвдухуqual SFын SFвдухуqual SFын SFвдухуqual SFын SFвдухуqual SFын SFвдухуquality SFын SFвдухуqual SFын SFвдухуqual SFын SFвдухуqual SFын SFвдухуqual SFын SFвдухуqual SFын SFвдухуqual SFын SFвдухуqual SFын SFвдухуqual SFын SFвдухуqual SFын SFвдухуqal SFын SFвдухуqual SFын SFвдухуqual SFын SFвдухуqual SFын SFвдухуqual SFын SFвдухуqual SFын SFвдухуqual SFын SFвдухуqual SFын SFвдухуqual SFын SFвдухуqual SFын SFвдуху qual SFын SFвдухуqual SFын SFвдухуqual SFын SFвдухуqual SFын SFвдухуqual SFын SFвдухуqual SFын SFвдухуqual SFын SFвдухуqual SFын SFвдухуqual SFын SFвдухуqual SFын SFвдуху qualitative SFын SFвдухуqual SFын SFвдухуqual SFын SFвдухуqual SFын SFвдухуqual SFын SFвдухуqual SFын SFвдухуqual SFын SFвдухуqual SFын SFвдухуqual SFын SFвдухуqual SFын SFвдухуQual SFын SFвдухуqual SFын SFвдухуqual SFын SFвдухуqual SFын SFвдухуqual SFын SFвдухуqual SFын SFвдухуqual SFын SFвдухуqual SFын SFвдухуqual SFын SFвдухуqual SFын SFвдуху Qual SFын SFвдухуqual SFын SFвдухуqual SFын SFвдухуqual SFын SFвдухуqual SFын SFвдухуqual SFын SFвдухуqual SFын SFвдухуqual SFын SFвдухуqual SFын SFвдухуqual SFын SFвдухуual SFын SFвдухуqual SFын SFвдухуqual SFын SFвдухуqual SFын SFвдухуqual SFын SFвдухуqual SFын SFвдухуqual SFын SFвдухуqual SFын SFвдухуqual SFын SFвдухуqual SFын SFвдухуquale SFын SFвдухуqual SFын SFвдухуqual SFын SFвдухуqual SFын SFвдухуqual SFын SFвдухуqual SFын SFвдухуqual SFын SFвдухуqual SFын SFвдухуqual SFын SFвдухуqual SFын SFвдуху qualifies SFын SFвдухуqual SFын SFвдухуqual SFын SFвдухуqual SFын SFвдухуqual SFын SFвдухуqual SFын SFвдухуqual SFын SFвдухуqual SFын SFвдухуqual SFын SFвдухуqual SFын SFвдуху qualifying SFын SFвдухуqual SFын SFвдухуqual SFын SFвдухуqual SFын SFвдухуqual SFын SFвдухуqual SFын SFвдухуqual SFын SFвдухуqual SFын SFвдухуqual SFын SFвдухуqual SFын SFвдухуqualification SFын SFвдухуqual SFын SFвдухуqual SFын SFвдухуqual SFын SFвдухуqual SFын SFвдухуqual SFын SFвдухуqual SFын SFвдухуqual SFын SFвдухуqual SFын SFвдухуqual SFын SFвдуху qualify SFын SFвдухуqual SFын SFвдухуqual SFын SFвдухуqual SFын SFвдухуqual SFын SFвдухуqual SFын SFвдухуqual SFын SFвдухуqual SFын SFвдухуqual SFын SFвдухуqual SFын SFвдуху qualified SFын SFвдухуqual SFын SFвдухуqual SFын SFвдухуqual SFын SFвдухуqual SFын SFвдухуqual SFын SFвдухуqual SFын SFвдухуqual SFын SFвдухуqual SFын SFвдухуqual SFын SFвдухуqualified SFын SFвдухуqual SFын SFвдухуqual SFын SFвдухуqual SFын SFвдухуqual SFын SFвдухуqual SFын SFвдухуqual SFын SFвдухуqual SFын SFвдухуqual SFын SFвдухуqual SFын SFвдуху QUALSFын SFвдухуqual SFын SFвдухуqual SFын SFвдухуqual SFын SFвдухуqual SFын SFвдухуqual SFын SFвдухуqual SFын SFвдухуqual SFын SFвдухуqual SFын SFвдухуqual SFын SFвдухуqualSFын SFвдухуqualSFын SFвдухуqualSFын SFвдухуqualSFын SFвдухуqualSFын SFвдухуqualSFын SFвдухуqualSFын SFвдухуqualSFын SFвдухуqualSFын SFвдухуqualSFын SFвдухуqual SFын SFвдухуqualSFын SFвдухуqualSFын SFвдухуqualSFын SFвдухуqualSFын SFвдухуqualSFын SFвдухуqualSFын SFвдухуqualSFын SFвдухуqualSFын SFвдухуqual SFын SFвдухуqual SFын SFвдухуqualSFын SFвдухуqualSFын SFвдухуqualSFын SFвдухуqualSFын SFвдухуqualSFын SFвдухуqualSFын SFвдухуqualSFын SFвдухуqual SFын SFвдухуqualSFын SFвдухуqual SFын SFвдухуqualSFын SFвдухуqualSFын SFвдухуqualSFын SFвдухуqualSFын SFвдухуqualSFын SFвдухуqualSFын SFвдухуqualSFын SFвдухуqual SFын SFвдухуqual SFын SFвдухуqual SFын SFвдухуqualSFын SFвдухуqualSFын SFвдухуqualSFын SFвдухуqualSFын SFвдухуqualSFын SFвдухуqualSFын SFвдухуqual SFын SFвдухуqualSFын SFвдухуqualSFын SFвдухуqual SFын SFвдухуqualSFын SFвдухуqualSFын SFвдухуqualSFын SFвдухуqualSFын SFвдухуqualSFын SFвдухуqualSFын SFвдухуqual SFын SFвдухуqualSFын SFвдухуqual SFын SFвдухуqual SFын SFвдухуqualSFын SFвдухуqualSFын SFвдухуqualSFын SFвдухуqualSFын SFвдухуqualSFын SFвдухуqualSFын SFвдухуqual SFын SFвдухуqual SFын SFвдухуqualSFын SFвдухуqual SFын SFвдухуqualSFын SFвдухуqualSFын SFвдухуqualSFын SFвдухуqualSFын SFвдухуqualSFын SFвдухуqualSFын SFвдухуqual SFын SFвдухуqual SFын SFвдухуqual SFын SFвдухуqual SFын SFвдухуqualSFын SFвдухуqualSFын SFвдухуqualSFын SFвдухуqualSFын SFвдухуqualSFын SFвдухуqual SFын SFвдухуqualSFын SFвдухуqualSFын SFвдухуqualSFын SFвдухуqual SFын SFвдухуqualSFын SFвдухуqualSFын SFвдухуqualSFын SFвдухуqualSFын SFвдухуqualSFын SFвдухуqual SFын SFвдухуqualSFын SFвдухуqualSFын SFвдухуqual SFын SFвдухуqual SFын SFвдухуqualSFын SFвдухуqualSFын SFвдухуqualSFын SFвдухуqualSFын SFвдухуqualSFын SFвдухуqual SFын SFвдухуqualSFын SFвдухуqual SFын SFвдухуqualSFын SFвдухуqual SFын SFвдухуqualSFын SFвдухуqualSFын SFвдухуqualSFын SFвдухуqualSFын SFвдухуqualSFын SFвдухуqual SFын SFвдухуqualSFын SFвдухуqual SFын SFвдухуqual SFын SFвдухуqual SFын SFвдухуqualSFын SFвдухуqualSFын SFвдухуqualSFын SFвдухуqualSFын SFвдухуqualSFын SFвдухуqual SFын SFвдухуqual SFын SFвдухуqualSFын SFвдухуqualSFын SFвдухуqual SFын SFвдухуqualSFын SFвдухуqualSFын SFвдухуqualSFын SFвдухуqualSFын SFвдухуqualSFын SFвдухуqual SFын SFвдухуqual SFын SFвдухуqualSFын SFвдухуqual SFын SFвдухуqual SFын SFвдухуqualSFын SFвдухуqualSFын SFвдухуqualSFын SFвдухуqualSFын SFвдухуqualSFын SFвдухуqual SFын SFвдухуqual SFын SFвдухуqual SFын SFвдухуqualSFын SFвдухуqual SFын SFвдухуqualSFын SFвдухуqualSFын SFвдухуqualSFын SFвдухуqualSFын SFвдухуqualSFын SFвдухуqual SFын SFвдухуqual SFын SFвдухуqual SFын SFвдухуqual SFын SFвдухуqual SFын SFвдухуqualSFын SFвдухуqualSFын SFвдухуqualSFын SFвдухуqualSFын SFвдухуqual SFын SFвдухуqualSFын SFвдухуqualSFын SFвдухуqualSFын SFвдухуqualSFын SFвдухуqual SFын SFвдухуqualSFын SFвдухуqualSFын SFвдухуqualSFын SFвдухуqual SFын SFвдухуqual SFын SFвдухуqualSFын SFвдухуqualSFын SFвдухуqualSFын SFвдухуqualSFын SFвдухуqual SFын SFвдухуqualSFын SFвдухуqualSFын SFвдухуqual SFын SFвдухуqualSFын SFвдухуqual SFын SFвдухуqualSFын SFвдухуqualSFын SFвдухуqualSFын SFвдухуqualSFын SFвдухуqual SFын SFвдухуqualSFын SFвдухуqualSFын SFвдухуqual SFын SFвдухуqual SFын SFвдухуqual SFын SFвдухуqualSFын SFвдухуqualSFын SFвдухуqualSFын SFвдухуqualSFын SFвдухуqual SFын SFвдухуqualSFын SFвдухуqual SFын SFвдухуqualSFын SFвдухуqualSFын SFвдухуqual SFын SFвдухуqualSFын SFвдухуqualSFын SFвдухуqualSFын SFвдухуqualSFын SFвдухуqual SFын SFвдухуqualSFын SFвдухуqual SFын SFвдухуqualSFын SFвдухуqual SFын SFвдухуqual SFын SFвдухуqualSFын SFвдухуqualSFын SFвдухуqualSFын SFвдухуqualSFын SFвдухуqual SFын SFвдухуqualSFын SFвдухуqual SFын SFвдухуqual SFын SFвдухуqualSFын SFвдухуqual SFын SFвдухуqualSFын SFвдухуqualSFын SFвдухуqualSFын SFвдухуqualSFын SFвдухуqual SFын SFвдухуqualSFын SFвдухуqual SFын SFвдухуqual SFын SFвдухуqual SFын SFвдухуqual SFын SFвдухуqualSFын SFвдухуqualSFын SFвдухуqualSFын SFвдухуqualSFын SFвдухуqual SFын SFвдухуqual SFын SFвдухуqualSFын SFвдухуqualSFын SFвдухуqualSFын SFвдухуqual SFын SFвдухуqualSFын SFвдухуqualSFын SFв徳 STSSTSSTSSTSSTSSTSSTSSTSSTSSTSSTSSTSSTSSTSSTSSTSSTSSTSSTSSTSSTSSTSSTSSTSSTSSTSSTSSTSSTSSTSSTSSTSSTSSTSSTSSTSSTSSTSSTSSTSSTSSTSSTSSTSSTSSTSSTSSTSSTSSTSSTS STSSTSSTSSTSSTSSTSSTSSTSSTSSTSSTSSTSSTSSTSSTSSTSSTSSTSSTSSTSSTSSTSSTSSTSSTSSTSSTSSTSSTSSTSSTSSTSSTSSTSSTSSTSSTSSTSSTSSTSSTSSTSSTSSTSSTSSTSSTSSTSSTSSTSSSTSSTSSTSSTSSTSSTSSTSSTSSTSSTSSTSSTSSTSSTSSTSSTSSTSSTSSTSSTSSTSSTSSTSSTSSTSSTSSTSSTSSTSSTSSTSSTSSTSSTSSTSSTSSTSSTSSTSSTSSTSSTSSTSSTSSTSSTSSTSSTSSTSSTSSTSSSTSSSTSSSTSSSTSSSTSSSTSSSTSSSTSSSTSSSTSSSTSSSTSSSTSSSTSSSTSSSTSSSTSSSTSSSTSSSTSSSTSSSTSSSTSSSTSSSTSSSTSSSTSSSTSSSTSSSTSSSTSSSTSSSTSSSTSSSTSSSTSSSTSSSTSSSTSSSTSSSTSSSTSSSTSSSTSSSTSSSTSSSTSSSTSSSTSSSTSS STSSSTSSSTSSSTSSSTSSSTSSSTSSSTSSSTSSSTSSSTSSSTSSSTSSSTSSSTSSSTSSSTSSSTSSSTSSSTSSSTSSSTSSSTSSSTSSSTSSSTSSSTSSSTSSSTSSSTSSSTSSSTSSSTSSSTSSSTSSSTSSSTSSSTSSSTSSSTSSSTSSSTSSSTSSSTSSSTSSSTSSSTSSSTSSSTSSSTSS-STSSSTSSSTSSSTSSSTSSSTSSSTSSSTSSSTSSSTSSSTSSSTSSSTSSSTSSSTSSSTSSSTSSSTSSSTSSSTSSSTSSSTSSSTSSSTSSSTSSSTSSSTSSSTSSSTSSSTSSSTSSSTSSSTSSSTSSSTSSSTSSSTSSSTSSSTSSSTSSSTSSSTSSSTSSSTSSSTSSSTSSSTSSSTSSSTSSSTSS(STS) | |
IMPORTANT INFORMATION
Spare parts and consumables for Hoover appliances
When replacing parts, use only original spare parts and consumables from Hoover. They can be purchased from your local Hoover dealer or from the official online store shop.hoover.ru (except spare parts). When ordering spare parts, be sure to indicate the model number of the vacuum cleaner.
QUALITY
Hoover products have undergone independent assessment for compliance with quality requirements for manufactured products. Our products are manufactured using a quality system that meets the requirements of ISO 9001.
WARRANTY TERMS
The warranty terms for this household electrical appliance are determined by our representative in the country where the appliance is sold. You can obtain detailed information about these terms from the seller or the warranty certificate for this product. In the event of situations covered by the manufacturer's warranty obligations, you must contact an authorized service organization and present the sales receipt or other document confirming the date of purchase within the warranty period stipulated by the warranty terms for this appliance.
All information presented in the instructions regarding configuration, technical characteristics, functions, color combinations, etc. is for informational purposes and under no circumstances constitutes a public offer. The manufacturer does not establish the terms and conditions of purchase; they must comply with the requirements of regional and/or national legislation of the countries where the goods are sold.
SAFETY INSTRUCTIONS
This appliance is intended for household use only, as described in this instruction manual. Make sure you understand this manual before using the appliance and keep it for future reference.
Before cleaning or maintenance, you must unplug the appliance and disconnect it from the power supply.
This appliance can be used by children aged 8 years and above and by persons with reduced physical, sensory or mental capabilities or lack of experience and knowledge if they have been given supervision or instruction concerning use of the appliance in a safe way and understand the hazards involved. Children shall not play with the appliance. Cleaning and user maintenance shall not be made by children without supervision.
Many devices use the same password by default.
If the default password is not changed, the device may continue to be used.
Store and use the product in a dry, clean, and well-ventilated area, so that it is protected from moisture.
Keep the product dry.
- INSTRUCTIONS FOR SAFE USE
- THE ENVIRONMENT
- MULTI SENSOR MONITORING SYSTEM
- CARBON MONOXIDE CONCENTRATION MONITORING AND ALARM
- PREPARING YOUR H-PURIFIER
- FILTER ASSEMBLY [FIG. 1]
- INSTALL THE DIFFUSER BOTTLE [FIG. 2]
- USING YOUR H-PURIFIER
- PLUG IN THE PRODUCT [FIG. 3]
- SWITCHING ON THE PRODUCT [FIG. 4]
- THE FOLLOWING FUNCTIONS ARE AVAILABLE VIA THE DISPLAY BUTTONS
- PAIRING TO WI-FI
- INSTRUCTIONS
- INFORMATION FUNCTION [FIG. 7]
- MODE FUNCTIONS
- AUTO MODE [FIG. 8]
- MAX MODE: [FIG. 9]
- SLEEP MODE: [FIG. 10]
- POLLEN ALLERGY MODE: [FIG. 11]
- LIGHT CONTROL FUNCTION: [FIG. 12]
- CHILD LOCK FUNCTION: [FIG. 13]
- DIFFUSER FUNCTION: [FIG. 14]
- MAINTAINING YOUR H-PURIFIER
- FILTER CLEANING / REPLACEMENT
- CLEANING / REPLACING THE FILTER: [FIG. 15]
- DIFFUSER MAINTENANCE
- DIFFUSER BOTTLE REPLACEMENT: [FIG. 16]
- STORAGE OF YOUR H-PURIFIER
- ALERTS & SOLUTIONS
- TROUBLESHOOTING
- IMPORTANT INFORMATION
- HOOVER SPARES AND CONSUMABLES
- QUALITY
- YOUR GUARANTEE
- SAFETY INSTRUCTIONS FOR USE
- H-PURIFIER MAINTENANCE
- FILTER CLEANING/REPLACEMENT
- CLEANING/REPLACING THE FILTER: [FIG.15]
- MAINTENANCE OF THE DIFFUSER
- ENVIRONMENT
- TURNING ON THE DEVICE [FIG.4]
- THE BUTTONS ON THE DISPLAY ALLOW YOU TO CONTROL THE FOLLOWING FUNCTIONS
- CONNECTING TO WI-FI
- OPERATING MODES
- ABTOMATUHECKN PEXKIM [PNC.8]
- MAKCUMAJBHBIPEXKIM:[PNC.9]
- PEXKM CHA:[PNC.10]
- PEXKIM ANLEPRM HA NBLBUY: [PWC.11]
- BACKLIGHT CONTROL FUNCTION: [FIG. 12]
- OPERATION OF THE DEVICE: [FIG. 14]
- SPARE PARTS AND CONSUMABLES FOR HOOVER APPLIANCES
- WARRANTY TERMS
- SAFETY INSTRUCTIONS
Brand : HOOVER
Model : HPURIFIER 500
Category : Air purifier