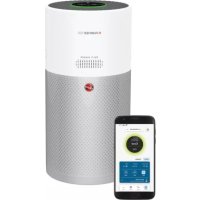
HPURIFIER 300 HHP30C001 - Air purifier HOOVER - Free user manual and instructions
Find the device manual for free HPURIFIER 300 HHP30C001 HOOVER in PDF.

User questions about HPURIFIER 300 HHP30C001 HOOVER
0 question about this device. Answer the ones you know or ask your own.
Ask a new question about this device
Download the instructions for your Air purifier in PDF format for free! Find your manual HPURIFIER 300 HHP30C001 - HOOVER and take your electronic device back in hand. On this page are published all the documents necessary for the use of your device. HPURIFIER 300 HHP30C001 by HOOVER.
USER MANUAL HPURIFIER 300 HHP30C001 HOOVER
MANUEL D'UTILISATION (FR)......12
MANUAL DE INSTRUÇÕES (PT) ..... 52
MANUAL DE USUARIO (ES) 62
BRUGERVEJLEDNING (DK) 72
BRUKERMANUAL (NO)......82
INSTRUKTIONSMANUAL (SE)......92
KAYTTOOHJE (FI) 102
natural_image
White and gray multi-sensor air purifier device with 'MULTI SENSOR' branding (no visible text beyond label)INSTRUCTIONS FOR SAFE USE
This appliance should only be used for private household use, as described in this user guide. Please ensure that this guide is fully understood before operating the appliance and keep for future reference.
Always switch off and remove the plug from the socket after use, or before cleaning the appliance or any maintenance task.
This appliance can be used by children aged from 8 years and above and persons with reduced physical, sensory or mental capabilities or lack of experience and knowledge if they have been given supervision or instruction concerning use of the appliance in a safe way and understand the hazards involved. Children shall not play with the appliance.
Cleaning and user maintenance shall not be made by children without supervision.
If the power cord is damaged stop using the appliance immediately. To avoid a safety hazard, an authorised HOOVER service engineer must replace the power cord.
Use only attachments, consumables or spares recommended or supplied by HOOVER.
Do not remove the plug by pulling on the power cord.
Do not continue to use your appliance if it appears faulty.
Place and use the product only on a dry, stable, level horizontal surface, so that tipping over is excluded.
Keep the product dry.
Never tilt or empty the product during operation.
Lay the supply cord so nobody will step on or trip over it.
Do not place the product on hot surfaces, near hot surfaces, near an open fire or in direct sunlight.
Do not let water or any other liquid or flammable detergent enter the appliance to avoid electric shock and/or a fire hazard.
Do not clean the appliance with water, any other liquid, or a (flammable) detergent to avoid electric shock and/or a fire hazard.
Do not spray any flammable materials such as insecticides or fragrance around the appliance.
Check if the voltage and ratings indicated on the label of the appliance corresponds to the local power voltage before you connect the appliance.
Do not block the air inlet or air outlet.
This appliance is not a substitute for proper ventilation, regular vacuum cleaning, or use of an extractor hood or fan while cooking.
Do not place anything on top of the appliance.
Do not place the appliance directly below an air conditioner to prevent condensation from dripping onto the appliance.
Make sure all filters are properly installed before you switch on the appliance.
Only use the original HOOVER filters specially intended for this appliance. Do not use any other filters.
Avoid knocking against the appliance (the air inlet and outlet in particular) with hard objects.
Do not insert your fingers or objects into the air outlet or the air inlet to prevent physical injury or malfunctioning of the appliance.
Do not use this appliance when you have used indoor smoke-type insect repellents or in places with oily residues, burning incense, or chemical fumes.
Do not use the appliance near gas appliances, heating devices or fireplaces.
Do not use the appliance in a room with major temperature changes.
To prevent interference, place the appliance at least 2m away from electrical appliances that use airborne radio waves such as TVs, radios, and radio-controlled clocks.
When the appliance is not used for a long time, bacteria may grow on the filters. Check the filters after a long period of disuse. If the filters are very dirty, replace them.
Do not use the appliance in wet surroundings or in surroundings with high ambient temperatures, such as the bathroom, toilet, or kitchen.
The appliance does not remove carbon monoxide (CO) or radon (Rn). It cannot be used as safety device in case of accidents with combustion processes and hazardous chemicals.
The CO Monitor function is not to be used as, nor implied to be used as a substitute for an EN 50291-1 UL-2034, CSA-6.19 or any other recognized standard certified carbon monoxide alarm where Local or Regional Codes or legislation mandate their use. The CO Monitor function is a supplemental carbon monoxide monitoring device only. Use of this device is at the user's discretion and implies the understanding and acceptance of its limitations to adhere to codes or legislation where applicable.
Do not place the appliance in any of the following locations:
- In a bathroom or other areas where the Alarm may be exposed to water splashes, dripping or condensation (e.g. above an electric kettle).
- Next to or directly above heaters or air conditioning vents, doors, windows, extractor fans or anywhere that it would be affected by draughts.
- Directly above a sink or cooker.
- In an area where the temperature could drop below -20^ or rise above 50^ .
- In an enclosed space (e.g. in or below a cupboard).
• In a damp or humid area. - Where it would be obstructed, e.g. by curtains or furniture.
- Where dirt or dust could block the sensor.
- Near paint, thinners, solvent fumes or air fresheners.
If CO alarm is activated, you should open all windows and doors (if safe to do so). Turn off all fuel burning appliances if possible and then evacuate the property leaving the windows and doors open. Get immediate medical help for anyone suffering the effects of carbon monoxide poisoning. Do not re-enter the property until the alarm stops. The alarm will stop once the CO has cleared. Do not use fuel burning appliances again until the CO source has been located and rectified by a qualified technician.
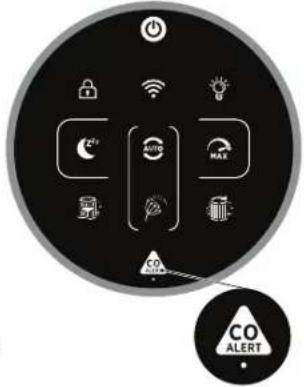
To activate the CO monitor, connect the plug to a socket outlet. The CO Sensor Condition Lamp will display green. When the CO monitor detects unsafe level of CO, the CO alarm will ring loudly and the CO Alert button and O ring lamp will blink in red colour. The alarm will continue to indicate until the detected CO reduces to a safe level.
Avoid using paint, thinners, solvent fumes, air fresheners, aerosol sprays or chemical cleaners near the appliance. This may affect functioning of CO monitor.
Do not allow small children to press the CO Alert button for 3 seconds as they could be subject to excessive noise when the alarm rings.
Touch [CO Alert] button for 3 seconds to test the CO Alarm function and the alarm will ring loudly for 5 seconds. Test the alarm monthly and after prolonged absence from the building (Eg Holidays). If the alarm fails to ring after touching the [CO Alert] button for 3 seconds, please contact the Hoover customer care centre to arrange a qualified technician to repair the fault. If the display indicates that the CO sensor is faulty or end of life has been reached, please contact the Hoover customer care centre to arrange a qualified technician to replace the CO sensor. The expected lifetime of the CO sensor is 5 years and must be replaced after this time.
Operating Humidity: 15 – 90% RH
Operating Temperature: 0°C to +40°C
When the detected level of CO reaches a high level, the [CO Alert] button and the [Air Quality LED Ring] blink in red color (2Hz), at the same time, alarm rings loudly (85\~110dB(A)) and continuously, the alarm will not stop until the intensity of CO falls back from the alarm level.
Carbon Monoxide affects the body by starving (suffocating) critical organs of oxygen.
When CO is inhaled it attaches to the hemoglobin in the blood that normally carries oxygen throughout the body. CO permanently displaces the ability for oxygen molecules to attach to the hemoglobin, thus reducing oxygen to vital organs. The concentration level and time exposed to CO can vary its effects on the body, but experts agree even low levels of carbon monoxide exposure over prolonged periods can have serious and lasting affects to anyone's overall health.
WARNING: THE CO ALARM IS DESIGNED TO PROTECT INDIVIDUALS FROM THE ACUTE EFFECTS OF CARBON MONOXIDE EXPOSURE OR PREVENT THE CHRONIC EFFECTS OF CARBON MONOXIDE EXPOSURE. IT WILL NOT FULLY SAFEGUARD INDIVIDUALS WITH SPECIFIC MEDICAL CONDITIONS. IF IN DOUBT CONSULT A MEDICAL PRACTITIONER.
This appliance should not be used as a substitute for proper installation, use and maintenance of fuel burning appliances including appropriate ventilation and exhaust systems.
The CO monitor mobile and tablet notifications require a functional Wi-Fi connection to operate. They are not a substitute for a third-party emergency monitoring service.
HOOVER service: To ensure the continued safe and efficient operation of this appliance we recommend that any servicing or repairs are only carried out by an authorised HOOVER service engineer.
The Environment
This appliance is marked according to the European directive 2011/65/EC on Waste Electrical and Electronic Equipment (WEEE). By ensuring this product is disposed of correctly, you will help prevent potential negative consequences for the environment and human health, which could otherwise be caused by inappropriate waste handling of this product.
The symbol on this appliance indicates that this appliance may not be treated as household waste. Instead it must be handed over to the applicable collection point for the recycling of electrical and electronic equipment. Disposal must be carried out in accordance with local environmental regulations for waste disposal. For more detailed information about treatment, recovery and recycling of this appliance, please contact your local city office, your household and waste disposal service or the shop where you purchased the appliance.

| Frequency bands 2400Mhz ~2483.5Mhz | |
| Maximum RF power transmitted in the frequency band 18.9 dBm | |


This appliance complies with the European Directives 2014/53/EU and 2011/65/EU. To receive a copy of the declaration of conformity, please contact the manufacturer at: www.candy-group.com
CANDY HOOVER GROUP S.r.l. Via Privata Eden Fumagalli, 20861 Brugherio (MB) Italy
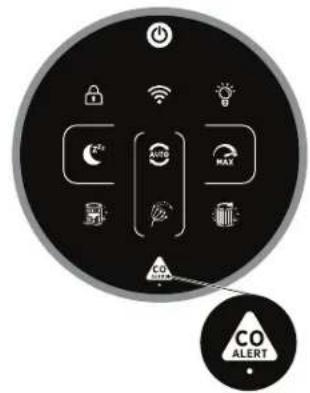
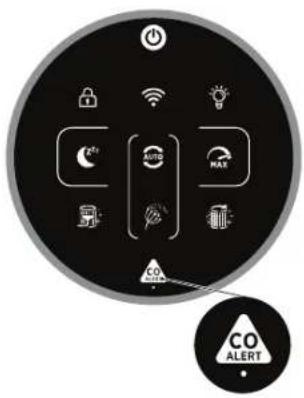
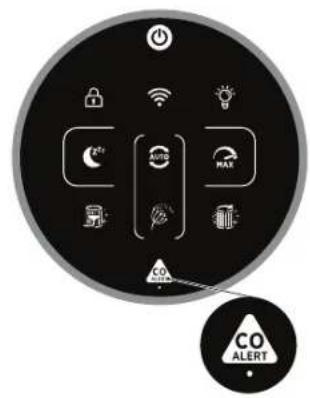
GETTING TO KNOW YOUR H-PURIFIER
GB
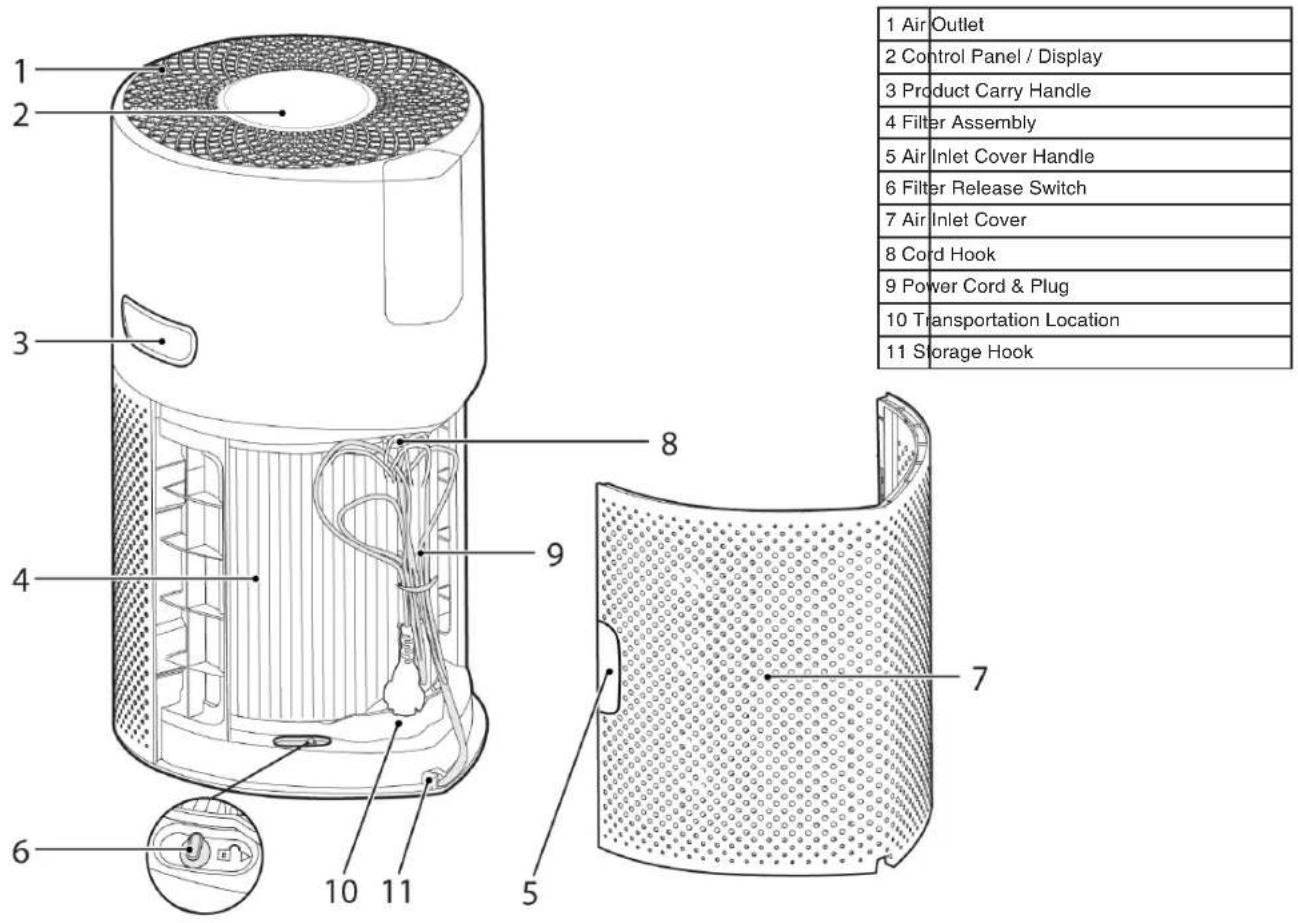
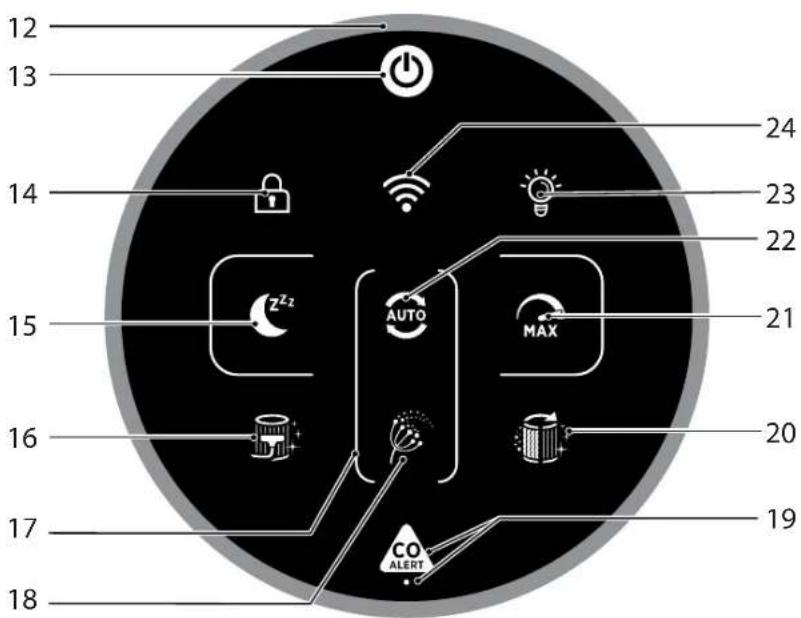
| 12 Air Quality LED Ring | |
| 13 Power Button | |
| 14 Child Lock Button | |
| 15 Sleep Mode Button | |
| 16 Filter Cleaning Button | |
| 17 Pollen Allergy Circle Lamp | |
| 18 Pollen Allergy Lamp | |
| 19 | CO Alert Button & LED |
| 20 Filter Replacement Button | |
| 21 Max Mode Button | |
| 22 Auto Mode Button | |
| 23 Light Control Button | |
| 24 Wi-Fi Button | |
Multi Sensor Monitoring System
Thanks to the Multi Sensor Monitoring System your product will continuously monitor the indoor air condition in terms of PM10, PM2.5, Volatile Organic Compounds (GAS), and Carbon Monoxide concentration (CO).
Each time you switch your product on, the Multi Sensor Monitoring system will start analyzing the indoor air and the Air Quality LED Ring will illuminate with different colors representing real time air quality conditions.
| Air Quality LED Ring Colour | Indoor Air Quality |
| GREEN EXCELLENT | |
| YELLOW SATISFACTORY | |
| ORANGE POOR | |
| RED VERY POOR |
Carbon Monoxide Concentration Monitoring and Alarm
The H-Purifier will constantly monitor the indoor air for Carbon Monoxide (CO). The product is equipped with an alert system.
When the Carbon Monoxide alarm is activated, the AIR Quality LED Ring, Infomation & CO Alert button will flash red simultaneously and an audible alarm will sound. The alarm will remain in operation until the Carbon Monoxide (CO) concentration has reduced to below 50 ppm unless silenced manually by pressing the CO Alert button for 3 seconds.
This CO Alert LED shows the working condition of the CO sensor. It appears in green color when the CO sensor is in normal condition, in yellow color when the sensor is malfunctioning or exceeds its working life.
You can test if the alarm is working properly by pressing the CO Alert Button for 3 seconds, and a loud buzzer sound will last for 5 seconds if the alarm works properly.
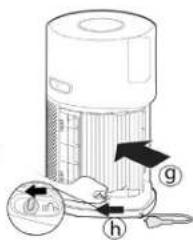
PREPARING YOUR H-PURIFIER
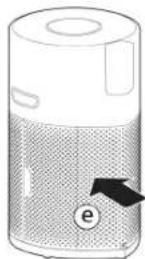
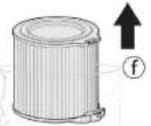
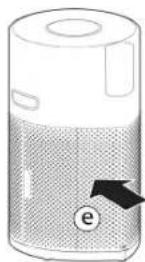
1. Filter Assembly [Fig. 1]
Before using your H-Purifier product you will need to remove the filter from it's protective packaging:
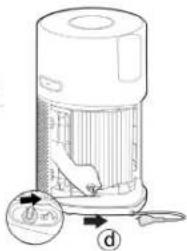
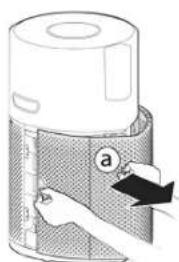
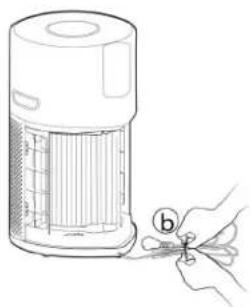
- Remove the Air Inlet Cover from your product, grip the two Air inlet cover handles and pull from the product. [Fig. 1a]
- Remove the plug from the transport location and release the cord from the Storage Hook. [Fig. 1b,c]
- Unlock the Filter release switch. [Fig. 1d]
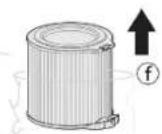
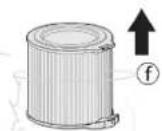
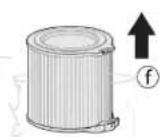
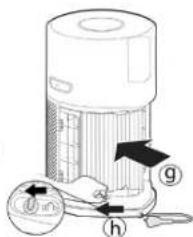
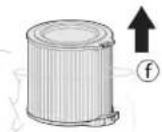
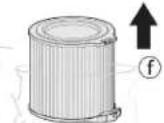
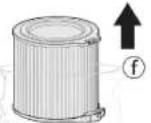
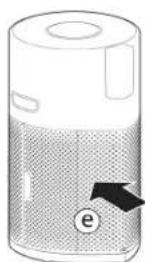
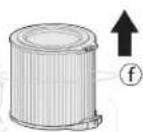
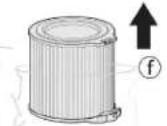
- Remove the filter from your product and remove the outer packaging. [Fig. 1e,f]
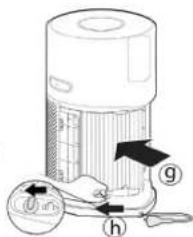
• Refit the filter into your product. [Fig. 1g] - Lock the filter release switch. [Fig. 1h]
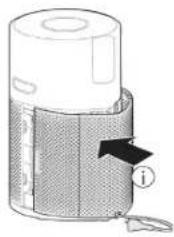
- Refit the Air Inlet Cover to your product. [Fig. 1i]
![HOOVER HPURIFIER 300 HHP30C001 - Filter Assembly [Fig. 1] - 1](/content/2026/03/506336/images/58da07fff1fb4c3a61d7a9ae8b453ba83d9461a7d15d457acae2c5eaab4ea720.jpg)
![HOOVER HPURIFIER 300 HHP30C001 - Filter Assembly [Fig. 1] - 2](/content/2026/03/506336/images/763935bced55c425d0717501186b2486d0730fe8c722704ab16e244e0f7b70d5.jpg)
![HOOVER HPURIFIER 300 HHP30C001 - Filter Assembly [Fig. 1] - 4](/content/2026/03/506336/images/acba375a9ffbaa2c9c42aa4060440cd14bf339d9253bd18b5ee5391b10a0c296.jpg)
![HOOVER HPURIFIER 300 HHP30C001 - Filter Assembly [Fig. 1] - 5](/content/2026/03/506336/images/3ad7ae4ab964fcd186b7901ba4fca4f4058cfffe3ff9fa0cd84cea917f5eb31b.jpg)

![HOOVER HPURIFIER 300 HHP30C001 - Filter Assembly [Fig. 1] - 7](/content/2026/03/506336/images/f652cea0efc07bd868d08fe7ace4e83db15ce8c7d6ba5f9ea018d9edc8e483fe.jpg)
natural_image
Diagram of a device with a labeled component (i) and directional arrow, no readable text or symbols present.Fig. 1
USING YOUR H-PURIFIER
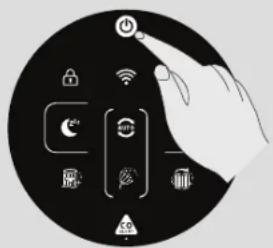
Plug in the Product [Fig. 2]:
Pull out the power cord and plug into a power supply.
All lights on the Control Panel / Display will fully illuminate for approximately 1 second to indicate a successful plug in.
The POWER button will be dimly lit and the CO sensor light will be ON to indicate that the Multi Sensor Monitoring System has started working to monitor the indoor Carbon Monoxide level.
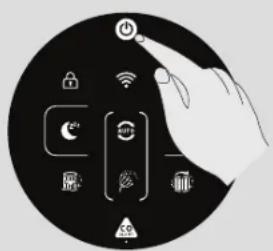
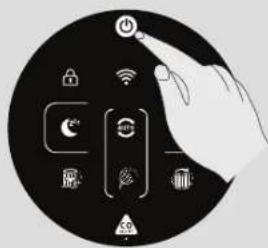
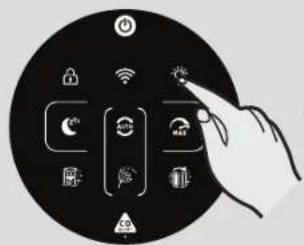
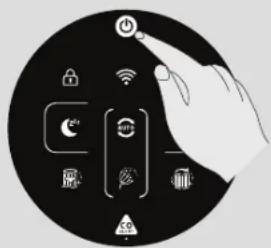
Switching on the Product [Fig. 3]:
To switch on your product, press the POWER button on the display.
The Air Quality LED Ring will illuminate through all colours in sequence whilst the sensors are analysing the realtime air condition. After a few seconds, the Air Quality LED ring will select the appropriate colour for the air quality at that time.
Your H-Purifier product will immediately enter AUTO MODE and begin to purify the indoor air.
The AUTO MODE button, LIGHT CONTROL button and on the Display will illuminate.
The following functions are available via the Display buttons:
Press the Wi-Fi button to turn on/off remote access.
Press the AUTO, MAX or SLEEP buttons to select a purifying mode.
Press the LIGHT CONTROL button to set the brightness of the display lights.
Press the CHILD LOCK button to inactivate all the buttons on the Control Panel/Display.
Press the POWER button to switch off the air purifier.
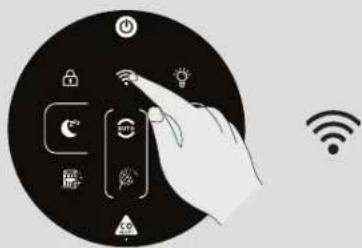
Pairing to Wi-Fi:
In order to access all the H-Purifiers functions from anywhere, it is suggested to download the hOn App. You will be able to control your product in the most efficient way.
Instructions:
- Download the hOn application from the App Store or Google Play. [Fig. 4]
- Open the APP, create an account with your e-mail and a password.
- Confirm login.
- Ensure your mobile device is connected to Wi-Fi.
- Log into the hOn app.
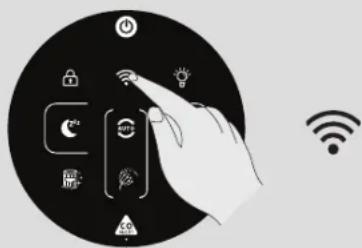
- Press and hold the Wi-Fi button on the display for 5 seconds, there will an audible beep and the Wi-Fi button will start flashing to indicate it is waiting for a connection. [Fig. 5]
- Follow the in app instructions to connect your mobile device to your product.
- When successfully paired, the Wi-Fi button on the product will remain illuminated.
- To reset the Wi-Fi, press & hold the Wi-Fi button for 5 Secs.
Wireless Parameters for Pairing
| Technology Wi-Fi | Bluetooth | |
| Standard IEE 802. | 11 b/g/n Bluetooth v4.2, BR/EDR, BLE | |
| Frequency Band(s) (MHz) | 2401 ~ 2483 2402 ~ 2480 | |
| Maximum Power (mW) | 100 10 | |
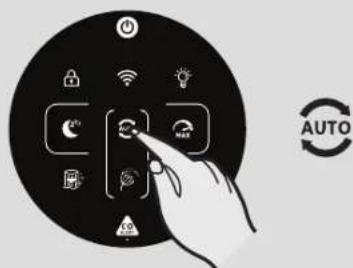
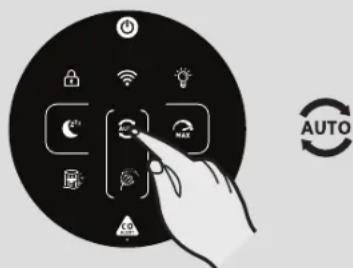
MODE Functions:
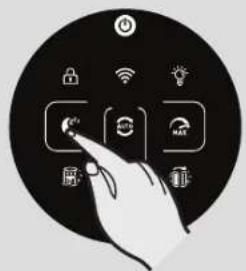
There are 3 available air purifying modes via the display: AUTO MODE, MAX MODE & SLEEP MODE Auto mode is the default setting for your product when switched on, all modes can be selected manually by pressing the related button on the display.
POLLEN ALLERGY mode can be activated via the hOn APP.
AUTO MODE [Fig. 6]:
This is the default mode of your H-Purifier product when first switched on. In Auto Mode, the H-Purifier automatically adjust its fan speed to the actual indoor air quality level to always guarantee an optimal air purification.
This is the recommended setting for your product.
In AUTO mode, after 30 minutes of excellent air quality, your product will enter an ECO mode by pausing the purifying function, the Multi Sensor Monitoring System will continue to analyse the indoor air and automatically switch on the purifying function when required.
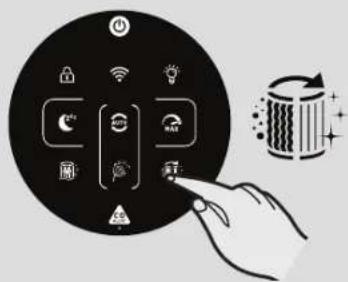
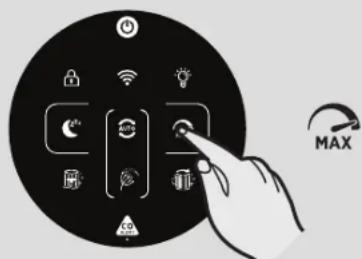
MAX MODE [Fig. 7]:
Press the MAX mode button on the display to activate air purifying at maximum power setting. To exit MAX mode simply select AUTO mode or SLEEP mode.
![HOOVER HPURIFIER 300 HHP30C001 - MAX MODE [Fig. 7]: - 1](/content/2026/03/506336/images/02a61a69aba9bc93b7d0ac9d0e64bd2c9de932bf6c9c8a5dcb9ae20243b39ed7.jpg)
natural_image
Illustration of a large cylindrical device emitting power lines with a hand inserting a plug into it (no text or symbols)Fig. 2
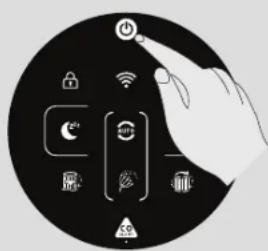
Fig. 3
![HOOVER HPURIFIER 300 HHP30C001 - MAX MODE [Fig. 7]: - 3](/content/2026/03/506336/images/13d668813cec94dbbfdf7a1592aa41a7c21daa7d7543034b4802a9dc8dc2d97e.jpg)
![HOOVER HPURIFIER 300 HHP30C001 - MAX MODE [Fig. 7]: - 4](/content/2026/03/506336/images/8bce19a79f47971f16fdf6bd471ac2abea5c073afa02901f611fac28e740d1c7.jpg)
Download on the App Store
![HOOVER HPURIFIER 300 HHP30C001 - MAX MODE [Fig. 7]: - 5](/content/2026/03/506336/images/a221918b63f3df178fb33a90f3caa22121d301d1c895a005c167019eb4a2f00c.jpg)
GOOGLE PLAY
Fig. 4
![HOOVER HPURIFIER 300 HHP30C001 - MAX MODE [Fig. 7]: - 6](/content/2026/03/506336/images/7f0422f3468a3ae6f60d288aa6a47f408074b347596c9882474c5baff3ff0b1a.jpg)
natural_image
Hand interacting with a circular device displaying smart icons (no text or symbols)Fig. 5

Fig. 6
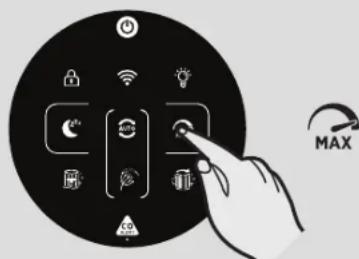
Fig. 7
GB


Fig. 8


Fig. 9


Fig. 10

natural_image
Circular icon depicting a hand interacting with smart devices including wireless, Wi-Fi, and smart lock symbols (no text or labels)
Fig. 11


Fig. 12

Fig. 13
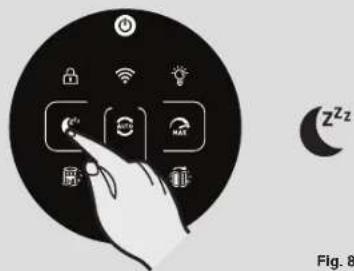
SLEEP MODE [Fig. 8]:
Press the SLEEP mode button to activate air purifying at the lowest silent power setting. The SLEEP mode button will be dimly lit and all other display lights will be off. This can be modified by pressing the LIGHT CONTROL button.
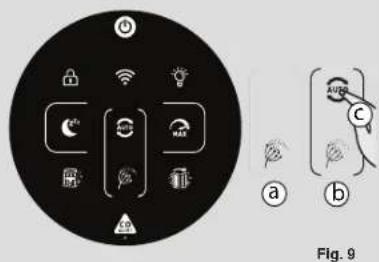
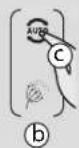
POLLEN ALLERGY MODE [Fig. 9]:
The Pollen Allergy mode can only be activated via the hOn APP. You will first be required to activate and register a profile in the app, in order to create your Pollen Allergy Profile.
The Pollen Allergy mode works only when AUTO MODE is selected. [Fig. 9c]
In Pollen Allergy mode, the appliance continuously receives real time data from the App about the monitored pollen concentration outdoor, and works automatically to maximize pollen capturing performance.
Once pollens are captured, they are inactivated to help alleviate allergic symptoms.
When Pollen Allergy mode is activated in the App, there are 2 possible notification lamps on the product display:
- The Pollen Allergy Lamp is WHITE [Fig. 9a]: The appliance and the App are monitoring the presence of pollens outdoor and there is no risk.
- The Pollen Allergy Lamp turns YELLOW [Fig. 9b] and the Pollen Allergy Circle lamp is WHITE [Fig. 9a]: The appliance and the APP have detected risk.
If the product is manually put into SLEEP mode or MAX mode whilst Pollen Allergy mode is activated, the Pollen Allergy mode will stop.
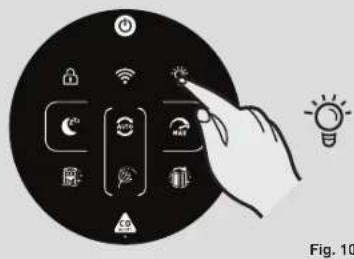
LIGHT CONTROL Function [Fig. 10]:
There are 3 settings available for the display lighting, On, Dim & Off.
To adjust the brightness of the display lighting simply press the LIGHT CONTROL button on the display to cycle through the 3 available options. ON is the default setting.
If OFF is selected, any other button will need to be pressed twice to activate, after one press, the lights will become DIM, on second press the action will be activated.
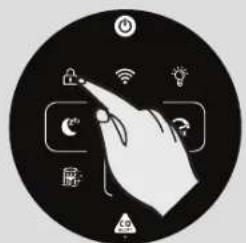
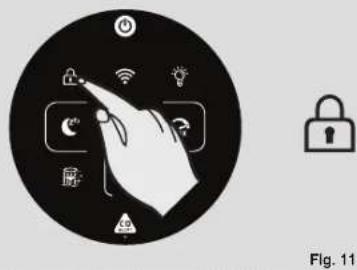
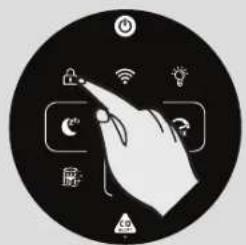
CHILD LOCK Function [Fig. 11]:
Press and hold the CHILD LOCK button for 3 seconds to activate, an audible sound will be heard when it has been activated and the CHILD LOCK button will remain illuminated. No other buttons will work when activated.
To exit, simply press and hold the CHILD LOCK button for 3 seconds, an audible sound will be heard confirm it is off and the button will no longer be illuminated.
FILTER CLEANING ALERT Function [Fig. 12]:
Your H-Purifier monitors the condition of your filter. When the FILTER CLEANING button turns yellow, you need to clean the outer layer of the filter. You can use a vacuum cleaner to clean the outer layer of the filter. See 'Maintaining your H-Purifier' section.
After cleaning the outer layer of the filter, press and hold the FILTER CLEANING button for 3 seconds to reset the alert.
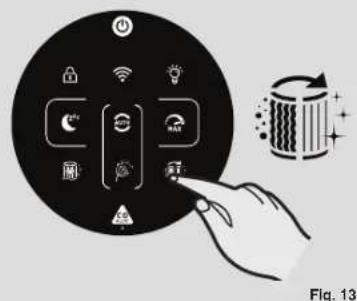
FILTER REPLACEMENT ALERT Function [Fig. 13]:
Your H-Purifier monitors the usage of your products and its filter. When the FILTER CLEANING button turns yellow, you need to replace the filter. See 'Maintaining your H-Purifier' section.
After replacing the filter, press and hold the FILTER REPLACEMENT button for 3 seconds to reset the alert.
MAINTAINING YOUR H-PURIFIER
IMPORTANT: ALWAYS UNPLUG YOUR APPLIANCE FROM THE POWER SUPPLY WHEN PERFORMING MAINTENANCE TASKS.
FILTER CLEANING / REPLACEMENT
Your H-Purifier will monitor the condition of your filter. FILTER CLEANING button or FILTER REPLACEMENT button will turn yellow indicating action is required to clean or change the filter.
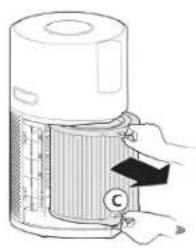
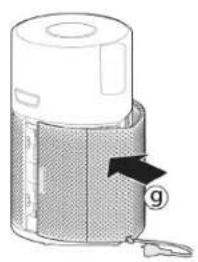
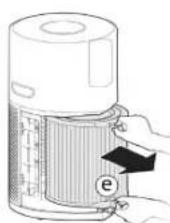
Cleaning / Replacing the Filter: [Fig. 14]
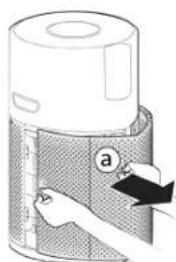
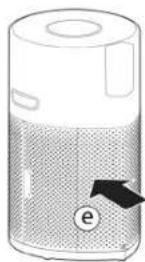
- Remove the Air Inlet Cover from your product. [Fig. 14a]
- Unlock the Filter release switch. [Fig. 14b]
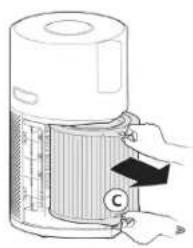
- Remove the filter from your product. [Fig. 14c]
• Use a Vacuum Cleaner to clean the external mesh on the Filter Assembly OR Replace with a NEW filter. [Fig. 14d] - Re-Fit the Filter assembly into the product. [Fig. 14e]
- Lock the filter release switch. [Fig. 14f]
• Refit the Air Inlet Cover to your product. [Fig. 14g]
• Plug in your appliance to the power supply and switch on. [Fig. 2,3] - Press and hold the FILTER CLEANING button or FILTER REPLACEMENT button for 3 secs, an audible alert will be heard to indicate a successful reset, and the button will be off. [Fig. 12,13]
![HOOVER HPURIFIER 300 HHP30C001 - Cleaning / Replacing the Filter: [Fig. 14] - 1](/content/2026/03/506336/images/8cf51b73206bdde3612be29f218809bb8c1fa40f6cf0c264de13cc00c582c616.jpg)
natural_image
Illustration of a hand inserting a component into a textured cylindrical device (no text or symbols visible)
![HOOVER HPURIFIER 300 HHP30C001 - Cleaning / Replacing the Filter: [Fig. 14] - 3](/content/2026/03/506336/images/8cd4e4694cb176839f433ae25359e73f7797672522aba38208197b37cb35af1e.jpg)
natural_image
Illustration of a hand inserting a component into a cylindrical device (no text or symbols visible)![HOOVER HPURIFIER 300 HHP30C001 - Cleaning / Replacing the Filter: [Fig. 14] - 4](/content/2026/03/506336/images/b4139f32122b111231d91b2e4e184a15a711dd07db2e65a8b0f51d2f705e0013.jpg)

![HOOVER HPURIFIER 300 HHP30C001 - Cleaning / Replacing the Filter: [Fig. 14] - 6](/content/2026/03/506336/images/f7a092c4817d6f5af643e7042cb0ae0f53609453eff685ef2d81616d6bfac175.jpg)
natural_image
Diagram of a cylindrical device with a textured base and labeled component 'g' (no text or symbols beyond label)Fig. 14
STORAGE OF YOUR H-PURIFIER
- Switch off the Air Purifier and unplug the socket.
- Clean all internal & external surfaces of the Air Purifier and the external mesh of the Filter.
- Ensure all components are dry.
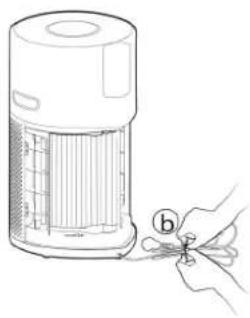
- Remove the Air Inlet Cover [Fig. 15a] and tidy up the power cord [Fig. 15b], hang the cord on to the Cord Hook [Fig. 15c], and fit the cord into the storage hook and fit the plug into the transport location [Fig. 15d]. Refit the air inlet cover. [Fig. 15e]
- Store the Air Purifier in a cool dry place.
natural_image
Illustration of a hand inserting a component into a fan-like device (no text or symbols visible)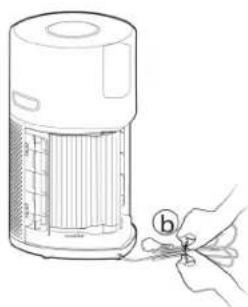
natural_image
Line drawing of a hand using scissors to cut a cylindrical object from a portable air purifier (no text or symbols)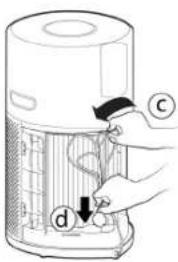

Fig. 15
ALERTS & SOLUTIONS
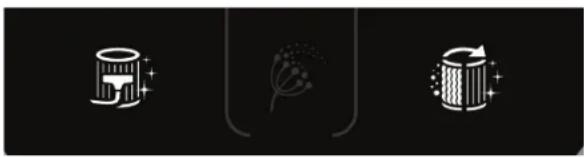
The following codes may appear during using. [Fig. 16]
natural_image
Three abstract icons on black background: cylindrical, flower, and striped (no text or symbols)Fig. 16
| Error Description | Error Description | Error Solution | |
| Alert on product Control Panel / Display | Alert on APP | ||
| Outer Layer's Filter cleaning Alert | Filter Cleaning button turns yellow | Filter cleaning Alert | 1.Follow the instructions in I/M to clean the Outer Layer's Filter.2.Reset the alert. |
| Filter replacement Alert | Filter Cleaning button turns yellow | Filter replacement Alert | 1.Follow the instructions in I/M to replace the filter.2.Reset the alert. |
| Filter not present or filter has not been locked | Filter Cleaning button and Filter Replacement button blink | Filter not present or filter has not been locked | 1.If filter is not present, put it back.2.If filter is in position, check whether the Filter Tab has been switched to LOCK status. |
| Dust sensor malfunctioning: no signal from sensor or output voltage exceeds the limit value | / | Dust sensor malfunctioning: no signal from sensor or output voltage exceeds the limit value | Dust sensor failure or dust sensor wire has not been connected well, please call service center to fix. |
| Motor no speed | / | Motor no speed feedback | Motor failure or motor wire has not been connected well, please call service center to fix. |
| CO sensor malfunctioning | CO sensor status lamp is on in yellow | CO sensor malfunctioning Alert: | need call service. |
ATTENTION: If any of these failures persist, contact your local Hoover representative. DO NOT try to disassemble the H-Purifier by yourself.
TROUBLESHOOTING
The following is a list of commonly encountered problems and solutions.
If any of these problems persist contact your local Hoover representative.
| The Fan does not work (Control Panel / Display Lights on) | Check the alert showing on the display or in the app.Check if there are any obstructions in the fan.Check if the H-Purifier is switched on.Check if the filter is incorrectly installed and locked. |
| The Fan does not work (Control Panel / Display Lights off) | The Air Purifier may be in the ECO mode due to the good air quality. See “AUTO MODE [Fig. 6]”Check if the H-Purifier is plugged in and switched on.Check if there are any obstructions in the fan. |
| No Lights on Control Panel / Display (Fan Working) | Check if the lights have not been switched off by pressing the Light Control button on the control Panel / Display. |
| Buttons on the control panel / Display do not operate | Check if Child lock has been activated by pressing and holding the Child Lock Button for 3 secs. |
| Air Flow is Weak | Check if the protective packaging has been removed from the filter.Check if there are any obstructions in the Air Intake Cover or Air outlet.Check the Filter staus on the Control Panel / Display or in App for clean or replace warning.Check if the H-Purifier is in sleep mode. The fan operates on reduced power in this mode. |
| Air Purifier is operating loudly | Check if there are any obstructions in the Air Outlet or the fan.Check if the H-Purifier is running in MAX mode, the air flow is at maximum power in this mode. |
| Air Purifier makes a loud buzzer sound all of a sudden. | The testing function of CO Alert button is activated by mis-operation. The sound will automatically stop after 5 seconds. |
IMPORTANT INFORMATION
Hoover Spares and Consumables
Always replace parts with genuine Hoover spares. These are available from your local Hoover dealer or direct from Hoover. When ordering parts always quote your model number.
Quality
Hoover's factories have been independently assessed for quality. Our products are made using a quality system which meets the requirements of ISO 9001.
Your Guarantee
The guarantee conditions for this appliance are as defined by our representative in the country in which it is sold. Details regarding these conditions can be obtained from the dealer from whom the appliance was purchased. The bill of sale or receipt must be produced when making any claim under the terms of this guarantee.
Subject to change without notice.
INSTRUCTIONS DE SÉCURITÉ D'UTILISATION
natural_image
Line drawing of a cylindrical device with internal components and a small inset showing a circular component (no text or symbols)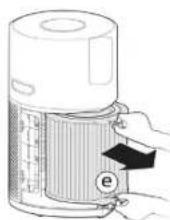


natural_image
Diagram of a device with a labeled component (i) and internal structure, no readable text or symbols present.Fig. 1
UTILISATION DE VOTRE H-PURIFIER
natural_image
Illustration of a large air purifier connected to an electrical outlet with a hand inserting a plug (no text or symbols present)Fig. 2

natural_image
Hand interacting with a circular device displaying various icons (no text or symbols)Fig. 3


Download on the App Store

GOOGLE PLAY
Fig. 4

Fig. 5

Fig. 6

Fig. 7
FR


Fig. 8


Fig. 9


Fig. 10

natural_image
Circular icon depicting a hand interacting with smart devices including wireless, Wi-Fi, and smart lock symbols (no text or labels)
Fig. 11


Fig. 12

Fig. 13
MODE SLEEP [Fig. 8]:
Press the SLEEP mode button to activate air purifying at the lowest silent power setting. The SLEEP mode button will be dimly lit and all other display lights will be off. Ceci peut être modifié en appuyant le bouton COMMANDE DE LUMIÈRE.
MODE POLLEN ALLERGY [Fig. 9]:
After cleaning the outer layer of the filter, press and hold the FILTER CLEANING button for 3 seconds to reset the alert.
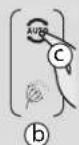
FILTER REPLACEMENT ALERT Function [Fig. 13]:
After replacing the filter, press and hold the FILTER REPLACEMENT button for 3 seconds to reset the alert.
ENTRETIEN DE VOTRE H-PURIFIER
IMPORTANT : DÉBRANCHEZ TOUJOURS VOTRE APPAREIL DE L'ALIMENTATION ÉLECTRIQUE QUAND VOUS EFFECTUEZ L'ENTRETIEN.
NETTOYAGE DU FILTRE / REMPLACEMENT
Votre H-Purifier surveillera l'état de votre filtre. NETTOYAGE DU FILTRE button or FILTER REPLACEMENT button will turn yellow indicating action is required to clean or change the filter.
natural_image
Illustration of a device with a label 'a' pointing to a textured surface, no text or symbols present.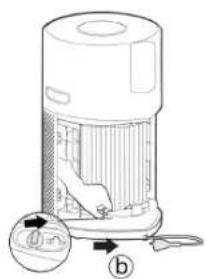
natural_image
Illustration of a hand inserting a component into a cylindrical device with a label 'C' (no text or symbols on the device itself)

natural_image
Diagram of a device with a mesh cover and labeled component 'g' (no text or symbols beyond label)Fig. 14
STOCKAGE DE VOTRE H-PURIFIER
natural_image
Illustration of a hand inserting a component into a mesh chamber, labeled 'a' (no text or symbols on the diagram itself)
natural_image
Line drawing of a hand holding scissors next to a device with a ruler and grid (no text or symbols)

Fig. 15
natural_image
Three abstract icons on black background: a stylized hat with sparkles, a rose with floral motif, and a circular arrow with sparkles (no text or symbols)Fig. 16


natural_image
Diagram of a cylindrical device with a mesh casing and a black arrow pointing to a labeled component (no text or symbols present)Abb. 1
GEBRAUCH IHRES H-LUFTREINIGERS
Alle Leuchten auf dem Bedienfeld / Display will fully illuminate for approximately 1 second to indicate a successful plug in.
To switch on your product, press the POWER button on the display.
The AUTO MODUS button, LIGHT CONTROL button and on the Display will illuminate.
The following functions are available via the Display buttons:
Press the LIGHT CONTROL button to set the brightness of the display lights.
Press the CHILD LOCK button to inactivate all the buttons on the Bedienfeld/Display.
Auto mode is the default setting for your product when switched on, all modes can be selected manually by pressing the related button on the display.
natural_image
Illustration of a large air purifier connected to an electrical outlet (no text or symbols present)Abb. 2

Abb. 3


Download on the App Store

GOOGLE PLAY
Abb. 4

Abb. 5
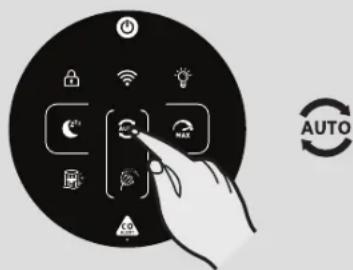
Abb. 6

Abb. 7
DE


Abb. 8


Abb. 9


Abb. 10

natural_image
Icon showing a hand interacting with smart home control elements (no text or symbols)
Abb. 11
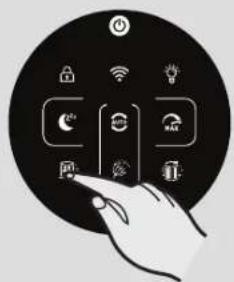

Abb. 12

Abb. 13
SCHLAFMODUS [Abb. 8]:
There are 3 settings available for the display lighting, On, Dim & Off.
To adjust the brightness of the display lighting simply press the LIGHT CONTROL button on the display to cycle through the 3 available options. ON is the default setting.
Abb. 14
natural_image
Line drawing of a hand holding scissors next to a cylindrical device with internal structure (no text or symbols)
![HOOVER HPURIFIER 300 HHP30C001 - SCHLAFMODUS [Abb. 8]: - 2](/content/2026/03/506336/images/24a760d0d9e00476fcd6f2d131a9699364cd9512e0176d4ec5ba07409556b16c.jpg)
Abb. 15
natural_image
Three abstract icons on black background: cylindrical, flower with dot pattern, and vertical bars with sparkles (no text or symbols)Abb. 16
Fig. 1
USO DEL H-PURIFIER
Press the Wi-Fi button to turn on/off remote access.
natural_image
Illustration of a large cylindrical device emitting air from a power outlet, with a hand inserting a plug into it (no text or symbols present)Fig. 2
natural_image
Hand interacting with a circular device displaying various icons (no text or symbols)Fig. 3


Download on the App Store

GOOGLE PLAY
Fig. 4
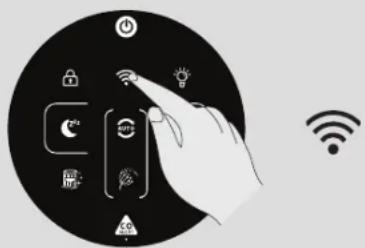
Fig. 5

Fig. 6

Fig. 7
IT


Fig. 8


Fig. 9


Fig. 10

natural_image
Circular icon depicting a hand interacting with smart devices including wireless, Wi-Fi, and smart lock symbols (no text or labels)
Fig. 11


Fig. 12

Fig. 13
MODALITÀ SLEEP [Fig. 8]:
natural_image
Illustration of a hand inserting a component into a device casing (no text or symbols visible)
![HOOVER HPURIFIER 300 HHP30C001 - MODALITÀ SLEEP [Fig. 8]: - 2](/content/2026/03/506336/images/589a7ecc6baa324306ea662cb02e0dc312ed76bcaf25eec6a526d9a4bfaa67aa.jpg)
natural_image
Illustration of a hand inserting a component into a cylindrical device with labeled parts (no text or symbols present)![HOOVER HPURIFIER 300 HHP30C001 - MODALITÀ SLEEP [Fig. 8]: - 3](/content/2026/03/506336/images/06bb144e2eac64201a614816ecab99f3a21db6e5351d4389e7531effcdfbe692.jpg)

![HOOVER HPURIFIER 300 HHP30C001 - MODALITÀ SLEEP [Fig. 8]: - 5](/content/2026/03/506336/images/01ce9f7015726a78b6e18913c22084c026a977842a8b780030ca1046aa9466f9.jpg)
natural_image
Diagram of a cylindrical device with a textured base and labeled component 'g' (no text or symbols beyond label)Fig. 14
natural_image
Illustration of a hand inserting a component into a device (no text or symbols visible)![HOOVER HPURIFIER 300 HHP30C001 - MODALITÀ SLEEP [Fig. 8]: - 6](/content/2026/03/506336/images/d2048e2df83956cd2fb85720464de7ceceaddc6283fc120bfeda2a7a65fd39e2.jpg)
natural_image
Line drawing of a hand holding a small tool next to a device resembling a portable air purifier (no text or symbols present)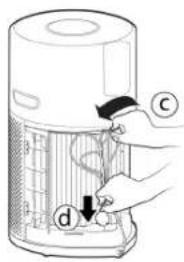
![HOOVER HPURIFIER 300 HHP30C001 - MODALITÀ SLEEP [Fig. 8]: - 8](/content/2026/03/506336/images/d4f325a261d9bcc9d03312daf8cb22087d98407de7158bd0418a5fef6af0a882.jpg)
Fig. 15
AVVISI & SOLUZIONI
natural_image
Three stylized icons: a cup with stars, a flower, and a barrel with sparkles on a black background (no text or symbols)Fig. 16
When the detected level of CO reaches a high level, the [CO Alert] button and the [Air Quality
natural_image
Technical line drawing of a portable air purifier with a labeled component (d), showing internal structure and base connection (no text or symbols beyond labels)
natural_image
Diagram of a device with a label 'i' pointing to a component, no readable text or symbols present.Fig. 1
UW H-PURIFIER GEBRUIKEN
The following functions are available via the Display buttons:
Press the Wi-Fi button to turn on/off remote access.
natural_image
Illustration of a large air purifier connected to an electrical outlet with a hand inserting a plug (no text or symbols present)Fig. 2

natural_image
Hand interacting with a circular device displaying various icons (no text or symbols)Fig. 3


Download on the App Store

GOOGLE PLAY
Fig. 4
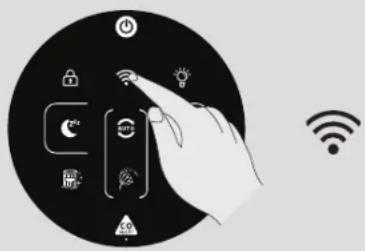
Fig. 5

Fig. 6

Fig. 7
NL


Fig. 8


Fig. 9


Fig. 10
natural_image
Icon showing a hand interacting with smart home control elements (no text or symbols)
Fig. 11


Fig. 12

Fig. 13
Fig. 14
OPSLAG VAN UW H-PURIFIER
natural_image
Illustration of a hand inserting a component into a mesh chamber with a label 'a' (no text or symbols on the diagram itself)Fig. 15
natural_image
Line drawing of a hand cutting scissors into a cylindrical container (no text or symbols)

WAARSCHUWINGEN & OPLOSSINGEN
natural_image
Three stylized icons: a top hat with sparkles, a flower, and a cylindrical container with sparkles against a black background (no text or symbols)Fig. 16


natural_image
Diagram of a cylindrical device with a mesh cover and a black arrow pointing to a labeled component (no text or symbols present)Fig. 1
UTILIZAR O SEU H-PURIFIER
Ligar o produto à ficha [Fig. 2]:
Press the Wi-Fi button to turn on/off remote access.
natural_image
Illustration of a large cylindrical device connected to an electrical outlet with a hand inserting a plug (no text or symbols present)Fig. 2
![HOOVER HPURIFIER 300 HHP30C001 - Ligar o produto à ficha [Fig. 2]: - 1](/content/2026/03/506336/images/846ade93e223c388e5b19980de2c2065bbc4a46648f0ed5f5fef1f9b50f22c31.jpg)
natural_image
Hand interacting with a circular device displaying various icons (no text or symbols)Fig. 3
![HOOVER HPURIFIER 300 HHP30C001 - Ligar o produto à ficha [Fig. 2]: - 2](/content/2026/03/506336/images/a8399e5fa13702ed4fb867b9ded1ccf0f8bf5db06d6b4e6aea29223e74085224.jpg)
![HOOVER HPURIFIER 300 HHP30C001 - Ligar o produto à ficha [Fig. 2]: - 3](/content/2026/03/506336/images/c8a86df2bb493591dd94426ce7f1fbddb7192da82e5f1186a9e86a25f987f7b4.jpg)
Download on the App Store
![HOOVER HPURIFIER 300 HHP30C001 - Ligar o produto à ficha [Fig. 2]: - 4](/content/2026/03/506336/images/b5baf3f93b3d8b84e1ce54d3a4b57c93412814a45e14857c5b371637b0806951.jpg)
GOOGLE PLAY
Fig. 4

Fig. 5

Fig. 6

Fig. 7
PT


Fig. 8


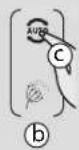
Fig. 9


Fig. 10

natural_image
Circular icon depicting a hand interacting with smart devices including wireless, Wi-Fi, and smart lock symbols (no text or labels)
Fig. 11


Fig. 12

Fig. 13
MODO REPOUSO [Fig. 8]:
Fig. 14
Fig. 15
![HOOVER HPURIFIER 300 HHP30C001 - MODO REPOUSO [Fig. 8]: - 1](/content/2026/03/506336/images/5ff1fb5e224276983f580fac9311d69fb67371220533b42417c473159cb62f49.jpg)
natural_image
Line drawing of a hand using scissors to cut the lid of a portable air purifier (no text or symbols)
![HOOVER HPURIFIER 300 HHP30C001 - MODO REPOUSO [Fig. 8]: - 3](/content/2026/03/506336/images/42b12ce5c8343982e86e90685603b74545b61038f31dad6f94e6332a1c10c8f2.jpg)
ALERTAS E SOLUÇÕES
natural_image
Three abstract icons on black background: a stylized hat with sparkles, a floral motif, and a circular arrow-like shape (no text or symbols)Fig. 16
natural_image
Diagram of a portable air purifier with a labeled component (d), showing internal structure and base, without any text or symbols.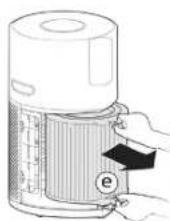

natural_image
Diagram of a device with a mesh casing and a labeled component (i), no readable text or symbols present.Fig. 1
USANDO SU H-PURIFIER
The AUTO MODE button, LIGHT CONTROL button and on the Display will illuminate.
Press the Wi-Fi button to turn on/off remote access.
natural_image
Illustration of a large cylindrical device connected to an electrical outlet with a hand inserting wires (no text or symbols present)Fig. 2

natural_image
Hand interacting with a circular device displaying various icons (no text or symbols)Fig. 3


Download on the App Store

GOOGLE PLAY
Fig. 4

Fig. 5
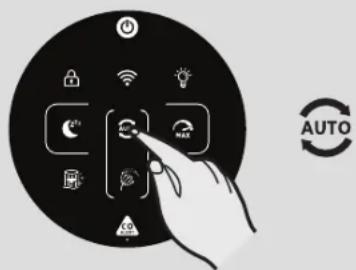
Fig. 6

Fig. 7
ES
natural_image
Illustration of a hand interacting with smart devices including wireless, lightbulb, and lock icons (no text or symbols)
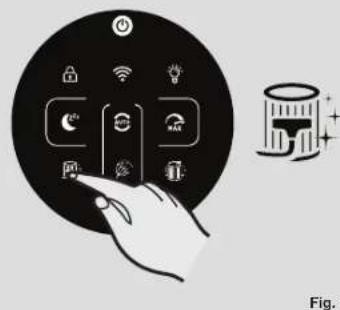

Fig. 12
natural_image
Illustration of a hand inserting a component into a device casing (no text or symbols visible)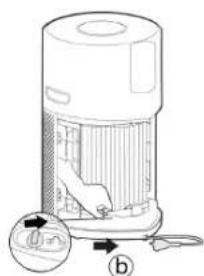
natural_image
Illustration of a hand holding a cylindrical device with a label 'C' pointing to it, no text or symbols present.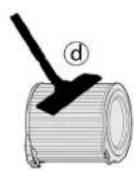


natural_image
Diagram of a cylindrical device with a mesh cover and a labeled arrow pointing to a small object (no text or symbols present)Fig. 14
ALMACENAMIENTO DE SU H-PURIFIER
natural_image
Illustration of a hand inserting a component into a device with arrows indicating direction (no text or symbols)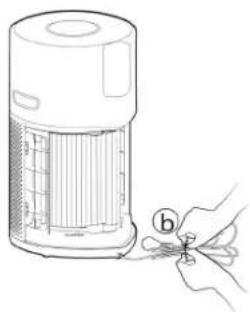
natural_image
Line drawing of a hand holding a small tool next to a portable air purifier (no text or symbols)

Fig. 15
ALERTAS Y SOLUCIONES
natural_image
Three stylized icons: a top hat with sparkles, a leaf with a flower, and a cylindrical container with decorative elements (no text or symbols)Fig. 16
Each time you switch your product on, the Multi Sensor Monitoring system will start analyzing the indoor air and the Air Quality LED Ring will illuminate with different colors representing real time air quality conditions.
| Air Quality LED Ring Colour | Indendørs luftkvalitet |
| GR∅N FREMRAGENDE | |
| GUL SATISFACTORY | |
| ORANGE DÅRLIG | |
| R∅D MEGET DÅRLIG |
Overvågning og alarm for kuliltekoncentration
natural_image
Line drawing of a portable air conditioner unit with a hand inserting a fan (no text or symbols)


natural_image
Diagram of a cylindrical device with a label 'i' pointing to its side panel (no text or symbols on the device itself)Fig. 1
BRUG AF DIN H-PURIFIER
The Air Quality LED Ring will illuminate through all colours in sequence whilst the sensors are analysing the realtime air condition. After a few seconds, the Air Quality LED ring will select the appropriate colour for the air quality at that time.
Din H-Purifier vil omgående gå i AUTOTILSTAND, og begynde at rense luften indendørs.
AUTOTILSTAND knappen LYSKONTROL knappen på displayet vil lyse.
natural_image
Illustration of a large cylindrical device connected to an electrical outlet with a hand inserting wires (no text or symbols present)Fig. 2

natural_image
Hand interacting with a circular device displaying various icons (no text or symbols)Fig. 3


Download on the App Store

GOOGLE PLAY
Fig. 4

Fig. 5

Fig. 6

Fig. 7
DK


Fig. 8
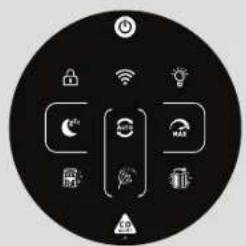


Fig. 9


Fig. 10

natural_image
Circular icon depicting a hand interacting with smart devices including wireless, Wi-Fi, and smart lock symbols (no text or labels)
Fig. 11
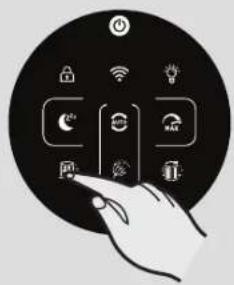

Fig. 12

Fig. 13
DVALETILSTAND [Fig. 8]:
Fig. 14
OPBEVARING AF DIN H-PURIFIER
- Sluk for luftrenseren, og fjern stikket fra stikkontakten.
- Rengør alle interne og eksterne overflader på luftrenseren, og filterets eksterne trådnet.
- Sørg for, at alle komponenter er tørre.
- Remove the Luftindtagets dæksel [Fig. 15a] and tidy up the power cord [Fig. 15b], hang the cord on to the Ledningskrog [Fig. 15c], and fit the cord into the storage hook and fit the plug into the transport location [Fig. 15d]. Genmonter luftindtagets dæksel. [Fig. 15e]
- Opbevar luftrenseren et köligt, tört sted.
natural_image
Illustration of a hand inserting a component into a mesh chamber (no text or symbols)Fig. 15

natural_image
Line drawing of a hand holding scissors next to a cylindrical device (no text or symbols)

ALARMER OG L∅SNINGER
Multi Sensor Monitoring System
Thanks to the Multi Sensor Monitoring System your product will continuously monitor the indoor air condition in terms of PM10, PM2.5, Volatile Organic Compounds (GAS), and Carbon Monoxide concentration (CO).
Each time you switch your product on, the Multi Sensor Monitoring system will start analyzing the indoor air and the Luftkvalitet LED Ring will illuminate with different colors representing real time air quality conditions.
| Luftkvalitet LED Ring-farge | Innendørs luftkvalitet |
| GR∅NN UTMERKET | |
| GUL SATISFACTORY | |
| ORANSJE DÅRLIG | |
| R∅D SVÆRT DÅRLIG |


natural_image
Diagram of a cylindrical device with a textured interior and a labeled arrow pointing to it, no text or symbols present.Fig. 1
BRUK AV H-PURIFIER
Plugg inn produktet [Fig. 2]:
Alle lampene på kontrollpanelet / Display will fully illuminate for approximately 1 second to indicate a successful plug in.
The POWER button will be dimly lit and the CO sensor light will be ON to indicate that the Multi Sensor Monitoring System has started working to monitor the indoor Carbon Monoxide level.
Press the Wi-Fi button to turn on/off remote access.
In AUTO mode, after 30 minutes of excellent air quality, your product will enter an ECO mode by pausing the purifying function, the Multi Sensor Monitoring System will continue to analyse the indoor air and automatically switch on the purifying function when required.
MAKSMODUS [Fig. 7]:
Trykk på MAKS-modusknappen på displayet for å aktivere den kraftigste luftrensingsinnstillingen. Du kan avslutte MAKS-modus ved å velge AUTO-modus eller SOVE-modus.
![HOOVER HPURIFIER 300 HHP30C001 - MAKSMODUS [Fig. 7]: - 1](/content/2026/03/506336/images/bb574f758e34e1342ae8c4452784aa34e22e096d085a2541b71f888728c3bd82.jpg)
natural_image
Illustration of a large cylindrical device connected to an electrical outlet with a hand inserting wires (no text or symbols visible)Fig. 2

Fig. 3
![HOOVER HPURIFIER 300 HHP30C001 - MAKSMODUS [Fig. 7]: - 3](/content/2026/03/506336/images/cfeb7080254d959ad4f16a9f7441f8e7aceca63b7541239ed6feeb662c301bd3.jpg)
![HOOVER HPURIFIER 300 HHP30C001 - MAKSMODUS [Fig. 7]: - 4](/content/2026/03/506336/images/3102f1eac7aab017021213a62ed10e862ccbaf88675293fcd30e5e5484fc849e.jpg)
Download on the App Store
![HOOVER HPURIFIER 300 HHP30C001 - MAKSMODUS [Fig. 7]: - 5](/content/2026/03/506336/images/6e1c93b2e74428c82840369d700d58d57f672b288c145ee4b6ea42e91eab99dd.jpg)
GOOGLE PLAY
Fig. 4

Fig. 5

Fig. 6

Fig. 7
NO


Fig. 8


Fig. 9


Fig. 10

natural_image
Circular icon depicting a hand interacting with smart devices including wireless, Wi-Fi, and smart lock symbols (no text or labels)
Fig. 11


Fig. 12

Fig. 13
SOVEMODUS [Fig. 8]:
VEDLIKEHOLDE H-PURIFIER
VIKTIG: APPARATET MÅ TIL ENHVER TID KOBLES FRA STRÖMFORSYNINGEN VED UTF∅RELSE AV VEDLIKEHOLD.
FILTERRENS / UTSKIFTNING
Fig. 14
OPPBEVARING AV H-PURIFIER
natural_image
Illustration of a hand inserting a component into a device (no text or symbols visible)Fig. 15

natural_image
Line drawing of a hand holding a small tool next to a cylindrical device (no text or symbols visible)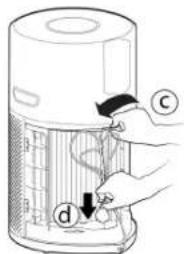

VARSLINGER OG L∅SNINGER
natural_image
Three abstract icons on black background: cylindrical, flower, and striped (no text or symbols)Fig. 16
natural_image
Line drawing of a portable air purifier with a hand inserting a fan (no text or symbols)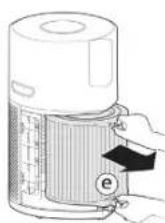


natural_image
Diagram of a cylindrical device with a textured base and labeled component 'i' (no text or symbols beyond label)Fig. 1
Alla lampor på kontrollpanelen / Display will fully illuminate for approximately 1 second to indicate a successful plug in.
The AUTO MODE button, LIGHT CONTROL button and on the Display will illuminate.
Press the Wi-Fi button to turn on/off remote access.
natural_image
Illustration of a large cylindrical device connected to an electrical outlet with a hand inserting wires (no text or symbols visible)Fig. 2

natural_image
Icon showing a hand interacting with smart home control icons (no text or symbols)Fig. 3


Download on the App Store

GOOGLE PLAY
Fig. 4

Fig. 5

Fig. 6
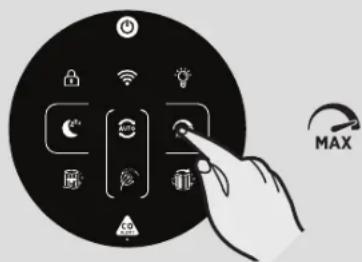
Fig. 7
SE


Fig. 8


Fig. 9


Fig. 10
natural_image
Circular icon depicting a hand interacting with smart devices including wireless, Wi-Fi, and smart lock symbols (no text or labels)
Fig. 11


Fig. 12

Fig. 13
VILOLÄGE [Fig. 8]:
natural_image
Illustration of a device with a handle and arrow indicating action (no text or symbols)
![HOOVER HPURIFIER 300 HHP30C001 - VILOLÄGE [Fig. 8]: - 2](/content/2026/03/506336/images/5dfc2c12915e80980a419f0881c22fe37c5e6fde4f0aa76416db9e6819f17c80.jpg)
natural_image
Illustration of a hand inserting a component into a cylindrical device with labeled parts (no text or symbols present)![HOOVER HPURIFIER 300 HHP30C001 - VILOLÄGE [Fig. 8]: - 3](/content/2026/03/506336/images/218d7c5b2416f3e592571ffe67ee7f2dc460571eaa738046b98611a34fe27a2a.jpg)

![HOOVER HPURIFIER 300 HHP30C001 - VILOLÄGE [Fig. 8]: - 5](/content/2026/03/506336/images/350d9fb0b7f034caef2255ab72e3f85d70bb9693c5883dc25d3f6c86f2869513.jpg)
natural_image
Diagram of a cylindrical device with a mesh cover and a labeled component 'g' (no text or symbols beyond the label)Fig. 14
natural_image
Illustration of a hand pressing down on a mesh device with a labeled component (a), no text or symbols present.![HOOVER HPURIFIER 300 HHP30C001 - VILOLÄGE [Fig. 8]: - 6](/content/2026/03/506336/images/7f5b90bae62d5fa001a031f882167459f2edf8e8a7a7b71fc70fd83be6969ba2.jpg)
natural_image
Line drawing of a hand cutting scissors into a cylindrical container (no text or symbols)
![HOOVER HPURIFIER 300 HHP30C001 - VILOLÄGE [Fig. 8]: - 8](/content/2026/03/506336/images/f366d8eed918aaf171f7dc61795027d794835e043efaff12a2b3d2ff509c1130.jpg)
Fig. 15
VARNINGAR OCH LÖSNINGAR
natural_image
Three abstract icons on black background: cylindrical, flower, and striped (no text or symbols)Fig. 16
natural_image
Line drawing of a portable air purifier with a handle and control knob, no text or symbols present


natural_image
Diagram of a cylindrical device with a labeled arrow pointing to its side (no text or symbols present)Kuva 1
H-PURIFIERIN KÄYTTÖ
Press the Wi-Fi button to turn on/off remote access.
natural_image
Illustration of a cylindrical device emitting air from a power outlet, with a hand inserting a plug into it (no text or symbols present)Kuva 2

Kuva 3


Download on the App Store

GOOGLE PLAY
Kuva 4

Kuva 5

Kuva 6

Kuva 7
FI


Kuva 8


Kuva 9


Kuva 10

natural_image
Circular icon depicting a hand interacting with smart devices including wireless, Wi-Fi, and smart lock symbols (no text or labels)
Kuva 11


Kuva 12
Kuva 13
LEPÔTILA [Kuva 8]:
Kuva 14
H-PURIFIERIN VARASTOINTI
natural_image
Three abstract icons on black background: a stylized cup with sparkles, a floral motif, and a circular container with swirls (no text or symbols)Kuva 16


natural_image
Diagram of a cylindrical device with internal components and an arrow indicating direction (no text or symbols)Рис. 1
Press the Wi-Fi button to turn on/off remote access.
natural_image
Illustration of a large air purifier connected to an electrical outlet with a hand inserting a plug (no text or symbols present)Рис. 2
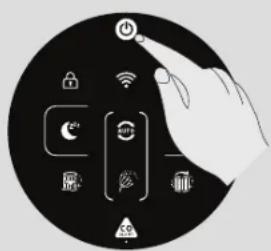
Рис. 3


Download on the App Store

GOOGLE PLAY
Рис. 4

Рис. 5

Рис. 6
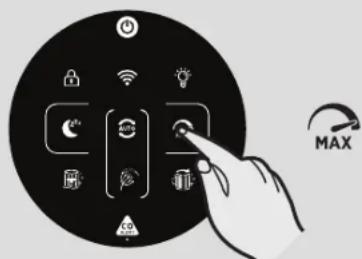
Рис. 7
RU


Рис. 8


Рис. 9


Рис. 10

natural_image
Circular icon depicting a hand interacting with smart devices including wireless, Wi-Fi, and smart lock symbols (no text or labels)
Рис. 11


Рис. 12

Рис. 13
РЕЖИМ СНА [Рис. 8]:
Рис. 14
ХРАНЕНИЕ Н-PURIFIER
natural_image
Illustration of a hand inserting a component into a device (no text or symbols visible)15

natural_image
Line drawing of a hand cutting a small electronic device with scissors (no text or symbols)
СИГНАЛЫ И РЕШЕНИЯ
natural_image
Three abstract icons on black background: cylindrical, flower with dot pattern, and circular bar (no text or symbols)Рис. 16
Eik. 1
Your H-Purifier product will immediately enter AUTO MODE and begin to purify the indoor air.
The AUTO MODE button, LIGHT CONTROL button and on the Oθόνη will illuminate.
Press the Wi-Fi button to turn on/off remote access.
natural_image
Illustration of a speaker emitting power lines from a wall socket (no text or symbols)Eik. 2
natural_image
Hand interacting with a black circular interface displaying various smart devices (no text or symbols visible)Eik. 3


Download on the App Store

Google play
Eik.4
Eik. 5
Eik.6

Eik.7
GR

Eik. 8

[Unreadable]

Eik.9

Eik. 10

natural_image
Circular icon depicting a hand interacting with smart devices including wireless, Wi-Fi, and smart lock symbols (no text or labels)
Eik.11


Eik. 12

Eik. 13
The Pollen Allergy mode works only when AUTO MODE is selected. [Eik. 9c]
Eik. 14
natural_image
Illustration of a hand inserting a component into a textured cylindrical device (no text or symbols visible)Eik. 15

natural_image
Line drawing of a hand using scissors to cut the lid of a portable air purifier (no text or symbols)
natural_image
Three abstract icons on black background: cylindrical, flower, and striped (no text or symbols)Eik. 16
natural_image
Line drawing of a portable air purifier with a handle and control knob, showing internal structure and no text or symbols.


natural_image
Diagram of a device with a mesh chamber and labeled component (i), no readable text or symbols present.Rys. 1
UŻYTKOWANIE URZĄDZENIA H-PURIFIER
Press the Wi-Fi button to turn on/off remote access.
natural_image
Illustration of a large cylindrical device emitting exhaust heat, connected to an electrical outlet (no text or symbols visible)Rys. 2
natural_image
Illustration of a hand interacting with smart home control icons (no text or symbols)Rys. 3


Download on the App Store

GOOGLE PLAY
Rys. 4
Rys. 5

Rys. 6

Rys. 7
PL


Rys. 8


Rys. 9


Rys. 10

natural_image
Circular icon depicting a hand interacting with smart devices including wireless, Wi-Fi, and smart lock symbols (no text or labels)
Rys. 11


Rys. 12

Rys. 13
TRYB USPIENIA [Rys. 8]:
Rys. 14
PRZECHOWYWANIE URZĄDZENIA H-PURIFIER
natural_image
Diagram of a hand inserting a component into a device panel, showing arrows and a label 'a' (no text or symbols on the diagram itself)Rys. 15

natural_image
Line drawing of a hand using scissors to cut the lid of a portable air purifier (no text or symbols)

ALARMY I ROZWIAZANIA
natural_image
Three abstract icons on black background: a stylized cup with sparkles, a leaf with a dot, and a circular container with swirls (no text or symbols)Rys. 16
When the detected level of CO reaches a high level, the [CO Alert] button and the [Air Quality LED Ring] blink in red color (2Hz), at the same time, alarm rings loudly (85\~110dB(A)) and continuously, the alarm will not stop until the intensity of CO falls back from the alarm level.
Each time you switch your product on, the Multi Sensor Monitoring system will start analyzing the indoor air and the Air Quality LED Ring will illuminate with different colors representing real time air quality conditions.
| Air Quality LED Ring Colour | Kvalita vnitřního vzduchu |
| ZELENÁ SKVĚLÁ | |
| ŽLUTÁ USPOKOJIVÁ | |
| ORANŽOVÁ ŠPATNÁ | |
| ČERVENÁ VELMI | ŠPATNÁ |

natural_image
Technical line drawing of a portable electronic device with a knob and base, showing internal components (no text or symbols)


natural_image
Diagram of a cylindrical device with a textured base and labeled component 'i' (no text or symbols beyond label)Obr. 1
POUŽITÍ VAŠEHO H-PURIFIER
The Air Quality LED Ring will illuminate through all colours in sequence whilst the sensors are analysing the realtime air condition. After a few seconds, the Air Quality LED ring will select the appropriate colour for the air quality at that time.
Press the Wi-Fi button to turn on/off remote access.
There are 3 available air purifying modes via the display: AUTOMATICÝ REŽIM, MAX MODE & REŽIM SLEEP
natural_image
Illustration of a cylindrical device emitting air from a power outlet, with a hand inserting a plug into it (no text or symbols present)Obr. 2

Obr. 3


Download on the App Store

GOOGLE PLAY
Obr. 4

natural_image
Hand interacting with a circular device displaying smart icons (no text or symbols)Obr. 5

Obr. 6

Obr. 7
CZ


Obr. 8


Obr. 9


Obr. 10

natural_image
Circular icon depicting a hand interacting with smart devices including wireless, Wi-Fi, and smart lock symbols (no text or labels)
Obr. 11


Obr. 12

Obr. 13
REŽIM SLEEP [Obr. 8]:
Obr. 14
SKLADOVÁNÍ VAŠEHO H-PURIFIER
natural_image
Illustration of a hand inserting a device into a fan-like device (no text or symbols visible)Obr. 15
natural_image
Line drawing of a hand using scissors to cut the lid of a portable air conditioner (no text or symbols)
UPOZORNĚNÍ & ŘEŠENÍ
natural_image
Three stylized icons on black background: a circular cup with stars, a floral pattern, and a cylindrical container with sparkles (no text or symbols)Obr. 16
When the detected level of CO reaches a high level, the [CO Alert] button and the [Air Quality LED Ring] blink in red color (2Hz), at the same time, alarm rings loudly (85\~110dB(A)) and continuously, the alarm will not stop until the intensity of CO falls back from the alarm level.
Each time you switch your product on, the Multi Sensor Monitoring system will start analyzing the indoor air and the Air Quality LED Ring will illuminate with different colors representing real time air quality conditions.
| Air Quality LED Ring Colour | Kvalita vnútorného vzduchu |
| ZELENÁ VYNIKAJÚCA | |
| ŽLTÁ USPOKOJIVÁ | |
| ORANŽOVÁ NÍZKA | |
| ČERVENÁ VELMI | ZLÁ |
natural_image
Line drawing of a portable air purifier with a handle and spool, showing internal structure and control buttons (no text or symbols)


natural_image
Diagram of a cylindrical device with internal components and an arrow indicating direction (no text or symbols)Obr. 1
POUŽÍVANIE ČISTIČA H-PURIFIER
Pripojenie výrobku [Obr. 2]:
The Air Quality LED Ring will illuminate through all colours in sequence whilst the sensors are analysing the realtime air condition. After a few seconds, the Air Quality LED ring will select the appropriate colour for the air quality at that time.
Press the Wi-Fi button to turn on/off remote access.
Stlačením tlačidla AUTO, MAX alebo SPÁNOK vyberte režim čistenia.
natural_image
Illustration of a large air purifier with a hand inserting a plug into the power outlet (no text or symbols)Obr. 2
![HOOVER HPURIFIER 300 HHP30C001 - Pripojenie výrobku [Obr. 2]: - 1](/content/2026/03/506336/images/3e19a60e4ae42a51646d6015a4977b1ede8167d053a35af9aa3defca8b59d54b.jpg)
natural_image
Hand interacting with a circular device displaying various icons (no text or symbols)Obr. 3
![HOOVER HPURIFIER 300 HHP30C001 - Pripojenie výrobku [Obr. 2]: - 2](/content/2026/03/506336/images/e2dc15f1240d5f49985f600113d1a4719c91f9959c03e8ae3498c74fcf199030.jpg)
![HOOVER HPURIFIER 300 HHP30C001 - Pripojenie výrobku [Obr. 2]: - 3](/content/2026/03/506336/images/ad7d4fd46f0da85ead3121d5cf1e78f2e79fa9aebbbe185e714a74064e9f9446.jpg)
Download on the App Store
![HOOVER HPURIFIER 300 HHP30C001 - Pripojenie výrobku [Obr. 2]: - 4](/content/2026/03/506336/images/4c5bfe687a7532092cf6e44cf74e431f8179bdec8fd8786848d7857df9f3e7c0.jpg)
GOOGLE PLAY
Obr. 4

Obr. 5

Obr. 6

Obr. 7
SK


Obr. 8


Obr. 9

Obr. 10

natural_image
Circular icon depicting a hand interacting with smart devices including wireless, Wi-Fi, and smart lock symbols (no text or labels)
Obr. 11


Obr. 12

Obr. 13
REŽIM SPÁNÓK [Obr. 8]:
Obr. 14
SKLADOVANIE ČISTIČA H-PURIFIER
natural_image
Illustration of a hand inserting a component into a device (no text or symbols visible)
natural_image
Line drawing of a hand holding a small tool next to a portable air purifier (no text or symbols)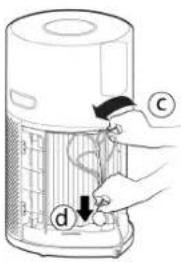
UPOZORNENIA A RIEŠENIA
natural_image
Three stylized icons: a cylindrical tube with sparkles, a flower with a dot, and a circular container with sparkles against a black background (no text or symbols)Obr. 16
natural_image
Line drawing of a portable air purifier with a handle and control panel, no text or symbols present


natural_image
Diagram of a cylindrical device with a textured base and labeled component (i), no readable text or symbols present.Şek. 1
H-PURIFIER CİHAZINIZIN KULLANIMI
The AUTO MODE button, LIGHT CONTROL button and on the Ekran will illuminate.
Press the Wi-Fi button to turn on/off remote access.
natural_image
Illustration of a large cylindrical device connected to an electrical outlet with a hand inserting a plug (no text or symbols present)Şek. 2
Şek. 3


Download on the App Store

GOOGLE PLAY
Şek. 4

natural_image
Hand interacting with a circular device displaying smart icons (no text or symbols)Şek. 5
Şek. 6
Şek. 7
TR


Şek. 8


Şek. 9


Şek. 10

natural_image
Circular icon depicting a hand interacting with smart devices including wireless, Wi-Fi, and smart lock symbols (no text or labels)
Şek. 11


Şek. 12

Şek. 13
UYKU MODU [Şek. 8]:
Şek. 14
H-PURIFIER CİHAZINIZIN SAKLANMASI
natural_image
Three abstract icons on black background: cylindrical, flower with dot pattern, and circular bar (no text or symbols)Şek. 16